Posts Tagged ‘password’

How to password encrypt / decrypt files on Linux to keep and pass your data private

Thursday, August 7th, 2014

how-to-password-protect-encrypt-decrypt-files-linux-tux-logo.png
If you have a sensitive data like a scan copy of your ID card, Driving License, Birth Certificate, Marriage Certificate or some revolutionary business / idea or technology and you want to transfer that over some kind of network lets say Internet vie some public unencrypted e-mail service like (Gmail.com / Yahoo Mail / Mail.com / (Bulgarian Mail Abv.bg)) etc. you will certainly want to transfer the file in encrypted form to prevent, someone sniffing your Network or someone having administrative permissions to servers of free mail where your mail data is stored.

Transferring your files in encrypted form become very important these days especially after recent Edward Snowden disclosures about American Mass Surveilance program PRISM – for those who didn't yet hear of PRISM (this is a American of America's NSA – National Security Agency aiming to sniff and log everyone's information transferred in digital form via the Internet and even Mobile Phone conversations)…

First step to mitigate surveilance is to use fully free software (100% free software) OS distribution like Trisquel GNU / Linux.
Second is to encrypt to use encryption –  the process of transforming information (referred to as plaintext) using an algorithm (called cipher) to make it unreadable to anyone except those possessing special knowledge, usually referred to as a key.
There are many ways to encrypt your data on Linux and to later decrpyt it, I've earlier blogged about encryping files with GPG and OpenSSL on Linux, however encryption with GPG and OpenSSL is newer as concept than the old-school way to encrypt files on UNIX with crypt command which in Linux is replaced by mcrypt command.

mcrypt is provided by mcrypt package by default on most if not all Linux distributions, however mcrypt is not installed by default so to start using it you have to install it first.

1. Install mcrypt on Debian / Ubuntu / Mint (deb based) Linux

apt-get install –yes mcrypt


2. Install mcrypt on Fedora / CentOS rest of RPM bases Linux

yum -y install libmcrypt


3. Encrypting file with mcrypt

To get a list with all supported algorithms by mcrypt:
 

mcrypt –list
cast-128 (16): cbc cfb ctr ecb ncfb nofb ofb
gost (32): cbc cfb ctr ecb ncfb nofb ofb
rijndael-128 (32): cbc cfb ctr ecb ncfb nofb ofb
twofish (32): cbc cfb ctr ecb ncfb nofb ofb
arcfour (256): stream
cast-256 (32): cbc cfb ctr ecb ncfb nofb ofb
loki97 (32): cbc cfb ctr ecb ncfb nofb ofb
rijndael-192 (32): cbc cfb ctr ecb ncfb nofb ofb
saferplus (32): cbc cfb ctr ecb ncfb nofb ofb
wake (32): stream
blowfish-compat (56): cbc cfb ctr ecb ncfb nofb ofb
des (8): cbc cfb ctr ecb ncfb nofb ofb
rijndael-256 (32): cbc cfb ctr ecb ncfb nofb ofb
serpent (32): cbc cfb ctr ecb ncfb nofb ofb
xtea (16): cbc cfb ctr ecb ncfb nofb ofb
blowfish (56): cbc cfb ctr ecb ncfb nofb ofb
enigma (13): stream
rc2 (128): cbc cfb ctr ecb ncfb nofb ofb
tripledes (24): cbc cfb ctr ecb ncfb nofb ofb


mcrypt < File-To-Crypt.PDF > File-To-Crypt.PDF.cpy


Enter the passphrase (maximum of 512 characters)
Please use a combination of upper and lower case letters and numbers.
Enter passphrase:
Enter passphrase:


If crypt is invoked to create the encrypted file without OS redirects (< >), i.e.:
 

mcrypt -a blowfish File-To-Crypt.PDF

Please use a combination of upper and lower case letters and numbers.
Enter passphrase:
Enter passphrase:

File File-To-Crypt was encrypted.


mcrypt outputs encrypted file in .nc extension and the new file and file default mode of 0600 (read write only for root user) are set, while new file keeps the modification date of the original.


4. Decrypting file with mcrypt

Decryption of files is done mdecrypt

mdecrypt File-To-Crypt.PDF.cpy
 

Enter passphrase:
File File-To-Crypt.PDF.cpy was decrypted.

To make mcrypt behave in a certain way when invoked modify ~/.mcryptrd

mcrypt is also available as a module for php5 (php5-mcrypt).

Extracting pages and page ranges, protect with password and remove password from PDF on GNU / Linux with QPDF – Linux Manipulating PDF files from command line

Friday, August 8th, 2014

qpdf-logo-extract-pages-page-ranges-protect-pdf-with-password-remove-password-from-pdf-linux-qpdf-manipulating-pdf-files-on-gnu-linux-and-bsd
If're a Linux user and you need to script certain page extraction from PDF files, crypt protect with password a PDF file or decrypt (remote password protection from PDF) or do some kind of structural transformation of existing PDF file you can use a QPDF command line utility. qpdf is in active development and very convenient tool for Website developers (PHP / Perl / Python), as often on websites its necessery to write code to cut / tailer / restructure PDFs.

1. Install QPDF from deb / rpm package

qpdf is instalalble by default in deb repositories on Debian / Ubuntu GNU / (deb derivative) Linux-es to install it apt-get it

apt-get install –yes qpdf

On RPM based distribution CentOS / SuSE / RHEL / Fedora Linux to install qpdf, fetch the respective distribution binary from rpmfind.net or to install latest version of qpdf build it from source code.

2. Install QPDF from source

To build latest qpdf from source

  • on RPM based distributions install with yum fullowing packages:

yum -y install zlib-devel pcre-devel gcc gcc-c++

  • on Deb based Linuces, you will need to install

apt-get install –yes build-essential gcc dpkg-dev g++ zlib1g-dev


Then to build gather latest qpdf source from here


cd /usr/local/src
wget -q https://www.pc-freak.net/files/qpdf-5.1.2.tar.gz
tar -zxvf qpdf-5.1.2.tar.gz
cd qpdf-5.1.2/
./configure
make
make install


Once it is installed, if you get error on qpdf runtime:
 

/usr/local/bin/qpdf: error while loading shared libraries: libqpdf.so.13: cannot open shared object file: No such file or directory

To solve the error find in your compile directory libqpdf.so.13 and copy it to /usr/lib or /usr/local/lib

 cp -rpf ./libqpdf/build/.libs/libqpdf.so.13 /usr/local/lib


3. Decrypt password encrypted (protected) PDF file

if you have time and you like reading be sure to check the extensive qpdf-manual.

To remove password from a PDF file protected with a password with qpdf

qpdf –password=SECRET-PASSWORD –decrypt input-file.pdf output-file.pdf

QPDF has a vast range of split and merge features. It can combine all the files in a folder (*.pdf), you can use it to try to recover damaged pdf files, extract individual pages from PDF, dump and reverse page range, make new created PDF with old PDF's reversed pages (pages 1,2,3,4 to become in order 4,3,2,1), apply some single pdf file metadata to multiple files.

4. Try to Recover damaged PDF file


To try to recover some damaged file with qpdf:
 

qpdf file-to-repair.pdf repaired-file.pdf

5. Extract certain pages or page range from PDF

It is recommended to use the version built from source to extract certain page range from PDF
 

/usr/local/bin/qpdf –empty –pages input-file.pdf 1-5 — outfile-file.pdf


If you wanted to take pages 1–5 from file1.pdf and pages 11–15 from file2.pdf in reverse, you would run
 

qpdf file1.pdf –pages file1.pdf 1-5 file2.pdf 15-11 — outfile.pdf


Creating multi-part zip archives in Linux with 7zip command to transfer large zip files data in parts

Monday, December 1st, 2014

creating-multi-part-zip-archives-in-Linux-debian-ubuntu-fedora-centos-rhel-with-7z-command-to-transfer-large-files-data-in-parts
Recently, I've blogged on how to move large files from source to destination server in parts on a slow / restricted networks or whenever the media is limtied in size. This is not a common scenario but it happens so if you're admin sooner or later you will need that. I give example with UNIX's split and unrar. However strip's file naming can get you insane (in case if you don't want to use cstrip command – split a file into sections determined by context lines instead) plus normal split Linux / *nix command doesn't support compression and encryption. On the other side on many Company internal Networks with Windows server hosts running – Winblows (2003, 2008, 1012) for security purposes it might be that WinRar is not installed, thus you might need to transfer the file parted between the GNU / Linux server and Windows server in standard OS supported by Windows ZIP format. Assuming that you have root (admin) access to the Linux host you can then archive your file in parts using ZIP encryption algorithm with 7zip.

1. Installing 7zip on CentOS / Fedora / RHEL and other Redhat based Linuces

If the Linux server is running:
Fedora / CentOS  / RHEL and you don't have 7zip installed yet install it with:

yum -y install p7zip

According to distros version  it might be the name could be a bit different if p7zip is different to find the one you need search with:

yum search p7zip

and install whatever you need
 

2. Installing 7zip on Debian / Ubuntu and other Debian based servers

apt-get install –yes p7zip-full

Depending on Deb based distro just like with fedora if p7zip-full pack is not installable, check 7zip's package distro version:

apt-cache search p7zip


3. Archiving ZIP file in multiple (sized) parts on GNU / Linux

7z a -v512m Large-file-separated-in-multi-parts.zip Large-Many-Gigabytes-File.SQL

This would output multiple files:

Large-file-separated-in-multi-parts.zip.001, Large-file-separated-in-multi-parts.zip.002, Large-file-separated-in-multi-parts.zip.003, Large-file-separated-in-multi-parts.004 etc.

If you want to add security to the transferred file to protect newly created ZIP archive with password use following command:

7z a -v512m Large-file-separated-in-multi-parts.zip Large-Many-Gigabytes-File.SQL


7-Zip [64] 9.20  Copyright (c) 1999-2010 Igor Pavlov  2010-11-18
p7zip Version 9.20 (locale=bg_BG.UTF-8,Utf16=on,HugeFiles=on,2 CPUs)
Scanning

Creating archive Large-file-separated-in-multi-parts.zip


Enter password (will not be echoed) :

Once you have transferred all the many parts via (SSH/ FTPS or not preferrably HTTP / HTTPS / FTP) place them in the same folder and use Windows standard ZIP to unarchive.

If the archived 7zip files are to be unarchived on another Linux host (in case if multi part zip transfer is between Linux -> Linux hosts) to unarchive, parted files:

7z x Large-file-separated-in-multi-parts.zip.*

Turn your Windows PC / notebook to Wireless Router with My Wifi Router 3.0 and TP-Link TL-WN722N

Wednesday, January 7th, 2015

my-wifi-router-3.0-turn-regular-windows-notebook-to-wifi-router

I've been to home of my wife's parents and for this Christmas, they have received second hand Acer Aspire notebook as a Christmas gift. So far they were using internet using their Windows XP PC which is getting internet here in Belarus via UTP network cable using ByFly ZTE ADSL router modem. As ADSL modem lacked wifh WI-FI Antenna (support) and there was already the Acer notebook which had to access the internet preferrably via Wireless connection, the option was to get a WI-FI router and connect it to the ADSL modem but as this would cost (20 EUR at minimum) and there was alreay Wireless (Receiver) adapter TP-LINK TL-WN722N unused, I decided to try make the TP-LINK Receiver and Windows XP PC to act as a small Home Made Wireless  (software) router.

Until I succeeded I've tried multiple softwares which all failed to turn the Windows PC to Wi-Fi Hotspot.
Here is list of few of the softwares I tried that didn't worked for some reason:

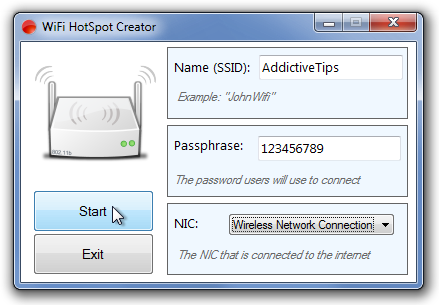
1. Wifi HotSpot Creator

WiFi-HotSpot-Creator-screenshot

Turn your PC into a Wi-Fi Router for Free!

Instantly share your internet connection with your friends and peers over Wi-Fi. Turns your PC into a Wi-Fi Router! And its Free! Wifi HotSpot Creator is said to be able to convert any Mac OS X and Windows PC to hotspot here is Wifi HotSpot Creator download website
Wifi HotSpot Creator is said to work with Windows Vista / XP / 7 / 8, however as I said it doesn't work for me on Windows XP.
 

2. Virtual Wifi router

Here is

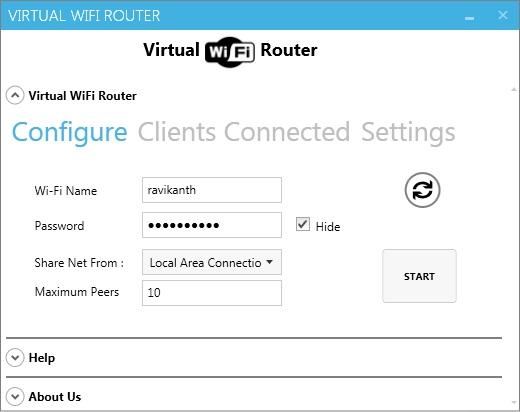
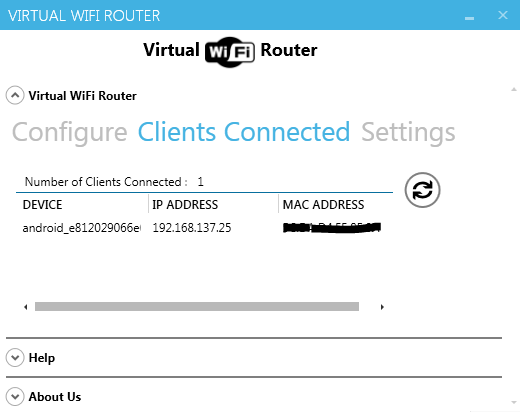
With Virtual WiFi Router you can create a WiFi hotspot for WiFi Reverse Tethering on Windows 7 and for wifi supported mobiles and other wifi enabled computer to create a network and to share internet. Virtual Wifi Router in a minute converts your PC into a WiFi hot spot for free.

To make the program working it depends on .NET 4.5. Though the program looked like a superb it unfortunately was crashing on Windows XP. Below are few screenshots from program working on Windows 7.

virtual-wifi-router-screenshot

virtual-wifi-router-connected-device-screenshot-windows
3. My Wifi Router 3.0

Finally I've come across My Wifi Router 3.0 which is just another program that makes necessery Windows configuration to TP-Link TL-WN722N Wireless receiver Adapter to turn it into a homemade Wi-Fi router.
my-wifi-router-on-windows-xp-desktop-pc-noteboko-creenshot

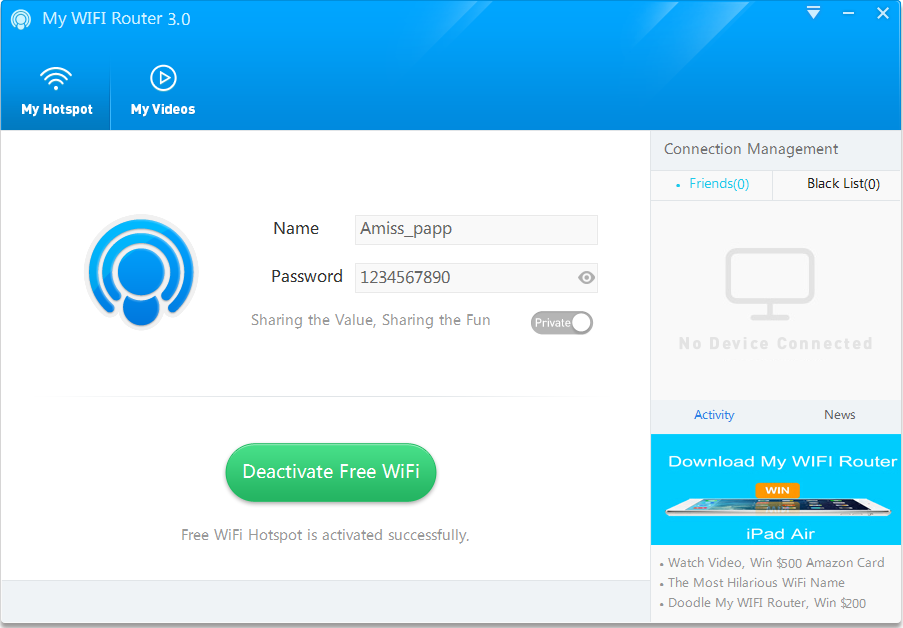
By default Amiss_papp Wifi is configured, this can be changed, however in my case when I tried changing it there were some issues, so finally I've had to re-install My Wifi Router to make it working again.
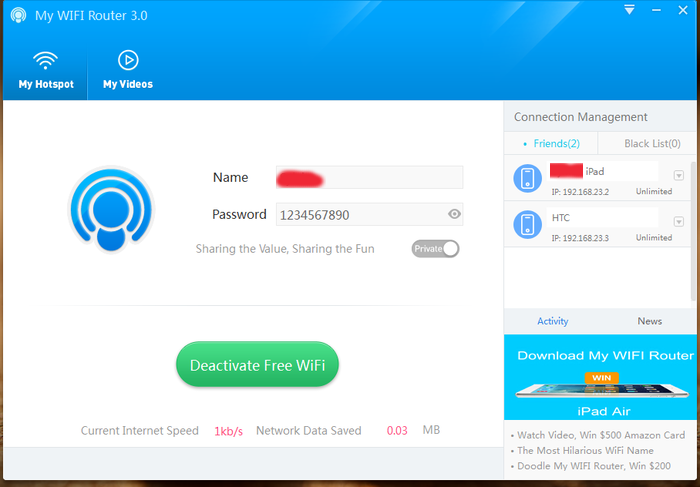
Once configured My Wifi Router there is the green button (Activate / Deactivate Free Wifi) as seen from screenshot.

As you can see My Wifi Router also allows to Share Videos over WiFi. Once I've tested the program and confirmed it as working, I had to configure it to automatically start on Windows PC boot.

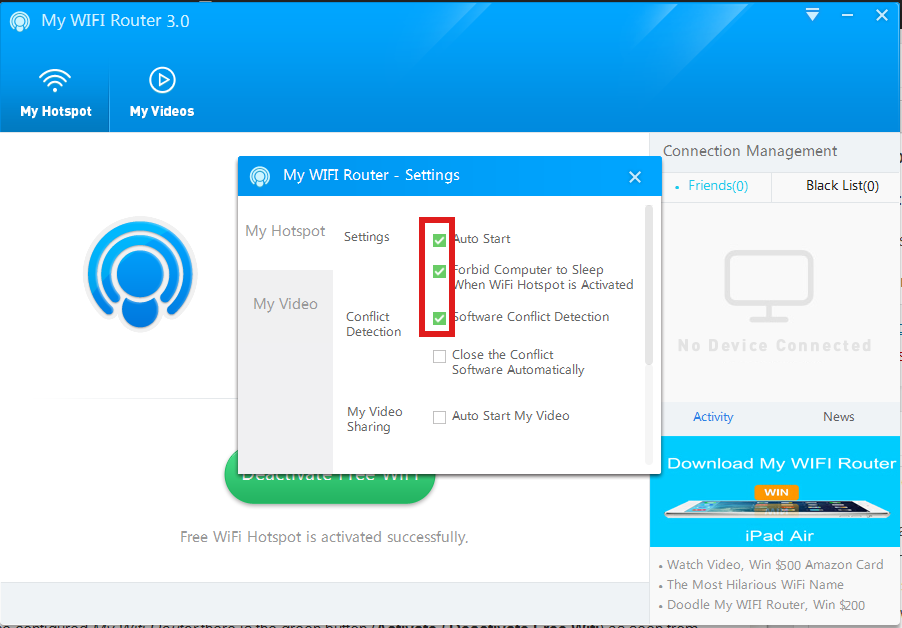
This is done from Settings (located on backward triangle button, next to minimize function).
I had to set check in to  Auto Start and Software Conflict Detection.

make-windows-pc-with-wireless-wifi-router-my-wifi-router-settings-screenshot

Once connected to the TP-Link TL-WN722N (USB) Wi-Fi (High Gain) Receiver adapter in Windows Tray a new indicator will popup that a device has been connected. I've tested My Wifi Router and it seem to be working fine with 3 remote connected Wi-Fi devices (1 Notebook and 2 Nokia Lumia mobile phones). The speed of internet was fast and if I didn't know the connection is done in a software way via such an improvised Windows XP Wi-Fi network router I would think it is just a regular Wi-Fi network router.

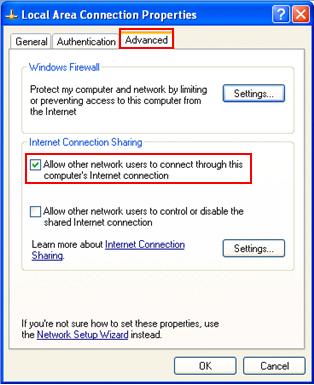
One more thing I had to do to make the internet working I had to share the the LAN Network (ethernet card) Interface's internet from
 

Control Panel -> Networking -> Local Area Connection (Properties) -> Advanced

https://www.pc-freak.net/images/windows-xp-internet-connection-sharing-how-to-networking-screenshot-make-network-address-translation-windows-xp.jpg

A downside of My Wifi Router is I couldn't find a way to save password while connection to the newly created WiFi router with it, so each time I had to login I had to manually type in the password (default my wifi router password is 123567890). Re-typing password on each login is annoying but if you have to do it once per day in the morning when you turn on your notebook it is not such a big deal.

Once connected to My Wifi Router in Connection Management in Friends (tab) you will see a list with connected devices.

my-wifi-router-on-windows-xp-with-htc-and-ipad-iphone-connected
As visible from above screenshot default IPs which will be assigned to new connected clients to My Wifi Router will be in local network IP range 192.168.23.2 – 192.168.23.254.

Now all left is to Enjoy  your new Software Wi-Fi router 🙂

Monitoring MySQL server queries and debunning performance (slow query) issues with native MySQL commands and with mtop, mytop

Thursday, May 10th, 2012

If you're a Linux server administrator running MySQL server, you need to troubleshoot performance and bottleneck issues with the SQL database every now and then. In this article, I will pinpoint few methods to debug basic issues with MySQL database servers.

1. Troubleshooting MySQL database queries with native SQL commands

a)One way to debug errors and get general statistics is by logging in with mysql cli and check the mysql server status:

# mysql -u root -p
mysql> SHOW STATUS;
+-----------------------------------+------------+
| Variable_name | Value |
+-----------------------------------+------------+
| Aborted_clients | 1132 |
| Aborted_connects | 58 |
| Binlog_cache_disk_use | 185 |
| Binlog_cache_use | 2542 |
| Bytes_received | 115 |
.....
.....
| Com_xa_start | 0 |
| Compression | OFF |
| Connections | 150000 |
| Created_tmp_disk_tables | 0 |
| Created_tmp_files | 221 |
| Created_tmp_tables | 1 |
| Delayed_errors | 0 |
| Delayed_insert_threads | 0 |
| Delayed_writes | 0 |
| Flush_commands | 1 |
.....
.....
| Handler_write | 132 |
| Innodb_page_size | 16384 |
| Innodb_pages_created | 6204 |
| Innodb_pages_read | 8859 |
| Innodb_pages_written | 21931 |
.....
.....
| Slave_running | OFF |
| Slow_launch_threads | 0 |
| Slow_queries | 0 |
| Sort_merge_passes | 0 |
| Sort_range | 0 |
| Sort_rows | 0 |
| Sort_scan | 0 |
| Table_locks_immediate | 4065218 |
| Table_locks_waited | 196 |
| Tc_log_max_pages_used | 0 |
| Tc_log_page_size | 0 |
| Tc_log_page_waits | 0 |
| Threads_cached | 51 |
| Threads_connected | 1 |
| Threads_created | 52 |
| Threads_running | 1 |
| Uptime | 334856 |
+-----------------------------------+------------+
225 rows in set (0.00 sec)

SHOW STATUS; command gives plenty of useful info, however it is not showing the exact list of queries currently processed by the SQL server. Therefore sometimes it is exactly a stucked (slow queries) execution, you need to debug in order to fix a lagging SQL. One way to track this slow queries is via enabling mysql slow-query.log. Anyways enabling the slow-query requires a MySQL server restart and some critical productive database servers are not so easy to restart and the SQL slow queries have to be tracked "on the fly" so to say.
Therefore, to check the exact (slow) queries processed by the SQL server (without restarting it), do
 

mysql> SHOW processlist;
+——+——+—————+——+———+——+————–+——————————————————————————————————+
| Id | User | Host | db | Command | Time | State | Info |
+——+——+—————+——+———+——+————–+——————————————————————————————————+
| 609 | root | localhost | blog | Sleep | 5 | | NULL |
| 1258 | root | localhost | NULL | Sleep | 85 | | NULL |
| 1308 | root | localhost | NULL | Query | 0 | NULL | show processlist |
| 1310 | blog | pcfreak:64033 | blog | Query | 0 | Sending data | SELECT comment_author, comment_author_url, comment_content, comment_post_ID, comment_ID, comment_aut |
+——+——+—————+——+———+——+————–+——————————————————————————————————+
4 rows in set (0.00 sec)
mysql>

SHOW processlist gives a good view on what is happening inside the SQL.

To get more complete information on SQL query threads use the full extra option:

mysql> SHOW full processlist;

This gives pretty full info on running threads, but unfortunately it is annoying to re-run the command again and again – constantly to press UP Arrow + Enter keys.

Hence it is useful to get the same command output, refresh periodically every few seconds. This is possible by running it through the watch command:

debian:~# watch "'show processlist' | mysql -u root -p'secret_password'"

watch will run SHOW processlist every 2 secs (this is default watch refresh time, for other timing use watch -n 1, watch -n 10 etc. etc.

The produced output will be similar to:

Every 2.0s: echo 'show processlist' | mysql -u root -p'secret_password' Thu May 10 17:24:19 2012

Id User Host db Command Time State Info
609 root localhost blog Sleep 3 NULL1258 root localhost NULL Sleep 649 NULL1542 blog pcfreak:64981 blog Query 0 Copying to tmp table \
SELECT p.ID, p.post_title, p.post_content,p.post_excerpt, p.pos
t_date, p.comment_count, count(t_r.o
1543 root localhost NULL Query 0 NULL show processlist

Though this "hack" is one of the possible ways to get some interactivity on what is happening inside SQL server databases and tables table. for administering hundred or thousand SQL servers running dozens of queries per second – monitor their behaviour few times aday using mytop or mtop is times easier.

Though, the names of the two tools are quite similar and I used to think both tools are one and the same, actually they're not but both are suitable for monitoring sql database execution in real time.

As a sys admin, I've used mytop and mtop, on almost each Linux server with MySQL server installed.
Both tools has helped me many times in debugging oddities with sql servers. Therefore my personal view is mytop and mtop should be along with the Linux sysadmin most useful command tools outfit, still I'm sure many administrators still haven't heard about this nice goodies.

1. Installing mytop on Debian, Ubuntu and other deb based GNU / Linux-es

mytop is available for easy install on Debian and across all debian / ubuntu and deb derivative distributions via apt.

Here is info obtained with apt-cache show

debian:~# apt-cache show mytop|grep -i description -A 3
Description: top like query monitor for MySQL
Mytop is a console-based tool for monitoring queries and the performance
of MySQL. It supports version 3.22.x, 3.23.x, 4.x and 5.x servers.
It's written in Perl and support connections using TCP/IP and UNIX sockets.

Installing the tool is done with the trivial:

debian:~# apt-get --yes install mytop
....

mtop used to be available for apt-get-ting in Debian Lenny and prior Debian releases but in Squeeze onwards, only mytop is included (probably due to some licensing incompitabilities with mtop??).

For those curious on how mtop / mytop works – both are perl scripts written to periodically connects to the SQL server and run commands similar to SHOW FULL PROCESSLIST;. Then, the output is parsed and displayed to the user.

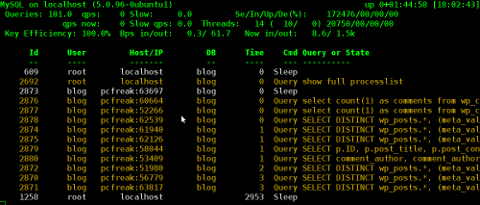
Here how mytop running, looks like:

MyTOP showing queries running on Ubuntu 8.04 Linux - Debugging interactively top like MySQL

2. Installing mytop on RHEL and CentOS

By default in RHEL and CentOS and probably other RedHat based Linux-es, there is neither mtop nor mytop available in package repositories. Hence installing the tools on those is only available from 3rd parties. As of time of writting an rpm builds for RHEL and CentOS, as well as (universal rpm distros) src.rpm package is available on http://pkgs.repoforge.org/mytop/. For the sake of preservation – if in future those RPMs disappear, I made a mirror of mytop rpm's here

Mytop rpm builds depend on a package perl(Term::ReadKey), my attempt to install it on CentOS 5.6, returned following err:

[root@cenots ~]# rpm -ivh mytop-1.4-2.el5.rf.noarch.rpm
warning: mytop-1.4-2.el5.rf.noarch.rpm: Header V3 DSA signature: NOKEY, key ID 6b8d79e6
error: Failed dependencies:
perl(Term::ReadKey) is needed by mytop-1.4-2.el5.rf.noarch

The perl(Term::ReadKey package is not available in CentOS 5.6 and (probably other centos releases default repositories so I had to google perl(Term::ReadKey) I found it on http://rpm.pbone.net/ package repository, the exact url to the rpm dependency as of time of writting this post is:

ftp://ftp.pbone.net/mirror/yum.trixbox.org/centos/5/old/perl-Term-ReadKey-2.30-2.rf.i386.rpm

Quickest, way to install it is:

[root@centos ~]# rpm -ivh ftp://ftp.pbone.net/mirror/yum.trixbox.org/centos/5/old/perl-Term-ReadKey-2.30-2.rf.i386.rpmRetrieving ftp://ftp.pbone.net/mirror/yum.trixbox.org/centos/5/old/perl-Term-ReadKey-2.30-2.rf.i386.rpmPreparing... ########################################### [100%]
1:perl-Term-ReadKey ########################################### [100%]

This time mytop, install went fine:

[root@centos ~]# rpm -ivh mytop-1.4-2.el5.rf.noarch.rpm
warning: mytop-1.4-2.el5.rf.noarch.rpm: Header V3 DSA signature: NOKEY, key ID 6b8d79e6
Preparing... ########################################### [100%]
1:mytop ########################################### [100%]

To use it further, it is the usual syntax:

mytop -u username -p 'secret_password' -d database

CentOS Linux MyTOP MySQL query benchmark screenshot - vpopmail query

3. Installing mytop and mtop on FreeBSD and other BSDs

To debug the running SQL queries in a MySQL server running on FreeBSD, one could use both mytop and mtop – both are installable via ports:

a) To install mtop exec:

freebsd# cd /usr/ports/sysutils/mtop
freebsd# make install clean
....

b) To install mytop exec:

freebsd# cd /usr/ports/databases/mytop
freebsd# make install clean
....

I personally prefer to use mtop on FreeBSD, because once run it runs prompts the user to interactively type in the user/pass

freebsd# mtop

Then mtop prompts the user with "interactive" dialog screen to type in user and pass:

Mtop interactive type in username and password screenshot on FreeBSD 7.2

It is pretty annoying, same mtop like syntax don't show user/pass prompt:

freebsd# mytop
Cannot connect to MySQL server. Please check the:

* database you specified "test" (default is "test")
* username you specified "root" (default is "root")
* password you specified "" (default is "")
* hostname you specified "localhost" (default is "localhost")
* port you specified "3306" (default is 3306)
* socket you specified "" (default is "")
The options my be specified on the command-line or in a ~/.mytop
config file. See the manual (perldoc mytop) for details.
Here's the exact error from DBI. It might help you debug:
Unknown database 'test'

The correct syntax to run mytop instead is:

freebsd# mytop -u root -p 'secret_password' -d 'blog'

Or the longer more descriptive:

freebsd# mytop --user root --pass 'secret_password' --database 'blog'

By the way if you take a look at mytop's manual you will notice a tiny error in documentation, where the three options –user, –pass and –database are wrongly said to be used as -user, -pass, -database:

freebsd# mytop -user root -pass 'secret_password' -database 'blog'
Cannot connect to MySQL server. Please check the:

* database you specified "atabase" (default is "test")
* username you specified "ser" (default is "root")
* password you specified "ass" (default is "")
* hostname you specified "localhost" (default is "localhost")
* port you specified "3306" (default is 3306)
* socket you specified "" (default is "")a
...
Access denied for user 'ser'@'localhost' (using password: YES)

Actually it is interesting mytop, precededed historically mtop.
mtop was later written (probably based on mytop), to run on FreeBSD OS by a famous MySQL (IT) spec — Jeremy Zawodny .
Anyone who has to do frequent MySQL administration tasks, should already heard Zawodny's name.
For those who haven't, Jeremy used to be a head database administrators and developer in Yahoo! Inc. some few years ago.
His website contains plenty of interesting thoughts and writtings on MySQL server and database management
 

Tracking graphically MySQL, Apache and Network performance in web with Munin on Debian Linux

Saturday, March 19th, 2011

munin_monitor_cpu_network_hard_drive_apache_mysql_performance-in-web-on-linux_logo

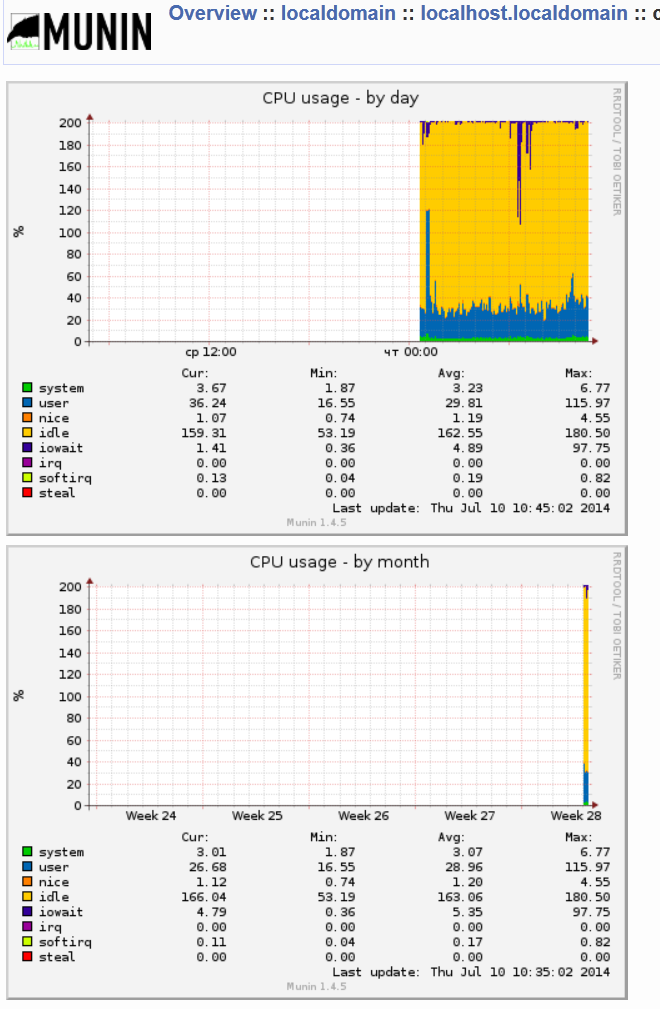
Munin is great software for surveillance software for your MySQL, Apache, Qmail, Postfix and many other of the classical daemon services which most of the Linux, BSD servers online are running on.

1. Munin on Debian Linux is really easy to be installed and comes to executing:

debian:~# apt-get install munin munin-node munin-plugins-extra

2. Link /var/www/munin/ to some VirtualHost or ServerHost
For instance if your munin is to be placed on the domain www.pc-freak.net.net which has the DocumentRoot of /var/www

debian:~# cd /var/www
debian:/var/www# ln -sf /var/www/munin munin

3. Add some extra MySQL related plugins

To check whole list of pmunin plugins you can enable check in /etc/munin/plugins directory

Lets say our Munin will be providing statistics mainly for MySQL, enable this bunch of plugins:

cd /etc/munin/plugins
ln -s /usr/share/munin/plugins/mysql_ mysql_
ln -s /usr/share/munin/plugins/mysql_bytes mysql_bytes
ln -s /usr/share/munin/plugins/mysql_innodb mysql_innodb
ln -s /usr/share/munin/plugins/mysql_isam_space_ mysql_isam_space_
ln -s /usr/share/munin/plugins/mysql_queries mysql_queries
ln -s /usr/share/munin/plugins/mysql_slowqueries mysql_slowqueries
ln -s /usr/share/munin/plugins/mysql_threads mysql_threads


Though above command would enable mysql monitoring it will be not working out of the box. You will find in munin logs error like:

Missing dependency Cache::Cache at /usr/share/munin/plugins/mysql_ line 716."

To fix this install libcache-perl and libcache-cache-perl

apt-get install --yes libcache-perl libcache-cache-perl
 

Then regenerate munin plugin configuration issue cmd:

munin-node-configure --suggest --shell | sh

and restart Munin-node server

service munin-node restart
 

Munin Node should be able login to the MySQL server using the Debian System Maintenance user however if you should need to create a custom user you can add the following configuration to:
 

/etc/munin/plugin-conf.d/munin-node


[mysql*]
    user root
    env.mysqluser muninmonitor
    env.mysqlpassword Your-Secret-Password

4. Edit Munin config

Make sure you have at least the following variables enabled in /etc/munin/munin.conf
 

 dbdir  /var/lib/munin
 htmldir /var/cache/munin/www
 logdir /var/log/munin
 rundir  /var/run/munin

 tmpldir    /etc/munin/templates

includedir /etc/munin/munin-conf.d

[localhost.localdomain]
    address 127.0.0.1
    use_node_name yes


5. Add Munin Alias or Virtualhost

To make Munin Accessible from Webserver you need to at least add an alias create a file
/etc/apache2/conf.d/munin with following content:

vim /etc/apache2/conf.d/munin

Alias /munin /var/cache/munin/www

<Directory /var/cache/munin/www>
        Order allow,deny
        #Allow from localhost 127.0.0.0/8 ::1
        Allow from all
        Options None
        php_value engine off

    <IfModule mod_expires.c>
        ExpiresActive On
        ExpiresDefault M310
    </IfModule>

</Directory>


If you want to access Munin from Apache subdomain create it lets say you want to access it via stats.www.pc-freak.net, use following config file:

vi /etc/apache2/sites-enabled/stats.www.pc-freak.net
 

<VirtualHost *>
   ServerAdmin hipo@www.pc-freak.net
   ServerName stats.www.pc-freak.net
   DocumentRoot /var/cache/munin/www
   <Directory />
       Options FollowSymLinks
       #AllowOverride All
       php_value engine off
   </Directory>
   LogLevel debug
   CustomLog /var/log/apache2/munin/access.log combined
   ErrorLog /var/log/apache2/munin/error.log
   ServerSignature On
<Directory /var/cache/munin/www>
        Order allow,deny
        #Allow from localhost 127.0.0.0/8 ::1
        Allow from all
        Options FollowSymlinks
        #AllowOverride All
        php_value engine off

</Directory>

</VirtualHost>


6. Restart Apache;

debian:~# /etc/init.d/apache2 restart

Now to access the newly installed munin point your favorite browser to (either the subdirectory configured for access or the Virtualhost subdomain):

https://www.pc-freak.net/munin/
or
http://munin.www.pc-freak.net

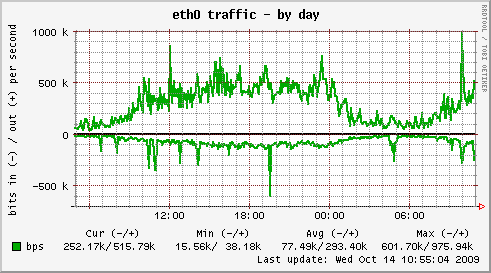
eth0-network-traffic-munin-server-statistics

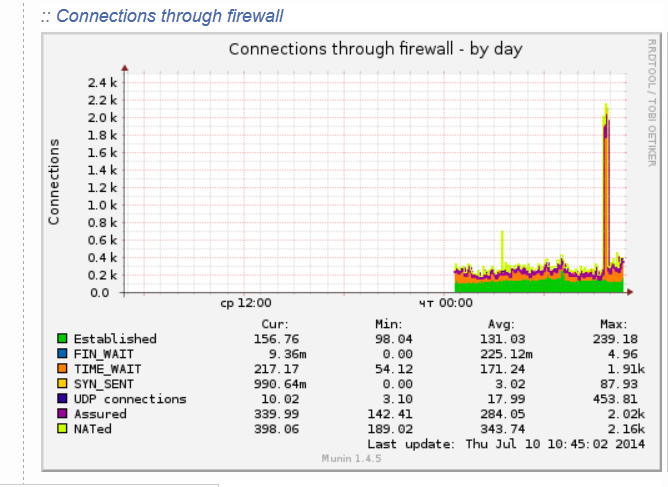
connections_through_firewall-statistics-munin-debian-linux
7. Protecting Munin with a password

As it could be a security leak to expose statistics regarding your server (Disk I/O, Memory, Load Avarage, Apache, MySQL Postfix) operations it is good security practice to protect munin with a password.

I've earlied blogged on how to protect your server munin web-statistics wtih an htaccess password (read it here)


munin-cup-statistics-by-day-and-by-month-screenshot

Happy Monitoring

Play Ascii Games on Pc-freak – Get back memories of the ASCII times

Tuesday, August 4th, 2009

I was considering starting a new ‘ascii games service’. Thus I’ve created a user `play` to provide a bunch of nice FreeBSD based ascii games able to be played directly through SSH (For all lacking a nice tty compatible client like gnome-terminal), try with PuTTY . To play the games:

telnet or ssh to: ascii-games.www.pc-freak.net
login with user: play
password: playnow

Enjoy!

MySQL SSL Configure Howto – How to Make MySQL communication secured

Wednesday, January 15th, 2014

mysql-over-ssl-how-to-configure-logo how to configure ssl on mysql server

Recently I've been asked How to make communication to MySQL database encrypted. The question was raised by a fellow developer who works on developing a Desktop standalone application in Delphi Programming Language with DevArt an (SQL Connection Component capable to connect Delphi applications to multiple databases like MySQL, Oracle, PostgreSQL, Interbase, Firebird etc.

Communicating in Secured form to MySQL database is not common task to do, as MySQL usually communicates to applications hosted on same server or applications to communicate to MySQL are in secured DMZ or administrated via phpMyAdmin web interface.

MySQL supports encrypted connections to itself using Secure Socket Layer (SSL) encryption. Setting up MySQL db to be communicated encrypted is a must for standalone Desktop applications which has to extract / insert data via remote SQL.
Configuring SQL to support communicated queries encrpytion is supported by default and easily configured on most standard Linux version distributions (Debian, RHEL, Fedora) with no need to recompile it.
1. Generate SSL Certificates

$ mkdir /etc/mysql-ssl && cd mysql-ssl

# Create CA certificate
$ openssl genrsa 2048 > ca-key.pem
$ openssl req -new -x509 -nodes -days 3600 \
         -key ca-key.pem -out ca-cert.pem

Create server certificate, remove passphrase, and sign it
server-cert.pem is public key, server-key.pem is private key
$ openssl req -newkey rsa:2048 -days 3600 \
         -nodes -keyout server-key.pem -out server-req.pem

$ openssl rsa -in server-key.pem -out server-key.pem
$ openssl x509 -req -in server-req.pem -days 3600 \
         -CA ca-cert.pem -CAkey ca-key.pem -set_serial 01 -out server-cert.pem

Create client certificate, remove passphrase, and sign it
client-cert.pem is public key and client-key.pem is private key
$ openssl req -newkey rsa:2048 -days 3600 \
         -nodes -keyout client-key.pem -out client-req.pem

$ openssl rsa -in client-key.pem -out client-key.pem
$ openssl x509 -req -in client-req.pem -days 3600 \
         -CA ca-cert.pem -CAkey ca-key.pem -set_serial 01 -out client-cert.pem

After generating the certificates, verify them:

$ openssl verify -CAfile ca-cert.pem server-cert.pem client-cert.pem
 

2. Add SSL support variables to my.cnf

Once SSL key pair files are generated in order to active SSL encryption support in MySQL server, add to (/etc/my.cnf,  /etc/mysql/my.cnf, /usr/local/etc/my.cnf … ) or wherever config is depending on distro

# SSL
ssl-ca=/etc/mysql-ssl/ca-cert.pem
ssl-cert=/etc/mysql-ssl/server-cert.pem
ssl-key=/etc/mysql-ssl/server-key.pem

3. Restart MySQL server

/etc/init.d/mysqld restart
...

4. Create SQL user to require SSL login

Create new user with access to database;

GRANT ALL ON Sql_User_DB.* TO Sql_User@localhost;
FLUSH PRIVILEGES;

To create administrator privileges user:

GRANT ALL PRIVILEGES ON *.* TO ‘ssluser’@'%’ IDENTIFIED BY ‘pass’ REQUIRE SSL;
FLUSH PRIVILEGES;

5. Test SSL Connection with MySQL CLI client or with few lines of PHP

To use mysql cli for testing whether SSL connection works:

$ mysql -u ssluser -p'pass' –ssl-ca /etc/mysql-ssl/client-cert.pem –ssl-cert /etc/mysql-ssl/client-key.pem

Once connected to MySQL to verify SSL connection works fine:

mysql> SHOW STATUS LIKE 'Ssl_Cipher';
 +---------------+--------------------+
| Variable_name | Value              |
 +---------------+--------------------+
| Ssl_cipher    | DHE-RSA-AES256-SHA |
+---------------+--------------------+

If you get this output this means MySQL SSL Connection is working as should.

Alternative way is to use test-mysqli-ssl.php script to test availability to mysql over SSL.

$conn=mysqli_init();
mysqli_ssl_set($conn, '/etc/mysql-ssl/client-key.pem', '/etc/mysql-ssl/client-cert.pem', NULL, NULL, NULL);
if (!mysqli_real_connect($conn, '127.0.0.1', 'ssluser', 'pass')) { die(); }
$res = mysqli_query($conn, 'SHOW STATUS like "Ssl_cipher"');
print_r(mysqli_fetch_row($res));
mysqli_close($conn);

Note: Change username password according to your user / pass before using the script

That's all now you have mysql communicating queries data over SSL