Posts Tagged ‘shell scripts’

How to monitor Haproxy Application server backends with Zabbix userparameter autodiscovery scripts

Friday, May 13th, 2022

zabbix-backend-monitoring-logo

Haproxy is doing quite a good job in High Availability tasks where traffic towards multiple backend servers has to be redirected based on the available one to sent data from the proxy to. 

Lets say haproxy is configured to proxy traffic for App backend machine1 and App backend machine2.

Usually in companies people configure a monitoring like with Icinga or Zabbix / Grafana to keep track on the Application server is always up and running. Sometimes however due to network problems (like burned Network Switch / router or firewall misconfiguration) or even an IP duplicate it might happen that Application server seems to be reporting reachable from some monotoring tool on it but unreachable from  Haproxy server -> App backend machine2 but reachable from App backend machine1. And even though haproxy will automatically switch on the traffic from backend machine2 to App machine1. It is a good idea to monitor and be aware that one of the backends is offline from the Haproxy host.
In this article I'll show you how this is possible by using 2 shell scripts and userparameter keys config through the autodiscovery zabbix legacy feature.
Assumably for the setup to work you will need to have as a minimum a Zabbix server installation of version 5.0 or higher.

1. Create the required  haproxy_discovery.sh  and haproxy_stats.sh scripts 

You will have to install the two scripts under some location for example we can put it for more clearness under /etc/zabbix/scripts

[root@haproxy-server1 ]# mkdir /etc/zabbix/scripts

[root@haproxy-server1 scripts]# vim haproxy_discovery.sh 
#!/bin/bash
#
# Get list of Frontends and Backends from HAPROXY
# Example: ./haproxy_discovery.sh [/var/lib/haproxy/stats] FRONTEND|BACKEND|SERVERS
# First argument is optional and should be used to set location of your HAPROXY socket
# Second argument is should be either FRONTEND, BACKEND or SERVERS, will default to FRONTEND if not set
#
# !! Make sure the user running this script has Read/Write permissions to that socket !!
#
## haproxy.cfg snippet
#  global
#  stats socket /var/lib/haproxy/stats  mode 666 level admin

HAPROXY_SOCK=""/var/run/haproxy/haproxy.sock
[ -n “$1” ] && echo $1 | grep -q ^/ && HAPROXY_SOCK="$(echo $1 | tr -d '\040\011\012\015')"

if [[ “$1” =~ (25[0-5]|2[0-4][0-9]|[01]?[0-9][0-9]?)\.(25[0-5]|2[0-4][0-9]|[01]?[0-9][0-9]?)\.(25[0-5]|2[0-4][0-9]|[01]?[0-9][0-9]?)\.(25[0-5]|2[0-4][0-9]|[01]?[0-9][0-9]?):[0-9]{1,5} ]];
then
    HAPROXY_STATS_IP="$1"
    QUERYING_METHOD="TCP"
fi

QUERYING_METHOD="${QUERYING_METHOD:-SOCKET}"

query_stats() {
    if [[ ${QUERYING_METHOD} == “SOCKET” ]]; then
        echo "show stat" | socat ${HAPROXY_SOCK} stdio 2>/dev/null
    elif [[ ${QUERYING_METHOD} == “TCP” ]]; then
        echo "show stat" | nc ${HAPROXY_STATS_IP//:/ } 2>/dev/null
    fi
}

get_stats() {
        echo "$(query_stats)" | grep -v "^#"
}

[ -n “$2” ] && shift 1
case $1 in
        B*) END="BACKEND" ;;
        F*) END="FRONTEND" ;;
        S*)
                for backend in $(get_stats | grep BACKEND | cut -d, -f1 | uniq); do
                        for server in $(get_stats | grep "^${backend}," | grep -v BACKEND | grep -v FRONTEND | cut -d, -f2); do
                                serverlist="$serverlist,\n"'\t\t{\n\t\t\t"{#BACKEND_NAME}":"'$backend'",\n\t\t\t"{#SERVER_NAME}":"'$server'"}'
                        done
                done
                echo -e '{\n\t"data":[\n’${serverlist#,}’]}'
                exit 0
        ;;
        *) END="FRONTEND" ;;
esac

for frontend in $(get_stats | grep "$END" | cut -d, -f1 | uniq); do
    felist="$felist,\n"'\t\t{\n\t\t\t"{#'${END}'_NAME}":"'$frontend'"}'
done
echo -e '{\n\t"data":[\n’${felist#,}’]}'


[root@haproxy-server1 scripts]# vim haproxy_stats.sh 
#!/bin/bash
set -o pipefail

if [[ “$1” = /* ]]
then
  HAPROXY_SOCKET="$1"
  shift 0
else
  if [[ “$1” =~ (25[0-5]|2[0-4][0-9]|[01]?[0-9][0-9]?)\.(25[0-5]|2[0-4][0-9]|[01]?[0-9][0-9]?)\.(25[0-5]|2[0-4][0-9]|[01]?[0-9][0-9]?)\.(25[0-5]|2[0-4][0-9]|[01]?[0-9][0-9]?):[0-9]{1,5} ]];
  then
    HAPROXY_STATS_IP="$1"
    QUERYING_METHOD="TCP"
    shift 1
  fi
fi

pxname="$1"
svname="$2"
stat="$3"

DEBUG=${DEBUG:-0}
HAPROXY_SOCKET="${HAPROXY_SOCKET:-/var/run/haproxy/haproxy.sock}"
QUERYING_METHOD="${QUERYING_METHOD:-SOCKET}"
CACHE_STATS_FILEPATH="${CACHE_STATS_FILEPATH:-/var/tmp/haproxy_stats.cache}"
CACHE_STATS_EXPIRATION="${CACHE_STATS_EXPIRATION:-1}" # in minutes
CACHE_INFO_FILEPATH="${CACHE_INFO_FILEPATH:-/var/tmp/haproxy_info.cache}" ## unused
CACHE_INFO_EXPIRATION="${CACHE_INFO_EXPIRATION:-1}" # in minutes ## unused
GET_STATS=${GET_STATS:-1} # when you update stats cache outsise of the script
SOCAT_BIN="$(which socat)"
NC_BIN="$(which nc)"
FLOCK_BIN="$(which flock)"
FLOCK_WAIT=15 # maximum number of seconds that "flock" waits for acquiring a lock
FLOCK_SUFFIX='.lock'
CUR_TIMESTAMP="$(date '+%s')"

debug() {
  [ “${DEBUG}” -eq 1 ] && echo "DEBUG: $@" >&2 || true
}

debug "SOCAT_BIN        => $SOCAT_BIN"
debug "NC_BIN           => $NC_BIN"
debug "FLOCK_BIN        => $FLOCK_BIN"
debug "FLOCK_WAIT       => $FLOCK_WAIT seconds"
debug "CACHE_FILEPATH   => $CACHE_FILEPATH"
debug "CACHE_EXPIRATION => $CACHE_EXPIRATION minutes"
debug "HAPROXY_SOCKET   => $HAPROXY_SOCKET"
debug "pxname   => $pxname"
debug "svname   => $svname"
debug "stat     => $stat"

# check if socat is available in path
if [ “$GET_STATS” -eq 1 ] && [[ $QUERYING_METHOD == “SOCKET” && -z “$SOCAT_BIN” ]] || [[ $QUERYING_METHOD == “TCP” &&  -z “$NC_BIN” ]]
then
  echo 'ERROR: cannot find socat binary'
  exit 126
fi

# if we are getting stats:
#   check if we can write to stats cache file, if it exists
#     or cache file path, if it does not exist
#   check if HAPROXY socket is writable
# if we are NOT getting stats:
#   check if we can read the stats cache file
if [ “$GET_STATS” -eq 1 ]
then
  if [ -e “$CACHE_FILEPATH” ] && [ ! -w “$CACHE_FILEPATH” ]
  then
    echo 'ERROR: stats cache file exists, but is not writable'
    exit 126
  elif [ ! -w ${CACHE_FILEPATH%/*} ]
  then
    echo 'ERROR: stats cache file path is not writable'
    exit 126
  fi
  if [[ $QUERYING_METHOD == “SOCKET” && ! -w $HAPROXY_SOCKET ]]
  then
    echo "ERROR: haproxy socket is not writable"
    exit 126
  fi
elif [ ! -r “$CACHE_FILEPATH” ]
then
  echo 'ERROR: cannot read stats cache file'
  exit 126
fi

# index:name:default
MAP="
1:pxname:@
2:svname:@
3:qcur:9999999999
4:qmax:0
5:scur:9999999999
6:smax:0
7:slim:0
8:stot:@
9:bin:9999999999
10:bout:9999999999
11:dreq:9999999999
12:dresp:9999999999
13:ereq:9999999999
14:econ:9999999999
15:eresp:9999999999
16:wretr:9999999999
17:wredis:9999999999
18:status:UNK
19:weight:9999999999
20:act:9999999999
21:bck:9999999999
22:chkfail:9999999999
23:chkdown:9999999999
24:lastchg:9999999999
25:downtime:0
26:qlimit:0
27:pid:@
28:iid:@
29:sid:@
30:throttle:9999999999
31:lbtot:9999999999
32:tracked:9999999999
33:type:9999999999
34:rate:9999999999
35:rate_lim:@
36:rate_max:@
37:check_status:@
38:check_code:@
39:check_duration:9999999999
40:hrsp_1xx:@
41:hrsp_2xx:@
42:hrsp_3xx:@
43:hrsp_4xx:@
44:hrsp_5xx:@
45:hrsp_other:@
46:hanafail:@
47:req_rate:9999999999
48:req_rate_max:@
49:req_tot:9999999999
50:cli_abrt:9999999999
51:srv_abrt:9999999999
52:comp_in:0
53:comp_out:0
54:comp_byp:0
55:comp_rsp:0
56:lastsess:9999999999
57:last_chk:@
58:last_agt:@
59:qtime:0
60:ctime:0
61:rtime:0
62:ttime:0
"

_STAT=$(echo -e "$MAP" | grep :${stat}:)
_INDEX=${_STAT%%:*}
_DEFAULT=${_STAT##*:}

debug "_STAT    => $_STAT"
debug "_INDEX   => $_INDEX"
debug "_DEFAULT => $_DEFAULT"

# check if requested stat is supported
if [ -z “${_STAT}” ]
then
  echo "ERROR: $stat is unsupported"
  exit 127
fi

# method to retrieve data from haproxy stats
# usage:
# query_stats "show stat"
query_stats() {
    if [[ ${QUERYING_METHOD} == “SOCKET” ]]; then
        echo $1 | socat ${HAPROXY_SOCKET} stdio 2>/dev/null
    elif [[ ${QUERYING_METHOD} == “TCP” ]]; then
        echo $1 | nc ${HAPROXY_STATS_IP//:/ } 2>/dev/null
    fi
}

# a generic cache management function, that relies on 'flock'
check_cache() {
  local cache_type="${1}"
  local cache_filepath="${2}"
  local cache_expiration="${3}"  
  local cache_filemtime
  cache_filemtime=$(stat -c '%Y' "${cache_filepath}" 2> /dev/null)
  if [ $((cache_filemtime+60*cache_expiration)) -ge ${CUR_TIMESTAMP} ]
  then
    debug "${cache_type} file found, results are at most ${cache_expiration} minutes stale.."
  elif "${FLOCK_BIN}" –exclusive –wait "${FLOCK_WAIT}" 200
  then
    cache_filemtime=$(stat -c '%Y' "${cache_filepath}" 2> /dev/null)
    if [ $((cache_filemtime+60*cache_expiration)) -ge ${CUR_TIMESTAMP} ]
    then
      debug "${cache_type} file found, results have just been updated by another process.."
    else
      debug "no ${cache_type} file found, querying haproxy"
      query_stats "show ${cache_type}" > "${cache_filepath}"
    fi
  fi 200> "${cache_filepath}${FLOCK_SUFFIX}"
}

# generate stats cache file if needed
get_stats() {
  check_cache 'stat' "${CACHE_STATS_FILEPATH}" ${CACHE_STATS_EXPIRATION}
}

# generate info cache file
## unused at the moment
get_info() {
  check_cache 'info' "${CACHE_INFO_FILEPATH}" ${CACHE_INFO_EXPIRATION}
}

# get requested stat from cache file using INDEX offset defined in MAP
# return default value if stat is ""
get() {
  # $1: pxname/svname
  local _res="$("${FLOCK_BIN}" –shared –wait "${FLOCK_WAIT}" "${CACHE_STATS_FILEPATH}${FLOCK_SUFFIX}" grep $1 "${CACHE_STATS_FILEPATH}")"
  if [ -z “${_res}” ]
  then
    echo "ERROR: bad $pxname/$svname"
    exit 127
  fi
  _res="$(echo $_res | cut -d, -f ${_INDEX})"
  if [ -z “${_res}” ] && [[ “${_DEFAULT}” != “@” ]]
  then
    echo "${_DEFAULT}"  
  else
    echo "${_res}"
  fi
}

# not sure why we'd need to split on backslash
# left commented out as an example to override default get() method
# status() {
#   get "^${pxname},${svnamem}," $stat | cut -d\  -f1
# }

# this allows for overriding default method of getting stats
# name a function by stat name for additional processing, custom returns, etc.
if type get_${stat} >/dev/null 2>&1
then
  debug "found custom query function"
  get_stats && get_${stat}
else
  debug "using default get() method"
  get_stats && get "^${pxname},${svname}," ${stat}
fi


! NB ! Substitute in the script /var/run/haproxy/haproxy.sock with your haproxy socket location

You can download the haproxy_stats.sh here and haproxy_discovery.sh here

2. Create the userparameter_haproxy_backend.conf

[root@haproxy-server1 zabbix_agentd.d]# cat userparameter_haproxy_backend.conf 
#
# Discovery Rule
#

# HAProxy Frontend, Backend and Server Discovery rules
UserParameter=haproxy.list.discovery[*],sudo /etc/zabbix/scripts/haproxy_discovery.sh SERVER
UserParameter=haproxy.stats[*],sudo /etc/zabbix/scripts/haproxy_stats.sh  $2 $3 $4

# support legacy way

UserParameter=haproxy.stat.downtime[*],sudo /etc/zabbix/scripts/haproxy_stats.sh  $2 $3 downtime

UserParameter=haproxy.stat.status[*],sudo /etc/zabbix/scripts/haproxy_stats.sh  $2 $3 status

UserParameter=haproxy.stat.last_chk[*],sudo /etc/zabbix/scripts/haproxy_stats.sh  $2 $3 last_chk


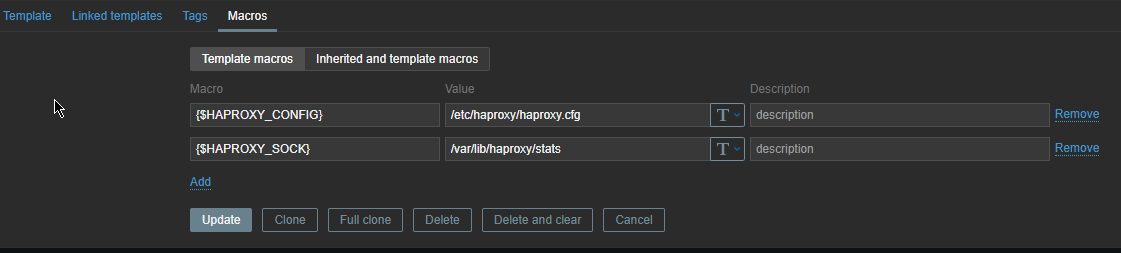
3. Create new simple template for the Application backend Monitoring and link it to monitored host

create-configuration-template-backend-monitoring

create-template-backend-monitoring-macros


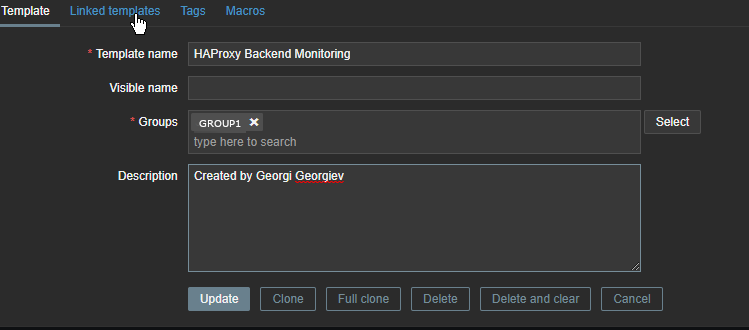
Go to Configuration -> Hosts (find the host) and Link the template to it


4. Restart Zabbix-agent, in while check autodiscovery data is in Zabbix Server

[root@haproxy-server1 ]# systemctl restart zabbix-agent


Check in zabbix the userparameter data arrives, it should not be required to add any Items or Triggers as autodiscovery zabbix feature should automatically create in the server what is required for the data regarding backends to be in.

To view data arrives go to Zabbix config menus:

Configuration -> Hosts -> Hosts: (lookup for the haproxy-server1 hostname)

zabbix-discovery_rules-screenshot

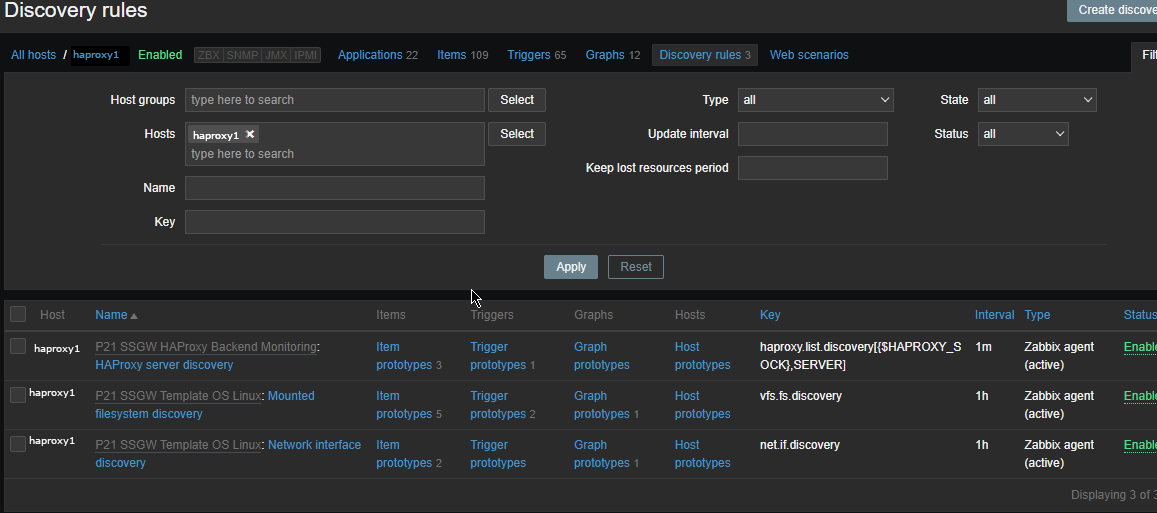
The autodiscovery should have automatically created the following prototypes

zabbix-items-monitoring-prototypes
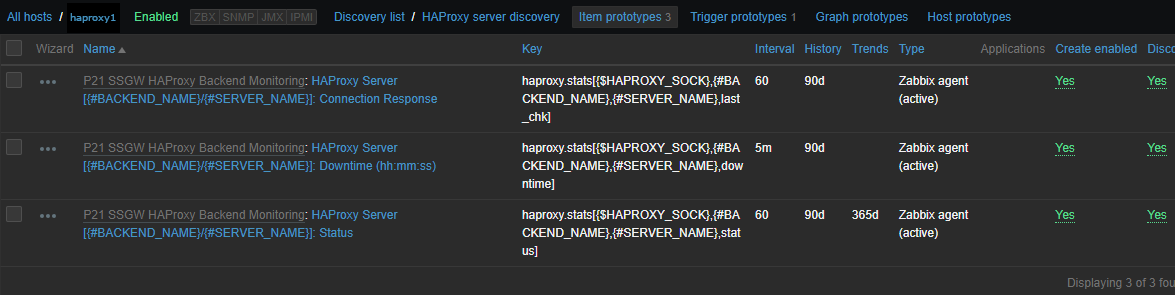
Now if you look inside Latest Data for the Host you should find some information like:

HAProxy Backend [backend1] (3 Items)
        
HAProxy Server [backend-name_APP/server1]: Connection Response
2022-05-13 14:15:04            History
        
HAProxy Server [backend-name/server2]: Downtime (hh:mm:ss)
2022-05-13 14:13:57    20:30:42        History
        
HAProxy Server [bk_name-APP/server1]: Status
2022-05-13 14:14:25    Up (1)        Graph
        ccnrlb01    HAProxy Backend [bk_CCNR_QA_ZVT] (3 Items)
        
HAProxy Server [bk_name-APP3/server1]: Connection Response
2022-05-13 14:15:05            History
        
HAProxy Server [bk_name-APP3/server1]: Downtime (hh:mm:ss)
2022-05-13 14:14:00    20:55:20        History
        
HAProxy Server [bk_name-APP3/server2]: Status
2022-05-13 14:15:08    Up (1)

To make alerting in case if a backend is down which usually you would like only left thing is to configure an Action to deliver alerts to some email address.

Things to install on newly installed GNU / Linux (My favourite must have Linux text and GUI programs missing in fresh Linux installs)

Thursday, September 7th, 2017

must-have-packages-to-install-on-a-freshly-brand-new-linux-installed-on-desktop-computer-gnu-linux-logo

On every next computer I use as a Desktop or Laptop, I install with Debian GNU / Linux I install the following bunch of extra packages in order to turn the computer into a powerful Multimedia, User, Sys Admin army knife tools, A Programmer desktop and Hacker / Penetration Testing security auditting station.

The packages names might vary less or more across various Debian releases and should be similar or the same in Ubuntu / Linux Mint and the rest of Deb based distribtuions.

Also some of the package names might given in the article might change from time of writting this article just like some  already changed in time from a release to release, nomatter that the general list is a collection of packages I have enjoyed for the last 8 years. And I believe anyone who is new to GNU / Linux and  or even some experienced free software users in need of  full featured computer system for remote system administration purposes or general software development and even small entertainment such as Movie Watching or Playing some unsophisticated basic games to kill some time might benefit from the list of programs collected from my experience as a Free Software GNU / Linux users over the last 12 years or so.

So here we go as you might know, once you have a Debian GNU / Linux, first thing to do is to add some extra repositories in /etc/apt/sources.list

For example my debian 9 Stretch sources.list looks like this:

cp -rpf /etc/apt/sources.list /etc/apt/sources.list-bak

vim /etc/apt/sources.list

And delete / substitute everything within with something as following:

deb http://deb.debian.org/debian stretch main non-free
deb-src http://deb.debian.org/debian stretch main

deb http://deb.debian.org/debian stretch-updates main
deb-src http://deb.debian.org/debian stretch-updates main

deb http://security.debian.org/ stretch/updates main
deb-src http://security.debian.org/ stretch/updates main

deb http://security.debian.org/debian-security stretch/updates main contrib
deb-src http://security.debian.org/debian-security stretch/updates main contrib

deb http://download.virtualbox.org/virtualbox/debian stretch contrib

If you're using an older Debian release for example debian 7 or 8, the sources.list codename stretch word should be changed to wheezy for legacy debian 7 or jessie for debian 8, do it respectively for any future or older Deb releases.

Then proceed and update all current installed packages to their latest release with:

apt-get update && apt-get upgrade

If you're running on a very old Debian GNU / Linux release , you might encounter errors from above cmds, if that's your case just follow the online guides and update to a newer still supported Deb release.

Once all this is done assuming you have connected to the internet via LAN network or if on a laptop via Wireless, here are some useful stuff to install especially if you're planning to use your computer effectively in both console and graphics environment.


1. Install some basic packages necessery if you're planning to be using compilers on the freshly installed GNU / linux

apt-get install –yes gcc autoconf build-essential fakeroot devscripts equivs libncurses5-dev g++ make libc6-dev fontconfig gdc

The most notable package here is build-essential it provides the following collection of C / C++ programs on Deb package based distributions Debian / Ubuntu / Mint etc.
 

  1. libc6-dev – C standard library.
  2. gcc – C compiler.
  3. g++ – C++ compiler.
  4. make – GNU make utility to maintain groups of programs.
  5. dpkg-dev – Debian package development tools.

2. Install w3m lynx elinks text browsers

apt-get install –yes lynx elinks w3m-img w3m

3. Install wireless and networking tools
 

apt-get install  –yes tcpdump vnstat wpasupplicant wpagui dnsutils

4. Install Network sniffing, penetration testing and network evaluation tools
 

apt-get install  –yes wireshark nmap zenmap sniffit iptraf iptraf-ng tshark dsniff netsniff-ng netwox netwag sslsniff darkstat kismet netcat ngrep hashcat hydra hydra-gtk ophcrack ophcrack-cli

————–

wiresharkGUI network traffic analyzer

nmapnmap port mapper and security audit tool

zenmapGUI frontend to nmap

sniffitconsole text based basic packet sniffer and monitoring tool very used tool to sniff servers authenticatoins in the past

iptraf-ngNext Generation interactive colorful IP Lan mointor

tsharkanother network traffic analyzer console version

dsniffVarious tools to sniff network traffic for cleartext insecurities

netsniff-ngLinux network packet sniffer toolkit

netwoxProvides more than 200 tools to solve network problems with DNS, FTP, HTTP, IRC, NNTP, SMTP, SNMP, SYSLOG, TELNET, TFTP

netwaggraphical frontend to netwox

sslsniff SSL/TLS man-in-the-middle attack tool

darkstatnetwork traffic analyzer

kismetwireless sniffer and monitor (very useful in the past for sniffing passwords on a Wi-Fi network)

netcatTCP / IP swiss army knife (good tool to listen and connect to local and remote ports)

ngrepgrep like tool for network traffic

hashcatClaims to be world's fastest and most advanced password recovery utility, capable of attacking more than 160 highly optimized hashing algorithms, supports CPU and GPU (using the video card CPU to enhance password cracking speed), also could be used for distributed password cracking

hydra Very fast network logon cracker, supports webforms works with dictionary attacks etc.

hydra-gtkGTK GUI version of Hydra

ophcrackMicrosoft Windows password cracker using rainbow tables GUI

ophcrack-cli Console version of Microsoft Windows password cracker using rainbow tables for speed

————


5. Install multimedia, entertainment few useful tools and other useful stuff
 

apt-get install –yes workrave xscreensaver xscreensaver-data xulrunner xutils zenity yelp zgv   tracker-utils alltray ant apt-utils bsdutils  aumix bwidget ca-certificates pulseaudio-module-jack aumix audacious ffmpeg bluefish bluefish-plugins blender blueman bluez cabextract bluez-firmware bsdmainutils dcraw dmidecode evtest file fonts-liberation fonts-stix fonts-uralic fonts-opensymbol fonts-lyx fonts-cantarell fuse gimp gimp-data-extras gimp-plugin-registry git gnupg gnupg2 imagemagick imwheel inkscape iw less 


bsdutils – Provides some nice old school programs such as :

-=-=-=-=-=-

wall – a program to write to every logged in user console, used in old times on time sharing servers to notify all users about sys admin planning for a reboot or for some other update activity

renice – allows to renice priority over already prioritized process with (nice command)

script – Allows you to do a recorder like saves of user activity on a console / terminal

logger – send logging output from programs to syslog 

-=-=-=-=-=-

alltray – A small program that allows you to bring to dock any program useful to make Thunderbird appear in Gnome / Mate / KDE Dock in a similar manner as Outlook does in m$ Windows

zgv – SVGAlib graphical (picture viewer) useful to view pictures from tty consoles

zenity – allows to display graphical dialog boxes by using shell scripts

aumix – Simple text based mixer control, useful to tune up sound values and mic recording volume from console

WorkRave – is a useful program to periodically remind you to stand out of the computer on a specified interval and shows you graphically some exercies to do to prevent your physical health to not deteriorate by standing all day immobilized

Bluefish – Is Advanced GTK+ HTML Editor useful if you're about to edit HTML / CSS and other Web files

dcraw – Decode raw digital images

dmidecode – Text program that reports your computer hardware

blueman, bluez – Programs to enable USB support on your Linux

evtest – evtest is a utility to monitor Linux input devices

file – little tool to determine file type based on "magic numbes"

fontsliberation – Fonts with same metrics as Times, Arial and Courier


6. Install Text based console Multimedia Mp3 / Mod / S3m players

apt-get install –yes mpg321 mpg123 cmus mp3blaster mplayer sox  ogg123 mikmod cplay cdcd cdck eject

———

mpg321, mpg123 Mp3 and Ogg Vorbis console player historically one of the earliest I used to play my music

cmus Another awesome ncurses menu based small music player

mp3blaster Full Screen ncurses text console mp3 and Ogg vorbis music player

mplayer An awesome old school (the defacto standard) and still one of the best Music and Video player for GNU / Linux

sox Swiss army knife of sound processing, contains (sox, play, rec and soxi commands), which could be used to play, rec and add effects to WAV and other popular old sound formats

ogg123 Play Ogg Vorbis .OGG Free encoding file format in console

mikmodThe most famous Tracker (S3M, MOD, IT) music player for *NIX, play the old soundtracker formats on your GNU / Linux

cplay – A really nice text front end to music players, the cool thing about it it shows how much is left for the song to over using ASCII

cdcd – play Audio CDs from console

eject – eject your CD Drive from console

cdck – tool to verify the quality of written CDs/DVDs

———


7. Install Games

apt-get install –yes xpenguins frozen-bubble alex4 bsdgames bb ninvaders blobwars btanks chromium-bsu criticalmass figlet freetennis njam swell-foop dreamchess extremetuxracer gltron gnuchess wesnoth njam wing nikwi dreamchess gltron gnome-games swell-foop aisleriot prboom

———–

xpenguins – little penguins walk on your screen great to use as a screensaver

frozen-bubble – cool game with bubbles you have to pop out

blobwars – platform shooting game

njam – pacman like game with multiplayer support

extremetuxracer – 3D racing game featuring Tux the Linux penguin mascot

gltron – 3D remake of the good well known Tron Game

gnuchess – GNU remake of classic Chess game

wing – arcade Galaga like game for GNU / Linux

wesnoth – Fantasy turne based strategy game

dremachess – 3D chess game

swell-fool – Colored ball puzzle game

gnome-games – A collection of Games for the GNOME Desktop

nikwi – platform game with a goal to collect candies

aisleriot – GNOME solitaire card game 

prboom – PrBoom, a remake of the Doom 3d shooter classic game using SDL (supports OpenGL), to play it you will need WAD files if you don't have it install (doom-wad-shareware) package

figlet – Make large character ASCII banners out of ordinary provided text (just provide any text and get a nice ASCII picture out of it)

———-
 

8. Install basic archivers such as rar, zip, arj etc.

apt-get install –yes zip unrar arj cpio p7zip unzip bzip2 file-roller


———–

cpioGNU cpio, a program to manager archive files

bzip2BunZip2 block compressor decompressor utility (necessery to untar the .tar.bz2 tar balls)

unzipDe-archiver for .zip files console version

rar, unrarArchiver Unarchiver for .rar files in terminal / console (unfortunately non-free software)

file-rollerArchive manager for gnome

gpg – gnu privacy guard to be able to generate gpg keys

————-

If you're looking for an advanced file archive, dearchive software GUI that be a substitute for Windows WinRar,  WinZip there is also the proprietary software PeaZip for Linux, as I stay as much as possible away from non-free software I don't use PeaZip though. For me file-roller's default GNOME archiver / unarchiver does a pretty good job and if it fails someties I use the console versions of above programs
 

9. Install text and speech synthesizer festival freetts
 

apt-get install –yes festival festival-cmu festvox-kallpc16k festvox-ru mbrola-en1 speech-dispatcher-festival freetts flite yasr gnupg2

————-

FestivalIs the general multi-lingual speech synthesis system

yasris a basic console screen reader program

flitea small run time speech synthesis engine alternative to festival, another free software synthesis tool based built using FestVox

————–

Festival is great if you want to listen to text files and can easily be used to convert basic PDFs or DOC files to listen them if you're lazy to read I've explained on how you can use festival to read speak for you PDFs and DOCs, ODF (Open Document Format) here
 

10. Install linux-header files for latest installed Debian kernel

apt-get install –yes linux-headers-$(uname -r)

You will need that package if you need to compile external usually DRM (Digital Rights Management)  external modules that could be loaded to current Debian precompiled kernel, I recommend you abstain from it since most of the modules are DRMed and doesn't respect your freedom.
 

11. Install GUI programs and browsers

apt-get install –yes gnome-themes-standard gnome-themes-standard-data epiphany-browser dconf-tools gnome-tweak-tool

epiphany-browserIntuitive GNOME web browser (I love this browser, though sometimes Crashing I prefer to use it as it is really fast and lightweight I think Mac OS's Safari has been partially based on its programming code)

dconf-tools Dconf is a low-level key / value database designed for storing desktop environment variables (provides dconf-editor – which allows you to tune tons of gnome settings tunable only through this database it is something like Windows regedit registry editor tool but for GNOME)

gnome-themes-standard / gnome-themes-standard-data The name says it all it provides beautiful gnome standard themes

gnome-tweak-tool Graphic tool to adjust many advanced configuration settings in GNOME in GNOME 3.2, many of the old GNOME 3.0 and 2.X capabilities such as Desktop icons or Computer on the Desktop and many more useful gnome capabilities you might be used for historically can be enabled through that handy tool, it is a must for the GNOME user

12. Install text and GUI mail clients

apt-get install –yes mutt fetchmail bsd-mailx mailutils thunderbird aspell-bg aspell-en aspell-ru

I use primary 3 languages Russian, Bulgarian and English, so by installing the 3 packages aspell-bg, aspell-en, aspell-ru, that would add a possiility for Thunderbird and LibreOffice to have ability to spell check your mails and ODF documents, if your native language is different or you speak different languages do run:
 

apt-cache search aspell 


And install whatever languages spell check support you need


13. Install filesystem mount, check and repair tools
 

apt-get install –yes ntfs-3g sshfs dosfstools ext3grep  e2fsprogs e2fsck-static growisofs  e2undel extundelete recover bleachbit


———–

ntfs-3g – read / write NTFS driver support for FUSE (Filesystem in UserSpace) or in other words install these to be able to mount in read/write mode NTFS filesystems

sshfs – filesystem client based on SSH File Transfer Protocol, that little nitty tool enables you to mount remotely SSH Filesystems to your local Linux Desktop, it is also useful to install across servers if you need to remotely mount SSH Filesystems

e2fsprogs ext2 / ext3 / ext4 filesystem utilities to check, fix, tune, defragment resize and create etc. new filesystems  (provides crucial commands such as fsck.ext2, fsck.ext3, fsck.ext4, e2label, lsattr, chattr, resize2fs, mkfs.ext2, mkfs.ext3, mkfs.ext4 …)

dosfstoolstool giving you ability to check, create and diagnose DOS and Windows FAT 32 Filesystems provides commands such as dosfsck, mkdosfs, dosfslabel, fsck.msdos, fsck.vfat, mkfs.msdos

growisofs DVD+ RW / Read Only Recorder

ext3greptool to help recover deleted files on ext3 filesystems

e2undel Undelete utility for ext2 filesystems
———–

14. Install emulators for PC OS Emuation (Qemu), DOS and Wine to run native Windows programs on GNU / Linux
 

apt-get install –yes qemu qemu-utils aqemu dosbox mame mame-extra os8 simh wine nestopia dgen


—————-

QemuVirtual Machine emulator with support UEFI firmware

Aqemu – Qemu QT VM GUI Frotend

Dosbox – Dos Emulator, great to have to play the good old DOS games on your GNU / Linux

Mame – Multiple Arcade Machine Emulator, great if you want to play the old arcade games of your youth such as The Punisher, Cadillacs and Dinosaurs, Captain America, Robocop, Captain Commando, Wonderboy and so on the list goes on and on …

simh – PDP-1 PDP-4 PDP-7, PDP-9, PDP-10, PDP-11, PDP-15 HP 2100, IBM System 3, IBM 1620, Interdata, SDS, LGP-21, LGP-30, DEC VaX emulator

nestopia Nintendo Entertainment System / Famicom Emulator

dgen – Sega MegaDrive GNU / Linux Emulator

—————


15. Install Network Time protocol daemon and ntpdate (time synchronizing text client)

apt-get install –yes ntpdate ntp

16. Install Djview and CHM books reader

apt-get install –yes djview djview4 djvulibre-bin xchm kchmviewer chm2pdf

Install this packages to be able read DjView and CHM book formats

17. Install other text stuff

# Install text calculator I always prefer and use this console tool instead of the GUI gnome-calculator

apt-get install –yes bc

18. Install printing CUPs and printing utilities

apt-get install –yes cups-client cups-daemon cups-server-common hplip hplip-data printer-driver-hpcups printer-driver-hpijs ghostscript 

A bunch of packages for your Linux Deskto po properly support printing, you might need to install some extra packages depending on the type of printer you need to use, perhaps you will have to take few minutes probably to configure CUPs.

19. Install text monitoring tools

apt-get install –yes htop atop  dnstop  iftop iotop  jnettop ntopng  pktstat  powertop  sntop mariadb-client  iotop  itop jnettop kerneltop logtop
pgtop powertop


—————–

htop – More interactive colorful process viewer similar to top

atop – Monitor for system resources and process activity

dnstop – Console tool for analyze DNS traffic

iftop displays bandwidth usage information on a chosen network interface

iotopsimple top-like I/O (I / O) information output by the Linux kernel

jnettopView hosts / ports taking up the most network traffic

ntopng High-Speed Web-based Traffic analysis and Flow Collection tool

pktstat top like utility for network connections usage

powertop tool to diagnose issues with power consumption and management (useful for Linux running laptops)

sntop A ncurses-based utility that polls hosts to determine connectivity

mariadb-clientthis is the new name for the old mytop / mtop MySQL top package

kerneltop shows Linux kernel usage in a style like top

pgtop Show PostgreSQL queries in a top like style

lograte real time log line rate analyzer

—————-

20. Install text command line tools for transferring data from Web sites and FTP

apt-get install –yes curl wget lftp filezilla gftp transmission linuxdcpp

———-
curl command line tool for transferring data with URL syntax

wget tool to retrvie files and html from the web

lftp sophisticated command-line FTP/HTTP/BitTorrent client program

filezilla Full-featured graphical FTP/FTPS/SFTP client

gftp X/GTK+ and console FTP client

transmission lightweight Bittorrent client

linuxdcpp – Port of the Windows file-sharing program DC++

———–

21. Install text based communication programs

apt-get install –yes irssi freetalk centerim finch

———-

Irssi Great console IRC chat client with support for encryption

FreeTalk console based jabber client

centerim Console based ICQ client

finch – Multi protocol Text console client for AIM/ICQ, Yahoo!, MSN, IRC, Jabber / XMPP / Google Talk Sametime, MySpaceIM, Napster, Zephyr, Gadu-Gadu, Bonjour, GroupWise

———-

22. Install Apache Webserver and MySQL

This two are necessery if you're about to use your computer as a PHP / MySQL develment station

apt-get install –yes mysql-server phpmyadmin apache2 libapache2-mod-php php-pear php php-mysql  ant ant-contrib apache2-dev apache2-ssl-dev

———-

mysql-server MySQL community edition

ant Java based build tool like make (necessery for building many third party apache modules and code)

libapache2-mod-php5the php module loaded into apache

phpmyadminWebtool admin to manage your MySQL database

——–

23. Install mouse support for consoles

apt-get install –yes gpm


———–

gpm is the general purpose mouse interface, if you want to have support for your mouse in TTY consoles (the ones you go to with CTRL + ALT + F2, CTRL + ALT + F3 and so on install it).

———–

24. Install various formats converter tools

apt-get install –yes html2text pdf2djvu unoconv oggconvert webkit2pdf img2pdf gsscan2pdf netpbm dir2ogg soundconverter


————

gsscan2pdfGUI program to produce PDF or DJVU from scanned documents

img2pdfLossless conversion of raster images to PDF

webkit2pdfexport web pages to PDF files or printer

html2textAdvanced HTML to text converter

oggcconvert – convert media files to free format 

netpbmGraphics conversion tools between image formats

dir2ogg – converts MP3, M4A, WMA, FLAC, WAV files and Audio CDs to the open-source OGG format.

soundconverter – GNOME application to convert audio files into other formats

————

There are probably a lot of more handy packages that other Free Software users like to install to make the GNU / Linux desktop notebook even more entertaining and fulfillful for daily work. If you can think of other useful packages not mentioned here you tend to use on a daily basis no matter where Debian based or other distro, please share that would help me too to learn a new thing and I'll be greateful.

Enjoy !

UPDATE: If you get errors with missing packages, just delete them out of the apt-get lines. The reason is some packages are beying removed from .deb repositories or the software package name has changed due to some reason.
 

Monitor General Server / Desktop system health in console on Linux and FreeBSD

Tuesday, October 4th, 2011

slurm-output-monitoring-networking
saidar
is a text based ncurses program to display live statistics about general system health.

It displays in one refreshable screen (similar to top) statistics about server state of:
CPU, Load, Memory, Swap, Network, I/O disk operations
Besides that saidar supports a ncurses console colors, which makes it more funny to look at.
Saidar extracts the statistics for system state based on libgstrap cross platform statistics library about pc system health.

On Debian, Ubuntu, Fedora, CentOS Linuxes saider is available for install straight from distribution repositories.
On Debian and Ubuntu saidar is installed with cmd:

debian:~# apt-get install saidar
...

On CentOS and Fedora saidar is bundled as a part of statgrab-tools rpm package.
Installing it on 64 bit CentOS with yum is with command:

[root@centos ~]# yum install statgrab-tools.x86_64

Saidar is also available on FreeBSD as a part of the /usr/ports/devel/libgstrab, hence to use on my FreeBSD I had to install the libgstrab port:

freebsd# cd /usr/ports/devel/libstatgrab
freebsd# make install clean

Here is saidar running on my Desktop Debian on Thinkpad in color output:

debian:~# saidar -c

Saidar Linux General statistics Screenshot

I've seen many people, who use various shell scripts to output system monitoring information, this scripts however are often written to just run without efficiency in mind and they put some let's say 1% extra load on the system CPU. This is not the case with saidar which is written in C and hence the program is optimized well for what it does.

Update: Next to saidar I recommend you check out Slurm (Real Time Network Interface Monitor) it can visualizes network interface traffic using ascii graph such as on top of the article. On Debian and Ubuntu Slurm is available and easily installable via simple:
 

apt-get install –yes slurm


How to stop / start services in boot time and install / remove / update SuSE SLES (Suse Enterprise Linux Server)?

Friday, February 6th, 2015

Suse-Logo-stop-start-services-on-linux-boot-time-howto-chkconfig
If you're long time Linux sysadmin but you haven't need to adminster SuSE Linux still and your company buys other business / company which already owns some SuSE servers and you need to deal with them, even though you're just starting up with SuSE Linux but you had already plenty of experience with other Linux distributions Fedora / RHEL / CentOS, don't worry set up / stop / start a service (daemon) to boot on Linux boot time is just the same as any other Redhat (RPM) Linux based distributions. it is done by multiple shell scripts located in /etc/init.d directory which can be manually stopped start by issuing the script with an argument e.g
 

suse:/etc/init.d# cd /etc/init.d/
suse:/etc/init.d# ./snmpd 
Usage: ./snmpd {start|stop|try-restart|restart|force-reload|reload|status}


To configure how each of the /etc/init.d/ existent service boots you can the use good old /sbin/chkconfig (a script written in perl) – which you already know from Fedora / CentOS and other RPM distros.

1. Get a list of all enabled on boot SuSE Linux services

To get a list of all set up to run on boot SuSE server services with chkconfig:


suse:/etc/init.d# /sbin/chkfong –list 

Makefile                  0:off  1:off  2:off  3:off  4:off  5:off  6:off
OVCtrl                    0:off  1:off  2:off  3:on   4:on   5:on   6:off
SuSEfirewall2_init        0:off  1:off  2:off  3:off  4:off  5:off  6:off
SuSEfirewall2_setup       0:off  1:off  2:off  3:off  4:off  5:off  6:off
Tivoli_lcfd1              0:off  1:off  2:on   3:on   4:off  5:on   6:off
Tivoli_lcfd1.bkp          0:off  1:off  2:off  3:off  4:off  5:off  6:off
aaeventd                  0:off  1:off  2:off  3:off  4:off  5:off  6:off
acpid                     0:off  1:off  2:on   3:on   4:off  5:on   6:off
alsasound                 0:off  1:off  2:on   3:on   4:off  5:on   6:off
apache2-eis               0:off  1:off  2:off  3:off  4:off  5:off  6:off
atd                       0:off  1:off  2:off  3:off  4:off  5:off  6:off
auditd                    0:off  1:off  2:off  3:on   4:off  5:on   6:off
autofs                    0:off  1:off  2:off  3:off  4:off  5:off  6:off
autoyast                  0:off  1:off  2:off  3:off  4:off  5:off  6:off
boot.apparmor             0:off  1:off  2:on   3:on   4:off  5:on   6:off  B:on
cron                      0:off  1:off  2:on   3:on   4:off  5:on   6:off
dbus                      0:off  1:off  2:off  3:on   4:off  5:on   6:off
earlykbd                  0:off  1:off  2:off  3:off  4:off  5:on   6:off
earlysyslog               0:off  1:off  2:off  3:off  4:off  5:on   6:off
esound                    0:off  1:off  2:off  3:off  4:off  5:off  6:off
evms                      0:off  1:off  2:off  3:off  4:off  5:off  6:off
fbset                     0:off  1:on   2:on   3:on   4:off  5:on   6:off
firstboot                 0:off  1:off  2:off  3:off  4:off  5:off  6:off
fixperms                  0:off  1:off  2:off  3:off  4:off  5:off  6:off
gpm                       0:off  1:off  2:off  3:off  4:off  5:off  6:off
gssd                      0:off  1:off  2:off  3:off  4:off  5:off  6:off
gwproxy                   0:off  1:off  2:on   3:on   4:off  5:on   6:off
haldaemon                 0:off  1:off  2:off  3:on   4:off  5:on   6:off
hp-health                 0:off  1:off  2:on   3:on   4:on   5:on   6:off
hp-ilo                    0:off  1:off  2:off  3:on   4:off  5:on   6:off
hp-snmp-agents            0:off  1:off  2:on   3:on   4:on   5:on   6:off
hpsmhd                    0:off  1:off  2:off  3:on   4:on   5:on   6:off
idmapd                    0:off  1:off  2:off  3:off  4:off  5:off  6:off
ipmi                      0:off  1:off  2:off  3:off  4:off  5:off  6:off
ipmi.hp                   0:off  1:off  2:off  3:off  4:off  5:off  6:off
irq_balancer              0:off  1:on   2:on   3:on   4:off  5:on   6:off
itcaIBMTivoliCommonAgent0  0:off  1:off  2:on   3:on   4:off  5:on   6:off
jboss                     0:off  1:off  2:off  3:off  4:off  5:off  6:off
joystick                  0:off  1:off  2:off  3:off  4:off  5:off  6:off
kadmind                   0:off  1:off  2:off  3:off  4:off  5:off  6:off
kbd                       0:off  1:on   2:on   3:on   4:off  5:on   6:off  S:on
kdump                     0:off  1:off  2:off  3:off  4:off  5:off  6:off
kpropd                    0:off  1:off  2:off  3:off  4:off  5:off  6:off
krb524d                   0:off  1:off  2:off  3:off  4:off  5:off  6:off
krb5kdc                   0:off  1:off  2:off  3:off  4:off  5:off  6:off
ldap                      0:off  1:off  2:off  3:on   4:off  5:on   6:off
lm_sensors                0:off  1:off  2:off  3:off  4:off  5:off  6:off
lw_agt                    0:off  1:off  2:off  3:off  4:off  5:off  6:off
mdadmd                    0:off  1:off  2:off  3:off  4:off  5:off  6:off
microcode                 0:off  1:on   2:on   3:on   4:off  5:on   6:off  S:on
multipathd                0:off  1:off  2:off  3:off  4:off  5:off  6:off
mysql                     0:off  1:off  2:off  3:off  4:off  5:off  6:off
network                   0:off  1:off  2:on   3:on   4:off  5:on   6:off
nfs                       0:off  1:off  2:off  3:on   4:off  5:on   6:off
nfsboot                   0:off  1:off  2:off  3:on   4:off  5:on   6:off
nfsserver                 0:off  1:off  2:off  3:off  4:off  5:off  6:off
nohup.out                 0:off  1:off  2:off  3:off  4:off  5:off  6:off
novell-zmd                0:off  1:off  2:off  3:off  4:off  5:off  6:off
nscd                      0:off  1:off  2:off  3:on   4:off  5:on   6:off
ntp                       0:off  1:off  2:on   3:on   4:off  5:on   6:off
openct                    0:off  1:off  2:off  3:off  4:off  5:off  6:off
opsware-agent             0:off  1:off  2:off  3:on   4:on   5:on   6:off
osddownt                  0:off  1:off  2:off  3:on   4:on   5:on   6:off
ovpa                      0:on   1:off  2:on   3:on   4:off  5:on   6:off
pcscd                     0:off  1:off  2:off  3:off  4:off  5:off  6:off
pctl                      0:off  1:off  2:on   3:on   4:off  5:on   6:off
portmap                   0:off  1:off  2:off  3:on   4:off  5:on   6:off
postfix                   0:off  1:off  2:off  3:on   4:off  5:on   6:off
powerd                    0:off  1:off  2:off  3:off  4:off  5:off  6:off
powersaved                0:off  1:off  2:off  3:off  4:off  5:off  6:off
random                    0:off  1:off  2:on   3:on   4:off  5:on   6:off
raw                       0:off  1:off  2:off  3:off  4:off  5:off  6:off
resmgr                    0:off  1:off  2:on   3:on   4:off  5:on   6:off
rpasswdd                  0:off  1:off  2:off  3:off  4:off  5:off  6:off
rpmconfigcheck            0:off  1:off  2:off  3:off  4:off  5:off  6:off
rrdtools                  0:off  1:off  2:off  3:on   4:off  5:on   6:off
rsyncd                    0:off  1:off  2:off  3:off  4:off  5:off  6:off
saslauthd                 0:off  1:off  2:off  3:off  4:off  5:off  6:off
skeleton.compat           0:off  1:off  2:off  3:off  4:off  5:off  6:off
slurpd                    0:off  1:off  2:off  3:off  4:off  5:off  6:off
smartd                    0:off  1:off  2:off  3:off  4:off  5:off  6:off
smpppd                    0:off  1:off  2:off  3:off  4:off  5:off  6:off
snmpd                     0:off  1:off  2:on   3:on   4:off  5:on   6:off
splash                    0:off  1:on   2:on   3:on   4:off  5:on   6:off  S:on
splash_early              0:off  1:off  2:on   3:on   4:off  5:on   6:off
sshd                      0:off  1:off  2:off  3:on   4:off  5:on   6:off
suseRegister              0:off  1:off  2:off  3:off  4:off  5:off  6:off
svcgssd                   0:off  1:off  2:off  3:off  4:off  5:off  6:off
syslog                    0:off  1:off  2:on   3:on   4:off  5:on   6:off
sysstat                   0:off  1:off  2:off  3:off  4:off  5:off  6:off
tecad_logfile             0:off  1:off  2:off  3:on   4:off  5:on   6:off
tomcat55                  0:off  1:off  2:off  3:off  4:off  5:off  6:off
tomcat_eis                0:off  1:off  2:off  3:off  4:off  5:off  6:off
tpmgwproxy.sh             0:off  1:off  2:on   3:on   4:off  5:on   6:off
uc4_smgrp                 0:off  1:off  2:off  3:on   4:off  5:on   6:off
uc4_smgrq1                0:off  1:off  2:off  3:on   4:off  5:on   6:off
xbis-ldap-tool            0:off  1:off  2:off  3:off  4:off  5:off  6:off
xdm                       0:off  1:off  2:off  3:off  4:off  5:on   6:off
xfs                       0:off  1:off  2:off  3:off  4:off  5:off  6:off
xinetd                    0:off  1:off  2:off  3:off  4:off  5:off  6:off
ypbind                    0:off  1:off  2:off  3:off  4:off  5:off  6:off
xinetd based services:
        chargen:            off
        chargen-udp:        off
        daytime:            off
        daytime-udp:        off
        echo:               off
        echo-udp:           off
        netstat:            off
        rsync:              off
        servers:            off
        services:           off
        systat:             off
        time:               off
        time-udp:           off


2. Stop / Disable a service in all Linux boot runlevels or in a concrete one

As you should know already in Linux there are multiple runlevels in which server can boot, under normal circumstances SuSE servers (as of time of writting) this article boots into runlevel 3, if you'r'e  unsure about the runlevel you can check it with runlevel command:
 

 suse:/etc/init.d# /sbin/runlevel
N 3

To stop a service on all possible boot runlevels – 1,2,3,4,5
 

suse:/etc/init.d# /sbin/chkconfig xinetd off


If you want to stop xinetd or any other service just for certain runlevels (lets say run-level 3,4,5):
 

suse:/etc/init.d# chkconfig –level 345 xinetd off


3. Start / Enable a service for a runlevel or all boot levels 1,2,3,4,5

To disable boot.apparmor on all boot runlevels –  kernel enhancement that enabled to set a limited set of resources for services (good for tightened security, but often creating issues with some external server configured services).
 

suse:/etc/init.d# chkconfig boot.apparmor off


Or for single boot modes again with –level option:
 

suse:/etc/init.d# chkconfig –level 345 boot.apparmor off


suse:/etc/init.d# chkconfig xfs off 


4. SuSE Linux Package management zypper console tool

If you need / wonder how to install /remove / update a service on a SuSE Linux server, take a look at zypper tool.
zypper is  a  command-line  interface to ZYPP system management library.

To install a package / service with zypper the syntax is very much like yum, for example:
 

suse: ~# zypper install vim -emacs


will remove emacs editor and install Vi Improved

The equivalent of yum -y  Fedora command in SuSE Enterprise Linux is –non-interactive option


suse:~# zypper –non-interactive install


In SuSE it is pretty annoying when you're asked for accepting licensing on some proprietary (external vendor) non-free software packages to get around this:
 

suse:~# zypper patch –auto-agree-with-licenses


To keep the SuSE server up2date – i.e. SLES equivalent of CentOS's yum update && yum upgrade


suse:~# zypper list-patches
Loading repository data…
Reading installed packages…
 
Repository                          | Name      | Version | Category | Status
————————————+———–+———+———-+——-
Updates for openSUSE 11.3 11.3-1.82 | lxsession | 2776    | security | needed


suse:~# zypper patch-check
Loading repository data…
Reading installed packages…
5 patches needed (1 security patch)


To look for a certain package with Zypper (equivalent of yum search packagename)

suse: ~# zypper search apache


To verify whether an RPM installed package dependecies are OK:
 

suse:~# zypper verify


The equivalent of Fedora yum update command in SuSE (SLES) are:

suse:~# zypper refresh


To force a complete refresh and rebuild of the database, including a forced download of raw metadata.
 

suse:~# zypper refresh -fdb


For people that are used to ncurses (midnight commander) like text interface you can also use yoast2 (text GUI) package manager:
 

suse:~# yoast2


update-linux-suse-server-with-yoast2-ncurses-package-text-gui-management-tool

If a package is messed you can always go back and use good old RPM (Redhat Package Manager) to solve it.


How to convert html pages to text in console / terminal on GNU / Linux and FreeBSD

Thursday, December 8th, 2011

HTML to Plain Text Convertion on GNU / Linux and FreeBSD

I’m realizing the more I’m converting to a fully functional GUI user, the less I’m doing coding or any interesting stuff…
I remembered of the old glorious times, when I was full time console user and got a memory on a nifty trick I was so used to back in the day.
Back then I was quite often writing shell scripts which were fetching (html) webpages and converting the html content into a plain TEXT (TXT) files

In order to fetch a page back in the days I used lynx(a very simple UNIX text browser, which by the way lacks support for any CSS or Javascipt) in combination with html2text – (an advanced HTML-to-text converter).

Let’s say I wanted to fetch a my personal home page https://www.pc-freak.net/, I did that via the command:

$ lynx -source https://www.pc-freak.net/ | html2text > pcfreak_page.txt

The content from www.pc-freak.net got spit by lynx as an html source and passed html2pdf wchich saves it in plain text file pcfreak_page.txt
The bit more advanced elinks – (lynx-like alternative character mode WWW browser) provides better support for HTML and even some CSS and Javascript so to properly save the content of many pages in plain html file its better to use it instead of lynx, the way to produce .txt using elinks files is identical, e.g.:

$ elinks -source https://www.pc-freak.net/blog/ | html2text > pcfreak_blog_page.txt

By the way back in the days I was used more to links , than the superior elinks , nowdays I have both of the text browsers installed and testing to fetch an html like in the upper example and pipe to html2text produced garbaged output.

Here is the time to tell its not even necessery to have a text browser installed in order to fetch a webpage and convert it to a plain text TXT!. wget file downloading tools supports source dump as well, for all those who did not (yet) tried it and want to test it:

$ wget -qO- https://www.pc-freak.net | html2text Anyways of course, some pages convertion of text inside HTML tags would not properly get saved with neither lynx or elinks cause some texts might be embedded in some elinks or lynx unsupported CSS or JavaScript. In those cases the GUI browser is useful. You can use any browser like Firefox, Epiphany or Opera ‘s File -> Save As (Text Files) embedded functionality, below is a screenshot showing an html page which I’m about to save as a plain Text File in Mozilla Firefox:

Firefox iceWeasel Opera etc. save html webpage as plain text on GNU / Linux, FreeBSD

Besides being handy in conjunction with text browsers, html2text is also handy for converting .html pages already existing on the computer’s hard drive to a plain (.TXT) text format.
One might wonder, why would ever one would like to do that?? Well I personally prefer reading plain text documents instead of htmls 😉
Converting an html files already existing on hard drive with html2text is done with cmd:

$ html2text index.html >index.txt

To convert a whole directory full of .html (documentation) or whatever files to plain text .TXT , cd the directory with HTMLs and issue the one liner bash loop command:

$ cd html/
html$ for i in $(echo *.html); do html2text $i > $(echo $i | sed -e 's#.html#.txt#g'); done

Now lay off your back and enjoy reading the dox like in the good old hacker days when .TXT files were fashionable 😉

How to configure networking in CentOS, Fedora and other Redhat based distros

Wednesday, June 1st, 2011

On Debian Linux I’m used to configure the networking via /etc/network/interfaces , however on Redhat based distributions to do a manual configuration of network interfaces is a bit different.

In order to configure networking in CentOS there is a special file for each interface and some values one needs to fill in to enable networking.

These network adapters configuration files for Redhat based distributions are located in the files:

/etc/sysconfig/network-scripts/ifcfg-*

Just to give you and idea on the content of this network configuration file, here is how it looks like:

[root@centos:~ ]# cat /etc/sysconfig/network-scripts/ifcfg-eth0
# Broadcom Corporation NetLink BCM57780 Gigabit Ethernet PCIe
DEVICE=eth0
BOOTPROTO=static
DHCPCLASS=
HWADDR=00:19:99:9C:08:3A
IPADDR=192.168.0.1
NETMASK=255.255.252.0
ONBOOT=yes

This configuration is of course just for eth0 for other network card names and devices, one needs to look up for the proper file name which corresponds to the network interface visible with the ifconfig command.
For instance to list all network interfaces via ifconfig use:

[root@centos:~ ]# /sbin/ifconfig |grep -i 'Link encap'|awk '{ print $1 }'
eth0
eth1
lo

In this case there are only two network cards on my host.
The configuration files for the ethernet network devices eth0 and eth1 from below example are located in files /etc/sysconfig/network-scripts/ifcfg-eth{1,2}

/etc/sysconfig/network-scripts/ directory contains plenty of shell scripts related to Fedora networking.
This directory contains actually the networking boot time load up rules for fedora and CentOS hosts.

The complete list of options available which can be used in /etc/sysconfig/network-scripts/ifcfg-ethx is located in:
/usr/share/doc/initscripts-*/sysconfig.txt

, to quickly observe the documentation:

[root@centos:~ ]# less /usr/share/doc/initscripts-*/sysconfig.txt

One typical example of configuring a CentOS based host to possess a static IP address (192.168.1.5) and a gateway (192.168.1.1), which will be assigned in boot time during the /etc/init.d/network is loaded is:

[root@centos:~ ]# cat /etc/sysconfig/network-scripts/ifcfg-eth0
# Broadcom Corporation NetLink BCM57780 Gigabit Ethernet PCIe
IPV6INIT=no
BOOTPROTO=static
ONBOOT=yes
USERCTL=yes
TYPE=Ethernet
DEVICE=eth0
IPADDR=192.168.1.5
NETWORK=192.168.1.0
GATEWAY=192.168.1.1
BROADCAST=192.168.1.255
NETMASK=255.255.255.0

After some changes to the network configuration files are made, to load up the new rules a /etc/init.d/network script restart is necessery with the command:

[root@centos:~ ]# /etc/init.d/network restart

Of course one can always use /etc/rc.local script as universal way to configure network rules on a Redhat based host, however using methods like rc.local to load up, ifconfig or route rules in a Fedora would break the distribution logic and therefore is not recommended.

There is also a serious additional reason against using /etc/rc.local post init commands load up script.
If one uses rc.local to load up and configure the networing, the network will get initialized only after all the other scripts in /etc/init.d/ gets started.

Therefore using /etc/rc.local might also be DANGEROUS!, if used remotely via (ssh), supposedly it might completely fail to load the networking, if all bringing the server interfaces relies on it.

Here is an example, imagine that some of the script set in to load up during a CentOS boot up hangs and does continue to load forever (for example after some crucial software upate), as a consequence the /etc/rc.local script will never get executed as it only starts up after all the rest init scripts had succesfully completed execution.

A network eth1 interface configuration for a Fedora host which has to fetch it’s network settings automatically via DHCP is as follows:

[root@fedora:/etc/network:]# cat /etc/sysconfig/network-scripts/ifcfg-eth1
# Intel Corporation 82557/8/9 [Ethernet Pro 100]DEVICE=eth1
BOOTPROTO=dhcp
HWADDR=00:0A:E4:C9:7B:51
ONBOOT=yes

To sum it up I think Fedora’s /etc/sysconfig/network-scripts methodology to configure ethernet devices is a way inferior if compared to Debian.

In GNU/Debian Linux configuration of all networking is (simpler)!, everything related to networking is in one single file ( /etc/network/interfaces ), moreover getting all the thorough documentation for the network configurations options for the interfaces is available as a system wide manual (e.g. man interfaces).

Partially Debian interfaces configuration is a bit more complicated in terms of syntax if matched against Redhat’s network-scripts/ifcfg-*, lest that generally I still find Debian’s manual network configuration interface to be easier to configure networking manually vicommand line.

How to fix “delivery 1: deferral: Sorry,_message_has_wrong_owner._(#4.3.5)/” qmail mail delivery failure message

Friday, May 20th, 2011

After a failed attempt to enable some wrapper scripts to enable domain keys support in a qmail powered mail server my qmail server suddenly stopped being able to normally send mail.

The exact error message which was logged in /var/log/qmail/current was:

@400000004dd66fcc16a088ac delivery 1: deferral: Sorry,_message_has_wrong_owner._(#4.3.5)/

This qmail messed happened after I substituted /var/qmail/bin/qmail-queue and /var/qmail/bin/qmail-remote with two respective wrapper shell scripts which were calling for the original qmail-queue and qmail-remote binaries under the names qmail-queue.orig and qmail-queue.orig

Restoring back qmail-queue.orig to /var/qmail/bin/qmail-queue and qmail-remote.orig to /var/qmain/bin/qmail-remote and restarting the mail server broke my qmail install.

After a bunch of nerves trying to isolate what is causing the error I found out that by mistake I forgot to copy the qmail-queue and qmail-remote permissions and ownership.

Thus I had to check another qmail working installation’s permissions for both binaries and fix the permissions to be equivalent to the permissions:

debian:~# ls -al /var/qmail/bin/qmail-remote
-rwx–x–x 1 root qmail 50464 2011-05-20 12:56 /var/qmail/bin/qmail-remote*
debian:~# ls -al /var/qmail/bin/qmail-queue
-rws–x–x 1 qmailq qmail 20392 2011-05-20 12:56 /var/qmail/bin/qmail-queue*

The exact chmod and chmod commands I issued to solve the shitty issues were as follows:

First I fixed the qmail-queue and qmail-remote ownership:

debian:~# chown qmailq:qmail /var/qmail/bin/qmail-queue
debian:~# chown root:qmail /var/qmail/bin/qmail-remote

Second I set the proper file permissions:

# make the qmail-queue binary suid
debian:~# chmod u+s /var/qmail/bin/qmail-queue
debian:~# chmod 611 /var/qmail/bin/qmail-queue
debian:~# chmod 611 /var/qmail/bin/qmail-remote

Third and last I did a restart of the qmail server and tested it sends properly

debian:~# /usr/bin/qmailctl stop
Stopping qmail...
qmail-send
qmail-smtpd
debian:~# /usr/bin/qmailctl start
Starting qmail

Finally to test that the qmail server qmail-queue was queing and sending with qmail-remote I used the system mail command like so:

debian:~# mail -s "test email" testuser@www.pc-freak.net
asdfafdsdf
.
Cc:

Afterwards the mail was properly received on my mail account testuser@www.pc-freak.net immediately.

In my /var/log/qmail/current log file all seemed fine:

@400000004dd6702a2eb2b064 starting delivery 1: msg 85281596 to remote testuser@www.pc-freak.net
@400000004dd6702a2eb2b834 status: local 0/20 remote 1/20
@400000004dd6702b34cc809c delivery 1: success: 83.228.93.76_accepted_message./Remote_host_said:_250_ok_
1305899099_qp_65293/
@400000004dd6702b34cc886c status: local 0/20 remote 0/20
@400000004dd6702b34cc8c54 end msg 85281596

The test mail was properly received on my mail account testuser@www.pc-freak.net immediately.

It took me like half an hour to figure out what exactly is wrong with the permissions in situations like this I really wanted to change all my qmail installs with postfix and forget forever I ever used qmail …