Posts Tagged ‘SSL’
Saturday, October 24th, 2020 If you had to administer some Windows webservers based on IIS and you're coming from the Linux realm, it would be really confusing on how you can use a single IP address to have binded multiple domain certificates.
For those who have done it on linux, they know Apache and other webservers in recent versions support the configuration Directive of a Wildcard instead of IP through the SNI extension capble to capture in the header of the incoming SSL connection the exact domain and match it correctly against the domain with the respective certificate. Below is what I mean, lets say you have a website called yourdomain.com and you want this domain to be pointing to another location for example to yourdomain1.com
For example in Apache Webserver this is easily done by defining 2 separate virtualhost configuration files similar to below:
/etc/apache2/sites-available/yourdomain.com
<Virtualhost *>
…
Servername yourdomain.com
ServerAlias www.yourdomain.com
….
SSLCertificateFile /etc/letsencrypt/live/yourdomain1.com/fullchain.pem
SSLCertificateKeyFile /etc/letsencrypt/live/yourdomain1.com/privkey.pem
</VirtualHost>
/etc/apache2/sites-available/yourdomain1.com
<Virtualhost *>
…
Servername yourdomain1.com
ServerAlias yourdomain1.com
…
SSLCertificateFile /etc/letsencrypt/live/yourdomain1.com/fullchain.pem
SSLCertificateKeyFile /etc/letsencrypt/live/yourdomain1.com/privkey.pem
</VirtualHost>
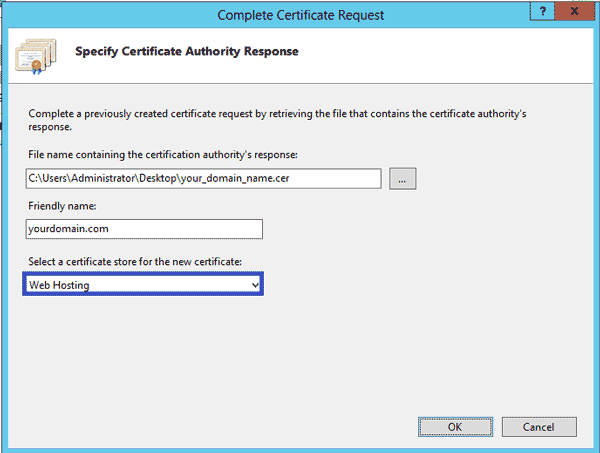
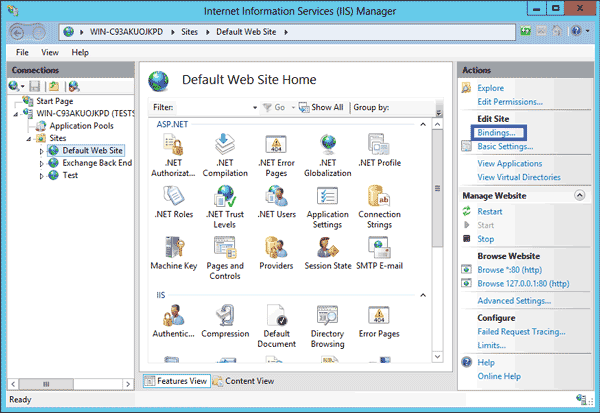
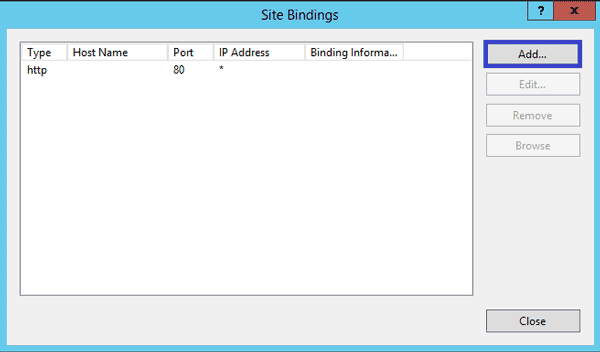
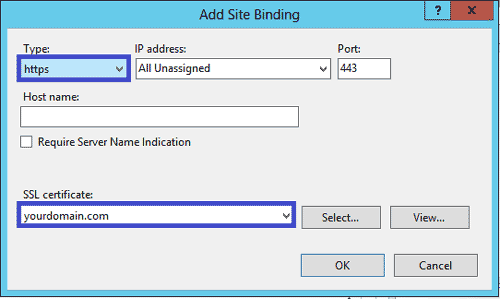
Unfortunately for those who still run legacy Windows servers with IIS version 7 / 7.5 your only option is to use separate IP addresses (or ports, but not really acceptable for public facing sites) and to bind each site with it's SSL certificate to that IP address.
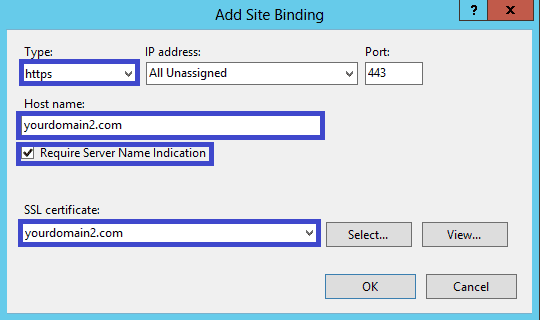
IIS ver. 8+ supports the Server Name Indication extension of TLS which will allow you to bind multiple SSL sites to the same IP address/port based on the host name. It will be transparent and the binding will work the same as with non-HTTPS sites.
In Microsoft IIS Webserver to configure, it is not possible to simply edit some configurations but you have to do it the clicking way as usually happen in Windows. thus you will need to have generated the Domain Certificate requests and so on and then you can simply do as pointed in below screenshots.

Tags: address, coming, domain certificate, IIS, pem, SSL, using, webservers, website, Windows
Posted in IIS, System Administration, Web and CMS, Windows | No Comments »
Thursday, October 11th, 2018 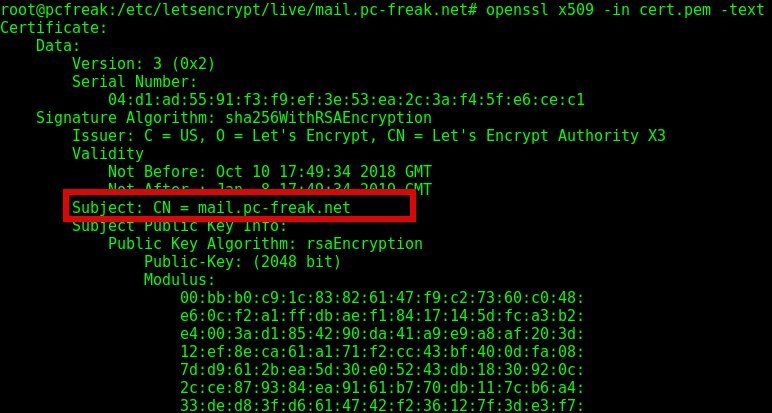
If you have generated a .pem formatted SSL certificate or you have multiple .pem SSL certificates and you're not sure which .pem file is generated for which domain / subdomain it is useful to Display content of SSL Certificate .PEM file with openssl command.
Viewing certificate's content is also very useful if you have hosted multiple websites hosted on a server and you want to check which of the SSLs assigned in the Virtualhosts has Expired (for example if you have domains that expire in short term period (365 days).
1. How to Display Content of SSL certificate .pem file?
root@pcfreak:~# openssl x509 -in cert.pem -text
Certificate:
Data:
Version: 3 (0x2)
Serial Number:
04:d1:ad:55:91:f3:f9:ef:3e:53:ea:2c:3a:f4:5f:e6:ce:c1
Signature Algorithm: sha256WithRSAEncryption
Issuer: C = US, O = Let's Encrypt, CN = Let's Encrypt Authority X3
Validity
Not Before: Oct 10 17:49:34 2018 GMT
Not After : Jan 8 17:49:34 2019 GMT
Subject: CN = mail.www.pc-freak.net
Subject Public Key Info:
Public Key Algorithm: rsaEncryption
Public-Key: (2048 bit)
Modulus:
00:bb:b0:c9:1c:83:82:61:47:f9:c2:73:60:c0:48:
e6:0c:f2:a1:ff:db:ae:f1:84:17:14:5d:fc:a3:b2:
e4:00:3a:d1:85:42:90:da:41:a9:e9:a8:af:20:3d:
12:ef:8e:ca:61:a1:71:f2:cc:43:bf:40:0d:fa:08:
7d:d9:61:2b:ea:5d:30:e0:52:43:db:18:30:92:0c:
2c:ce:87:93:84:ea:91:61:b7:70:db:11:7c:b6:a4:
33:de:d8:3f:d6:61:47:42:f2:36:12:7f:3d:e3:f7:
5b:11:3e:1c:f0:af:96:cd:61:8a:1a:a0:f0:b5:23:
65:73:b6:b4:9c:19:a7:09:dd:43:96:37:ac:48:fc:
21:07:02:52:67:26:2c:81:24:f4:d7:10:e6:f4:12:
69:53:ef:91:2a:15:6a:21:06:22:ea:fe:31:38:82:
b4:5a:b5:9b:67:90:16:b8:31:e8:27:38:f2:41:b9:
19:02:8f:c7:6e:e1:2c:84:75:19:6d:bb:30:3b:d2:
02:f0:65:f1:76:82:15:9c:ce:31:3a:d4:7c:83:ca:
d1:f9:e1:b7:76:f6:78:93:47:d2:00:f9:63:aa:94:
41:d4:78:d0:ee:bc:e6:e9:14:14:e4:ae:54:31:88:
f8:58:8d:7b:3e:9f:87:5c:f2:04:e5:07:e0:4c:9a:
81:eb
Exponent: 65537 (0x10001)
X509v3 extensions:
X509v3 Key Usage: critical
Digital Signature, Key Encipherment
X509v3 Extended Key Usage:
TLS Web Server Authentication, TLS Web Client Authentication
X509v3 Basic Constraints: critical
CA:FALSE
X509v3 Subject Key Identifier:
DB:AB:81:E3:14:5F:6D:BE:B4:78:7B:5E:7D:FB:66:BF:56:37:C5:1D
X509v3 Authority Key Identifier:
keyid:A8:4A:6A:63:04:7D:DD:BA:E6:D1:39:B7:A6:45:65:EF:F3:A8:EC:A1
Authority Information Access:
OCSP – URI:http://ocsp.int-x3.letsencrypt.org
CA Issuers – URI:http://cert.int-x3.letsencrypt.org/
X509v3 Subject Alternative Name:
DNS:mail.www.pc-freak.net
X509v3 Certificate Policies:
Policy: 2.23.140.1.2.1
Policy: 1.3.6.1.4.1.44947.1.1.1
CPS: http://cps.letsencrypt.org
User Notice:
Explicit Text: This Certificate may only be relied upon by Relying Parties and only in accordance with the Certificate Policy found at https://letsencrypt.org/repository/
CT Precertificate SCTs:
Signed Certificate Timestamp:
Version : v1 (0x0)
Log ID : E2:69:4B:AE:26:E8:E9:40:09:E8:86:1B:B6:3B:83:D4:
3E:E7:FE:74:88:FB:A4:8F:28:93:01:9D:DD:F1:DB:FE
Timestamp : Oct 10 18:49:34.453 2018 GMT
Extensions: none
Signature : ecdsa-with-SHA256
30:46:02:21:00:D6:DE:47:AD:D2:32:BE:BE:DD:B3:EB:
EE:84:9E:02:8A:4F:33:E2:63:21:D5:F7:4D:47:82:92:
AB:B9:0A:49:62:02:21:00:E8:7D:17:81:32:E3:4F:CF:
2D:79:8C:97:46:E1:EF:5E:99:F4:8A:8B:B5:6D:23:5F:
05:84:E2:14:6A:56:8E:A0
Signed Certificate Timestamp:
Version : v1 (0x0)
Log ID : 29:3C:51:96:54:C8:39:65:BA:AA:50:FC:58:07:D4:B7:
6F:BF:58:7A:29:72:DC:A4:C3:0C:F4:E5:45:47:F4:78
Timestamp : Oct 10 18:49:34.451 2018 GMT
Extensions: none
Signature : ecdsa-with-SHA256
30:44:02:20:6C:8E:E7:E2:70:AD:33:A6:5C:E0:89:84:
FB:0B:F6:E1:5C:05:06:0A:A8:DB:8B:1C:7A:D0:52:99:
5F:3F:A2:64:02:20:4B:CD:0B:E7:A0:27:04:31:19:18:
58:99:51:73:49:6B:77:25:A7:E7:5B:10:8C:BD:ED:54:
03:DD:40:E4:2D:31
Signature Algorithm: sha256WithRSAEncryption
9c:86:b3:34:64:af:ac:9d:c4:d3:a7:cc:fc:8a:32:18:75:95:
95:47:9b:9c:3c:0e:3b:61:f9:88:61:38:1a:a6:92:69:3d:14:
6a:53:13:14:65:e6:ca:fa:b9:8e:48:c9:d4:73:f6:e4:74:8a:
1f:2b:f2:14:86:f1:18:55:26:1b:a0:97:89:15:0b:62:c6:2b:
27:81:6f:60:af:55:68:b3:2c:5b:10:56:a2:7d:28:cb:8e:fc:
f0:21:65:78:9b:3a:52:d3:9d:27:ff:d7:24:95:de:0f:d8:3d:
a2:43:6e:fc:a5:2d:f2:ad:37:e9:ea:db:b5:75:b8:7c:ad:23:
45:1d:bd:fe:4e:36:c7:f4:e2:3d:47:c9:06:fc:cb:75:ba:d4:
0a:90:17:ea:e1:7f:49:e6:68:27:97:8a:70:c7:50:e9:19:4a:
8a:21:18:26:79:a3:61:ff:1b:26:9e:fe:85:8f:20:ed:c6:4d:
c1:0e:04:21:a8:05:d4:29:69:99:53:63:81:c7:d5:58:71:df:
02:b5:94:c9:36:48:c9:35:80:ab:71:78:d9:12:f6:f5:10:25:
3d:38:c5:40:75:25:b1:95:18:d8:1c:96:f1:c6:1a:d2:c4:99:
f5:01:2e:f4:e1:4a:1f:10:42:0e:34:ed:92:8e:53:9f:c2:7b:
11:51:78:6a
—–BEGIN CERTIFICATE—–
MIIGDTCCBPWgAwIBAgISBNGtVZHz+e8+U+osOvRf5s7BMA0GCSqGSIb3DQEBCwUA
MEoxCzAJBgNVBAYTAlVTMRYwFAYDVQQKEw1MZXQncyBFbmNyeXB0MSMwIQYDVQQD
ExpMZXQncyBFbmNyeXB0IEF1dGhvcml0eSBYMzAeFw0xODEwMTAxNzQ5MzRaFw0x
OTAxMDgxNzQ5MzRaMBwxGjAYBgNVBAMTEW1haWwucGMtZnJlYWsubmV0MIIBIjAN
BgkqhkiG9w0BAQEFAAOCAQ8AMIIBCgKCAQEAu7DJHIOCYUf5wnNgwEjmDPKh/9uu
8YQXFF38o7LkADrRhUKQ2kGp6aivID0S747KYaFx8sxDv0AN+gh92WEr6l0w4FJD
2xgwkgwszoeThOqRYbdw2xF8tqQz3tg/1mFHQvI2En894/dbET4c8K+WzWGKGqDw
tSNlc7a0nBmnCd1DljesSPwhBwJSZyYsgST01xDm9BJpU++RKhVqIQYi6v4xOIK0
WrWbZ5AWuDHoJzjyQbkZAo/HbuEshHUZbbswO9IC8GXxdoIVnM4xOtR8g8rR+eG3
dvZ4k0fSAPljqpRB1HjQ7rzm6RQU5K5UMYj4WI17Pp+HXPIE5QfgTJqB6wIDAQAB
o4IDGTCCAxUwDgYDVR0PAQH/BAQDAgWgMB0GA1UdJQQWMBQGCCsGAQUFBwMBBggr
BgEFBQcDAjAMBgNVHRMBAf8EAjAAMB0GA1UdDgQWBBTbq4HjFF9tvrR4e159+2a/
VjfFHTAfBgNVHSMEGDAWgBSoSmpjBH3duubRObemRWXv86jsoTBvBggrBgEFBQcB
AQRjMGEwLgYIKwYBBQUHMAGGImh0dHA6Ly9vY3NwLmludC14My5sZXRzZW5jcnlw
dC5vcmcwLwYIKwYBBQUHMAKGI2h0dHA6Ly9jZXJ0LmludC14My5sZXRzZW5jcnlw
dC5vcmcvMBwGA1UdEQQVMBOCEW1haWwucGMtZnJlYWsubmV0MIH+BgNVHSAEgfYw
gfMwCAYGZ4EMAQIBMIHmBgsrBgEEAYLfEwEBATCB1jAmBggrBgEFBQcCARYaaHR0
cDovL2Nwcy5sZXRzZW5jcnlwdC5vcmcwgasGCCsGAQUFBwICMIGeDIGbVGhpcyBD
ZXJ0aWZpY2F0ZSBtYXkgb25seSBiZSByZWxpZWQgdXBvbiBieSBSZWx5aW5nIFBh
cnRpZXMgYW5kIG9ubHkgaW4gYWNjb3JkYW5jZSB3aXRoIHRoZSBDZXJ0aWZpY2F0
ZSBQb2xpY3kgZm91bmQgYXQgaHR0cHM6Ly9sZXRzZW5jcnlwdC5vcmcvcmVwb3Np
dG9yeS8wggEEBgorBgEEAdZ5AgQCBIH1BIHyAPAAdwDiaUuuJujpQAnohhu2O4PU
Puf+dIj7pI8okwGd3fHb/gAAAWZfUA/1AAAEAwBIMEYCIQDW3ket0jK+vt2z6+6E
ngKKTzPiYyHV901HgpKruQpJYgIhAOh9F4Ey40/PLXmMl0bh716Z9IqLtW0jXwWE
4hRqVo6gAHUAKTxRllTIOWW6qlD8WAfUt2+/WHopctykwwz05UVH9HgAAAFmX1AP
8wAABAMARjBEAiBsjuficK0zplzgiYT7C/bhXAUGCqjbixx60FKZXz+iZAIgS80L
56AnBDEZGFiZUXNJa3clp+dbEIy97VQD3UDkLTEwDQYJKoZIhvcNAQELBQADggEB
AJyGszRkr6ydxNOnzPyKMhh1lZVHm5w8Djth+YhhOBqmkmk9FGpTExRl5sr6uY5I
ydRz9uR0ih8r8hSG8RhVJhugl4kVC2LGKyeBb2CvVWizLFsQVqJ9KMuO/PAhZXib
OlLTnSf/1ySV3g/YPaJDbvylLfKtN+nq27V1uHytI0Udvf5ONsf04j1HyQb8y3W6
1AqQF+rhf0nmaCeXinDHUOkZSoohGCZ5o2H/Gyae/oWPIO3GTcEOBCGoBdQpaZlT
Y4HH1Vhx3wK1lMk2SMk1gKtxeNkS9vUQJT04xUB1JbGVGNgclvHGGtLEmfUBLvTh
Sh8QQg407ZKOU5/CexFReGo=
—–END CERTIFICATE—–
Same way a .der files content / encryption algorithm and domain name could be grasped.
root@pcfreak:~# openssl x509 -in cert.der -inform der -text
Certificate:
Data:
Version: 3 (0x2)
Serial Number:
ad:c2:96:6f:4b:db:31:5c
Signature Algorithm: sha256WithRSAEncryption
Issuer: CN = example.com
Validity
Not Before: Jun 22 04:00:37 2015 GMT
Not After : Jul 22 04:00:37 2015 GMT
Subject: CN = example.com
Subject Public Key Info:
Public Key Algorithm: rsaEncryption
Public-Key: (512 bit)
Modulus:
00:ac:75:73:b4:51:ed:1f:dd:ae:70:52:43:fc:df:
c7:5b:d0:2c:75:1b:14:b8:75:01:04:10:e5:1f:03:
65:45:dd:df:a7:9f:34:ae:fd:be:e9:05:84:df:47:
16:81:d9:89:4b:ce:8e:6d:1c:fa:95:44:e8:af:84:
74:4f:ed:c2:e5
Exponent: 65537 (0x10001)
X509v3 extensions:
X509v3 Subject Key Identifier:
26:CF:C8:ED:4B:D7:94:B2:E4:25:03:58:24:8F:04:C0:74:D5:97:8A
X509v3 Authority Key Identifier:
keyid:26:CF:C8:ED:4B:D7:94:B2:E4:25:03:58:24:8F:04:C0:74:D5:97:8A
X509v3 Basic Constraints:
CA:TRUE
Signature Algorithm: sha256WithRSAEncryption
0c:8b:ff:12:80:9e:4c:90:bc:26:b0:96:20:ab:76:0c:64:71:
d2:15:48:a5:33:f6:47:e4:03:df:76:5e:0f:cd:e1:1b:5e:d1:
4d:c2:1f:8d:b8:63:2f:c9:7d:6e:5c:3b:cb:cd:a3:d0:d8:27:
74:66:a3:76:06:a5:fb:81:3a:b6
—–BEGIN CERTIFICATE—–
MIIBdTCCAR+gAwIBAgIJAK3Clm9L2zFcMA0GCSqGSIb3DQEBCwUAMBYxFDASBgNV
BAMMC2V4YW1wbGUuY29tMB4XDTE1MDYyMjA0MDAzN1oXDTE1MDcyMjA0MDAzN1ow
FjEUMBIGA1UEAwwLZXhhbXBsZS5jb20wXDANBgkqhkiG9w0BAQEFAANLADBIAkEA
rHVztFHtH92ucFJD/N/HW9AsdRsUuHUBBBDlHwNlRd3fp580rv2+6QWE30cWgdmJ
S86ObRz6lUTor4R0T+3C5QIDAQABo1AwTjAdBgNVHQ4EFgQUJs/I7UvXlLLkJQNY
JI8EwHTVl4owHwYDVR0jBBgwFoAUJs/I7UvXlLLkJQNYJI8EwHTVl4owDAYDVR0T
BAUwAwEB/zANBgkqhkiG9w0BAQsFAANBAAyL/xKAnkyQvCawliCrdgxkcdIVSKUz
9kfkA992Xg/N4Rte0U3CH424Yy/JfW5cO8vNo9DYJ3Rmo3YGpfuBOrY=
—–END CERTIFICATE—–
2. How to display content and info about .CSR (Certificate Signing request)
root@pcfreak:~# openssl req -in cert.csr -noout -text
Certificate Request:
Data:
Version: 1 (0x0)
Subject: C = BG, ST = BG, L = Dobrich, O = Pc Freak, CN = mail.www.pc-freak.net, emailAddress = hipo@www.pc-freak.net
Subject Public Key Info:
Public Key Algorithm: rsaEncryption
Public-Key: (2048 bit)
Modulus:
00:b1:83:a7:07:62:19:d4:60:95:58:49:de:b3:48:
a8:39:31:fa:5a:bd:2b:d6:73:94:50:36:72:74:18:
58:b6:27:d3:0b:26:75:15:a8:ba:1b:77:a7:c9:54:
96:1f:c7:8d:da:bd:c9:17:91:53:85:9e:0a:f4:71:
3c:fb:d6:e4:75:41:c1:95:32:e1:22:fc:7b:1f:36:
23:12:00:ca:37:27:d5:f9:9b:29:48:4a:51:95:d1:
40:d0:ea:94:51:98:98:6b:d3:d9:79:1d:a1:65:bb:
a9:d1:ab:c9:46:6e:03:ee:24:45:e5:f2:73:e5:f4:
82:4a:08:57:b1:06:52:c3:cc:42:9a:02:5b:7a:7c:
bd:34:d5:5f:d7:ba:ef:27:d5:3d:97:16:69:06:c7:
c1:06:5e:d9:07:16:3f:a3:61:50:9d:dd:ea:95:32:
f1:ee:93:82:48:df:20:8b:ae:d2:95:89:05:e4:3d:
0c:d7:e1:cf:07:ae:55:84:11:06:92:be:34:b4:a2:
a1:ce:07:06:bf:21:bc:80:e2:03:d2:85:b4:64:02:
8d:cd:d2:86:1c:49:41:52:43:a8:12:f8:ef:2c:f4:
be:a0:dc:ac:ea:27:3a:f9:ab:ab:27:da:28:63:1d:
10:5a:4f:b8:51:42:40:ae:be:c0:2d:e9:a3:5a:5a:
23:7f
Exponent: 65537 (0x10001)
Attributes:
a0:00
Signature Algorithm: sha256WithRSAEncryption
47:f0:54:cd:5e:46:6f:2c:cc:48:7e:85:f0:a8:96:10:ca:a3:
15:98:77:d3:02:95:8c:67:84:e3:55:d2:0c:e8:d5:a7:ba:82:
95:fb:ce:73:4c:bc:8f:da:85:97:0c:a8:59:32:b3:a4:af:0a:
80:4c:78:7f:62:cd:1b:00:01:e8:51:27:9c:eb:75:29:80:e9:
99:24:fc:86:e2:09:28:be:47:5a:1d:bf:b1:b4:c4:29:4e:6e:
f3:70:b4:58:f8:d9:a6:63:03:8b:a1:ef:ee:6d:1a:35:33:1e:
b2:32:25:c1:33:37:3d:46:82:37:9b:0d:4c:40:20:ae:ff:e0:
cc:51:a2:6b:dd:74:26:d6:93:26:89:c7:76:29:13:cf:6e:5a:
0f:7c:1b:f5:80:be:3b:6a:a3:c0:10:cd:07:1e:a2:31:8b:49:
94:d7:63:cf:93:8d:80:03:75:4a:76:b4:cd:14:fe:96:62:61:
6b:96:8f:c0:a5:ef:67:c7:5e:c0:a5:4b:4f:95:57:b6:43:03:
8b:6d:10:5f:ab:f2:95:54:ba:85:8e:8b:c1:99:ea:fd:3f:5e:
23:01:d4:27:f3:e9:20:37:c4:05:47:30:67:94:53:f0:87:27:
48:73:57:55:f2:70:04:b1:e9:29:eb:2e:2c:9a:cc:55:f4:cc:
a4:71:c2:5a
That's all folks 🙂
Tags: AA, csr, DB, DER, Display, Display Content, encryption algorithm, f2, f7, get cert info, How to, mail, none, Oct, openssl, pcfreak, pem, SSL
Posted in System Administration, Web and CMS | 1 Comment »
Thursday, May 4th, 2017 
1. Change default Apache (Reverse Proxy) SSL client cipher suite to end customer for Android Mobile applications to work
If you're a sys admin like me and you need to support client environments with multiple Reverse Proxy Apache servers include old ones Apache version 2.2.x (with mod_ssl compiled in Apache or enabled as external module)
and for that reason a certain specific Apache Reverse Proxy certificate SSL encoding cipher default served suite change to be TLS_DHE_RSA_WITH_AES_128_CBC_SHA in order for the application to properly communicate with the server backend application then this article might help you.
There is an end user client application which is Live on a production servers some of which running on backend WebSphere Application Servers (WAS) / SAP / Tomcat servers and for security and logging purposes the traffic is being forwarded from the Apache Reverse Proxies (whose traffic is incoming from a roundup Load Balancers).
Here is a short background history of why cipher suite change is necessery?
The application worked fine and was used by a desktop PCs, however since recently there is an existent Android and Apple Store (iOS) mobile phone application and the Android Applications are unable to properly handle the default served Apache Reverse Proxy cipher suite and which forced the client to ask for change in the default SSL cipher suite to:
TLS_DHE_RSA_WITH_AES_128_CBC_SHA
By default, the way the client lists the cipher suites within its Client Hello will influence on Apache the selection of the cipher suite used between the client and server.
The current httpd.conf in Apache is configured so the ciphers for RP client cipher suite Hello transferred between Reverse Proxy -> Client are being provided in the following order:
1. TLS_RSA_WITH_RC4_128_MD5
2. TLS_RSA_WITH_RC4_128_SHA
3. TLS_RSA_WITH_RC4_128_CBC_SHA
4. TLS_DHE_RSA_WITH_AES_128_CBC_SHA
This has to be inverted so:
4. TLS_DHE_RSA_WITH_AES_128_CBC_SHA
becomes on the place of
1. TLS_RSA_WITH_RC4_128_MD5
A very good reading that helped me achieve the task as usual was Apache's official documentation about mod_ssl see here
So to fix the SSL/TLS cipher suite default served order use
SSLCipherSuite and SSLHonorCipherOrder directives
.
SSLCipherSuite directive is used to specify the cipher suites enabled on the server.
To dictate also preferred cipher suite order directive and that's why you need SSLHonorCipherOrder directive (note that this is not available for older Apache 2.x branch), the original bug for this directive can be seen within
For Example:
SSLHonorCipherOrder On
SSLCipherSuite RC4-SHA:AES128-SHA:AES256-SHA:DHE-RSA-AES128-SHA:DHE-RSA-AES256-SHA:DES-CBC3-SHA
So here is my fix for changing the Ciphersuite SSL Crypt order (notice the
TLS_DHE_RSA_WITH_AES_128_CBC_SHA being given as first argument):
SSLHonorCipherOrder On
SSLCipherSuite TLS_DHE_RSA_WITH_AES_128_CBC_SHA:RC4-SHA:AES128-SHA:AES256-SHA:DHE-RSA-AES128-SHA:DHE-RSA-AES256-SHA:DES-CBC3-SHA
if you want also to enable TLSv1.2 certificate cipher support you can use also:
SSLProtocol -all +TLSv1.2
SSLHonorCipherOrder on
# Old Commented configuration from my httpd.conf – no RC4, 3DES allowed
#SSLCipherSuite "EECDH+ECDSA+AESGCM EECDH+aRSA+AESGCM EECDH+ECDSA+SHA384 EECDH+ECDSA+SHA256 EECDH+aRSA+SHA384 EECDH+aRSA+SHA256 EECDH+aRSA+RC4 EECDH EDH+aRSA 3DES-EDE-CBC-SHA RC4 !aNULL !eNULL !LOW !MD5 !EXP !PSK !SRP !DSS !RC4"
Because there was also requirement for a multiple of SSL cipher encryption (to support large range of both mobile and desktop computers and operating systems the final) cipher suite configuration in httpd.conf that worked for the client looked like so:
SSLCipherSuite ECDHE-RSA-AES128-GCM-SHA256:ECDHE-ECDSA-AES128-GCM-SHA256:ECDHE-RSA-AES256-GCM-SHA384:ECDHE-ECDSA-AES256-GCM-SHA384:DHE-DSS-AES128-GCM-SHA256:kEDH+AESGCM:ECDHE-RSA-AES128-SHA256:ECDHE-ECDSA-AES128-SHA256:ECDHE-RSA-AES128-SHA:ECDHE-ECDSA-AES128-SHA:ECDHE-RSA-AES256-SHA384:ECDHE-ECDSA-AES256-SHA384:ECDHE-RSA-AES256-SHA:ECDHE-ECDSA-AES256-SHA:DHE-DSS-AES128-SHA256:DHE-DSS-AES256-SHA:AES128-GCM-SHA256:AES256-GCM-SHA384:AES128-SHA:AES256-SHA:AES:CAMELLIA:DES-CBC3-SHA:!aNULL:!eNULL:!EXPORT:!DES:!RC4:!MD5:!PSK:!aECDH:!EDH-DSS-DES-CBC3-SHA:!EDH-RSA-DES-CBC3-SHA:!KRB5-DES-CBC3-SHA:!DHE-RSA-AES128-GCM-SHA256:!DHE-RSA-AES256-GCM-SHA384:!DHE-RSA-AES128-SHA256:!DHE-RSA-AES256-SHA:!DHE-RSA-AES128-SHA:!DHE-RSA-AES256-SHA256:!DHE-RSA-CAMELLIA128-SHA:!DHE-RSA-CAMELLIA256-SHA
Once this was done the customer requested HTTP cookie restriction to be added to the same virtual host.
There initial request was to:
2. Set HTTP cookie secure flag and HttpOnly on every cookie that is not being accessed from Internal website JavaScript code
To make Apache Reverse Proxy to behave that way here is the httpd.conf config added to httpd.conf
# vim httpd.conf
#Header edit Set-Cookie ^(.*)$ $1;HttpOnly;Secure
Header always edit Set-Cookie ^(.*)$ $1;HttpOnly;Secure
Finally an Apache restart was necessery
Tags: AES, CAMELLIA, change, Client Hello, configured, default, How to, httpd, Secure, SSL
Posted in Linux, System Administration, Various, Web and CMS | No Comments »
Thursday, April 12th, 2012 
One of our company SSL (https) Certificates recently expired so I needed to renew the SSL certificate.
I was in a hurry doing plenty of other stuffs so it seemed logical for me to Revoke the Certificate. I thought revoking the certificate will simply cancel it and afterwards, in Godaddy's SSL (Manager Certificates) interface the Revoked – Cancelled certificate will re-appear in the menu, ready to be generated in the same way as earlier I initially generated the Godaddy's bought SSL certificate
Hence I proceeded and used Revoke button:
Well guess what my calculations, were wrong.
Revoking, just cancel it. The revoked domain SSL certificate did not show up again in Godaddy's Cert Manager and I have no way from their interface to revert the changes.
To deal with the situation, I contacted Godaddy Support immediately with the following inquiry:
Other : Revoked SSL Certificate
Issue :
Hello we have revoked the SSL certificate for our domain our.domain-name.com.
Can we revert back the certificate as it was.
If not how to generate a new key for our domain https://our.domain-name.com
Thanks in Advance.
Kindest Regards
"My-Company-name" Tech Support
In 5 hours time I received the following tech support answer:
Dear Tech Support,
Thank you for contacting Online Support. It is not possible to reinstate a canceled certificate. You will need to purchase a new certificate. I have requested that a refund be applied to your account. Once the credit appears in your account, please allow 5-7 business days to see the funds applied to the associated payment method. Thank you for your patience and understanding in this matter.
Please let us know if we can help you in any other way.
Sincerely,
Christian P.
Online Support Team
Customer Inquiry
Name : Cadia Tech Support
Domain Name : our.domain-name.com
ShopperID : xxxxxxxxx
Phone : xxxxxxxx
Shopper Validated : Yes
Browser : Mozilla/5.0 (Windows; U; Windows NT 6.1; en-US; rv:1.9.2.3) Gecko/20100401 Firefox/3.6.3
Apparently Godaddy, can work out a bit on their tech support answering time 5 hours for a simple reply is quite long.
Now taking in consideration, above reply from Godady, my only options are to either wait for 5 to 7 (business days) or buy a new credit for SSL certificate.
Buying a new credit will probably not happen as our company is experiencing some financial troubles because of the crisis. So I guess we will have to wait for this 7 days at worst. So again if you wonder to REVOKE or not an SSL certificate. Think again …
Just a small note to make here, that Godaddy has a very straight forward way to just renew an expered certificate, which I succesfully later have done for 4 domains. Well, if only I knew earlier what REVOKE SSL cert really does I wouldn't have ended in this mess …
Tags: answer, Apparently Godaddy, business days, Button, Cancelled, cert, certificate, certificate issue, com, company, Company-name, Credit, customer inquiry, deal, Dear Tech Support, domain certificate, domain name, gecko, godaddy, https certificates, hurry, interface, issue, key, kindest regards, menu, Mozilla, nbsp, patience, quot, reply, revert, Revoking, rv, Shopper, SSL, ssl certificate, stuffs, support domain, team, tech support, thanks in advance, time, wait, xxxxxxxxx
Posted in Everyday Life, Various, Web and CMS | 6 Comments »
Wednesday, April 2nd, 2014 A classic sysadmin scenario is to configure new Apache webserver with requirement to have an SSL ceriticate installed and working on port 443 and all requests coming on port 80 to be redirected to https://.
On Apache this is done with simple mod_rewrite rule:
RewriteEngine On

RewriteCond %{HTTPS} off

RewriteRule (.*) https://%{HTTP_HOST}%{REQUEST_URI}
Before applying the rule don't forget to have Apache mod_rewrite enabled usually it is not enabled on default most Linux distributions by default.
On shared hostings if you don't have access to directly modify Apache configuration but have .htaccess enabled you can add above rules also to .htaccess
Add this to respective VirtualHost configuration and restart Apache and that's it. If after configuring it for some reason it is not working debug mod_rewrite issues by enabling mod_rewrite's rewrite.log
Other useful Apache mod_rewrite redirect rule is redirect a single landing page from HTTP to HTTP
RewriteEngine On

RewriteRule ^apache-redirect-http-to-https.html$ https://www.site-url.com/apache-redirect-http-to-https.html [R=301,L]
!Note! that in case where performance is a key requirement for a website it might be better to use the standard way to redirect HTTP to HTTPS protocol in Apache through:
ServerName www.site-url.com Redirect / https://www.site-url.com/
To learn more on mod_rewrite redirecting check out this official documentation on Apache's official site.
Tags: case, default, HTTP, HTTPS, key, official documentation, performance, port, redirect, requirement, RewriteRule, SSL, standard, sysadmin, website, working, www
Posted in System Administration, Various, Web and CMS | No Comments »
Friday, April 11th, 2014 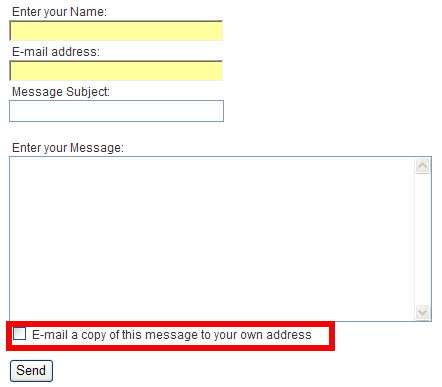
If you happen to have installed Joomla based website and setup a contact form and everything worked fine until recently but suddenly your server starts mysteriously acting as a spam relay – even though email server is perfectly secured against spam.
You probably have some issue with a website email contact form hacked or some vulnerability which allowed hackers to upload spammer php script.
I have a website based on Joomla and just until recently everything was okay until I noticed there are tons of spam flying out from my Qmail mail server (which is configured to check spam with Spamassassin has Bayesian Filtering, Distributed Checksum Claring House, Python Razor and plenty of custom anti-spam rules.
It was just yesterday I ended into that situation, then after evaluating all the hosted website, I've realized Spam issues are caused by an Old Joomla Website Contact form!
There were two issues in the form
in the contact form you have the field with a tick:
1. Well Known Joomla Form Vulnerability
Currently all Joomla (including 1.5.22 and 1.6 versions) are vulnerable to a serious spam relay problem as described in the official Joomla site.
There is a quick dirty workaround fix to contact form vulnerability – disable a Joomla Comonent in ../joomla/components/com_mailto/
To disable it I had to:
cd /var/www/joomla/components
mv com_mailto com_mailtoNOT_USED
Above solution was described under a post resolve joomla spam relay earlier by Anatoliy Dimitrov (after checking closely the website it happened he is a colleague at HP 🙂 )
2. Second issue causing high amount of spam sent over the email server
was: "E-mail a copy of this message to your own address." contact form tick, which was practically enabling any Spammer with a list to inect emails and spam via the form sending copies to any email out on the internet!
You would definitely want to disable "E-mail a copy of this message to your own address."
I wonder why ever any Joomla developer came up with this "spam form"??
Here is the solution to this:
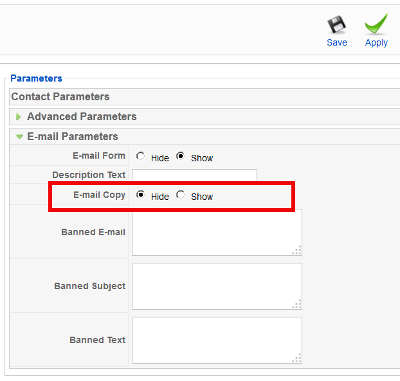
1. Login to Joomla Admin with admin account
2. Goto Components -> Contacts -> Contacts
3. Click on the relevant Contact form
4. Under Contact Parameters go to Email Parameters
5. Change field E-mail Copy from Show to Hide and click Apply button
And Hooray the E-mail a copy of this message to your own address will be gone from contact form! 🙂
I've seen already plenty of problematic hacked servers and scripts before with Joomla in my last job in International University College – where joomla was heavy used, but I never experienced Joomla Security issues myself 'till know, in future I'm planning to never ever use joomla. Though it is an easy CMS system to setup a website its quite complicated to learn the menus – I remember when creating the problematic website it took me days until I properly setup all the menus and find all joomla components … besides these there is no easy way to migrate between different versions major releases in Joomla like in Wordperss, I guess this Mail Security Issue absolutely convinced me to quit using that piece of crap in future.
In mean Time another very serious Apache security flaw leaked on the Internet just few days ago – The OpenSSL Hearbleed Bug. Thanksfully I'm not running SSL anywhere on my website but many systems are affecting making most of your SSL communication with your Internet banking, E-mail etc. in danger. If you're running Apache with SSL make sure you test it for this vulnerability. Here is description of Heartbleed SSL Critical Vulnerability.

"The Heartbleed Bug is a serious vulnerability in the popular OpenSSL cryptographic software library. This weakness allows stealing the information protected, under normal conditions, by the SSL/TLS encryption used to secure the Internet. SSL/TLS provides communication security and privacy over the Internet for applications such as web, email, instant messaging (IM) and some virtual private networks (VPNs).
The Heartbleed bug allows anyone on the Internet to read the memory of the systems protected by the vulnerable versions of the OpenSSL software. This compromises the secret keys used to identify the service providers and to encrypt the traffic, the names and passwords of the users and the actual content. This allows attackers to eavesdrop on communications, steal data directly from the services and users and to impersonate services and users."
11
Tags: admin, Click, contact, copy, Disable E-mail, email, Email Parameters, form, International University College, Internet, Joomla, Joomla Admin, message, setup, solution, spam, SSL, Stop, vulnerability, website
Posted in System Administration, Web and CMS | 2 Comments »
Tuesday, July 1st, 2014 
In case of development (QA) systems, where developers deploy new untested code, exposing Apache or related Apache modules to unexpected bugs often it is necessery to increase Apache loglevel to log everything, this is done with:
LogLevel debug
LogLevel warn is common logging option for Apache production webservers.
Loglevel warn
in httpd.conf is the default Apache setting for Log. For some servers that produce too many logs this setting could be changed to LogLevel crit which will make the web-server log only errors of critical importance to webserver. Using LogLevel debug setting is very useful whether you have to debug issues with unworking (failing) SSL certificates. It will give you whole dump with SSL handshake and reason for it failing.
You should be careful before deciding to increasing server log level, especially on production servers.
Increased logging level puts higher load on Apache webserver, as well as produces a lot of gigabytes of mostly useless logs that could lead quickly to filling all free disk space.
If you would like to increase logged data in access.log / error.log, because you would like to perform versatile statistical analisys on daily hits, unique visits, top landing pages etc. with Webalizer, Analog or Awstats.
Change LogFormat and CustomLog variables from common to combined.
By default Apache is logging with following LogFormat and Customlog
LogFormat "%h %l %u %t "%r" %>s %b" common
CustomLog logs/access_log common
Which will be logging in access.log format:
127.0.0.1 – jericho [10/Oct/2000:13:55:36 -0700] "GET /apache_pb.gif HTTP/1.0" 200 2326
Change it to something like:
LogFormat "%h %l %u %t "%r" %>s %b "%{Referer}i" "%{User-agent}i"" combined CustomLog log/access_log combined
This would produce logs like:
127.0.0.1 – jericho [10/Oct/2000:13:55:36 -0700] “GET /apache_pb.gif HTTP/1.0” 200 2326 “http://www.example.com/start.html” “Mozilla/4.08 [en] (Win98; I ;Nav)"
Using Combined Log Format produces all logged information from CustomLog … common, and also logs the Referrer and User-Agent headers, which indicate where users were before visiting your Web site page and which browsers they used. You can read rore on custom Apache logging tailoring theme on Apache's website
Tags: common, conf, CustomLog, howto, lead, loglevel, logs, production, setting, SSL, webservers
Posted in Everyday Life, Various, Web and CMS | No Comments »
Saturday, July 17th, 2010 There is a quick way to achieve a a full url redirect from a normal unencrypted HTTP request to a SSL crypted HTTPS
This is achieved through mod_rewrite using the RedirectMatch directive.
For instance let’s say we’d like to redirect https://www.pc-freak.net/blog to https://www.pc-freak.net/blog.
We simply put in our .htacess file the following rule:
Redirect permanent /blog https://www.cadiabank.com/login
Of course this rule assumes that the current working directory where the .htacess file is stored is the main domain directory e.g. / .
However this kind of redirect is a way inflexible so for more complex redirect, you might want to take a look at mod rewrite’s RedirectMatch directive.
For instance if you inted to redirect all urls (https://www.pc-freak.net/blog/something/asdf/etc.) which as you see includes the string blog/somestring/asdf/etc. to (https://www.pc-freak.net/blog/something/asdf/etc then you might use some htaccess RedirectMatch rule like:
RedirectMatch permanent ^/blog/(.*)$ https://www.pc-freak.net.net$1

or

RedirectMatch permanent ^/blog/(.*)$ https://www.pc-freak.net.net/$1
Hopefully your redirect from the http protocol to https protocol with mod_rewrite rule should be completed.
Also consider that the Redirect directive which by the way is an Apache directive should be faster to process requests, so everywhere you can I recommend using instead of RedirectMatch which calls the external Apache mod_rewrite and will probably be times slower.
Tags: blog, directory, HTTP, HTTPS, instance, net, port, redirect, Redirect http URL folder to https e.g. redirect (http://example.com to https://www.example.com) with mod_rewrite, something, SSL, string, url, www
Posted in Linux, SEO, System Administration | 3 Comments »
Friday, January 31st, 2014 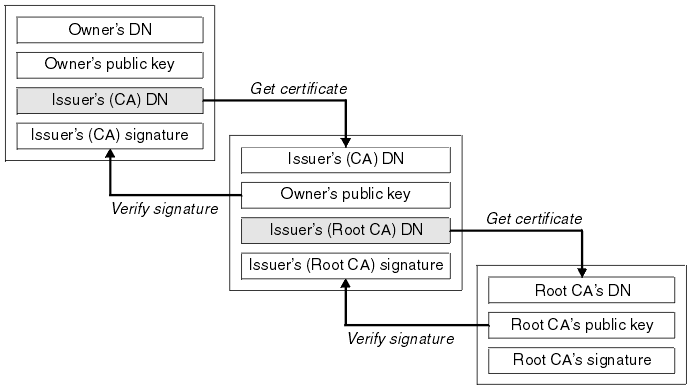
If you work in a big company with large network infrastructure who has to deal with SSL Certificates you will sooner or later will have to learn about existence of SSL Certificate Chains.
Its worthy thus to know what is SSL Certificate Chains and how such a chain is configured in Apache?
Personal SSL certificates (certificates issued to an individual or a company) can be used by clients to uniquely identify themselves when they are involved in starting an SSL connection.
SSL Certificate file contains X.509 certificate, which, in turn, contains a public key used for encryption.
Each personal certificate has zero or more certificate chains of certification authority certificates that extend back to the root certification authority.
Certificate R (Root Certification Authority)
|
| represents issuer of
V
Certificate I1 (Intermediate Certification Authority)
|
| represents issuer of
V
Certificate I2 (A subsidiary Intermediate Certification Authority)
|
| represents issuer of
V
Certificate I3 (A further subsidiary Intermediate Certification Authority)
|
| represents issuer of
V
Certificate P (A personal certificate that is used to identify its owner
on an SSL handshake)
Certificate chains are used to verify the authenticity of each certificate in that chain, including the personal certificate. Each certificate in the chain is validated using its 'parent' certificate, which in turn is validated using the next certificate up the chain, and so on, from the personal certificate up to the root certification authority certificate.
Now after explaining thoroughfully what is SSL Certificate Chain, here is how to configure a SSL Certificate in Apache Webserver.
Open apache2.conf or httpd.conf (depending on GNU / Linux distribution) and add to it;
   SSLEngine On

   SSLCertificateFile conf/cert/webserver-host.crt

   SSLCertificateKeyFile conf/cert/webserver-host.key

   SSLCertificateChainFile conf/cert/internet-v4.crt

   # SSLCertificateChainFile conf/cert/intranet-v3.crt

   SSLOptions +StdEnvVars +OptRenegotiate +ExportCertData
SSLCertificateChainFile conf/cert/chain-cert.crt
loads a chain of separate Personal SSL certificates each signing each other on different levels, chain is leading to top ROOT CA (Certificate Authority).
Tags: apache, apache2, cert, certificate, Certificate Chain, com, company, conf, configured, deal, existence, httpd, individual, installation, key, parent, root, signing, SSL, webserver, www
Posted in Linux, System Administration, Web and CMS | 1 Comment »
Wednesday, January 15th, 2014 
Recently I've been asked How to make communication to MySQL database encrypted. The question was raised by a fellow developer who works on developing a Desktop standalone application in Delphi Programming Language with DevArt an (SQL Connection Component capable to connect Delphi applications to multiple databases like MySQL, Oracle, PostgreSQL, Interbase, Firebird etc.
Communicating in Secured form to MySQL database is not common task to do, as MySQL usually communicates to applications hosted on same server or applications to communicate to MySQL are in secured DMZ or administrated via phpMyAdmin web interface.
MySQL supports encrypted connections to itself using Secure Socket Layer (SSL) encryption. Setting up MySQL db to be communicated encrypted is a must for standalone Desktop applications which has to extract / insert data via remote SQL.
Configuring SQL to support communicated queries encrpytion is supported by default and easily configured on most standard Linux version distributions (Debian, RHEL, Fedora) with no need to recompile it.
1. Generate SSL Certificates
$ mkdir /etc/mysql-ssl && cd mysql-ssl
# Create CA certificate
$ openssl genrsa 2048 > ca-key.pem
$ openssl req -new -x509 -nodes -days 3600 \
-key ca-key.pem -out ca-cert.pem
Create server certificate, remove passphrase, and sign it
server-cert.pem is public key, server-key.pem is private key
$ openssl req -newkey rsa:2048 -days 3600 \
-nodes -keyout server-key.pem -out server-req.pem
$ openssl rsa -in server-key.pem -out server-key.pem
$ openssl x509 -req -in server-req.pem -days 3600 \
-CA ca-cert.pem -CAkey ca-key.pem -set_serial 01 -out server-cert.pem
Create client certificate, remove passphrase, and sign it
client-cert.pem is public key and client-key.pem is private key
$ openssl req -newkey rsa:2048 -days 3600 \
-nodes -keyout client-key.pem -out client-req.pem
$ openssl rsa -in client-key.pem -out client-key.pem
$ openssl x509 -req -in client-req.pem -days 3600 \
-CA ca-cert.pem -CAkey ca-key.pem -set_serial 01 -out client-cert.pem
After generating the certificates, verify them:
$ openssl verify -CAfile ca-cert.pem server-cert.pem client-cert.pem
2. Add SSL support variables to my.cnf
Once SSL key pair files are generated in order to active SSL encryption support in MySQL server, add to (/etc/my.cnf, /etc/mysql/my.cnf, /usr/local/etc/my.cnf … ) or wherever config is depending on distro …
# SSL

ssl-ca=/etc/mysql-ssl/ca-cert.pem

ssl-cert=/etc/mysql-ssl/server-cert.pem

ssl-key=/etc/mysql-ssl/server-key.pem
3. Restart MySQL server
 /etc/init.d/mysqld restart

...
4. Create SQL user to require SSL login
Create new user with access to database;
GRANT ALL ON Sql_User_DB.* TO Sql_User@localhost;

FLUSH PRIVILEGES;
To create administrator privileges user:
 GRANT ALL PRIVILEGES ON *.* TO ‘ssluser’@'%’ IDENTIFIED BY ‘pass’ REQUIRE SSL;

FLUSH PRIVILEGES;
5. Test SSL Connection with MySQL CLI client or with few lines of PHP
To use mysql cli for testing whether SSL connection works:
$ mysql -u ssluser -p'pass' –ssl-ca /etc/mysql-ssl/client-cert.pem –ssl-cert /etc/mysql-ssl/client-key.pem
Once connected to MySQL to verify SSL connection works fine:
 mysql> SHOW STATUS LIKE 'Ssl_Cipher';

 +---------------+--------------------+

| Variable_name | Value              |

 +---------------+--------------------+

| Ssl_cipher    | DHE-RSA-AES256-SHA |

+---------------+--------------------+
If you get this output this means MySQL SSL Connection is working as should.
Alternative way is to use test-mysqli-ssl.php script to test availability to mysql over SSL.
$conn=mysqli_init();

mysqli_ssl_set($conn, '/etc/mysql-ssl/client-key.pem', '/etc/mysql-ssl/client-cert.pem', NULL, NULL, NULL);

if (!mysqli_real_connect($conn, '127.0.0.1', 'ssluser', 'pass')) { die(); }

$res = mysqli_query($conn, 'SHOW STATUS like "Ssl_cipher"');

print_r(mysqli_fetch_row($res));

mysqli_close($conn);
Note: Change username password according to your user / pass before using the script
That's all now you have mysql communicating queries data over SSL
Tags: administrator, application, change, cnf, common, data, databases, Debian, Delphi Programming Language, Desktop, DMZ, fellow, How to, make, multiple, null, openssl, password, pem, php, queries, rhel, script, setting, SSL, testing, username, variables
Posted in MySQL, System Administration, Web and CMS | No Comments »


