Posts Tagged ‘string’

How to count number of ESTABLISHED state TCP connections to a Windows server

Wednesday, March 13th, 2024

count-netstat-established-connections-on-windows-server-howto-windows-logo-debug-network-issues-windows

Even if you have the background of a Linux system administrator, sooner or later you will have have to deal with some Windows hosts, thus i'll blog in this article shortly on how the established TCP if it happens you will have to administarte a Windows hosts or help a windows sysadmin noobie 🙂

In Linux it is pretty easy to check the number of established conenctions, because of the wonderful command wc (word count). with a simple command like:
 

$ netstat -etna |wc -l


Then you will get the number of active TCP connections to the machine and based on that you can get an idea on how busy the server is.

But what if you have to deal with lets say a Microsoft Windows 2012 /2019 / 2020 or 2022 Server, assuming you logged in as Administrator and you see the machine is quite loaded and runs multiple Native Windows Administrator common services such as IIS / Active directory Failover Clustering, Proxy server etc.
How can you identify the established number of connections via a simple command in cmd.exe?

1.Count ESTABLISHED TCP connections from Windows Command Line

Here is the answer, simply use netstat native windows command and combine it with find, like that and use the /i (ignores the case of characters when searching the string) /c (count lines containing the string) options

C:\Windows\system32>netstat -p TCP -n|  find /i "ESTABLISHED" /c
1268

Voila, here are number of established connections, only 1268 that is relatively low.
However if you manage Windows servers, and you get some kind of hang ups as part of the monitoring, it is a good idea to setup a script based on this simple command for at least Windows Task Scheduler (the equivallent of Linux's crond service) to log for Peaks in Established connections to see whether Server crashes are not related to High Rise in established connections.
Even better if company uses Zabbix / Nagios, OpenNMS or other  old legacy monitoring stuff like Joschyd even as of today 2024 used in some big of the TOP IT companies such as SAP (they were still using it about 4 years ago for their SAP HANA Cloud), you can set the script to run and do a Monitoring template or Alerting rules to draw you graphs and Trigger Alerts if your connections hits a peak, then you at least might know your Windows server is under a "Hackers" Denial of Service attack or there is something happening on the network, like Cisco Network Infrastructure Switch flappings or whatever.

Perhaps an example script you can use if you decide to implement the little nestat established connection checks Monitoring in Zabbix is the one i've writen about in the previous article "Calculate established connection from IP address with shell script and log to zabbix graphic".

2. Few Useful netstat options for the Windows system admin
 

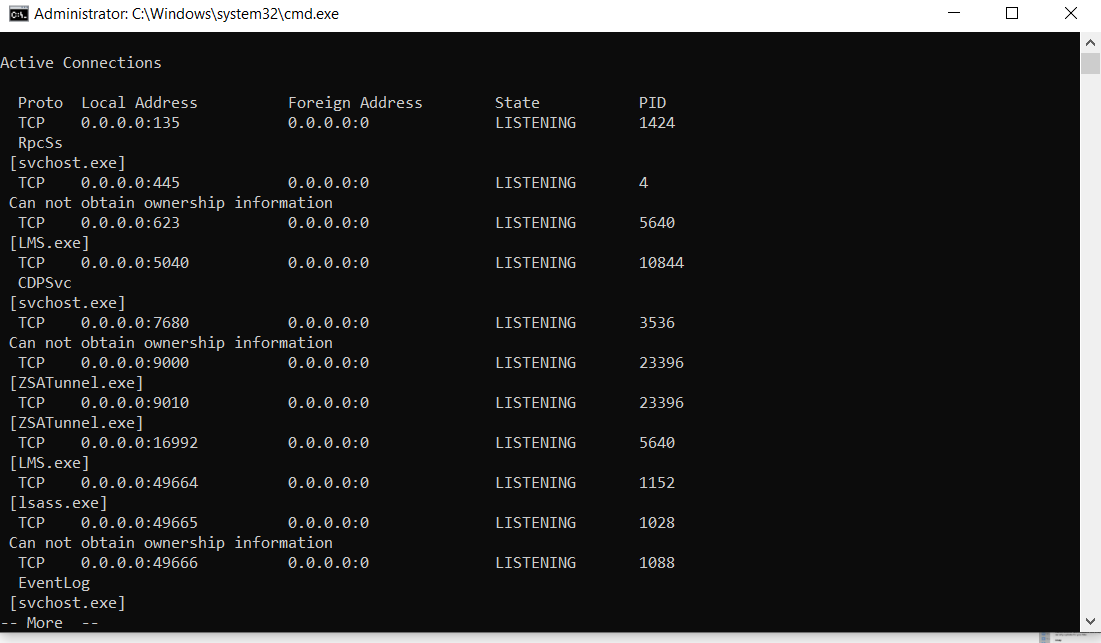
C:\Windows\System32> netstat -bona


netstat-useful-arguments-for-the-windows-system-administrator

Cmd.exe will lists executable files, local and external IP addresses and ports, and the state in list form. You immediately see which programs have created connections or are listening so that you can find offenders quickly.

b – displays the executable involved in  creating the connection.
o – displays the owning process ID.
n – displays address and port numbers.
a – displays all connections and listening ports.

As you can see in the screenshot, by using netstat -bona you get which process has binded to which local address and the Process ID PID of it, that is pretty useful in debugging stuff.

3. Use a Third Party GUI tool to debug more interactively connection issues

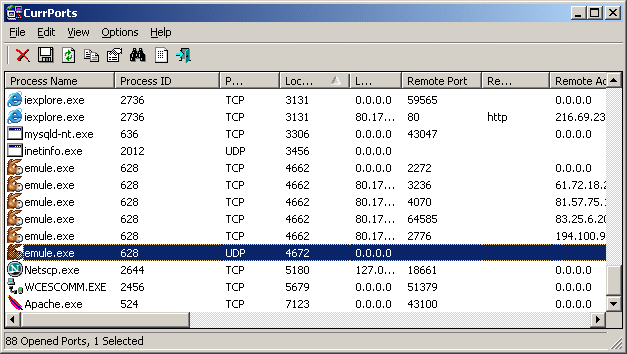
If you need to keep an eye in interactive mode, sometimes if there are issues CurrPorts tool can be of a great help

currports-windows-network-connections-diagnosis-cports

CurrPorts Tool own Description

CurrPorts is network monitoring software that displays the list of all currently opened TCP/IP and UDP ports on your local computer. For each port in the list, information about the process that opened the port is also displayed, including the process name, full path of the process, version information of the process (product name, file description, and so on), the time that the process was created, and the user that created it.
In addition, CurrPorts allows you to close unwanted TCP connections, kill the process that opened the ports, and save the TCP/UDP ports information to HTML file , XML file, or to tab-delimited text file.
CurrPorts also automatically mark with pink color suspicious TCP/UDP ports owned by unidentified applications (Applications without version information and icons).

Sum it up

What we learned is how to calculate number of established TCP connections from command line, useful for scripting, how you can use netstat to display the process ID and Process name that relates to a used Local / Remote TCP connections, and how eventually you can use this to connect it to some monitoring tool to periodically report High Peaks with TCP established connections (usually an indicator of servere system issues).
 

Enable PSK encryption on Zabbix Agent (client) sent encrypted monitored datas to Zabbix server

Friday, April 7th, 2023

zabbix-client-server-encryption-public-key-exchange

Those concerned of security and in use of their Zabbix monitored data who communicate Zabbix collected agent
data over internet or via some kind of untrusted network might definitely not enjoy the fact that zabbix-agent sents
its collected data to server in a plain text. Clear text data is allowing any network sniffer to possibly collect your
monitored server and hardware devices data and exposes all data sent over the network to same problems like in the past
the old uencrypted SMTP protocol.

To mitigate those great security hole for the paranoid sys admin it is rather easy to enable PSK (Pre Shared Key) based encryption.
To generate Pre Shared key you have to had to important values present

1. PSK Identity
2. PSK Secret

PSK secret should be minimum of 128 bit (16-byte PSK, entered as 32 hexadecimal digits), and supports up to
2048 bit (256-byte PSK, entered as 512 hexadecimal digits)

Usually something like 256 bit PSK secret on the machine should be strong enough and simply generated by running

# openssl rand -hex 32

1. Agent to zabbix server or proxy connection config

In /etc/zabbix/zabbix_agentd.conf for a Server Active (e.g. server to actively request the client to sent its collected data)
On machine running zabbix-agent should have a configuration similar to:

# cat /etc/zabbix/zabbix_agentd.conf

PidFile=/var/run/zabbix/zabbix_agentd.pid
LogFile=/var/log/zabbix/zabbix_agentd.log
LogFileSize=0

# IP of the machine
SourceIP=10.10.10.30
# turn it on if you need to execute to remote machine commands
EnableRemoteCommands=0

# IP of the server
servers=10.30.50.80
ListenPort=10080

# IP of the machine
ListenIP=10.30.30.31

# IP of the server
ServerActive=10.30.50.80

HostMetadataItem=system.uname
BufferSize=5400
MaxLinesPerSecond=5
Timeout=10
AllowRoot=0
StartAgents=5
LogRemoteCommands=0


# Machine hostname
Hostname=fqdn-of-zabbix-data-collect-server.com
Include=/etc/zabbix/zabbix_agentd.d/*.conf

# Encryption
TLSConnect=psk
TLSAccept=psk
TLSPSKIdentity=PSK to Zabbix Server5
TLSPSKFile=/etc/zabbix/zabbix_agentd.psk


! Important security note

!!! The TLSPSKIdentity value you decide will not be encrypted on transport, so don't use anything sensitive.

Once you include the TSL config

2 Generate / Create Zabbix Agent Key

Generate the key with pseudo-random bites inside /etc/zabbix/zabbix_agentd_key.psk

# cd /etc/zabbix
# openssl rand -hex 32 > zabbix_agentd_key.psk
# chown zabbix:zabbix zabbix_agentd_key.psk
# chmod 600 zabbix_agentd_key.psk

3. Configure PSK encryption in Zabbix Server Web User interface

Go to Zabbix Server User interface in browser and configure the PSK encryption options for the host.

Select the:

'Connections to host' = PSK

'Connections from host' = PSK

'PSK Identity' = [public-value-configured-in-Zabbix-agent-config]

'PSK' = [paste the long hex string generated from the OpenSSL command above]


In some seconds up to a minute or two the Zabbix Server and Agent will successfully communicate using PSK encryption.
Making the monitored data unreadable in plain text for malignant sniffers hanging in the middle equipment between the zabbix-agent and zabbix-server hosts.

4. PSK encryption behind a Proxy

Many companies, nowadays use zabbix proxy for improvement of network infrastrucutre. For example it is used to offload the zabbix-server when multiple zabbix-agents have to report various datas or to monitor servers and devices that are phyisically in separate networks or data centers (are passing through paranoic built firewalls) or monitor locations are having unreliable communications between each other.
 

To enable PSK for communications between your Zabbix Server and Zabbix Proxy.

1. Create a new secret, and add the PSK Identity and Secret to

Administration ⇾ Proxies ⇾ [Your proxy] ⇾ Encryption

2. Adjust the settings inside the zabbix proxies configuration file at /etc/zabbix/zabbix_proxy.conf


If setting up PSK encryption for agents behind a Zabbix proxy, ensure your have

Zabbix Server ⇽⇾ Proxy PSK enabled
first in Zabbix Server UI.

This is because, when you start the Proxy, or do some testing to send some key value to Zabbix server via the proxy with commands :

# zabbix_get -s 127.0.0.1 -k system.hostname
# zabbix_server -R config_cache_reload


config_cache_reload, the Proxy will download all its host settings from the server, and this also includes the servers copy of the secret.

The proxy needs to know the secret since it is now managing the communications on behalf of the server.

3. To add PSK encryption for any Agents behind a proxy, then you continue to set up the Agents as normal by creating a new secret, editing

Configuration ⇾ Hosts ⇾ [Your Host] ⇾ Encryption page

and also editing /etc/zabbix/zabbix_agentd.conf.

Remember that, since your Agents Host configuration in the Zabbix UI will be set as Monitored by Proxy, the PSK settings will be applicable for communications happening between the Zabbix Proxy and the Agent that it is monitoring, not between the Zabbix Server and the Agent behind the proxy.

You can also add PSK Encryption between your Zabbix Proxy and its own local Agent if you want.
You would set its PSK settings in the Proxy Agents host configuration at

Configuration ⇾ Hosts ⇾ [Your proxy] ⇾ Encryption

and modify the settings in the agents on configuration file at /etc/zabbix/zabbix_agentd.conf.
Keep in mind, this is only applicable to communications between the Zabbix Proxy, and its own Agent process.

When setting up PSK encryption for the Zabbix Server, Proxy and Agents, you may see an error in the Proxy logs,

cannot send proxy data to server at "zabbix.your-domain.tld": connection of type "TLS with PSK" is not allowed for proxy "your-proxy".

If you hit this, check that your

Zabbix Server ⇽⇾ Proxy PSK settings

are correct first.

Don't get confused between the Proxies own optional agent process, and its main Proxy process which is required.

OSCommerce how to change / reset lost admin password

Monday, October 16th, 2017

reset-forgotten-lost-oscommerce-password-howto-Os_commerce-logo.svg

How to change / reset OSCommerce lost / forgotten admin password?

The password in OSCommerce is kept in table "admin", so to reset password connect to MySQL with mysql cli client.

First thing to do is to generate the new hash string, you can do that with a simple php script using the md5(); function


root@pcfreak:/var/www/files# cat 1.php
<?
$pass=md5('password');
echo $pass;
?>


root@pcfreak:/var/www/files# php 1.php
5f4dcc3b5aa765d61d8327deb882cf99
root@pcfreak:/var/www/files#


Our just generated string (for text password password) is hash: 5f4dcc3b5aa765d61d8327deb882cf99

Next to update the new hash string into SQL, we connect to MySQL:


$ mysql -u root -p


And issue following command to modify the encrypted hash string:


UPDATE `DB`.`admin` SET `admin_password` = '5f4dcc3b5aa765d61d8327deb882cf99' WHERE `admin`.`admin_id` = 6;

Remove string line from file on Linux and BSD – Delete entire line with string from file

Tuesday, March 15th, 2016

linux-remove-lines-containing-string-with-sed

If you're already used too using grep -v "sometring" filename to print everything from a file without the certain grepped string output and you want to do the same to delete lines based on strings without having to output the grepped string to a file and then overwritting the original file:
 

grep -v 'whatever' filename > filename1
mv filename1 filename


A much better way to delete an whole line containing a string match from a file is to use sed
sed
should be the tool of choice especially if you're scripting because sed is especially made for such batch edittings.

Here is how to do delete an entire line based on a given string:


sed –in-place '/some string to search and delete/d' myfilename


It might be a good idea to also create backups just to make sure something doesn't get deleted incidently to do use:

sed –in-place=.bak '/some string to search and delete/d' myfilename

If you need to wipe out an exact string from all files within a folder you might use a for loop or perl (some good examples check my previous article here)

In short to use bash's for loop here is how to backup and remove all lines with a string match within all files within a Linux directory:


for f in *.txt; do sed –in-place '/some string/d'
"$f"; done
find -name '*.txt' -exec sed –in-place=.bak '/some
string/d' "{}" ';'


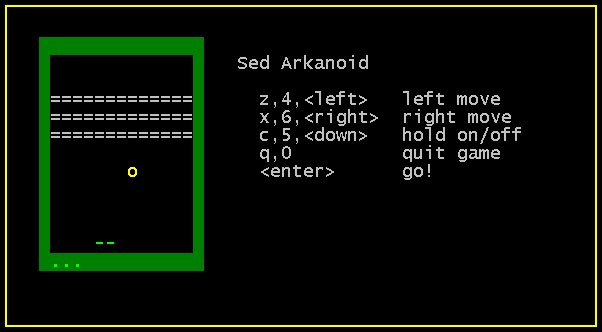
BTW SED is really rich editor and some people got so much into it that there is even a sed written text (console) version of arkanoid 🙂

sed-text-editor-written-arkanoid-game-linux-bsd

If you want to break the ice and get some fun in your boring sysadmin life get sed arkanoid code from here.
I have it installed under pc-freak.net free ASCII Games entertainment service, so if you want to give it a try just login and give a try.

Enjoy 🙂

How to colorize your Mac OS X Terminal – Beautify your Mac OS terminal and proper Page Up / Page Down and Home / End bindings

Thursday, March 19th, 2015


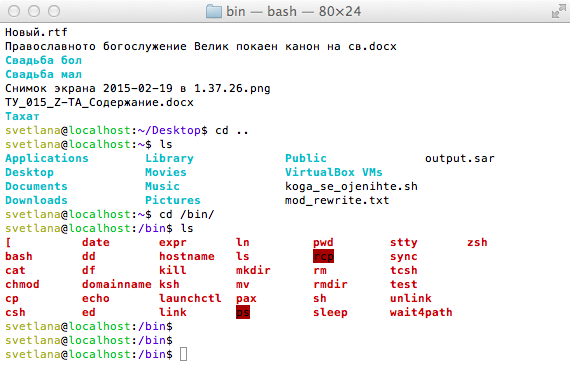
If you're a sysadmin (like me) or a programmer and love working on console most of the time on a recently bought Apple (Mac) PC, probably not like that by default Terminal App lacks nice color highlighting, color highlighly is already standard on Ubuntu / Debian / Mint and many of the streamline Linux distros for years, so it's weird that the shiny Mac lacks that in console 🙂
 I'm not blaming Mac OS developers for shipping by default Mac's console so much greyish as most Mac userbase almost never use terminals, however adding some appearance candy makes my boring digital life much more entertaining.

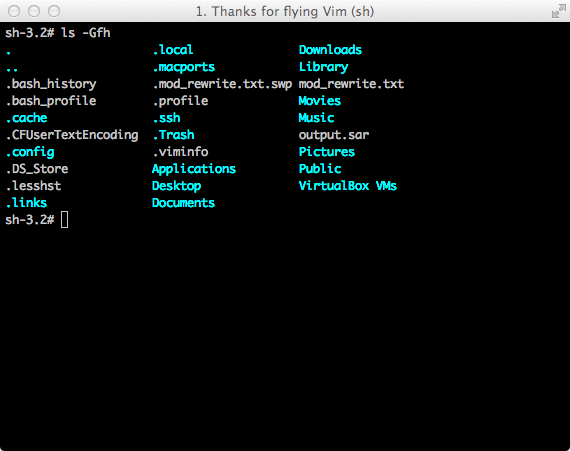
beautify-add-colors-to-Mac-OSX-default-app-program-add-shiny-clolors-improve-mac-os-x-terminal-screenshot.png

Put in your home directory $HOME/.profile or in .bash_profile file below code:


vim ~/.profile
PS1='\[\e[0;33m\]\u\[\e[0m\]@\[\e[0;32m\]\h\[\e[0m\]:\[\e[0;34m\]\w\[\e[0m\]\$ '
export PATH="/opt/local/bin:/opt/local/sbin:$PATH"
export CLICOLOR=1
export LSCOLORS=ExFxBxDxCxegedabagacad
alias ls='ls -GFh'


echo "PS1='\[\e[0;33m\]\u\[\e[0m\]@\[\e[0;32m\]\h\[\e[0m\]:\[\e[0;34m\]\w\[\e[0m\]\$ '
export PATH="/opt/local/bin:/opt/local/sbin:$PATH"" >> ~/.profile

echo "export CLICOLOR=1" >> ~/.profile
echo "export LSCOLORS=ExFxBxDxCxegedabagacad" >> ~/.profile
echo "alias ls='ls -GFh'"  >> ~/.profile


PS1 with above string do colorize Terminal's default “username@hostname:cwd $” following alias makes by default ls (dir) command to have colors enabled (show files and folders in shiny colors like on GNU / Linux). As you see the ls command perameter -G which actually adds colors is the same like in FreeBSD (since very big part of Mac OS is based on BSD UNIX utils), -F makes directories to be marked with / and -h (stands for human readable).
If you want to enable terminal ls colors for all existing Mac computer users open /etc/profile and (uncomment) / include:


export CLICOLOR=1
export LSCOLORS=GxFxCxDxBxegedabagaced


If you want to customize further Mac OS's default Terminal App (add different Colorize Theme), change default shell, change default Title, add Transparency, Change Term Encoding etc.  go and check settings in:
 

Terminal -> Settings


Mac-OS-default-Terminal-shell-settings-interface-change-theme-mountain-lion-screenshot
One really annoying thing about Mac OS X terminal for being users is that by default Command + D which is like CTRL + D on a non-Mac PC sends Split Window command, splitting the screen by two,  if you're a new Mac user like me you will have to get used to Command + Shift + D which is the Mac equivalent of regular PC keyboard CTRL + D. Note that it is not possible to move between Splitted screens but instead the upper part of the split screen is just like a buffer where old output from terminal is put and can be used to keep an eye constantly on old content displayed on terminal …
If you're too lazy to edit files and stuff and just want to receive already well configured Terminal which has many of the features of gnome-terminal / konsole which are not there in  Mac's default Terminal App, just download and use iTerm2 (OS X Terminal Replacement)

iterm2-mac-osx-mounta-lion-10.8.5-best-terminal-application-for-mac-OSX-screenshot

Once over with Terminal customizations if you happen to use VI Improved (VIM) text editor as an editor of choice on Mac create at least following .vimrc in your HOME directory
 

$ vim ~/.vimrc

" End
map <C-E> <End>
imap <C-E> <C-O><End>

" Home
map <C-A> <Home>
map <C-A> <C-O><Home>


This maps Command + A / Command + E to (emulate) act like normal PC Home / End Keyboard key button, to emulate Page Up / Page Down keys on Mac OS keyboard inside Terminal app use Fn (key) + Up / Down arrows.
To make HOME / END buttons answer to Control + A / E on a Terminal App level:


Inside Terminal.app
Open the Preferences window (CMD+,)
Click the Settings tab
Select your current Settings theme, and click on the Keyboard tab
Edit (or Add) the entry for Home
Set Action: to send string to shell:
Set the string to \001 (or press Ctrl+a)
Edit (or Add) the entry for End
Set Action: to send string to shell:
Set the string to \005 (or press Ctrl+e)
Edit (or Add) the entry for Page Up
Set Action: to send string to shell:
Set the string to \033[5~ (copy and paste this in)
Edit (or Add) the entry for Page Down
Set Action: to send string to shell:
Set the string to \033[6~ (copy and paste this in)
Close the settings window.

MySQL: How to check user privileges and allowed hosts to connect with mysql cli

Wednesday, April 2nd, 2014

how-to-check-user-privileges-and-allowed-hosts-to-connect-with-mysql-cli

On a project there are some issues with root admin user unable to access the server from remote host and the most probable reason was there is no access to the server from that host thus it was necessary check mysql root user privilegse and allowed hosts to connect, here SQL query to do it:
 

mysql> select * from `user` where  user like 'root%';
+——————————–+——+——————————————-+————-+————-+————-+————-+————-+———–+————-+—————+————–+———–+————+—————–+————+————+————–+————+———————–+——————+————–+—————–+——————+——————+—————-+———————+——————–+——————+————+————–+———-+————+————-+————–+—————+————-+—————–+———————-+
| Host                           | User | Password                                  | Select_priv | Insert_priv | Update_priv | Delete_priv | Create_priv | Drop_priv | Reload_priv | Shutdown_priv | Process_priv | File_priv | Grant_priv | References_priv | Index_priv | Alter_priv | Show_db_priv | Super_priv | Create_tmp_table_priv | Lock_tables_priv | Execute_priv | Repl_slave_priv | Repl_client_priv | Create_view_priv | Show_view_priv | Create_routine_priv | Alter_routine_priv | Create_user_priv | Event_priv | Trigger_priv | ssl_type | ssl_cipher | x509_issuer | x509_subject | max_questions | max_updates | max_connections | max_user_connections |
+——————————–+——+——————————————-+————-+————-+————-+————-+————-+———–+————-+—————+————–+———–+————+—————–+————+————+————–+————+———————–+——————+————–+—————–+——————+——————+—————-+———————+——————–+——————+————+————–+———-+————+————-+————–+—————+————-+—————–+———————-+
| localhost                      | root | *5A07790DCF43AC89820F93CAF7B03DE3F43A10D9 | Y           | Y           | Y           | Y           | Y           | Y         | Y           | Y             | Y            | Y         | Y          | Y               | Y          | Y          | Y            | Y          | Y                     | Y                | Y            | Y               | Y                | Y                | Y              | Y                   | Y                  | Y                | Y          | Y            |          |            |             |              |             0 |           0 |               0 |                    0 |
| server737                        | root | *5A07790DCF43AC89820F93CAF7B03DE3F43A10D9 | Y           | Y           | Y           | Y           | Y           | Y         | Y           | Y             | Y            | Y         | Y          | Y               | Y          | Y          | Y            | Y          | Y                     | Y                | Y            | Y               | Y                | Y                | Y              | Y                   | Y                  | Y                | Y          | Y            |          |            |             |              |             0 |           0 |               0 |                    0 |
| 127.0.0.1                      | root | *5A07790DCF43AC89820F93CAF7B03DE3F43A10D9 | Y           | Y           | Y           | Y           | Y           | Y         | Y           | Y             | Y            | Y         | Y          | Y               | Y          | Y          | Y            | Y          | Y                     | Y                | Y            | Y               | Y                | Y                | Y              | Y                   | Y                  | Y                | Y          | Y            |          |            |             |              |             0 |           0 |               0 |                    0 |
| server737.server.myhost.net | root | *5A07790DCF43FC89820A93CAF7B03DE3F43A10D9 | Y           | Y           | Y           | Y           | Y           | Y         | Y           | Y             | Y            | Y         | Y          | Y               | Y          | Y          | Y            | Y          | Y                     | Y                | Y            | Y               | Y                | Y                | Y              | Y                   | Y                  | Y                | Y          | Y            |          |            |             |              |             0 |           0 |               0 |                    0 |
| server4586                        | root | *5A07790DCF43AC89820F93CAF7B03DE3F43A10D9 | N           | N           | N           | N           | N           | N         | N           | N             | N            | N         | N          | N               | N          | N          | N            | N          | N                     | N                | N            | N               | N                | N                | N              | N                   | N                  | N                | N          | N            |          |            |             |              |             0 |           0 |               0 |                    0 |
| server4586.myhost.net              | root | *5A07790DCF43AC89820F93CAF7B03DE3F43A10D9 | N           | N           | N           | N           | N           | N         | N           | N             | N            | N         | N          | N               | N          | N          | N            | N          | N                     | N                | N            | N               | N                | N                | N              | N                   | N                  | N                | N          | N            |          |            |             |              |             0 |           0 |               0 |                    0 |
+——————————–+——+——————————————-+————-+————-+————-+————-+————-+———–+————-+—————+————–+———–+————+—————–+————+————+————–+————+———————–+——————+————–+—————–+——————+——————+—————-+———————+——————–+——————+————+————–+———-+————+————-+————–+—————+————-+—————–+———————-+
6 rows in set (0.00 sec)

mysql> exit


Here is query explained:

select * from `user` where  user like 'root%'; query means:

select * – show all
from `user` – from user database
where user like 'root%' – where there is match in user column to any string starting with 'root*',
 

Windows batch read variable – equivalent of Linux read line command

Wednesday, March 12th, 2014

bat-file-icon-windows-read-variable
If you need to do some basic batch scripting sooner or later you will have to insert input from command line to a variable. In Linux this is done with read command, i.e.:
$ echo -n "Type a password for admin:";
$ read line;
$ echo $line;

So here is how to do the same if you need it for a Windows Batch (.BAT) file

C:\\Users\\> Set /p string='What do you want to ask?:'
'What do you want to ask?:'

This will define the string variable, to later print out the variable use:
> echo %string%
variable input output

find text strings recursively in Linux and UNIX – find grep in sub-directories command examples

Tuesday, May 13th, 2014

unix_Linux_recursive_file_search_string_grep
GNU Grep
is equipped with a special option "-r" to grep recursively. Looking for string in a file in a sub-directories tree with the -r option is a piece of cake. You just do:

grep -r 'string' /directory/

or if you want to search recursively non-case sensitive for text

grep -ri 'string' .
 

Another classic GNU grep use (I use almost daily) is whether you want to match all files containing (case insensitive) string  among all files:

grep -rli 'string' directory-name
 

Now if you want to grep whether a string is contained in a file or group of files in directory recursively on some other UNIX like HP-UX or Sun OS / Solaris where there is no GNU grep installed by default here is how to it:

find /directory -exec grep 'searched string' {} dev/null ;

Note that this approach to look for files containing string on UNIX is very slowThus on not too archaic UNIX systems for some better search performance it is better to use xargs;

find . | xargs grep searched-string


A small note to open here is by using xargs there might be weird results when run on filesystems with filenames starting with "-".

Thus comes the classical (ultimate) way to grep for files containing string with find + grep, e.g.

find / -exec grep grepped-string {} dev/null ;

Another way to search a string recursively in files is by using UNIX OS '*' (star) expression:

grep pattern * */* */*/* 2>/dev/null

Talking about recursive directory text search in UNIX, should mention  another good GNU GREP alternative ACK – check it on betterthangrep.com 🙂 . Ack is perfect for programmers who have to dig through large directory trees of code for certain variables, functions, objects etc.


How to remove parameters from URL on Apache (Reverse Proxy) with .htaccess and mod_rewrite – Remove query string from Link

Thursday, December 11th, 2014

Desktop/How_to_remove_parameters_from_URL_on_Apache_with_htaccess_and_SAP
Recently I had a task to delete number of set variables (listed parameters) from URL address on a Apache webserver serving as Reverse Proxy. 
To make it more clear exact task was when customers call the URL https://companywebsite-url.com (all subdomains included) the following URL parameters should always be deleted by the reverse proxy

– ebppMode 
– ebppObjectKey 
– ebppObjectType 
– ebppSystem 
– logSys 

The paramets are part of SAP Biller Direct in a Portal (based on the famous SAP database) which is often deployed as a component of Internet Sales (ISA) / Supplier Relationship Management (SRM) / CRM
, if a user is logged in with his Credentials (KID (Key ID) / Admin KID)  into the system. The EBPP part of most variables stands for (Electronic Bill Presentment and Payment).

 By passing above parameters to Website, modes of use, user accounts switched with which user is logged into the system system logs read and other stuff which can turn to be a severe security hole.
As most of Big Companies, does pass there web traffic via a "transparent" Reverse Proxy,it is a good security practice for SAP Biller Direct (including CRM systems( to wipe out this variables

Here is the mod_rewrite working rules that I used to achieve the delete variable from URL address task:
 

   RewriteEngine On
   RewriteCond %{QUERY_STRING} ^(.*)bebppMode=(w*)b(.*)
   RewriteRule (.*) $1?%1%3

   RewriteCond %{QUERY_STRING} ^(.*)bebppObjectKey=(w*)b(.*)
   RewriteRule (.*) $1?%1%3

   RewriteCond %{QUERY_STRING} ^(.*)bebppObjectType=(w*)b(.*)
   RewriteRule (.*) $1?%1%3

   RewriteCond %{QUERY_STRING} ^(.*)bebppSystem=(w*)b(.*)
   RewriteRule (.*) $1?%1%3

   RewriteCond %{QUERY_STRING} ^(.*)logSys=(w*)b(.*)
   RewriteRule (.*) $1?%1%3

   RewriteCond %{QUERY_STRING} ^(.*)&&(.*)
   RewriteRule (.*) $1?%1%3


P.S. I've implemented above Rewrite rules into all Virtualhosts of Applications (in that case all living in the same httpd.conf on SuSE (SLES) 11 SP1 Enterprise Linux server).
To make changes affective, restarted HTTPD Webserver:
 

/etc/init.d/httpd restart


The sesult is:

https://companywebsite-url.com/start.html?page=start&ebppMode=A&ebppSystem=Test

leads to a internal URL redirection

https://companywebsite-url.com/start.html?page=start

without parameters ebppSystem, ebppMode, ebppObjectKey, ebppSystem,   logSys .

Other mod_rewrite rule that works but is too ugly and when I tried it on Debian Linux host was behaving strange (including in the rewrited URL address the directory address of the PHP twice):

RewriteCond %{QUERY_STRING} (.*)(^|&|%26|%20)ebppMode(=|%3D)([^&]+)(.*)$ [OR]
RewriteCond %{QUERY_STRING} (.*)(^|&|%26|%20)ebppObjectKey(=|%3D)([^&]+)(.*)$ [OR]
RewriteCond %{QUERY_STRING} (.*)(^|&|%26|%20)ebppObjectType(=|%3D)([^&]+)(.*)$ [OR]
RewriteCond %{QUERY_STRING} (.*)(^|&|%26|%20)ebppSystem(=|%3D)([^&]+)(.*)$ [OR]
RewriteCond %{QUERY_STRING} (.*)(^|&|%26|%20)logSys(=|%3D)([^&]+)(.*)$

RewriteRule (.*) /$1?%1%5 [R=307]

 Well anyways, with the first bunch of mod_rewrite rule it works fine.

Thanks God Problem Solved 🙂