Posts Tagged ‘Button’

Reboot Safely a frozen (hanged up) Linux Server with Magic SysRQ Key combination

Monday, June 20th, 2011

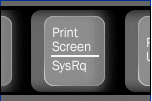
Linux Magic SysRQ Key picture

Being a remote system administrator for many years from now, I’ve experienced many times sudden Linux crashes, mostly caused by system hardware overloads.

This is a common thing especially on busy Web Servers with (Apache/MySQL). Situations like this are really messy and many times in order to bringt the server back online, one has to either physically go to the Data Center or contact the Technical support to request a server reboot.

In this terrible times, data loss might occur if the Server reset button is used to cold reboot it.

Happily in 99% of the cases the data loss which might occur could be prevented with Linux’s kernel capability to support the Magic SysRQ key !

Having the Magic SysRQ key functionality being supported in Linux in past times wasn’t that common, thanksfully these days this has changed andlmost every Linux distrubution supports this handy feature.

Now you might wonder what is the magic with those Magic SysRQ key ?

Let me explain, Magic SysRQ is a kernel level functionality which supports even completely crashed Linux systems with the horrifying:

Kernel Panic
message to be properly shutdown.

Using Magic SysRQ instead of the mostly used indiced cold reboots is really advantageous, as all the opened files by programs on the crashed server which hanged will be properly saved and closed and thus possible data loss caused by the sudden server crash will be minimized.

One other good thing about the Magic SysRQ Key keyboard combination is that initiating the Magic SysRQ could be made blindly (no need for server monitor or display to present any error messages on the failed server).

Now to check if the magic sysrq is enabled on a server one should issue the command:

Here are some Magic SysRQ keyboard combinations one can use in case of server failure:

ALT+SYSRQ+M to dump memory info;
ALT+SYSRQ+P to dump processes states;
ALT+SYSRQ+S to sync disks;
ALT+SYSRQ+U to unmount all mounted filesystems;
ALT+SYSRQ+E to terminate processes;
ALT+SYSRQ+I to kill all processes
ALT+SYSRQ+U to try to unmount once again;
ALT+SYSRQ+B to reboot.

I would skip to explain what each of the keyboard combinations will do as I believe the above description explains it well.

One classics of combinations one might want to issue on a failed Linux server supporting the Magic SysRQ would be:

ALT+SYSRQ+R
ALT+SYSRQ+E
ALT+SYSRQ+I
ALT+SYSRQ+S
ALT+SYSRQ+U
ALT+SYSRQ+B

The ALT+SYSRQ+REISUB key combination is very popular among system administrators.
Also Magic SysRQ is heavily used by kernel developers as it includes many handy debugging options.

If you try the Magic SysRQ key on older servers and you realize it doesn’t react you will have to recompile the linux kernel and enable the CONFIG_MAGIC_SYSRQ kernel time compilation option.

The Magic SysRQ can also be initiated remotely on a properly running server 😉 by initiating:

server:~# echo b > /proc/sysrq-trigger

This command would be useful if you want to just have fun and test that magic sysrq works on your system for sure 😉

To sum it up using the Magic SysRQ will guarantee your locked up, server a Safe Reboot and will hopefully save you a lot of time for backups recovery.
Howto remote access Windows PC which is behind Vivacom ADSL (Commtrend SmartAX MT882 router) modem with VNC server

Wednesday, May 11th, 2011

I had been assigned the not easy task to make a Windows XP Pro which is located behind an ADSL modem to be remotely accessible via VNC

The Windows is connected to the Bulgarian Vivacom Intrnet provider through their ADSL service and hence there is an ADSL router modem which is configured to disallow all inbuond connections by default.

The Windows Pro PC where the VNC server was needed to be accessible did not have a real IP address (e.g. was assigned a virtual IP address by the ADSL modem.

The exact ADSL model used to connect the computer via a lan cable to the internet was Huawei SmartAX MT882

As the device is owned by Vivacom (the ex BTK tele communication company) I did not have any admin user and pass credentials for the ADSL modem to configure the ADSL router to do a port NAT forwarding of port 5800 and 5900 used by the VNC software I installed on the PC (TightVNC)

Nevertheless the missing user and password I decided to check in google if I can find some default passwords that Vivacom ADSL modems are configured to work with

After a few minutes spend in Google I already had found few passwords which were said to work fine with the Vivacom ADSL router.
Here are the passwords I found for the Vivacom ADSL Internet modems:

ZTE ZXDSL 832
username: root
password:GSrootaccess

ZTE ZXDSL 831
username:root
password:GSrootaccess

ZTE
username:root
password:831access

Huawei SmartAX MT882
username:root
password:MT882rootaccess

ZTE ZXDSL-531b
username: root
password:warmWLspot

I tried some old school brute force techniques 😉 by trying all the passwords via the ADSL web interface located on http://192.168.1.1 (I was not sure which model the Vivacom ADSL modem is as on the router there was nothing written concerning the modem type but only the Vivacom logo was present.

After a bit of time I already knew that the ADSL modem model, user and pass was:

Huawei SmartAX MT882
-------------------------------
user: root
pass: MT882rootaccess

My next step was to configure port forwarding for the SmartAX MT882 ADSL in order to achieve from modem’s web administrator I had to follow the menus:

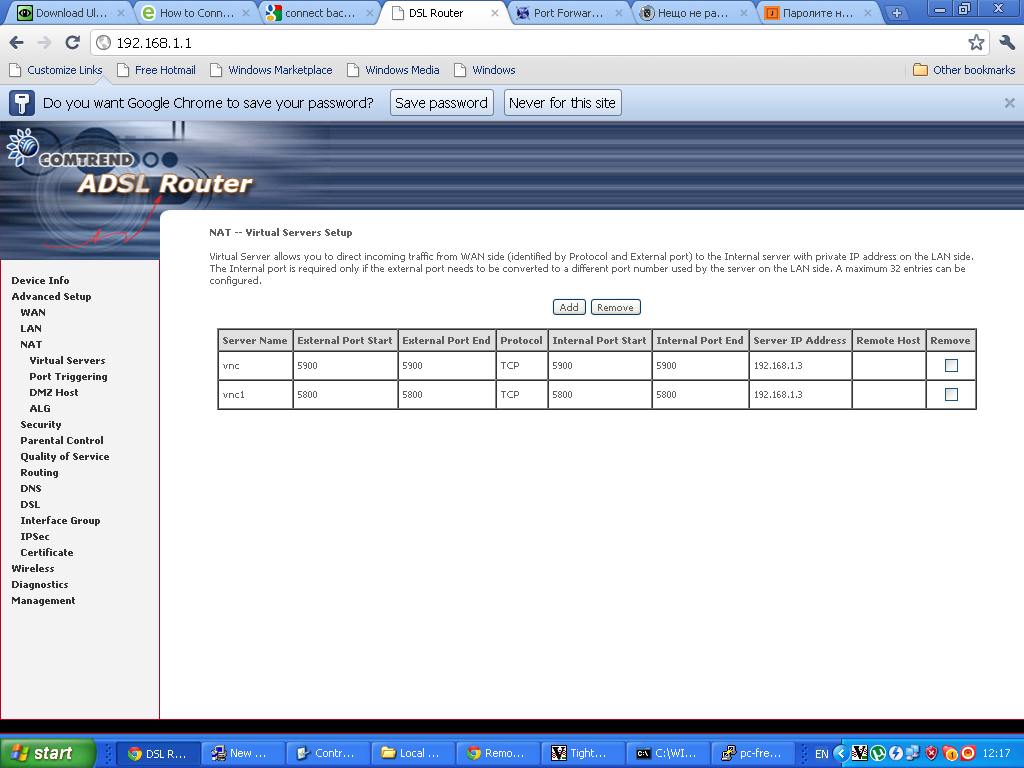
Advanced Setup -> Virtual Servers

ADSL virtual servers menu screen

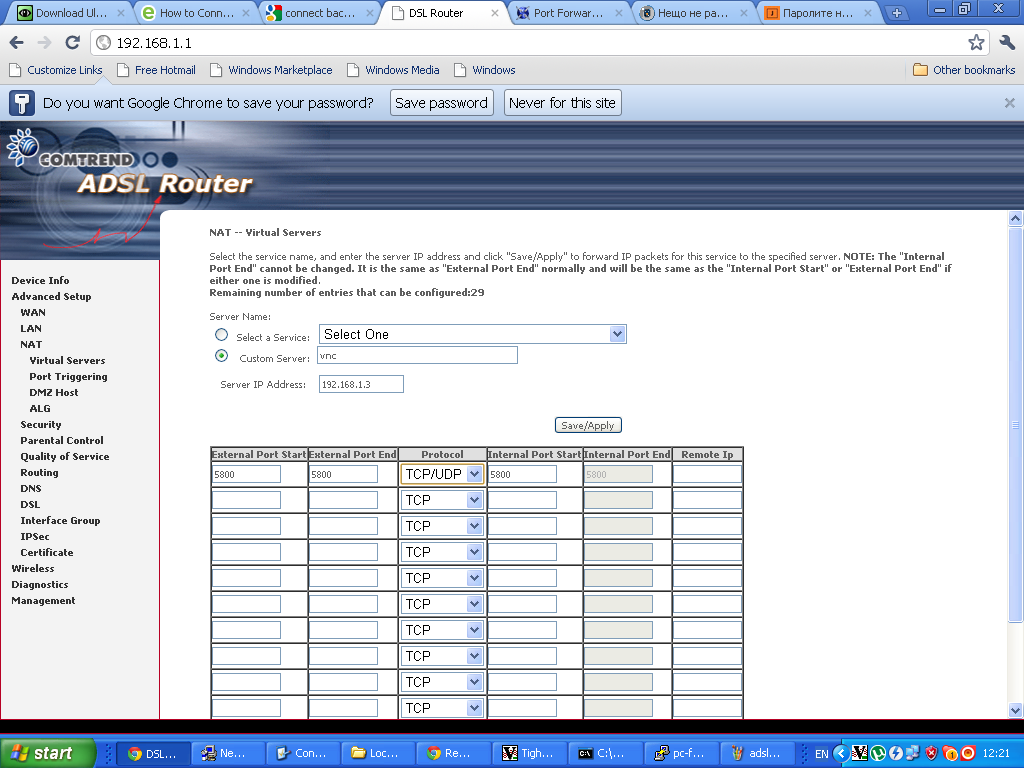
Next in the NAT — Virtual Servers section I pressed the Add button to create new automatic redirection (port forwarding) rule.

Virtual Server port forwarding screenConfiguring ADSL SmartAX MT882 TightVNC NAT port redirection screenTightVNC requires also NAT port redirection rule for port 5900 in order to be able to connect to the VNC server behind the dsl, so analogically I added a Virtual Server NAT rule for port 5900.
Note that the private IP address of the Windows host was assigned by the ADSL router to the ip 192.168.1.3

Further on I expected the adsl port forwarding created rule would now allow me to connect to the VNC server on the pc located behind the dsl firewall, but I was wrong… even though all seemed to be configured just fine in the ADSL router still the port unmbers 5800 and 5900 were showing up as closed during nmap scan as well as a simple telnet connection to port 5800 and 5900 failed to get established.

My logical assumption was that some configured Firewall on the Windows PC is blocking port connections to 5800 and 5900 thus I decided to check the default Windows Firewall settings as a first possible cause for the vnc ports being blocked.

I did that via the Windows menus:

Start -> Settings -> Control Panel -> Windows Firewall

However weirly enought it seemed the Windows Firewall was disabled e.g. the Off (not recommended) option was set for the firewall.

A bunch of other lookup over all the running system and services on the windows hosts I have found the PC is protected by NOD32 Antivirus – Personal Firewall

The default behaviour of NOD32’s Persnal firewall was extremely restrictive and I found it’s causing a port filter of the 5800 and 5900 vnc connection ports.

To solve the filtering nod32 did I had to open NOD32 and navigate to the following menus:

Setup -> Personal Firewall -> Configure rules and Zones

In the Zone and rule setup menu config window I had to further press on:
New button to add new personal firewall rule.

In the New rule: menu I filled in the following info:
In the General tab:

Name: vnc
Direction: Both
Action: Allow

In the tab Local

I pressed over the Add Port

Number: 5800

in the Remote tab once again I had to fill in:
Number: 5800

Then to confirm settings just pressed OK

Next on I added in the same manner an allow rule for port 5900.

After this settings I restarted the NOD32 firewall to make sure the new settings takes place by pressing over the Personal firewall button Disable filtering: allow all traffic and right after enabling the firewall once again.

Now remote tightvnc connections to the Windows XP Pro pc works like a charm once again, Thanks God 😉

Best software available today for Linux video Desktop capturing on Debian

Tuesday, April 19th, 2011

I’ve been experimenting since some time in order to understand better what is the current situation with Video Desktop Capturing Software available today for Linux and FreeBSD.

My previous investigations has led me to write an article about xvidcap called How to make Video from your Linux Desktop with xvidcap

Though xvidcap works pretty well, it is currently uncapable of capturing the audio stream of a Linux Desktop env and hence part of the interactivity of the videos is missing when used.

A bit of further investigation on the topic has pointed me to 3 free software programs which are capable to record Desktop environment on Linux with sound embedded

The interesting screen video capturing Desktop tools I’ve found are:

1. recordMyDesktop
2. Istanbul
and
3. vnc2swf

Installing them on a Debian based distribution is pleasable, as there are installable debian packages of each one which I installed easily with apt:

debian:~# apt-get install istanbul recordmydesktop gtk-recordmydesktop vnc2swf

RecordMyDesktop‘s package contains a command line little tool which when started directly starts capturing video and audio of the Linux Desktop. After a Ctrl+C is pressed the program quits, saves and encodes the video in ogg-encapsulated theora-vorbis file format.

Here is the output I got in saving a sample file by launching recordmydesktop without any arguments:

hipo@debian:~/Desktop$ recordmydesktop
Initial recording window is set to:
X:0 Y:0 Width:1024 Height:768
Adjusted recording window is set to:
X:0 Y:0 Width:1024 Height:768
Your window manager appears to be Metacity

Initializing…
Buffer size adjusted to 4096 from 4096 frames.
Opened PCM device hw:0,0
Recording on device hw:0,0 is set to:
2 channels at 22050Hz
Capturing!
Broken pipe: Overrun occurred.
^C
*********************************************

Cached 5 MB, from 207 MB that were received.
Average cache compression ratio: 97.3 %

*********************************************
Saved 69 frames in a total of 69 requests
Shutting down..Broken pipe: Overrun occurred.

STATE:ENCODING
Encoding started!
This may take several minutes.
Pressing Ctrl-C will cancel the procedure (resuming will not be possible, but
any portion of the video, which is already encoded won’t be deleted).
Please wait…
Output file: out.ogv
[100%]
Encoding finished!
Wait a moment please…

Done.
Written 692529 bytes
(635547 of which were video data and 56982 audio data)

Cleanning up cache…
Done!!!
Goodbye!

The captured file as I you see in the above output is saved in file out.ogv

RecordMyDesktop has also a GUI interface (written in Python) called gtk-recordmydesktop

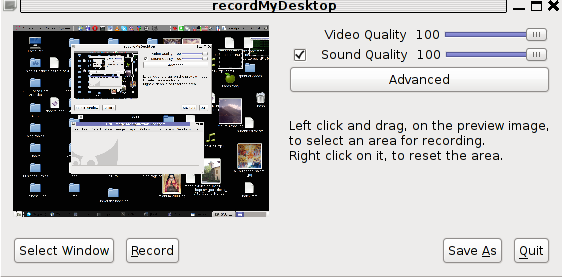
Below you see a screenshot of the GUI gtk-recordmydesktop:

RecordMyDesktop GTK interface entry screen

gtk-recordmydesktop is a super-easy to use as you already see in the picture, you can either configure it with Advanced button or use Save As button to select where you want the Desktop captured video and audio to be stored.

In Debian Squeeze 6.0, the Advanced GUI button interface button is not working but that’s not such an issue, as the rest of the buttons works fine.
After the recordmydesktop‘s Record button is pressed it will start capturing from your Desktop and the window seen in the above screenshot will disappear/hide in the system tray:

recordmydesktop recording minimized in system tray
When you press over the white little square in the system tray the screen capturing will be interrupted and a window will pop-up informing you that the captured video and audio is being encoded, here is another screenshot of recordmydesktop encoding a saved Desktop video stream:

recordmydesktop saving captured desktop video

After the final .ogv file is encoded and saved to further transfer it into (.flv) I used ffmpeg;

debian:~# ffmpeg -i test.ogv test.flv
...

Now let’s evaluate a bit on the the final results, the produced test.ogv‘s synchronization between sound and video was not good as the sound was starting earlier than the video and therefore even though recordmydesktop used to be highly praised on the net, the proggie developers still needs to do some bug fixing
Further on, I continued and (gave the other Desktop screen capturer) Istanbul a try hoping that at least with it the video and audio of my Linux desktop will be properly captured. But guess what, the results with Istanbul was even more unsatisfactory as the produced videos and sounds, were slow and a lot of frames from the screens were missing completely.
Moreover the sound which was supposed to accompany the video was completely 🙁

Thus I will skip on talking about Istanbul as in my view, this piece of software is far away from being production ready.

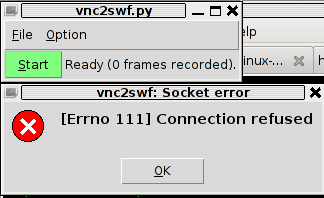
I also tested vnc2swf , launched it by: pressing alt+f2 and typing in vnc2swf in GNOME’s run application prompt, just to be surprised by an error …:

vnc2swf error no 111 Connection refused

The reason for this error is caused by the xserver (Xorg) port 5900 is being closed by default on Debian

However this error is easily solvable, by making the Xserver to listen to a the port 5900, to make the Xorg server on Debian to listen on this port you need to edit the file:

/etc/X11/xinit/xserverrc

and change inside it:

exec /usr/bin/X -nolisten tcp "$@"

with:

exec /usr/bin/X "$@"

and either reboot your Linux or restart only the Xorg server by pressing Ctrl+Alt+BackSpace

Now let me conclude, the results from my desktop video screen capturing experiments prooved that vnc2swf is superior (as it is capable of properly saving a movie with sound and video from a Linux Desktop). It appears this soft is actually the best one you can use to make a video of your Linux desktop.

Sadly my testing has proven that Linux is still lacking behind Windows and Mac in even doing the most simple tasks …
Let’s hope that situation will get better soon and Gnome or KDE developers will soon provide us with better software capable to save properly a video and audio captured from the Linux Desktop.

How to make Video from your Linux Desktop with xvidcap / Capture desktop output in a video on Linux

Wednesday, April 6th, 2011

If you have wondered on how to create videos aiming at manuals on how you do certain stuff on Linux, let’s say related to programming or system administration.
Then you should definitely check out

xvidcap

Below is the package description as taken from apt-cache show xvidcap

A screen capture enabling you to capture videos off your X-Window desktop
for illustration or documentation purposes. It is intended to be a
standards-based alternative to tools like Lotus ScreenCam.

On Debian based Linux systems (e.g. Debian Ubuntu) xvidcap is available straight from the package repositories. To install and test it you can straight issue:

linux:~# apt-get install xvidcap
...

To start using xvidcap, either by starting it with alt+f2 in gnome or straight launch it from the applications menu via:

Applications -> Sound & Video -> xvidcap

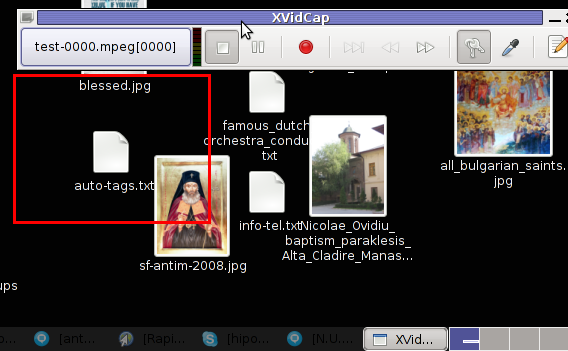
Here is how the xvidcap program looks like right after you start it;
xvidcap screenshot main menu

As you see in the screenshot xvidcap’s menu interface is extraordinary simple.

As you see it only has a stop, pause, rec, back and forward buttons, a capture selector and movie editor.
Pitily xvidcap does not support music capturing, but at least for me that’s not such an issue.

If you click over the field test-0000.mpeg[0000] with your last mouse button, you will notice a drop down menu with an option for preferences of xvidcap.

Take the time to play with the preferences, since there are quite a few of them.

The most important preference that you might like to straightly adjust in my view is in the:

Preferences -> Multi-Frame tab -> File Name:

The default file that xvidcap uses to store it’s content files as you will see in the preferences is utest-%04d.mpeg

If you want to change the type of the output file format to let’s say flv change the File Name: value to utest-%04d.flv
Next time you record with xvidcap, you will have the file stored in flv format.

The red lines which you see in the above screenshot is the capture area, you will have to also tune the screen capture area before you can proceed with recording a video from your desktop.

The way to capture your Desktop in fullscreen is a bit unusual, you first need to mark up all your visible Desktop and before that you will have to select from xvidcap’s preferences from:

Preferences -> General -> Minimize to System Tray

By selecting this option each time you press the xvidcap’s record button the xvidcap’s controller interface will be minimized to tray and capturing the video of the region previously selected with the capture selector will start up.

Upgrade Ubuntu from 9.04 to latest Ubuntu

Friday, April 1st, 2011

Updating a version of Ubuntu version 9.04 to the latest stable release is actually very simple and BORING.

It takes some long time and a lot of clicking, however eventually, the upgrade to the latest Ubuntu will be at hand.
The whole upgrade philosophy to Upgrade an outdated Ubuntu distribution to the newest supported stable Ubuntu release is in a consequentual number of release to release upgrades.

Let’s say you’re running Ubuntu 9.04 (Jaunty Jackalope and) you want to upgrade to Ubuntu 11.10 TLS
then you will have to to the following step by step upgrades;

Upgrade Ubuntu from;

  • Ubuntu 9.04 to Ubuntu 9.10
  • Ubuntu 9.10 to Ubuntu 10.04
  • Ubuntu 10.04 to Ubuntu 10.10
  • Ubuntu 10.10 to Ubuntu 11.04
  • Ubuntu 11.04 to Ubuntu 11.11

Now let’s start upgrading …
1. Upgrade Ubuntu 9.04 to Ubuntu 9.10

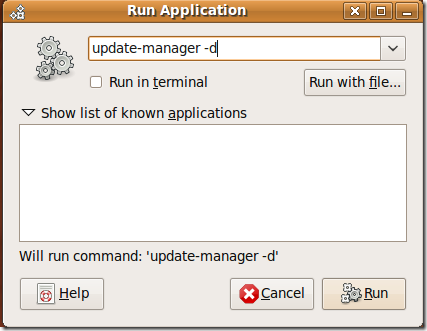
Press Alt+F2 and type:

update-manager -d

Update Manager Ubuntu

Press the Run Button afterwards to launch the command.
You will be prompted for your Linux administrator password, so type it in.

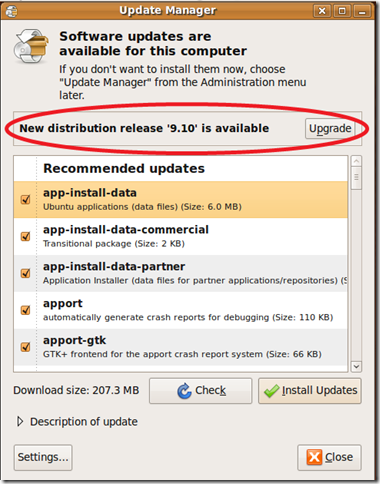
Next the command will launch the Update Manager . The update manager will show you all the available updates.

The Update Manager will show you the update options, it should say something like:

New distribution release ‘9.10’ is available

update manager ubuntu 9.10

Click Over the Update button and wait.

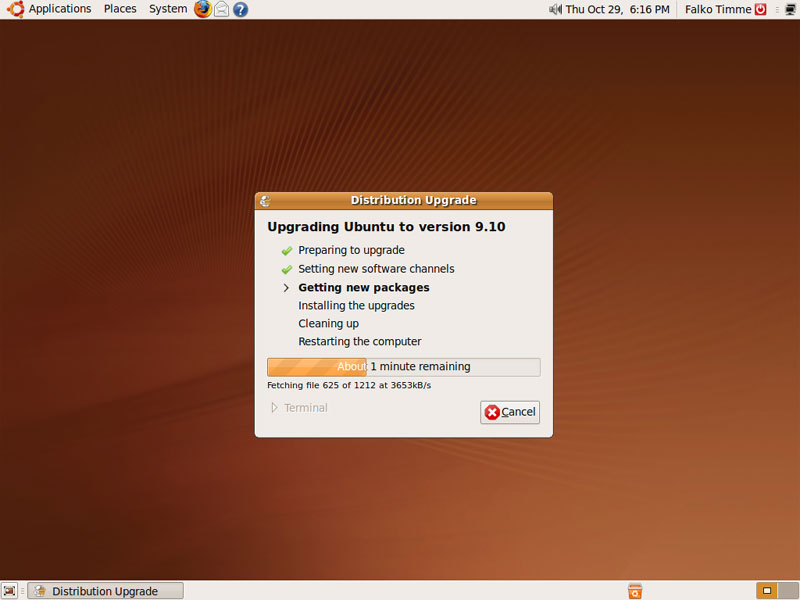
The Ubuntu update will went by by few steps:

1. Preparing Updates
2. Setting new software channels
3. Getting new packages
4. Installing the updates
5. Cleaning up
6. Restarting the computer

You will see further on a screen reading “Support for some applications ended”, on that screen simply press the Close button.

Further on you will be prompted with a windows reading:

Do you want to start the upgrade? You have to click over Start Upgrade button to finally begin with the upgrade process.
Getting new packages screen Ubuntu Update procedure

Now a prompt window will appearing asking you to reboot the system, when the prompt appears click over:

Restart Now

After the upgrade the new release of Ubuntu 9.10 will start booting up, and you will see a screen similar to the picture below:

Ubuntu 9.10 boot screen

Now as you have updated from Ubuntu 9.04 next step is to upgrade to Ubuntu 10.04

Now guess what you will have to upgrade the trivial quick update procedures once again.

Once again launch the Ubuntu Update Manager

System -> Administration -> Update Manager Now as you have updated from Ubuntu 9.04 next step is to upgrade to Ubuntu 10.04 (LTS – Lucid Lynx)

Now guess what you will have to upgrade the trivial quick update procedures once again.

Once again launch the Ubuntu Update Manager

System -> Administration -> Update Manager

Now follow the above described procedure with update-manager -d

After repeating the few trivial steps you will have Ubuntu 10.04 LTS on your Desktop

Further on complete the trivial update steps with the update-manager to update to Ubuntu release 10.10 (Maverick Meerkat).

After having succesfully upgraded to version 10.10, now repeat the boring update procedures described in the beginning of the article to update to Ubuntu 11.04

Now as you should be with Ubuntu 11.04, upgrade once again with update-manager to Ubuntu 11.04 (Natty Narwhal).

And ast a last, once again with the update-manager -d update following the instructions to Ubuntu 11.10.

I’m pretty sure this is one of my most boring articles ever …
It’s interesting fact that I learn once from a friend of mine about the Ubuntu distribution. The Ubuntu distribution has it’s versioning based on months and year whether a version is out for instance Ubuntu 9.04 means this Ubuntu release is released on (Month 04 (April), year 2009)), Ubuntu 11.10 Means this distribution is released in (year 2011, month 10 (October)).