Posts Tagged ‘Button’
Monday, February 13th, 2012 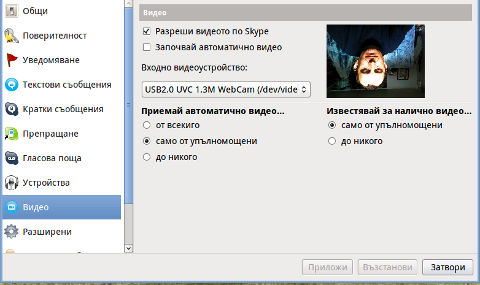
Does your camera show video correctly in cheese but shows captured video upside-down (inverted) in skype ?
This is an issue a friend of mine experienced on his Asus K51AC-SX037D laptop on both Ubuntu and Debian Linux.
As you can see in the picture above it is funny as with this bug the person looks like a batman 😉
As the webcam upside-down issue was present on both latest Ubuntu 11.10 and latest stable Debian Squeeze 6.02, my guess was other GNU / Linux rpm based distro like Fedora might have applied a fix to this weird Skype inverted video (bat human like) issue.
Unfortunately testing the webcam with Skype on latest both Fedora 16 and Linux Mint 12 appeared to produce the same webcam bug.
A bit of research for the issue online and try outs of a number of suggested methods to resolve the issue led finally to a work around, thanks to this post
Here is few steps to follow to make the webcam show video like it should:
1. Install libv4l-0 package
root@linux:~# apt-get --yes install libv4-0

...
Onwards to start skype directly from terminal and test the camera type:
hipo@linux:~$ LD_PRELOAD=/usr/lib/libv4l/v4l1compat.so skype
This is the work around for 32 bit Linux install, most people however will probably have installed 64 bit Linux, for 64bit Linux installs the above command should be little different:
hipo@linux:~$ LD_PRELOAD=/usr/lib32/libv4l/v4l1compat.so skype
Once skype is launched test the camera and see if the camera capture is now uninverted, through menus:
S -> Options -> Video Devices -> Test
2. Create a skype Wrapper script Launcher
To make skype launch everytime with exported shell variable:
LD_PRELOAD=/usr/lib32/libv4l/v4l1compat.so
A new skype wrapper bash shell script should be created in /usr/local/bin/skype , the file should contain:
#!/bin/sh

LD_PRELOAD=/usr/lib32/libv4l/v4l1compat.so

/usr/bin/skype
To create the script with echo in a root terminal issue;
root@linux:~# echo '#!/bin/sh' >> /usr/local/bin/skype

root@linux:~# echo 'LD_PRELOAD=/usr/lib32/libv4l/v4l1compat.so' >> /usr/local/bin/skype

root@linux:~# echo '/usr/bin/skype' >> /usr/local/bin/skype

root@linux:~# chmod +x /usr/local/bin/skype
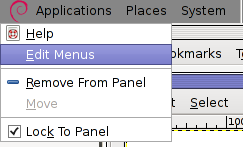
3. Edit the Skype gnome menu to substitute /usr/bin/skype Skype Launcher with /usr/local/bin/skype
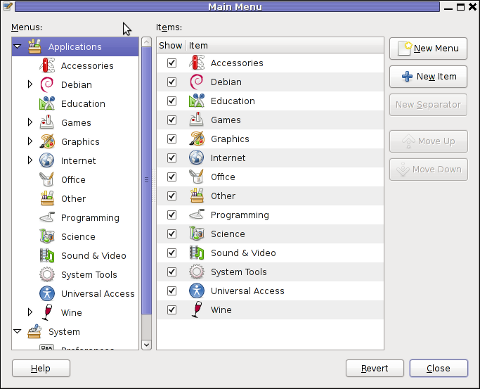
Gnome 2 has a handy menu launcher, allowing to edit and add new menus and submenus (menus and items) to the Application menu, to launch the editor one has to click over Applications with last mouse button (right button) and choose Edit Menus
The menu editor like the one in the below screenshot will appear:
In the preceeding Launcher properties window, Command: skype has to be substituted with:
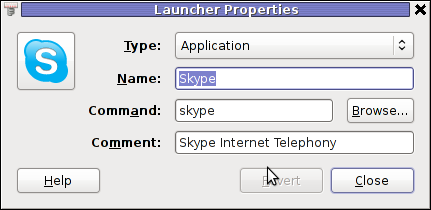
Command: /usr/local/bin/skype
For console freaks who doesn't want to bother in editting Skype Launcher via GUI /usr/share/applications/skype.desktop file can be editted in terminal. Inside skype.desktop substitute:
Exec=skype
with
Exec=/usr/local/bin/skype
As one can imagine the upside-down video image in Skype is not a problem because of Linux, but rather another bug in Skype (non-free) software program.
By the way everyone, who is using his computer with Free Software operating system FreeBSD, Linux etc. knows pretty well by experience, that Skype is a very problematic software; It is often a cause for system unexpected increased system loads, problems with (microphone not capturing), camera issues, issues with pulseaudio, problem with audio playbacks … Besides the long list of bugs there are unexpected display bugs in skype tray icon, bugs in skype messanger windows and at some rare occasions the program completely hangs and had to be killed with kill command and re-launched again.
Another worrying fact is Skype's versions available for GNU / Linux and BSD is completely out of date with its "competitor" operating systems MS Windows, MacOS X etc.
For people like me and my friend who want to use free operating system the latest available skype version is not even stable … current version fod download from skype's website is (Skype 2.2Beta)!
On FreeBSD the skype situation is even worser, freebsd have only option to run Skype ver 1.3 or v. 2.0 at best, as far as I know skype 2.2 and 2.2beta is not there.
Just as matter of comparison the latest Skype version on Windows is 5.x. Windows release is ages ahead its Linux and BSD ver. From a functional point of view the difference between Linux's 2.x and Windows 5.x is not that much different, what makes difference is is the amount of bugs which Linux and BSD skype versions contain…
Skype was about 6 months ago bought by Microsoft, therefore the prognosis for Skype Linux support in future is probably even darker. Microsoft will not probably bother to release new version of Skype for their competitor free as in freedom OSes.
I would like to thank my friend and brother in Christ Stelian for supplying me with the Skype screenshots, as well as for being kind to share how he fixed his camera with me.
Tags: Asus, Auto, bash shell script, batman, BSD, Button, camera capture, camera show, camera type, debian gnu, Desktop, distro, Draft, exec, fedora, file, gnu linux, gt options, hipo, laptop, launcher, ld, linux rpm, menu, Microsoft, person, PRELOAD, quot, root, root linux, rpm, Shell, show, Skype, software, squeeze, terminal, test, Ubuntu, ubuntu linux, video, video devices, web camera, webcam, work, wrapper script
Posted in Linux, Linux and FreeBSD Desktop, Skype on Linux | 29 Comments »
Monday, January 16th, 2012 I needed to set TeamViewer to autorun, each and every startup on one Xubuntu Linux
Xubuntu is running by default with Xfce 4 . Xfce is a sort of a very liteweight GNOME like graphical environment.
In Gnome the way that is through invoking the gnome-session-manager .
In Xfce the command is almost analogous doing changes is done by running:
user@xubuntu:~$ xfce4-session-manager
Further on simply use the Add button to add applications to load each time user (opens xfce session) / logs in.
Cheers 😉
Tags: add button, Auto, Autorun, Button, Cheers, command, default, Draft, environment, Gnome, graphical environment, Linux, LinuxXubuntu, liteweight, session, session logs, session manager, sort, startup, TeamViewer, time, time user, use, User, way, XFCE, Xubuntu
Posted in Linux, Linux and FreeBSD Desktop | No Comments »
Monday, January 16th, 2012 My sister, experience some programs running with wine (Windows Emulator) to crash on her Ubuntu 11.10.
As she is quite new with Linux, she has no idea about the existence of CTRL ALT BACKSPACE key combination to restart a hanged GNOME, KDE by directly killing the Xorg server.
I felt obliged to explain her it is better to use CTRL ALT BACKSPACE X kill switch instead of restarting the whole Linux kernel (which basiclly is working) and that it is just the display keeping blacnk.
Pressing the would kill Xorg and therefore all applicatins previously running on top of it will die. In Ubuntu Xorg is configured to run via gdm, so once killed it will automatically reload the GDM (Gnome Display Manager).
I was about to explain her that its better she use CTRL+ALT+BACKSPACE instead of restarting the whole system but suddenly I realized this is not working.
In UBUNTU 11.10 and I guess in all UBUNTU's after 9.04 CTRL ALT BACKSPACE is substituted with the key switch combination ALT PRINTSCREEN K, I've explained her about that.
This change is actually a change implied by most Linux distributions nowdas and is some kind of change in Xorg newer versions…
To enable back the CTRL + ALT + BACKSPACE , I've issued cmd:
stanimira@ubuntu~:$ echo' setxkbmap -option terminate:ctrl_alt_bksp' >> ~/.xinitrc
An alternative way to set setxkbmap -option terminate:ctrl_alt_bksp to run on Ubuntu user login is by setting it as a startup application using;
stanimira@ubuntu:~$ gnome-session-properties
Press the Add button and type in the box to appear;
Name: setxkbmap

Command: setxkbmap -option terminate:ctrl_alt_bksp

Comment: setxkbmap
Reverting the Xserver kill switch back to the classical Ctrl+Alt+Backspace should also be running fine on older Ubuntu Linuces – 11.04, 10.10, 10.04 etc.
Tags: add button, Alt, Auto, backspace, Button, change, Comment, Ctrl, Display, Draft, existence, GDM, Gnome, kde, key switch, kill, kill switch, Linux, linux kernel, login, most linux distributions, ocelot, option, Press, printscreen, Reverting, session properties, setxkbmapCommand, startup, startup application, switch combination, type, Ubuntu, wine, wine windows, xinitrcAn, Xorg, xserver
Posted in Linux, Linux and FreeBSD Desktop | No Comments »
Thursday, December 15th, 2011 
I’m writting some game reviews and movie reviews, every now and then and therefore being able to capture a fullscreen running program like let’s say mplayer or vlc or some full screen running game is something I really need.
The usual PrtScr button which normally works to prepare screenshots in GNOME or KDE, however is not working if the root window handler is being passed to a different program than the Window Manager and pressing it while inside of many older programs or applicationsdoes not produce a print screen of the current screen.
Anyways I found a hack to this using the good old ImageMagick – import command line screenshotting program.
To take a screenshot of a certain program run from gnome-terminal or konsole using import cmd its possible to use a quick one liner which will take a snapshot of the root Window the started program will use.
Let’s say you want to make a screenshot of the entry screen of the FreeDOOM (DooM 3d shooter classical game arcade free Software Alternative).
Launch gnome-terminal or konsole , xterm , depending on the GUI environment you use and issue the commands:
debian:~$ ( sleep 15; import -window root my_desired_screenshot_name.png ) &

debian:~$ freedoom
The first command will launch import after a sleep of 15 secs and therefore will screenshot the active window which will be at focus after 15 seconds, where the & sign will background it and the second one will launch FreeDooM . You will have to wait for a certain secs and switch to the exact screen you will want to screenshot.
If you want to screenshot some game scene that will appear in 20 minutes change above sleep 15 cmd to be to something like sleep 180
That method can be used for screenshotting any other program running on fullscreen, the method is a bit inflexible as you will have to adjust a timing but it works fine 😉
Tags: bit, Button, classical game, cmd, Desktop, desktop environment, exact screen, first command, FreeDooM, fullscreen, game arcade, game reviews, game scene, Gnome, GNU, gnu linux, gui environment, how to take a screenshot, ImageMagick, import, import command, import window, launch, Linux, mplayer, PrtScr, root, root window, running game, screen, screenshot, shooter, sign, sleep, software, something, timing, VLC, xterm
Posted in FreeBSD, Linux, Linux and FreeBSD Desktop, Various | No Comments »
Tuesday, December 13th, 2011 
Yesterday, one (girl)friend of mine brought me one Packard Bell notebook, which had a 2 years old Windows installed on it.
As one can imagine Windows XP on it is full of Spyware and Viruses. Besides the software problems the notebook had some hardware problems with the CD / DVD which is not reading CD / DVDs at all.
Initially I thought, the CD unable to read problems are caused by the infected Windows, however even restarting the PC with a bootable Hirens BootCD and a Whoppix liveCD and trying to boot from it failed this convinced me its a CD / DVD combo drive hardware failure.
By the way, I’ve just recently found out about Nixory – Is a nice Free Software Open Source AntiSpyware tool for Firefox, IE and Chrome.
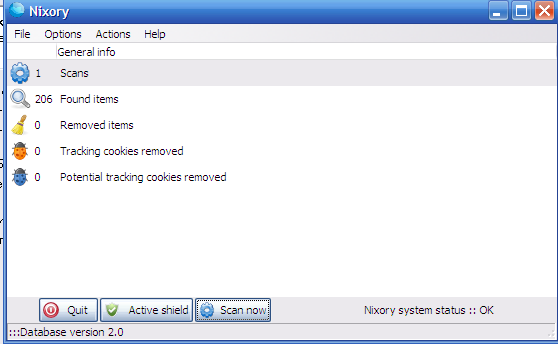
I hope it will get a sharp development and soon, when some friend asks me to fix his stupid non free-Windows PC, I would not have to use a trial version of Malware Bytes but directly use only Nixory
Anyways after using Nixory, MalwareBytes and Avira and thoroughfully scanned the system in Safe Mode and found and deleted some 15 Spyware / Viruses and tampered a bit with the Wireless Driver settings all the notebook devices started working fine again.
The wireless had also one really odd problem on this Packard Bell – Hera GL, even though the notebook wireless antenna was capable of detecting all the wireless networks it couldn’t properly connect to any of it but failed to get proper IP addresses.
Partially the unable to grab an IP via wireless router dhcp server got fixed by using the Wireless restart Button (located on the Notebook corpus).
However even after cleaning up the Virus and Spyware the Wireless Networks connectivity problems on this Packard Bell continued, until I changed also few settings in the Control PanelI never thought Viruses / Spyware infected can have some bad impact on Wireless Card and CD drive make them unsusable though they showed like working correctly in Windows Control Panel -> System ??
In the meantime I reinstalled the Wireless Driver for the notebook, the Wireless card on the notebook was showing up itself under the name of Ralink 802.11n Wireless Lan Card in Windows Device Manager
After re-installing the wireless driver I had to also change few settings for the Wireless Network Connection using the menus Properties -> Configure -> Extended; therein everywhere for each Value I make it be Enable and for Power Saving Mode , I’ve choose the Value option of CAM
After a system reboot, everything started working finally fine. One last thing to add is that before I fixed the Ralink wireless to work under Windows, I tried to use a Bootable Linux LiveCD but even there the wireless was failing to connect to the wireless networks (maybe this shit wireless device has some issues with its Linux drivers).
Tags: antenna, AntiSpyware, Avira, bell notebook, bootcd, Button, CD-drive, Chrome, combo drive, connectivity problems, dhcp server, drive, drive hardware, Driver, driver settings, Free, hardware failure, hardware problems, hera, laptop, livecd, Malware, Mode, non, odd problem, old windows, Open, Packard, packard bell, Safe, software, software open source, software problems, Spyware, tool, value, Viruses, wireless antenna, wireless router
Posted in System Administration, Windows | No Comments »
Wednesday, August 24th, 2011 While I was deploying a new Nagios install to Monitor some Windows hosts I’ve came across the following error in Nagios’s web interface:
Sorry, but Nagios is currently not checking for external commands, so your command will not be committed!

Read the documentation for information on how to enable external commands...
This error is caused by an option configuration for /etc/nagios/nrpe.cfg (part of the nrpe-nagios-server Debian package.
The config variable in nrpe.cfg causing the error is check_external_command=0 , the fix comes to changing the variable to:
check_external_command=1
As well as restart the /etc/init.d/nagios-nrpe-server and /etc/init.d/nagios3 services:
debian:~# /etc/init.d/nagios3 restart

...

debian:~# /etc/init.d/nagios-nrpe-server

...
This changes has work out the error Sorry, but Nagios is currently not checking for external commands, so your command will not be committed! , however immediately after another kind of error appared in Nagios web interface when I tried to use the send Nagios commands button. The error was:
Error: Could not stat() command file '/var/lib/nagios3/rw/nagios.cmd'!
This error is due to a deb package, which seems to be affecting the current deb versions of Nagios shipped with Debian 6 Squeeze stable, as well as the Latest Ubuntu release 11.04.
Thanksfully there is a work around to the problem I found online, to fix it up I had to execute the commands:
debian:~# /etc/init.d/nagios3 stop debian:~# dpkg-statoverride --update --add nagios www-data 2710 /var/lib/nagios3/rw

debian:~# dpkg-statoverride --update --add nagios nagios 751 /var/lib/nagios3

debian:~# /etc/init.d/nagios3 start
And hooray Thanks God the error is gone 😉
Tags: Button, check, checking, command, config, deb, deb package, dpkg, ERROR, file, god, hooray, information, kind, lib, monitor, nagios, online, option, package, squeeze, Stable, stat, Thanksfully, Ubuntu, var, web interface, work, www data
Posted in Linux, System Administration | 8 Comments »
Tuesday, August 23rd, 2011 I’ve been working on a servers running Windows 2003 and Windows 2008 these days.
As I wanted to be more flexible on what I can do from the command line I decided to install GNUwin (provides port of GNU tools), most of which are common part of any Linux distribution).
Having most of the command line flexibility on a Windows server is a great thing, so I would strongly recommend GNUWin to any Windows server adminsitrator out there.
Actually it’s a wonderful thing that most of the popular Linux tools can easily be installed and used on Windows for more check GnuWin32 on sourceforge
One of the reasons I installed Gnuwin was my intention to use the good old Linux tail command to keep an eye interactive on the IIS server access log files, which by the way for IIS webserver are stored by default in C:WindowsSystem32LogFilesW3SVC1*.log
I’ve managed to install the GNUWin following the install instructions, not with too much difficulties. The install takes a bit of time, cause many packs containing different parts of the GNUWin has to be fetched.
To install I downloaded the GNUWin installer available from GNUWin32’s website and instructed to extracted the files into C:Program FilesGnuwin
Then I followed the install instructions suggestions, e.g.:
C:> cd c:Program FilesGnuWin

C:Program FilesGnuWin> download.bat

...

C:Program FilesGnuWin> install c:gnuwin32

...
After the installation was succesfully completed on the two Windows machines, both of which by the way are running 64 bit Windows, it was necessery to add the newly installed GNU .exe files to my regular cmd.exe PATH variable in order to be able to access the sed, tail and the rest of the gnuwin32 command line tools.
In order to add C:GnuWin32bin directory to the windows defined Command line Path , I had to do the following:
a. Select (Properties) for My Computer
Start (button) -> My Computer (choose properties)
b. Select the My Computer Advanced (tab)
Then, from the My Computer pane press on Advanced tab
c. Next press on Environment Variables
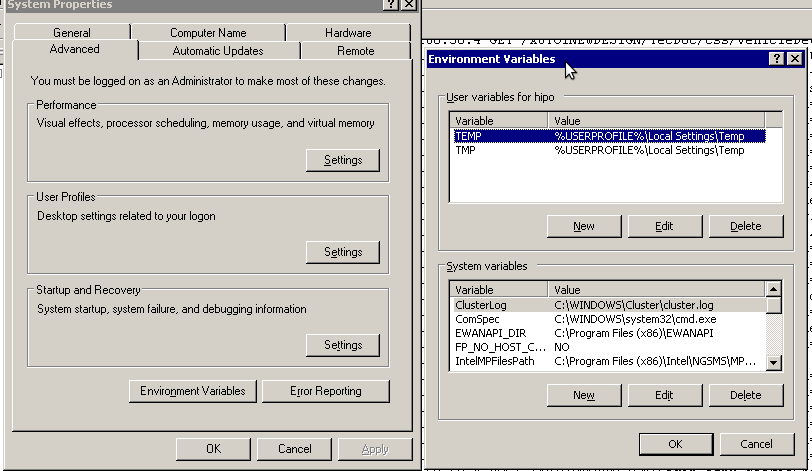
You see in above’s screenshot the Environment Variables config dialog, to add the new path location in System Variables sectiom, between the list I had to add the c:GNUwin32bin path locatiion. To find I pressed on Edit button scrolled down to find the Variable and hence added at the end of the long list defined paths.
After adding in GNUwin, the Windows path looks like this:
C:Program Files (x86)EWANAPI;C:WINDOWSsystem32;C:WINDOWS;C:WINDOWSSystem32Wbem;C:Program Files (x86)IntelNGSMSMPFiles;C:Program Files (x86)Microsoft SQL Server100ToolsBinn;C:Program FilesMicrosoft SQL Server100ToolsBinn;C:Program FilesMicrosoft SQL Server100DTSBinn;C:Program Files (x86)Microsoft SQL Server100ToolsBinnVSShellCommon7IDE;C:Program Files (x86)Microsoft Visual Studio 9.0Common7IDEPrivateAssemblies;C:Program Files (x86)Microsoft SQL Server100DTSBinn;C:WINDOWSsystem32WindowsPowerShellv1.0;C:gnuwin32bin
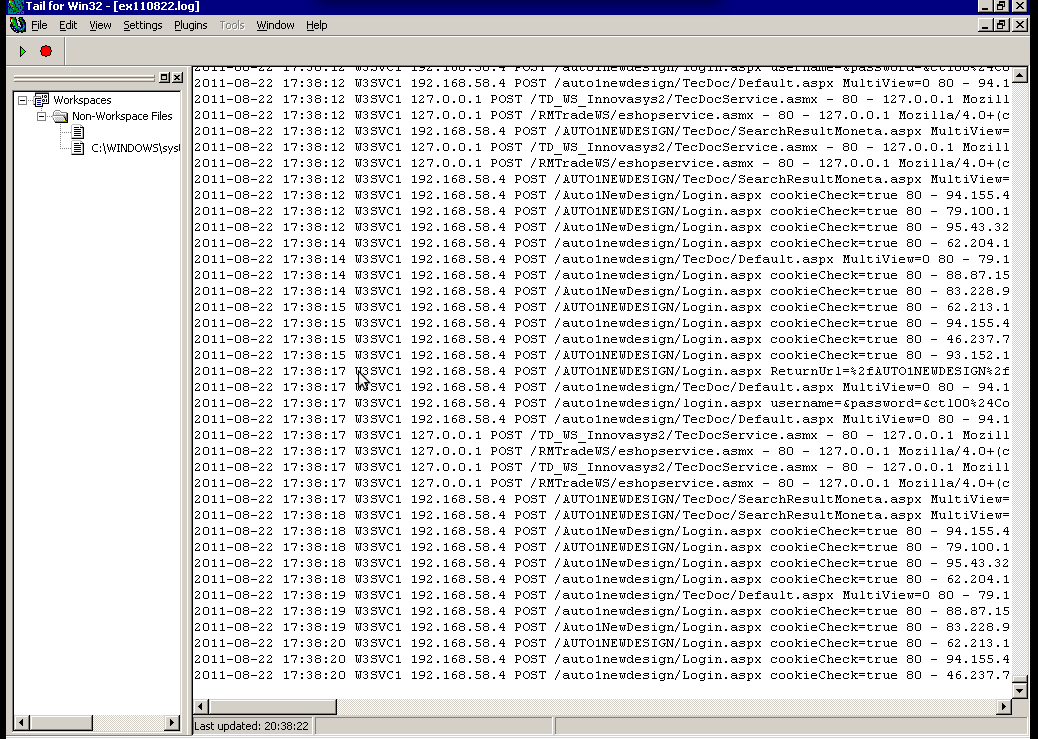
Further on, I launched the tail command to intercatively take an eye on who is accessing the IIS webserver.
Sadly this worked not, trying to use tail with the IIS ex10116.log log;
C:WindowsSystem32LogfilesW3SVC1> tail -f ex10116.log
Spit an error tail: ex10116.log: Bad file descriptor
Since I couldn’t use tail -f I looked for alternative and a quick search led me to Tail 4 Win32 . Lest the name suggests it is supposed to work on 32 bit arch Windows the version on tailforwin32’s website is working perfectly fine on 64 bit Windows as well.
What it does is to simulate a normal tail -f command inside a very simplistic window interface. You see it in action with opened IIS log on below’s screenshot:
Finally my goal is achieved and I can take an eye interactively on IIS logs. End of the article, hope it wasn’t too boring 😉
Tags: bin directory, binary files, Button, c program, command line tools, Computer, distribution, download, exe files, eye, Files, flexibility, gnu tools, gnuwin, gnuwin32, IDE, IIS, installation, line path, linux distribution, linux tools, log, Microsoft, necessery, Path, program, screenshot, select properties, sourceforgeOne, SQL, start button, tail, time, time cause, two windows, windows machines, windows server, wonderful thing
Posted in System Administration, Windows | 1 Comment »
Friday, July 15th, 2011 At the company where I administrate some servers, they’re running Nagios to keep track of the servers status and instantly report if problems with connectivity to certain servers occurs.
Now one of the servers which had configured UP host checks is up, but because of heavy ICMP denial of service attacks to the servers the ICMP protocol ping is completely disabled.
In Nagios this host was constantly showing as DOWN in the usual red color, so nagios reported issue even though all services on the client are running fine.
As this is quite annoying, I checked if Nagios supports host checking without doing the ICMP ping test. It appeared it does through something called in nagios Submit passive check result for host
Enabling the “Submit passive check result for this host” could be done straight from Nagios’s web interface (so I don’t even have to edit configurations! ;).
Here is how I did it. In Nagios I had to navigate to:
Hosts -> Click over my host (hosting1) which showed in red as down

You see my down host which I clicked over showing in red in above pic.
On next Nagios screen I had to select, Disable active checks of this host
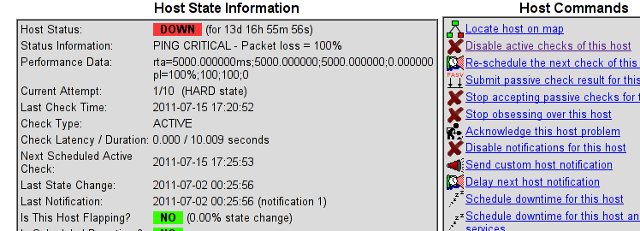
and press on the Commit button.
Next following text appears on browser:
Your command request was successfully submitted to Nagios for processing.
Note: It may take a while before the command is actually processed.
Afterwards I had to click on Submit passive check result for this host and in:
Check Output to type in:
check_tcp -p 80
Here is the Screenshot of the Command Options dialog:
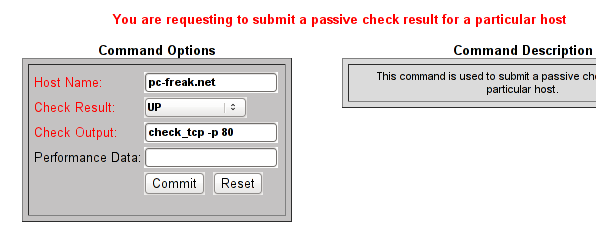
That’s all now Nagious should start checking the down host by doing a query if the webserver on port 80 is up and running instead of pinging it.
As well as the server is no longer shown in the Nagio’s Down host list.
Tags: Button, check result, checks, client, command options, command request, Commit, company, connectivity, denial of service, denial of service attacks, downYou, host, host list, hosts, ICMP, icmp ping, icmp protocol, Nagio, nagios, Output, ping, ping test, processing, request, screen, screenshot, servers, something, status, Submit, test, text, type, web interface
Posted in Linux, System Administration | 4 Comments »
Tuesday, July 5th, 2011 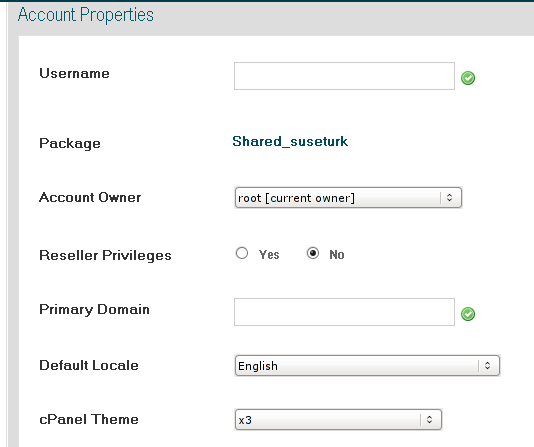
One client asked for his account primary domain name in WHM to be changed, to solve that I entered the WHM admin and navigated to:
Main >> Account Functions >> Modify an Account
A plenty of options concerning the user registration are available for changing from WHM’s Modify an Account, the only one I had to change was under the field Primary Domain e.g.:
Primary Domain: server-domain-name.com
Chainging it to let’s say new-server-domain-name.com and Saving the settings changes the primary domain for the user.
Bear in mind that if the user has already tried to modify his primary domain himself changing the list of his addon domains the above decribed procedure won’t work out because of a WHM Cpanel admin bug.
If this happens a shitty error msg Unable to change domain name will appear and the Save button on Modify Account will not work out.
The only resolution to this I’m aware of is to completely delete the problematic user account and add it to Cpanel again.
Tags: account functions, addon, Bear, bear in mind, Button, change, client, com, Cpanel, domain, domain server, ERROR, list, Main, mind, Modify, name, plenty, procedure, registration, resolution, server domain name, shitty
Posted in System Administration, Web and CMS | No Comments »
Friday, July 1st, 2011 My sister’s newly bought laptop is Acer Aspire 5736Z . By the default this notebook comes with some kind of Linux distribution Linpus .
Even though this Linpus (crafted Linux especially for Acer notebooks) looked really nice, it prooved to be a piece of shit linux distro.
Linplus was unable to even establish a simple Wireless WPA2 protected connection with my wireless router, not to mention that the physical Linux consoles (CTRL+ALT+F1) were disabled …
This LinPlus was so bad that I couldn’t even launch any type of terminal on it (I was stuck!) so I decided to kill it and make a decent latest Ubuntu 11.04 Install on it.
I was surprised to find out that trying to boot up the Ubuntu 11.04 installer led me to a black screen (black screen of death).
The v Aspire’s 5736Z monitor kept completely blank, where the hard drive was continuously reading (indicating that the Ubuntu installer has properly booted but it couldn’t light up the notebook screen).
A bit of investigation on any issues with this Acer notebook model has led me to a thread in fedora forums:
http://forums.fedoraforum.org/showthread.php?t=263794
On this forum the same kind of Linux install problem was described to also occur with ASPIREs 5736Z during a Fedora install.
I just tried the suggested fix and it works like a charm.
The fix goes like this:
1. Invoke the Ubuntu settings parameter Install pre install screen
Just press any button while the Ubuntu installer CD is reading and after few secs the Install options screen should appear, like you see it in below’s screenshot:
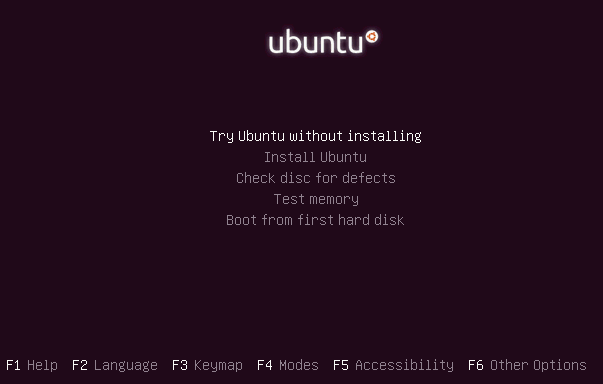
2. Select the nomodetest Boot CD Ubuntu option
You see in the above screenshot the F6 Other Options . I had toto press F6 and choose the nomodetest boot option to make the Ubuntu be able to further boot up.
After selecting the nomodetest option and pressing on the Install Ubuntu menu option the graphic installer launched succesfully 😉
Hope this small tip to be helpful to some Ubuntu or other Linux user who is trying to install Linux on his Acer Aspire 5736Z
Cheers 😉
Tags: acer notebook, acer notebooks, ASPIRE, ASPIREs, boot cd, boot option, Button, drive, f1, fedora, hard drive, Hope, how to install ubuntu linux, Install, installer cd, investigation, laptop, Linplus, linux consoles, menu option, nomodetest, notebook model, option, options screen, piece, piece of shit, reading, screen, secs, showthread, terminal, thread, tip, toto, type, Ubuntu, wireless router, wpa2
Posted in Linux, Various | 20 Comments »


How to enable Ctrl+Alt+Backspace in Ubuntu 11.10 (Oneiric Ocelot) Linux
Monday, January 16th, 2012My sister, experience some programs running with wine (Windows Emulator) to crash on her Ubuntu 11.10.
As she is quite new with Linux, she has no idea about the existence of CTRL ALT BACKSPACE key combination to restart a hanged GNOME, KDE by directly killing the Xorg server.
I felt obliged to explain her it is better to use CTRL ALT BACKSPACE X kill switch instead of restarting the whole Linux kernel (which basiclly is working) and that it is just the display keeping blacnk.
Pressing the would kill Xorg and therefore all applicatins previously running on top of it will die. In Ubuntu Xorg is configured to run via gdm, so once killed it will automatically reload the GDM (Gnome Display Manager).
I was about to explain her that its better she use CTRL+ALT+BACKSPACE instead of restarting the whole system but suddenly I realized this is not working.
In UBUNTU 11.10 and I guess in all UBUNTU's after 9.04 CTRL ALT BACKSPACE is substituted with the key switch combination ALT PRINTSCREEN K, I've explained her about that.
This change is actually a change implied by most Linux distributions nowdas and is some kind of change in Xorg newer versions…
To enable back the CTRL + ALT + BACKSPACE , I've issued cmd:
stanimira@ubuntu~:$ echo' setxkbmap -option terminate:ctrl_alt_bksp' >> ~/.xinitrc
An alternative way to set setxkbmap -option terminate:ctrl_alt_bksp to run on Ubuntu user login is by setting it as a startup application using;
stanimira@ubuntu:~$ gnome-session-properties
Press the Add button and type in the box to appear;
Name: setxkbmap
Command: setxkbmap -option terminate:ctrl_alt_bksp
Comment: setxkbmap
Reverting the Xserver kill switch back to the classical Ctrl+Alt+Backspace should also be running fine on older Ubuntu Linuces – 11.04, 10.10, 10.04 etc.
Tags: add button, Alt, Auto, backspace, Button, change, Comment, Ctrl, Display, Draft, existence, GDM, Gnome, kde, key switch, kill, kill switch, Linux, linux kernel, login, most linux distributions, ocelot, option, Press, printscreen, Reverting, session properties, setxkbmapCommand, startup, startup application, switch combination, type, Ubuntu, wine, wine windows, xinitrcAn, Xorg, xserver
Posted in Linux, Linux and FreeBSD Desktop | No Comments »