Posts Tagged ‘network’

Free Software in Balkans 2010 (A free software conference on the Balkanies is approaching)

Tuesday, August 24th, 2010

Richard Stallman on a Free Software Conference

Today when I was reviewing my daily visited websites I come across an interesting news.
This kind of meeting is quite a news because it is the first in line where Free software users and developmers fromall around the balkanies will meet to discuss,test,share and continue the free software code and ideals.
The first Free Software conference in the Balkanies is about to be hosted in Vlora University Albania .

The conference Free Software in Balkans (FreeSB2010) is an annual meeting of the free software users, developpers and supporters in the Balkan countries. It will travel from country to country, year to year to different locations. The Conference will gather professionals, academics and enthusiasts who share the vision that software should be free and open for the community to develop and customize to its needs, and that knowledge is a communal property and free and open to everyone.

This kind of event will build up the social network between free software fans and developers and will further help in the general spread of free software on the balkanies.
This kind of meeting are already for a long time a tradition in many states in America, so having it in the balkanies is quite a development.

You can read a bit more about the exact focus of Free Software in Balkans 2010 conference here

Pitily right now there is no published scheduled list of presentations which are about to be given in the conference, but I guess the conference schedule would be out in a few days time.
I’m not yet sure if I’ll have the time and opportunity to attend the conference, however I do hope that somebody of my balkan readers will got interested into the “fabulous” Free Software event and will support the event’s initiative by visiting it 🙂

What is IPMI (IPKVM), ILO and IDRAC – Remote management interfaces to server / PC on BIOS level

Friday, May 30th, 2014

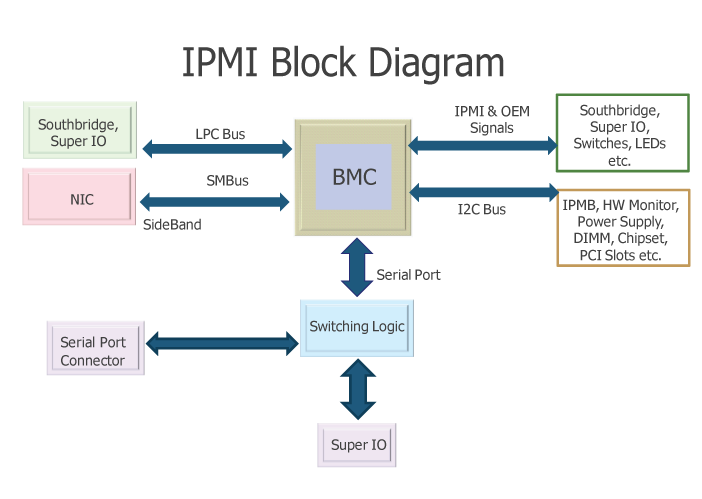
IPMI-Block-Diagram-ILO-IPKVM-how-it-works
IPMI
Intelligent Platform Management Interface is a standardized computer interface also accessible remotely via Java applet allowing remote management and monitoring access to PC BIOS. IPMI is a way to manage a computer that may be powered off or otherwise unresponsive by using a network connection to the hardware rather than to an operating system or a keyboard physical / screen login shell. The IPMI server standard was introduced by Intel and nowadays supported by more than 200 computer vendors i.e. – Super Micro, Hewlett Packard, Cisco, Dell etc.

Intelligent Platform Management Interface is an open, industry-standard interface that was designed for the management of server systems over network. IPMI interfaces by various vendors have also Virtual Media support (i.e. – Operating System  ISO files could be mounted remotely to a Virtual CD / DVD rom and you can approach installing a bare-metal server without physical presense to it). Just like Power Off / Restart, BIOS Entrance and Virtual Media access is done directly through a web-browser interface over the network or the internet.

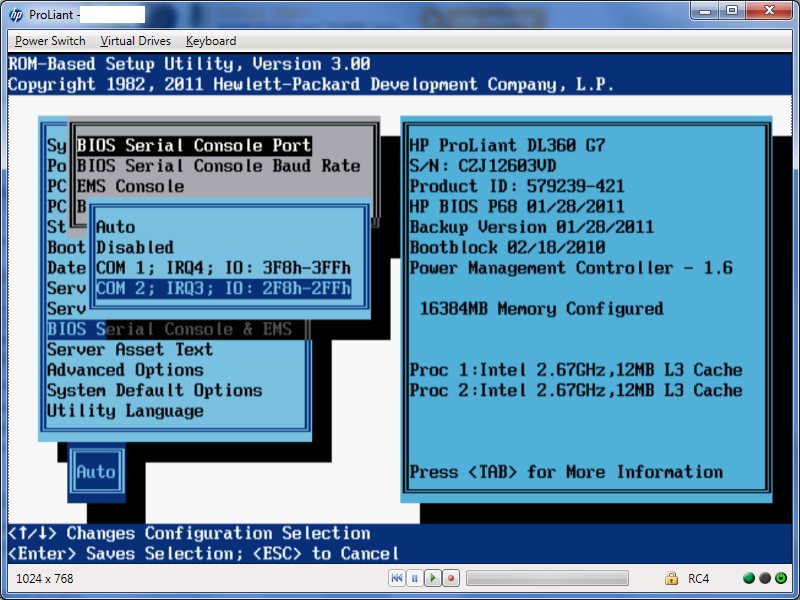
HP_IPMI_ILO-screenshot-remote-management-server-console

ILO – stands for Integrated Lights-Out and is  HP Proliant servers remote console to PC / server physical screen. ILO is server integrated chip on HP servers and doesn't need further installations. It gives you a web console using Java showing you server screen just like there is a Monitor connected to the server it is precious for remote system administration purposes as often when there is no SSH  or Remote Desktop to server you can see directly whether the server has completed hanged and try to recover or see a failing hardware notification on the screen to a server with a partially accessible services. Using ILO console access to an HP server one can have a BIOS access remotely to machines already colocated in data canters. In other words ILO is HP's variation of IPMI remote interface also known under business buzz word IPKVM.

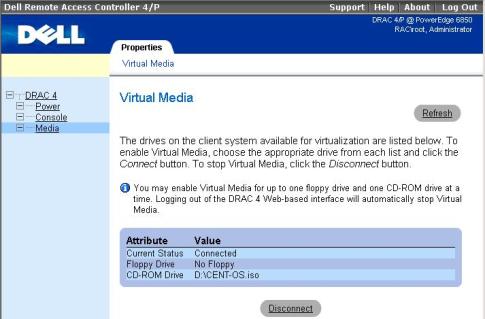
DRAC-Dell-Remote-Acccess-console-IPMI-tools-remote-management-bios-interface

DRAC (iDRAC)- Dell's Remote Access Controller is interface card from Dell Inc. offering remote access (out-of-band) management facilities – i.e. DRAC is Dell's variant of HP's ILO – an implementation of Intel's IPMI out-of-band standard. DRAC is also giving you remote way to access no other means accessible server on a software level. Interesting and nice things is Dell provides their DRAC source code, so if you're a developer you can learn how DRAC technology works on a lower level.

ILO, iDRAC (Dell's new generation DRAC for Blade servers) and ILO's remote management interfaces's (IPMI tools) most valuable features is it allows remote system Power On / Shutdown and Remote Restart while monitoring the server screen (hardware output) messages and allowing you see critical hardware issue messages on pre-OS boot time, failure with memory, hard disks etc. and remote interface to do BIOS tuning.

Create local network between virtual machines in Virtualbox VM – Add local LAN between Linux Virtual Machines

Wednesday, June 11th, 2014

add-virtualbox-virtual-machines-inside-local-network-create-internal-LAN-local-net-linux-windows

I want to do test MySQL Cluster following MySQL Cluster Install Guide for that purpose, I've installed 2 version of CentOS 6.5 inside Virtualbox and I wanted to make the 2 Linux hosts reachable inside a local LAN network, I consulted some colleagues who adviced me to configure two Linux hosts to use Bridget Adapter Virtualbox networking (Network configuration in Virtualbox is done on a Virtual Machine basis from):
 

Devices -> Network Settings

(Attached to: Bridged Adapter)

Note!: that by default Cable Connected (tick) is not selected so when imposing changes on Network – tick should be set)
After Specifying Attached to be Bridged Adapter to make CentOS linux refresh network settings run in gnome-terminal:

[root@centos ~]# dhclient eth0

However CentOS failed to grab itself DHCP IP address.
Thus I tried to assign manually IP addresses with ifconfig, hoping that at least this would work, e.g.:

on CentOS VM 1:

/sbin/ifconfig eth0 192.168.10.1 netmask 255.255.255.0

on CentOS VM 2:

/sbin/ifconfig eth1 192.168.10.2 netmask 255.255.255.0

To test whether there is connection between the 2 VM hosts tried ping-ing 192.168.10.2 (from 192.168.10.1) and tested with telnet if I can access remotely SSH (protocol), from CentOS VM2 1 to CentOS VM2 and vice versa, i.e.:

[root@centos ~]# telnet 192.168.10.2 22


Trying 192.168.10.2…
telnet: connect to address 192.168.10.2: No route to host

Then after checking other options and already knowing by using VBox NAT network option I had access to the internet, I tried to attach a standard local IP addresses to both Linux-es as Virtual interfaces (e.g eth0:1), .e.g:

On Linux VM 1:

/sbin/ifconfig eth0:0 192.168.10.1 netmask 255.255.255.0

On Linux VM 2:

/sbin/ifconfig eth1:0 192.168.10.2 netmask 255.255.255.0

Then to test again used telnet

[root@centos ~]# telnet 192.168.10.2 22

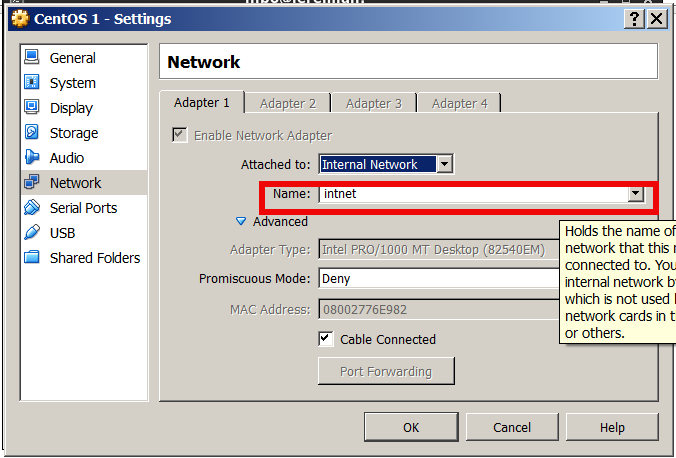
Then I found Virtualbox has a special Internal Networking support

to choose in Attached to drop down menu. According to Internal Networking Virtualbox instructions to put two Virtual Machine hosts inside an Internal network they should be both set in Internal network with identical name.
P. S. It is explicitly stated that using Internal Network will enable access between Guest Virtual Machines OS, but hosts will not have access to the Internet (which in my case doesn't really mattered as I needed the two Linux VMs just as a testbed)

virtualbox-create-internal-local-network-between-guest-host-Linux-Windows1

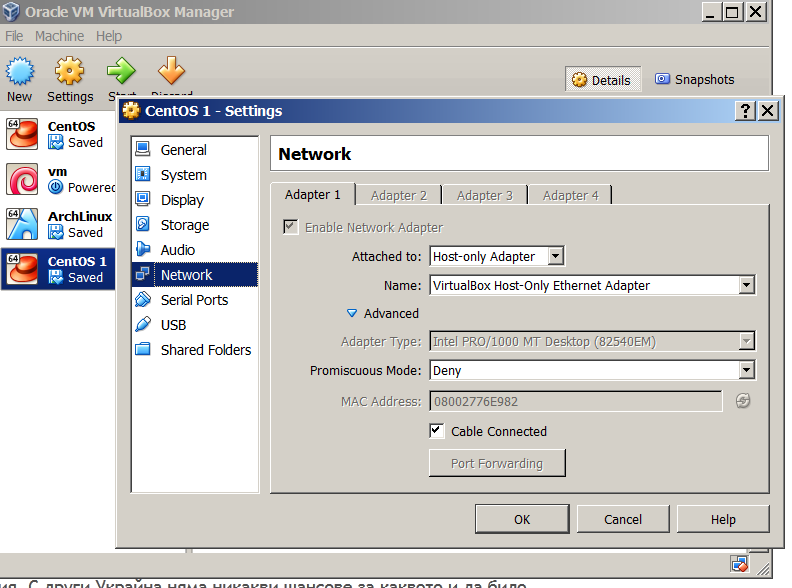
I tried this option but it doesn't work for me for some reason, after some time of research online on how to create local LAN network between 2 Virtual Machines luckily I decided to test all available Virtualbox Networking choices and noticed Host-only adapter.

Selecting Host-only Adapter and using terminal to re-fetch IP address over dhcp:

virtualbox-connect-in-local-lan-network-linux-and-windows-servers-hosts-only-adapter

On CentOS VM1

dhclient eht0

On CentOS VM2

dhclient eth1

assigned me two adjoining IPs – (192.168.56.101 and 192.168.56.102).

Connection between the 2 IPs 192.168.56.101 and 192.168.56.102 on TCP and UDP and ICMP protocol works, now all left is to install MySQL cluster on both nodes.


How to share your Windows local drives via Remote Desktop (RDP) – Safe file copy with RDP protocol

Tuesday, October 14th, 2014

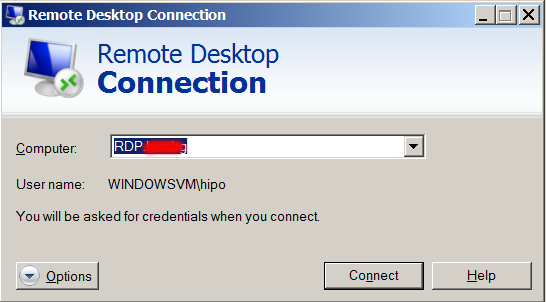
remote-desktop-connection-options-button-screenshot

Just had a task to install Tomcat 7, Java JRE 1.7 and .NET Framework 3.5 and MS Visual C++ x86 on a Windows 2008 RC2 system situated behind a firewalled network NAT. To do the installation I had to use a special jump host (which was also a MS Windows system). The end system where installation had to occur did not have access to the Internet was in special DMZ-ed network so to install above 3 software packages I had to transfer them from my notebook to install host.
To depic what had to happen, I had to:

Transfer files from (host A – my notebook) -> via host (B – jump host) to host (C – the end install host).

Default Windows RDP Client command (mstsc.exe) supports transferring files between host A and RDP-ed host B via standard file copy / paste, so I tried transferring files between my work Windows PC to (jump host B), by copy pasting the files, but as the DotNetFx35Client.exe file was 261 Megabytes and the network between host A and B has some shapings and network firewalls the file transfer timed out. Copy / Paste method via RDP Protocol by default, doesn’t support Transfer Resume thus in order to transfer the 261 MB file, I tried Sharing C:Temp Folder and transfer that way, but unfortunately I didn’t have the permissions in that Windows Domain to create sharings (even though on the remote system I was already logged in with admin accounts). I’ve consulted a colleague on advise on how to transfer the files and I was told about a Win RDP client option to share drives.

Here is how to share your PC drive letters C: D: E: etc. via Remote Desktop Protocol


1. Run mstsc.exe

2. Click the Options button

remote-desktop-connection-options-button-screenshot

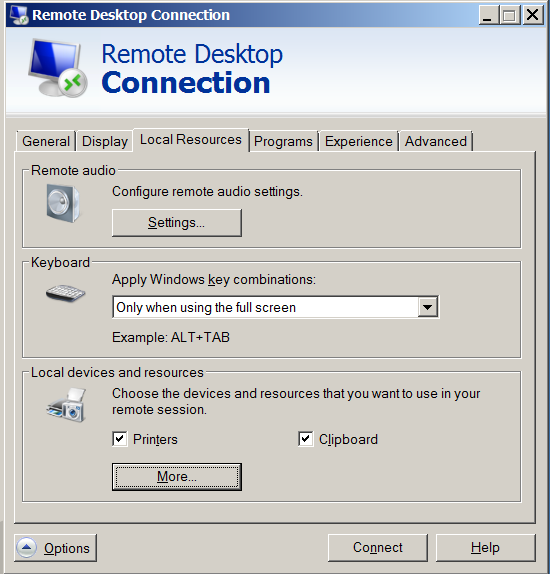
3. Click Local Resources tab

4. Click More button

remote-desktop-connection-more-options-button-screenshot

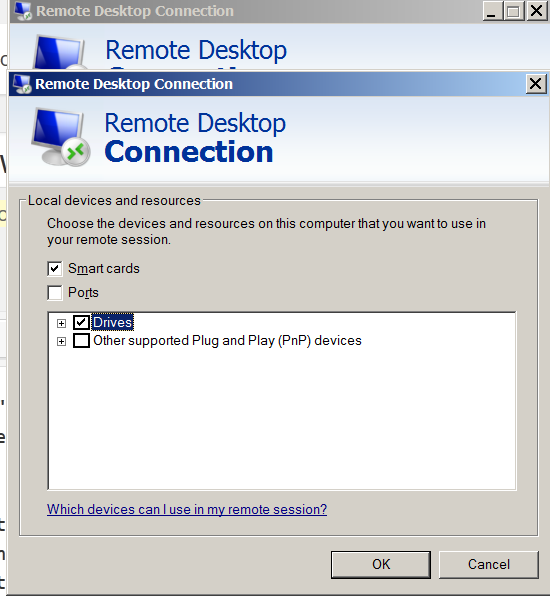
5. Click on Drives

remote-desktop-connection-share-windows-disk-drives-option-screenshot

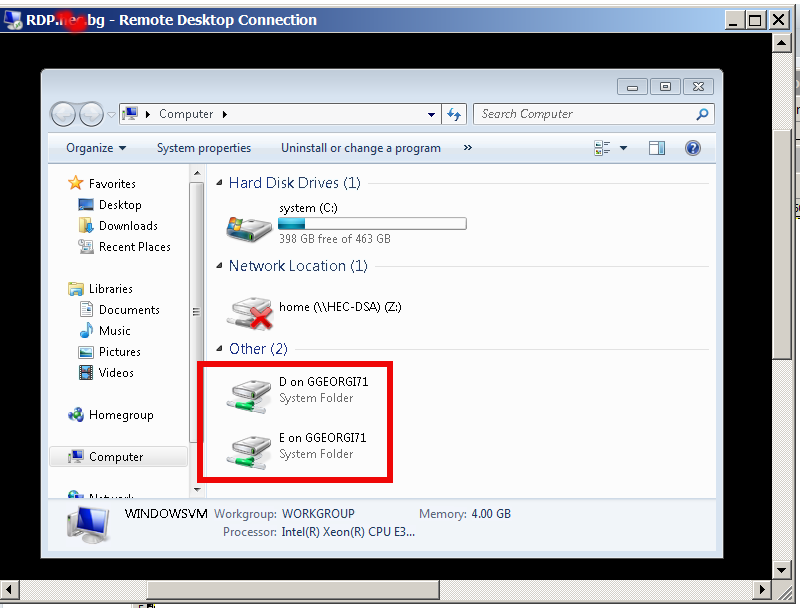
Then after connecting to the Remote RDP host, all your local PC drive partitions C: D: E: will be visible as (attached) ones in mounted in My Computer / MS Explorer with assigned new drive letters

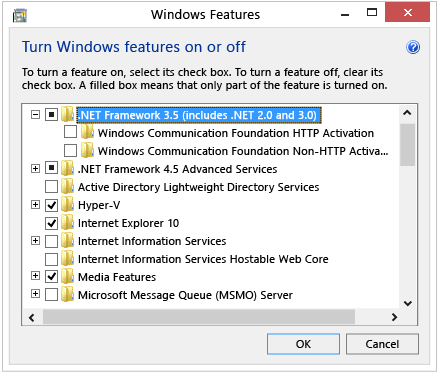
Once, I transferred the .NET Framework 3.5 while using the installer I was notified that .NET Framework 3.5 is by default included in Windows 8 and I need only to enable it.

To enable .NET Framework 3.5 in Windows 8 from Control Panel

Choose Programs, and then choose Turn Windows features on or off.

Select the .NET Framework 3.5 (includes .NET 2.0 and 3.0) check box.
enable-dot-net-framework-windows-8-windows-8.1-add-feature-screenshot

How to disable IPv6 on Debian / Ubuntu / CentOS and RHEL Linux

Friday, December 9th, 2011

I have few servers, which have automatically enabled IPv6 protocols (IPv6 gets automatically enabled on Debian), as well as on most latest Linux distribituions nowdays.

Disabling IPv6 network protocol on Linux if not used has 2 reasons:

1. Security (It’s well known security practice to disable anything not used on a server)
Besides that IPv6 has been known for few criticil security vulnerabilities, which has historically affected the Linux kernel.
2. Performance (Sometimes disabling IPv6 could have positive impact on IPv4 especially on heavy traffic network servers).
I’ve red people claiming disabling IPv6 improves the DNS performance, however since this is not rumors and did not check it personally I cannot positively confirm this.

Disabling IPv6 on all GNU / Linuces can be achieved by changing the kernel sysctl settings net.ipv6.conf.all.disable_ipv6 by default net.ipv6.conf.all.disable_ipv6 equals 1 which means IPv6 is enabled, hence to disable IPv6 I issued:

server:~# sysctl net.ipv6.conf.all.disable_ipv6=0

To set it permanently on system boot I put the setting also in /etc/sysctl.conf :

server:~# echo 'net.ipv6.conf.all.disable = 1 >> /etc/sysctl.conf

The aforedescribed methods should be working on most Linux kernels version > 2.6.27 in that number it should work 100% on recent versions of Fedora, CentOS, Debian and Ubuntu.

To disable IPv6 protocol on Debian Lenny its necessery to blackist the ipv6 module in /etc/modprobe.d/blacklist by issuing:

echo 'blacklist ipv6' >> /etc/modprobe.d/blacklist

On Fedora / CentOS there is a another universal “Redhat” way disable IPv6.

On them disabling IPv6 is done by editting /etc/sysconfig/network and adding:

NETWORKING_IPV6=no
IPV6INIT=no

I would be happy to hear how people achieved disabling the IPv6, since on earlier and (various by distro) Linuxes the way to disable the IPv6 is probably different.
 

Alto to stop Iptables IPV6 on CentOS / Fedora and RHEL issue:

# service ip6tables stop

# service ip6tables off

MobaXTerm: A good gnome-terminal like tabbed SSH client for Windows / Windows Putty Tabs Alternative

Wednesday, November 13th, 2013

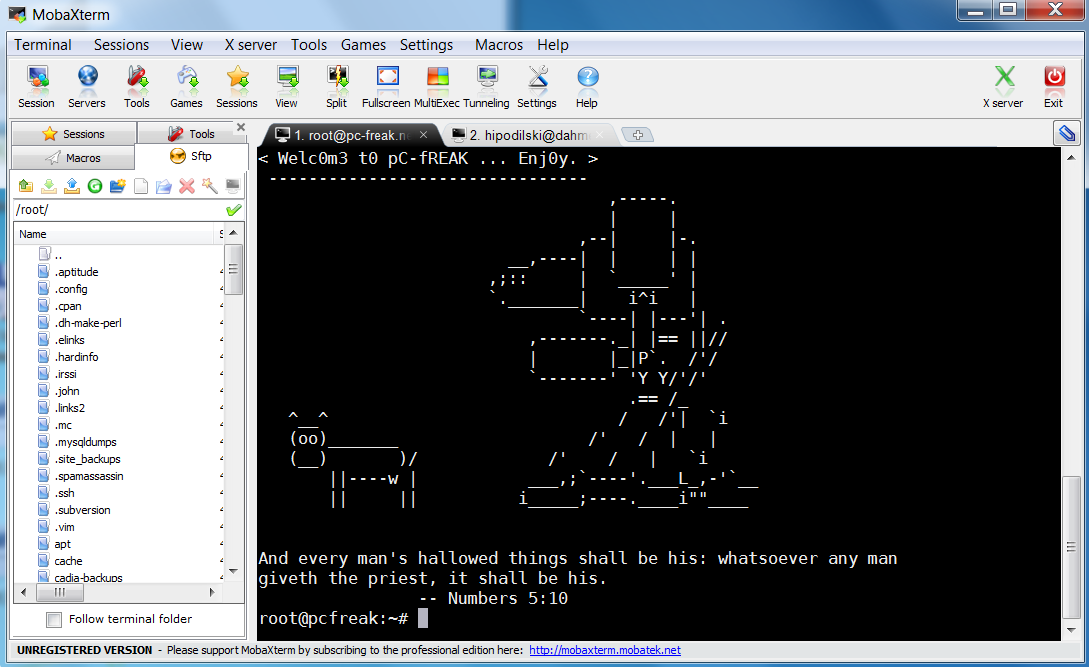
Mobaxterm ssh client putty MS Windows alternative with tabs suitable for ex linux users

mobaxterm with tabbed ssh connections screenshot best putty windows ssh client alternative now

Last 10+ years I worked on GNU / Linux as Desktop. Last 7 years most of my SSH connections were managed from GNOME and I'm quite used to gnome-terminal ssh tabbing. In my new Employee Hewlett Packard. I'm forced to work on Microsoft Windows 7 and thus I used for a month or so Putty and Kitty fork from version 0.63 of PuTTY advertising itself as the best telnet / SSH client in the world. Both of the two lack tabbing and have interface which is pretty unfamiliar to me. As I'm so used to using native UNIX terminal. Fortunately a colleague of mine Ivelin was using an SSH client called MobaXTerm which very much did emulation similar to my favourite gnome-terminal. MobaXterm is not free software / open source app but this doesn't matter so much to me as anyways I'm running a non-free Win OS on my desktop. What makes MobaXterm so attractive is its rich functionality (cosmic years infront of Putty).

Here is website description of MobaXterm quoted from its website:

MobaXterm is an enhanced terminal for Windows with an X11 server, a tabbed SSH client and several other network tools for remote computing (VNC, RDP, telnet, rlogin). MobaXterm brings all the essential Unix commands to Windows desktop, in a single portable exe file which works out of the box.

Overall list of features MobaXterm offers are;

  •     multitab terminal with embedded Unix commands (ls, cd, cat, sed, grep, awk, rsync, wget, …)

  •     embedded X11 server for easily exporting your Unix/Linux display

  •     a session manager with several network utilities: SSH, RDP, VNC, Telnet, Rlogin, FTP, SFTP and XDMCP

  •     passwords management for SSH, RDP, VNC, SFTP (on demand password saving)

  •     easy graphical file transfer using drag and drop during SSH sessions

  •     advanced SSH tunnels creation tool (graphical port forwarding builder)

  •     tasks automation using scripts or macros

Mobaxterm is portable just like Putty so its useful to use on HOP stations to servers like used in big companies like HP. Featured embedded Unix commands (e.g., ls, cd, cat, sed, grep, awk, rsync, wget) gives a feeling like you're working on pure Linux console making people addicted to Linux / BSD quite confortable. Some other very useful terminal emulator functions are support for anti-aliasing session manager (save / remember passwords for ssh sessions in Crypted format so much missing in Putty) and it even supports basic macros.
Basic UNIX commands embedded in MobaXterm are taken and ported from Cygwin projectLinux-like environment for Windows making it possible to port software running on POSIX systems (such as Linux, BSD, and Unix systems) to Windows. A very cool think is also MobaXterm gives you a Linux like feel of console navigation in between basic files installed from Cygwin. Some downside I found is program menus which look at first glimpse a bit confusing especially for people used to simplicity of gnome-terminal. Once logged in to remote host via ssh command the program offers you to log you in also via SFTP protocol listing in parallel small window with possibility to navigate / copy / move etc. between server files in SFTP session which at times is pretty useful as it saves you time to use some external SFTP connector tools like  WinSCP.

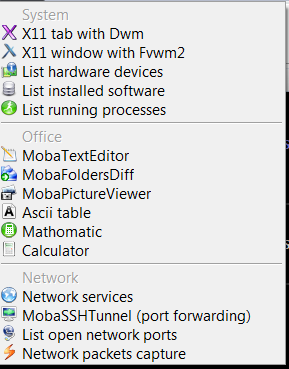
From Tools configuration menu, there are few precious tools as well;
         – embedded text editor MobaTextEditor
         – MobaFoldersDiff (Able to show diffeernces between directories)
         – AsciiTable (Complete List of Ascii table with respective codes and characters)
         – Embedded simple Calculator
         – List open network ports – GUI Tool to list all open ports on Windows localhost
         – Network packets capture – A Gui tool showing basic info like from UNIX's tcpdump!
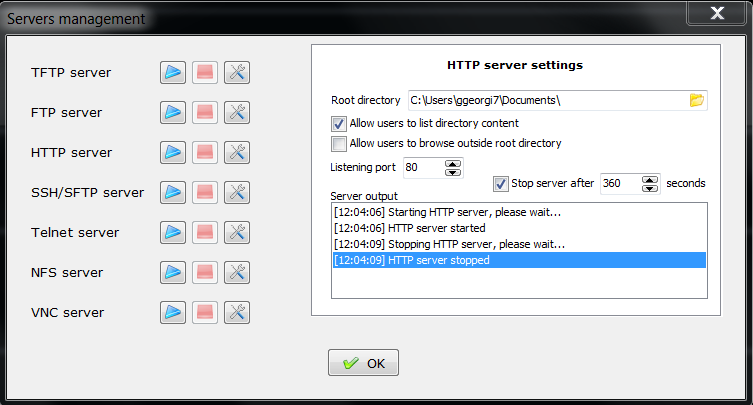
         – Ability to start quickly on local machine (TFTP, FTP, SFTP / SSH server, Telnet server, NFS server, VNC Server and even simple implementation of HTTP server)

Mobaxterm list of tools various stuff

         Mobaxterm run various services quickly on Windows servers management screenshot

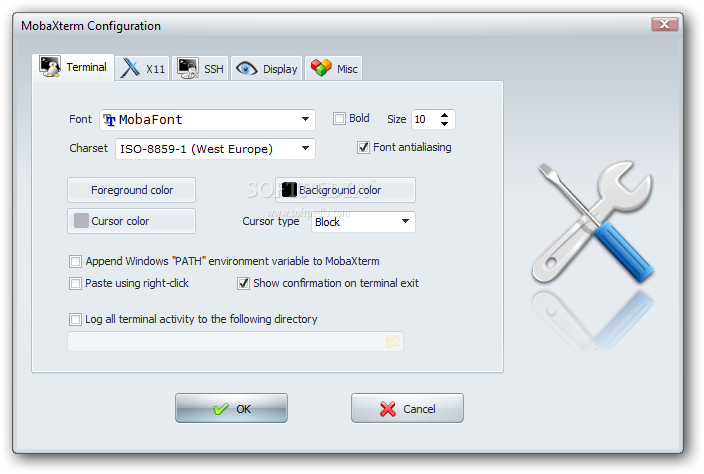
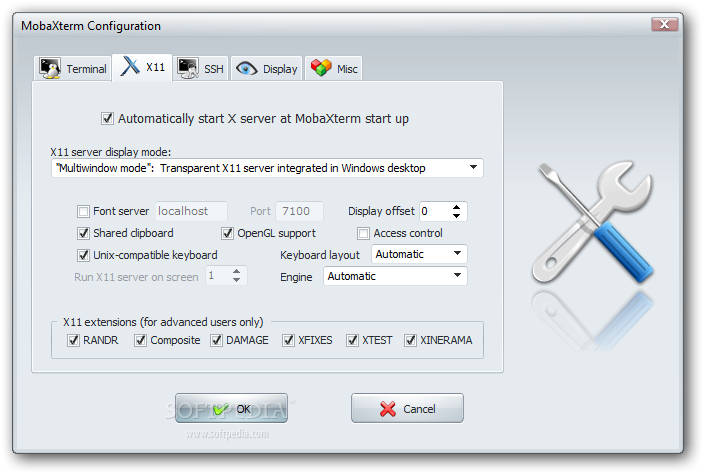
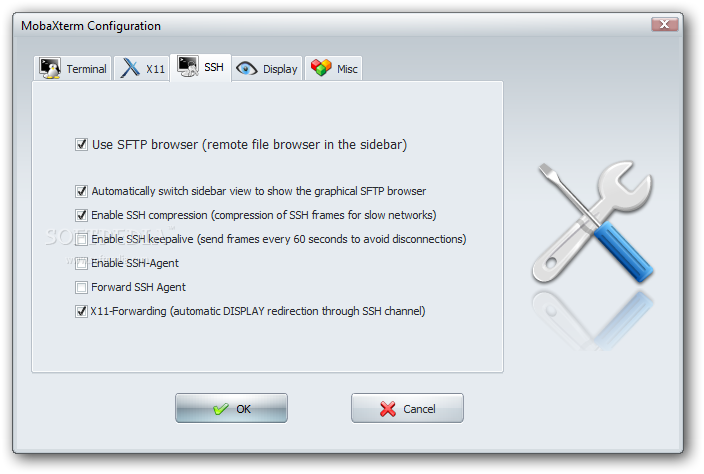
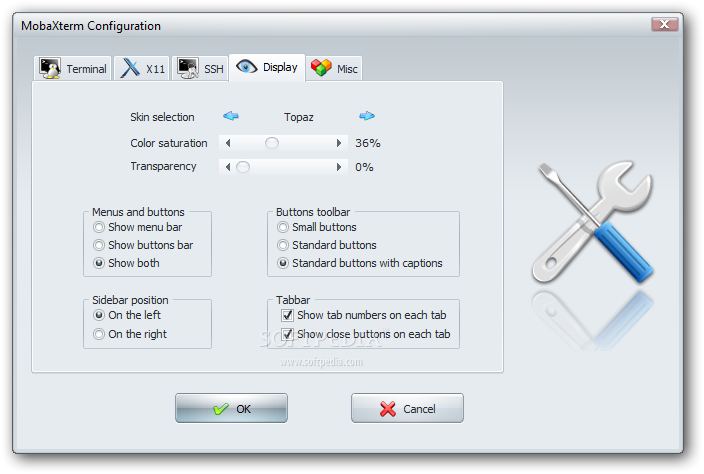
Below are few screenshots to get you also idea about what kind of configuration MobaXterm supports
  mobaxterm terminal configuration settings screenshot

mobaxterm better putty alternative x11 configuration tab screenshot

mobaxterm windows ssh client for linux users configuration ssh tab screenshot

mobaxterm-putty-alternative-for-windows-configuration-display-screenshot
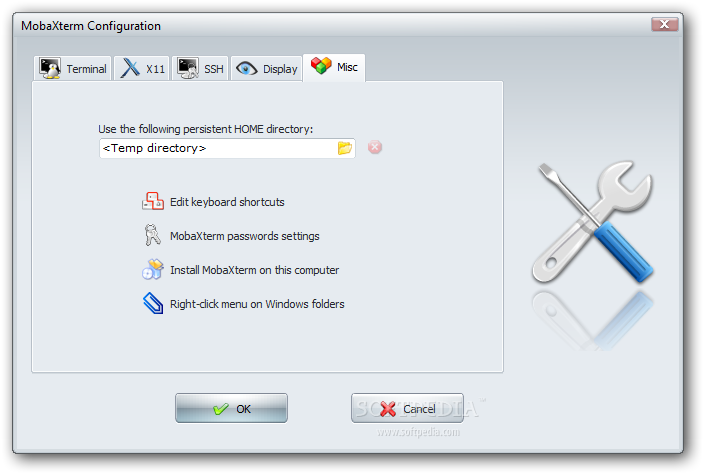
MobaXTerm Microsoft Windows ssh client configuration misc menu screenshot
To configure and use Telnet, RSH, RDP, VNC, FTP etc. Sessions use the Sessions tab on top menu.

One very handy thing is MobaXterm supports export of remote UNIX display with no requirement to install special Xserver like already a bit obsolete Xming – X server for Windows.
The X Display Manager Control Protocol (XCMCP) is a key feature of the X11 architecture. Together with XDMCP, the X network protocol allows distributed operation of the X server and X display manager. The requesting X server runs on the client (usually as an X terminal), thus providing a login service, that why the X server ported to MobaXterm from Cygwin also supports XDMCP. If, for example, you want to start a VNC session with a remote VNC server, all you have to do is enter the remote VNC server’s IP address in the VNC area; the default VNC port is already registered.

Accessing the remote Windows server via RDP (Remote Desktop Protocol) is also a piece of cake. Once you establish a session to RDP or other Proto it is possible to save this session so later you just choose between session to access. The infamous (X11 Port Forwarding) or creation of SSH encrypted tunnels between hosts to transfer data securily or hide your hostname is also there.

MobaXterm is undoubtedly a very useful and versatile tool. Functionally, the software is well mannered, and Windows users who want to sniff a little Linux/Unix air can get a good idea of how Linux works. A closer look reveals that anything you can do with MobaXterm can be achieved directly with freely available tools (Cygwin) and Unix tools ported from Cygwin. However, although Cygwin provides a non-Posix environment for Windows, it doesn’t offer a decent terminal, which is one thing Moba-Xterm has going for it.

Admittedly, in pure vanilla Cygwin, you can start an X server automatically and then use xterm, but xterm lacks good-quality fonts, whereas MobaXterm conveniently lets you integrate a font server.

How to change order of network cards eth0 and eth0 (swap lan cards) on Debian GNU / Linux

Friday, September 21st, 2012

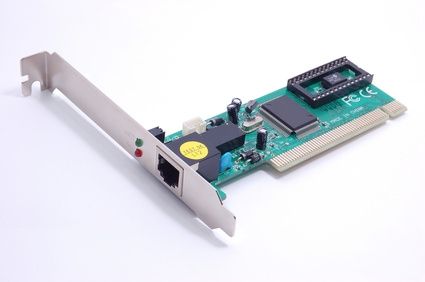
Swap eth0 and eth1 lan card / how to change network card order on Debian Gnu / linux

I have a Debian server with 2 network adapter cards – (eth0 and eth1). The first lan card eth0 is Mainboard embedded (integrated) one.

The hardware of the Lenovo ThinkCentre host was purchased with one LAN Card but a second one was added in order to make the machine capable of doing NAT routing with iptables.

The machine is to be configured as a router in 1st lan card eth0, an internet UTP cable should influx and the 2nd lan card is to be connected to a Network Switch and will be used to NAT network traffic from the internal network of number of hosts with assigned local IP addresses like (192.168.0.1 – 255) etc.

Everyone knows that integrated Network cards, are usually inferior to the normal non-integrated ones and besides that if a high voltage (during Weather Storm) enters through UTP cable attached to the integrated LAN Card it is quite likely the whole Mainboard to burn out …

With saying this back to my case I had to make the Internet to connect on eth0 on a Debian Linux host which was supposed to run as a Network router. As eth0 was the one where I had to configure the Internet real IP address to be assigned, I preferred eth0 to be attached to the non-integrated Ethernet Card which was automatically recognized and assigned to be eth1 by kernel.

Therefore I needed to swap interfaces eth0 and eth1, here is how this is done on Debian GNU / Linux Squeeze (6.0.5):

1. Edit /etc/udev/rules.d/70-persistent-net.rules


# vim /etc/udev/rules.d/70-persistent-net.rules

The file content should look something similar to:


# This file was automatically generated by the
/lib/udev/write_net_rules
# program, run by the persistent-net-generator.rules rules file.
#
# You can modify it, as long as you keep each rule on a single
# line, and change only the value of the NAME= key.
# PCI device 0x10ec:0x8168 (r8169)
SUBSYSTEM=="net", ACTION=="add", DRIVERS=="?*",
ATTR{address}=="90:f6:C2:3d:76:f5", ATTR{dev_id}=="0x0",
ATTR{type}=="1", KERNEL=="eth*", NAME="eth0"
# PCI device 0x10ec:0x8168 (r8169)
SUBSYSTEM=="net", ACTION=="add", DRIVERS=="?*",

ATTR{address}=="8d:89:a5:c2:e8:f8", ATTR{dev_id}=="0x0",

ATTR{type}=="1", KERNEL=="eth*", NAME="eth1"

Swap eth0 and eth1 definitions so eth0 becomes eth1 and vice versa, e.g.:


SUBSYSTEM=="net", ACTION=="add", DRIVERS=="?*",

ATTR{address}=="8d:89:a5:c2:e8:f8", ATTR{dev_id}=="0x0",

ATTR{type}=="1", KERNEL=="eth*", NAME="eth0"
SUBSYSTEM=="net", ACTION=="add", DRIVERS=="?*",
ATTR{address}=="90:f6:C2:3d:76:f5", ATTR{dev_id}=="0x0",
ATTR{type}=="1", KERNEL=="eth*", NAME="eth1"

ATTR{type}=="1", KERNEL=="eth*", NAME="eth0"

To make udevd, reassign eth0 / eth1 cards orders restart udev daemon:


# /etc/init.d/udev restart
...

or restart the system, i.e.


# restart

That should swap the Lan card order as recognized by Linux. Cheers 😉

FreeBSD Jumbo Frames network configuration short how to

Wednesday, March 14th, 2012

FreeBSD Jumbo Frames Howto configure FreeBSD

Recently I wrote a post on how to enable Jumbo Frames on GNU / Linux , therefore I thought it will be useful to write how Jumbo Frames network boost can be achieved on FreeBSD too.

I will skip the details of what is Jumbo Frames, as in the previous article I have thoroughfully explained. Just in short to remind you what is Jumbo Frames and why you might need it? – it is a way to increase network MTU transfer frames from the MTU 1500 to MTU of 9000 bytes

It is interesting to mention that according to specifications, the maximum Jumbo Frames MTU possible for assignment are of MTU=16128
Just like on Linux to be able to take advantage of the bigger Jumbo Frames increase in network thoroughput, you need to have a gigabyt NIC card/s on the router / server.

1. Increasing MTU to 9000 to enable Jumbo Frames "manually"

Just like on Linux, the network tool to use is ifconfig. For those who don't know ifconfig on Linux is part of the net-tools package and rewritten from scratch especially for GNU / Linux OS, whether BSD's ifconfig is based on source code taken from 4.2BSD UNIX

As you know, network interface naming on FreeBSD is different, as there is no strict naming like on Linux (eth0, eth1, eth2), rather the interfaces are named after the name of the NIC card vendor for instance (Intel(R) PRO/1000 NIC is em0), RealTek is rl0 etc.

To set Jumbro Frames Maximum Transmission Units of 9000 on FreeBSD host with a Realtek and Intel gigabyt ethernet cards use: freebsd# /sbin/ifconfig em0 192.168.1.2 mtu 9000
freebsd# /sbin/ifconfig rl0 192.168.2.2 mtu 9000

!! Be very cautious here, as if you're connected to the system remotely over ssh you might loose connection to it because of broken routing.

To prevent routing loss problems, if you're executing the above two commands remotely, you better run them in GNU screen session:

freebsd# screen
freebsd# /sbin/ifconfig em0 192.168.1.2 mtu 9000; /sbin/ifconfig rl0 192.168.1.2 mtu 9000; \
/etc/rc.d/netif restart; /etc/rc.d/routed restart

2. Check MTU settings are set to 9000

If everything is fine the commands will return empty output, to check further the MTU is properly set to 9000 issue:

freebsd# /sbin/ifconfig -a|grep -i em0em0: flags=8843<UP,BROADCAST,RUNNING,SIMPLEX,MULTICAST> metric 0 mtu 9000freebsd# /sbin/ifconfig -a|grep -i rl0
rl0: flags=8843<UP,BROADCAST,RUNNING,SIMPLEX,MULTICAST> metric 0 mtu 9000

3. Reset routing for default gateway

If you have some kind of routing assigned for em0 and rl0, network interfaces they will be affected by the MTU change and the routing will be gone. To reset the routing to the previously properly assigned routing, you have to restart the BSD init script taking care for assigning routing on system boot time:

freebsd# /etc/rc.d/routing restart
default 192.168.1.1 done
add net default: gateway 192.168.1.1
Additional routing options: IP gateway=YES.

4. Change MTU settings for NIC card with route command

There is also a way to assign higher MTU without "breaking" the working routing, e.g. avoiding network downtime with bsd route command:

freebsd# grep -i defaultrouter /etc/rc.conf
defaultrouter="192.168.1.1"
freebsd# /sbin/route change 192.168.1.1 -mtu 9000
change host 192.168.1.1

5. Finding the new MTU NIC settings on the FreeBSD host

freebsd# /sbin/route -n get 192.168.1.1
route to: 192.168.1.1
destination: 192.168.1.1
interface: em0
flags: <UP,HOST,DONE,LLINFO,WASCLONED>
recvpipe sendpipe ssthresh rtt,msec rttvar hopcount mtu expire
0 0 0 0 0 0 9000 1009

6. Set Jumbo Frames to load automatically on system load

To make the increased MTU to 9000 for Jumbo Frames support permanent on a FreeBSD system the /etc/rc.conf file is used:

The variable for em0 and rl0 NICs are ifconfig_em0 and ifconfig_rl0.
The lines to place in /etc/rc.conf should be similar to:

ifconfig_em0="inet 192.168.1.1 netmask 255.255.255.0 media 1000baseTX mediaopt half-duplex mtu 9000"

Change in the above lines the gateway address 192.168.1.1 and the netmask 255.255.255.0 to yours corresponding gw and netmask.
Also in the above example you see the half-duplex ifconfig option is set insetad of full-duplex in order to prevent some duplex mismatches. A full-duplex could be used instead, if you're completely sure on the other side of the host is configured to support full-duplex connections. Otherwise if you try to set full-duplex with other side set to half-duplex or auto-duplex a duplex mismatch will occur. If this happens insetad of taking the advantage of the Increase Jumbo Frames MTU the network connection could become slower than originally with standard ethernet MTU of 1500. One other bad side if you end up with duplex-mismatch could be a high number of loss packets and degraded thoroughout …

7. Setting Jumbo Frames for interfaces assigning dynamic IP via DHCP

If you need to assign an MTU of 9000 for a gigabyt network interfaces, which are receiving its TCP/IP network configuration over DHCP server.
First, tell em0 and rl0 network interfaces to dynamically assign IP addresses via DHCP proto by adding in /etc/rc.conf:

ifconfig_em0="DHCP"
ifconfig_rl0="DHCP"

Secondly make two files /etc/start_if.em0 and /etc/start_if.rl0 and include in each file:

ifconfig em0 media 1000baseTX mediaopt full-duplex mtu 9000
ifconfig rl0 media 1000baseTX mediaopt full-duplex mtu 9000

Copy / paste in root console:

echo 'ifconfig em0 media 1000baseTX mediaopt full-duplex mtu 9000' >> /etc/start_if.em0
echo 'ifconfig rl0 media 1000baseTX mediaopt full-duplex mtu 9000' >> /etc/start_if.rl0

Finally, to load the new MTU for both interfaces, reload the IPs with the increased MTUs:

freebsd# /etc/rc.d/routing restart
default 192.168.1.1 done
add net default: gateway 192.168.1.1

8. Testing if Jumbo Frames is working correctly

To test if an MTU packs are transferred correctly through the network you can use ping or tcpdumpa.) Testing Jumbo Frames enabled packet transfers with tcpdump

freebsd# tcpdump -vvn | grep -i 'length 9000'

You should get output like:

16:40:07.432370 IP (tos 0x0, ttl 50, id 63903, offset 0, flags [DF], proto TCP (6), length 9000) 192.168.1.2.80 > 192.168.1.1.60213: . 85825:87285(1460) ack 668 win 14343
16:40:07.432588 IP (tos 0x0, ttl 50, id 63904, offset 0, flags [DF], proto TCP (6), length 9000) 192.168.1.2.80 > 192.168.1.1.60213: . 87285:88745(1460) ack 668 win 14343
16:40:07.433091 IP (tos 0x0, ttl 50, id 63905, offset 0, flags [DF], proto TCP (6), length 9000) 192.168.1.2.80 > 192.168.1.1.60213: . 23153:24613(1460) ack 668 win 14343
16:40:07.568388 IP (tos 0x0, ttl 50, id 63907, offset 0, flags [DF], proto TCP (6), length 9000) 192.168.1.2.80 > 192.168.1.1.60213: . 88745:90205(1460) ack 668 win 14343
16:40:07.568636 IP (tos 0x0, ttl 50, id 63908, offset 0, flags [DF], proto TCP (6), length 9000) 192.168.1.2.80 > 192.168.1.1.60213: . 90205:91665(1460) ack 668 win 14343
16:40:07.569012 IP (tos 0x0, ttl 50, id 63909, offset 0, flags [DF], proto TCP (6), length 9000) 192.168.1.2.80 > 192.168.1.1.60213: . 91665:93125(1460) ack 668 win 14343
16:40:07.569888 IP (tos 0x0, ttl 50, id 63910, offset 0, flags [DF], proto TCP (6), length 9000) 192.168.1.2.80 > 192.168.1.1.60213: . 93125:94585(1460) ack 668 win 14343

b.) Testing if Jumbo Frames are enabled with ping

Testing Jumbo Frames with ping command on Linux

linux:~# ping 192.168.1.1 -M do -s 8972
PING 192.168.1.1 (192.168.1.1) 8972(9000) bytes of data.
9000 bytes from 192.168.1.1: icmp_req=1 ttl=52 time=43.7 ms
9000 bytes from 192.168.1.1: icmp_req=2 ttl=52 time=43.3 ms
9000 bytes from 192.168.1.1: icmp_req=3 ttl=52 time=43.5 ms
9000 bytes from 192.168.1.1: icmp_req=4 ttl=52 time=44.6 ms
--- 192.168.0.1 ping statistics ---
4 packets transmitted, 4 received, 0% packet loss, time 3003ms
rtt min/avg/max/mdev = 2.397/2.841/4.066/0.708 ms

If you get insetad an an output like:

From 192.168.1.2 icmp_seq=1 Frag needed and DF set (mtu = 1500)

--- 192.168.1.1 ping statistics ---
0 packets transmitted, 0 received, +4 errors

This means a packets with maximum MTU of 1500 could be transmitted and hence something is not okay with the Jumbo Frames config.
Another helpful command in debugging MTU and showing which host in a hop queue support jumbo frames is Linux's traceroute

To debug a path between host and target, you can use:

linux:~# traceroute --mtu www.google.com
...

If you want to test the Jumbo Frames configuration from a Windows host use ms-windows ping command like so:

C:\>ping 192.168.1.2 -f -l 8972
Pinging 192.168.1.2 with 8972 bytes of data:
Reply from 192.168.1.2: bytes=8972 time=2ms TTL=255
Ping statistics for 192.168.1.2:
Packets: Sent = 4, Received = 4, Lost = 0 (0% loss),
Approximate round trip times in milli-seconds:
Minimum = 2ms, Maximum = 2ms, Average = 2ms

Here -l 8972 value is actually equal to 9000. 8972 = 9000 – 20 (20 byte IP header) – 8 (ICMP header)