Posts Tagged ‘running’

Adding another level of security to your shared Debian Linux webhosting server with SuPHP

Tuesday, April 7th, 2015

suphp_improve-apache-security-protect-against-virus-internal-server-infections-suphp-webserver-logo

There are plenty of security schemes and strategies you can implement if you're a Shared Web Hosting company sysadmin however probably the most vital one is to install on Apache + PHP Webserver SuPHP module.

# apt-cache show suphp-common|grep -i descrip -A 4

Description: Common files for mod suphp Suphp consists of an Apache module (mod_suphp for either Apache 1.3.x or Apache 2.x) and a setuid root binary (suphp) that is called by the Apache module to change the uid of the process executing the PHP interpreter to the owner of the php script.

So what SuPHP actuall  does is to run separate CPanel / Kloxo etc. Users with separate username and groupid permissions coinciding with the user present in /etc/passwd , /etc/shadow files existing users, thus in case if someone hacks some of the many customer sites he would be able to only write files and directories under the user with which the security breach occured.

On servers where SuPHP is not installed, all  systemusers are using the same UserID / GuID to run PHP executable scripts under separate domains Virtualhost which are coinciding with Apache (on Debian / Ubuntu  uid, gid – www-data) or on (CentOS / RHEL / Fedora etc. – user apache) so once one site is defaced  exploited by a worm all or most server websites might end up infected with a Web Virus / Worm which will be trying to exploit even more sites of a type running silently in the background.  This is very common scenarios as currently there are donezs of PHP / CSS / Javasripts / XSS vulnerability exploited on VPS and Shared hosting servers due to failure of a customer to update his own CMS  scripts / Website  (Joomla, Wordpress, Drupal etc.) and the lack of resource to regularly monitor all customer activities / websites.

Therefore installing SuPHP Apache module is essential one to install on new serverslarge hosting providers as it saves the admin a lot of headache from spreading malware across all hosted servers sites ..
Some VPS admins that are security freaks tend to also install SuPHP module together with many chrooted Apache / LiteSpeed / Nginx webservers each of which running in a separate Jailed environment.

Of course using SuPHP besides giving a improved security layer to the webserver has its downsides such as increased load for the server and making Apache PHP scripts being interpretted a little bit slower than with plain Apache + PHP but performance difference while running a site on top of SuPHP is often not so drastic so you can live it up ..

Installing SuPHP on a Debian / Ubuntu servers is a piece of cake, just run the as root superuser, usual:
 

# apt-get install libapache2-mod-suphp


Once installed only thing to make is to turn off default installed Apache PHP module (without SuPHP compiled support and restart Apache webserver):
 

# a2dismod php5 …

# /etc/init.d/apache2 restart


To test the SuPHP is properly working on the Apache Webserver go into some of many hosted server websites DocumentRoot

And create new file called test_suphp.php with below content:

# vim test_suphp.php
<?php
system('id');
?>

Then open in browser http://whatever-website/test_suphp.php assuming that system(); function is not disabled for security reasons in php.ini you should get an User ID, GroupID bigger than reserved system IDs on GNU / Linux e.g. ID > UID / GID 99

Its also a good idea to take a look into SuPHP configuration file /etc/suphp/suphp.conf and tailor options according to your liking 

If different hosted client users home directories are into /home directory, set in suphp.conf

;Path all scripts have to be in

docroot=/home/


Also usually it is a good idea to set 

umask=0022 

How to completely disable Replication in MySQL server 5.1.61 on Debian GNU / Linux

Monday, July 16th, 2012

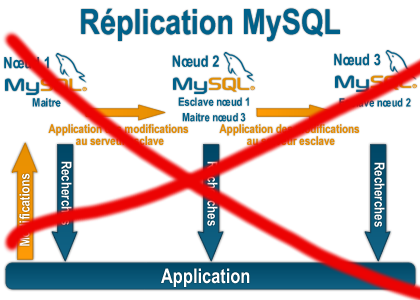
Replication_mysql_disable

Some time ago on one of the Database MySQL servers, I've configured replication as it was required to test somethings. Eventually it turned out replication will be not used (for some reason) it was too slow and not fitting our company needs hence we needed to disable it.

It seemed logical to me that, simply removing any replication related directives from my.cnf and a restart of the SQL server will be enough to turn replication off on the Debian Linux host. Therefore I proceeded removed all replication configs from /etc/my/my.cnf and issued MySQL restart i. e.:

sql-server:~# /etc/init.d/mysql restart
....

This however didn't turned off replication,as I thought and in phpmyadminweb frontend interface, replication was still appearing to be active in the replication tab.

Something was still making the SQL server still act as an Replication Slave Host, so after a bit of pondering and trying to remember, the exact steps I took to make the replication work on the host I remembered that actually I issued:

mysql> START SLAVE;

Onwards I run:

mysql> SHOW SLAVE STATUS;
....

and found in the database the server was still running in Slave Replication mode

Hence to turn off the db host run as a Slave, I had to issue in mysql cli:

mysql> STOP SLAVE;
Query OK, 0 rows affected, 1 warning (0.01 sec)
mysql> RESET SLAVE;
Query OK, 0 rows affected, 1 warning (0.01 sec)

Then after a reload of SQL server in memory, the host finally stopped working as a Slave Replication host, e.g.

sql-server:~# /etc/init.d/mysql restart
....

After the restart, to re-assure myself the SQL server is no more set to run as MySQL replication Slave host:

mysql> SHOW SLAVE STATUS;
Empty set (0.00 sec)

Cheers 😉

‘host-name’ is blocked because of many connection errors; unblock with ‘mysqladmin flush-hosts’

Sunday, May 20th, 2012

mysql-logo-host-name-blocked-because-of-many-connection-errors
My home run machine MySQL server was suddenly down as I tried to check my blog and other sites today, the error I saw while trying to open, this blog as well as other hosted sites using the MySQL was:

Error establishing a database connection

The topology, where this error occured is simple, I have two hosts:

1. Apache version 2.0.64 compiled support externally PHP scripts interpretation via libphp – the host runs on (FreeBSD)

2. A Debian GNU / Linux squeeze running MySQL server version 5.1.61

The Apache host is assigned a local IP address 192.168.0.1 and the SQL server is running on a host with IP 192.168.0.2

To diagnose the error I've logged in to 192.168.0.2 and weirdly the mysql-server was appearing to run just fine:
 

debian:~# ps ax |grep -i mysql
31781 pts/0 S 0:00 /bin/sh /usr/bin/mysqld_safe
31940 pts/0 Sl 12:08 /usr/sbin/mysqld –basedir=/usr –datadir=/var/lib/mysql –user=mysql –pid-file=/var/run/mysqld/mysqld.pid –socket=/var/run/mysqld/mysqld.sock –port=3306
31941 pts/0 S 0:00 logger -t mysqld -p daemon.error
32292 pts/0 S+ 0:00 grep -i mysql

Moreover I could connect to the localhost SQL server with mysql -u root -p and it seemed to run fine. The error Error establishing a database connection meant that either something is messed up with the database or 192.168.0.2 Mysql port 3306 is not properly accessible.

My first guess was something is wrong due to some firewall rules, so I tried to connect from 192.168.0.1 to 192.168.0.2 with telnet:
 

freebsd# telnet 192.168.0.2 3306
Trying 192.168.0.2…
Connected to jericho.
Escape character is '^]'.
Host 'webserver' is blocked because of many connection errors; unblock with 'mysqladmin flush-hosts'
Connection closed by foreign host.

Right after the telnet was initiated as I show in the above output the connection was immediately closed with the error:

Host 'webserver' is blocked because of many connection errors; unblock with 'mysqladmin flush-hosts'Connection closed by foreign host.

In the error 'webserver' is my Apache machine set hostname. The error clearly states the problems with the 'webserver' apache host unable to connect to the SQL database are due to 'many connection errors' and a fix i suggested with mysqladmin flush-hosts

To temporary solve the error and restore my normal connectivity between the Apache and the SQL servers I logged I had to issue on the SQL host:

mysqladmin -u root -p flush-hostsEnter password:

Thogh this temporar fix restored accessibility to the databases and hence the websites errors were resolved, this doesn't guarantee that in the future I wouldn't end up in the same situation and therefore I looked for a permanent fix to the issues once and for all.

The permanent fix consists in changing the default value set for max_connect_error in /etc/mysql/my.cnf, which by default is not too high. Therefore to raise up the variable value, added in my.cnf in conf section [mysqld]:

debian:~# vim /etc/mysql/my.cnf
...
max_connect_errors=4294967295

and afterwards restarted MYSQL:

debian:~# /etc/init.d/mysql restart
Stopping MySQL database server: mysqld.
Starting MySQL database server: mysqld.
Checking for corrupt, not cleanly closed and upgrade needing tables..

To make sure the assigned max_connect_errors=4294967295 is never reached due to Apache to SQL connection errors, I've also added as a cronjob.

debian:~# crontab -u root -e
00 03 * * * mysqladmin flush-hosts

In the cron I have omitted the mysqladmin -u root -p (user/pass) input options because for convenience I have already stored the mysql root password in /root/.my.cnf

Here is how /root/.my.cnf looks like:

debian:~# cat /root/.my.cnf
[client]
user=root
password=a_secret_sql_password

Now hopefully, this would permanently solve SQL's 'failure to accept connections' due to too many connection errors for future.

How to install and configure djbdns from source as a Cachening Localhost Proxy resolver to increase resolving efficiency on Debian 6 Squeeze

Monday, August 1st, 2011

djbdns-logo-install-configure-djbdns-from-source-on-gnu-linux-to-accelerate-server-dns-resolving
It seems DjbDNS on Debian Squeeze has been not included as a Debian package. There is still possibility to install djbdns from an older deb package or install it from source. I however decided to install it from source as finding the old Debian package for Lenny and Etch takes time, plus I'm running an amd64 version of Debian and this might even more complicate the situation.
Installing it from source is not really a Debian way but at least it works.

In this article I assume that daemontools and ucspi-tcp are preliminary installed, if not one needs to install them with:

debian:~# apt-get install ucspi-tcp daemontools daemontools-run
...

The above two ones are required as DJBDNS is originally made to run through djb's daemontools.

Here is the exact step I took to have it installed as local caching DNS server on a Debian Squeeze server:

1. Download and untar DjbDNS

debian:~# wget -q http://cr.yp.to/djbdns/djbdns-1.05.tar.gz debian:~# tar -zxvvf djbdns-1.05.tar.gz
...

2. Add DjbDNS users to /etc/passwd

Creating the below two users is not arbitrary but it's recommendable.

echo 'dnscache:*:54321:54321:dnscache:/dev/null:/dev/null' >> /etc/passwd
echo 'dnslog:*:54322:54322:dnslog:/dev/null:/dev/null' >> /etc/passwd

3. Compile DJBDNS nameserver

First it's necessery to use the below echo command to work around a common Linux bug:

debian:~# cd djbdns-1.05
debian:/root/djbdns-1.05# echo gcc -O2 -include /usr/include/errno.h > conf-cc

Next let's make it:

debian:/root/djbdns-1.05# make

4. Install the compiled djbdns binaries

debian:/root/djbdns-1.05# make setup check
# here comes some long install related output

If no errors are produced by make setup check this means that the djbdns should have installed itself fine.

As installation is compileted it's a good idea to report about the newly installed DjbDNS server if running a mail server. This info is used by Dan Bernstein to gather statistical data about the number of installations of djbdns servers throughout the world.

5. Do some general configurations to the newly installed DJBDNS

Now let's copy the list of the IP addresses of the global DNS root servers in /etc/.

debian:/root/djbdns-1.05# cp -rpf dnsroots.global /etc/ debian:/root/djbdns-1.05# ./dnscache-conf dnscache dnslog /etc/dnscache 0.0.0.0

dnscache-conf will generate some default configuration files for djbdns in /etc/dnscache

Next allow the networks which should be able to use the just installed djbdns server as a caching server:

debian:/root/djbdns-1.05# cd /etc/dnscache/root/ip
debian:/etc/dnscache/root# touch 192.168.1
debian:/root/djbdns-1.05# touch 123.123

First command will allow all ips in range 192.168.1.* to be able to access the DNS server and the second command will allow all ips from 123.123.1-255.1-255 to be able to query the server.

Some further fine tunning can be done from the files:

/etc/dnscache/env/CACHESIZE and /etc/dnscache/env/DATALIMIT

As a last step, before it's running, we have to link the /etc/dnscache to daemontools like so:

debian:/root/djbdns-1.05# ln -sf /etc/dnscache /etc/service/dnscache

If the daemontools is not linked to be accessible via /etc/service it's also a good to link it there:

debian:~# ln -sf /etc/service /

Now the DJBDNS should be running fine, to test if it's running without errors through daemontools I used:

debian:~# ps ax|grep -i readproc
5358 pts/18 R+ 0:00 grep -i readproc
11824 ? S 0:00 readproctitle service errors: ...........

If no errors are displayed it's configured and running to also test if it's capable of resolving I used the host command:

debian:~# host www.pc-freak.net localhost
Using domain server:
Name: localhost
Address: 127.0.0.1#53
Aliases:

www.pc-freak.net has address 83.228.93.76
www.pc-freak.net mail is handled by 0 mail.www.pc-freak.net.

Now the DJBDNS is properly installed and if you test it for a while with time host somehost.com localhost , you will see how quick it is in resolving.

The advantage of running DJBDNS is it does not require almost no maintance, its rock solid and great just like all other Dan Bernstein's written software.
Enjoy 😉

How to check Apache Webserver and MySQL server uptime – Check uptime of a running daemon with PS (process) command

Tuesday, March 10th, 2015

check_Apache_Webserver_and_MySQL_server_uptime_-_Check-uptime-of-running-daemon-service-with-PS-process-command

Something very useful that most Apache LAMP (Linux Apache MySQL PHP) admins should know is how to check Apache Webserver uptime and MySQL server running (uptime).
Checking Apache / MySQL uptime is primary useful for scripting purposes – creating auto Apache / MySQL service restart scripts, or just as a quick console way to check what is the status and uptime of Webserver / SQL.

My experience as a sysadmin shows that lack of Periodic Apache and MySQL restart every week or every month often creates sys-admin a lot of a headaches cause (Apache / NGINX / SQL  server) starts eating too much memory or under some circumstances leads to service or system crashes. Periodic system main services restart is especially helpful in case if Website's backend programming code is writetn in a bad and buggy uneffient way by unprofessional (novice) programmers.
While I was still working as Senior SysAdmin in Design.BG, I've encountered many such Crappy Web applications developed by dozen of different programmers (because company's programmers changed too frequently and many of the hired Web Developers ,were still learning to program, I guess same is true also for other Start-UP Web / IT Company where crappy programming code is developed you will certainly need to keep an eye on Apache / MYSQL uptime.  If that's the case below 2 quick one liners with PS command will help you keep an eye on Apache / MYSQL uptime


ps -eo "%U %c %t"| grep apache2 | grep -v grep|grep root
root     apache2            02:30:05

Note that above example is Debian specific on RPM based distributions you will have to grep for httpd instead of apache2
 

ps -eo "%U %c %t"| grep http| grep -v grep|grep root

root     apache2            10:30:05

To check MySQL uptine:
 

ps -eo "%U %c %t"| grep mysqld
root     mysqld_safe        20:42:53
mysql    mysqld             20:42:53


Though example is for mysql and Apache you can easily use ps cmd in same way to check any other Linux service uptime such as Java / Qmail / PostgreSQL / Postfix etc.
 

ps -eo "%U %c %t"|grep qmail
qmails   qmail-send      19-01:10:48
qmaill   multilog        19-01:10:48
root     qmail-lspawn    19-01:10:48
qmailr   qmail-rspawn    19-01:10:48
qmailq   qmail-clean     19-01:10:48
qmails   qmail-todo      19-01:10:48
qmailq   qmail-clean     19-01:10:48
qmaill   multilog        40-18:02:53


 ps -eo "%U %c %t"|grep -i nginx|grep -v root|uniq
nobody   nginx           55-01:22:44


ps -eo "%U %c %t"|grep -i java|grep -v root |uniq
hipo   java            27-22:02:07


Speed up WordPress / Joomla CMS and MySQL server on Linux with tmpfs ram file system / Decrease Website pageload times with RAM caching

Wednesday, March 4th, 2015

speed-up-accelerate-wordpress-joomla-drupal-cms-and-mysql-server-with-tmpfs_ramfs_decrease-pageload-times-with-ram-caching
As a WordPress blog owner and an sys admin that has to deal with servers running a lot of WordPress / Joomla / Droopal and other custom CMS installed on servers, performoing slow or big enough to put a significant load on servers
and I love efficiency and hardware cost saving is essential for my daily job, I'm constantly trying to find new ways to optimize Customer Website (WordPress) and rest of sites in order to utilize better our servers and improve our clients sites speed (and hence satisfaction). 

There is plenty of little things to do on servers but probably among the most crucial ones which we use nowadays that save us a lot of money is tmpfs, and earlier (ramfs) – previously known as shmfs).
TMPFS is a (Temporary File Storage Facility) Linux kernel technology based on ramfs (used by Linux kernel initrd / initramfs on boot time in order to load and store the Linux kernel in memory, before system hard disk partition file systems are mounted) which is heavily used by virtually all modern popular Linux distributions. 

Using ramfs (cramfs variation – Compressed ROM filesystem) has been used to store different system environment kernel and Desktop components of many Linux environment / applications and used by a lot of the Linux BootCD such as the most famous (Klaus Knopper's) KNOPPIX LiveCD and Trinity Rescue Kit Linux (TRK uses /dev/shm which btw can be seen on most modern Linux distros and is actually just another mounted tmpfs).
If you haven't tried Live Linux yet try it out as me and a lot of sysadmins out there use some kind of LiveLinux at least few times on yearly basis  to Recover Unbootable Linux servers after some applied remote Updates as well as for Rescuing (Save) Data from Linux server failing to properly boot because of hard disk (bad blocks) failures. As I said earlier TMPFS is also used on almost any distribution for the /dev/ filesystem which is kept in memory.

You can see which tmpfs partitions is used on your Linux server with:


debian-server:~# mount |grep -i tmpfs
tmpfs on /lib/init/rw type tmpfs (rw,nosuid,mode=0755)
udev on /dev type tmpfs (rw,mode=0755)
tmpfs on /dev/shm type tmpfs (rw,nosuid,nodev)


Above is an output from a standard Debian Linux server. On CentOS 7 standard mounted tmpfs are as follows:


[root@centos ~]# mount |grep -i tmpfs
devtmpfs on /dev type devtmpfs (rw,nosuid,seclabel,size=1016332k,nr_inodes=254083,mode=755)
tmpfs on /dev/shm type tmpfs (rw,nosuid,nodev,seclabel)
tmpfs on /run type tmpfs (rw,nosuid,nodev,seclabel,mode=755)
tmpfs on /sys/fs/cgroup type tmpfs (rw,nosuid,nodev,noexec,seclabel,mode=755)


[root@centos ~]# df -h|grep -i tmpfs
devtmpfs                 993M     0  993M   0% /dev
tmpfs                   1002M   92K 1002M   1% /dev/shm
tmpfs                   1002M  8.8M  993M   1% /run
tmpfs                   1002M     0 1002M   0% /sys/fs/cgroup

The /run tmpfs mounted directory is also to be seen also on latest Ubuntus and Fedoras and is actually the good old /var/run ( where applications keep there pids and some small app related files) stored in tmpfs filesystem stored in memory.

If you're wondering what is /dev/shm and why it appears mounted on every single Linux Server / Desktop you've ever used this is a special filesystem shared memory which various running programs (processes) can use to transfer data quick and efficient between each other to preven the slow disk swapping. People using Linux for the rest 15 years should remember /dev/shm has been a target of a lot of kernel exploits as historically it had a lot of security issues.

While writting this article I've just checked about KNOPPIX developed amd just for info as of time of writting this distro has already 1000+ programs on CD version and 2600+ packages / application on DVD version.
Nowadays Knoppix is mostly used mostly as USB Live Flash drive as a lot of people are dropping CD / DVD use (many servers doesn't have a CD / DVD Drive) and for USB Live Flash Linux distros tmpfs is also key technology used as this gives the end user an amazing fast experience (Desktop applications run much fasten on Live USBs when tmpfs is used than when the slow 7200 RPM HDDs are used).

Loading big parts of the distribution within RAM (with tmpfs from Linux Kernel 2.4+ onwards) is also heavily used by a lot of Cluster vendors in most of Clustered (Cloud) Linux based environemnts, cause TMPFS gives often speeds up improvements to x30 times and decreases greatly I/O HDD. FreeBSD users will be happy to know that TMPFS is already ported and could be used on from FreeBSD 7.0+ onward.

In this small article I will give you example use on how I use tmpfs to speed up our WordPress Websites which use WP Caching plugins such as W3 Total Cache and WP Super Cache
and Hyper Cache / WP Super Cache disk caching and MySQL server as a Database backend.
Below example is wordpress specific but since it can be easily applied to JoomlaDrupal or any other CMS out there that uses mySQL server to make a lot of CPU expensive memory hungry (LEFT JOIN) queries which end up using a slow 7200 RPM hard disk.


1. Preparing tmpfs partitions for WordPress File Cache directory
 

If you want to give tmpfs a test drive, I recommend you try to create / mount a 20 Megabyte partition. To create a tmpfs partition you don't need to use a tool like mkfs.ext3 / mkfs.ext4 as TMPFS is in reality a virtual filesystem that is mapped in the server system physical RAM (volatile memory). TMPFS is very nice because if you run out of free RAM system starts a combination of RAM use + some Hard disk SWAP 
The great thing about TMPFS is it never uses all of the available RAM and SWAP, which would not halt your server if TMPFS partition gets filled, but instead you will start getting the usual "Insufficient Disk Space", just like with a physical HDD parititon. RAMFS cares much less about server compared to TMPFS, because if RAMFS is historically older.

ramfs file systems cannot be limited in size like a disk base file system which is limited by it’s capacity, thus ramfs will continue using memory storage until the system runs out of RAM and likely crashes or becomes unresponsive. This is a problem if the application writing to the file system cannot be limited in total size, so in my opinion you better stay away from RAMFS except you have a good idea what you're doing. Another disadvantage of RAMFS compared to TMPFS is you cannot see the size of the file system in df and it can only be estimated by looking at the cached entry in free.

Note that before proceeding to use TMPFS or RAMFS you should know besides having advantages, there are certain serious disadvantage that if the server using tmpfs (in RAM) to store files crashes the customer might loose his data, therefore using RAM filesystems on Production servers is best to be used just for caching folders which are regularly synchronized with (rsync) to some folder to assure no data will be lost on server reboot or crash.

Memory of fast storage areas are ideally suited for applications which need repetitively small data areas for caching or using as temporary space such as Jira (Issue and Proejct Tracking Software) Indexing  As the data is lost when the machine reboots the tmpfs stored data must not be data of high importance as even scheduling backups cannot guarantee that all the data will be replicated in the even of a system crash.

To test mounting a tmpfs virtual (memory stored) filesystem issue:
 

mount -t tmpfs tmpfs -o size=256m /mnt/tmpfs


If you want to test mount a ramfs instead:


 mount -t ramfs -o size=256m ramfs /mnt/ramfs


debian-server:~#  mount |grep -i -E "ramfs|tmpfs"
tmpfs on /lib/init/rw type tmpfs (rw,nosuid,mode=0755)
udev on /dev type tmpfs (rw,mode=0755)
tmpfs on /dev/shm type tmpfs (rw,nosuid,nodev)
tmpfs on /mnt/tmpfs type tmpfs (rw,size=256m)
ramfs on /mnt/ramfs type tmpfs (rw,size=256m)


Once mounted tmpfs can be used in the same way as any ext4 / reiserfs filesystem. In the same way to make mounts permanent, its necessery to add a line to /etc/fstab

To illustrate better a tmpfs use case on my blog running WordPress with W3TotalCache (W3TC) plugin cache folder in /var/www/blog/wp-content/w3tc to get advantage of tmpfs to store w3tc files.

a) Stop Apache

On Debian
 

debian-server:~# /etc/init.d/apache stop


On CentOS 
 

[root@centos ~]# /etc/init.d/httpd stop


b) Move w3tc dir to w3tc-bak


debian-server:~# cd /var/www/blog/wp-content/
debian-server:~# mv w3tc w3tc-bak


c) Create w3tc directory
 

debian-server:/var/www/blog/wp-content# mkdir w3tc
debian-server:/var/www/blog/wp-content# chown -R www-data:www-data w3tc


d) Add tmpfs record to /etc/fstab

My W3TC Cache didn't grow bigger than 2Gigabytes so I create a 2Giga directory for it by adding following in /etc/fstab 
 

debian-server:~# vim /etc/fstab


tmpfs /var/www/blog/wp-content/w3tc tmpfs defaults,size=2g,noexec,nosuid,uid=33,gid=33,mode=1755 0 0


You might also want to add the nr_inodes (option) to tmpfs while mounting. nr_inodes is the maximum inode for instance. Default is half the number of your physical RAM pages, (on a machine with highmem) the number of lowmem RAM page, some common option that should work is nr_inodes=5k, if you're unsure what this option does you can safely skip it 🙂

e) Mount new added tmpfs folder

Then to mount the newly added filesystem issue:
 

mount -a


Or if you're on a CentOS / RHEL server use httpd Apache user instead and whenever you have docroot and wordpress installed.


[root@centos ~]# chown -R apache:apache: w3tc


If you're using Apache SuPHP use whatever the UID / GID is proper.

On CentOS you will need to set proper UID and GID (UserID / GroupID), to find out which ones to to use check in /etc/passwd:
 

[root@centos ~]# grep -i apache /etc/passwd
apache:x:48:48:Apache:/var/www:/sbin/nologin


f) Move old w3tc cache from w3tc-bak to w3tc


debian-server:/var/www/blog/wp-content# mv w3tc-bak/* w3tc/


g) Start again Apache

On Debian:


debian-server:~# /etc/init.d/apache2 start


On CentOS:
 

[root@centos~]# /etc/init.d/httpd start

h) Keeping w3tc cache site folder synced

As I said earlier the biggest problem with caching (the reason why many hosting providers) and site admins refuse to use it is they might loose some data, to prevent data loss or at least mitigate the data loss to few minutes intervals it is a good idea to synchronize tmpfs kept folders somewhere to disk with rsync.

To achieve that use a cronjob like this:
 

debian-server:~# crontab -u root -e
*/5 * * * * /usr/bin/ionice -c3 -n7 /usr/bin/nice -n 19 /usr/bin/rsync -ah –stats –delete /var/www/blog/wp-content/w3tc/ /backups/tmpfs/cache/ 1>/dev/null


Note that you will need to have the /backups/tmpfs/cache folder existing, create it with:


debian-server:~# mkdir -p /backups/tmpfs/cache


You will also need to add a rsync synchronization from backupped folder to tmpfs (in case if the server gets accidently rebooted because it hanged or power outage), place in

/etc/rc.local


ionice -c3 -n7 nice -n 19 rsync -ahv –stats –delete /backups/tmpfs/cache/ /var/www/blog/wp-content/w3tc/ 1>/dev/null


(somewhere before exit 0) line
 

0 05 * * * /usr/bin/ionice -c3 -n7 /bin/nice -n 19 /usr/bin/rsync -ah –stats –delete /var/www/blog/wp-content/w3tc/ /backups/tmpfs/cache/ 1>/dev/null


2. Preparing tmpfs partitions for MySQL server temp File Cache directory


Its common that MySQL servers had to serve a lot of long and heavy SQL JOIN Queries mostly by related posts WP plugins such as (Zemanta Related Posts) and Contextual Related posts though MySQLs are well optimized  to work as much as efficient using mysql tuner (tuning primer) still often SQL servers get a lot of temp tables created to disk (about 25% to 30%) of all SQL queries use somehow HDD to serve queries and as this is very slow and there is file lock created the overall MySQL performance becomes sluggish at times to fix (resolve) that without playing with SQL code to optimize the slow queries the best way I found is by using TMPFS as MySQL temp folder.

To do so I create a TMPFS usually the size of 256 MB because this is usually enough for us, but other hosting companies might want to add bigger virtual temp disk:

a) Add tmpfs new dir to /etc/fstab

In /etc/fstab add below record with vim editor:
 

debian-server:~# vim /etc/fstab


tmpfs /var/mysqltmp tmpfs rw,gid=111,uid=108,size=256M,nr_inodes=10k,mode=0700 0 0


Note that the uid / and gid 105 and 114 are taken again from /etc/passwd

On Debian

debian-server:~# grep -i mysql /etc/passwd
mysql:x:108:111:MySQL Server,,,:/var/lib/mysql:/bin/false


On CentOS
 

[root@centos ~]# grep -i mysql /etc/passwd
mysql:x:27:27:MySQL Server:/var/lib/mysql:/bin/bash


b) Create folder /var/mysqltmp or whenever you want to place the tmpfs memory kept SQL folder


debian-server:~# mkdir /var/mysqltmp
debian-server:~# chown mysql:mysql /var/mysqltmp


debian-server:~# mount|grep -i tmpfs
tmpfs on /lib/init/rw type tmpfs (rw,nosuid,mode=0755)
udev on /dev type tmpfs (rw,mode=0755)
tmpfs on /dev/shm type tmpfs (rw,nosuid,nodev)
tmpfs on /var/www/blog/wp-content/w3tc type tmpfs (rw,noexec,nosuid,size=2g,uid=33,gid=33,mode=1755)
tmpfs on /var/mysqltmp type tmpfs (rw,gid=108,uid=111,size=256M,nr_inodes=10k,mode=0700)


c) Add new path to tmpfs created folder in my.cnf 

Then  edit /etc/mysql/my.cnf


debian-server:~# vim /etc/mysql/my.cnf

[mysqld]
#
# * Basic Settings
#
user        = mysql
pid-file    = /var/run/mysqld/mysqld.pid
socket      = /var/run/mysqld/mysqld.sock
port        = 3306
basedir     = /usr
datadir     = /var/lib/mysql
tmpdir      = /var/mysqltmp


On CentOS edit and change tmpdir in same way within /etc/my.cnf


d) Finally Restart Apache and MySQL to make mysql start using new set tmpfs memory kept folder

On Debian:
 

debian-server:~# /etc/init.d/apache2 stop; /etc/init.d/mysql restart; /etc/init.d/apache2 start

On CentOS:
 

[root@centos ~]# /etc/init.d/httpd stop; /etc/init.d/mysqld restart; /etc/initd/httpd start


Now monitor your server and check your pagespeed increase for me such an optimization usually improves site performance so site becomes +50% faster, to see the difference you can test your website before applying tmpfs caching for site and after that by using Google PageInsight (PageSpeed) Online Test. Though this example is for MySQL and WordPress you can easily adopt the same for Joomla if you have Joomla Caching enabled to some folder, same goes for any other CMS such as Drupal that can take use of Disk Caching. Actually its a small secret of many Hosting providers that allow clients to create sites via CPanel and Kloxo this tmpfs optimizations are already used for sites and by this the provider is able to offer better website service on lower prices. VPS hosting providers also use heavy caching. A lot of people are using TMPFS also to accelerate Sites that have enabled Google Pagespeed as Cacher and accelerator, as PageSpeed module puts a heavy HDD I/O load that can easily stone the server. Many admins also choose to use TMPFS for  /tmp, /var/run, and /var/lock directories as this leads often to significant overall server services operations improvement.
Once you have tmpfs enabled, It is a good idea to periodically monitor your SWAP used space with (df -h), because if you allocate bigger tmpfs partitions than your physical memory and tmpfs's full size starts to be used your machine will start swapping heavily and this could have a very negative performance affect.
 

debian-server:~# df -h|grep -i tmpfs
tmpfs            3,9G     0   3,9G   0% /lib/init/rw
tmpfs            3,9G     0   3,9G   0% /dev/shm
tmpfs            2,0G  1,4G   712M  66% /var/www/blog/wp-content/w3tc
tmpfs            256M     0   256M   0% /mnt/tmpfs
tmpfs            256M  236K   256M   1% /var/mysqltmp

The applications of tmpfs to accelerate services is up to your imagination, so I will be glad to hear from other admins on any interesting other application or problems faced while using TMPFS.

 Enjoy! 🙂

Create SSH Tunnel to MySQL server to access remote filtered MySQL port 3306 host through localhost port 3308

Friday, February 27th, 2015

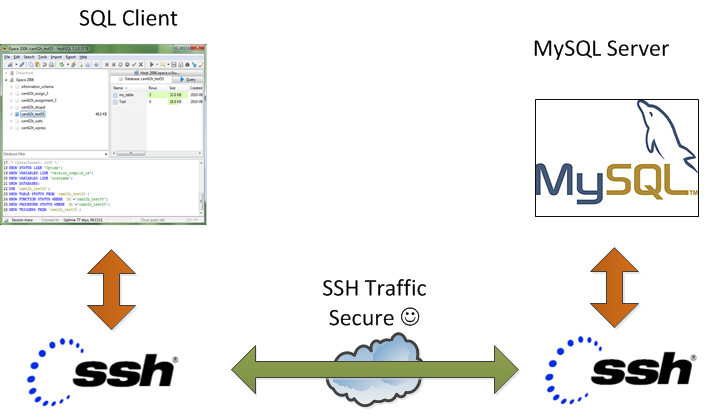
create_ssh_tunnel_to-mysql_server-to-access-remote-filtered-mysql-on-port-3306-secure_ssh_traffic
On our Debian / CentOS / Ubuntu Linux and Windows servers we're running multiple MySQL servers and our customers sometimes need to access this servers.
This is usually problem because MySQL Db  servers are running in a DMZ Zone with a strong firewall and besides that for security reasons SQLs are configured to only listen for connections coming from localhost, I mean in config files across our Debian Linux servers and CentOS / RHEL Linux machines the /etc/mysql/my.cnf and /etc/my.cnf the setting for bind-address is 127.0.0.1:
 

[root@centos ~]# grep -i bind-address /etc/my.cnf 
bind-address            = 127.0.0.1
##bind-address  = 0.0.0.0


For source code developers which are accessing development SQL servers only through a VPN secured DMZ Network there are few MySQL servers witha allowed access remotely from all hosts, e.g. on those I have configured:
 

[root@ubuntu-dev ~]# grep -i bind-address /etc/my.cnf 

bind-address  = 0.0.0.0


However though clients insisted to have remote access to their MySQL Databases but since this is pretty unsecure, we decided not to configure MySQLs to listen to all available IP addresses / network interfaces. 
MySQl acess is allowed only through PhpMyAdmin accessible via Cleint's Web interface which on some servers is CPanel  and on other Kloxo (This is open source CPanel like very nice webhosting platform).

For some stubborn clients which wanted to have a mysql CLI and MySQL Desktop clients access to be able to easily analyze their databases with Desktop clients such as MySQL WorkBench there is a "hackers" like work around to create and use a MySQL Tunnel to SQL server from their local Windows PCs using standard OpenSSH Linux Client from Cygwin,  MobaXterm which already comes with the SSH client pre-installed and has easy GUI interface to create SSH tunnels or eventually use Putty's Plink (Command Line Interface) to create the tunnel

Anyways the preferred and recommended (easiest) way to achieve a tunnel between MySQL and local PC (nomatter whether Windows or Linux client system) is to use standard ssh client and below command:
 

ssh -o ServerAliveInterval=10 -M -T -M -N -L 3308:localhost:3306 your-server.your-domain.com


By default SSH tunnel will keep opened for 3 minutes and if not used it will automatically close to get around this issue, you might want to raise it to (lets say 15 minutes). To do so in home directory user has to add in:
 

~/.ssh/config

ServerAliveInterval 15
ServerAliveCountMax 4


Note that sometimes it is possible ven though ssh tunnel timeout value is raised to not take affect if there is some NAT (Network Adress Translation) with low timeout setting on a firewall level. If you face constant SSH Tunnel timeouts you can use below bash few lines code to auto-respawn SSH tunnel connection (for Windows users use MobaXterm or install in advance bash shell cygwin package):
 

while true
do
 
ssh -o ServerAliveInterval=10 -M -T -M -N -L 3308:localhost:3306 your-server.your-domain.com
  sleep 15
done


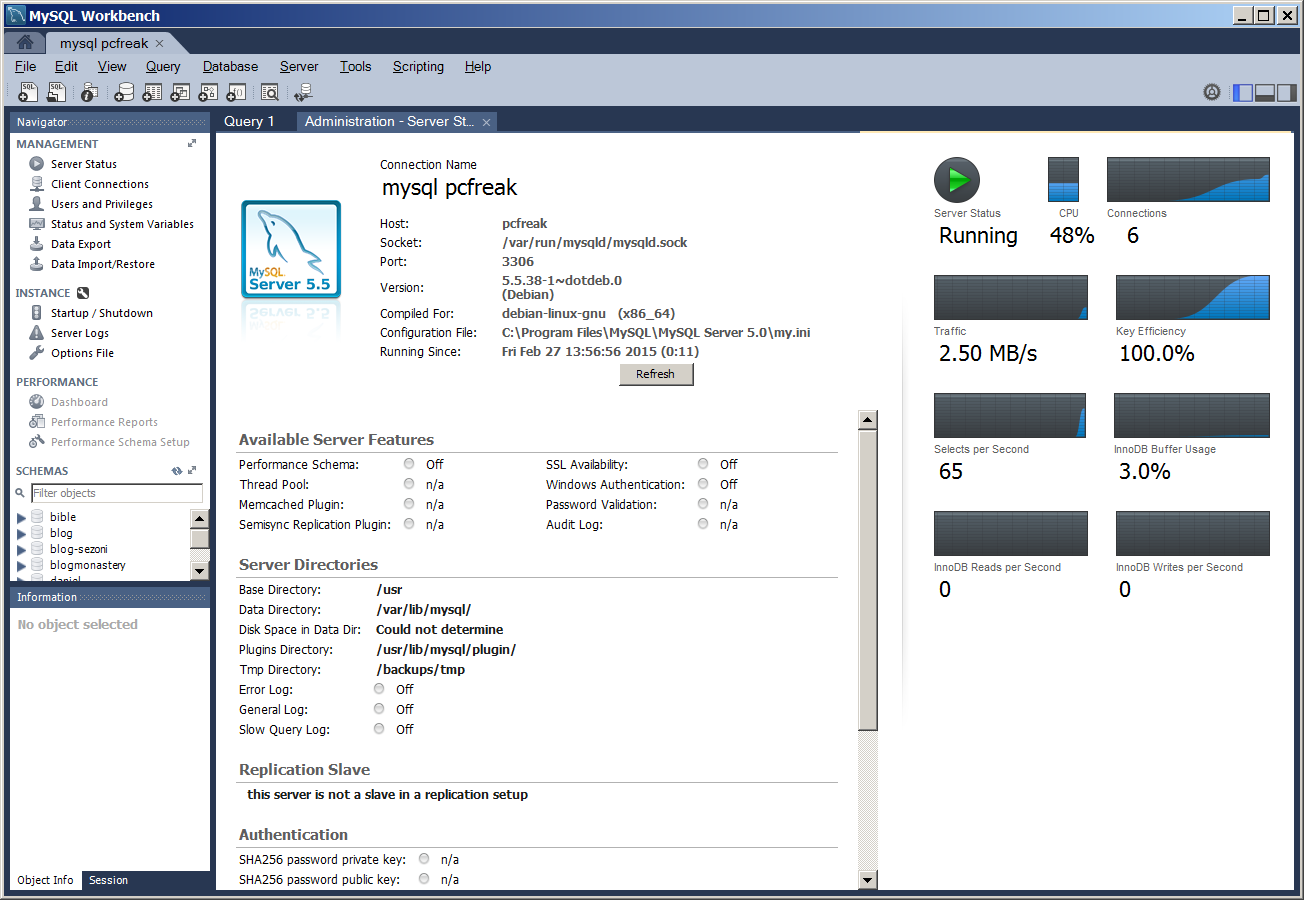
Below is MySQLBench screenshot connected through server where this blog is located after establishing ssh tunnel to remote mysql server on port 3308 on localhost

mysql-workbench-database-analysis-and-management-gui-tool-convenient-for-data-migratin-and-queries-screenshot-

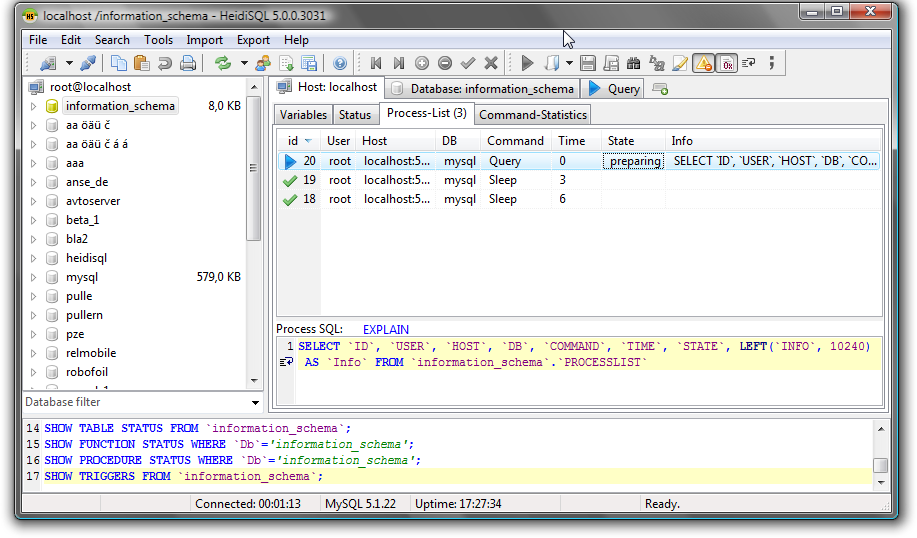
There is also another alternative way to access remote firewall filtered mysql servers without running complex commands to Run a tunnel which we recommend for clients (sql developers / sql designers) by using HeidiSQL (which is a useful tool for webdevelopers who has to deal with MySQL and MSSQL hosted Dbs).

heidisql-show-host_processlist-screenshot

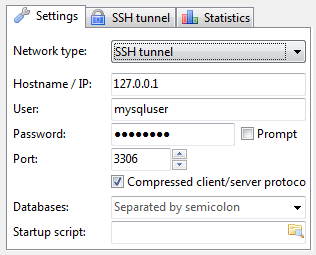
To connect to remote MySQL server through a Tunnel using Heidi:

mysql_connection_configuration-heidi-mysql-gui-connect-tool


In the ‘Settings’ tab

1. In the dropdown list of ‘Network type’, please select SSH tunnel

2. Hostname/IP: localhost (even you are connecting remotely)

3. Username & Password: your mysql user and password

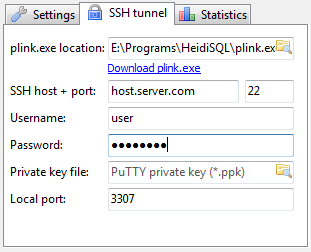
Next, in the tab SSH Tunnel:

1. specify plink.exe or you need to download it and specify where it’s located

2. Host + port: the remote IP of your SSH server(should be MySQL server as well), port 22 if you don’t change anything

3. Username & password: SSH username (not MySQL user)


heidi-connection_ssh_tunnel_configuration-heidi-sql-tool-screenshot
 

Linux release of the game Savage Wheels (Destruction Derby like game) is out!

Friday, September 17th, 2010

Savage Wheels Game for Linux

A close friend of mine Pro-Xex (a.k.a. Necroleak) has released Savage Wheels game for Linux.

The Savage Wheels game is a recreation of a game in a way similar to the good old Destruction Derby that most of the hard code old school arcade know very well.

The Savage Wheels has been an existant for a long time for a free download. However for a couple of years the Pro-XeX decided not to publish it’s code publicly, his considerations were that the code is too messy and not ready to go public.

For almost 2 years now the game source code has been existent openly for download from a source repository at google code

Though the source was there for download, until recently, the game source code was not ready to compile on Linux, though the game’s programming style used is 100% compatible with the Linux / BSD platform.

Right now the game is licensed under the MIT free software license
A few weeks before Peter (Pro-Xex) has contacted me and shared and told me the good news, that he has finally ported the game for the Linux platform and asked me to help him a bit with the game testing!
I thought this is pretty cool, but I was busy until this very day that I actually downloaded the compiled binary of Savage Wheels on my Debian Testing/Unstable (Squeeze/Sid) and gave it a try.

I’m running the 64 bit Debian release, featuring kernel version:

Linux noah 2.6.32-5-amd64 #1 SMP Wed Aug 25 13:59:41 UTC 2010 x86_64 GNU/Linux

Installing the game was a really easy all I had to do is download the archived binary of the game and untar it into a new directory I’ve created for the game.

hipo@noah:~$ mkdir savagewheels
hipo@noah:~$ cd savagewheels
hipo@noah:~/savagewheels$ wget -c http://savagewheels.googlecode.com/files/savagewheels-1.4-linux-x86.tar.gz
hipo@noah:~/savagewheels$ tar -zxvf savagewheels-1.4-linux-x86.tar.gz

It will take like few secs until the game source gets extracted:

To go and start up the game I directly tried executing the game main binary file savagewheels , like you can see below

hipo@noah:~/savagewheels$ ./savagewheels
./savagewheels: error while loading shared libraries: libfmod-3.75.so: cannot open shared object file: No such file or directory

The error in loading library was pretty unexpected, but counting the fact that I’m one of the first people that test the game on Linux I guess it’s pretty normal.
In order to resolve the missing shared library on game execution It was necessary to copy the libfmod-3.75.so to /usr/local/lib/

To do so I issued as a root user:

hipo@noah:/home/hipo/savagewheels# cp -rpf libfmod-3.75.so /usr/local/lib

In case if you don’t want to copy the libfmod-3.75.so into /usr/local/lib, it’s also possible to use the shell export command to specify the exact location of libfmod-3.75.so to your current known systemlibraries.

If you prefer it that way issue command:


hipo@noah:~/savagewheels$ export LD_LIBRARY_PATH=.:$LD_LIBRARY_PATH

Now when I invoked the savagewheels game binary once again:
hipo@noah:~/savagewheels$ ./savagewheels

the game poped up in a window.

As I’ve red in the Readme.html file it’s already noted there that by default the game would run in window mode instead of full screen due to some bugs or video drivers etc.
Happily it was indicated in the Readme file that in order to run it in fullscreen, it’s necessary to invoke the game binary with the -force-fullscreen option included, e.g. running it in fullscreen comes to:

hipo@noah:~/savagewheels$ ./savagewheels -force-fullscreen

At first I was a bit confused when the game poped up before I notice the left side menu which appears could be only reached with the mouse pointer. So I warn you that if you go to give the game a try you will probably wonder how to start up the game after the game entry window with menus appears.

Since the game is so new with Linux it has several bugs to be fixed, one of the bugs is that the Window in which the game pops up by default couldn’t be closed if you press the close window button.

Another thing I do notice is that when I play sometimes during a I crash another car, my car gets stucked for a while.

Another thing which is not very intuitive about the game is the player keys, they could be fount expolained in Readme.html

But I’ll post them here as well to facilitate my dear readers who might be willing to play the game immediately without reading boring docs 🙂

So Player 1 keys are:

arrow keys to move
UP (accelerate up)
LEFT (turn left) RIGHT (turn right)
DOWN (back gear)
RIGHT CTRL - to place landmines
DELETE - self destruction

I think giving the player 1 keys are enough for the player 2 control keys take a quick look in Readme.html

Here is the time to tell you that the game music is absolutely awesome!! So the game is worthy to play just because Pro-Xex has present the user with the wonderful soundtrack that is.

For some further general information related to the game you can read the Savage Wheels game Readme online from here

I would place the game among one of the best car crash games available currently for Linux, so if you’re a arcade game maniac you would probably have a great time with the game.