Posts Tagged ‘conf’

Remove \r (Carriage Return) from string with standard bash shell / sed / tr / vim or awk – Replace \r hidden messy characters from files

Tuesday, February 10th, 2015

remove_r_carriage_return_from_string_with-standard-bash_shell_sed_tr_or_awk_replace_annoying_hidden_messy_characters_from_files

I've been recently writting this Apache webserver / Tomcat / JBoss / Java decomissioning bash script. Part of the script includes extraction from httpd.conf of DocumentRoot variable configured for Apache host.
I was using following one liner to grep and store DocumentRoot set directory into new variable:

documentroot=$(grep -i documentroot /usr/local/apache/conf/httpd.conf | awk '{ print $2 }' |sed -e 's#"##g');

Above line greps for documentroot prints 2nd column of the matchi (which is the Apache server set docroot and then removes any " chars).

However I faced the issue that parsed string contained in $documentroot variable there was mysteriously containing r – return carriage – this is usually Carriage Return (CR) sent by Mac OS and Apple computers. For those who don't know the End of Line of files in UNIX / Linux OS-es is LF – often abreviated as n – often translated as return new line), while Windows PCs use for EOF CR + LF – known as the infamous  rn. I was running the script from the server which is running SuSE SLES 11 Linux, meaning the CR + LF end of file is standardly used, however it seem someone has editted the httpd.conf earlier with a text editor from Mac OS X (Terminal). Thus I needed a way to remove the r from CR character out of the variable, because otherwise I couldn't use it to properly exec tar to archive the documentroot set directory, cause the documentroot directory was showing unexistent.

Opening the httpd.conf in standard editor didn't show the r at the end of
"directory", e.g. I could see in the file when opened with vim

DocumentRoot "/usr/local/apache/htdocs/site/www"

However obviously the r character was there to visualize it I had to use cat command -v option (–show-nonprinting):

cat -v /usr/local/apache/conf/httpd.conf

DocumentRoot "/usr/local/apache/htdocs/site/wwwr"


1. Remove the r CR with bash

To solve that with bash, I had to use another quick bash parsing that scans through $directory and removes r, here is how:

documentroot=${documentroot%$'r'}

It is also possible to use same example to remove "broken" Windows rn Carriage Returns after file is migrated from Windows to Liunx /  FreeBSD host:

documentroot=${documentroot%$'rn'}


2. Remove r Carriage Return character with sed

Other way to do remove (del) Windows / Mac OS Carriage Returns in case if Migrating to UNIX is with sed (stream editor).

sed -i s/r// filename >> filename_out.txt


3. Remove r CR character with tr

There is a third way also to do it with (tr) – translate or delete characters old shool *nix command:

tr -d 'r' < file_with_carriagereturns > file_without_carriage_returns


4. Remove r CRs with awk (pattern scanning and processing language)

 awk 'sub("$", "r")' inputf_with_crs.txt > outputf_without_crs.txt


5. Delete r CR with VIM editor

:%s/r//g


6. Converting  file DOS / UNIX OSes with dos2unix and unix2dos command line tools

For sysadmins who don't want to bother with writting code to convert CR when moving files between Windows and UNIX hosts there are dos2unix and unix2dos installable commands.

All done Cheers ! 🙂

How to remove and disable BlueTooth support on Debian GNU / Linux servers

Thursday, October 18th, 2012

How to remove / disable bluetooth support on Debian GNU / Linux servers
If you running Debian Squeeze Linux (as server Apache, MySQL, Qmail etc.) on brand new purchased hardware with bluetooth support; you will notice default Linux kernel will detect and load modules for Bluetooth

This would not be a problem only if Bluetooth does not pose possible errors or (even at cases even maybe system hangs ups?). The actual reason in my case to want to disable bluetooth on a productive Linux server operating like host was I found out in dmesg produced output, some errors related to Bluetooth, here they are:


root@deb:~# dmesg|grep -i 'call trace' -A 8
[323406.744439] Call Trace:
[323406.744440] [] ? lapic_next_event+0x18/0x1d
[323406.744450] [] ? __report_bad_irq+0x30/0x7d
[323406.744453] [] ? note_interrupt+0x105/0x16e
[323406.744455] [] ? handle_fasteoi_irq+0x93/0xb5
[323406.744458] [] ? handle_irq+0x17/0x1d
[323406.744460] [] ? do_IRQ+0x57/0xb6
[323406.744463] [] ? ret_from_intr+0x0/0x11
[323406.744464]

I saw this error and similar ones occuring, every now and then obviously displaying something wents wrongs with IRQs related to BlueTooth Communication with Kernel (as it keeps processing requests loaded in system memory) …

Well anyways having the bluetooth kernel module loaded on memory just takes up few chunks of useless assigned memory.
I don't have intention to use bluetoothever in future on these host so I decided to completely remove bluetooth support on those Debian.

1. Remove blueetoh support on Debian GNU / Linux

First to check info about the loaded kernel module bluetooth.ko and its assigned module load alias run:


root@deb:~# /sbin/modinfo bluetooth
filename: /lib/modules/2.6.32-5-amd64/kernel/net/bluetooth/bluetooth.ko
alias: net-pf-31
license: GPL
version: 2.15
description: Bluetooth Core ver 2.15
author: Marcel Holtmann
srcversion: 9FD5BF98FC88505DC637909
depends: rfkill
vermagic: 2.6.32-5-amd64 SMP mod_unload modversions

Secondly disable memory preloaded bluetooth.ko on the current host with cmds:


root@deb:~# rmmod -f bnep
root@deb:~# rmmod -f l2cap
root@deb:~# rmmod -f sco
root@deb:~# rmmod -f bluetooth

Default way to control if Bluetooth (on host support is ON or OFF) is through /etc/default/bluetooth. Inside /etc/default/bluetooth is a control variable:


BLUETOOTH_ENABLED=1

To shut it off change its value to 0:


BLUETOOTH_ENABLED=0

Then to permanently prevent bluetooth.ko from being ever in future loaded its also good idea to blacklist modules – bnep, btusb, bluetooth:


root@deb:~# echo 'blacklist bnep' >> /etc/modprobe.d/bluetooth.conf
root@deb:~# echo 'blacklist btusb' >> /etc/modprobe.d/bluetooth.conf
root@deb:~# echo 'blacklist bluetooth' >> /etc/modprobe.d/bluetooth.conf

Onwards re-build, current kernel initramfs:


root@deb:~# update-initramfs -u -k `uname -r` -v
......
......

Next update boot init scripts with update-rc.d to make sure bluetooth (service / daemon) is not started:


root@deb:~# update-rc.d bluetooth remove
......

That's all bluetooth will not load up anymore on next boot and at present time will not take up useless mem space.

2. Re-enable disabled blueetooth on Debian Linux
 
I've been asked in one of comments, what to do If you need to re-enable bluetooth on your Debian Linux at some time in future, so here are the steps to turn back blueetooth on again


/etc/modprobe.d/bluetooth.conf

Change variable:

BLUETOOTH_ENABLED=0

to 

BLUETOOTH_ENABLED=1

Open  /etc/modprobe.d/bluetooth.conf and remove any blacklisted modules, e.g:

'blacklist bnep'
'blacklist btusb'
&39;blacklist bluetooth'

Rebuild again kernel ramfs

root@deb:~# update-initramfs -u -k `uname -r` -v
 
Enjoy 🙂

How to disable IPv6 on Debian / Ubuntu / CentOS and RHEL Linux

Friday, December 9th, 2011

I have few servers, which have automatically enabled IPv6 protocols (IPv6 gets automatically enabled on Debian), as well as on most latest Linux distribituions nowdays.

Disabling IPv6 network protocol on Linux if not used has 2 reasons:

1. Security (It’s well known security practice to disable anything not used on a server)
Besides that IPv6 has been known for few criticil security vulnerabilities, which has historically affected the Linux kernel.
2. Performance (Sometimes disabling IPv6 could have positive impact on IPv4 especially on heavy traffic network servers).
I’ve red people claiming disabling IPv6 improves the DNS performance, however since this is not rumors and did not check it personally I cannot positively confirm this.

Disabling IPv6 on all GNU / Linuces can be achieved by changing the kernel sysctl settings net.ipv6.conf.all.disable_ipv6 by default net.ipv6.conf.all.disable_ipv6 equals 1 which means IPv6 is enabled, hence to disable IPv6 I issued:

server:~# sysctl net.ipv6.conf.all.disable_ipv6=0

To set it permanently on system boot I put the setting also in /etc/sysctl.conf :

server:~# echo 'net.ipv6.conf.all.disable = 1 >> /etc/sysctl.conf

The aforedescribed methods should be working on most Linux kernels version > 2.6.27 in that number it should work 100% on recent versions of Fedora, CentOS, Debian and Ubuntu.

To disable IPv6 protocol on Debian Lenny its necessery to blackist the ipv6 module in /etc/modprobe.d/blacklist by issuing:

echo 'blacklist ipv6' >> /etc/modprobe.d/blacklist

On Fedora / CentOS there is a another universal “Redhat” way disable IPv6.

On them disabling IPv6 is done by editting /etc/sysconfig/network and adding:

NETWORKING_IPV6=no
IPV6INIT=no

I would be happy to hear how people achieved disabling the IPv6, since on earlier and (various by distro) Linuxes the way to disable the IPv6 is probably different.
 

Alto to stop Iptables IPV6 on CentOS / Fedora and RHEL issue:

# service ip6tables stop

# service ip6tables off

Preserve Session IDs of Tomcat cluster behind Apache reverse proxy / Sticky sessions with mod_proxy and Tomcat

Wednesday, February 26th, 2014

apache_and_tomcat_merged_logo_prevent_sticky_sessions
Having a combination of Apache webservice Reverse Proxy to redirect invisibly traffic to a number of Tomcat server positioned in a DMZ is a classic task in big companies Corporate world.
Hence if you work for company like IBM or HP sooner or later you will need to configure Apache Webserver cluster with few running Jakarta Tomcat Application servers behind. Scenario with necessity to access a java based application via Tomcat which requires logging (authentication) relaying on establishing and keeping a session ID is probably one of the most common ones and if you do it for first time you will probably end up with Session ID issues.  Session ID issues are hard to capture at first as on first glimpse application will seem to be working but users will have to re-login all the time even though the programmers might have coded for a session to expiry in 30 minutes or so.

… I mean not having configured Session ID prevention to Tomcats will cause random authentication session expiries and users using the Tomcat app will be unable to normally access below application with authenticated credentials. The solution to these is known under term "Sticky sessions"
To configure Sticky sessions you need to already have configured Apache/s with following minimum configuration:

  • enabled mod_proxy, proxy_balancer_module, proxy_http_module and or mod_proxy_ajp (in Apache config)

  LoadModule proxy_module modules/mod_proxy.so
LoadModule proxy_balancer_module modules/mod_proxy_balancer.so
LoadModule proxy_http_module modules/mod_proxy_http.so

  • And configured and tested Tomcats running an Application reachable via AJP protocol

Below example assumes there is Reverse Proxy Load Balancer Apache which has to forward all traffic to 2 tomcats. The config can easily be extended for as many as necessary by adding more BalancerMembers.

In Apache webserver (apache2.conf / httpd.conf) you need to have JSESSIONID configured. These JSESSIONID is going to be appended to each client request from Reverse Proxy to each of Tomcat servers with value opened once on authentication to first Tomcat node to each of the other ones.

<Proxy balancer://mycluster>
BalancerMember ajp://10.16.166.53:11010/ route=delivery1
BalancerMember ajp://10.16.166.66:11010/ route=delivery2
</Proxy>

ProxyRequests Off
ProxyPass / balancer://mycluster/ stickysession=JSESSIONID
ProxyPassReverse / balancer://mycluster/

The two variables route=delivery1 and route=delivery2 are routed to hosts identificators that also has to be present in Tomcat server configurations
In Tomcat App server First Node (server.xml)

<Engine name="Catalina" defaultHost="localhost" jvmRoute="delivery1">

In Tomcat App server Second Node (server.xml)

<Engine name="Catalina" defaultHost="localhost" jvmRoute="delivery2">

Once Sticky Sessions are configured it is useful to be able to track they work fine this is possible through logging each of established JESSSIONIDs, to do so add in httpd.conf

LogFormat "%h %l %u %t \"%r\" %>s %b \"%{Referer}i\" \"%{User-Agent}i\"\"%{JSESSIONID}C\"" combined

After modifications restart Apache and Tomcat to load new configs. In Apache access.log the proof should be the proof that sessions are preserved via JSESSIONID, there should be logs like:
 

127.0.0.1 - - [18/Sep/2013:10:02:02 +0800] "POST /examples/servlets/servlet/RequestParamExample HTTP/1.1" 200 662 "http://localhost/examples/servlets/servlet/RequestParamExample" "Mozilla/5.0 (X11; Linux x86_64; rv:17.0) Gecko/20130807 Firefox/17.0""B80557A1D9B48EC1D73CF8C7482B7D46.server2"

127.0.0.1 - - [18/Sep/2013:10:02:06 +0800] "GET /examples/servlets/servlet/RequestInfoExample HTTP/1.1" 200 693 "http://localhost/examples/servlets/" "Mozilla/5.0 (X11; Linux x86_64; rv:17.0) Gecko/20130807 Firefox/17.0""B80557A1D9B48EC1D73CF8C7482B7D46.server2"

That should solve problems with mysterious session expiries 🙂

How to configure Apache to serve as load balancer between 2 or more Webservers on Linux / Apache basic cluster

Monday, October 28th, 2013

Apache doing load balancer between Apache servers Apache basic cluster howto

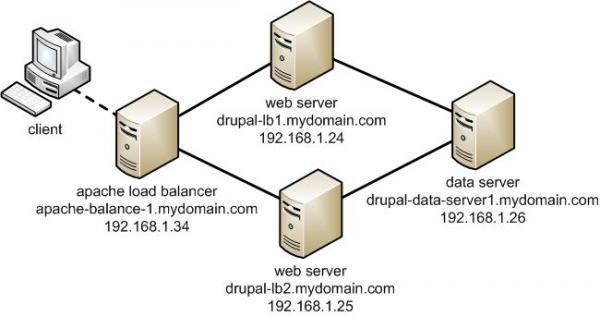
Any admin somehow involved in sphere of UNIX Webhosting knows Apache pretty well. I've personally used Apache for about 10 years now and until now I always used it as a single installation on a Linux. Always so far whenever the requirements for more client connections raised up, web hosting companies I worked for did a migration of Website / websites on a newer better (quicker) server hardware configuration. Everyone knows keeping a site on a single Apache server poses great RISK if the machine hangs up for a reason or gets DoSed this makes websites unavailable until reboot and poses unwanted downtime. Though I know pretty well the concept of load balancing until today I never had configured Apache to serve as Load balancer between two or more identical machines set-upped to interpret PHP / Perl scripts. Amazingly load balancing users web traffic happened to be much easier than I supposed. All necessary is a single Apache configured with mod_proxy_balancer which acts as proxy and ships HTTP requests between two Apache servers. Logically its very important that the entry traffic host with Apache mod_proxy_balancer has to be configured to only run only mod_proxy_balancer otherwise it will be eating unnecessary server memory as with each unnecessary loaded Apache module usage of memory resources raise up.

The scenario of my load balancer and 2 webserver hosts behind it goes like this:

a. Apache with load balancer with external IP address – i.e. (83.228.93.76) with DNS record for ex. www.mybalanced-webserver.com
b. Normally configured Apache to run PHP scripts with internal IP address through NAT – (Network address translation) (on 10.10.10.1) – known under host JEREMIAH
c. Second identical Apache to above host running on 10.10.10.1 with IP 10.10.10.2. with internal host ISSIAH.

N.B.! All 3 hosts are running latest  Debian GNU / Linux 7.2 Wheezy
 
After having this in mind, I proceeded with installing the on 83.228.93.76 apache and removing all unnecessary modules.

!!! Important note is if you use some already existent Apache configured to run PHP or any other unnecessary stuff – make sure you remove this otherwise expect severe performance issues !!!
1. Install Apache webserver

loadbalancer:~# apt-get install --yes apache2

2. Enable mod proxy proxy_balancer and proxy_http
On Debian Linux modules are enabled with a2enmod command;

loadbalancer:~# a2enmod proxy
loadbalancer:~# a2enmod proxy_balancer
loadbalancer:~# a2enmod proxy_http

Actually what a2enmod command does is to make symbolic links from /etc/apache2/mods-available/{proxy,proxy_balancer,proxy_http} to /etc/apache2/mods-available/{proxy,proxy_balancer,proxy_http}

3. Configure Apache mod proxy to load balance traffic between JEREMIAH and ISSAIAH webservers

loadbalancer:~# vim /etc/apache2/conf.d/proxy_balancer

/etc/apache2/conf.d/proxy-balancer

Paste inside:

<Proxy balancer://mycluster> BalancerMember http://10.0.0.1 BalancerMember http://10.0.0.4 </Proxy> ProxyPass / balancer://mycluster – See more at: http://www.elastichosts.com/support/tutorials/add-a-front-end-apache-cloud-load-balancer/#sthash.29iPnZpz.dpuf

<Proxy balancer://mycluster>
BalancerMember http://10.10.10.1
BalancerMember http://10.10.10.2
</Proxy>
ProxyPass / balancer://mycluster

<Proxy balancer://mycluster> BalancerMember http://10.0.0.1 BalancerMember http://10.0.0.4 </Proxy> ProxyPass / balancer://mycluster – See more at: http://www.elastichosts.com/support/tutorials/add-a-front-end-apache-cloud-load-balancer/#sthash.29iPnZpz.dpuf

<Proxy balancer://mycluster> BalancerMember http://10.0.0.1 BalancerMember http://10.0.0.4 </Proxy> ProxyPass / balancer://mycluster – See more at: http://www.elastichosts.com/support/tutorials/add-a-front-end-apache-cloud-load-balancer/#sthash.29iPnZpz.dpuf

<Proxy balancer://mycluster> BalancerMember http://10.0.0.1 BalancerMember http://10.0.0.4 </Proxy> ProxyPass / balancer://mycluster – See more at: http://www.elastichosts.com/support/tutorials/add-a-front-end-apache-cloud-load-balancer/#sthash.29iPnZpz.dpuf

<Proxy balancer://mycluster> BalancerMember http://10.0.0.1 BalancerMember http://10.0.0.4 </Proxy> ProxyPass / balancer://mycluster – See more at: http://www.elastichosts.com/support/tutorials/add-a-front-end-apache-cloud-load-balancer/#sthash.29iPnZpz.dpuf


4. Configure Apache Proxy to access traffic from all hosts (by default it is configured to Deny from all)

<Proxy balancer://mycluster> BalancerMember http://10.0.0.1 BalancerMember http://10.0.0.4 </Proxy> ProxyPass / balancer://mycluster – See more at: http://www.elastichosts.com/support/tutorials/add-a-front-end-apache-cloud-load-balancer/#sthash.29iPnZpz.dpuf

loadbalancer:~# vim /etc/apache2/mods-enabled/proxy.conf

Change there Deny from all to Allow from all

Deny from all
/etc/apache2/mods-enabled/proxy.conf

5. Restart Apache

loadbalancer:~# /etc/init.d/apache2 restart

Once again I have to say that above configuration is actually a basic Apache cluster so hosts behind load balancer Apache there should be machines configured to interpret scripts identically. If one Apache server of the cluster dies, the other Apache + PHP host will continue serve and deliver webserver content so no interruption will happen. This is not a round robin type of load balancer. Above configuration will distribute Webserver load requested in ratio 3/4 3 parts will be served by First server and 4th parth will be delivered by 2nd Apache.
Well, that's all load balancer is configured! Now to test it open in browser www.mybalanacer-webserver.com or try to access it by IP in my case: 83.228.93.76

a2enmod proxy

VIM and VI UNIX text editor syntax highlighting and howto add remove code auto indent

Tuesday, February 4th, 2014

vim-vi-linux-text-editor-logo-vim-highlighting how to turn vim syntax highlighting on linux

For my daily system administration job I have to login to many SuSE Linux servers and do various configugration edits.
The systems are configured in different ways and the only text editors available across all servers I can use are VI and VIM (VI Improved).

As I usually had to edit configuration files and scripts and I'm on SSH color terminal its rather annoying that on some of the servers opening a file with VIM is not displayed with SYNTAX HIGHLIGHTING. Not having syntax highlighting is ugly and makes editting ugly and unreadable.
Thus it is useful to enable VI syntax highlighting straight into the file being editted. I suspect many novice sysadmins might not know how to turn syntax highlighting in vi so here is how.
 

Turn Syntax Highlighting in VIM


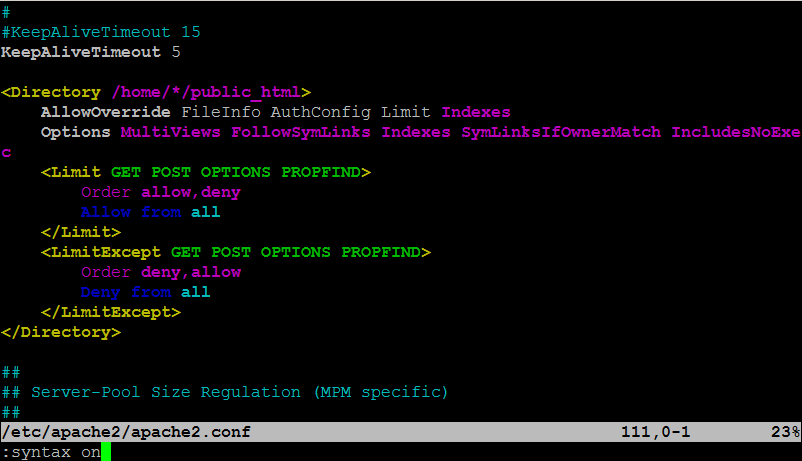
1. Open file with vim lets say Apache configuration

# vim /etc/apache2/apache2.conf

2. Press (Esc) Escape and ":" from kbd and then type in syntax on

:syntax on

vim-syntax-highlighting-howto-syntax-on-picture-screenshot-apache-config

To Turn On / Off VI Syntax Highlighting permanent add ":syntax on"
into ~/.vimrc

~/.vimrc file is red automatically on VIM start, so right after :syntax on is appended in it on relaunch vim will start showing colorfully.

Enjoy ! 🙂


Apache SSLCertificateChainFile adding SSL with Certificate Chain / What is Certificate Chain

Friday, January 31st, 2014

configure-apache-ssl-certificate-chain-ssl-certificate-keychain-each-signing-each-other

If you work in a big company with large network infrastructure who has to deal with SSL Certificates you will sooner or later will have to learn about existence of SSL Certificate Chains.
Its worthy thus to know what is SSL Certificate Chains and how such a chain is configured in Apache?

Personal SSL certificates (certificates issued to an individual or a company) can be used by clients to uniquely identify themselves when they are involved in starting an SSL connection.
SSL Certificate file contains X.509 certificate, which, in turn, contains a public key used for encryption.
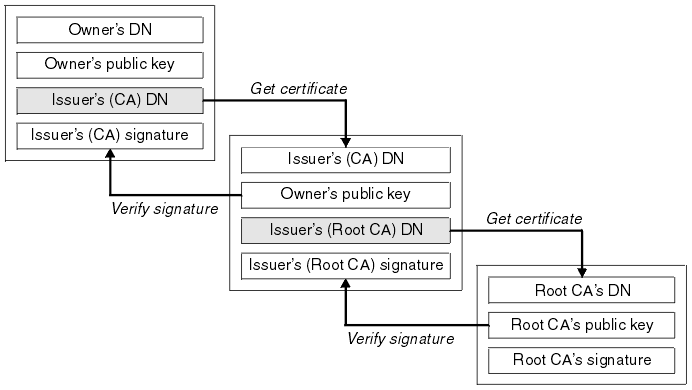
Each personal certificate has zero or more certificate chains of certification authority certificates that extend back to the root certification authority.
 

Certificate R (Root Certification Authority)
|
| represents issuer of
V
Certificate I1 (Intermediate Certification Authority)
|
| represents issuer of
V
Certificate I2 (A subsidiary Intermediate Certification Authority)
|
| represents issuer of
V
Certificate I3 (A further subsidiary Intermediate Certification Authority)
|
| represents issuer of
V
Certificate P (A personal certificate that is used to identify its owner 
on an SSL handshake)

Certificate chains are used to verify the authenticity of each certificate in that chain, including the personal certificate. Each certificate in the chain is validated using its 'parent' certificate, which in turn is validated using the next certificate up the chain, and so on, from the personal certificate up to the root certification authority certificate.

Now after explaining thoroughfully what is SSL Certificate Chain, here is how to configure a SSL Certificate in Apache Webserver.

Open apache2.conf or httpd.conf (depending on GNU / Linux distribution) and add to it;

  SSLEngine On
   SSLCertificateFile conf/cert/webserver-host.crt
   SSLCertificateKeyFile conf/cert/webserver-host.key
   SSLCertificateChainFile conf/cert/internet-v4.crt
   # SSLCertificateChainFile conf/cert/intranet-v3.crt
   SSLOptions +StdEnvVars +OptRenegotiate +ExportCertData

SSLCertificateChainFile conf/cert/chain-cert.crt
loads a chain of separate Personal SSL certificates each signing each other on different levels, chain is leading to top ROOT CA (Certificate Authority).

Set up Modsecurity on Debian 7 GNU / Linux to mitigate websites virus infections / Cross Site Scripting and SQL Injects

Friday, September 6th, 2013

mod security raise up your Apache webserver security and protect against cross site scripting javascript hacks and viruses

There are plenty of tutorials around on how to install and configure modsecurity  So This tutorial is nothing new, but I decided to write it since, I had to install mod_security on Debian Wheezy to protect a Debian Linux server websites from being periodically infected with Viruses / XSS / Backdoored Javascripts and Trojan horses.

Everyone who used Debian stable distribution knows the packages included in it are usually about 2 years older than latest available. Situation with latest Debian stable Wheezy  is same, but anyways even a bit outdated my experience so far is mod_security does a great job of protecting Apache sites …

1. Install libapache-mod-security and other libraries (not obligitory), but useful on most Apache + PHP servers

  Run below commands to add xml and rest of useful Apache stuff:


apt-get install libxml2 libxml2-dev libxml2-utils
apt-get install libaprutil1 libaprutil1-dev

Above commands will install a bunch of other dependency packages.

Next install mod-security deb. Run below command, to install and activate modsecurity. Note that installing libapache-mod-security will also automatically restart the Apache server.
 

apt-get install libapache-mod-security

Next to enable all functionality of modsecurity headers Apache module is required as well, activate it with:

 
a2enmod headers
service apache2 restart

2. Make sure mod_security Apache config looks like


<IfModule security2_module>
# Default Debian dir for modsecurity's persistent data
SecDataDir /var/cache/modsecurity
# Include all the *.conf files in /etc/modsecurity.
# Keeping your local configuration in that directory
# will allow for an easy upgrade of THIS file and
# make your life easier
Include "/etc/modsecurity/*.conf"
</IfModule>

Important part of conf is  "Include "/etc/modsecurity/*.conf"" line. /etc/modsecurity directory is main place to set up and configure modsecurity. This configuration file, combined with mod-security.load, do everything necessary to load the modsecurity into Apache server.

3.Enable and Load modsecurity default configuration rules:

So far, modsecurity is loaded into the apache server, but isn't stopping any attempts of hack scripts / Viruses / or automated tools to exploit Vulnerabilities in Web Applications. To make modsecurity start filtering requests, should activate  modsecurity specific configuration and load some regular expression rules.
First to do is enable "recommended" modsecurity configuration file:
 

Code:
cd /etc/modsecurity
mv modsecurity.conf-recommended modsecurity.conf

Default configuration from recommended conf enables modsecurity in an "examine only" mode. In order to make full use of the module, we have to make a few changes. With  favorite text editor open modsecurity.conf (mine is vim)and make the following change:

Code:
SecRuleEngine On

This makes modsecurity to block requests based on its (pre-written) developer rules. Other settings in this file that are useful to know about are the debug controls, very useful, whether you have to debug problems with sites not properly opening due to server enabled mod_security.
 

Code:
#SecDebugLog /opt/modsecurity/var/log/debug.log
#SecDebugLogLevel 3

This controls how much information is stored in modsecurity's "audit log as well as keeps track of attacks launched to server. Default debug level of 3 is pretty much and stores "everything". This is dangerous as a huge logs are produces on  busy servers.
 

Code:
SecAuditLogParts ABIJDEFHZ

4. Enable extra modsecurity prevention rules

Modsecurity works by using rules by pre-defined patterns used to recognize when your website/s is being probed or attacked. Once installed modsecurity base package as a dependency modsecurity-crs package is installed. modsecurity-crs contains addition free core rule set. Current Core rule from modsecurity.org are newer than version included with wheezy,  thus rules lack a bit behind but this is only option whether using default debian bundled packge otherwise manual modsecurity recompile is required. We all know how bad it is to custom compile software on production machines, so custom compile experiments are really bad idea.

CRS (Core Rule Set) is installed in /usr/share/modsecurity-crs. This directory contains an "activated_rules" directory present also in /etc/modsecurity

Quickest way to activate rules is by symlinking from the actual config and rule files into the /etc/modsecurity config directory.

We'll be making links from the /usr/share/modsecurity location into /etc/modsecurity to activate some other useful modsec useful rules. First link main crs config file:
 

ln -s /usr/share/modsecurity-crs/modsecurity_crs_10_setup.conf /etc/modsecurity/modsecurity_crs_10_setup.conf

This file provides some basic configuration directives for crs.

Futher on, link each rule file in the base_rules and optional_rules directories using 2 tiny bash loops.


cd /usr/share/modsecurity-crs/base_rules
for f in * ; do sudo ln -s /usr/share/modsecurity-crs/base_rules/$f /etc/modsecurity/$f ; done
cd /usr/share/modsecurity-crs/optional_rules
for f in * ; do sudo ln -s /usr/share/modsecurity-crs/optional_rules/$f /etc/modsecurity/$f ; done

With that done, there's one more edit to check if modsecurity blocking works as expected. Open the /etc/modsecurity/modsecurity.conf file and add the following lines at the end (this is from the free, modsecurity pdf book, link provided below)


SecRule ARGS "MY_UNIQUE_TEST_STRING"\
"phase:1,log,deny,status:503"

Finally after all configuration rules are loaded to modsec, Usual Apache restart is required:

 
/etc/init.d/apache2 restart

Whether no fatal errors pop up and Apache starts normally, now modsecurity should be properly running.

5. Verify if modsecurity is set-up and kicking ass

To verify installation, open a browser and access some of hosted websites  like this:
http://www.your-server-domain.com/?test=MY_UNIQUE_TEST_STRING

A sure sign that modsec works is  503 "Service Temporarily Unavailable" message from Apache. Alternatively  examine server's modsec audit log file (default location in /var/log/apache2/modsec_audit.log) (grep the string MY_UNIQUE_TEST_STRING. You should see full transcript of the communication between your browser and server logged. Depending on amount of site traffic gets make sure to monitor  size of file for some minutes to make sure it doesn't grow too big and it doesn't fill up quickly your HDD.

Well now all fine your Apache server security is better for sure and by God's grace you should not have to deal with hundreds of hours of sites recovery after a bunch of client's websites are hacked.

Feedback and comments are mostly welcome. Enjoy 😉

How to disable / block sites with Squid Proxy ACL rules on Debian GNU / Linux – Setup Transparent Proxy

Wednesday, October 16th, 2013

Squid transparant proxy disabling blocking websites with Squid proxy

Often when configuring new Firewall router for a network its necessary to keep log on HTTP (Web) traffic passing by the router. The best way to do this in Linux is by using Proxy server. There are plenty of different Proxy (Caching) servers for GNU / Linux. However the most popular one is Squid (WWW Proxy Cache). Besides this its often a requirement in local office networks that Proxy server is transparent (invisible for users) but checking each and every request originating from the network. This scenario is so common in middle sized and small sized organizations that its a must that every Linux admin is ready to easily configure it. In most of my experience so far I used Debian Linux, so in this post I will explain how to configure Transparent Squid Proxy with configured ACL block rules for employee's time wasting services like facebook / youtube / vimeo etc.

Here is diagram I found on a skullbox.net showing graphically below Squid setup:

Squid as transparent proxy behind nat firewall diagram

1. Install Squid Proxy Server

Squid is available as Debian package since a long time, so on Deb Linux installing Squid is a piece of cake.

debian-server:~# apt-get install --yes squid
...


2. Create /var/cache/proxy directory and set proper permissions necessary for custom config

debian-server:~# mkdir /var/cache/proxy
debian-server:~# chown -R proxy:proxy /var/cache/proxy

3. Configure Squid Caching Server

By default debian package extract script does include default squid.conf which should be substituted with my custom squid.conf. A Minor user changes has to be done in config, download my squid.conf from here and overwrite default squid.conf in /etc/squid/squid.conf. Quickest way to do it is through:

debian-server:~# cd /etc/squid
debian-server:/etc/squid# mv /etc/squid/squid.conf /etc/squid/squid.conf.orig
debian-server:/etc/squid# wget -q https://www.pc-freak.net/files/squid.conf
debian-server:/etc/squid# chown -R root:root squid.conf

Now open squid.conf and edit lines:

http_port 192.168.0.1:3128

Change 192.168.0.1 which is IP assigned to eth1 (internal NAT-ted interface) with whatever IP of local (internal network) is. Some admins prefer to use 10.10.10.1 local net addressing.
Below in configuration, there are some IPs from 192.168.0.1-255 network configured through Squid ACLs to have access to all websites on the Internet. To tune such IPs you will have to edit lines after (1395) after comment

# allow access to filtered sites to specific ips


4. Disabling sites that pass through the proxy server

Create file /etc/disabled-sites i.e.:

debian-server:~# touch /etc/disabled-sites

and place inside all siles that would like to be inaccessible for local office network either through text editor (vim / pico etc.) or by issuing:

debian-server:~# echo 'facebook.com' >> /etc/disabled-sites
debian-server:~# echo ''youtube.com' >> /etc/disabled-sites
debian-server:~# echo 'ask.com' >> /etc/disabled-sites

5. Restart Squid to load configs

debian-server:~# /etc/init.d/squid restart
[ ok ] Restarting Squid HTTP proxy: squid.

6. Making Squid Proxy to serve as Transparent proxy through iptables firewall Rules

Copy paste below shell script to lets say /etc/init.d/squid-transparent-fw.sh
 

#!/bin/bash
IPT=/sbin/iptables;

IN=INPUT;
OUT=OUTPUT;
FORW=FORWARD;

AC=ACCEPT;
REJ=REJECT;
DRP=DROP;
RED=REDIRECT;
MASQ=MASQUERADE;
POSTR=POSTROUTING;
PRER=PREROUTING;
OUT_IFACE=eth2;
OUT_B_IFACE=eth0;
IN_IFACE=eth1;
MNG=mangle;

ALL_NWORKS='0/0';
LOCALHOST='127.0.0.1';

# forward to squid.
$IPT -t nat -I $PRER -p tcp -s 192.168.0.0/24 -d ! 192.168.0.1 –dport www -j $RED –to 3128
$IPT -t nat -I $PRER -p tcp -s 192.168.0.0/24 -d ! 192.168.0.1 –dport 3128 -j $RED –to 3128

# Reject connections to squid from the untrusted world.
# rules for order.
$IPT -A $IN -p tcp -s 83.228.93.76 -d $ALL_NWORKS –dport 65221 -j $AC

$IPT -A $IN -p tcp -s $ALL_NWORKS –dport 65221 -j $REJ
$IPT -A $IN -i $OUT_B_IFACE -p tcp -s $ALL_NWORKS –dport 3128 -j $REJ

Easiest way to set up squid-transparent-fw.sh firewall rules is with:

debian-server:~# cd /etc/init.d/
debian-server:/etc/init.d# wget -q https://www.pc-freak.net/files/squid-transparent-fw.sh
debian-server:/etc/init.d# chmod +x squid-transparent-fw.sh
debian-server:/etc/init.d/# bash squid-transparent-fw.sh
Then place line /etc/init.d/squid-transparent-fw.sh into /etc/rc.local before exit 0
 

That's all now Squid Transparent Proxy will be up and running and the number of sites listed in disabled-sites will be filtered for Office employees returning a status of Access Denied.

Access Denied msg

Gets logged in /var/log/squid/access.log example of Denied access for Employee with IP 192.168.0.155 is below:

192.168.0.155 - - [16/Oct/2013:16:50:48 +0300] "GET http://youtube.com/ HTTP/1.1" 403 1528 TCP_DENIED:NONE

Various other useful information on what is cached is also available via /var/log/squid/cache.log and /var/log/squid/store.log

Another useful thing of using Transparent Squid Proxy is that you can always keep track on exact websites opened by Employees in Office so you can easily catch people trying to surf p0rn websites or some obscenity.

Hope this post helps some admin out there 🙂 Enjoy

How to disable PC Speaker on FreeBSD / Mute PC-Speaker on BSD kernels

Wednesday, May 16th, 2012


old school personal computer pc speaker / freebsd disable Pc-Speaker picture

After finding out How PC Speaker is muted on Linux , I've decided to also disable the annoying beeps on BSD. This is in tandem with the minimalistic philosophy I try to apply to every server I manage.

Also on BSD Desktop machines it is quite annoying especially if csh (C Shell) is used, everytime you press TAB you get the beep sound. On BSD beep sound produced on tab completion is louder than in Linux and that makes it even more annoying …

Disabling pc-speaker beeps on BSDs is done via a sysctl kernel variable:

freebsd# sysctl hw.syscons.bell=0
hw.syscons.bell: 0 -> 0

To further permanently disable on system boot add hw.syscons.bell=0 to /etc/sysctl.conf, e.g.:

freebsd# echo 'hw.syscons.bell=0' >> /etc/sysctl.conf


Well that's it no more mind drilling beeps :)