Some time ago, I asked myself if there is a SSH/Telnet supporting Terminal program
for Windows which enables you to have a tabs with the opened connections to a number
of servers. Well after some time spent looking, I’ve came across the solution
which concludes to a nice PuTTy wrapper program called Putty Connection Manager .
Putty Connection Manager requires you to have PuTTY installed all it does it runs a multiple putty instances
each one opening in a nice multi tab windows, like the good old linux gnome-terminal.
Cheers!END—–
Posts Tagged ‘good’
Putty Connection Manager A Handy tip to make your PuTTY multi tab enabled
Wednesday, September 30th, 2009PortQRY Native Windows command line Nmap like port scanner – Check status of remote host ports on Windows
Monday, June 30th, 2014 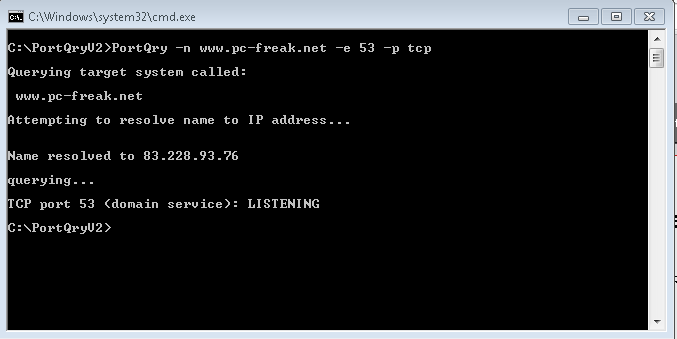
Linux users know pretty well Nmap (network mapper) tool which is precious in making a quick server host security evaluation.
Nmap binary port is available for Windows too, however as nmap is port for its normal operation you have to install WinPcap (Packet Capture Library).
And more importantly it is good to mention if you need to do some remote port scanning from Windows host, there is Microsoft produced native tool called PortQry (Port Query).
PortQRY is a must have tool for the Windows Admin as it can help you troubleshoot multiple network issues.
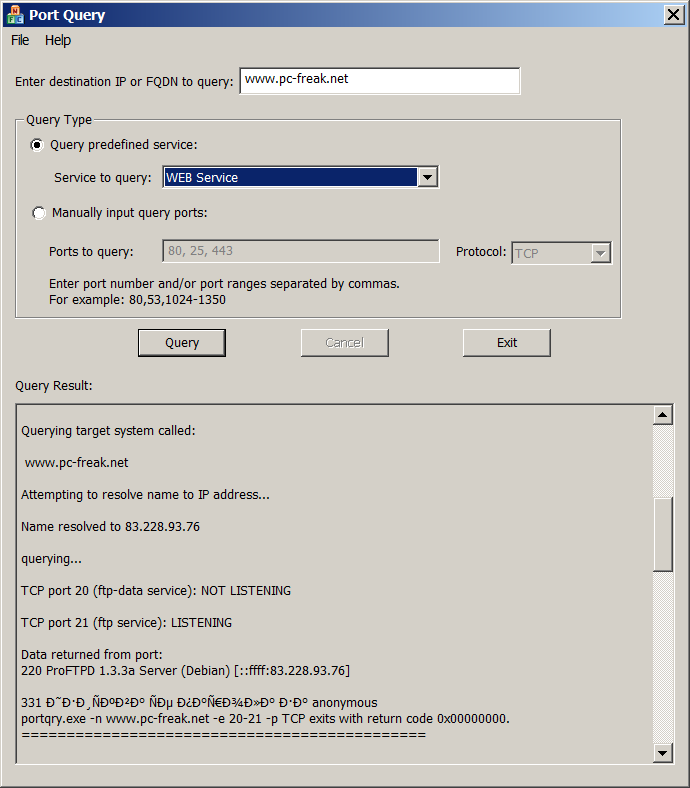
As of time of writting this post PortQRY is at version 2, PortQRY tool has also a GUI (UI) Version for those lazy to type in command line.
Port Query UI tool (portqueryui.exe) is a tool to query open ports on a machine. This tool makes use of command line version port query tool (portqry.exe). The UI provides the following functionalities:
1. Following "Enter destination IP or FQDN to query:”, an edit box needs the user to specify the IP address or FDQN name of the destination to query port status.
2. The end user is able to choose Query type:
– Predefined services type. It groups ports into service, so that you can query multiple ports for a service by a single click. Service includes "Domains and Trusts", "DNS Queries", "NetBIOS communication", "IPSEC", "Networking", "SQL Service", "WEB Service", "Exchange Server", "Netmeeting", and other services.
You can check detail port and protocol info for each service category by opening Help -> Predefined Services…
PORTQRY is part of Windows Server 2003 Support Tools and can be added to any NT based Windows (XP, 2003, Vista, 7, 8)
You can download portqry command line tool here or my mirrored portqry version command line port scanner here and PortQRY UI here.
PortQRY comes in PortQryV2.exe package which when run extracts 3 files: PortQry.exe program, EULA and readme file. Quickest way to make portqry globally accessible from win command prompt is to copy it to %SystemRoot% (The environment variable holding default location for Windows Installation directory).
It is good idea to add PortQRY to default PATH folder to make it accessible from command line globally.
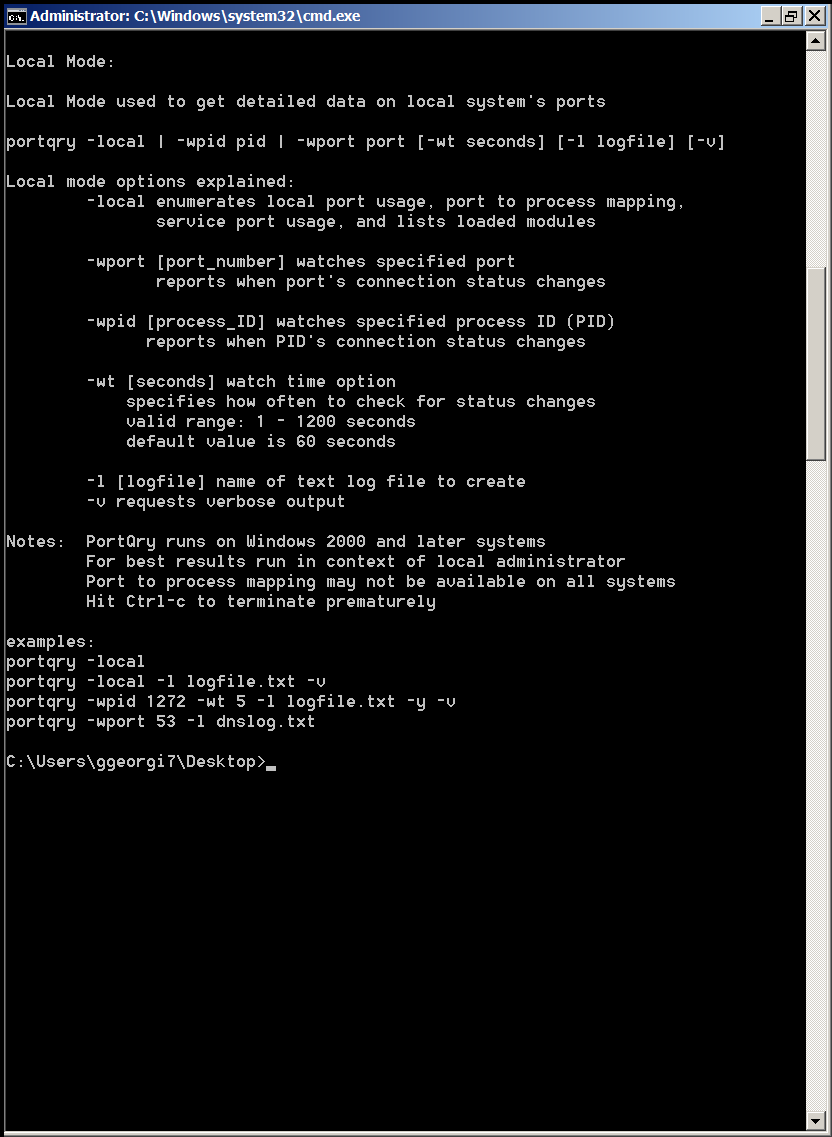
PorQry has 3 modes of operation:
Command Line Mode, Interactive Mode and Local Mode

Command Line Mode – is when it is invoked with parameters.
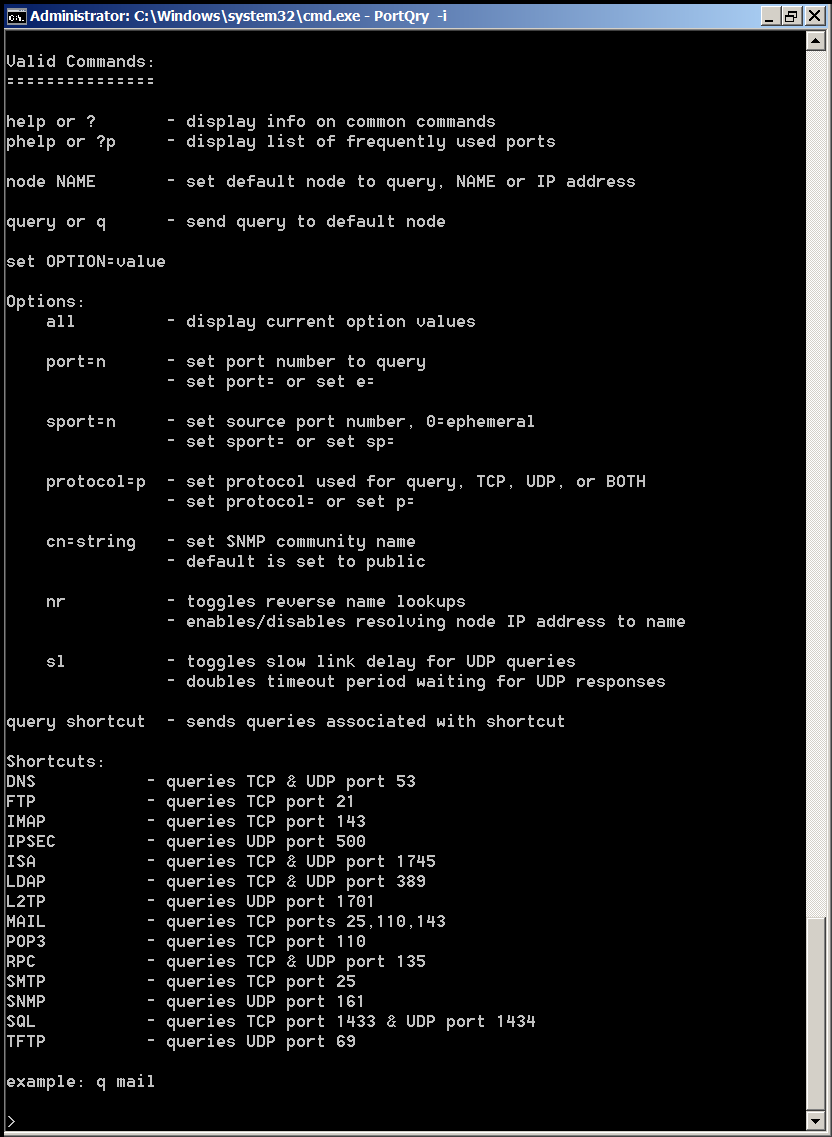
Interactive Mode is when it runs in interactive CLI console
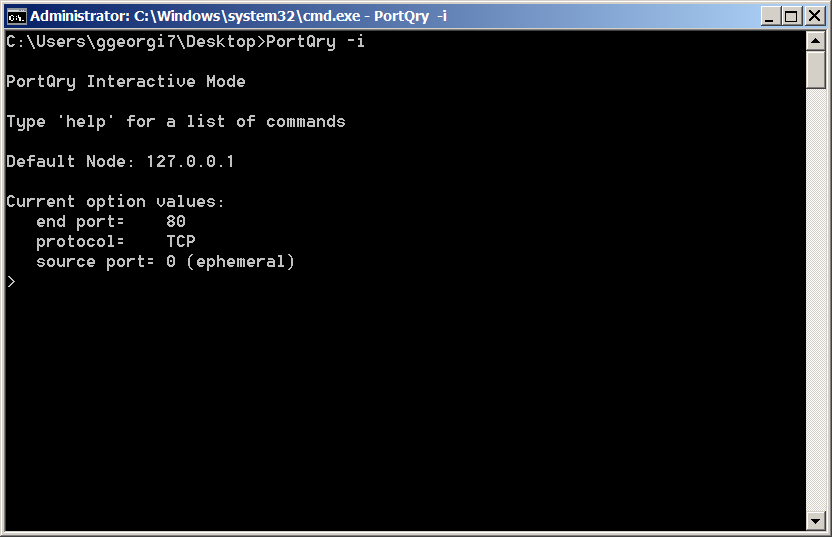
and Local Mode is used whether information on local system ports is required.
Here are some examples on basic usage of portqry:
1. Check if remote server is running webserver is listening on (HTTPS protocol) TCP port 80
portqry -n servername -e 80
Querying target system called:
www.pc-freak.net
Attempting to resolve name to IP address…
Name resolved to 83.228.93.76querying…
TCP port 80 (http service): FILTERED
2. Check whether some common Samba sharing and DNS UDP ports are listening
portqry -n servername -p UDP -o 37,53,88,135
Querying target system called:
servername
Attempting to resolve name to IP address…
Name resolved to 74.125.21.100querying…
UDP port 37 (time service): NOT LISTENING
UDP port 53 (domain service): NOT LISTENING
UDP port 88 (kerberos service): NOT LISTENING
UDP port 135 (epmap service): NOT LISTENING
3. Scan open ports in a port range – Check common services port range (port 1-1024)
portqry -n 192.168.1.20 -r 1:1024 | find ": LISTENING"
4. Logging network scan output to file
Portqry –n localhost –e 135 -l port135.txt
Querying target system called:
localhost
Attempting to resolve name to IP address…
Name resolved to 127.0.0.1querying…
TCP port 135 (epmap service): LISTENING
Using ephemeral source port
Querying Endpoint Mapper Database…
Server's response:UUID: d95afe70-a6d5-4259-822e-2c84da1ddb0d
ncacn_ip_tcp:localhost[49152]UUID: 2f5f6521-cb55-1059-b446-00df0bce31db Unimodem LRPC Endpoint
ncacn_np:localhost[PIPEwkssvc]
…Total endpoints found: 38
5. Scanning UDP and TCP protocols port
PortQry -n www.pc-freak.net -e 25 -p both
Querying target system called:
www.pc-freak.net
Attempting to resolve name to IP address…
Name resolved to 83.228.93.76querying…
TCP port 53 (domain service): LISTENING
UDP port 53 (domain service): LISTENING or FILTERED
Sending DNS query to UDP port 53…
6. Checking remote server whether LDAP ports are listening
Portqry -remotehost.com -p tcp -e 389

Portqry -n remotehost.com -p tcp -e 636

Portqry -n remotehost.com -p both -e 3268

Portqry -n remotehost.com -p tcp -e 3269
7. Making SNMP community name requests
portqry -n host2 -cn !my community name! -e 161 -p udp
8. Initiating scan from pre-selected source port
A network socket request initiation is useful from certain port because, some remote services expect connection from certain ports, lets say you're connecting to mail server, you might want to set as a source port – port 25, to make remote server another SMTP is connecting.
portqry -n www.pc-freak.net -e 25 -sp 25
9. Scanning whether server ports required by Active Directories are opened
Common ports used in Windows hosts to communicate between each other to sustain Active Directory are:
88 (Kerberos)
135 (RPC)
389 (LDAP)
445 (CIFS)
3268 (Global Catalog)
portqry -n remote-host.com -o 88,135,389,445,3268 -p both
portqry has also a silent mode with the "-q" switch if you want to get only whether a port is LISTENING (opened).
On port scan it returns three major return codes (very useful for scripting purposes);
- returncode 0 – if port / service is listening
- returncode 1 – if service is not listening
- returncode 2 – if service is listening or filtered
PortQry is very simple port scanner for win sysadms and is precious tool for basic network debugging (services) on Windows farms, however it doesn't have the powerful cracker functionality, application / OS versioning etc. like Nmap.
Make picture transparent with the Gimp on Linux
Tuesday, November 16th, 2010![]()
I’m trying to learn some basic design this days as an attempt to fill my huge missing gap of knowledge in graphic processing.
I’ve always been not too good with visual stuff and always been focused on the command line and console, however since
some time design started being quite interesting thing to me and I found it quite handy and challenging to learn some basic designing.
I’m not really a Windows guy and thus my Photoshop skills are next to zero.
Since The Gimp is the substitute for Photoshopfor Linux users and I had a task for one of the websites I’m developing to make some pictures for the website transparent, therefore I had to learn how to make pictures transparent with The Gimp
After some reading online and some experimenting with GIMP it appeared to me it’s very easy to actually make pictures transparent with the GIMP.
So I’ve come with a small article here on how to make image or a picture transparent with Gimp in simple steps in order to help people who are trying to achieve the same easy task:
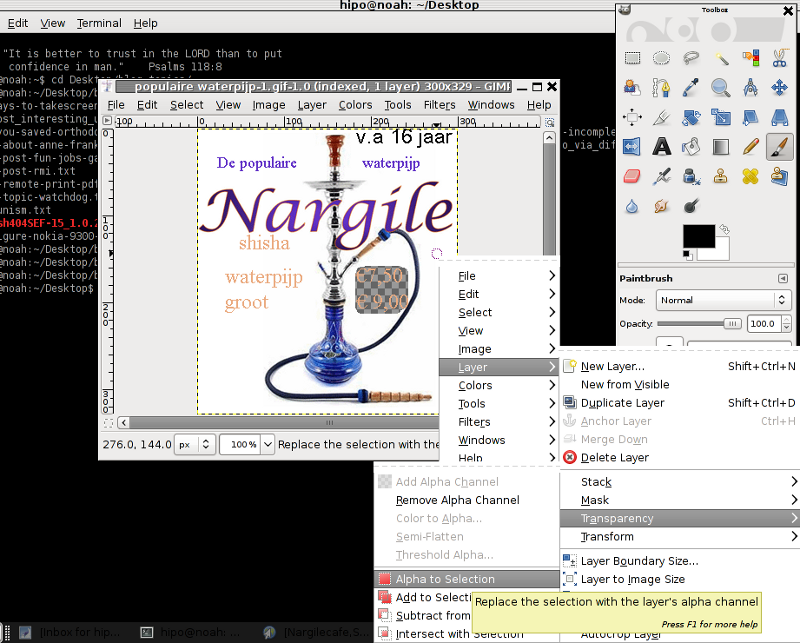
1. Open Gimp and place your mouse cursor on the picture
Here, Press the 2nd or 3rd mouse button to show menu.
2. Select Layer -> Transperancy -> Alpha to Selection
In that menu select
Select Layer -> Transprerancy -> Alpha to Selection
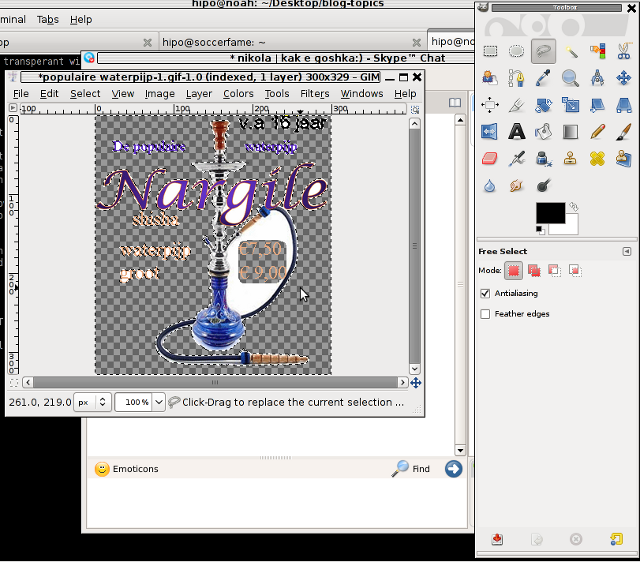
3. Use Fuzzy Select Tool and select the picture background
4. From Gimp Window pane main menu choose the Clear option
Edit -> Clear (Delete)
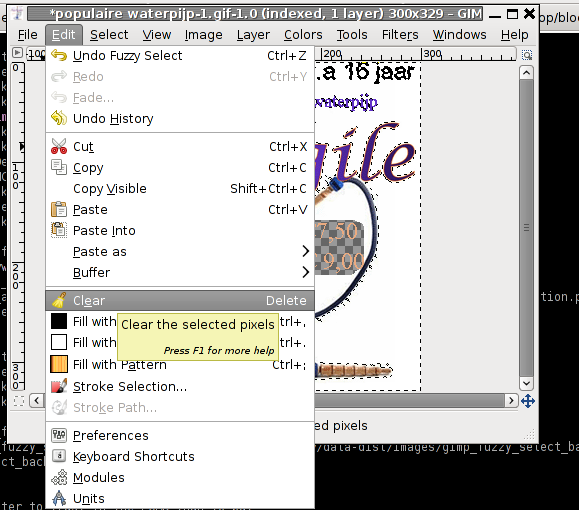
That’s all now your picture background should be removed if some parts of the picture still needs to be purged just follow the above step and remove them.
I should say I thought making picture transparent with GIMP would be a more complex task than it really was, quite nice one more step in my development as a designer 🙂
How to Turn Off, Suppress PHP Notices and Warnings – PHP error handling levels via php.ini and PHP source code
Friday, April 25th, 2014 ![]()
PHP Notices are common to occur after PHP version upgrades or where an obsolete PHP code is moved from Old version PHP to new version. This is common error in web software using Frameworks which have been abandoned by developers.
Having PHP Notices to appear on a webpage is pretty ugly and give a lot of information which might be used by malicious crackers to try to break your site thus it is always a good idea to disable PHP Notices. There are plenty of ways to disable PHP Notices
The easiest way to disable it is globally in all Webserver PHP library via php.ini (/etc/php.ini) open it and make sure display_errors is disabled:
display_errors = 0
or
display_errors = Off
Note that that some claim in PHP 5.3 setting display_errors to Off will not work as expected. Anyways to make sure where your loaded PHP Version display_errors is ON or OFF use phpinfo();
It is also possible to disable PHP Notices and error reporting straight from PHP code you need code like:
<?php
// Turn off all error reporting
error_reporting(0);
?>
or through code:
ini_set('display_errors',0);
PHP has different levels of error reporting, here is complete list of possible error handling variables:
<?php
// Report simple running errorserror_reporting(E_ERROR | E_WARNING | E_PARSE);
// Reporting E_NOTICE can be good too (to report uninitialized
// variables or catch variable name misspellings …)error_reporting(E_ERROR | E_WARNING | E_PARSE | E_NOTICE);
// Report all errors except E_NOTICE
// This is the default value set in php.inierror_reporting(E_ALL ^ E_NOTICE);
// Report all PHP errors (see changelog)error_reporting(E_ALL);
// Report all PHP errors error_reporting(-1);
// Same as error_reporting(E_ALL);ini_set('error_reporting', E_ALL); ?>
The level of logging could be tuned on Debian Linux via /etc/php5/apache2/php.ini or if necessary to set PHP log level in PHP CLI through /etc/php5/cli/php.ini with:
error_reporting = E_ALL & ~E_NOTICE
If you need to remove to remove exact warning or notices from PHP without changing the way PHPLib behaves is to set @ infront of variable or function that is causing NOTICES or WARNING:
For example:
@yourFunctionHere();
@var = …;
Its also possible to Disable PHP Notices and Warnings using .htaccess file (useful in shared hosting where you don't have access to global php.ini), here is how:
# PHP error handling for development servers
php_flag display_startup_errors off
php_flag display_errors off
php_flag html_errors off
php_flag log_errors on
php_flag ignore_repeated_errors off
php_flag ignore_repeated_source off
php_flag report_memleaks on
php_flag track_errors on
php_value docref_root 0
php_value docref_ext 0
php_value error_log /home/path/public_html/domain/php_errors.log
php_value error_reporting -1
php_value log_errors_max_len 0
This way though PHP Notices and Warnings will be suppressed errors will get logged into php_error.log
Save data from failing hard disk on Linux – Rescuing data from failing disk with bad blocks
Wednesday, April 16th, 2014 
Sooner or later your Linux Desktop or Linux server hard drive will start breaking up, whether you have a hardware or software RAID 1, 6 or 10 you can and good hard disk health monitoring software you can react on time but sometimes as admins we have to take care of old servers which either have RAID 0 or missing RAID configuration and or disk firmware is unable to recognize failing blocks on time and remap them. Thus it is quite useful to have techniques to save data from failing hard disk drives with physical badblocks.
With ddrescue tool there is still hope for your Linux data though disk is full of unrecoverable I/O errors.
apt-cache show ddrescue
apt-cache show ddrescue|grep -i description -A 12
Description: copy data from one file or block device to another
dd_rescue is a tool to help you to save data from crashed
partition. Like dd, dd_rescue does copy data from one file or
block device to another. But dd_rescue does not abort on errors
on the input file (unless you specify a maximum error number).
It uses two block sizes, a large (soft) block size and a small
(hard) block size. In case of errors, the size falls back to the
small one and is promoted again after a while without errors.
If the copying process is interrupted by the user it is possible
to continue at any position later. It also does not truncate
the output file (unless asked to). It allows you to start from
the end of a file and move backwards as well. dd_rescue does
not provide character conversions.
To use ddrescue for saving data first thing is to shutdown the Linux host boot the system with a Rescue LiveCD like SystemRescueCD – (Linux system rescue disk), Knoppix (Most famous bootable LiveCD / LiveDVD), Ubuntu Rescue Remix or BackTrack LiveCD – (A security centered "hackers" distro which can be used also for forensics and data recovery), then mount the failing disk (I assume disk is still mountable :). Note that it is very important to mount the disk as read only, because any write operation on hard drive increases chance that it completely becomes unusable before saving your data!
To make backup of your whole hard disk data to secondary mounted disk into /mnt/second_disk
# mkdir /mnt/second_disk/rescue
# mount /dev/sda2 /mnt/second_disk/rescue
# dd_rescue -d -r 10 /dev/sda1 /mnt/second_disk/rescue/backup.img
# mount -o loop /mnt/second_disk/rescue/backup.img
In above example change /dev/sda2 to whatever your hard drive device is named.
Whether you have already an identical secondary drive attached to the Linux host and you would like to copy whole failing Linux partition (/dev/sda) to the identical drive (/dev/sdb) issue:
ddrescue -d -f -r3 /dev/sda /dev/sdb /media/PNY_usb/rescue.logfile
If you got just a few unreadable files and you would like to recover only them then run ddrescue just on the damaged files:
ddrescue -d –R -r 100 /damaged/disk/some_dir/damaged_file /mnt/secondary_disk/some_dir/recoveredfile
-d instructs to use direct I/O
-R retrims the error area on each retry
-r 100 sets the retry limit to 100 (tries to read data 100 times before resign)
Of course this is not always working as on some HDDs recovery is impossible due to hard physical damages, if above command can't recover a file in 10 attempts it is very likely that it never succeeds …
A small note to make here is that there is another tool dd_rescue (make sure you don't confuse them) – which is also for recovery but GNU ddrescue performs better with recovery.
How ddrescue works is it keeps track of the bad sectors, and go back and try to do a slow read of that data in order to read them.
By the way BSD users would happy to know there is ddrescue port already, so data recovery on BSDs *NIX filesystems if you're a Windows user you can use ddrescue to recover data too via Cygwin.
Of course final data recovery is also very much into God's hands so before launching ddrescue, don't forget to say a prayer 🙂
Archive Outlook mail in Outlook 2010 to free space in your mailbox
Thursday, May 15th, 2014 ![]()
If you're working in a middle or big sized IT company or corporation like IBM or HP, you're already sucked into the Outlook "mail whirlwind of corporate world" and daily flooded with tons of corporate spam emails with fuzzy business random terms like taken from Corporate Bullshit Generator
Many corporations, because probably of historic reasons still provide employees with small sized mailboxes half a gigabyte, a gigabyte or even in those with bigger user Mailboxes like in Hewlett Packard, this is usually no more than 2 Gigabytes.
This creates a lot of issues in the long term because usually mail communication in Inbox, Sent Items, Drafts Conversation History, Junk Email and Outbox grows up quickly and for a year or a year and a half, available Mail space fills up and you stop receiving email communication from customers. This is usually not too big problem if your Mailbox gets filled when you're in the Office (in office hours). However it is quite unpleasent and makes very bad impression to customers when you're in a few weeks Summar Holiday with no access to your mailbox and your Mailbox free space depletes, then you don't get any mail from the customer and all the time the customer starts receiving emails disrupting your personal or company image with bouncing messages saying the "INBOX" is full.
To prevent this worst case scenario it is always a good idea to archive old mail communication (Items) to free up space in Outlook 2010 mailbox.
Old Outlook Archived mail is (Saved) exported in .PST outlook data file format. Later exported Mail Content and Contacts could be easily (attached) from those .pst file to Outlook Express, leaving you possibility to still have access to your old archived mail keeping the content on your hard drive instead on the Outlook Exchange Mailserver (freeing up space from your Inbox).
Here is how to archive your Outlook mail Calendar and contacts:
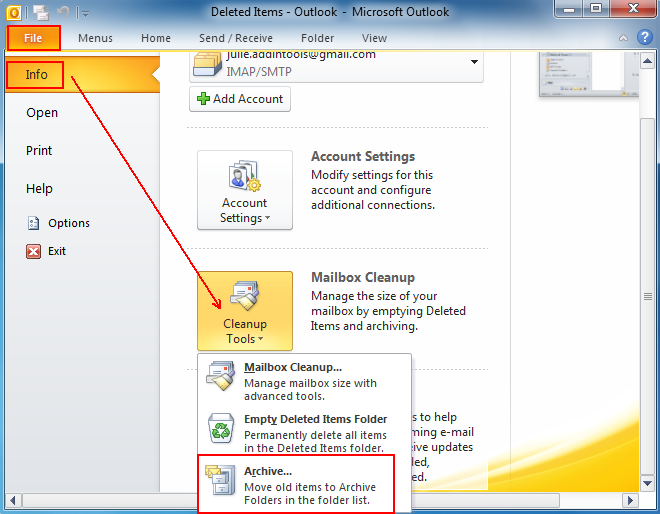
1. Click on the "File" tab on the top horizontal bar.Select "Cleanup Tools" from the options.
2. Click "Cleanup Tools" from the options.
3. Click on the "Archive this folder and all subfolders" option.
4. Select what to archive (e.g. Inbox, Drafts, Sent Items, Calendar whatever …)
5. Choose archive items older than (this is quite self-explanatory)
6. Select the location of your archive file (make sure you palce the .PST file into directory you will not forget later)
That's all now you have old mails freed up from Outlook Exchange server. Now make sure you create regular backups ot old-archived-mail.pst file you just created, it is a very good idea to upload this folder to encrypted file system on USB stick or use something like TrueCrypt to encrypt the file and store it to external hard drive, if you already don't have a complete backup corporate solution backuping up all your Laptop content.
Later Attaching or detaching exported .PST file in Outlook is done from:
File -> Open -> Open Outlook Data File
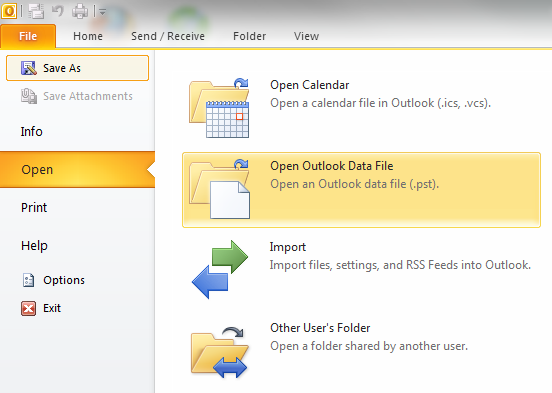
Once .PST file is opened and attached in Left Inbox pane you will have the Archived old mail folder appear.
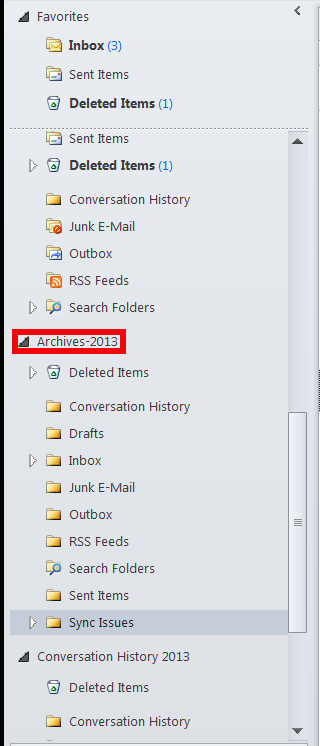
You can change Archived name (like I did to some meaningful name) like I've change it to Archives-2013 by right clicking on it (Data File properties -> Advanced)
Migrate VMWare Linux Virtual Machine to Virtualbox – Convert VMware .VMX to .OVF (Open Virtual Format)
Monday, June 2nd, 2014 
VMWare Virtual Machines are usually stored in OVA Format which is bundle of OVF(Open Virtualization Format) and in multiple *.VMDK files.
Though other Virtual Machines are supposed to also support these "open virtualization format", different VM vendors implement and support it differently, therefore though in theory VirtualBox and QEMU are said to support OVA Format. Attempts to import such usually will fail. In this little article I will explain how VMWare stored (exported) VirtualMachine machine can be succesfully imported to VirtualBox.
1. Locate where is Virtualbox .vmx files from Window search or via dir command
I'm a console guy, so I prefer looking for VMWare's .vmx from command line:
C:\Users\GGEORGI7> cd c:\ C:\> dir /s *.vmx
Volume in drive C is PC COE
Volume Serial Number is XXXX-XXXX
…
Directory of C:\Users\ggeorgi7\Documents\Virtual Machines\Debian 706/02/14 11:06 AM 2,687 Debian 7.vmx
05/28/14 15:44 PM 370 Debian 7.vmxf
2 File(s) 3,057 bytes
2. Switch to wherever the VMWare virtualmachine .vmx file is located
C:\> cd \Users\ggeorgi7\Documents\Virtual Machines\Debian 7
N.B. !Make sure the VMWare Virtualmachine is Shutdown (if it is Suspended converted file will not be properly implemented inside VirtualBox!). Whether the migrated virtualhost is suspended, launch VMWare, restore its state and Shut it down properly before starting migration with ovftool.
3. Remove Vmware-tools, Reset Display settings and Input D (before exporting to OVF) in VMWare
a) Remove vmware-tools
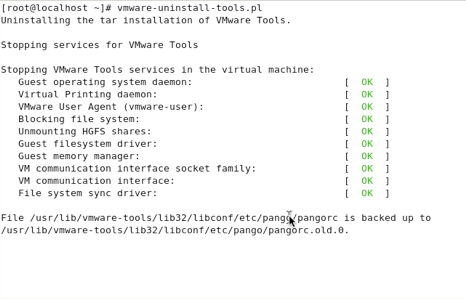
Vmware-tools kernel modules and stuff compiled specific for VMWare are no longer needed and might pose issues, thus it is always a good idea if previously installed in VMWare to wipe them out with cmd:
vmware-uninstall-tools.pl
b) Reset Display Device and Input Devices
Inside VMWare virtual machine Linux host, before shutting it down run:
mv /etc/X11/xorg.conf /etc/X11/xorg.conf.vmware
c) Remove Incomptable devices
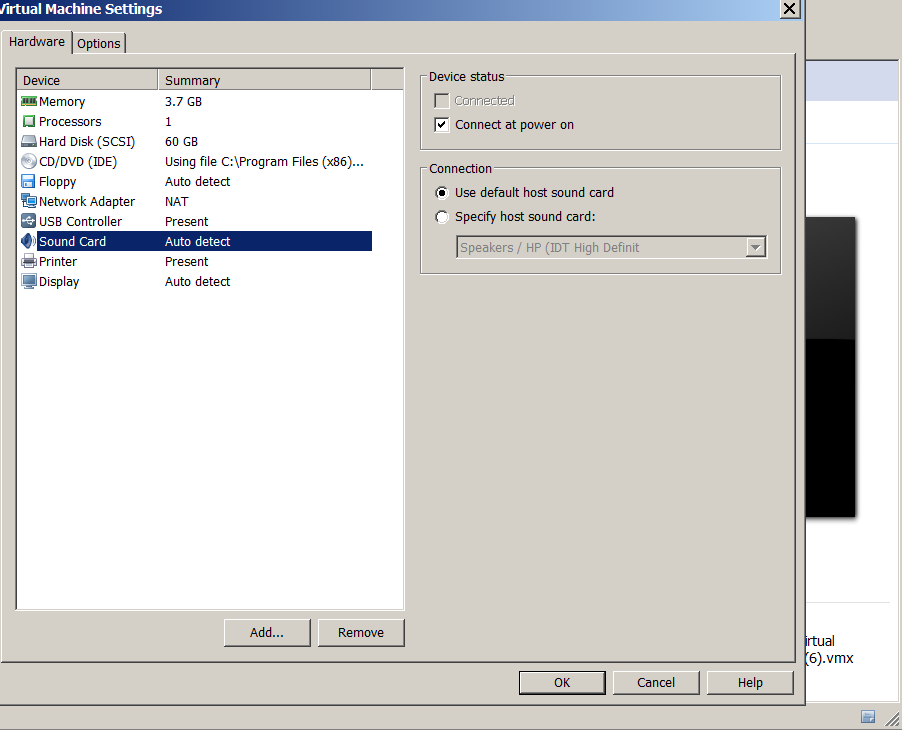
To prevent issues with sound – its necessary to remove VMWare device created for soundcard, in order to let VirtualBox create its soundcard device on 1st boot after migration. To do so click on Virtual Machine and from context menu click Settings then in Hardware tab select Sound Card and Remove:
Settings -> Hardware -> Sound Card (Click Remove)
4. Make a Clone (Backup) of Virtual Machine
Its always a good idea to create backup of VMWare VM to be migrated just in case something goes wrong during migration, so you have a way to step back to the already working one. Once files are copied it might be a good idea to use use some archiver like PeaZip or 7-Zip to save some disk space.
mkdir SomeFolder
copy Path_To_Virtual_Machine Folder_for_Backup_Virtual_Machine
In my case this was
mkdir \Temp\VMWare-machine-backup

C:\>copy "C:\Users\ggeorgi7\Documents\Virtual Machines\Debian 7"\ c:\Temp\VM

ware-machine-backup
Restoring later VMWare VirtualMachines in case of some failure is done by simply copying backuped files to VMWare Working Directory folder
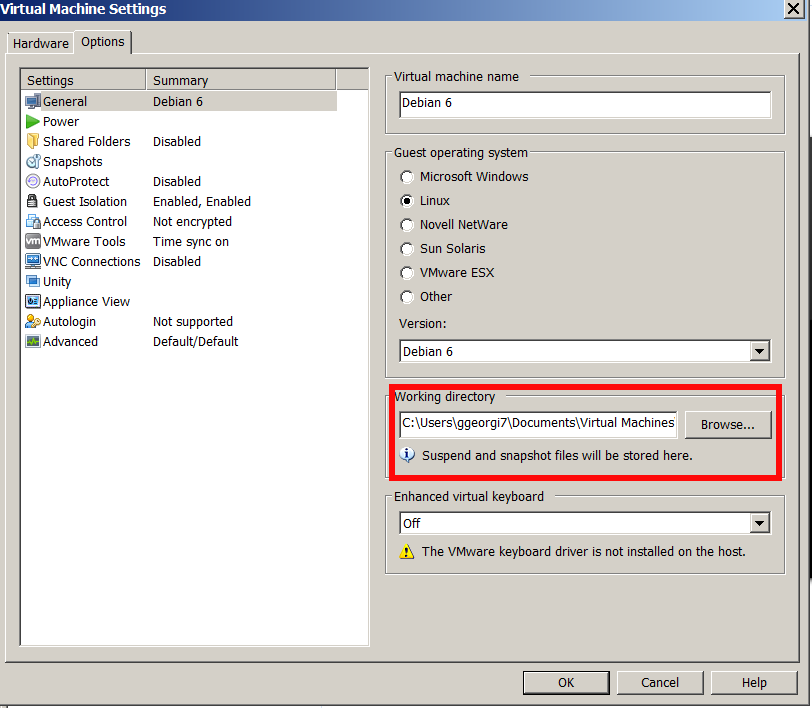
In case if Wondering
Where is stored VMWare Virtual Machines?
Check in:
VM -> Settings -> Options
5. Use VMWare ovftool.exe to convert .VMX to Open Virtualization Format (.OVF)
Though export from .VMX to .OVF it can be also done from VMWare GUI from:
File -> Export to OVF
Anyways I think it is better to do it via OVFTool console tool:
The most common location for VMWare Workstation is:
C:\Program Files (x86)\Vmware\Vmware Workstation\OVFTool
For VMware Player it is:
C:\Program Files (x86)\Vmware\Vmware Player\OVFTool
Very important thing to mention here is you have to be cautious, Never to run together VMWare and VirtualBox.
!! Before proceeding to next OVTool .vmx to .ovf migration Shutdown the VirtualMachine and as a best practice close VMware completely.
cd Location-directory-ofOVFTool
ovftool.exe Path-folder-to_VMVM_file.vmx Path-folder_to_VM_exportVM_file_export.ovf
C:\> cd "\Program Files (x86)\VMware\VMware Workstation"\OVFTool

C:\Program Files (x86)\VMware\VMware Workstation\OVFTool>ovftool.exe "\Users\ggeorgi7\Documents\Virtual Machines\Debian 7\Debian 7.vmx" C:\Users\ggeorg i7\vmware-debian-export.ovf
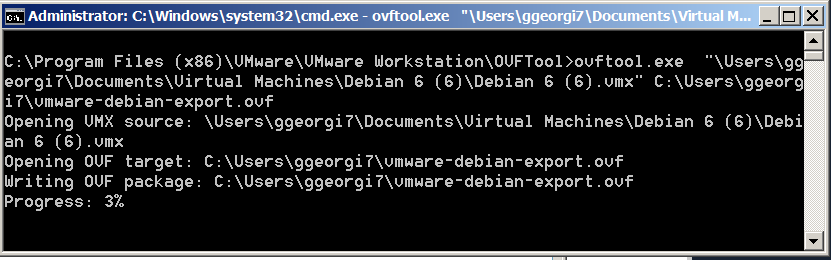
Convertion will take about 30 minutes on a normal computer hardware lets say (Dual Core PC 2Ghz with 4 Gb of RAM).
If you get a “failed to open disk” error during convertion, its likely that the virtual machine is still running or wasn’t shut down properly – boot the virtual machine and perform a shut down.
6. Launch VirtualBox, Install Guest Additions to enable Copy / Paste and USB support in Virtual Machine
After the process completes, you can boot the virtual machine. If you haven't earlier uninstalled vmware-tools uninstall VMware Tools, and install VirtualBox’s Guest Additions (in order to allow Copy / Paste between VirtualBox and guess OS).
7. Launch VirtualBox and Import exported .OVF
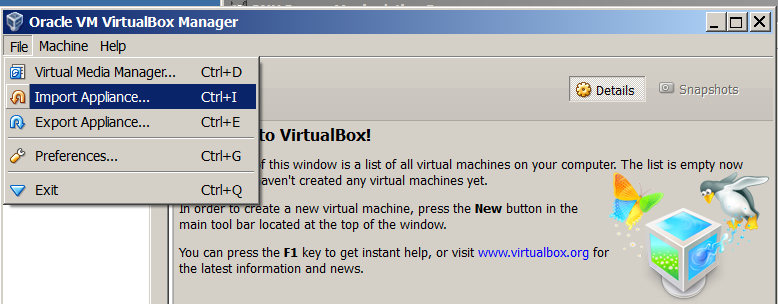
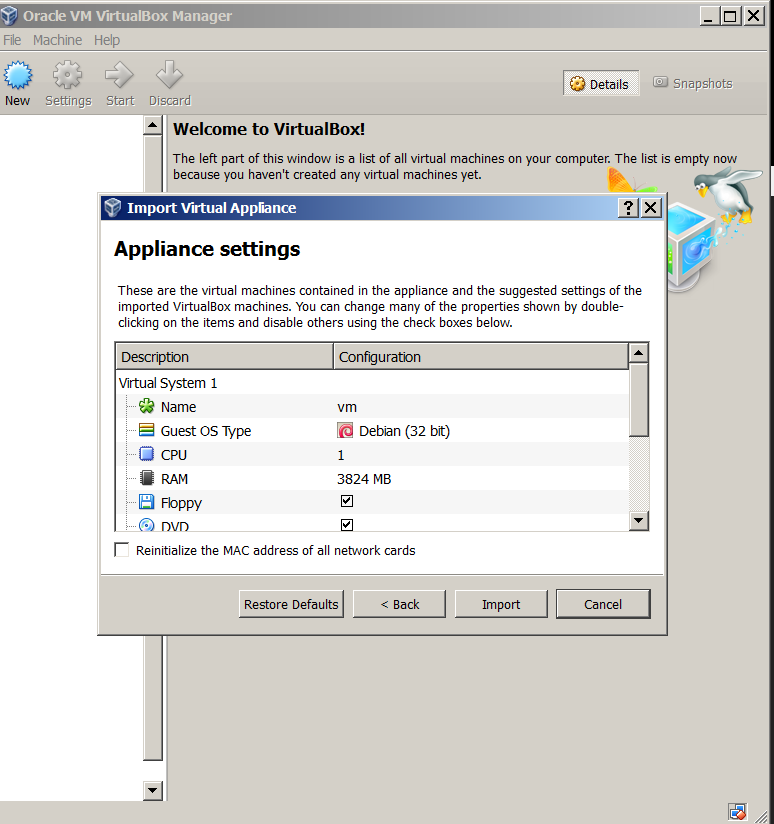
Once Virtual Machine is exported, to import it into VirtualBox, launch VirtualBox and choose:
File -> Import Appliance
Run 2 and more Skypes simultaneously on Mac OS X – Run multiple Skype acccounts on same Mac
Saturday, June 21st, 2014 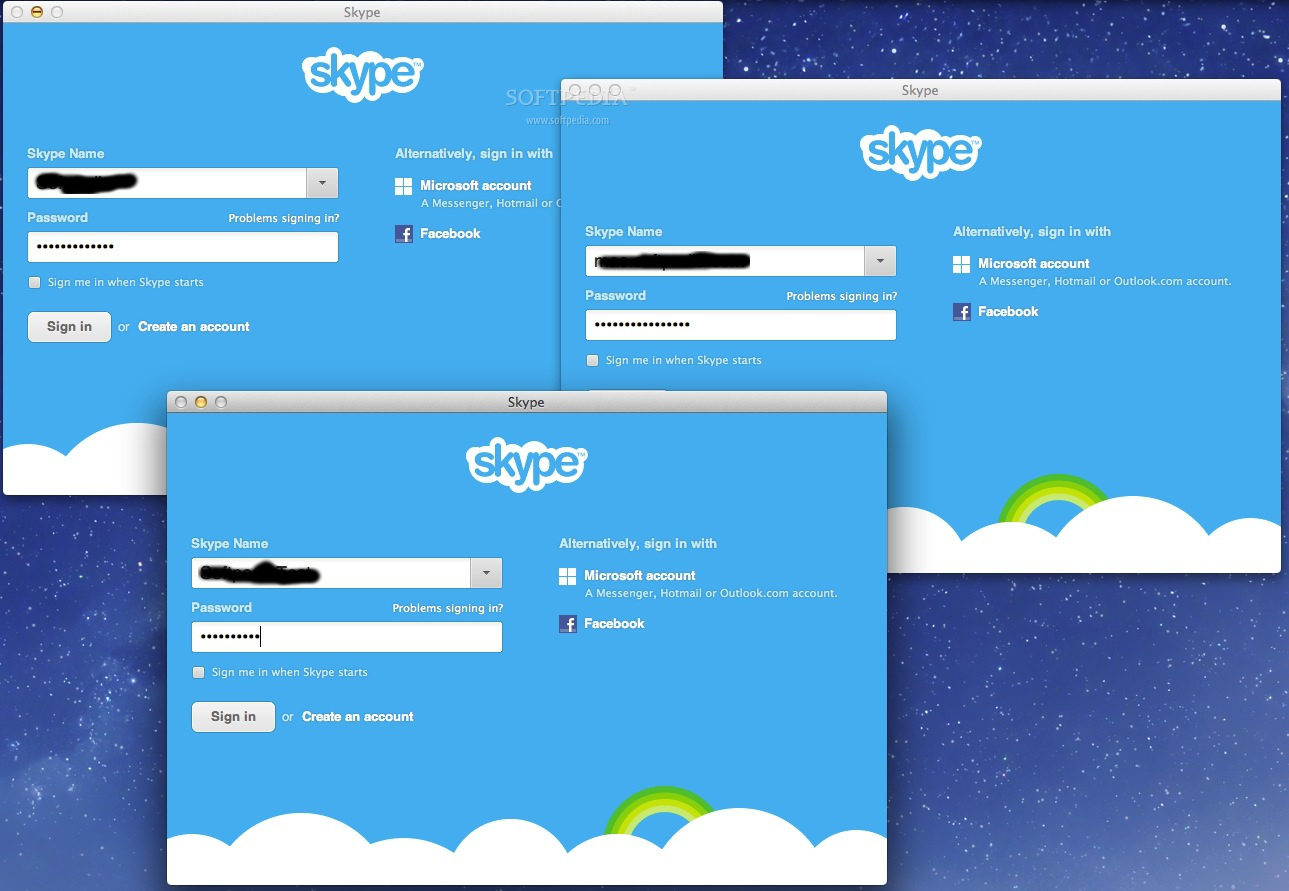
For people running Mac OS X, the question of how is it possible to use 2 skype accounts in parallel on Mac probably makes good sense?
I don't own a Mac notebook and thefore I'm a Mac newbie, however, I'm into situation where I and my wife Svetlana went (for 3 days) to my hometown Dobrich and we have with us only her Mac OS X powered Mac Book air.
One user is already logged in Skype, (my wife) is expecting some relatives and friends to contact us and same time I had to login to check few servers via ssh and discuss some server downtime issues from yesterday in Skype .
Thus we need 2 skype instances to run separately on her Macbook air powered PC with Mac OS X Leopard
Earlier I've blogged how to make 2 and more Skype accounts work simultaneously on one Windows PC because I had to set it up for a company, in this short article I will explain how is possible to run many skype clients on Mac OS X.
1. Open Mac Terminal from Finder

2. In Terminal run the first Skype Instance
Type in Terminal:
open /Applications/Skype.app/Contents/MacOS/Skype
3. Run Second Skype instance
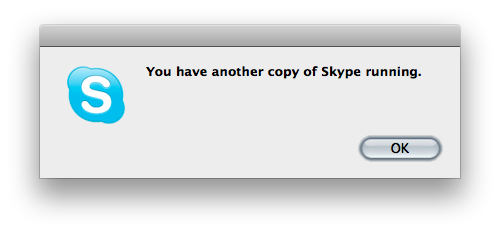
In older Skype Mac OS versions, I read the
/secondary
Skype command option was there and could be used to run a second parallel skype instance on Mac, however in newer releases this option was removed and if you try to invoke it warning window pops up saying an instance is already running.
To get around the issue and run the second Skype, quickest way is to run another Skype client under privileged user through sudo command (this is unsecure – but anyways as Mac OS is proprietary and we don't have access to code and probably there are tons of spy and report software integrated into the OS, it doesn't really matter.)
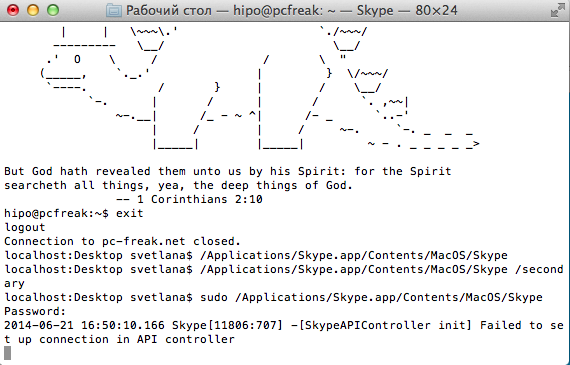
To get around the issue and run the second Skype, quickest way is to run another Skype client under privileged user through sudo command (this is unsecure – but anyways as Mac OS is proprietary and we don't have access to code and probably there are tons of spy and report software integrated into the OS, it doesn't really matter.)
4. Script it into 2nd_skype.sh for later use
To run and use two parallel skypes regularly it might be useful to make shell script out of it and place it somewhere, 2nd_skype.sh script should be something like:
#!/bin/bash

open /Applications/Skype.app/Contents/MacOS/Skype

sudo /Applications/Skype.app/Contents/MacOS/Skype
Then make the script executable with:
chmod a+x 2nd_skype.sh
5. Run more than 2 Skypes (Run multiple Skypes on same Mac PC hack)
There is another "hack" method with deleting the Skype.pid (Process ID). Skype recognize where it is running by checking its Skype.pid on start up.
Deleting the pid after each next Skype client launch, allow the user to run as many Skypes as you want on Mac OS X but it is not clear for how long it time it will work.
rm -f ~/Library/Application Support/Skype/Skype.pid
Then launch again Skype in background from Mac Terminal
open -nW '/Application/Skype.app' &
In case if you wonder why the open command is used, since above line could be run also directly and Skype will pop-up, by using open command you instruct the program to detach itself from Terminal from which it run, so later if Terminal is closed Skype app. will not terminate.
Another approach is to create, a many users lets say 5 users and use the Skype sudo run method each client with a separate user.
sudo user1 /Applications/Skype.app/Contents/MacOS/Skype
sudo user2 /Applications/Skype.app/Contents/MacOS/Skype
sudo user3 /Applications/Skype.app/Contents/MacOS/Skype
sudo user4 /Applications/Skype.app/Contents/MacOS/Skype
sudo user5 /Applications/Skype.app/Contents/MacOS/Skype
I enclose the script with the custom icon (Skype) ready to be launched and Voila, on script launch Skype multiple login prompts pops up.
For the lazy ones who don't want to tamper with writting scripts or doing hacks to run Skype multiple times on Mac there is even a Multi Skype Launcher app for Mac.
Schindler’s List – A must see classical movie about the terrible Jewish Holocaust during World War II
Wednesday, September 10th, 2014 
A very little is known in these days especially among young people of Europe about the terrible attrocities of the Jewish Holocaust and the concentration camps like Auschwitz organized by Hitler's Nazi Germany in World War II.
Schindler's List is a very good American movie (from 1993) retelling a true story about how enterpreneur Oskar Schindler managed to save about 1200 Jewish people from extermination in the camp of dead – Auschwitz during WWII.
Schindler's List is a movie that shows how even a deeply business oriented money obsessed man like O.

Schindler was before the beginning of war could grow in the love of Christ and Christian faith to risk his life and well being in order to be liable and honest with himself in a years when most of Nazi's Germans become totally unhuman and obsessed to wipe out existence of Old Testament God's Choosen People – The Jewish.
The movie is based on a popular novel Schindler's Ark by Canadian Thomas Keneally about how the German Shindler saved lifes of thousand Polish-Jewish refugees by creating an own business (fabric) run in Nazi's Germany before WWII and later inside a concentration camp. The movie is shot by the the film legend Steven Spilberg (who is also a Jew) intentionally Black and White to put an extra artistic impact and is very much made to look like a documentary.
The movie is 3 hours 28 minutes of Drama and has multiple awards for Best Picture, Best Director, Best Adapted Screenplay, and Best Original Score. The movie plot starts from how the anti-semitism in Germany started and how it progressed a little time before the emerge of war and the start of Jewish persecution. The main actors are Oscar Schindler a member of German Nazi Party whose dream is to make a big fortune out of the war. By using bribes and his bright manipulative personality he manages to bribe Wehrmacht (German Armed Forces) and WWII SS (German special forces). Schindler uses the local Jewish Itzhak Stern who has plenty of contacts in Jewish Business community and black marketers to form a cheap-hand jewish labour force for his factory for metal vessels to be used within Germany Nazi's Army. Many high qualified jewish was more than happy to be hired in his "Fabryka Oskara Schindlera" fabric, because this was quite a better alternative than being in one of the deadly concentration camps.

The movie shows, how jewish were forced to obey an always changing and unclear criterias in order to convince them they're no good for nothing and thus for Nazis to find reason to kill as many as possible of them. At a certain point the situation gets out of control and Jewish peoples who are forced to live in Jewish ghettos start being randomly mass murdered for missing reasons in Płaszów concentration camp. SS-Untersturmführer (second lieutenant) Amon Goeth is responsible to oversee the Plaszow camp , once the camp completes its construction by jews, he orders getto liquidated.

As the Germans start loosing the war, an order is made to sent all surviving jews to the most deadly Nazi concentration camp Auschwitz.

Oscan Schindler (also known by all jews as the director), witnesses the jewish massacres and in being profoundly affected, makes full effort to convince the Nazis the his company jews are important as a workforce and he needs them to produce ammos and military weapons in order to make full profit.
He has to pay almost all his earned money in early prior war times and first 2 war years in order to ransom the jews and sents him to work in another established factory of his (he manages to convince Nazis that even children and handicapped are useful for his company thus managing to save a multitude of doomed innocent people. As the train carrying women and children is accidentally redirected to Auschwitz-Birkenau, Schindler bribes the commandant of Auschwitz with a bag of diamonds to win their release.
In his new factory Shindler forbids the SS guards to enter the factory and orders the production of ammos and weapons to be produced defective by his workers. Letting them to even to observe their Jewish Shabbath (Sabbath). In the next 7 months Shindler bribes multiple Nazi officials and runs out of money in 1945 exactly when the War in Europe is over with Germany surrender. The SS Guards are being ordered to kill the Jews as the red-army is advancing and soon liberate the concentration camp, however Shindler succesfully convinces SS's to let Jews alive and go to their families and homes.

As a sign of thankstfullness his jewish workers give Schindler a signed statement attesting to his role saving Jewish lives, together with a ring engraved with a Talmudic quotation: "Whoever saves one life saves the world entire.". Schindler is deeply ashamed for not doing even more to save more Jews from extermination. Schindler has to flee the concentration camp to escape being killed by the approaching red-army. On next morning Soviet soldier comes and announces liberation of Jews. The evil Hitler follower Goeth is executed for his crimes against humanity and his unwillingness to refuse his Nazis ideas.
The movie is quite hard to grasp, so prepare for a lot of bloody scenes, nomatter that it is one of the best movies I've seen and has good spiritual elements. It is also good to see for it shows that the Good always triumphs victoriously over the evil.
Happy Watching!


