Posts Tagged ‘gzip’
Monday, July 5th, 2021 
If you have to administer a bunch of Web or Application servers you will definetely end up with some machines that has some logrotate misconfiguration.
Perhaps the most common one sysadmin faces is when you have rotated webserver, proxy, mail server logs that gets gzipped with a date timestamp of the rotation and a brand new files is created by logrotate. Such a thing could be seen on various Linux distributions and even a more corporate prodcution ready Linux – es like CentOS and Fedora occasionally end up with issues caused by improperly created user / group permissions (usually root:root) of logrotate.
The wrong permissions of usually normally logging to file by a service, happens when the log file will get filled (or matches some thresholds) configured by logrotate respective config, the log rotate mechanism will rename this file gzip / bzip it depending on how it is prepared to behave and opens a new one, however the newly produced log file will not have the
read write
permission which are necessery for the respective service because the service is not running as administrator (root), lets say there is a haproxy daemon running with user / group haproxy, haproxy, like it happeed today on one of our legacy CentOS 6.5 servers.
The sad result is /var/log/haproxy.log or whatever log file stays empty forever even though the service is normally working and you end up blind not seeing what's going on …
To solve the empty file due to logrotate dumping the original file permissions to a wrong one due to misconfiguration or a lack of special configuration it is as easy as setting up the logrotated file to write down the new rotated file to a specic user, this is done with a one line addition of code with a syntax like:
create mode owner group
Below is extract from logrotate man page (man logrotate)
Immediately after rotation (before the postrotate script is run) the log file is created (with the same name as the log file just rotated).
mode
specifies the mode for the log file in octal (the same as chmod(2)), owner specifies the user name who will own the log file, and group specifies the group the log file will belong to. Any of the log file attributes may be omitted, in which case those attributes for the new file will use the same values as the original log file for the omitted attributes. This option can be disabled using the nocreate option.
Lets say you have following /etc/logrotate.d/haproxy configuration that is instructing logrotate to do the rotation and this will create empty file with root:root after rotate:
root@haproxy2:/etc/logrotate.d# cat haproxy
/var/log/haproxy.log {
daily
rotate 52
missingok
notifempty
compress
delaycompress
postrotate
/usr/lib/rsyslog/rsyslog-rotate
endscript
}
To make /var/log/haproxy.log be owned by haproxy user and group and chmod to certain owner permissions hence, do add inside the block something like:
/var/log/haproxy.log {
….
create 664 user group
….
}
i.e. :
/var/log/haproxy.log {
….
create 644 haproxy hapoxy
….
}
To test the configuration do a logrotate config dry run do:
root@haproxy2:/etc/logrotate.d# logrotate -v -d -f /etc/logrotate.d/haproxy
WARNING: logrotate in debug mode does nothing except printing debug messages! Consider using verbose mode (-v) instead if this is not what you want.
reading config file /etc/logrotate.d/haproxy
Reading state from file: /var/lib/logrotate/status
Allocating hash table for state file, size 64 entries
Creating new state
Creating new state
Creating new state
Creating new state
Creating new state
Creating new state
Creating new state
Creating new state
Creating new state
Creating new state
Creating new state
Creating new state
Handling 1 logs
rotating pattern: /var/log/haproxy.log forced from command line (52 rotations)
empty log files are not rotated, old logs are removed
considering log /var/log/haproxy.log
Now: 2021-07-05 21:51
Last rotated at 2021-07-05 00:00
log needs rotating
rotating log /var/log/haproxy.log, log->rotateCount is 52
dateext suffix '-20210705'
glob pattern '-[0-9][0-9][0-9][0-9][0-9][0-9][0-9][0-9]'
compressing log with: /bin/gzip
renaming /var/log/haproxy.log.8.gz to /var/log/haproxy.log.9.gz (rotatecount 52, logstart 1, i 8),
renaming /var/log/haproxy.log.7.gz to /var/log/haproxy.log.8.gz (rotatecount 52, logstart 1, i 7),
renaming /var/log/haproxy.log.6.gz to /var/log/haproxy.log.7.gz (rotatecount 52, logstart 1, i 6),
renaming /var/log/haproxy.log.5.gz to /var/log/haproxy.log.6.gz (rotatecount 52, logstart 1, i 5),
renaming /var/log/haproxy.log.4.gz to /var/log/haproxy.log.5.gz (rotatecount 52, logstart 1, i 4),
renaming /var/log/haproxy.log.3.gz to /var/log/haproxy.log.4.gz (rotatecount 52, logstart 1, i 3),
renaming /var/log/haproxy.log.2.gz to /var/log/haproxy.log.3.gz (rotatecount 52, logstart 1, i 2),
renaming /var/log/haproxy.log.1.gz to /var/log/haproxy.log.2.gz (rotatecount 52, logstart 1, i 1),
renaming /var/log/haproxy.log.0.gz to /var/log/haproxy.log.1.gz (rotatecount 52, logstart 1, i 0),
log /var/log/haproxy.log.53.gz doesn't exist — won't try to dispose of it
renaming /var/log/haproxy.log to /var/log/haproxy.log.1
creating new /var/log/haproxy.log mode = 0644 uid = 106 gid = 112
running postrotate script
running script with arg /var/log/haproxy.log: "
/usr/lib/rsyslog/rsyslog-rotate
"
root@haproxy2:/etc/logrotate.d# grep -Ei '106|112' /etc/passwd
haproxy:x:106:112::/var/lib/haproxy:/usr/sbin/nologin
You do it for any other service respectively by editting whatever /etc/logrotate.d/file, lets say postfix's /var/log/maillog should be owned with 644 by postfix:postfix.
# cat /etc/logrotate/postfix
/var/log/maillog {
….
create 664 postfix postfix
….
}
Tags: Creating, gzip, haproxy, lib, notifempty, postfix, root root, running, state, var
Posted in Linux, System Administration | No Comments »
Wednesday, July 4th, 2012 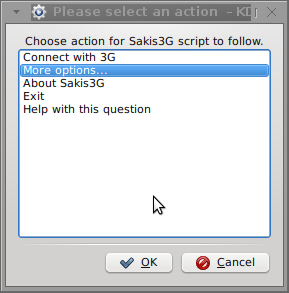
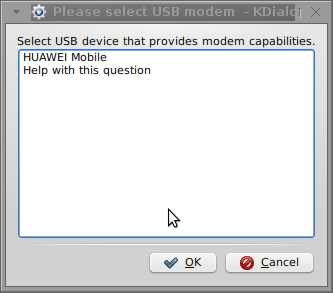
I've been given a HUAWEI Mobile Broadband E173 USB 3g model. The USB modem contains a flash USB Storage segment storing a little install program dedicated to make the modem work fine on Microsoft Windows XP / Vista / 7 and probably other M$ OSes. I'm a long time DebianGNU / Linux user and as a free software enthusiast I ofcourse wanted to be able to use Vivacom's 3G USB Modem on my Linux powered notebook.
Thanksfully as I've red on Vivacom's website the modem supports Linux OS 🙂
For those unaware in Bulgaria there are currently 3 major GSM network providers providing 3G internet this are;;;
- VIVACOM – The ex Government ran national company BTC (Bulgarian Telecommunication Company)
- M-Tel – The first GSM network provider that entered Bulgaria around year 1995
- GLOBUL – The 3rd and last GSM mobile and net provider entered last and not so much used by Bulgarians today
Until today I had no experience in running any 3G modems on Linux, neither I had used the 3 networks 3G internet to determine which one is best, however I've been given for temporal use a VIVACOM 3G internet modem today so I proceeded to try installing it on my Debian host.
My Linux system is a bit strangely configured as I use wicd network connection manager -( wicd-gtk ) to manage wireless and LAN connections instead of the standard installed GNOME network manager – available through package ( network-manager-gnome ).
The reason I use wicd is not that it is so much better than GNOME network manger but rather for historical reasons because few years past I had impression it works better in connecting me to wireless networks. Another reason why I choosed wicd back then was the nice looking stats …
I tried plugging in the Vivacom USB 3G modem stick and checked in wicd to see if I can see a possibility to connect to the mobile opeartor 3G network but unfortunately nothing appeared.
Though the 3G adsl modem was unavailable straing in wicd, checking about it in the list of attached USB devices I could see it detected, e.g.:
noah:~# lsusb |grep -i huawei

Bus 001 Device 007: ID 12d1:1c05 Huawei Technologies Co., Ltd.
This was at least a good sign pointing me to the thoughts that the modem is probably gonna work.
I did a quick Google search to see if other people succeded running the device on a Linux host and came across a few blog posts in Bulgarian explaining a "success story" on Ubuntu Linux through using a tweakened shell script – sakis3g. For more on how the script works and script download check out Sakis3g
Here is a quote from sakis3g's website describing the script:
It automagically setups your USB or Bluetooth™ modem, and may even detect operator settings.
You should try it when anything else fails!
Sakis3g has different versions designed for for plenty of spacific hware architectures i.e. for (i386, amd64, armv4t, armv5t).
There is also a version of the script which by the way contains a combination of bash shell scripting instruction and some binary exec data.
To run sakis3g on my laptop I did:
1. Download sakis3g
My notebook architecture is 64 bit so I download and used the amd64 version of the script;;;
hipo@noah:~$ mkdir sakis3g

hipo@noah:~$ cd sakis3g

hipo@noah:~/sakis3g$ wget http://www.sakis3g.org/versions/latest/amd64/sakis3g.gz
I've made also a mirror of sakis3g i386, 64 bit and all architecture the mirrors just in case it disappears in future. The mirror versions of sakis3g are here:
a. sakis3g i386 b. sakis3g amd64 c. sakis3g all architectures source
2. Unarchive and make it executable
After downloading it as it is in gzip I had to do the usual de-gzipping and making the file executable;;;
hipo@noah:~/sakis3g$ /bin/gzip -d sakis3g.gz

hipo@noah:~/sakis3g$ chmod +x sakis3g
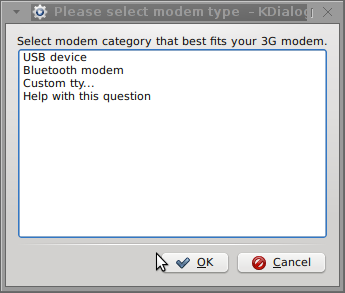
The script is then ready to run by either clicking twice on it or (as I prefer for debugging reasons to run it in terminal):
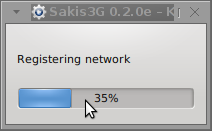
hipo@noah:~$ ./sakis3g
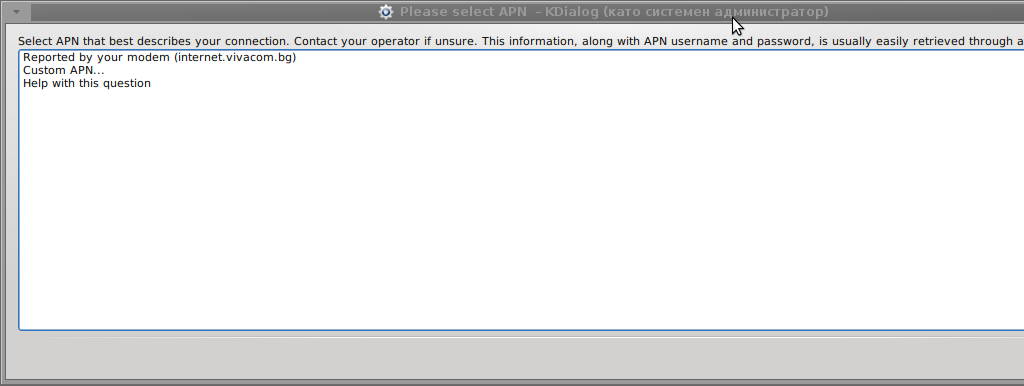
Something that I have wondered a bit was the dialog where I had to fill in some data of some variable APN abbreviation for – (Access Point Name)
The APN host for VIVACOM mobile internet is;;;
APN: internet.vivacom.bg
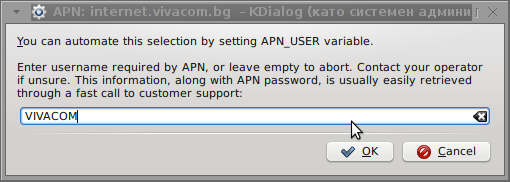
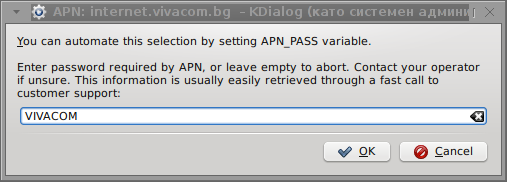
I've used the Windows configuration progrma to gather also the following data that I thought might be important for configuring the 3G adsl modem on the Linux host;;;
Auth: *99#

User: VIVACOM

pass: VIVACOM
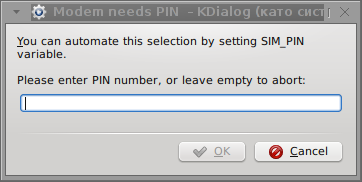
Here are all the configuration screenshots I've taken from sakis3g and all the data that I filled in.
Next the following tiny window appeared on screen:

Well that's all folks, now sakis3g succesfully connected to the I_net via an (PPP) VPN connection tunnel here is data from ifconfig command showing the succesful 3G connection to VIVACOM;;;
noah:~# /sbin/ifconfig ppp0

ppp0 Link encap:Point-to-Point Protocol

inet addr:10.58.146.232 P-t-P:10.64.64.64 Mask:255.255.255.255

UP POINTOPOINT RUNNING NOARP MULTICAST MTU:1500 Metric:1

RX packets:2066 errors:1 dropped:0 overruns:0 frame:0

TX packets:1609 errors:0 dropped:0 overruns:0 carrier:0

collisions:0 txqueuelen:3

RX bytes:2232058 (2.1 MiB) TX bytes:341693 (333.6 KiB)
The internet via the 3G connection is not blazing fast but good enough to check your mail or read some webpages. VIVACOM currently has different (traffic limited packages) for their 3G internet, I'm not sure which package exactly is the 3G USB stick modem but probably the "quick" internet connection that is now would slow down once the traffic limit is reached …
Hope this post helps someone to configure 3G internet on VIVACOM in Debian and Ubuntu Linux. Though I've tested sakis3g on Debian it should work with no hassles on any other GNU Linux distribution that has bash installed.
Tags: adsl modem, architecture, Auto, bulgarians, configure, connection, DebianGNU, download, Draft, Flash, flash usb, free software enthusiast, Gnome, GSM, gsm network, gzip, host, internet modem, lan connections, linux system, m tel, manager, microsoft windows, Mobile, modem work, modems, nbsp, network provider, network providers, Point, quot, reason, segment, Shell, software, telecommunication company, time, Ubuntu, usb internet, usb modem, wicd, wireless networks, work
Posted in Linux, Linux and FreeBSD Desktop, Various | 3 Comments »
Wednesday, November 15th, 2017 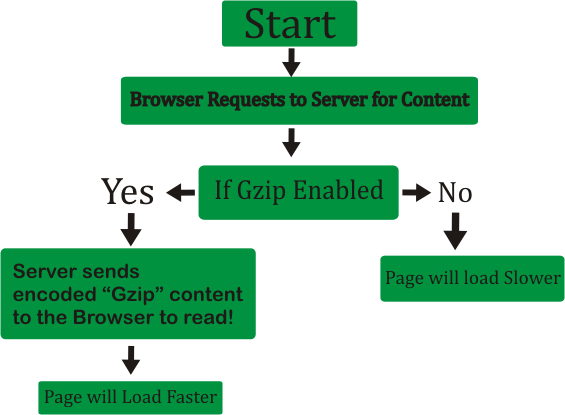
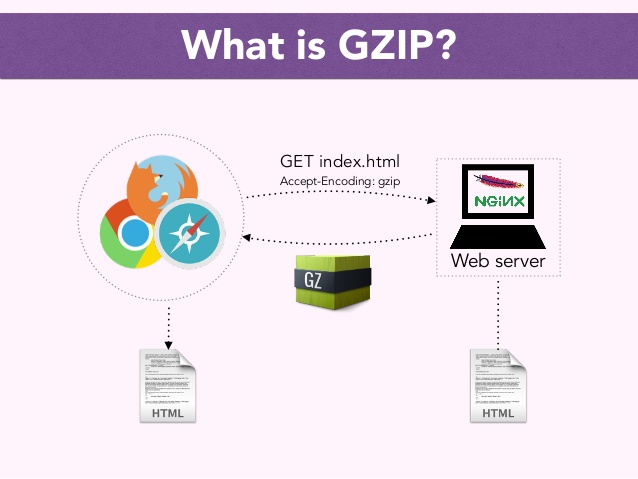
What is GZIP Compression and why you need it?
- What is gzip? – In Linux / Unix gzip of files is used to compress files so they can take less space when they're transferred from server to server via network in order to speed up file transfer.
- Usually gzipped files are named as filename.gz
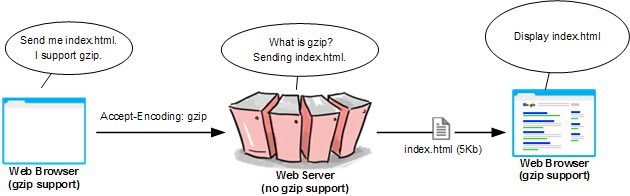
- Why GZIp compression is important to be enabled on servers, well because that reduces the transferred (served) file by webserver to client browser
- The effect of this is the faster file transfer of the file and increased overall web user performance
Most webservers / websites online currently use gzipping of a sort, those who still did not use it has websites which are up to 40% slower than those of competitor websites
How to enable GZIP Compression on Apache Webserver
The easiest way for most people out there who run there websites on a shared hosting is to add the following Apache directives to dynamic loadable .htaccess file:
<ifModule mod_gzip.c>
mod_gzip_on Yes
mod_gzip_dechunk Yes
mod_gzip_item_include file .(html?|txt|css|js|php|pl)$
mod_gzip_item_include handler ^cgi-script$
mod_gzip_item_include mime ^text/.*
mod_gzip_item_include mime ^application/x-javascript.*
mod_gzip_item_exclude mime ^image/.*
mod_gzip_item_exclude rspheader ^Content-Encoding:.*gzip.*
</ifModule>
You can put a number of other useful things in .htaccess the file should already be existing in most webhostings with Cpanel or Kloxo kind of administration management interface.
Once the code is included to .htaccess you can reflush site cache.
To test whether the just added HTTP gzip compression works for the Webserver you can use The Online HTTP Compression test
If for some reason after adding this code you don't rip the benefits of gzipped content served by webserver you can try to add altenatively to .htaccess
AddOutputFilterByType DEFLATE text/plain
AddOutputFilterByType DEFLATE text/html
AddOutputFilterByType DEFLATE text/xml
AddOutputFilterByType DEFLATE text/css
AddOutputFilterByType DEFLATE application/xml
AddOutputFilterByType DEFLATE application/xhtml+xml
AddOutputFilterByType DEFLATE application/rss+xml
AddOutputFilterByType DEFLATE application/javascript
AddOutputFilterByType DEFLATE application/x-javascript
Howto Enable GZIP HTTP file compression on NGINX Webserver?
Open NGINX configuration file and add to it the following command parameters:
gzip on;
gzip_comp_level 2;
gzip_http_version 1.0;
gzip_proxied any;
gzip_min_length 1100;
gzip_buffers 16 8k;
gzip_types text/plain text/html text/css application/x-javascript text/xml application/xml application/xml+rss text/javascript;
# Disable for IE < 6 because there are some known problems
gzip_disable "MSIE [1-6].(?!.*SV1)";
# Add a vary header for downstream proxies to avoid sending cached gzipped files to IE6
gzip_vary on;
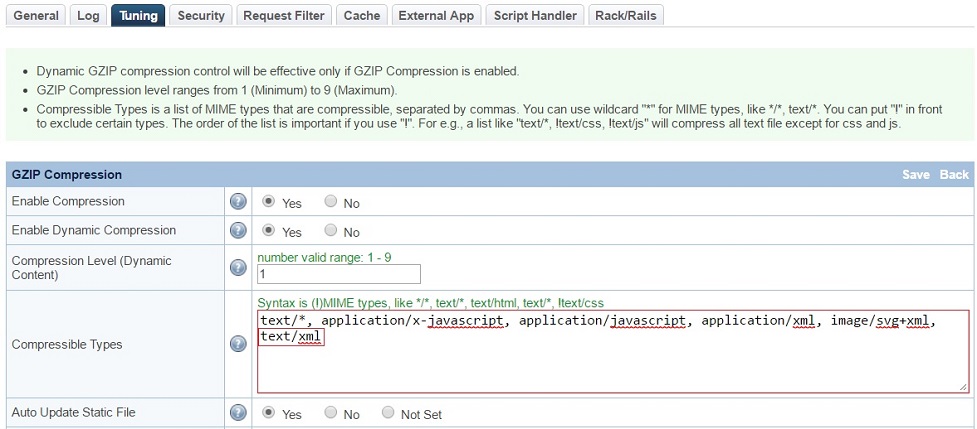
Enable HTTP file Compression on LiteSpeed webserver
In configuration under TUNING section check whether "enable compression" is enabled, if it is not choose "Edit"
and turn it on.
What is the speed benefits of using HTTP gzip compression?
By using HTTP gzip compression you can save your network and clients abot 50 to 70% (e.g. transferred data) of the original file size.
This would mean less time for loading pages and fetched files and decrease in used bandwidth.

A very handy tool to test whether HTTP Compression is enabled as well as how much is optimized for Speed your Website is Google PageSpeed Insights
as well as GTMetrix.com
Tags: compression, Files, gzip, Optimize, served, server
Posted in System Administration, Web and CMS | No Comments »
Friday, April 8th, 2011 I have recently installed and configured a Debian Linux server with nginx
. Since then I’ve been testing around different ways to optimize the nginx performance.
In my nginx quest, one of the most crucial settings which dramatically improved the end client performance was enabling the so called output compression which in Apache based servers is also known as content gzip compression .
In Apache webservers the content gzip compression is provided by a server module called mod_deflate .
The output compression nginx settings saves a lot of bandwidth and though it adds up a bit more load to the server, the plain text files like html, xml, js and css’s download time reduces drasticly as they’re streamed to the browser in gzip compressed format.
This little improvement in download speed also does impact the overall end user browser experience and therefore improves the browsing speed experience with websites.
If you have already had experience nginx you already know it is a bit fastidious and you have to be very careful with it’s configuration, however thanksfully enabling the gzip compression was actually rather easier than I thought.
Here is what I added in my nginx config to enable output compression:
## Compression

gzip on;

gzip_buffers 16 8k;

gzip_comp_level 9;

gzip_http_version 1.1;

gzip_min_length 0;

gzip_vary on;
Important note here is that need to add this code in the nginx configuration block starting with:
http {

....

## Compression

gzip on;

gzip_buffers 16 8k;

gzip_comp_level 9;

gzip_http_version 1.1;

gzip_min_length 0;

gzip_vary on;
In order to load the gzip output compression as a next step you need to restart the nginx server, either by it’s init script if you use one or by killing the old nginx server instances and starting up the nginx server binary again:
I personally use an init script, so restarting nginx for me is done via the cmd:
debian:~# /etc/init.d/nginx restart

Restarting nginx: nginx.
Now to test if the output gzip compression is enabled for nginx, you can simply use telnet
hipo@linux:~$ telnet your-nginx-webserver-domain.com 80

Escape character is '^]'.
After the Escape character is set ‘^]’ appears on your screen type in the blank space:
HEAD / HTTP/1.0
and press enter twice.
The output which should follow should look like:
HTTP/1.1 200 OK

Server: nginx

Date: Fri, 08 Apr 2011 12:04:43 GMT

Content-Type: text/html

Content-Length: 13

Last-Modified: Tue, 22 Mar 2011 15:04:26 GMT

Connection: close

Vary: Accept-Encoding

Expires: Fri, 15 Apr 2011 12:04:43 GMT

Cache-Control: max-age=604800

Accept-Ranges: bytes
The whole transaction with telnet command issued and the nginx webserver output should look like so:
hipo@linux:~$ telnet your-nginx-webserver-domain.com 80

Trying xxx.xxx.xxx.xxx...

Connected to your-nginx-webserver-domain.com

.Escape character is '^]'.

HEAD / HTTP/1.0
HTTP/1.1 200 OK
Server: nginx
Date: Fri, 08 Apr 2011 12:04:43 GMT
Content-Type: text/html
Content-Length: 13
Last-Modified: Tue, 22 Mar 2011 15:04:26 GMT
Connection: close
Vary: Accept-Encoding
Expires: Fri, 15 Apr 2011 12:04:43 GMT
Cache-Control: max-age=604800
Accept-Ranges: bytes
The important message in the returned output which confirms your nginx output compression is properly configured is:
Vary: Accept-Encoding
If this message is returned by your nginx server, this means your nginx now will distribute it’s content to it’s clients in compressed format and apart from the browsing boost a lot of server and client bandwitdth will be saved.
Tags: apache webservers, bandwidth, client, client performance, com, compression, compression gzip, config, configuration block, content, different ways, download, EncodingExpires, experience, Fri, GMTConnection, gzip, gzip compression, gzipfile, HEAD, How to, html xml, HTTP, init, init script, js, level, Linux, linux server, Mar, mod, Modified, nginx, OKServer, output compression, plain text files, server instances, servers, text, time, use, xml
Posted in Linux, System Administration, Web and CMS | 3 Comments »
Wednesday, April 13th, 2011 
Watching videos in youtube today and already for about 2 years is the de-facto hype.
There is almost none a day passed without almost each one of us has watched a dozen videos in Youtube.
Watching videos in youtube has become even more addictive for many than the early days of Internet Relay Chats (IRC)
As youtube is very accessible for people and it’s a comparativily easy way people share more and more with the day.
There is no question that the business idea of youtube is great and youtube generates millions of dollars for Google day by day, however I have a serious objection here! All is good the only pitfall is that you don’t own the youtube videos you watch!
Youtube’s story is not that different from the story of the cloud computing threat to internet users Freedom
The good thing here is that we’re not still completely dependant on youtube and there is still way to retrieve your favourite youtube video and store it for later watching or distribution.
Probably the most famous browser plugin that allows files retrieval from youtube, as most people know is DownloadHelper .
However using download helper is browser dependant, you need to use the browser to save the plugin and I don’t find it to be the best way to download a youtube video.
Since the old days I have started using Linux, I’ve been quite addicted to as many things on my linux as possible from the command line (terminal / console) (CLI) .
In that manner of thoughts it was a real delight for me to find out that a group of free software developer guys has come up with a command line tool that allows downloads of youtube videos straight from terminal, the great software is called youtube-dl and at the moment of this post writting it’s to be found on the URL address:
http://rg3.github.com/youtube-dl/
Youtube-dl is written in python so, it requires the Python interpreter, version 2.5 in order to properly run on Unix, Mac OS X or even on Windows!
The fact that it’s written in python has made the little shiny tool quite a multi-platform one.
To start using immediately the tool on a Debian or Ubuntu Linux you will have to install python (even though in most cases you must have it already installed):
1. To make sure you have python interpreter installed issue the cmd:
debian:~# apt-get install python

Building dependency tree

Reading state information... Done

python is already the newest version.

0 upgraded, 0 newly installed, 0 to remove and 0 not upgraded.
As you can see from above apt-get’s output I do have it installed so nothing gets installed.
2. As a next step I used links to download the youtube-dl python script, like so:
debian:~# links https://github.com/rg3/youtube-dl/raw/2011.03.29/youtube-dl >> youtube-dl

Use the links interface to save youtube-dl and use gzip to ungzip it

debian:~# gzip -d youtube-dl.gz

debian:~# chmod +x youtube-dl
Now to make it system wide accessible I have copied the youtube-dl to /usr/local/bin , whether I selected /usr/local/bin as a location as this location is predetermined to contain mostly files which does not belong to a regular deb package.
3. Move youtube-dl to /usr/local/bin
debian:~# mv youtube-dl /usr/local/bin
4. Test the newly installed youtube-dl command line youtube retrieval tool:
debian:~# ./youtube-dl https://www.youtube.com/watch?v=g7tvI6JCXD0

[youtube] Setting language

[youtube] g7tvI6JCXD0: Downloading video webpage

[youtube] g7tvI6JCXD0: Downloading video info webpage

[youtube] g7tvI6JCXD0: Extracting video information

[download] Destination: g7tvI6JCXD0.flv

[download] 53.3% of 22.62M at 33.23k/s ETA 05:25

[download] 100.0% of 22.62M at 31.91k/s ETA 00:00 [u
As you might have noticed from the above youtube-dl command output the newly retrieved youtube file will be saved under a name g7tvI6JCXD0.flv
The line I passed to youtube-dl is directly taken from my browser and pasted to console, the file downloading from youtube took me about 10 minutes but this is mostly because of some kind of youtube server speed restrictions …
In general at least I have this video for later, watching, so after a while I can watch it once again without loosing a lot of time trying to remember what was the video headline name
5. To use youtube-dl in a bit advanced way you can for instance invoke the command with options like:
debian:~# ./youtube-dl -l -w -c https://www.youtube.com/watch?v=g7tvI6JCXD0

[youtube] Setting language

[youtube] g7tvI6JCXD0: Downloading video webpage

[youtube] g7tvI6JCXD0: Downloading video info webpage

[youtube] g7tvI6JCXD0: Extracting video information

[download] Destination: BSD is Dying, Jason Dixon, NYCBSDCon 2007-g7tvI6JCXD0.flv

[download] 4.4% of 22.62M at 1.43M/s ETA 00:15
As you can see now youtube-dl was even able to detect the downloaded video file name and store it on the computer with a correct name 😉
I would recommend you also to check out the youtube-dl help page, to do use command: youtube-dl –help
Tags: browser plugin, business idea, command line tool, computing, download, Extracting, favourite, favourity, file, free software developer, google, great software, gzip, hype, info, information, internet relay chats, internet users, irc, JCXD, line terminal, location, mac os x, many things, none, objection, os x, pitfall, plugin, python, python interpreter, software, story, terminal, threat, tool, url address, video, youtube video, youtube videos
Posted in Linux and FreeBSD Desktop, Linux Audio & Video | 4 Comments »
Friday, March 30th, 2012 While browsing I stumbled upon a nice blog article
Dumping HTTP headers
The arcitle, points at few ways to DUMP the HTTP headers obtained from user browser.
As I'm not proficient with Ruby, Java and AOL Server what catched my attention is a tiny php for loop, which loops through all the HTTP_* browser set variables and prints them out. Here is the PHP script code:
<?php<br />
foreach($_SERVER as $h=>$v)<br />
if(ereg('HTTP_(.+)',$h,$hp))<br />
echo "<li>$h = $v</li>\n";<br />
header('Content-type: text/html');<br />
?>
The script is pretty easy to use, just place it in a directory on a WebServer capable of executing php and save it under a name like:
show_HTTP_headers.php
If you don't want to bother copy pasting above code, you can also download the dump_HTTP_headers.php script here , rename the dump_HTTP_headers.php.txt to dump_HTTP_headers.php and you're ready to go.
Follow to the respective url to exec the script. I've installed the script on my webserver, so if you are curious of the output the script will be returning check your own browser HTTP set values by clicking here.
PHP will produce output like the one in the screenshot you see below, the shot is taken from my Opera browser:

Another sample of the text output the script produce whilst invoked in my Epiphany GNOME browser is:
HTTP_HOST = www.pc-freak.net
HTTP_USER_AGENT = Mozilla/5.0 (X11; U; Linux x86_64; en-us) AppleWebKit/531.2+ (KHTML, like Gecko) Version/5.0 Safari/531.2+ Debian/squeeze (2.30.6-1) Epiphany/2.30.6
HTTP_ACCEPT = application/xml,application/xhtml+xml,text/html;q=0.9,text/plain;q=0.8,image/png,*/*;q=0.5
HTTP_ACCEPT_ENCODING = gzip
HTTP_ACCEPT_LANGUAGE = en-us, en;q=0.90
HTTP_COOKIE = __qca=P0-2141911651-1294433424320;
__utma_a2a=8614995036.1305562814.1274005888.1319809825.1320152237.2021;wooMeta=MzMxJjMyOCY1NTcmODU1MDMmMTMwODQyNDA1MDUyNCYxMzI4MjcwNjk0ODc0JiYxMDAmJjImJiYm; 3ec0a0ded7adebfeauth=22770a75911b9fb92360ec8b9cf586c9;
__unam=56cea60-12ed86f16c4-3ee02a99-3019;
__utma=238407297.1677217909.1260789806.1333014220.1333023753.1606;
__utmb=238407297.1.10.1333023754; __utmc=238407297;
__utmz=238407297.1332444980.1586.413.utmcsr=www.pc-freak.net|utmccn=(referral)|utmcmd=referral|utmcct=/blog/
You see the script returns, plenty of useful information for debugging purposes:
HTTP_HOST – Virtual Host Webserver name
HTTP_USER_AGENT – The browser exact type useragent returnedHTTP_ACCEPT – the type of MIME applications accepted by the WebServerHTTP_ACCEPT_LANGUAGE – The language types the browser has support for
HTTP_ACCEPT_ENCODING – This PHP variable is usually set to gzip or deflate by the browser if the browser has support for webserver returned content gzipping.
If HTTP_ACCEPT_ENCODING is there, then this means remote webserver is configured to return its HTML and static files in gzipped form.
HTTP_COOKIE – Information about browser cookies, this info can be used for XSS attacks etc. 🙂
HTTP_COOKIE also contains the referrar which in the above case is:
__utmz=238407297.1332444980.1586.413.utmcsr=www.pc-freak.net|utmccn=(referral)
The Cookie information HTTP var also contains information of the exact link referrar:
|utmcmd=referral|utmcct=/blog/
For the sake of comparison show_HTTP_headers.php script output from elinks text browser is like so:
 * HTTP_HOST = www.pc-freak.net

* HTTP_USER_AGENT = Links (2.3pre1; Linux 2.6.32-5-amd64 x86_64; 143x42)

* HTTP_ACCEPT = */*

* HTTP_ACCEPT_ENCODING = gzip,deflate * HTTP_ACCEPT_CHARSET = us-ascii, ISO-8859-1, ISO-8859-2, ISO-8859-3, ISO-8859-4, ISO-8859-5, ISO-8859-6, ISO-8859-7, ISO-8859-8, ISO-8859-9, ISO-8859-10, ISO-8859-13, ISO-8859-14, ISO-8859-15, ISO-8859-16, windows-1250, windows-1251, windows-1252, windows-1256,

windows-1257, cp437, cp737, cp850, cp852, cp866, x-cp866-u, x-mac, x-mac-ce, x-kam-cs, koi8-r, koi8-u, koi8-ru, TCVN-5712, VISCII,utf-8 * HTTP_ACCEPT_LANGUAGE = en,*;q=0.1

* HTTP_CONNECTION = keep-alive
One good reason, why it is good to give this script a run is cause it can help you reveal problems with HTTP headers impoperly set cookies, language encoding problems, security holes etc. Also the script is a good example, for starters in learning PHP programming.
Tags: AOL, arcitle, article, attention, Auto, blog, browser, code, code lt, content type, copy, debugging, download, Draft, dump, Dumping, ENCODING, ereg, freak, gecko, Gnome, gzip, host, host www, HTTP, image png, information, Java, khtml, linux x86, loop, nbsp, opera browser, php, php script, php txt, place, prints, quot, ruby, Safari, screenshot, script, script code, server, set variables, shot, show, squeeze, support, text, Tiny, type, unam, User, utmb, utmcsr, xml
Posted in Programming, System Administration | No Comments »
Wednesday, March 7th, 2012 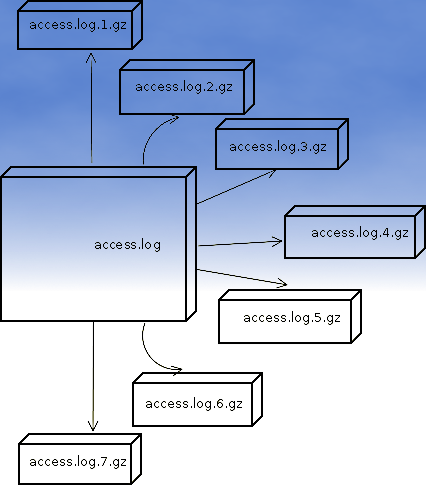
If you are sys admin of Apache Webserver running on Debian Linux relying on logrorate to rorate logs, you might want to change the default way logroration is done.
Little changes in the way Apache log files are served on busy servers can have positive outcomes on the overall way the server CPU units burden. A good logrotation strategy can also prevent your server from occasional extra overheads or downtimes.
The way Debian GNU / Linux process logs is well planned for small servers, however the default logroration Apache routine doesn't fit well for servers which process millions of client requests each day.
I happen to administrate, few servers which are constantly under a heavy load and have occasionally overload troubles because of Debian's logrorate default mechanism.
To cope with the situation I have made few modifications to /etc/logrorate.d/apache2 and decided to share it here hoping, this might help you too.
1. Rotate Apache acccess.log log file daily instead of weekly
On Debian Apache's logrorate script is in /etc/logrotate.d/apache2
The default file content will be like so like so:
debian:~# cat /etc/logrotate.d/apache2

/var/log/apache2/*.log {

weekly

missingok

rotate 52

size 1G

compress

delaycompress

notifempty

create 640 root adm

sharedscripts

postrotate

if [ -f "`. /etc/apache2/envvars ; echo ${APACHE_PID_FILE:-/var/run/apache2.pid}`" ]; then

/etc/init.d/apache2 reload > /dev/null

fi

endscript

}
To change the rotation from weekly to daily change:
weekly
to
#weekly
2. Disable access.log log file gzip compression
By default apache2 logrotate script is tuned ot make compression of rotated file (exmpl: copy access.log to access.log.1 and gzip it, copy access.log to access.log.2 and gzip it etc.). On servers where logs are many gigabytes, once logrotate initiates its scheduled work it will have to compress an enormous log record of apache requests. On very busy Apache servers from my experience, just for a day the log could grow up to approximately 8 / 10 Gigabytes.
I'm sure there are more busy servers out there, which log files are growing to over 100GB for just a single day.
Gzipping a 100GB file piece takes an enormous load on the CPU, as well as often takes long time. When this logrotation gzipping occurs at a moment where the servers CPU cores are already heavy loaded from Apache serving HTTP requests, Apache server becomes inaccessible to most of the clients.
Then for end clients various oddities are experienced, for example Apache dropped connection errors, webserver returning empty pages, or simply inability to respond to the client browser.
Sometimes as a result of the overload, even secure shell connection to SSHD to the server is impossible …
To prevent your server from this roration overloads remove logrorate's default access.log gzipping by commenting:
compress
to
#comment
3. Change maximum log roration by logrorate to be up to 30
By default logrorate is configured to create and keep up to 52 rotated and gzipped access.log files, changing this to a lower number is a good practice (in my view), in cases where log files grow daily to 10 or more GBs. Doing so will save a lot of disk space and reduce the chance the hard disk gets filled in because of the multiple rorated ungzipped enormous access.log files.
To tune the default keep max rorated logs to 30, change:
rotate 52
to
rotate 30
The way logrorate's apache log processing on RHEL / CentOS Linux is working better on high load servers, by default on CentOS logrorate is not configured to do log gzipping at all.
Here is the default /etc/logrorate.d/httpd script for
CentOS release 5.6 (Final)
[hipo@centos httpd]$ cat /etc/logrotate.d/httpd /var/log/httpd/*log {

missingok

notifempty

sharedscripts

postrotate

/bin/kill -HUP `cat /var/run/httpd.pid 2>/dev/null` 2> /dev/null || true

endscript

}
Tags: adm, apache linux, apache log files, apache webserver, apache2, Auto, burden, CentOS, change, client, client requests, compression, connection, copy, cpu units, default mechanism, Disk, doesn, Draft, enormous log, fi, file, gnu linux, gzip, heavy load, init, Linux, linux servers, logrorate, logrotation, logs, mechanism, notifempty, overheads, PID, postrotate, quot, root, rotation, script, server cpu, weeklyto
Posted in Linux, System Administration | No Comments »
Thursday, February 23rd, 2012 1. Install the slackware binary package xfce4-screenshooter.
For the latest Slackware Linux release which as of time of writting is 13.37 xfce4-screenshooter-1.7.9-i486-3sl.txz can be download from here
Install of xfce4-screenshooter-1.7.9-i486-3sl.txz is done with slackware's usual installpkg package manager command:
bash-4.1# /sbin/installpkg xfce4-screenshooter-1.7.9-i486-3sl.txz
By the way, I haven't used slackware for a long time so in the mean time since Slackware 13, the default slackware packages format .tgz is now substituted with the newer .txz (better compressed .txz). The old .tgz was simply a tar archive with DEFLATE gzip. The newer .txz packages bundled with newer slackware releases are using the LZMA2 (XZ) chain algorithm for compression. LZMA implies higher compression than even bzip2 and this is the reason why Patrick Volkerding – the one man army man behind Slackware decided to use it.
The reason Vollerding choose using .txz is slackware network distribution will load up less the networks and will take less time for downloading extra slackware packages via the internet. The .txz also reduces slackware main CD size so more packages can be contained in the same 700MB sized slack install CD.
Anyways now back to the installation of xfce-screenshooter.
Once installed to runit use the Xfce menus:
Xfce Menu -> Accesories -> Screenshot
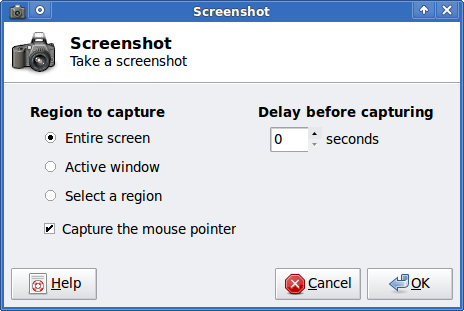
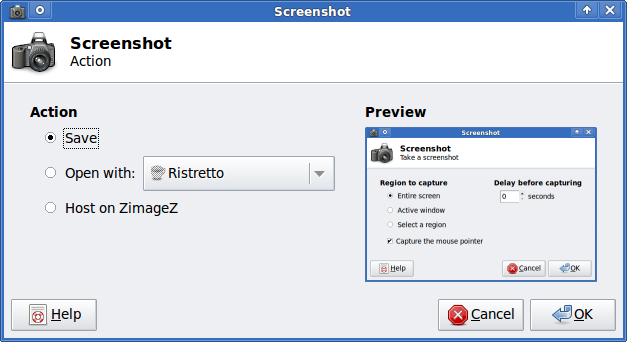
Next you will see the xfce-screenshooter program to pop-up:
To take a snapshot of the screen use:
Entire Screen -> Save
Tags: algorithm, army man, Auto, binary package, compression, distribution, download, Draft, format, graphical environment, gzip, Install, installation, Linux, long time, LZMA, man army, manager, mean time, menu, menus, nbsp, network distribution, package, reason, screen, size, slack, slackware packages, snapshot, tar archive, tgz, time, txzBy, Vollerding, writting, XFCE, xfce4
Posted in Linux, Linux and FreeBSD Desktop, System Administration | 2 Comments »
Friday, September 23rd, 2011 I’m trying to get the most of server + wordpress performance and these days I’m heavily playing with it as one can read from my past few articles 😉
Today I’ve come across three other plugins which in many cases could be beneficial and bring a good performance increase in wordpress, this are:
- WP-Minify – http://wordpress.org/extend/plugins/wp-minify/
- HeadJS Loader – http://wordpress.org/extend/plugins/headjs-loader/
- Scripts Gzip – http://wordpress.org/extend/plugins/scripts-gzip/
WP-Minify – does combine all JS and CSS script into one consolidated compressed script or style as well removes any duplicate script resources and hence could have positive impact on performance
HeadJS Loader – does strips out all your old javascript declarations and puts them into one head.js file so that they are loaded in parallel in the head of the pages and through that prevents the blocking of load up until all JS is a loaded so commonly seen these days on the net for more info on how HeadJS works check out http://headjs.com
Script Gzip – merges and compresses the CSS and JS links on page, the plugin does not have caching functionality. The plugin doesn’t have much configuration options which I find as a good thing
To find out what works best for you its a best practice if the website speed load time is tested after loading each of the plugins and with all of them enabled and configured, finally for best results just leave only the plugins or a combination of them which gives the lowest page responce times.
Tags: check, configuration options, css script, declarations, doesn, functionality, gzip, HEAD, HeadJS, impact, info, Javascript, js, loader, nbsp, net, page, performance, performance increase, plugin, script resources, scripts, speed, speed load time, style, thingTo, time, website, website speed, Wordpress, wp
Posted in Wordpress | 1 Comment »


