Posts Tagged ‘client’
Thursday, November 21st, 2013 
I and my TEAM Web and Middleware Implementation Team @Hewlett Packard are assigned an online training to follow on topic of JBoss Application server.It is my first online training of this kind where a number of people are streamed a video from a trainer who explains in real time concepts of JBoss – A Community Drive open source middleware (Application Server), since some time JBoss is known under a new name (WildFly).

In short what is JBoss? – It is an application server similar to Apache Tomcat -an open source software implementation of the Java Servlet and JavaServer Pages technologies.

In case you wonder about what is Middleware it is a buzzword well established in Corporate world referring to all kind of servers in the middle between Servers on pure OS and hardware Level and end client. Middleware includes all kind of Web and Application servers like Apache, JBoss, Tomcat, Adobe's WebLogic Webserver, IBM WebSphere application server etc..
What this means is JBOSS is very similar to Tomcat but it is designed to run interpret through (Java Virtual Machine), higher scale of Java Applications and then return content to a a web browser. In other words if you need to have a Webserver with support for Java VM. JBoss is one of the open source technologies available which can be a substitute for Tomcat. In Fact Jboss itself started as a fork of Tomcat and n owadays, Jboss has an implementation of Tomcat embedded into itself. Jboss is mainly developed and supported by Redhat. It has 3 major releases used in IT Companies. Jboss 5, JBoss 6 and JBoss 7. In most production server systems running some kind of Java servlets currently still Jboss ver. 5 and Jboss v. 6 is used. Just like Tomcat, the server is messy in its structure. But if we have to compare Tomcat with Jboss then JBoss is at least 100 times more messy and hard to configure tune than Tomcat. Actually after getting to know JBoss 6 I would not advice anyone to use this Application server. Its too complex and all configuration and performance tuning is done through hundred of XML so it is like a hell for the usual System Administrator who likes clearness and simplicity. JBoss has a Web configuration interface which in version 7 is a bit advanced and easier to configure and get to know the server compared to previous versions. But same web interface for older releases is lousy and not nice. Just like Tomcat, JBoss supports clustering, here is full list of all features it supports:
- Full clustering support for both traditional J2EE applications and EJB 3.0 POJO applications
- Automatic discovery. Nodes in cluster find each other with no additional configuration.
- Cluster-wide replicated JNDI context
- Failover and load-balancing for JNDI, RMI and all EJB types
- Stateful Session Bean state replication
- HTTP Session replication
- High Availability JMS
- Farming. Distributed deployment of JBoss components. Deploying on one node deploys on all nodes.
Looks like JBoss is among the few Application Servers supporting deployment of Java JSP, WAR Archive files, SAR Archives, JMS (Java Message Service), JNDI (Java Naming and Directory Interface). Jboss supports load balancing between clustered nodes, supports SOAP, Java servlet faces and Java MQ (Messaging Queue). JBoss can be installed on GNU / Linux, FreeBSD and Windows. So far from what I've learned for JBOSS I prefer not to use it and don't recommend this Application server to anyone. Its too complex and doesn't worth the effort to learn. Proprietary products like WebLogic and Webspehere are in light years better.
Tags: client, end, hewlett packard, Java, Java Servlet, JNDI, kind, middle, need, online, open source, open source software, OS, run, scale, server, servers, software, version
Posted in Everyday Life, Various | 1 Comment »
Monday, November 18th, 2013 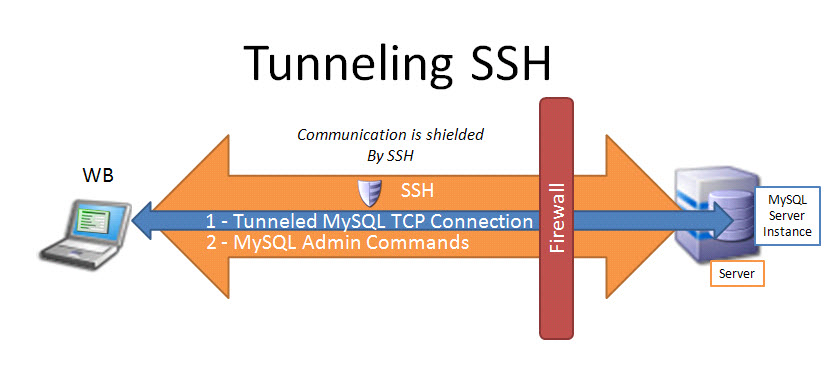
Earlier I blogged how to create SSH tunnels on Linux. Another interesting thing is how to make SSH tunnels on Windows. This can be done with multiple SSH clients but probably quickest and most standard way is to do create SSH tunnel with Putty. So why would one want to make SSH tunnel to a Windows host? Lets say your remote server has a port filtered to the Internet but available to a local network to which you don't have direct access, the only way to access the port in question then is to create SSH tunnel between your computer and remote machine on some locally binded port (lets say you need to access port 80 on remote host and you will access it through localhost tunneled through 8080). Very common scenario where tunneling comes handy if you have a Tomcat server behind firewalled DMZ| / load balancer or Reverse Proxy. Usually on well secured networks direct access to Tomcat application server will be disabled to its listen port (lets say 11444). Another important great think of SSH tunnels is all information between Remote server and local PC are transferred in strong SSH crypted form so this adds extra security level to your communication.
Once "real life" case of SSH tunnel is whether you have to deploy an application which fails after deployment with no meaningful message but error is returned by Apache Reverse Proxy. To test directly tomcat best thing is to create SSH tunnel between remote host 11444 and local host through 11444 (or any other port of choice). Other useful case would be if you have to access directly via CLI interface an SQL server lets say MySQL (remote port 3306 filtered) and inaccessible with mysql cli or Oracle DB with Db listener on port 1521 (needed to accessed via sqlplus).
In that case Putty's Tunneling capabilities comes handy especially if you don't have a Linux box at hand.
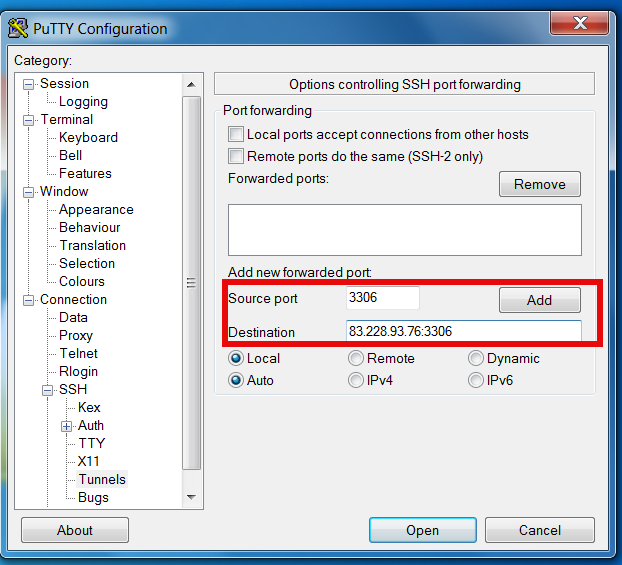
To create new SSH tunnel in putty to MySQL port 3306 on localhost (3306) – be sure MySQL is not running on localhost 😉
Open Putty Navigate in left pane config bar to:
SSH -> Tunnels
Type in
Source Port
– port on which SSH tunnel will be binded on your Windows (localhost / 127.0.0.1) in this example case 3306.
Then for
Destination
– IP address or host of remote host with number of port to which SSH tunnel will be opened.
N.B. ! in order to make tunneling possible you will need to have opened access to SSH port of remote (Destination) host
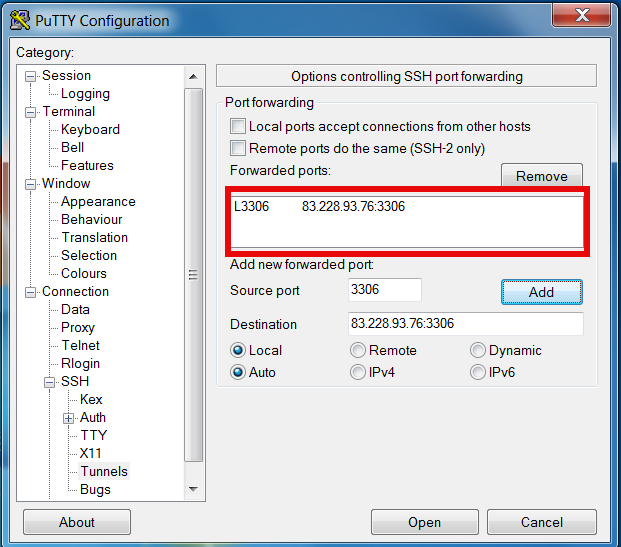
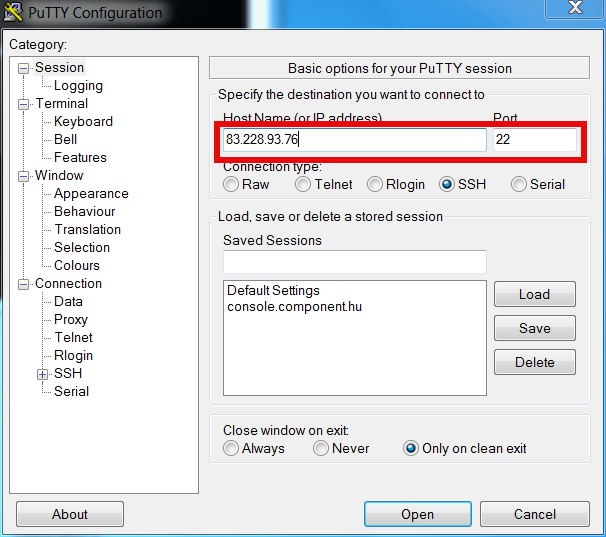
Once click Open you will be prompted for username on remote host in my case to my local router 83.228.93.76. Once you login to remote host open command prompt and try to connect Windows Command prompt Start -> Run (cmd.exe) ;
C:\Users\\hipo> telnet localhost 3306
Connection should be succesful and you from there on assuming you have the MySQL cli version for windows installed you can use to login to remote SQL via SSH tunnel with;
C:\Users\\hipo> mysql -u root -h localhost -p
To later remove existing SSH Tunnel go again to SSH -> Tunnels press on SSH tunnel and choose Remove
Further you can craete multiple SSH tunnels for all services to remote host where access is needed. Important think to remember when creating multiple SSH connections is source port on localhost to remote machine should be unique
Tags: client, direct access, host, How to, Internet, Linux, localhost, machine, port, Putty, Reverse Proxy, running, say, server, ssh, standard, thing, Windows
Posted in System Administration, Various, Windows | No Comments »
Thursday, November 7th, 2013 
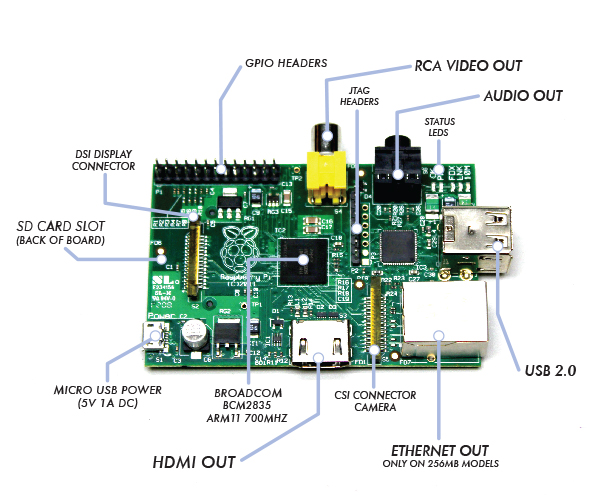
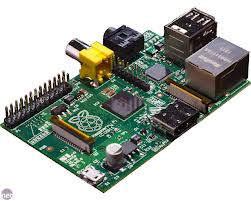
Not of a the latest thing out there but I believe a must know for every geek is existence of Raspberry Pi mini computer Linux board. It is a geek credit-card sized mini PC on extremely cheap price between 25$ and 35$ bucks (e.g. Raspberry Pi model A and Raspberry Pi Model B).
Raspberry Pi hardware you get for this ultra low price is as follows:
- Broadcom BCM2835 system on chip
- ARM Mobile processor model ARM1176JZF running at 700 Mhz (overlocking up to 1Ghz is possible – overclocked RP is called Turbo 🙂 )!
- VideoCore IV GPU with 512 MBytes of ram
- No Build hard disk or solid-state drive but instead designed to use SD-Card as a Storage
- two video outputs
- composite RCA and an HDMI port
- 3.5mm audio output
- 2 or 1SD/MMC/SDIO card slot (depending on device model A or model B)
- Micro USB adapter power charger 500mA (2.5 watts) – Model and 700mA (3.5 watts)
The idea of whole device is to make cheap affordable device for pupils and people from third countries who can't afford to pay big money for a full-featured computer. Achievement is unique all you need to Raspberry Pi credit card sized device is external keyboard a mouse, SD-card and a monitor, this makes a 700Mhz featured almost fully functional computer for less than lets say 80$ whether used with a second hand monitor / mouse and kbd :). A fully functional computer or full functional thin client for as less as 80$ yes that's what RaspberryPi is!
It is recommendable that SD-Card storage on which it is installed is at least 4GB as this is part of its minimum requirement, however it is best if you can get an SD-Card of 32GBytes whether you plan to use its whole graphic functionalities.
Raspberry Pi Hardware is not too powerful to run a version of Windows as well as there is no free version of MS-Windows for ARM Processor, so basicly device is planned to run free software OSes GNU / Linux. 5 operating systems are working fine with the mini-board device as time of writting;
- Raspbian – Debian "Wheezy" Linux port
- Pidora – Fedora mixed version ported to run on Raspberry Pi
- Risk OS port
- Arch Linux port for ARM devices
- Slackware Arm
FreeBSD / NetBSD
- QtonPi
Recommended and probably best distro port is for Debian Squeeze
To boot an OS into raspberry PI dowbnload respective image from raspberrypi.org
– Use application for copying and extracting image to SD-Card like Win32 Disk Imager – whether on Windows platform
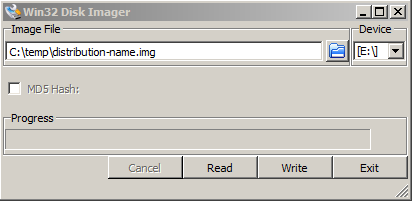
– Or from Linux format SD-Card with gparted (N!B! format disk to be in FAT32 filesystem), extrat files and copy them to SD-CARD.
Once Raspberry Pi loads up it will drop you into Linux console, so further configuration will have to be done manually with invoking plenty of apt-get commands (which I will not talk about here as there are plenty of manuals already) – you will have to manually install your Desktop … Default shipped Web browser in Debian is Midori and due to lack of ported version of flash player for ARM streaming video websites like youtube.com / vimeo.com does not work in browser. There is a Google Chrome for Raspberry Pi port but just like with Midori heavy object loaded websites works very slow and thus not very suitable for multimedia.
Raspberry Pi device is very suitable for ThinClient use there is a special separate project – Raspberry ThinClient Project – using which a hobbyist can save 400$ for buying proprietary ThinClient.
Tags: Arch Linux, ARM, boot, card, client, com, Debian Squeeze Linux, distro, drive, functionalities, geek, HDMI, hobbyist, Linux, OS, Pc, PI, power, price, Raspberry Pi, run, state, thing, use, version, working, youtube
Posted in Curious Facts, Everyday Life, Linux, Various | 4 Comments »
Tuesday, October 25th, 2011 I needed to add a newly created MySQL user with no access to any database with no special permissions (user is created from phpmyadmin) with some permissions to a specific database which is used for the operation of a website, here are the MySQL CLI client commands I issued to make it work:
# mysql -u root -p

mysql> GRANT ALL ON Sql_User_DB.* TO Sql_User@localhost;

mysql> FLUSH PRIVILEGES;
Where in the Example Sql_User_DB is my example database to which the user is granted access and my sample user is Sql_User .
Note that without FLUSH PRIVILEGES; new privileges might not be active.
To test further if all is fine login with Sql_User and try to list database tables.
$ mysql -u Sql_User -p

password:

mysql> USE Sql_User_DB;

mysql> SHOW TABLES;

...
Tags: cli, client, Database, Delete, example, example database, FLUSH, Insert, localhost, Mysql, operation, phpmyadmin, Privileges, root, sample, SQL, TABLE, table permissions, update, User, website
Posted in Linux, MySQL, System Administration, Various, Web and CMS | No Comments »
Wednesday, June 29th, 2011 
I’m using access to the mysql servers via localhost with mysql cli on daily basis.
With time I’ve figured out that it’s pretty unahandy to always login with my root mysql password, I mean each time to enter it, e.g.:
root@mysql-server:~# mysql -u root

Enter password:

...
Thus to make my life a way easier I decided to store my mysql root password in order to allow my root admin user to be able to login to my mysql server without asking for password. This saves time and nerves, as I’m not supposed to look up for the password file I store my server mysql root pass.
To allow my mysql cli interface, to login passwordless to the SQL server I had to create the file /root/.my.cnf readable only for my root user and store my MySQL username and password there.
Here is a sample /root/.my.cnf file:
root@mysql-server:~# cat /root/.my.cnf

[client]

user="root"

pass="mysecretMySQLPasswordgoeshere"
Now next time I use the mysql console interface to access my mysql server I don’t have to supply the password, here is how easier is the mysql login afterwards:
root@mysql-server:~# mysql -u root

Welcome to the MySQL monitor. Commands end with ; or g.

Your MySQL connection id is 3520

Server version: 5.0.77 Source distribution
Type ‘help;’ or ‘h’ for help. Type ‘c’ to clear the buffer.
mysql>
The only downside of using .my.cnf to store permanently the mysql server root and password is from security standpoint.
If for instance somebody roots my servers, where I have stored my root user/pwds in .my.cnf , he will be able immediately to get access to the MySQL server.
Another possible security flaw with using the mysql passwordless login “trick” is if somebody forgets to set proper file permissions to, .my.cnf
Once again the file should possess the permissons of:
root@mysql-server:~# ls -al /root/.my.cnf

-rw------- 1 root root 90 Apr 2 00:05 /root/.my.cnf
Any other permissons might allow non-privileged users to read the file and gain unathorized admin access to the SQL server.
Tags: Auto, basis, buffer, cat, cli, client, cnf, connection id, daily basis, distribution type, downside, Draft, file, file permissions, help, life, localhost, mysql connection, mysql servers, order, password, password file, root, root admin, root password, root root, root user, security, security flaw, security standpoint, server mysql, server root, server version, source distribution, standpoint, time, type, username, version, way
Posted in FreeBSD, Linux, MySQL, System Administration | No Comments »
Monday, July 4th, 2011 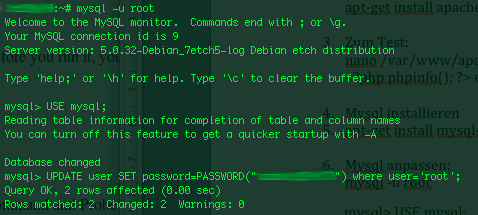
On a couple of occasions, I’ve had the issue of loosing / forgetting a MySQL password at other times I had to login to servers which contained MySQL servers with a password I don’t know.
In any of this occasions I was required to restore the ROOT access to the mysql server.
Sadly recoving a mysql lost root password is not really possible in a easy way, thus in most cases the only option one have is to stop the mysql server and run it again in a special skip-grant-tables mode, which runs the server in a sort of passwordless safe mode and makes it accessible without admin password through mysql cli .
To Omit the password check the skip-grant-table option instructs the MySQL server not to check in mysql.user while any request to connect with mysql client to the server is made.
Therefore one can login to the mysql server passwordless and reset the current (lost) password to another one.
Thease can be achived in the following four easy steps:
1. Stop the MySQL server
mysql:~# /etc/init.d/mysqld stop
2. Run the mysql server with the –skip-grant-tables option
mysql:~# mysqld_safe --skip-grant-tables &
3. Login to the mysql and change current mysql root password
mysql:~# mysq -u root

mysql> UPDATE user SET password=PASSWORD('yournewpassword')

WHERE user='root';

mysql> FLUSH privileges;
4. Stop and Start the Mysql server again
mysql:~# killall -9 mysqld_safe

mysql:~# /etc/init.d/mysqld start

..
Now the new mysql password will be identical to the yournewpassword . Cheers 😉
Tags: amp, Cheers, cli, client, couple, FLUSH, issue, killall, login, Mode, mysq, mysql password, mysql servers, mysqld, occasions, password, password check, Privileges, request, root, root password, safe mode, safemysql, server root, servermysql, Set, sort, Stop, thease, update, way, WHERE
Posted in Linux, MySQL, System Administration | No Comments »
Thursday, November 22nd, 2012 1. Enable / Disable Telnet Client command on Windows XP
By default telnet is enabled on Windows XP. However on some messed up Windows installations, cause of viruses or some custom users changes the PATH variable set for command prompt to
C:\WINDOWS\system32\
is missing and therefore typing in telnet in cmd.exe fails to find the command. Thus it is good idea before trying to enable telnet with dism command to try running in Command Prompt
C:\WINDOWS\system32\telnet.exe,
If the command is not found by giving it full path, then you can read down the article how to enable it.
Launch command prompt cmd.exe and type:
dism /online /Enable-Feature /FeatureName:TelnetClient
 Launching again:
dism /online /Enable-Feature /FeatureName:TelnetClient
Disables telnet, whether it is enabled on system, on some systems XP admins might want to do this for increasing system security
2. Enabling Telnet client using XP Graphical interface
Start (button) -> Control Panel -> Add / Remove Programs-> (Click on Turn Windows features on and Off )
3. Turn on Windows Telnet Client on Win 7 using Graphical Environment
Probably out of security, concerns within Microsoft took a wise decision to make Telnet Client disabled by default on Windows 7. Thus just trying to run it via cmd.exe users one gets 'telnet is not recognized as internal or external command, operable program or batch file'

Start (button) -> Control Panel -> Program and Features -> (Click on Turn Windows features on and Off )
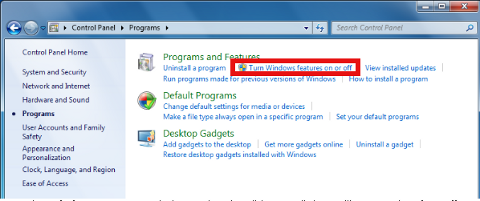
You will get a dialog listing a number of things you can turn on you need to set tick on
Telnet Client
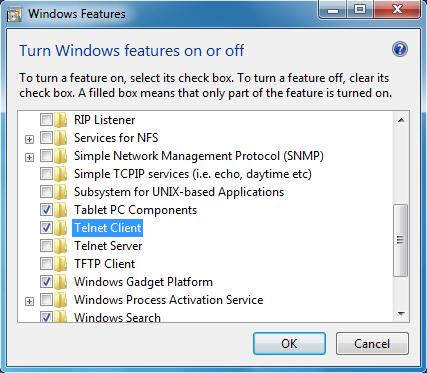
Then a pop-up User Account Control will require you to enter administrator user password (if not already logged in as administrator).
Further on launch cmd.exe and type telnet
Start (menu) -> Start Search -> cmd.exe
or pressing Windows Button + R and type in cmd.exe and type telnet
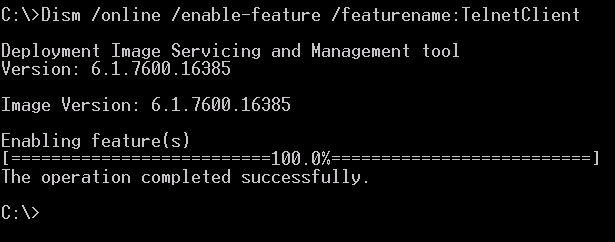
4. Turn on ( Install ) Win 7 Telnet Client from command line:
Launch command prompt (cmd.exe) and type in:
C:\Windows> pkgmgr /iu:"TelnetClient"
Installing using pkgmgr /ui: "TelnetClient" should be able to install telnet also on Windows 2008, Windows 2008 R2 Servers and Windows Vista
Happy telnet-ing 🙂
Tags: Activate, client, enable, Telnet, Windows
Posted in System Administration, Various, Windows | 1 Comment »
Sunday, July 29th, 2012 A friend of mine (Dido) who is learning C programming, has written a tiny chat server / client (peer to peer) program in C. His program is a very good learning curve for anyone desiring to learn basic C socket programming.
The program is writen in a way so it can be easily modified to work over UDP protocol with code:
struct sockaddr_in a;
a_sin_family=AF_INET;
a_sin_socktype=SOCK_DGRAM;
Here are links to the code of the Chat server/client progs:
Tiny C Chat Server Client source code
Tiny C Chat Client source code
To Use the client/server compile on the server host tiny-chat-serer-client.c with:
$ cc -o tiny-chat-server tiny-chat-server.c
Then on the client host compile the client;
$ cc -o tiny-chat-client tiny-chat-client.c
On the server host tiny-chat-server should be ran with port as argument, e.g. ;
$ ./tiny-chat-server 8888
To chat with the person running tiny-chat-server the compiled server should be invoked with:
$ ./tiny-chat-client 123.123.123.123 8888
123.123.123.123 is the IP address of the host, where tiny-chat-server is executed.
The chat/server C programs are actually a primitive very raw version of talk.
The programs are in a very basic stage, there are no condition checks for incorrectly passed arguments and with wrongly passed arguments it segfaults. Still for C beginners its useful …
Tags: Auto, c programming, c programs, c socket programming, chat client, chat server, checks, client, client host, client server, client source code, codeTo, cThen, curve, dido, Draft, family, ip address, learning c, learning curve, mine, minimalistic, peer to peer program, person, port, program, programming, Protocol, raw version, server c, server client, server host, sockaddr, Socket, socktype, stage, struct, struct sockaddr, Tiny, tiny c, UDP, version, way, writen
Posted in Programming | No Comments »
Friday, July 13th, 2012 One of the QMAIL mail servers, setup-uped on a Debian host has been creating some auto configuration issues. Every-time a new mail user tries to use the embedded Thunderbird client auto configuration, the auto config fails leaving the client unable to use his Mailbox through POP3 or IMAP protocols.
Since about 2 years Thunderbird and many other modern pop3 and imap mail desktop and mobile clients are by default using the auto configuration and hence it was unthinkable to manually change settings for new clients with the QMAIl install; Besides that most of the Office users are always confused, whether they have to manually change SMTP or POP3 host for a server.
Below is a screenshot displaying the warning during email auto-configuration:
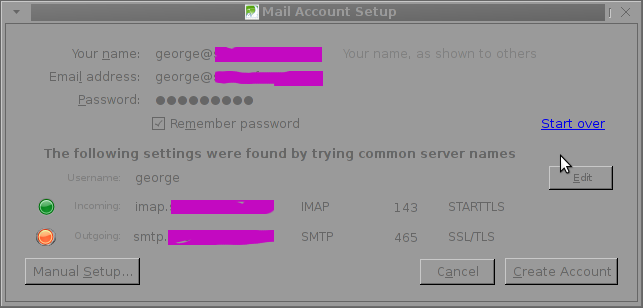 The orange color in the button for the newly auto-detected smtp.mail-domain.com indicates, something is not right with the SMTP host.
Obviously, something was wrong with smtp.mail-domain.com, hence I checked where smtp.mail.domain.com resolves with host command. What I found was actually smtp.mail-domain.com Active ( A ) DNS records was pointing to an IP address, our company previously used for the mail server. At present time the correct mail server host name is mx.mail-domain.com and the QMAIL installation on mx.soccerfame.com is configured to be the actual SMTP server.
By default Thunderbird and many other POP3, IMAP mail clients, however automatically assume the default SMTP host for a mail server is to be configured under a host name smtp.mail-domain.com. This is really strange, especially when the primary MX record for mail-domain.com domain is pointing to mx.mail-domain.com, e.g.:
qmail:~# host -t MX mail-domain.com

soccerfame.com mail is handled by 10 mx.mail-domain.com.

soccerfame.com mail is handled by 20 mail.mail-domain.com.

soccerfame.com mail is handled by 30 mail-domain.com.
The whole warning was caused due to the fact mx.mail-domain.com was resolving to an IP like xxx.xxx.xxx.xxx, whether smtp.mail-domain.com was resolving to yyy.yyy.yyy.yyy
Both xxx.xxx.xxx.xxx and yyy.yyy.yyy.yyy hosts were configured to have a different qmail SMTP host i.e.:
The server under IP xxx.xxx.xxx.xxx – (mx.mail-domain.com) was configured in /var/qmail/control/me to be mx.mail-domain.com and the other old one yyy.yyy.yyy.yyy – (mail.mail-domain.com) had (mail.mail-domain.com) in /var/qmail/control/me
As smtp.mail-domain.com was actually being still resolved to mail.mail-domain.com, the EMAILs were improperly trying to be sent with a configured DNS hostname of smtp.mail-domain.com, where the actual one on the server was mail.mail-domain
It took, me about an hour of pondering what is causing the oddities until I got the here explained issue. As the DNS recors for the domain the sample mail-domain.com were handled by Godaddy, to fix the mess, I logged in to Godaddy and;
a) deleted – DNS record for smtp.mail-domain.com.
b) Created new CNAME record for smtp.mail-domain.com to be a domain alias for mx.soccerfame.com
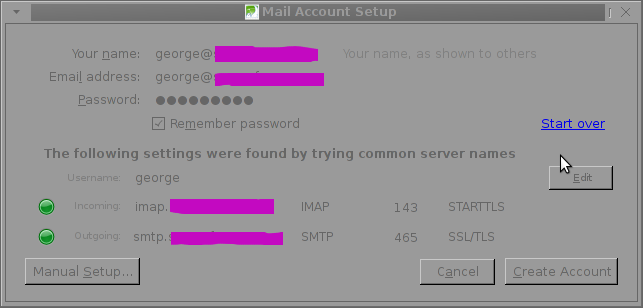
A few minutes, afterwards I tried configuring once again the same email account in Thunderbird and this time both imap.mail-domain.com and smtp.mail-domain.com turned green; indicating everything is configured fine.
To be 100% sure all is working fine I first fetched, all email via the IMAP protocol without hassles and onwards sent a test email to my Gmail account; thanksfully the sent email was delivered to Gmail indicating both Get Mail and Send Mail functions worked now fine.
Tags: Auto, auto configuration, Button, client, com, comA, comsoccerfame, config, control, correct mail server, Desktop, DNS, dns records, Draft, Emails, everything, host, host command, imap protocols, installation, mail clients, mail domain, mail imap, mail mail, mail servers, mail user, mess, mobile clients, mx mail, mx record, nbsp, new mail, orange, pop3 host, qmail installation, right, screenshot, server host name, server smtp, smtp, smtp host, soccerfame, something, test, time
Posted in Qmail, System Administration | 4 Comments »
Tuesday, May 8th, 2012 I'm starting to learn some video editing, as I need it sometimes for building client websites.
As a Linux user I needed to have some kind of software for amateur video editing.
For Microsoft Windows OS, there are tons of video editor programs both free and proprietary (paid).
Windows users can for instance use the free software program VirtualDub (licensed under GPL license) to easily cut movie scenes from a video.
Unfortunately VirtualDub didn't have a Linux or BSD version so in my case I had to look for another soft.

I consulted a friend of mine who recommended a video editor program called LiVES.
If you haven't done any video editing previously on Linux (like my case was), you will certainly be happy to try LiVES

LiVES can extract only sound from videos, cut selected parts (frames) from videos and do plenty of other nice stuff. It is just great piece of software for anyone, who needs to do simply (newbie) video editting.
With LiVES even an amateur video editor like me could, immediately learn how to chop a movie scenes …

To master the basics and edit one video in FLV format it took me about 1 hour of time, as in the beginning it was confusing to get confortable with the program scenes selector.
One downside of LiVES it failure to open a FLV file I wanted to edit.
In order to be able to edit the flv movie hence I first had to convert the FLV to AVI or MPEG, as this two (video multimedia formats) are supported by LiVES video editor.
After completing my video scenes chopping to the AVI file I had to convert back to FLV.
In order to complete the convertion between FLV to AVI format on my Debian Linux, I used a program called avidemux
Avidemux has a nice GUI interface and also like Lives has support for video editting, though I have never succesfully done any video edits with it.
Avidemux IMHO is user (completely intuitive). To convert the FLV to AVI, all I had to do was simply open the file FLV file, press (CTRL+S) select my FLV video file format and select the output file extension format to be AVI.
Further on, used LiVES to cut my desired parts from my video of choice. Once the cuts were complete I saved the new cutted version of video to AVI.
Then I needed the video again in FLV to upload it in Joomla, so used ffmpeg – command line tool to do the AVI to FLV file converstion, like so:
hipo@noah:~$ /usr/bin/ffmpeg -i my_media_file.avi my_video_file.flv
Hope this article helps someone aiming to do basic video editting on Linux with LiVES and just like needed FLV to AVI and AVI to FLV convertions.
Tags: Auto, avi, avi file, avi format, avidemux, BSD, client, client websites, convertion, debian linux, downside, Draft, editing, editor, failure, file, flv file, format, free software program, gui interface, how to convert flv to avi, IMHO, instance, Linux, linux user, Microsoft, microsoft windows os, multimedia formats, nice stuff, piece, selector, simple, software, support, time, video, video editing, video editor, video editting, video multimedia, video scenes, Videos, windows users
Posted in Entertainment, Everyday Life, Linux and FreeBSD Desktop | No Comments »


