Posts Tagged ‘size’
Wednesday, February 8th, 2012 
I had to create a number of Facebook and Twitter accounts for one of the companies where I am employed. As I had to put Avatars to each and every new account. I therefore had to resize the company logos to fit the to the avatar dimensions..
It took me a bit of research until I found the proper picture dimensions. Here are the dimensions:
For facebook page Avatar the good picture width / height dimensions is a square like:
151x151 pixels
If however you prefer to have a sky scraper picture in Facebook, this is possible as thumbnail pictures up to 180×540 w/h pixels are showing up in FB.
At most cases FaceBook automatically resizes the uploaded picture and generates a thumbnail which in most pictures looks okay, however in some odd picture dimensions the picture preview might be messy, so its better to ship the profile pic in standard square size like 151×151, 256×256, 313×313 etc.
For Twitter page Avatar the fixed picture width / height dimensions is:
73x73 pixels

In Twitter again the avatar picture should be a square like, to have twitter during upload automatically resize and make a good looking pic thumbnail. If some picture with a non square dimensions is uploaded as an Avatar for twitter account usually, twitter's pic auto resize server side program chops parts of the picture. This is not a bug but expected behaviour. In Twitter another requirement is that the uploaded avatar image does not exceed 700kb, trying to puload a picture over 700k fails.
In both Facebook and Twitter the uploaded Avatar logo should be in format JPEG, GIF or PNG .
To resize the company logo pictures for FB and Twitter, I used GIMP 's:
Image -> Scale Image
menus.
I've red some people claiming the size of the Avatar logo in Facebook could have some impact in terms of e-marketing, but I'm not sure if this is a fact or some false rumour. Anyways it is sure that a wide sky scraper like picture allows you to show more even from the profile and maybe through the picture have larger influence over the audience.
Tags: Auto, avatar, avatar image, avatars, behaviour, company logo, company logos, Draft, facebook, false rumour, fb, format, format jpeg, GIF, GIMP, height, height dimensions, Image, image menus, impact, influence, JPEG, logo, marketing, nbsp, non, number, page, picture, pixel, pixelsIf, pixelsIn, png, Profile, puload, requirement, resize, scale, scale image, server side, side, size, sky, sky scraper, square dimensions, thumbnail, twitter, upload, wide sky, width
Posted in Various, Web and CMS | 2 Comments »
Thursday, February 23rd, 2012 1. Install the slackware binary package xfce4-screenshooter.
For the latest Slackware Linux release which as of time of writting is 13.37 xfce4-screenshooter-1.7.9-i486-3sl.txz can be download from here
Install of xfce4-screenshooter-1.7.9-i486-3sl.txz is done with slackware's usual installpkg package manager command:
bash-4.1# /sbin/installpkg xfce4-screenshooter-1.7.9-i486-3sl.txz
By the way, I haven't used slackware for a long time so in the mean time since Slackware 13, the default slackware packages format .tgz is now substituted with the newer .txz (better compressed .txz). The old .tgz was simply a tar archive with DEFLATE gzip. The newer .txz packages bundled with newer slackware releases are using the LZMA2 (XZ) chain algorithm for compression. LZMA implies higher compression than even bzip2 and this is the reason why Patrick Volkerding – the one man army man behind Slackware decided to use it.
The reason Vollerding choose using .txz is slackware network distribution will load up less the networks and will take less time for downloading extra slackware packages via the internet. The .txz also reduces slackware main CD size so more packages can be contained in the same 700MB sized slack install CD.
Anyways now back to the installation of xfce-screenshooter.
Once installed to runit use the Xfce menus:
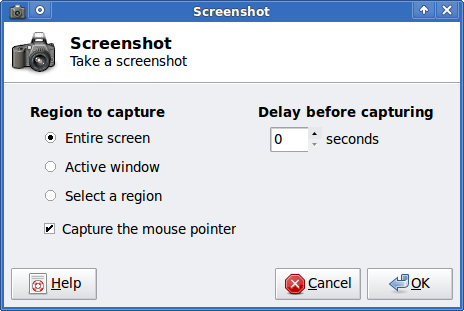
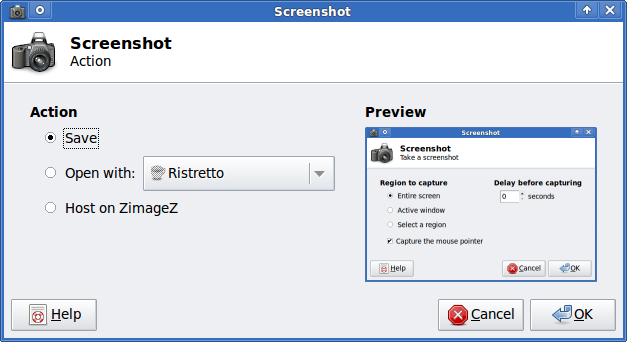
Xfce Menu -> Accesories -> Screenshot
Next you will see the xfce-screenshooter program to pop-up:
To take a snapshot of the screen use:
Entire Screen -> Save
Tags: algorithm, army man, Auto, binary package, compression, distribution, download, Draft, format, graphical environment, gzip, Install, installation, Linux, long time, LZMA, man army, manager, mean time, menu, menus, nbsp, network distribution, package, reason, screen, size, slack, slackware packages, snapshot, tar archive, tgz, time, txzBy, Vollerding, writting, XFCE, xfce4
Posted in Linux, Linux and FreeBSD Desktop, System Administration | 2 Comments »
Monday, February 20th, 2012

Already on a couple of mail boxes located on one of the qmail powered mail servers I adminiter, there is an over QUOTA reached problem encountered.
Filling up the mailbox quota is not nice as mails starts get bounced back to the sender with a message QUOTA FULL or EXCEEDED MESSAGE, if this is a crucial mail waiting for some important data etc. the data is never received.
Below is a copy of the mail quota waarning notification message:
Delivered-To: email_use@my-mail-domain.net

Date: Wed, 15 Feb 2012 17:40:36 +0000

X-Comment: Rename/Copy this file to ~vpopmail/domains/.quotawarn.msg, and make appropriate changes

X-Comment: See README.quotas for more information

From: Mail Delivery System <Mailer-Daemon@different.bg>

Reply-To: email@www.pc-freak.net

To: Valued Customer:;

Subject: Mail quota warning

Mime-Version: 1.0

Content-Type: text/plain; charset=iso-8859-1

Content-Transfer-Encoding: 7bit

>

Your mailbox on the server is now more than 90% full. So that you can continue

to receive mail you need to remove some messages from your mailbox.
As you can read from the copy of the mail message above, the message content sent to the mail owner whose quota is getting full is red from /var/vpopmail/domains/.quotawarn.msg
The mail reaching quota problem is very likely to appear in cases like low mailbox quota set, but sometimes also occurs due to bugs in vpopmail quota handling.
Various interesting configuration settings for mail quotas etc. are in /home/vpopmail/etc/vlimits.default file, (assuming vpopmail is installed in /home).
In my specific case, the default vpopmail mailbox quota size was set to only 40 Megabytes.
40MB is too low if compared to todays mailbox size standards which in Gmail and Yahoo mail services are already a couple of gigabytes.
Hence to get around the quota troubles, I removed the quota for the mail.
To remove the quota size in vpopmail set for address (email_user@my-mail-domain.net) used cmd:
qmail-server:~# vmoduser -q NOQUOTA email_user@my-mail-domain.net
To save myself from future quota issues, I decided to apply a permanent fix to all those over quota size VPOPMAIL mailbox problems by removing completely quota restriction for all mailboxes in my vpopmail existent mail domain.
To do so, I wrote a quick simple bash loop one-liner script:
qmail-server:~# cd /home/vpopmail/domains

qmail-server:~/vpopmail/domains# cd my-mail-domain.net

qmail-server:~/vpopmail/domains/my-mail-domain.net# for i in *; do \

vmoduser -q NOQUOTA $(echo $i|grep -v vpasswd)@my-mail-domain.net; \

done
This works only on vpopmail installations which are configured to store the mail messages directly on the filesystem. Therefore this approach will not work for people who during vpopmail install had configured it to store mailboxes in MySQL or in other kind of SQL db engine.
Anyways for Vpopmail installed to use SQL backend, the script can be changed to read directly a list with all the mailboxes obtained from databasae (SQL query) and then, loop over each of the mail addresses apply the vmoduser -q NOQUOTA mail@samplemaildomain.net.
I've written also a few lines shell script (remove_vpopmail_emails_domain_quota.sh), it accepts one argument which is a vpopmail domain to which the admin would like to reset all applied mailbox quotas. The script is useful, if you have to often remove all quotas for vpopmail domainsor have to do quota wipe out simultaneously for multiple email domain names located on different servers.
Tags: Auto, bit, charset, configuration settings, content transfer, copy, Date, Draft, EXCEEDED, file, free mail services, FULL, gigabytes, Gmail, information, ISO, mail boxes, mail delivery system, mail domain, mail message, mail owner, mail quota, mail quotas, mail server, mail servers, mail services, mailbox quota, mailbox size, megabytes, message, message quota, Mime, msg, msgThe, nbs, NOQUOTA, notification message, Qmail, quot, quota problem, README, Rename, script, sender, size, SQL, text, transfer, version, vpopmail
Posted in Qmail, System Administration | No Comments »
Tuesday, January 24th, 2012 I needed a G/Linux distribution that will work fine on an old PC with hardware configuration:
guest@xubuntu-desktop:~$ grep -i cpu /proc/cpuinfo; free -m; df -h

cpu family : 6

cpu MHz : 797.613cpuid level : 2

total used free shared buffers cachedMem: 497 470 26 0 35 259-/+ buffers/cache: 176 321Swap: 1454 10 1444File System Size Used Free % Mounted on

/dev/sda1 37G 4,3G 31G 13% /
I've read a lot on the internet and come to the conclusion I have basicly two popular Linux distros as option to install on archaic x86 hardware:
 1. Puppy Linux

 2. Xubuntu Linux
I first give Puppy Linux a try. It worked quite nice, but the interface was too old school and the desktop felt like a bit out-dated.
Besides that many of the Puppy Linux shipped programs were not a mainstream programs available across most of the other Linux distributions.
Many of the programs shipped with Puppy are great, but more suitable for a computer geek than for a Windows accustomed GUI user.
My opinion on Puppy (from what I've seen) is that its great distro for old school hardcore Linux users.
Anyways its not suitable for absolutely "uniniated" users who encounter Linux for a first time.
Secondly I installed Xubuntu. Most of the archaic hardware on the PC was detected during install time (a pleasently surprise).
Xubunto works fast and Xfce menus opens "light fast" as on the old 800Mhz pc with 512 mem of ram. Generally the GUI worked quick and responsive.
To conclude I liked Xubuntu a lot and I strongly recommend it to anyone who want to quickly roll on Linux on an old PC.
What impressed me most is the minimalistic look & feel and simplicity.
I'm sure Debian will be working great on old hardware as well, however configuring it will be hell a lot of work. Thus I think Xubuntu is a good choice for people who want save some time in obscure configurations and easily have a neat Linux ready for desktop use.
Tags: Auto, bit, buffers, computer geek, CPU, cpu family, cpu mhz, cpuid, Desktop, distribution, distro, Draft, family, Free, geek, hardcore, hardware 1, hardware configuration, hardware pc, installing linux, level, Linux, linux distribution, linux distributions, linux distros, mainstream, mainstream programs, menus, Mounted, old hardware, old school, opinion, option, puppy linux, quot, school hardcore, sda, simplicity, size, thoughs, time, work, x86 hardware
Posted in Linux, Linux and FreeBSD Desktop, Linux Audio & Video | No Comments »
Friday, January 6th, 2012 I'm testing some old school arcade games, available from Debian's package repositories and quitting one of the games ended me up with a GNOME Screen Resolution of 640×480 pixels.
I wanted to revert back to the Classics resolution, so what I would normally do to do that is use >GNOME menus:
System -> Preferences -> Monitors
In that huge screen resolution on my 14 inch lenovo notebook screen, however the System menu cannot fit in 640×480 resolution. You can see the non-screen fitting System on the screenshot below:
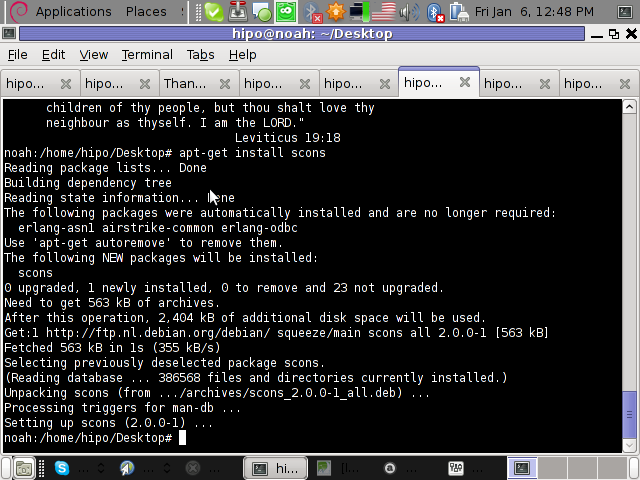
Having this situation, I needed a way to change back to my normal daily used 1024x768px screen resolution to continue my daily work by some other way.
One possible solution I thought of was Logging Off Gnome and logging again. Loggig off and log on again would usually restart the initiated GNOME session and therefore will reset the screen resolution to my default 1024×768 / 32 bit color.
Having the unobservable System gnome panel menu on my screen however made using the usual Log off procedure via System -> Log Out myusername impossible…
Another possible way to actually restart my screen and hence revert back to my original resolution is achiavable using the classical restart X server key switch CTRL + ALT + backspace (bckspc) . Though this was a possible approach to the situation, I had a bunch of programs already running on my desktop and I did not wanted to interrupt my desktop session, what I was looking for is simply change the screen resolution size .
With all said I had to look up for alternative way (preferably easy) way, to revert back my screen resolution to my desired 1024×768.
As a console guy, I was interested if there is some kind of possibility to change my GNOME resolution directly using xterm or gnome-terminal , after a bit of check up online, I've found few threads started by people who were looking just like me for a way to change GNOME / KDE screen resolution size on various distributions Linux desktops as well on Free/Net/Open/BSDs. The answer to the question on few places was the command xrandr which I had used some few years ago to initiate remote X server connections via SSH
xrandr is actually a great tool part of the x11-xserver-utils
Actually xrandr is capable of doing a few things besides setting the screen resolution size, just to name a few it supports change the screen orientation, reflection of the output of the screen, adjust brightness, set color gamma etc. etc.
It is good to mention that xrandr changes the resolution not on a GNOME level but on Xorg server level.
Using xrandr to change the screen resolution appeared to be very easy.
1. First I issued xrandr to check all the supported xrandr resolutions by my X server
hipo@noah:~/Desktop$ xrandr Screen 0: minimum 320 x 200, current 1024 x 768, maximum 8192 x 8192VGA1 disconnected (normal left inverted right x axis y axis)LVDS1 connected 1024x768+0+0 (normal left inverted right x axis y axis) 304mm x 228mm 1024x768 60.0*+ 50.0 800x600 60.3 56.2 640x480 60.0 59.9 TV1 disconnected (normal left inverted right x axis y axis)hipo@noah:~/Desktop$
From the output you can see I have 3 basic resolutions configured in my Xorg, I can switch between.
2. To switch to my previous default screen resolution
hipo@noah:~/Desktop$ xrandr -s 1024x768
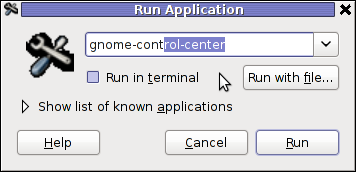
After using xrandr command to revert back to my default screen size, I realized there is two other (partially command line partially gui) way to change to 1024×768 pixels.3. Through launching gnome Control Center and searching for Monitors menu.
If one prefers this way he can;
i) press ALT+F2 to invoke Gnome's Run Application dialog
ii) issue gnome-control-center command:
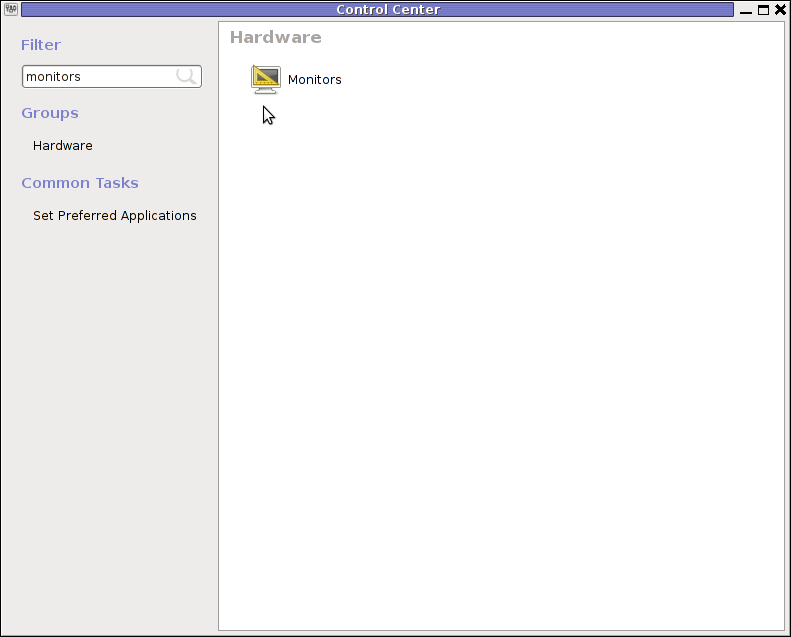
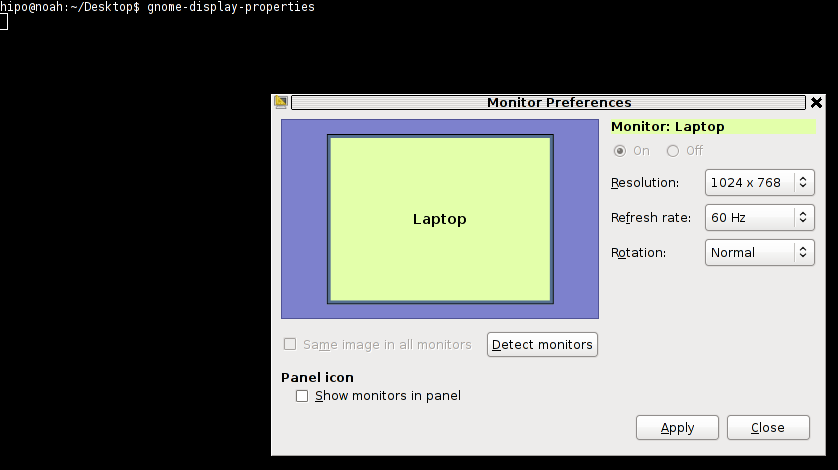
4. By invoking gnome's Control Panel -> Monitors settings window by a command
hipo@noah:~/Desktop$ gnome-display-properties
Tags: Alt, arcade games, Auto, bckspc, change, debian gnu, Desktop, Draft, freebsd, Gnome, gnome panel, gnome resolution, gnu linux, hipo, key switch, level, Linux, menu, menus, Monitors, noah, notebook, old school, package, panel menu, possibility, possible solution, repositories, resolution size, right, screen, screenshot, size, system menu, terminal, threads, work, x server, Xorg, xterm
Posted in FreeBSD, Linux and FreeBSD Desktop | 2 Comments »
Monday, November 14th, 2011 
These days more and more people start to forget the g* / Linux old times when we used to copy CDs from console using dd in conjunction with mkisofs .
Therefore to bring some good memories back of the glorious console times I decided to come up with this little post.
To copy a CD or DVD the first thing one should do is to make an image copy of the present inserted CD into the CD-drive with dd :
1. Make copy of the CD/DVD image using dd
# dd if=/dev/cdrom of=/tmp/mycd.iso bs=2048 conv=notrunc
/dev/cdrom is the location of the cdrom device, on many Linuces including (Debian) /dev/cdrom is just a link to the /dev/ which corresponds to the CD drive. Note on FreeBSD the location for the CD Drive is /dev/acd0
/tmp/mycd.iso instructs dd CD image creation to be placed in /tmp/ directory.
bs argument instructs it about the byte size portions by which the content of the CD-Drive inserted CD will be read. bs value of 2048 is actually only 2KB per dd read, increasing this value will decrease the time required for the CD image to be extracted.
2. Prepare CD image file to be ready for burning
After dd completes the image copy operation, next to prepare the extracted image / ISO to be ready for burning mkisofs is used:
# mkisofs -J -L -r -V TITLE -o /tmp/imagefile.iso /tmp/mycd.iso
The -J option makes the CD compatible for Pcs running Microsoft Windows. The -V TITLE option should be changed to whatever title the new CD should have, -r will add up status bar for the mkisofs operation.
-r is passed to create specific file permissions on the newly created CD, -o specifies the location where mkisofs will produce its file based on the CD image /tmp/mycd.iso .
3. Burning the mkisofs image file to a CD/DVD on GNU / Linux
linux:~# cdrecord -scanbus

linux:~# cdrecord dev=1,0,0 /tmp/imagefile.iso
If all wents okay with cdrecord operation, after a while the CD should be ready.
4. Burning the mkisofs image file to CD on FreeBSD
freebsd# burncd -f /dev/acd0 data /tmp/imagefile.iso fixate
Tags: argument, byte, byte size, cd image, CD-drive, cdrom, conv, copy, dd cd, drive, file, file permissions, freeb, gnu linux, Image, image copy, image creation, image file, image iso, imagefile, ISO, isoIf, linux cdrecord, linux linux, location, Microsoft, mkisofs, mycd, new cd, notrunc, operation, option, size, size portions, status, terminal, time, title option, tmp, value
Posted in Linux, Linux and FreeBSD Desktop, System Administration, Various | 1 Comment »
Thursday, September 29th, 2011 ffmpeg is the de-facto standard for Video conversion on Linux and BSD platforms. I was more than happy to find out that ffmpeg is capable of converting an .ogv file format to .flv (Flash compressed Video).
Ogg Vorbis Video to Flash’s conversion on Linux is a real piece of cake with ffmpeg .
Here is how to convert .ogv to .flv:
debian:~# ffmpeg -i ogg_vorbis_video_to_convert_.ogv converted_ogg_vorbis_video_to_flash_video.flv

...
Conversion of a 14MB ogg vorbis video to flv took 28 seconds, the newly produced converted_ogg_vorbis_video_to_flash_video.flv has been reduced to a size of 9MB. This is on a system with 2 GB of memory and dual core 1.8 Ghz intel CPU.
Tags: BSD, bsd platforms, cake, conversion, core, CPU, de facto standard, Debian, dual core, ffmpeg, file, file format, Flash, flv, format, freebsd, ghz intel, intel, intel cpu, Linux, memory, Ogg, ogv, piece of cake, platform, size, standard, system, video conversion, Vorbis
Posted in FreeBSD, Games Linux, Linux Audio & Video | No Comments »


