There is a nice site in Bulgarian explaining quite extensively how to add Bulgarian phonetic key set on Injinera’s Website. Another way to solve the problem is to use bgphon_xp program.
Posts Tagged ‘website’
Howto add Bulgarian Phonetic keyboard set to Windows XP
Wednesday, September 23rd, 200912 must have Joomla extension plugins / Essential modules for new Joomla CMS install
Thursday, June 16th, 2011
These days very often I have to install, plain new Joomla based websites. I’ve realized that since there is no structured guide to follow describing the most essential plugins that every new fresh new joomla installation is required to have.
Thus I took the time and wrote this post, as it will be useful to myself in my future new joomla based websites establishment, I also believe these guide will be useful to other Joomla enthusiasts or administrators in their daily work.
Below I will describe in short the installation, configuration and oddities I’ve faced during installment of the above described bundle of plugins on a plan Joomla 1.5 install.These article will walk through 12 joomla essential plugins that I believe every fresh Joomla installation should be equipped with.
Hope this guide will be helpful to you. Now let’s start it up:
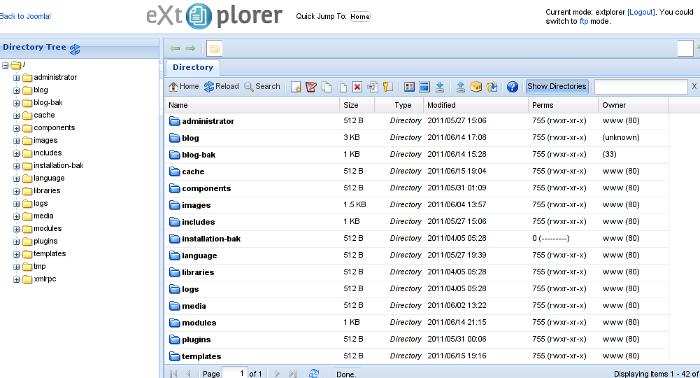
1. JoomlaXplorer – A sophisticated web file explorer for Joomla
One of the basic modules, beneficial with a new joomla CMS install is Joomla Xptplorer . This module enables the joomla admin to browse files in a web file explorer, on the server where the joomla CMS is installed. Below you see how handy the joomla web explorer provided by the plugin is:
Installing and using the plugin is a piece of cake. To install the plugin:
a. download Joomla file Xplorer from here or from the official plugin website.
b. Install the plugin through the admin joomla menu:
Extensions -> Install/Uninstall
c. Start using the newly installed plugin by following to menus:
Components -> eXtplorer
2. JCrawler Generate easily sitemap.xml to aim the overall Joomla website SEO optimization
![]()
I have previously written a very through tutorial on how to install configure and generate website sitemap with Jcrawler module, You can read my article titled: How to build website sitemap.xml in Joomla here
3. sh404SEF – Make your Joomla links and content more user friendly

sh404SEF is a great Joomla plugin, which will seriously improve SEO and could contribute well for a website to be better indexed with major search engines.
I have previously written an article describing thoroughfully the install and use procedures for the module.
You can read the article Making your Joomla URLS Google friendly with sh404sef plugin / Simple Joomla link SEO here
4. Akeeba Backup Joomla solution

Installing a joomla backup solution is very essential if you does take care about your data, it often happens that server hard disk got crashes or a RAID massives got corrupted or some kind of other unexpected disaster hits the server. In these terrible times, having a website backup will save you nerves and data recovery funds, not to mention that in many cases data recovery is impossible.
Joomla has a very easy to use software for creating full website backup called Akeeba Backup
To start using the software one must:
a. Download Akeeba Backup and install it via:
Extensions -> Install/Uninstall
After the Akeeba Backup installation is over, to create your first backup, one needs to navigate to:
Components -> Akeeba Backup -> Backup Now
Each Akeeba backup (a version of the website’s files data and sql info) will be created in an archive file with the extension .jpa
The backup files are created under joomla’s website (main) root directory in directory location administrator/components/com_akeeba/backup
The Akeeba plugin also has capabilities to recover a (.jpa) backup restore point easily.
To recover a backup with the Akeeba plugin one needs to do it once again, via the plugin joomla web interface.
5. Google Analytics (place easy tracking code) in Joomla
![]()
a. Download the Google Analytics Tracking Module
The module is available from Joomla Extensions on joomla.org
At the current time of writting you need to download the analytics_tracking15,zip file
b. Install the Google Analytics Tracking Module;
Login as joomla admin and navigate to;
Extensions -> Install
Place the analytics_tracking15.zip url to the Install URL: field.
Again as of time of writting you need to place https://www.pc-freak.net/files/analytics_tracking15.zip;
c. Open the Module Manager
Extensions -> Module Manager
d. Click over Google Analytics Tracking Module
On the right pane you will notice in the Module Parameters the Analytics_uacct_code field. In the uacct_code field you need to paste your UA obtained from your created google-analytics account.
This code is usually something like UA-2101595-10
Now place your code their and press the save green button located near the right top of the screen. You should see the text in blue Item Saved which would indicate your UA code is stored already in the Google Analytics Tracking Module, now press the Cancel button located again on the right top.
As a last step before the Google analytics is set-up on the Joomla you need to enable the plugin to do you need to press over the tick left sided from the text reading Google Analytics Tracking Module in the Module Manager
e. Click over the Enabled button in Module Manager;
Google Analytics Tracking Module -> Enabled
6. Itprism (Facebook, Twitter etc.) Social Network share buttons Joomla plugin

a. to add the itpsocialbuttons to joomla Download the Itpsocialbuttons latest module files from http://itprism.com/free-joomla-extensions/social-buttons-plugin or use my mirrored module files below:
Download mod_itpsocialbuttons .zip file
Download plg_itpsocialbuttons .zip
After having the two files necessery to be installed to make the ITPSocialButtons appear on website, installation is done like with any other installation:
Extensions -> Install/Uninstall -> Upload Package File (Choose File)
Next its necessery to configure the plugin to do so, follow to menus:
Extensions -> Module Manager -> Share
You will notice the Share dialog in the list of Module Name column in Module Manager
Here is a screenshot on how the settings options for ITpsocialbuttons will look like:
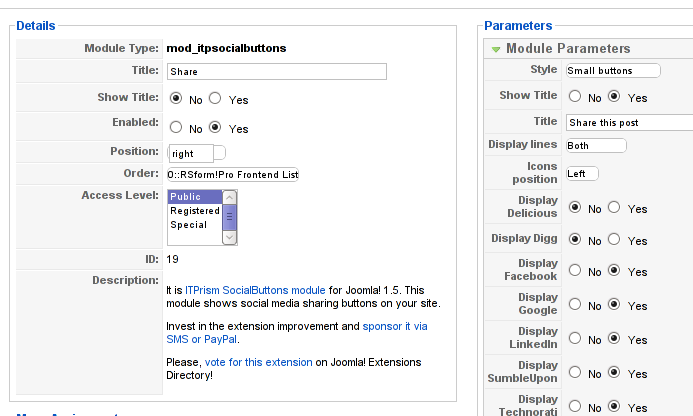
The options which I personally changed was:
Show Title – I set this one to No as I wanted to omit the plugin title text to appear on my website.
Further on I’ve set the Enabled option to Yes to enable the plugin and choose the buttons Style option to be of a Small buttons type.
I’ve also found that the most suitable position for the Social Share buttons were to be of a right – Position .
Here is how the social network itprism share buttons looks like:

The plugin supports sharing of joomla pages to the following list of social networks:
- Delicios.com
- Digg.com
- Google Bookmarks
- StumbleUpon
- Technorati
The module configuration, also allows the user to configure the type of social network buttons, one wants to display on the website.
7. Joomla JCE Content Editor
This content editor is really awesome compared to the default editor TinyMCE. If you want to have an options rich content editor for Joomla, then this is the one for you 🙂
download JCE Content Editor here
After installing the JCE Joomla content editor in order to enable it as a default editor you need to go to the following location:
Site -> Global Configuration -> Default WYSIWYG Editor
There place on Editor TinyMCE and change it with Editor – JCE
Now go to edit some article, and you will see the difference in the editor 🙂
8. Add gallery Joomla capabilities with sigplus (Image Gallery Plus) and Very Simple Image Gallery

Image Gallery Plus plugin (sigplus) gallery review screenshot
sigplus Image Gallery Plus is a straightforward way to add image or photo galleries to a Joomla article with a simple syntax. It takes a matter of minutes to set up a gallery but those who are looking for a powerful gallery solution will not be disappointed either: sigplus is suitable for both beginner and advanced users.
Download Sigplus Joomla Image Gallery plugin here
Using sigllus is quite easy all one has to do is use Joomla Media Manager from links:
Site -> Media Manager
Create new folder in the stories folder, let’s say New Pictures and further on use Media Manager to upload all desired pictures to be later displayed.
Being done with uploading the images you want to display, go to Article Manager :
Content -> Article Manager
From there choose your article where new uploaded pictures you want to display and type in the article:
{gallery}New Pictures{/gallery}.
Note that New Pictures is the directory just recently created as stated below, it’s important that there is no spacing between {gallery}and New Pictures, if one tries {gallery} New Pictures {/gallery} instead of {gallery}New Pictures{/gallery} an error will occur instead of the pictures being displayed in a scrolled gallery.
Sigplus Image Gallery has also a number of configuration options, which might make it look a bit more decent.
I have to say in my view the default way sigplus displays pictures is awful!
Another alternative if you don’t like Sigplus ‘s way of creating new galleries is to use Very Simple Image Gallery
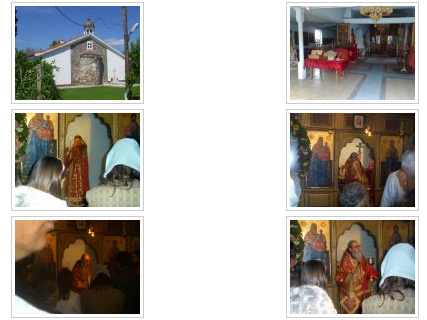
Here is a screenshot on a sample gallery created with Very Simple Image Gallery Joomla Plugin
You can download Very simple image gallery here
After installing the plugin. It’s use is analogous to the Sigplus . To use it likewise sigplus create new directory through Media Manager and in stories and upload your files in let’s say New Pictures1 . Later on in your article place, the code
{vsig}New Pictures1{/vsig}
Gallery will be generated automatically by the plugin. I think Simple Image Gallery is a bit more advanced and gives a better outlook to Galleries, though it’s configuration settings are much less than with SigPlus image gallery.
To add pictures comments e.g. img link alt=” and title=” tib you need to place a code within the Article manager similar to:
{vsig_c}0|Picture_1.JPG|Some sample text|Some other text{/vsig_c}

{vsig_c}0|Picture_2.JPG|Some example text|Some text{/vsig_c}

etc. ..
Note that the 0 in above example specifies the gallery number if you for instance are using a couple of galleries with Simple Image Gallery , the first one you used would be call 0 . The text specified as comments to the picture will also appear after you preview the gallery right below the picture when clicked on as a picture description in a really nice way.
9. Install Google maps plugin for Joomla
It’s a wise idea that every website has a location map on it’s website, for that reason Google maps is just great.
To install Google maps capability to joomla one can use a plugin called Google Maps .
You can straighly download Joomla’s Googlemap plugin from here
Afterwards use Extension Manager to install the plugin e.g. follow:
Extensions -&gr; Install/Uninstall (Choose File)
and click on Upload File & Install button.
To further enable and configure the Joomla Googlemap plugin you will have to go to the location:
Extensions -> Plugin Manager
Therein you will have to find and enable the Google Maps plugin which is to be found in the column named Plugin Manager
On my Joomla installation the plugin was located in the second page with modules, so if you don’t find the module on the listing with modules on the first page, make sure you scroll to the bottom of the page and click on Next button.
Therein in the list you will most likely notice Google Maps use the Enable button to enable it.
Next step is to configure the plugin, to do so press on the plugin name Google Maps
All configuration necessery here is to place Googlemaps API Key in the respective field (you will see it among config options).
Issuing a new Google Maps api key takes just few seconds, if you already have a gmail account just go to http://code.google.com/apis/maps/signup.html and take few seconds to issue the key.
You will get the key right on your gmail account after being issued (to repeat myself issuing takes few seconds so no worrier here).
One moreOnce having the key place it in the Googlemaps API Key field and configuring Address (which is one of the list of many options the plugin provides) you will be done with configuration.
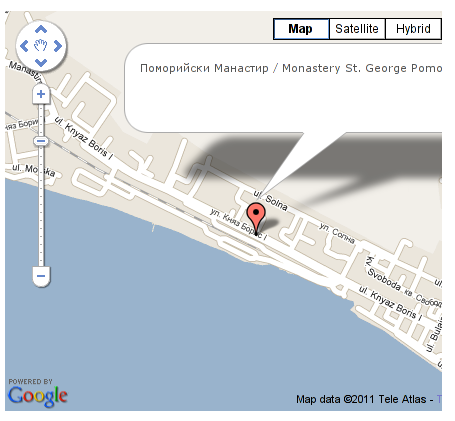
To display a google map the location you just configured go to the Article Manager , select the article where you want the google maps location picture of your address to appear and type in the Article:
{mosmap|text='Exact street address location'|zoom='15'|zoomType='Large'|zoomNew='0'}
After you save the article a very nice Google map showing you the location’s streets will appear.
You can further conifgure a number of things related to the google map to appear, one thing you might want to play with is the zoom option which as you see in below’s code is equal to 15, e.g. zoom=’15’
Set it to another one if you want to regulate your googlemaps zoom level. For more thoroughful options take a look at the extensive plugin documentation.
10. Joomla Xmap (generating static HTML sitemap) Download Xmap from here , install it the usual plugin way.
Right after installation on the plugin succesful install screen you will notice the link component menu .
Clicking on the component menu you will be leaded to a page showing you few links Sitemap’s URL :
- XML Sitemap:
- HTML Sitemap:
- News Sitemap:
- Images Sitemap:
11. Add Joomla donate Paypal capabilities with Joomla PAYPAL DONATION MODULE

Just recently I’ve written a a post on how to add a paypal donation capabilities to joomla, you can read my previous post here
12. Install Joomla RSForms Module (Advanced Joomla Forms Support)
If you’re planning to add a complicated form support for Joomla, there are plenty of plugins, however one that was suggested by a friend of mine which is deep in Joomla world and moreover works good on my joomla installations is RSForms
Joomla – RSForms! is free to download and has great and easy interface to create new joomla forms.
At the time of writting I use these three RSForms components on new Joomla installations:
RSform Pro 1.1.0 com
Mod RsForm for Joomla 1.5
Mod Rsform list for Joomla
For latest release of RSForms! use the link http://www.rsjoomla.com/joomla-components/rsform.html
Installation is like any other module and is done through Extensions -> Install/Uninstall menu.
After installation, setting up a new form is available from the Joomla Menus:
Components -> RSform!Pro -> Manage Forms
I would not enter in details on how to edit the default RSForms or create a new RSForm. Just take some time and learn it by trying 😉
After the rsform is ready, to enable the new form, navigate to Joomla menus:
Menus -> Main Menu
Press the New button located in the buttons bar nearby the page header in the list of options in Select Menu item Type you will notice the RSForm!Pro as an option, press on it to establish the new form in the menus.
A follow up window will appear where one can set a Title: and Alias: for the new form as well as few other options.
After finalizing the settings press on Apply button to save the settings and the new form should appear in Joomla.
Probably there are many more handy plugins, which I’m missing here thus I’ll be glad if readers suggest some more helpful essential (must have plugins) for Joomla.
Feedback on this tutorial is very welcome!
Looking forward to hear for your opinions if my article was helpful to you 😉
WordPress Plugins to monitor and debug WP enabled plugins – Find Errors / Warnings and Remove WP problematic plugins slowing down your Website (blog) database
Thursday, February 19th, 2015 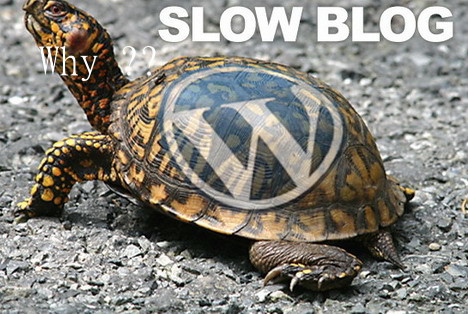
Recent days, I'm spending a lot of time again trying to optimize my wordpress blog. Optimizing WP for better efficiency is becoming harder and harder task day by day as the website file content data is growing along with SQL databases. Moreover situation gets even worse because the number of plugins enabled on my blog is incrementally growing with time because, there is more and more goodies I'd like to add.
Optimizing WordPress to run for Speed on a server is a whole a lot of art and its a small universe in itself, because as of time of writting this post the count (number) of WordPress available PLUGINS is 36,197 !
1. Manually Tracking WordPress Plugins causing Slow SQL Queries (MySQL bottleneck) issues directly using console / SSH
Because of its open source development and its nice modular design wordpress has turned into a standard for building small, middle sized and large websites (some WordPress based blogs and sites have from 50 000 to 100 000 unique pages!). My blog is still a small WordPress site with only 1676 posts, so I still haven't reached the high volume traffic optimization requirements but still even though I have a relatively good server hardware 8GB RAM / (2×2.70 Ghz Intel CPU) / 500 GB (7400 RPM HDD) at times I see Apache Webservers is unable to properly serve coming requests because of MySQL database (LEFT JOIN) requests being slow to serve (taking up to few seconds to complete) and creating a MySQL table lock, putting all the rest SQL queries to stay in a long unserved queues line, I've realized about this performance issue by using a a mysql cli (command) client and few commands and console command (tool) called mytop (also known as mtop). MyTop refreshes every 3 seconds, so the slow query will immediately stay on screen to view moer info about it press "f" and type the in query ID.
![]()
![]()
Finally it is very useful to run for a while MySQL server logging to /var/log/mysql/slow-query.log:
Slow query is enabled (on my Debian 7 Wheezy host) by adding to /etc/mysql/my.cnf after conf section
vim /etc/mysql/my.cnf
#
# * Logging and Replication
#
# Both location gets rotated by the cronjob.
# Be aware that this log type is a performance killer.
# As of 5.1 you can enable the log at runtime!
#general_log_file = /var/log/mysql/mysql.log
#general_log = 1
#
# Error logging goes to syslog due to /etc/mysql/conf.d/mysqld_safe_syslog.cnf.
#
# Here you can see queries with especially long duration
Paste:
slow_query_log = 1
slow_query_log_file = /var/log/mysql/slow-query.log
long_query_time = 2
log-queries-not-using-indexes
And then to make new mysql configuration load restarted mysql server:
debian-server:~# /etc/init.d/mysql restart
Stopping MySQL database server: mysqld.
Starting MySQL database server: mysqld ..
Checking for tables which need an upgrade, are corrupt or were
not closed cleanly..
Leaving mysql-slow.log to be enabled for 30 minutes to an 1 hrs is a good time to track most problematic slow queries and based on this queries, I took parts of SQL UPDATE / SELECT / INSERT etc. Db queries which was problematic and grepped throughout /var/www/blog/wp-content/plugin files in order to determine which WordPress Plugin is triggering the slow query, causing blog to hang when too many clients try to see it in browser.
My main problematic SQL query having long execution time (about 2 to 3 seconds!!!) most commonly occuring in slow-query.log was:
SELECT DISTINCT post_title, ID, post_type, post_name FROM wp_posts wposts LEFT JOIN wp_postmeta wpostmeta ON wposts.ID = wpostmeta.post_id LEFT JOIN wp_term_relationships ON (wposts.ID = wp_term_relationships.object_id) LEFT JOIN wp_term_taxonomy ON (wp_term_relationships.term_taxonomy_id = wp_term_taxonomy.term_taxonomy_id) WHERE (post_type='page' OR (wp_term_taxonomy.taxonomy = 'category' AND wp_term_taxonomy.term_id IN(11))) AND post_status = 'publish' AND LENGTH(post_title)>=5 ORDER BY LENGTH(post_title) ASC LIMIT 500
Because above query uses SQL Column names and Tables which are not hard coded in PHP code, to find out which plugins is most probably to launch this complex LEFT JOIN query, I used a quick bash one-liner:
# cd /var/www/blog/wp-content/plugins
# for i in $(grep -rli 'SELECT DISTINCT' *); do grep -rli 'LEFT JOIN' $i; done
./seo-automatic-links/seo-links.php
./wp-postviews/wp-postviews.php
./yet-another-related-posts-plugin/classes/YARPP_Cache_Tables.php
I wanted to put less load on CPU during grep so looked for string only in .PHP extensioned files with:
# for i in $(find . -iname '*.php' -exec grep -rli 'SELECT DISTINCT' '{}' \;); do grep -rli 'LEFT JOIN' $i; done
./seo-automatic-links/seo-links.php
./wp-postviews/wp-postviews.php
./yet-another-related-posts-plugin/classes/YARPP_Cache_Tables.php
As you can see the complex query is being called from PHP file belonging to one of 3 plugins
- SEO Automatic Links – this is SEO Smart Links WP plugin (Does internal bliog interlinking in order to boast SEA)
- WP PostViews – WordPress Post Views plugin (Which allows me to show how many times an article was read in WP Widget menu)
- Yet Another Related Posts – Which is WP plugin I installed / enabled to show Related posts down on each blog post
2. Basic way to optimize MySQL slow queries (EXPLAIN / SHOW CREATE TABLE)
Now as I have a basic clue on plugins locking my Database, I disabled them one by one while keeping enabled mysql slow query log and viewing queries in mytop and I figure out that actually all of the plugins were causing a short time overheat (lock) on server Database because of LEFT JOINs. Though I really like what this plugins are doing, as they boast SEO and attract prefer to disable them for now and have my blog all the time responsible light fast instead of having a little bit better Search Engine Optimization (Ranking) and loosing many of my visitors because they're annoyed to wait until my articles open …
Before disabling I tried to optimize the queries using MySQL EXPLAIN command + SHOW CREATE TABLE (2 commands often used to debug slow SQL queries and find out whether a Column needs to have added INDEX-ing to boast MySQL query).
Just in case if you decide to give them a try here is example on how they're used to debug problematic SQL query:
- mysql> explain SELECT DISTINCT post_title, ID, post_type, post_name
- -> FROM wp_posts wposts LEFT JOIN wp_postmeta wpostmeta
- -> ON wposts.ID = wpostmeta.post_id LEFT JOIN wp_term_relationships
- -> ON (wposts.ID = wp_term_relationships.object_id) LEFT JOIN wp_term_taxonomy
- -> ON (wp_term_relationships.term_taxonomy_id = wp_term_taxonomy.term_taxonomy_id)
- -> WHERE (post_type='page'
- -> OR (wp_term_taxonomy.taxonomy = 'category'
- -> AND wp_term_taxonomy.term_id IN(11,15,17)))
- -> AND post_status = 'publish'
- -> AND LENGTH(post_title)>=5
- -> ORDER BY LENGTH(post_title) ASC
- -> LIMIT 500;
- +—-+————-+———————–+——–+——————+———+———+———————————————+——+———————————————-+
- | id | select_type | table | type | possible_keys | key | key_len | ref | rows | Extra |
- +—-+————-+———————–+——–+——————+———+———+———————————————+——+———————————————-+
- | 1 | SIMPLE | wposts | ALL | type_status_date | NULL | NULL | NULL | 1715 | Using where; Using temporary; Using filesort |
- | 1 | SIMPLE | wpostmeta | ref | post_id | post_id | 8 | blog.wposts.ID | 11 | Using index; Distinct |
- | 1 | SIMPLE | wp_term_relationships | ref | PRIMARY | PRIMARY | 8 | blog.wposts.ID | 19 | Using index; Distinct |
- | 1 | SIMPLE | wp_term_taxonomy | eq_ref | PRIMARY | PRIMARY | 8 | blog.wp_term_relationships.term_taxonomy_id | 1 | Using where; Distinct |
- +—-+————-+———————–+——–+——————+———+———+———————————————+——+———————————————-+
- 4 rows in set (0.02 sec)
-
- mysql>
-
- mysql> show create table wp_posts;
- +———-+————————–+
- | Table | Create Table |
- +———-+————————–+
- | wp_posts | CREATE TABLE `wp_posts` (
- `ID` bigint(20) unsigned NOT NULL AUTO_INCREMENT,
- `post_author` bigint(20) unsigned NOT NULL DEFAULT '0',
- `post_date` datetime NOT NULL DEFAULT '0000-00-00 00:00:00',
- `post_date_gmt` datetime NOT NULL DEFAULT '0000-00-00 00:00:00',
- `post_content` longtext NOT NULL,
- `post_title` text NOT NULL,
- `post_excerpt` text NOT NULL,
- `post_status` varchar(20) NOT NULL DEFAULT 'publish',
- `comment_status` varchar(20) NOT NULL DEFAULT 'open',
- `ping_status` varchar(20) NOT NULL DEFAULT 'open',
- `post_password` varchar(20) NOT NULL DEFAULT '',
- `post_name` varchar(200) NOT NULL DEFAULT '',
- `to_ping` text NOT NULL,
- `pinged` text NOT NULL,
- `post_modified` datetime NOT NULL DEFAULT '0000-00-00 00:00:00',
- `post_modified_gmt` datetime NOT NULL DEFAULT '0000-00-00 00:00:00',
- `post_content_filtered` longtext NOT NULL,
- `post_parent` bigint(20) unsigned NOT NULL DEFAULT '0',
- `guid` varchar(255) NOT NULL DEFAULT '',
- `menu_order` int(11) NOT NULL DEFAULT '0',
- `post_type` varchar(20) NOT NULL DEFAULT 'post',
- `post_mime_type` varchar(100) NOT NULL DEFAULT '',
- `comment_count` bigint(20) NOT NULL DEFAULT '0',
- PRIMARY KEY (`ID`),
- KEY `post_name` (`post_name`),
- KEY `type_status_date` (`post_type`,`post_status`,`post_date`,`ID`),
- KEY `post_parent` (`post_parent`),
- KEY `post_author` (`post_author`),
- FULLTEXT KEY `post_related` (`post_title`,`post_content`)
- ) ENGINE=MyISAM AUTO_INCREMENT=12033 DEFAULT CHARSET=utf8 |
- +———-+———————-+
- 1 row in set (0.00 sec)
-
- mysql>
-
By the way above output is a paste from the the new PasteBin Open Source (Stikked powered) service I started on www.pc-freak.net – paste.www.pc-freak.net (p.www.pc-freak.net) 🙂
Before I took final decision to disable slow WP plugins, I've experimented a bit trying to add INDEX to Table Column (wposts) in hope that this would speed up SQL queries with:
mysql> ALTER TABLE TABLE_NAME ADD INDEX (wposts);
…
But this didn't improve query speed even on the contrary it make execution time worse.
3. Tracking WordPress Plugin PHP Code Execution time and Plugins causing Slow SQL Queries (MySQL bottleneck) issues through WP itself
Well fine, I'm running my own hosted Blog and WordPress sites, but for people who have wordpress sites on shared hosting, there is usually no SSH (Terminal) Access to server, those people will be happy to hear there are 2 Free easy installable WordPress plugins which can be used to Debug Slow WordPress Plugins SQL Queries as well as plugin to Track which plugin takes most time to execute, this are:
- WordPress Query Monitor
- (P3 Plugin Performance Profiler)
- WordPress Memory Viewer plugin
- WordPress DebugBar Memory reporter plugin
a) P3 Plugin Performance Profiler
runs a scan over your site to determine what resources your plugins are using, and when, during a standard page request. P3 PPP Can even create reports in a beatiful Excel like Pie chart sheet.
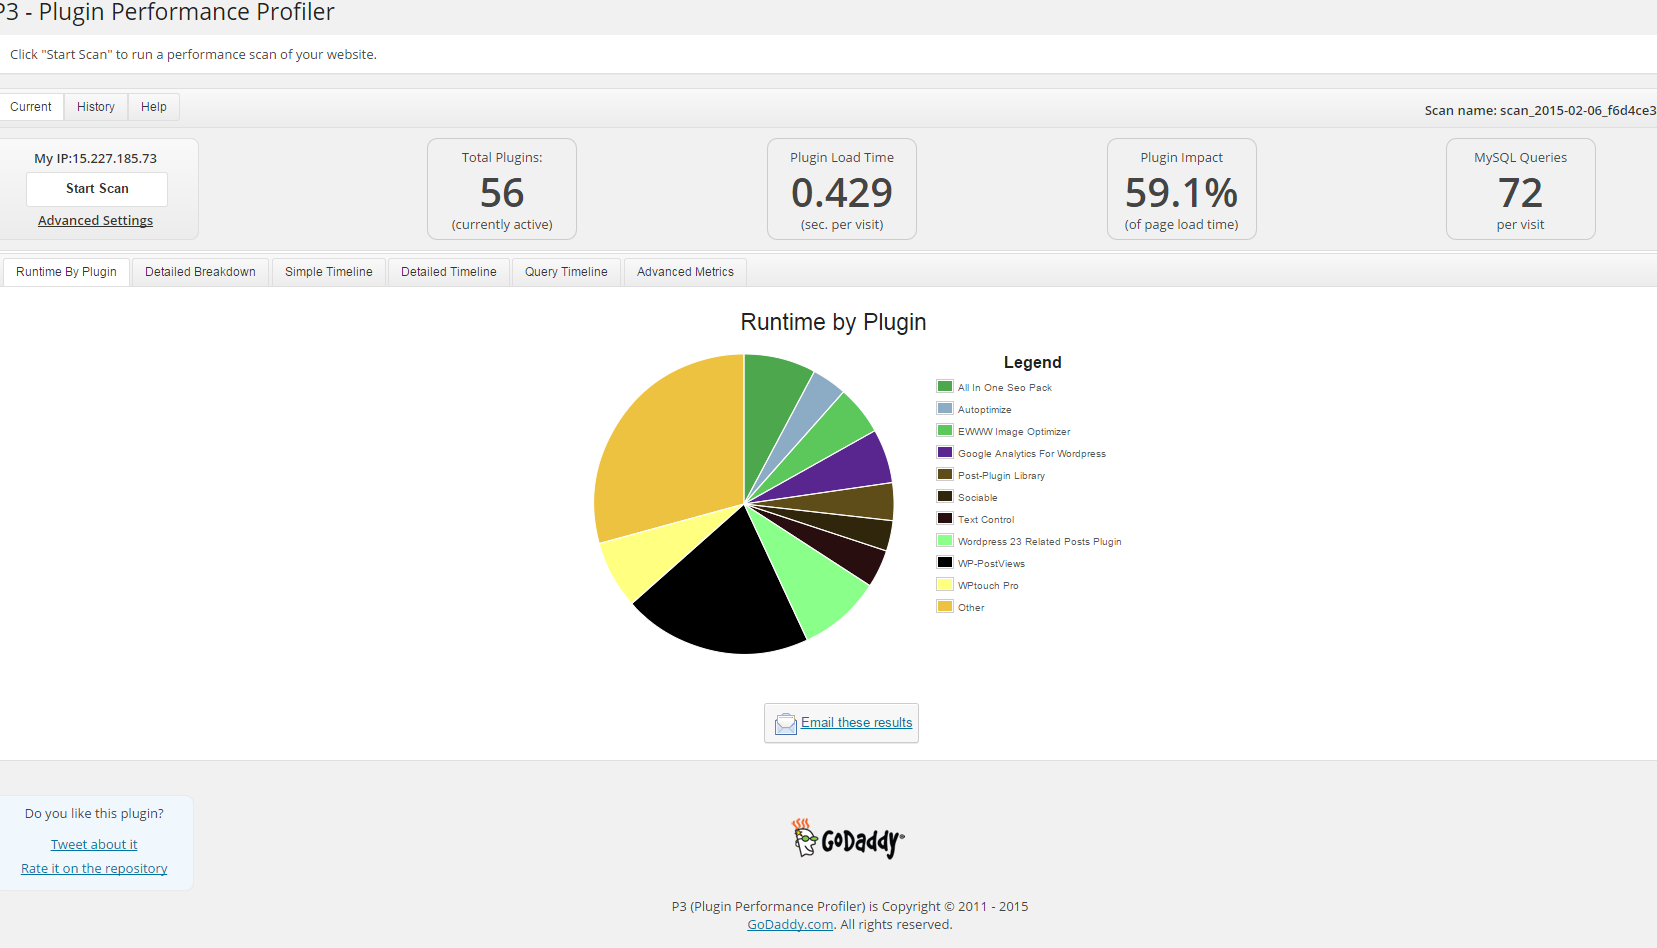
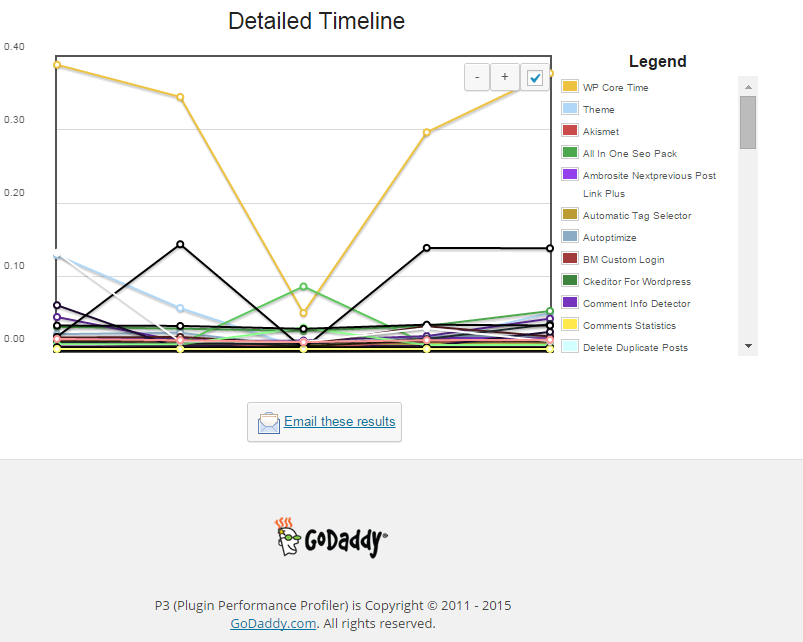
Another useful thing to see with P3 PPP is Detailed Timeline it shows when the plugins are being loaded during new page request so you can see if there is a certain sequence in time when a plugin slows down the website.
The pictures says it all as P3 PPP is Godaddy's work, congrats to GoDaddy, they've done great job.
b) WordPress memory Viewer WP plugins
Is useful to check how much memory each of WordPress plugin is taking on user (visitor) request.
Memory Viewer is allows you to view WordPress’ memory utilization at several hooks during WordPress’ execution. It also shows a summary of MySQL Queries that have ran as well as CPU time.
To use it download it to plugins/ folder as usual enable it from:
Installed Plugins -> (Inactive) -> Memory Viewer (Enable)
To see statistics from Memory Viewer open any post from your blog website and scroll down to the bottom you will notice the statistics, showing up there, like on below screenshot.
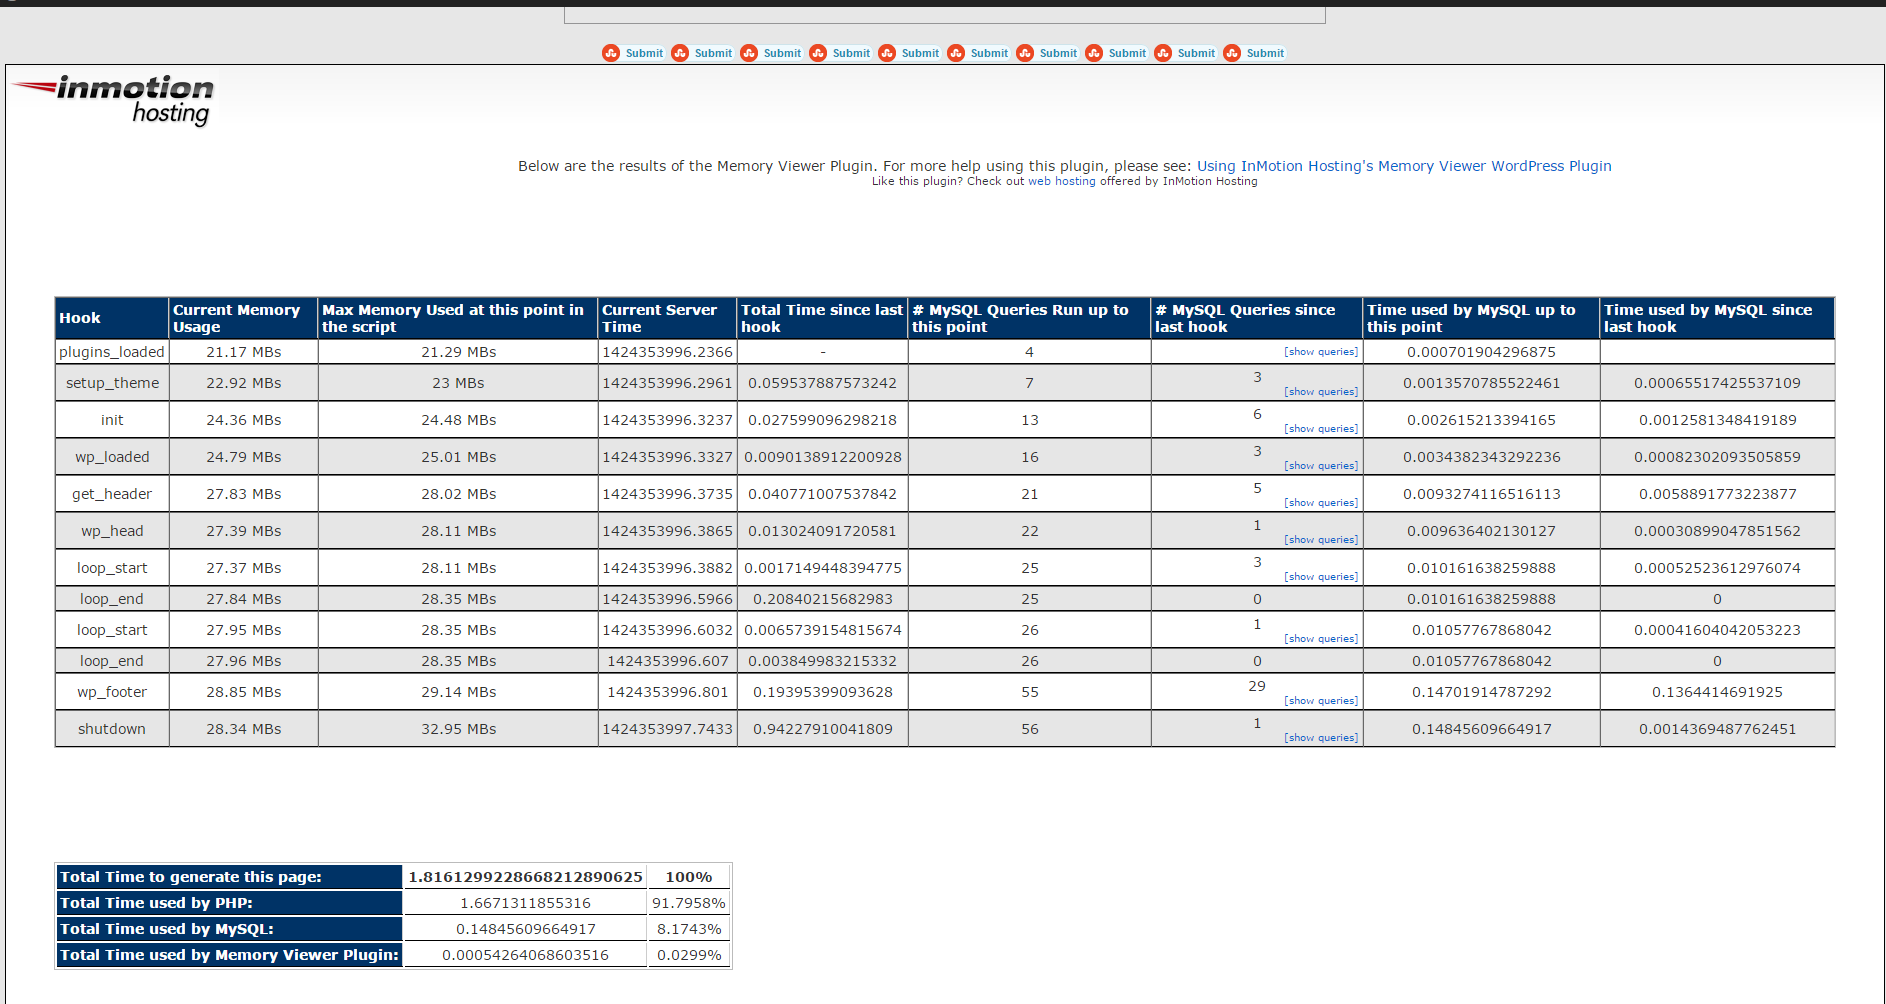
Though WP Memory Viewer is said to work only up to WP version 3.2.1, I've tested it and it works fine on my latest stable WordPress 4.1 based blog.
c) WordPress Query Monitor
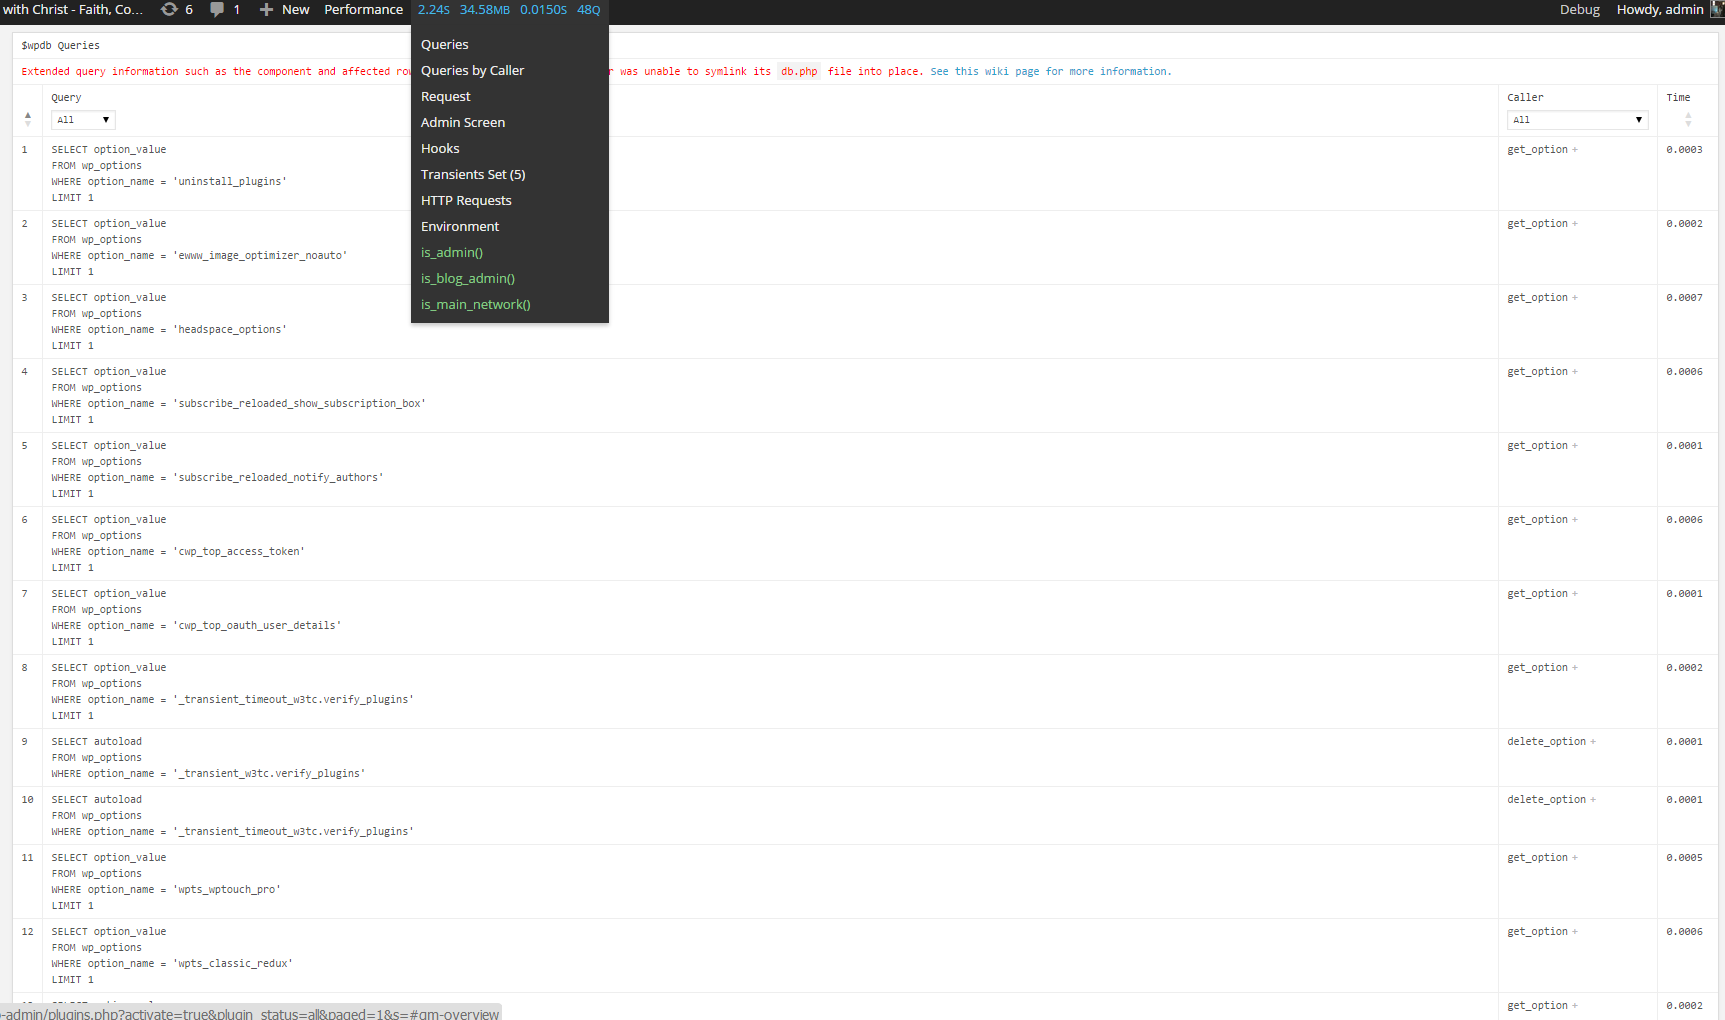
Query Monitor is a debugging plugin for anyone developing with WordPress but also very helpful for anyone who want to track issues with plugins who use the database unefficient.
It has some advanced features not available in other debugging plugins, including automatic AJAX debugging and the ability to narrow down things by plugin or theme.
You can view plenty of precious statistics on how enabled plugins query the database server, here is a short overview on its Database Queries capabilities:
- Shows all database queries performed on the current page
- Shows affected rows and time for all queries
- Show notifications for slow queries and queries with errors
- Filter queries by query type (SELECT, UPDATE, DELETE, etc)
- Filter queries by component (WordPress core, Plugin X, Plugin Y, theme)
- Filter queries by calling function
- View aggregate query information grouped by component, calling function, and type
- Super advanced: Supports multiple instances of wpdb on one page
- Once enabled from Plugins you will see it appear as a new menu on bottom Admin raw.
An important note to make here is latest Query Monitor extension fails when loaded on current latest Wordpress 4.1, to use it you will have to download and useolder Query Monitor plugin version 2.6.8 you can download it from here
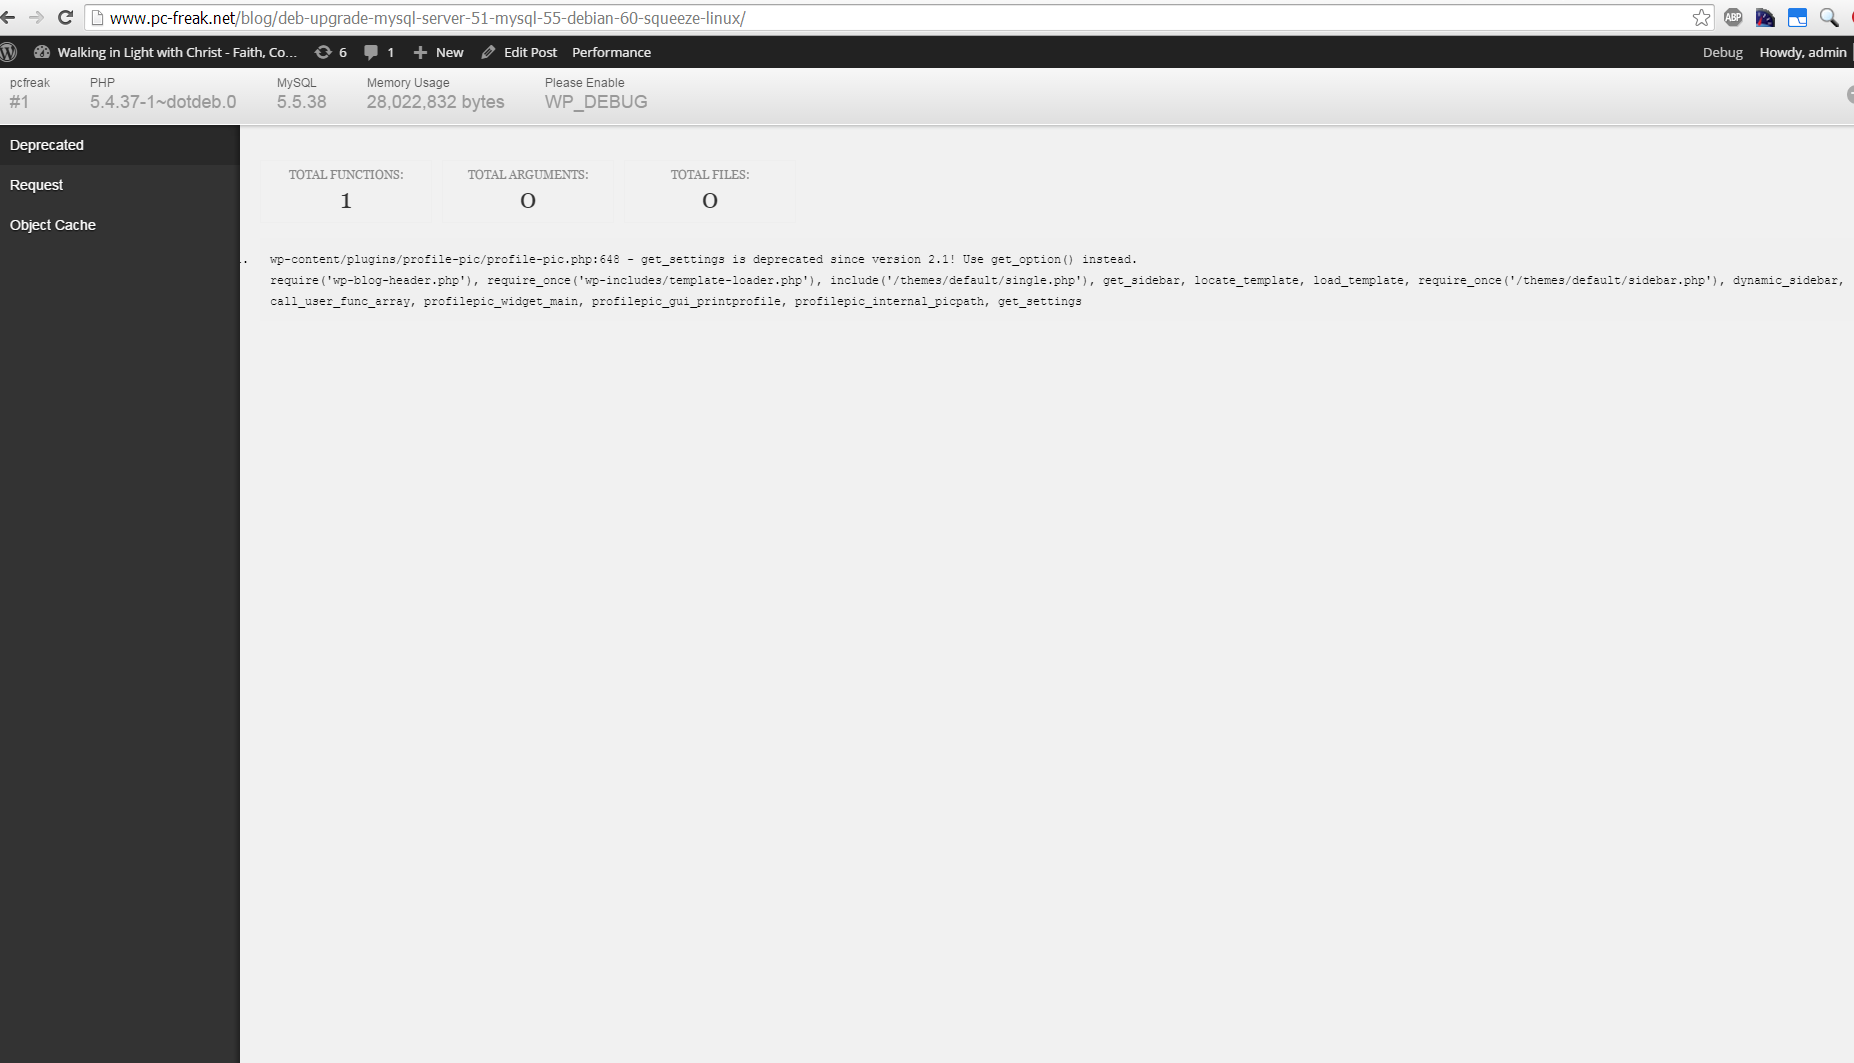
d) Debug Bar
If you want you want a Memory Viewer like plugin for more complex used components memory debugging, reporting if (WP_DEBUG is set in wp-config.php) also check out Debug Bar .
For me Debug Bar was very useful because it show me depreciated functions some plugins used, so I substituted the obsoleted function with new one.
4. Server Hardware hungry (slow) WordPress plugins that you better not use
While spending time to Google for some fixes to WP slow query plugins – I've stumbled upon this post giving a good list with WordPress Plugins better off not to use because they will slow down your site
This is a publicly well known list of WP plugins every WordPress based site adminstrator should avoid, but until today I didn't know so my assumption is you don't know either ..
Below plugins are extremely database intensive mentioned in article that we should better (in all cases!) avoid:
- Dynamic Related Posts
- SEO Auto Links & Related Posts
- Yet Another Related Posts Plugin
- Similar Posts
- Contextual Related Posts
- Broken Link Checker — Overwhelms even our robust caching layer with an inordinate amount of HTTP requests.
- MyReviewPlugin — Slams the database with a fairly significant amount of writes.
- LinkMan — Much like the MyReviewPlugin above, LinkMan utilizes an unscalable amount of database writes.
- Fuzzy SEO Booster — Causes MySQL issues as a site becomes more popular.
- WP PostViews — Inefficiently writes to the database on every page load. To track traffic in a more scalable manner, both the stats module in Automattic’s Jetpack plugin and Google Analytics work wonderfully.
- Tweet Blender — Does not play nicely with our caching layer and can cause increased server load.
There are few alternatives to this plugins and when I have some free time I will download and test their alternatives but for now I plan the plugins to stay disabled.
For the absolute WP Performance Optimization Freaks, its good to check out the native way to Debug a wordpress installation through using few embedded
variables
define('WP_DEBUG', true);
define('WP_DEBUG', false);
define('WP_DEBUG_LOG', true);
define('WP_DEBUG_DISPLAY', false);
define('SAVEQUERIES', true);
An article describing how you can use native WP debug variables is here
Happy Optimizing ! 🙂
mod_rewrite redirect rule 80 to 443 on Apache webserver
Wednesday, April 2nd, 2014 A classic sysadmin scenario is to configure new Apache webserver with requirement to have an SSL ceriticate installed and working on port 443 and all requests coming on port 80 to be redirected to https://.
On Apache this is done with simple mod_rewrite rule:
RewriteEngine On

RewriteCond %{HTTPS} off

RewriteRule (.*) https://%{HTTP_HOST}%{REQUEST_URI}
Before applying the rule don't forget to have Apache mod_rewrite enabled usually it is not enabled on default most Linux distributions by default.
On shared hostings if you don't have access to directly modify Apache configuration but have .htaccess enabled you can add above rules also to .htaccess
Add this to respective VirtualHost configuration and restart Apache and that's it. If after configuring it for some reason it is not working debug mod_rewrite issues by enabling mod_rewrite's rewrite.log
Other useful Apache mod_rewrite redirect rule is redirect a single landing page from HTTP to HTTP
RewriteEngine On

RewriteRule ^apache-redirect-http-to-https.html$ https://www.site-url.com/apache-redirect-http-to-https.html [R=301,L]
!Note! that in case where performance is a key requirement for a website it might be better to use the standard way to redirect HTTP to HTTPS protocol in Apache through:
To learn more on mod_rewrite redirecting check out this official documentation on Apache's official site.
Preserve domain name after redirect with mod_rewrite and some useful mod rewrite redirect and other examples – Redirect domain without changing URL
Friday, July 11th, 2014 
If you're a webhosting company sysadmin, sooner or later you will be asked by application developer or some client to redirect from an Apache webserver to some other webserver / URL's IP, in a way that the IP gets preserved after the redirect.
I'm aware of two major ways to do the redirect on webserver level:
1. To redirect From Apache host A to Webserver on host B using ReverseProxy mod_proxy
2. To use Mod Rewrite to redirect all client requests on host A to host B.
There is quite a lot to be said and is said and written online on using mod_rewrite to redirect URLs.
So in this article I will not say nothing new but just present some basic scenarios on Redirecting with mod rewrite and some use cases.
Hope this examples, will help some colleague sys-admin to solve some his crazy boss redirection tasks 🙂 I'm saying crazy boss because I already worked for a start-up company which was into internet marketing and the CEO has insane SEO ideas, often impossible to achieve …
a) Dynamic URL Redirect from Apache host A to host B without changing domain name in browser URL and keeping everything after the query in
Lets say you want to redirect incoming traffic to DomainA to DomainB keeping whole user browser request, i.e.
Redirect:
http://your-domainA.com/whole/a/lot/of/sub/directory/query.php
Passthe the whole request including /whole/a/lot/of/sub/directory/query.php
so when Apache redirects to redirect to:
http://your-domainB.com/whole/a/lot/of/sub/directory/query.php
In browser
To do it with Mod_Rewrite either you have to add in .htaccess mod_rewite rules:
RewriteEngine On
RewriteCond %{HTTP_HOST} ^your-domainA.com [OR]
RewriteCond %{HTTP_HOST} ^http://your-domainA.com
RewriteRule ^(.*) http://your-domainB.com/$1 [P]
or include this somewhere in VirtualHost configuration of your domain
Above mod_rewrite will make any request to your-domainA.com to forward to your-domainB.com while preserving the hostname in browser URL bar to old domain http://your-domainA.com, however still contet will be served by http://your-domainB.com
http://yourdomainA.com/YOUR-CUSTOM-REQUEST-ADDRESS
to redirect to
http://yourdomainB.com/YOUR-CUSTOM-REQUEST-ADDRESS
WARNING !! If you're concerned about your SEO well positioning in search Engines, be sure to never ever use such redirects. Making such redirects will cause two domains to show up duplicate content
and will make Search Engines to reduce your Google, Yahoo, Yandex etc. Pagerank !!
Besides that such, redirect will use mod_rewrite on each and every redirect so from performance stand point it is a CPU killer (for such redirect using native mod_proxy ProxyPass is much more efficient – on websites with hundred of thousands of requests daily using such redirects will cause you to spend your hardware badly …)
P.S. ! Mod_Rewrite and Proxy modules needs to be previously enabled
On Debian Linux, make sure following links are existing and pointing to proper existing files from /etc/apache2/mods-available/ to /etc/apache2/mods-enabled
debian:~# ls -al /etc/apache2/mods-available/*proxy*
-rw-r–r– 1 root root 87 Jul 26 2011 /etc/apache2/mods-available/proxy_ajp.load
-rw-r–r– 1 root root 355 Jul 26 2011 /etc/apache2/mods-available/proxy_balancer.conf
-rw-r–r– 1 root root 97 Jul 26 2011 /etc/apache2/mods-available/proxy_balancer.load
-rw-r–r– 1 root root 803 Jul 26 2011 /etc/apache2/mods-available/proxy.conf
-rw-r–r– 1 root root 95 Jul 26 2011 /etc/apache2/mods-available/proxy_connect.load
-rw-r–r– 1 root root 141 Jul 26 2011 /etc/apache2/mods-available/proxy_ftp.conf
-rw-r–r– 1 root root 87 Jul 26 2011 /etc/apache2/mods-available/proxy_ftp.load
-rw-r–r– 1 root root 89 Jul 26 2011 /etc/apache2/mods-available/proxy_http.load
-rw-r–r– 1 root root 62 Jul 26 2011 /etc/apache2/mods-available/proxy.load
-rw-r–r– 1 root root 89 Jul 26 2011 /etc/apache2/mods-available/proxy_scgi.load
debian:/etc/apache2/mods-avaialble:~# ls *proxy*
proxy.conf@ proxy_connect.load@ proxy_http.load@ proxy.load@
If it is is not enabled to enable proxy support in Apache on Debian / Ubuntu Linux, either create the symbolic links as you see them from above paste or issue with root:
a2enmod proxy_http
a2enmod proxy
b) Redirect Main Domain requests to other Domain specific URL
RewriteEngine On
RewriteCond %{HTTP_HOST} ^your-domainA.com
RewriteRule ^(.*) http://your-domainB.com/YOUR-CUSTOM-URL [P]
Note that no matter what kind of subdirectory you request on http://your-domain.com (lets say you type in http://your-domainA.com/My-monkey-sucks ) it will get redirected to:
http://your-domainB.com/YOUR-CUSTOM-URL
Sometimes this is convenient for SEO, because it can make you to redirect any requests (including mistakenly typed requests by users or Bot Crawlers to real existing landing page).
c) Redirecting an IP address to a Domain Name
This probably a very rare thing to do as usually a Domain Name is redirected to an IP, however if you ever need to redirect IP to Domain Name:
RewriteCond %{HTTP_HOST} ^##.##.##.##
RewriteRule (.*) http://your-domainB.com/$1 [R=301,L]
Replace ## with digits of your IP address, the is used to escape the (.) – dots are normally interpreted by mod_rewrite.
d) Rewritting URL extensions from .htm to .php, doc to docx etc.
Lets say you're updating an old website with .htm or .html to serve .php files with same names as old .htmls use following rewrite rules:. Or all your old .doc files are converted and replaced with .docx and you need to make Apache redirect all .doc requests to .docx.
Options +FollowSymlinks
RewriteEngine on
RewriteRule ^(.*).html$ $1.php [NC]
Options +FollowSymlinks
RewriteEngine on
RewriteRule ^(.*).doc$ $1.docx [NC]
The [NC] flag at the end means "No Case", or "case-insensitive"; Meaning it will not matter whether files are requested with capital or small letters, they will just show files if file under requested name is matched.
Using such a redirect will not cause Apache to redirect old files .html, .htm, .doc and they will still be accessible again creating duplicate content which will have a negavite impact on Search Engine Optimization.
The better way to do old extensioned files redirect is by using:
Options +FollowSymlinks
RewriteEngine on
RewriteRule ^(.+).htm$ http://your-domainB.com/$1.php [R,NC]
[R] flag would tell make mod_rewrite send HTTP "MOVED TEMPORARILY" redirection, aka, "302" to browser. This would cause search engines and other spidering entities will automatically update their links to the new locations.
e) Grabbing content from URL with Mod Rewrite and passing it to another domain
Lets say you want zip files contained in directory files/ to be redirected from your current webserver on domainA to domainB's download.php script and be passed as argument to the script
Options +FollowSymlinks
RewriteEngine on
RewriteRule ^files/([^/]+)/([^/]+).zip https://www.pc-freak.net/download.php?section=$1&file=$2 [R,NC]
f) Shortening URLs with mod_rewrite
This is ueful If you have a long URL address accessible via some fuzzy long hard to remember URL address and you want to make it acessible via a shorter URL without phyisally moving the files within a short named directory, do:
Options +FollowSymlinks
RewriteEngine On
RewriteRule ^james-brown /james-brown/files/download/download.php
Above rule would make requests coming to http://your-domain.com/james-brown?file=my.zip be opened via http://mysite/public/james-brown/files/download/download.php?file=my.zip
g) Get rid of the www in your domain name
Nowdays many people are used to typing www.your-domain.com, if this annoys you and you want them not to see in served URLs the annoying www nonsense, use this:
Options +FollowSymlinks
RewriteEngine on
RewriteCond %{http_host} ^www.your-domain.com [NC]
RewriteRule ^(.*)$ http://your-domain.com/$1 [R=301,NC]
That's mostly some common uses of mod rewrite redirection, there are thousands of nice ones. If you know others, please share?
References and thanks to:
How to redirect domain without changing the URL
More .htaccess tips and tricks – part 2
Make Apache webserver fix spelling mistyped URL errors and serve files case insensitive with mod_speling
Wednesday, July 16th, 2014 ![]()
On most if not all modern GNU / Linux distributions, Apache webserver comes preinstalled with mod_speling.
What mod_speling does is it tries to find and serve files and directories for non-existing (404 return code) urls with a similar name to passed URL. Other thing mod_speling does is it serves files case-insensitive, even though the UNIX / Linux filesystems are built to understand files case-sensitive.
mod_speling is a very useful module especially when files are being pushed (synchronized) to Apache visible from web document folder from operating systems like Windows whose filesystem doesn't store files case sensitive.
Let me give you a small example on M$ Windows a create file NewFile.html, NEWFILE.HTML, NeWfIlE.Html etc. are one and the same file newfile.html and not 3 different files like it is usually on UNIX / Linux filesystems.
If you happen to migrate old static Websites from Microsoft Internet Information Services (IIS) to UNIX / Linux based hosting. Often Html coders which create websites on Windows platform doesn't respect in website hyperlinks case-sensitive, because anyways Windows FS is case-insetive, thus moving the website to Linux host with Apache the website/s will end up with many 404 error pages, whose fixing for big static websites will be a real pain in the ass.
Also there might be need for mod_speling module enabled, for PHP / Python / Perl websites developed on MS Windows platform and tested on Windows host and then officially to be deployed on Linux.
Note that mod_speling name as a funny thing as actually the module is also converting mis-pelled / mis-typed Apache URLs:
If for example, someone tried to link to your website from a forum mistyping the URL address with mod_speling the mistyped URL could still be handled to open the real existing URL:
Lets say you have URL:
http://your-domain.com/files/what-Ever-fle.php
and the actual URL is:
http://your-domain.com/files/what-Ever-file.php
mod_speling will make Apache scan in /files/ for any files with similar name to what-Ever-fle.php and will open any similar matched file name, preventing you from the normal 404 error and therefore often serving exactly what it has to. Of course such a behavior could be unwanted in same cases for CMSes, which depend on 404 error code for proper operating, so be very sure when configuring mod_speling that this is exactly what you need.
mod_speling can be also useful sometimes for Search Engine Optimization – SEO, as it will show less 404 pages to Crawler search engine bots.
1. Enable mod_speling module on Debian GNU / Linux and Ubuntu
Enabling mod_speling in Apache in Debian / Ubuntu etc. debian based Linuxes is done with either creating symlink from /etc/apache2/mods-available/speling.load to /etc/apache2/mods-enabled/speling.load :
ln -sf /etc/apache2/mods-available/speling.load /etc/apache2/mods-enabled/speling.load
Or by using a2enmod – Debian apache module enabling script:
a2ensite sitename
To enable mod_speling mis-speling resolve feature config directive is:
CheckSpelling on
To disable case sensitivity – as I said earlier helpful for migrations from Microsoft Windows hosts to Linux, use directive:
CheckCaseOnly on
To enable both use:
<IfModule mod_speling.c>
CheckCaseOnly on
CheckSpelling on
</IfModule>
Enabling mod_speling case-insensitivity and fixing mistypes in URL could be done from .htaccess, for any <Directory> (vhost) with enabled .htaccess with
AllowOverride All
To enable it for default set host in new Apache install place it in /etc/apache2/apache2.conf and /etc/apache2/sites-enabled/000-default
Then as usual to make the configuration changes take affect, restart Apache:
/etc/init.d/apache2 restart
2. Enablig mod_speling on CentOS, RHEL and Fedora Linux
Most of RPM based Linux distributions have already mod_speling by default in Apache, so there will be no need to explicitly enable the module within HTTPD.
To check whether mod_speling is already enabled in httpd issue:
/usr/sbin/httpd -M |grep -i mod_speling
If you don't get no output from command this means the module is not enabled. This is the case with CentOS Linux 6.5 for example …
To enable mod_speling on Apache level add in /etc/httpd/conf/httpd.conf
LoadModule speling_module modules/mod_speling.so
and restart webserver
/etc/init.d/httpd restart
If you get instead
/usr/sbin/httpd -M |grep -i mod_speling
speling_module (shared)
Then it is already loaded in HTTPD to enable the module for default domain add to /etc/httpd/conf/httpd.conf – within (<Directory "/var/www/html">),
<IfModule mod_speling.c>
CheckCaseOnly on
CheckSpelling on
</IfModule>
Or if you want to make it active for specific directories within /var/www/html/whatever-dir use either new <Directory ..> directive within Apache config, or enable .htaccess processing with AllowOverride All and place them in .htaccess . For complete mod_speling reference check on Apache's official website
Create video from linux console / terminal – Record ssh terminal session as video with asciinema, showterm, termrecord
Thursday, August 21st, 2014 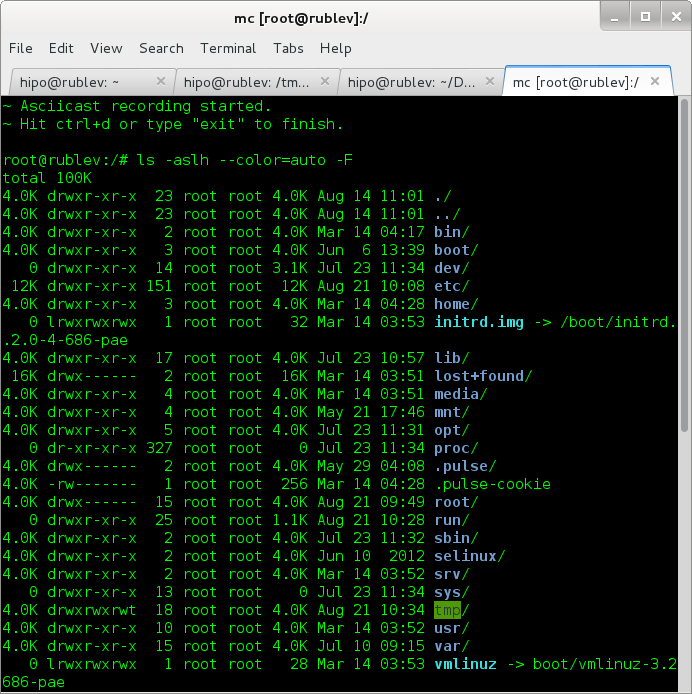
You probably already know of existence of two Linux commands available by default across all Linux distributions script – which makes a text based save of all commands executed on console and scriptreplay – which playbacks saved script command typescripts. Using this two you can save terminal sessions without problem, but in order to play them you need to have a Linux / UNIX computer at hand.
However If you want to make a short video record displaying what you have done on Linux console / terminal, you have few other options with which you can share your Linux terminal sessions on the web. In this short article I will go through 3 popular tools to do that – asciinema, showterm and termrecord.
1. Asciinema Current most popular tool to create video from Linux terminal
Here is how ASCIINEMA's website describes it:
"Asciinema is a free and open source solution for recording the terminal sessions and sharing them on the web."
apt-get –yes install python-pip
To install it with pip – python package installer
pip install asciinema
Or if the machine is in DMZ secured zone and have access to the internet over a Proxy:
pip install –proxy=http://internet-proxy-host.com:8080 asciinema
It will get installed in /usr/local/bin/asciinema to make a terminal screen video capture just launch it (nomatter if it is privileged or non-privileged user):
asciinema
To finalize and upload the recorded terminal session, just type exit (to exit the shell), hopefully it will get you an upload link.
exit
You can claim authorship on video you issue:
asciinema auth
Use can then embed the new Linux terminal session video to your website.
2. ShowTerm – "It's showtime in a terminal near you!"
ShowTerm have same features as AsciiNema. Just like AsciiNema, what it does is it creates a record of your terminal session and then uploads it to showterm.io website, providing you a link over which you can share your terminal lesson / ascii art video / whatever with your friends. ShowTerm is written in, the world famous Ruby on Rails – ruby web development framework, so you will need to have ruby programming language installed before use. As showterm uses the Internet to upload video, so it is not really an option to create videos from remote terminal session on servers which are in DMZ with no access to the internet, I will explain in a little while how to create video of your terminal / console for private purpose on local server and then share it online on your own site.
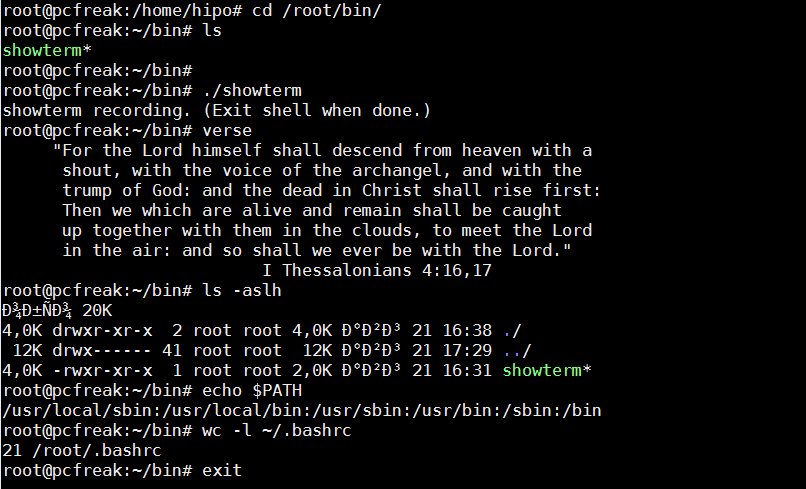
a) To install ShowTerm:
– First be sure to have ruby installed:
On Debian / Ubuntu and derives deb Linux, as supersuser:
apt-get install –yes ruby curl
On CentOS / RHEL / Fedora Linux
yum -y install ruby curl
NB! curl is real requirement but as showterm.io website recommends downloading the script with it and later same curl tool is used to upload the created showterm file to http://showterm.io .
– Then to finalize install, download showterm script and make it executable
curl showterm.io/showterm > ~/bin/showterm
% Total % Received % Xferd Average Speed Time Time Time Current
Dload Upload Total Spent Left Speed
100 2007 100 2007 0 0 2908 0 –:–:– –:–:– –:–:– 8468
mkdir ~/bin
chmod +x ~/bin/showterm
This will save the script into your home folder ~/bin/showterm
b) Using showterm
To run it to create video from your terminal simply start it and do whatver you will in terminal.
~/bin/showterm
After you're done with the video you like type exit
exit
Note that if your server is behind a proxy curl will not understand proxy set inside Linux shell variable with http_proxy var, to upload the file if you're behind a proxy you will have to pass to curl –proxy setting, once you get the curl line invoked after failure to upload use something like:
curl –proxy $(echo $http_proxy) https://showterm.herokuapp.com/scripts –data-urlencode cols=80 –data-urlencode lines=24 –data-urlencode scriptfile@/tmp/yCudk.script –data-urlencode timingfile@/tmp/lkiXP.timing
Where assuming proxy is defined already inside http_proxy shell variable.
3. Creating video from your terminal / console on Linux for local (private) use with TermRecord
In my humble view TermRecord is the most awesome of all the 3, as it allows you to make records with an own generated Javascript based video player and allows you to keep the videos on your own side, guaranteeing you independence of external services. Its
pip install TermRecord
TermRecord -o /tmp/session.html
You can further access the video in a local browser in Firefox / Chrome / Epiphany type in URL address bar:
/tmp/session.html to play the video
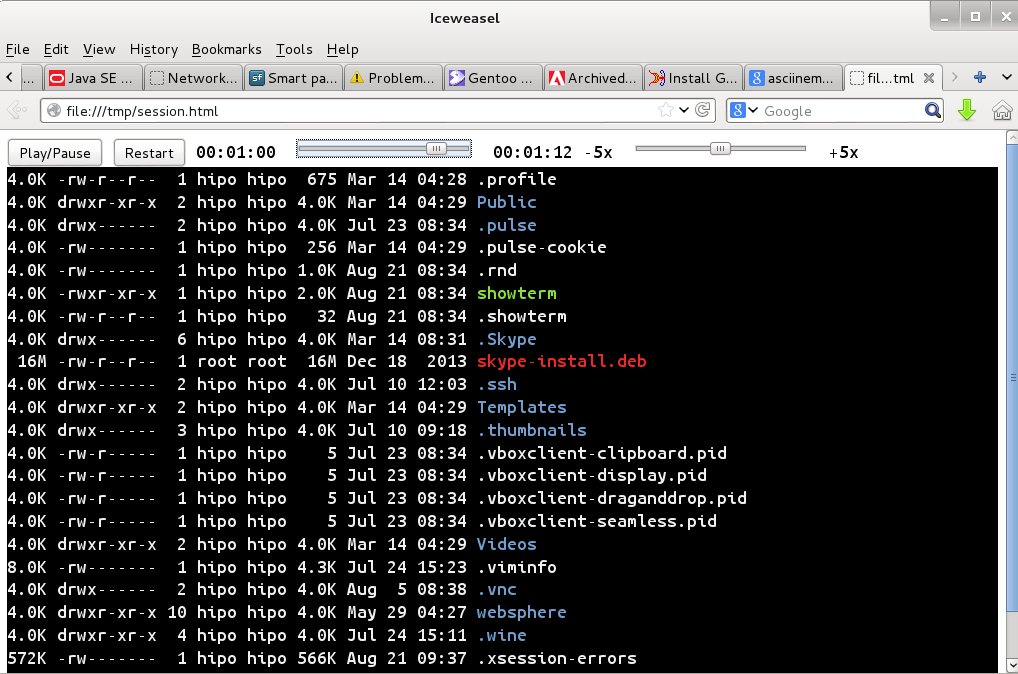
TermRecord uses term.js javascript to create the video web player and play the video which is directly encoded inside session.html.
If you want to share the video online, place it on your webserver and you're done 🙂
Check out my TermRecord generated video terminal sample session here.
Disable annoying ads on Youtube in Firefox and Google Chrome – Adblock Plus
Monday, November 17th, 2014

I'm not an Youtube addict but every now and then to kill some time I watch videos there usually this is 10 to 20 videos a day. Over the last few months, I've noticed Youtube video Adsense ads has increased dramatically and this is seriously breaking the overall user-experience one gets when watching videos.
Thus finally I decided to get rid of the ads and to prevent the annoyance, i've seen a hack on LifeHacker claiming to disable Youtube Ads with Javascript setting, I've tested this one but probably since 2013 when the hack was working Youtube updated, there player Ads inclusion algorithm and this Adus removal tip no longer works.

Thanksfully there is an easy way to achieve that with no need for crytic commands in through developers by using the good old Adblock Plus Browser extension which besides of capable of removing standard Adsense Advertisements (showing up on almost every webpage on the internet) also removes Adsense Advertisements "embedded" into Youtube Videos is a generally one of the few recommended plugins to increase your browser security.
Installation of Adblockplus 2 is done directly from plugin website for both Firefox and Google Chrome, just click on Install button and you're done.
You don't need to do any post-configuration of Adblockplus even though for those who like to finely tune on any custom website White / Blacklisting.


Remove URL from comments in WordPress Blogs and Websites to mitigate comment spam URLs in pages
Friday, February 20th, 2015If you're running a WordPress blog or Website where you have enabled comments for a page and your article or page is well indexing in Google (receives a lot of visit / reads ) daily, your site posts (comments) section is surely to quickly fill in with a lot of "Thank you" and non-sense Spam comments containing an ugly link to an external SPAM or Phishing website.
Such URL links with non-sense message is a favourite way for SPAMmers to raise their website incoming (other website) "InLinks" and through that increase current Search Engine position.
We all know a lot of comments SPAM is generally handled well by Akismet but unfortunately still many of such spam comments fail to be identified as Spam because spam Bots (text-generator algorithms) becomes more and more sophisticated with time, also you can never stop paid a real-persons Marketers to spam you with a smart crafted messages to increase their site's SEO ).
In all those cases Akismet WP (Anti-Spam) plugin – which btw is among the first "must have" WP extensions to install on a new blog / website will be not enough ..
To fight with worsening SEO because of spam URLs and to keep your site's SEO better (having a lot of links pointing to reported spam sites will reduce your overall SEO Index Rate) many WordPress based bloggers, choose to not use default WordPress Comments capabilities – e.g. use exnternal commenting systems such as Disqus – (Web Community of Communities), IntenseDebate, LiveFyre, Vicomi …
However as Disqus and other 3rd party commenting systems are proprietary software (you don't have access to comments data as comments are kept on proprietary platform and shown from there), I don't personally recommend (or use) those ones, yes Disqus, Google+, Facebook and other comment external sources can have a positive impact on your SEO but that's temporary event and on the long run I think it is more advantageous to have comments with yourself.
A small note for people using Disqos and Facebook as comment platforms – (just imagine if Disqos or Facebook bankrupts in future, where your comments will be? 🙂 )
So assuming that you're a novice blogger and I succeeded convincing you to stick to standard (embedded) WordPress Comment System once your site becomes famous you will start getting severe amount of comment spam. There is plenty of articles already written on how to remove URL comment form spam in WordPress but many of the guides online are old or obsolete so in this article I will do a short evaluation on few things I tried to remove comment spam and how I finally managed to disable URL link spam to appear on site.
1. Hide Comment Author Link (Hide-wp-comment-author-link)
This plugin is the best one I found and I started using it since yesterday, I warmly recommend this plugin because its very easy, Download, Unzip, Activate and there you're anything typed in URL field will no longer appear in Posts (note that the URL field will stay so if you want to keep track on person's input URL you can get still see it in Wp-Admin). I'm using default WordPress WRC (Kubrick), but I guess in most newer wordpress plugins is supposed to work. If you test it on another theme please drop a comment to inform whether works for you. Hide Comment Author Link works on current latest Wordpress 4.1 websites.
A similar plugin to hide-wp-author-link that works and you can use is Hide-n-Disable-comment-url-field, I tested this one but for some reason I couldn't make it work.
Whatever I type in Website field in above form, this is wiped out of comment once submitted 🙂
2. Disable hide Comment URL (disable-hide-comment-url)
I've seen reports disable-hide-comment-url works on WordPress 3.9.1, but it didn't worked for me, also the plugin is old and seems no longer maintaned (its last update was 3.5 years ago), if it works for you please please drop in comment your WP version, on WP 4.1 it is not working.
3. WordPress Anti-Spam plugin
WordPress Anti-Spam plugin is a very useful addition plugin to install next to Akismet. The plugin is great if you don't want to remove commenter URL to show in the post but want to cut a lot of the annoying Spam Robots crawling ur site.
Anti-spam plugin blocks spam in comments automatically, invisibly for users and for admins.
Plugin is easy to use: just install it and it just works.
Anti bot works fine on WP 4.1
4. Stop Spam Comments
Stop Spam Comments is:
Stop Spam Comments works fine on WP 4.1.
I've mentioned few of the plugins which can help you solve the problem, but as there are a lot of anti-spam URL plugins available for WP its up to you to test and see what fits you best. If you know or use some other method to protect yourself from Comment Url Spam to share it please.
Import thing to note is it usually a bad idea to mix up different anti-spam plugins so don't enable both Stop Spam Comments and WordPress Anti Spam plugin.
5. Comment Form Remove Url field Manually
This (Liberian) South) African blog describes a way how to remove URL field URL manually
In short to Remove Url Comment Field manually either edit function.php (if you have Shell SSH access) or if not do it via Wp-Admin web interface:
Paste at the end of file following PHP code:
Now to make changes effect, Restart Apache / Nginx Webserver and clean any cache if you're using a plugin like W3 Total Cache plugin etc.
Other good posts describing some manual and embedded WordPress ways to reduce / stop comment spam is here and here, however as it comes to my blog, none of the described manual (code hack) ways I found worked on WordPress v. 4.1.
Thus I personally stuck to using Hide and Disable Comment URL plugin to get rid of comment website URL.
Tags: article, bloggers, btw, data, interface, lot, page, php, platform, problem, running, Search Engine, SEO, spam, Spam Robots, Stop Spam Comments, theme, URLs, use, website, Wordpress Comments, wordpress plugins, wp
Posted in Curious Facts, Various, Web and CMS, Wordpress | 2 Comments »