Posts Tagged ‘script’

How to check who is flooding your Apache, NGinx Webserver – Real time Monitor statistics about IPs doing most URL requests and Stopping DoS attacks with Fail2Ban

Wednesday, August 20th, 2014

check-who-is-flooding-your-apache-nginx-webserver-real-time-monitoring-ips-doing-most-url-requests-to-webserver-and-protecting-your-webserver-with-fail2ban

If you're Linux ystem administrator in Webhosting company providing WordPress / Joomla / Drupal web-sites hosting and your UNIX servers suffer from periodic denial of service attacks, because some of the site customers business is a target of competitor company who is trying to ruin your client business sites through DoS or DDOS attacks, then the best thing you can do is to identify who and how is the Linux server being hammered. If you find out DoS is not on a network level but Apache gets crashing because of memory leaks and connections to Apache are so much that the CPU is being stoned, the best thing to do is to check which IP addresses are causing the excessive GET / POST / HEAD requests in logged.
 

There is the Apachetop tool that can give you the most accessed webserver URLs in a refreshed screen like UNIX top command, however Apachetop does not show which IP does most URL hits on Apache / Nginx webserver. 


1. Get basic information on which IPs accesses Apache / Nginx the most using shell cmds


Before examining the Webserver logs it is useful to get a general picture on who is flooding you on a TCP / IP network level, with netstat like so:
 

# here is howto check clients count connected to your server
netstat -ntu | awk '{print $5}' | cut -d: -f1 | sort | uniq -c | sort -n


If you get an extensive number of connected various IPs / hosts (like 10000 or something huge as a number), depending on the type of hardware the server is running and the previous scaling planned for the system you can determine whether the count as huge as this can be handled normally by server, if like in most cases the server is planned to serve a couple of hundreds or thousands of clients and you get over 10000 connections hanging, then your server is under attack or if its Internet server suddenly your website become famous like someone posted an article on some major website and you suddenly received a tons of hits.


There is a way using standard shell tools, to get some basic information on which IP accesses the webserver the most with:

tail -n 500 /var/log/apache2/access.log | cut -d' ' -f1 | sort | uniq -c | sort -gr

Or if you want to keep it refreshing periodically every few seconds run it through watch command:

watch "tail -n 500 /var/log/apache2/access.log | cut -d' ' -f1 | sort | uniq -c | sort -gr"

monioring-access-hits-to-webserver-by-ip-show-most-visiting-apache-nginx-ip-with-shell-tools-tail-cut-uniq-sort-tools-refreshed-with-watch-cmd


Another useful combination of shell commands is to Monitor POST / GET / HEAD requests number in access.log :
 

 awk '{print $6}' access.log | sort | uniq -c | sort -n

     1 "alihack<%eval
      1 "CONNECT
      1 "fhxeaxb0xeex97x0fxe2-x19Fx87xd1xa0x9axf5x^xd0x125x0fx88x19"x84xc1xb3^v2xe9xpx98`X'dxcd.7ix8fx8fxd6_xcdx834x0c"
      1 "x16x03x01"
      1 "xe2
      2 "mgmanager&file=imgmanager&version=1576&cid=20
      6 "4–"
      7 "PUT
     22 "–"
     22 "OPTIONS
     38 "PROPFIND
   1476 "HEAD
   1539 "-"
  65113 "POST
 537122 "GET


However using shell commands combination is plenty of typing and hard to remember, plus above tools does not show you, approximately how frequenty IP hits the webserver


2. Real-time monitoring IP addresses with highest URL reqests with logtop


Real-time monitoring on IP addresses with highest URL requests is possible with no need of "console ninja skills"  through – logtop.


2.1 Install logtop on Debian / Ubuntu and deb derivatives Linux


a) Installing Logtop the debian way

LogTop is easily installable on Debian and Ubuntu in newer releases of Debian – Debian 7.0 and Ubuntu 13/14 Linux it is part of default package repositories and can be straightly apt-get-ed with:

apt-get install –yes logtop

b) Installing Logtop from source code (install on older deb based Linuxes)

On older Debian – Debian 6 and Ubuntu 7-12 servers to install logtop compile from source code – read the README installation instructions or if lazy copy / paste below:

cd /usr/local/src
wget https://github.com/JulienPalard/logtop/tarball/master
mv master JulienPalard-logtop.tar.gz
tar -zxf JulienPalard-logtop.tar.gz

cd JulienPalard-logtop-*/
aptitude install libncurses5-dev uthash-dev

aptitude install python-dev swig

make python-module

python setup.py install

make

make install


mkdir -p /usr/bin/
cp logtop /usr/bin/


2.2 Install Logtop on CentOS 6.5 / 7.0 / Fedora / RHEL and rest of RPM based Linux-es

b) Install logtop on CentOS 6.5 and CentOS 7 Linux

– For CentOS 6.5 you need to rpm install epel-release-6-8.noarch.rpm
 

wget http://dl.fedoraproject.org/pub/epel/6/x86_64/epel-release-6-8.noarch.rpm
rpm -ivh epel-release-6-8.noarch.rpm
links http://dl.fedoraproject.org/pub/epel/6/SRPMS/uthash-1.9.9-6.el6.src.rpm
rpmbuild –rebuild
uthash-1.9.9-6.el6.src.rpm
cd /root/rpmbuild/RPMS/noarch
rpm -ivh uthash-devel-1.9.9-6.el6.noarch.rpm


– For CentOS 7 you need to rpm install epel-release-7-0.2.noarch.rpm


links http://download.fedoraproject.org/pub/epel/beta/7/x86_64/repoview/epel-release.html
 

Click on and download epel-release-7-0.2.noarch.rpm

rpm -ivh epel-release-7-0.2.noarch
rpm –import /etc/pki/rpm-gpg/RPM-GPG-KEY-EPEL-7
yum -y install git ncurses-devel uthash-devel
git clone https://github.com/JulienPalard/logtop.git
cd logtop
make
make install


2.3 Some Logtop use examples and short explanation


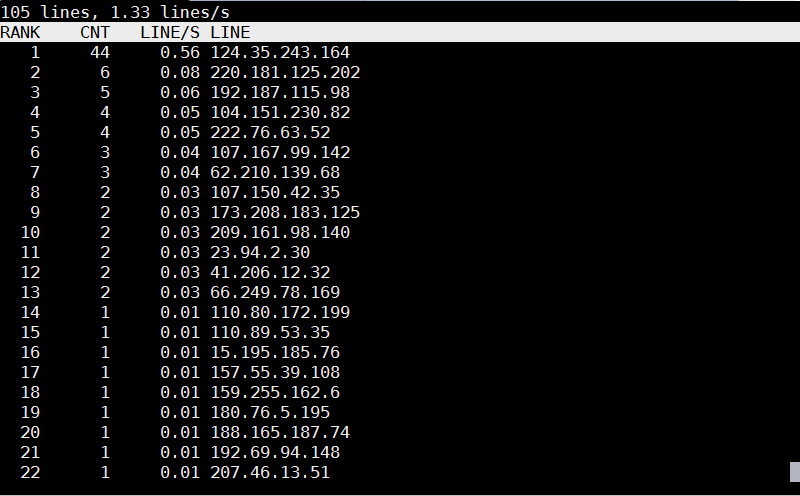
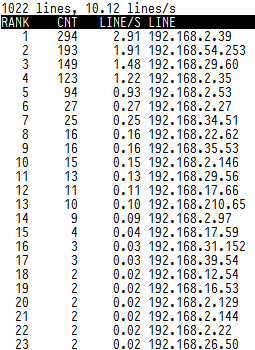
logtop shows 4 columns as follows – Line number, Count, Frequency, and Actual line


The quickest way to visualize which IP is stoning your Apache / Nginx webserver on Debian?


tail -f access.log | awk {'print $1; fflush();'} | logtop


logtop-check-which-ip-is-making-most-requests-to-your-apache-nginx-webserver-linux-screenshot

On CentOS / RHEL

tail -f /var/log/httpd/access_log | awk {'print $1; fflush();'} | logtop


Using LogTop even Squid Proxy caching server access.log can be monitored.
To get squid Top users by IP listed:


tail -f /var/log/squid/access.log | awk {'print $1; fflush();'} | logtop


logtop-visualizing-top-users-using-squid-proxy-cache
 

Or you might visualize in real-time squid cache top requested URLs
 

tail -f /var/log/squid/access.log | awk {'print $7; fflush();'} | logtop


visualizing-top-requested-urls-in-squid-proxy-cache-howto-screenshot


3. Automatically Filter IP addresses causing Apache / Nginx Webservices Denial of Service with fail2ban
 

Once you identify the problem if the sites hosted on server are target of Distributed DoS, probably your best thing to do is to use fail2ban to automatically filter (ban) IP addresses doing excessive queries to system services. Assuming that you have already installed fail2ban as explained in above link (On Debian / Ubuntu Linux) with:
 

apt-get install –yes fail2ban


To make fail2ban start filtering DoS attack IP addresses, you will have to set the following configurations:
 

vim /etc/fail2ban/jail.conf


Paste in file:
 

[http-get-dos]
 
enabled = true
port = http,https
filter = http-get-dos
logpath = /var/log/apache2/WEB_SERVER-access.log
# maxretry is how many GETs we can have in the findtime period before getting narky
maxretry = 300
# findtime is the time period in seconds in which we're counting "retries" (300 seconds = 5 mins)
findtime = 300
# bantime is how long we should drop incoming GET requests for a given IP for, in this case it's 5 minutes
bantime = 300
action = iptables[name=HTTP, port=http, protocol=tcp]


Before you paste make sure you put the proper logpath = location of webserver (default one is /var/log/apache2/access.log), if you're using multiple logs for each and every of hosted websites, you will probably want to write a script to automatically loop through all logs directory get log file names and automatically add auto-modified version of above [http-get-dos] configuration. Also configure maxtretry per IP, findtime and bantime, in above example values are a bit low and for heavy loaded websites which has to serve thousands of simultaneous connections originating from office networks using Network address translation (NAT), this might be low and tuned to prevent situations, where even the customer of yours can't access there websites 🙂

To finalize fail2ban configuration, you have to create fail2ban filter file:

vim /etc/fail2ban/filters.d/http-get-dos.conf


Paste:
 

# Fail2Ban configuration file
#
# Author: http://www.go2linux.org
#
[Definition]
 
# Option: failregex
# Note: This regex will match any GET entry in your logs, so basically all valid and not valid entries are a match.
# You should set up in the jail.conf file, the maxretry and findtime carefully in order to avoid false positives.
 
failregex = ^<HOST> -.*"(GET|POST).*
 
# Option: ignoreregex
# Notes.: regex to ignore. If this regex matches, the line is ignored.
# Values: TEXT
#
ignoreregex =


To make fail2ban load new created configs restart it:
 

/etc/init.d/fail2ban restart


If you want to test whether it is working you can use Apache webserver Benchmark tools such as ab or siege.
The quickest way to test, whether excessive IP requests get filtered – and make your IP banned temporary:
 

ab -n 1000 -c 20 http://your-web-site-dot-com/

This will make 1000 page loads in 20 concurrent connections and will add your IP to temporary be banned for (300 seconds) = 5 minutes. The ban will be logged in /var/log/fail2ban.log, there you will get smth like:

2014-08-20 10:40:11,943 fail2ban.actions: WARNING [http-get-dos] Ban 192.168.100.5
2013-08-20 10:44:12,341 fail2ban.actions: WARNING [http-get-dos] Unban 192.168.100.5

Install simscan on Qmail for better Mail server performance and get around unexisting suid perl in newer Linux Debian / Ubuntu servers

Tuesday, August 18th, 2015

qmail-fixing-clamdscan-errors-and-qq-errors-qmail-binary-migration-few-things-to-check-outclamav_logo-installing-clamav-antivirus-to-scan-periodically-debian-server-websites-for-viruses

I've been stuck with qmail-scanner-queue for a while on each and every new Qmail Mail server installation, I've done, this time it was not different but as time evolves and Qmail and Qmail Scanner Wrapper are not regularly updated it is getting, harder and harder to make a fully functional Qmail on newer Linux server distribution releases.

I know many would argue QMAIL is already obsolete but still I have plenty of old servers running QMAIL whose migration might cause more troubles than just continuing to use QMAIL. Moreover QMAIL once set-upped works like a charm.

I've been recently experiencing severe issues with clamdscan errors and I tried to work around this with compiling and using a suid wrapper, however still the clamdscan errors continued and as qmail-scanner is not actively developed and it is much slower than simscan, I've finally decided to give simscan as a mean to fix the clamdscan errors and thanksfully this worked as a solution.

Here is what I did "rawly" to make simscan work on this install:
 

Make sure simscan is properly installed on Debian Linux 7 or Ubuntu servers and probably (should work) on other Deb based Linuxes by following below steps:
 

a) Configure simscan with following compile time options as root (superuser)

./configure \
–enable-user=qscand \
–enable-clamav \
–enable-clamdscan=/usr/local/bin/clamdscan \
–enable-custom-smtp-reject=y \
–enable-per-domain=y \
–enable-attach=y \
–enable-dropmsg=n \
–enable-spam=y \
–enable-spam-hits=5 \
–enable-spam-passthru=y \
–enable-qmail-queue=/var/qmail/bin/qmail-queue \
–enable-ripmime=/usr/local/bin/ripmime \
–enable-sigtool-path=/usr/local/bin/sigtool \
–enable-received=y


b) Compile it


 make && make install-strip

c) Fix any wrong permissions of simscan queue directory


chmod g+s /var/qmail/simscan/

chown -R qscand:qscand /var/qmail/simscan/
chmod -R 777 simscan/chown -R qscand:qscand simscan/
chown -R qscand:qscand simscan/

d) Add some additional simscan options (how simscan is how to perform scans)

The restart qmail to make mailserver start using simscan instead of qmail-scanner, run below command (again as root):

echo ":clam=yes,spam=yes,spam_hits=8.5,attach=.vbs:.lnk:.scr:.wsh:.hta:.pif" > /var/qmail/control/simcontrol


e) Run /var/qmail/bin/simscanmk in order to convert /var/qmail/control/simcontrol into the /var/qmail/control/simcontrol.cdb database

/var/qmail/bin/simscanmk
/var/qmail/bin/simscanmk -g

f) Modify /service/qmail-smtpd/run to set simscan to be default Antivirus Wrapper Scanner

vim /service/qmail-smtpd/run

I'm using thibs's run script so I've uncommented the line there:

QMAILQUEUE="$VQ/bin/simscan"

Below two lines should stay commented as qmail-scanner is no longer used:

##QMAILQUEUE="$VQ/bin/qmail-scanner-queue"
##QMAILQUEUE="$VQ/bin/qmail-scanner-queue.pl"
export QMAILQUEUE

qmailctl restart
* Stopping qmail-smtpdssl.
* Stopping qmail-smtpd.
* Sending qmail-send SIGTERM and restarting.
* Restarting qmail-smtpd.
* Restarting qmail-smtpdssl.

g) Test whether simscan is properly sending / receiving emails:

echo "Testing Email" >> /tmp/mailtest.txt
env QMAILQUEUE=/var/qmail/bin/simscan SIMSCAN_DEBUG=3 /var/qmail/bin/qmail-inject hipo@my-mailserver.com < /tmp/mailtest.txt

Besides that as I'm using qscand:qscand as a user for my overall Qmail Thibs install I had to also do:

chown -R qscand:qscand /var/qmail/simscan/
chmod -R 777 simscan/
chown -R qscand:qscand simscan/


It might be a good idea to also place that lines in /etc/rc.local to auto change permissions on Linux boot, just in case something wents wrong with permissions.

Yeah, I know 777 is unsecure but without this permissions, I was still getting errors, plus the server doesn't have any accounts except the administrator, so I do not worry other system users might sniff on email 🙂

h) Test whether Qmail mail server send / receives fine with simscan

After that I've used another mail server with mail command to test whether mail is received:
 

mail -s "testing email1234" hipo@new-configured-qmail-server.com
asdfadsf
.
Cc:

Then it is necessery to also install latest clamav daemon from source in my case that's on Debian GNU / Linux 7, because somehow the Debian shipped binary version of clamav 0.98.5+dfsg-0+deb7u2 does fail to scan any incoming or outgoing email with error:
 

clamdscan: corrupt or unknown clamd scanner error or memory/resource/perms problem – exit status -1/72057594037927935

So to fix it you will have to install clamav on Debian Linux from source.


Voilla, that's all finally it worked !

How to Remove / Add SuSE Linux start service command

Thursday, July 2nd, 2015

opensuse-remove-add-new-service-geeko-suse-linux-mini-logo
If you happen to administer SUSE LINUX Enterprise Server 9 (x86_64) and you need to add or remove already existing /etc/init.d script or custom created Apache / Tomcat .. etc. service and you're already familiar with Fedora's / RHEL chkconfig, then the good news chkconfig is also available on SuSE and you can use in same way chkconfig to start / stop / enable / disable boot time services.

To list all available boot time init.d services use:
 

suse-linux:/etc # chkconfig –list


SuSEfirewall2_final       0:off  1:off  2:off  3:off  4:off  5:off  6:off
SuSEfirewall2_init        0:off  1:off  2:off  3:off  4:off  5:off  6:off
SuSEfirewall2_setup       0:off  1:off  2:off  3:off  4:off  5:off  6:off
Tivoli_lcfd1.bkp          0:off  1:off  2:off  3:off  4:off  5:off  6:off
activate_web_all          0:off  1:off  2:off  3:on   4:off  5:on   6:off
alsasound                 0:off  1:off  2:on   3:on   4:off  5:on   6:off
apache2                   0:off  1:off  2:off  3:off  4:off  5:off  6:off
apache2-eis               0:off  1:off  2:off  3:on   4:off  5:off  6:off
atd                       0:off  1:off  2:off  3:off  4:off  5:off  6:off
audit                     0:off  1:off  2:off  3:off  4:off  5:off  6:off
autofs                    0:off  1:off  2:off  3:off  4:off  5:off  6:off
autoyast                  0:off  1:off  2:off  3:off  4:off  5:off  6:off
boot.clock                0:off  1:off  2:off  3:off  4:off  5:off  6:off
boot.crypto               0:off  1:off  2:off  3:off  4:off  5:off  6:off
boot.device-mapper        0:off  1:off  2:off  3:off  4:off  5:off  6:off
boot.evms                 0:off  1:off  2:off  3:off  4:off  5:off  6:off
boot.idedma               0:off  1:off  2:off  3:off  4:off  5:off  6:off
boot.ipconfig             0:off  1:off  2:off  3:off  4:off  5:off  6:off
boot.isapnp               0:off  1:off  2:off  3:off  4:off  5:off  6:off
boot.klog                 0:off  1:off  2:off  3:off  4:off  5:off  6:off
boot.ldconfig             0:off  1:off  2:off  3:off  4:off  5:off  6:off
boot.loadmodules          0:off  1:off  2:off  3:off  4:off  5:off  6:off
boot.localfs              0:off  1:off  2:off  3:off  4:off  5:off  6:off
boot.localnet             0:off  1:off  2:off  3:off  4:off  5:off  6:off
boot.lvm                  0:off  1:off  2:off  3:off  4:off  5:off  6:off
boot.md                   0:off  1:off  2:off  3:off  4:off  5:off  6:off
boot.multipath            0:off  1:off  2:off  3:off  4:off  5:off  6:off
boot.proc                 0:off  1:off  2:off  3:off  4:off  5:off  6:off
boot.restore_permissions  0:off  1:off  2:off  3:off  4:off  5:off  6:off
boot.rootfsck             0:off  1:off  2:off  3:off  4:off  5:off  6:off
boot.sched                0:off  1:off  2:off  3:off  4:off  5:off  6:off
boot.scpm                 0:off  1:off  2:off  3:off  4:off  5:off  6:off
boot.scsidev              0:off  1:off  2:off  3:off  4:off  5:off  6:off
boot.shm                  0:off  1:off  2:off  3:off  4:off  5:off  6:off
boot.swap                 0:off  1:off  2:off  3:off  4:off  5:off  6:off
boot.sysctl               0:off  1:off  2:off  3:off  4:off  5:off  6:off
boot.udev                 0:off  1:off  2:off  3:off  4:off  5:off  6:off
coldplug                  0:off  1:on   2:on   3:on   4:off  5:on   6:off


To then stop the service:
 

suse-linux:/etc # chkconfig gtiweb off


If you prefer to do it the SuSE way and learn a bit more on SuSE boot time process check out:


suse-linux:/etc # man insserv


Removing already existing SuSE start-up script from init.d start up with insserv is done with:

suse-linux:/etc # cd /etc/init.d/
suse-linux:etc/init.d # insserv -r gtiweb
insserv: script ipmi.hp: service ipmidrv already provided!
insserv: script boot.multipath.2008-10-29: service boot.multipath already provided!


To install a new custom written and placed into /etc/inti.d/ on SuSE's server boot time with insserv:


suse-linux:/etc/init.d/ # insserv your_custom_script_name

Windows add / delete services command sc.exe create/delete – Create or Delete services

Thursday, April 9th, 2015

sc-exe-command-line-program-to-create-delete--service-start-stop-service-on-ms-windows
If you end up in situation where you need to delete or create services from current existing ones with a batch script because it is existing on multiple servers and you want to automate / deploy it via batch (.bat) script you will have to use sc.exe tool – Service Controller Command Tool

SC.EXE command  is standard windows console tool to create and delete services. If you want to create a new service, you can use the "create" parameter.

1. Deleting Service with Windows Service Controller Tool

Deleting service is very easy to do you just have to know the service you like to remove not to be listed or Automatically start

sc delete SERVICE_NAME_TO_BE_REMOVED


Below is a real time example on how to remove Apache webserver configured to auto-start


sc.exe delete ApacheService

[SC] DeleteService SUCCESS

2. Create / Add service to existing to auto start on Windows

Before running sc.exe create command with arguments for service you will need to know following info:

  • What will be the Service Name: A single word to name the new service.
  • Full Binary Path: The path name where the executable program for new service is currently located.
  • Dispaly Name for service: A short name for the new service.


C:\Windows>sc.exe create ApacheService 
   binPath= "C:\local\apache\bin\httpd.exe -k runservice" 
   DisplayName= "Apache Server"


[SC] CreateService SUCCESS


Once service is added to be showing in services.msc GUI  you can start the newly added Apache service with:


C:\Windows>sc.exe start ApacheService


SERVICE_NAME: ApacheService
   TYPE               : 10  WIN32_OWN_PROCESS
   STATE              : 2  START_PENDING
                      (NOT_STOPPABLE,NOT_PAUSABLE,IGNORES_SHUTDOWN)
   WIN32_EXIT_CODE    : 0  (0x0)
   SERVICE_EXIT_CODE  : 0  (0x0)
   CHECKPOINT         : 0x2
   WAIT_HINT          : 0x7530
   PID                : 2552
   FLAGS              :


To stop the ApacheService or any other service:


C:\Windows>sc.exe stop ApacheService

SERVICE_NAME: ApacheService
   TYPE               : 10  WIN32_OWN_PROCESS
   STATE              : 3  STOP_PENDING
                      (NOT_STOPPABLE,NOT_PAUSABLE,IGNORES_SHUTDOWN)
   WIN32_EXIT_CODE    : 0  (0x0)
   SERVICE_EXIT_CODE  : 0  (0x0)
   CHECKPOINT         : 0x4
   WAIT_HINT          : 0x7530


To get the status of a running service lets say the recently ran ApacheService:

C:\Windows>sc.exe query ApacheService


SERVICE_NAME: ApacheService
   TYPE               : 10  WIN32_OWN_PROCESS
   STATE              : 4  RUNNING
                      (STOPPABLE,NOT_PAUSABLE,IGNORES_SHUTDOWN)
   WIN32_EXIT_CODE    : 0  (0x0)
   SERVICE_EXIT_CODE  : 0  (0x0)
   CHECKPOINT         : 0x0
   WAIT_HINT          : 0x0


As you see from above output the STATE of service is RUNNING. If Apache Webserver was not running you will get an error like:

[SC] EnumQueryServicesStatus:OpenService FAILED 1060:
The specified service does not exist as an installed service.


Enjoy sc-ing 🙂

Weblogic – How to change / remove IP/hostname quick and dirty howto

Wednesday, March 11th, 2015

Oracle-Weblogic-Server-logo-how-to-change-ip-hostname-weblogic-quick-and-dirty-howto

This is just quick & dirty doc on how to change/remove IP/host on Oracle WebLogic Application server

– In logs the Error message will be message like:


<Oct 21, 2013 1:06:51 AM SGT> <Warning> <Security> <BEA-090504> <Certificate chain received from cluster2.yourdomain.com – 192.168.1.41 failed hostname verification check. Certificate contained cluster1.yourdomain.com but check expected cluster2.yourdomain.com>


Solution:

On web console – change/remove IP/hostname


As root / admin supersuser:


– Stop Weblogic Webserver 

As this is RHEL Linux, to stop WLS use standard init script start / stop service command


service wls stop


– As Application user create directory where new key will be created


mkdir /home/uwls11pp/tmp_key
cd /home/uwls11pp/tmp_key


– Make backup of current JKS (Keystore File)


cp /WLS/app/oracle/wls1036/wlserver_10.3/server/lib/DemoIdentity.jks /WLS/app/oracle/wls1036/wlserver_10.3/server/lib/DemoIdentity.jks_11032015


– Execute set env . script


/WLS/app/oracle/wls1036/wlserver_10.3/server/bin/setWLSEnv.sh


– Copy & paste output from script above and export variables


export CLASSPATH;
export PATH;


– Check old certificate in keystore


/WLS/app/oracle/jdk1.7.0_25/bin/keytool -list -v -keystore /WLS/app/oracle/wls1036/wlserver_10.3/server/lib/DemoIdentity.jks  -storepass DemoIdentityKeyStorePassPhrase


– Delete old Weblogic keystore JKS file


/WLS/app/oracle/jdk1.7.0_25/bin/keytool -delete -alias demoidentity -keystore /WLS/app/oracle/wls1036/wlserver_10.3/server/lib/DemoIdentity.jks -storepass DemoIdentityKeyStorePassPhrase


– Check wether proper Java version is used


java -version


– Get hostname from hosts file


cat /etc/hosts


#Replace weblogic1 with your FQDN (Fully Qualified Domain Name) – this step will create new certificate with new hostname


java utils.CertGen -cn weblogic1 -keyfilepass DemoIdentityPassPhrase -certfile newcert -keyfile newkey


#Import certificate to “official” keystore


java utils.ImportPrivateKey -keystore /WLS/app/oracle/wls1036/wlserver_10.3/server/lib/DemoIdentity.jks -storepass DemoIdentityKeyStorePassPhrase -keyfile newkey.pem -keyfilepass DemoIdentityPassPhrase -certfile newcert.pem -alias demoidentity


#Recheck once again if correct certificate is in use


/WLS/app/oracle/jdk1.7.0_25/bin/keytool -list -v -keystore /WLS/app/oracle/wls1036/wlserver_10.3/server/lib/DemoIdentity.jks  -storepass DemoIdentityKeyStorePassPhrase


– Finally issue as root user restart Weblogic server again


service wls start

How to SSH client Login to server with password provided from command line as a script argument – Running same commands to many Linux servers

Friday, March 6th, 2015

ssh-how-to-login-with-password-provided-from-command-line-use-sshpass-to-run-same-command-to-forest-of-linux-servers

Usually admins like me who casuanlly need to administer "forests" (thousands of identicallyconfigured services Linux servers) are generating and using RSA / DSA key authentication for passwordless login, however this is not always possible as some client environments does prohibit the use of RSA / DSA non-pass authentication, thus in such environments to make routine server basic package rpm / deb upgrades or do other maintanance patching its necessery to use normal ssh user / pass login but as ssh client doesn't allow password to be provided from prompt for security reasons and therefore using some custom bash loop to issue single command to many servers (such as explained in my previous article) requires you to copy / paste password on password prompt multiple times. This works its pretty annoying so if you want to run single command on all your 500 servers with specifying the password from password prompt use sshpass tool (for non-interactive ssh password auth).

SSHPASS official site description:
 

sshpass is a utility designed for running ssh using the mode referred to as "keyboard-interactive" password authentication, but in non-interactive mode.


Install sshpass on Debian / Ubuntu (deb based) Linux

sshpass is installable right out of regular repositories so to install run:
 

apt-get install —yes sshpass


Install sshpass on CentOS / Fedora (RPM based) Linux


sshpass is available also across most RPM based distros too so just use yum package manager


yum -y install sshpass


If its not available across standard RPM distro provided repositories, there should be RPM on the net for distro just download latest one and use wget and rpm to install:

 wget -q http://dl.fedoraproject.org/pub/epel/6/x86_64/sshpass-1.05-1.el6.x86_64.rpm

 rpm -ivh sshpass-1.05-1.el6.x86_64.rpm


How Does SshPass Works?


Normally openssh (ssh) client binary uses direct TTY (/dev/tty)= an abbreviation for PhyTeleTYpewriter or (the admin jargon call Physical Console access)  instead of standard remotely defined /dev/ptsVirtual PTY.
To get around this Sshpass runs ssh in a dedicated TTY to emulate the password is indeed issues by interactive keyboard user thus  fooling remote sshd server to thinking password
is provided by interactive user.


SSHPass use

Very basic standard use which allows you to pass the password from command line is like this:
 

sshpass -p 'Your_Password_Goes_here123' ssh username@server.your-server.com


Note that the server you're working is shared with other developers they might be able to steal your username / password by using a simple process list command such as:
 

 ps auxwwef


In my case security is not a hot issue, as I'm the only user on the server (and only concern might be if someone hacks into the server 🙂 


Then assuming that you have a plain text file with all your administered servers, you can easily use sshpass in a Bash Script loop in order to run, lets say a package upgrade across all identical Linux version machines:
 

while read line; do
sshpass -p 'Your_Password_Goes_here123' ssh username@$line "apt-get update && apt-get upgrade && apt-get dist-upgrade" < /dev/null;
done < all_servers_list.txt

Change the command you like to issue across all machines with the string "apt-get …"
Above command can be used to keep up2date all Debian stable server packages. What you will do on servers is up to your imaginations, very common use of above line would be if you want to see uptime /netstat command output across all your network servers.


while read line; do
sshpass -p 'Your_Password_Goes_here123' ssh username@$line "uptime; who; netstat -tunlp; " < /dev/null;
done < all_servers_list.txt


As you can guess SshPass is swiss army knife tool for admins whoneed to automate things with scripts simultaneously across number of servers.
 

Happy SSH-ing 🙂


How to install nginx webserver from source on Debian Linux / Install Latest Nginx on Debian

Wednesday, March 23rd, 2011

Nginx install server logo
If you're running a large website consisting of a mixture of php scripts, images and html. You probably have noticed that using just one Apache server to serve all the content is not that efficient

Each Apache child (I assume you're using Apache mpm prefork consumes approximately (20MB), this means that each client connection would consume 20 mb of your server memory.
This as you can imagine is truly a suicide in terms of memory. Each request for a picture, css or simple html file would ask Apache to fork another process and will consume (20mb of extra memory form your server mem capacity)!.

Taking in consideration all this notes and the need for some efficiency here, the administrator should normally think about dividing the processing of the so called static content from the dynamic content served on the server.

Apache is really a nice webserver software but with all the loaded modules to serve dynamic content, for instance php, cgi, python etc., it's becoming not the best solution for handling a (css, javascript, html, flv, avi, mov etc. files).

Even a plain Apache server installation without (libphp, mod_rewrite mod deflate etc.) is still not dealing efficiently enough with the aforementioned static files content

Here comes the question if Apache is not that quick and efficient in serving static files, what then? The answer is caching webserver! By caching the regular static content files, your website visitors will benefit by experiencing shorter webserver responce files in downloading static contents and therefore will generally hasten your website and improve the end user's experience.

There are plenty of caching servers out there, some are a proprietary software and some are free software.

However the three most popular servers out there for static file content serving are:

  • Squid,
  • Varnish
  • Nginx

In this article as you should have already found out by the article title I'll discuss Nginx

You might ask why exactly Nginx and not some of the other twos, well simply cause Squid is too complicated to configure and on the other hand does provide lower performance than Nginx. On the other hand Varnish is also a good solution for static file webserver, but I believe it is not tested enough. However I should mention that my experience with testing varnish on my own home router is quite good by so far.

If you're further interested into varhisn cache I would suggest you checkout www.varhisn-cache.org .

Now as I have said a few words about squid and varhisn let's proceed to the essence of the article and say few words about nginx

Here is a quote describing nginx in a short and good manner directly extracted from nginx.com

nginx [engine x] is a HTTP and reverse proxy server, as well as a mail proxy server written by Igor Sysoev. It has been running for more than five years on many heavily loaded Russian sites including Rambler (RamblerMedia.com). According to Netcraft nginx served or proxied 4.70% busiest sites in April 2010. Here are some of success stories: FastMail.FM, WordPress.com.

By default nginx is available ready to be installed in Debian via apt-get, however sadly enough the version available for install is pretty much outdated as of time of writting the nginx debian version in lenny's deb package repositories is 0.6.32-3+lenny3

This version was release about 2 years ago and is currently completely outdated, therefore I found it is not a good idea to use this old and probably slower release of nginx and I jumped further to install my nginx from source:
Nginx source installation actually is very simple on Linux platforms.

1. As a first step in order to be able to succeed with the install from source make sure your system you have installed the packages:

debian:~# apt-get install libpcre3 libpcre3-dev libpcrecpp0 libssl-dev zlib1g-dev build-essential

2. Secondly download latest nginx source code tarball

Check out on http://nginx.com/download the latest stable release of nginx and further issue the commands below:

debian:~# cd /usr/local/src
debian:/usr/local/src# wget http://nginx.org/download/nginx-0.9.6.tar.gz

3.Unarchive nginx source code

debian:/usr/local/src#tar -zxvvf nginx-0.9.6.tar.gz
...

The nginx server requirements for me wasn't any special so I proceeded and used the nginx ./configure script which is found in nginx-0.9.6

4. Compline nginx server

debian:/usr/local/src# cd nginx-0.9.6
debian:/usr/local/src/nginx-0.9.6# ./configure && make && make install
+ Linux 2.6.26-2-amd64 x86_64
checking for C compiler ... found
+ using GNU C compiler
+ gcc version: 4.3.2 (Debian 4.3.2-1.1)
checking for gcc -pipe switch ... found
...
...

The last lines printed by the nginx configure script are actually the major interesting ones for administration purposes the default complation options in my case were:

Configuration summary
+ using system PCRE library
+ OpenSSL library is not used
+ md5: using system crypto library
+ sha1 library is not used
+ using system zlib library

nginx path prefix: "/usr/local/nginx"
nginx binary file: "/usr/local/nginx/sbin/nginx"
nginx configuration prefix: "/usr/local/nginx/conf"
nginx configuration file: "/usr/local/nginx/conf/nginx.conf"
nginx pid file: "/usr/local/nginx/logs/nginx.pid"
nginx error log file: "/usr/local/nginx/logs/error.log"
nginx http access log file: "/usr/local/nginx/logs/access.log"
nginx http client request body temporary files: "client_body_temp"
nginx http proxy temporary files: "proxy_temp"
nginx http fastcgi temporary files: "fastcgi_temp"
nginx http uwsgi temporary files: "uwsgi_temp"
nginx http scgi temporary files: "scgi_temp"

If you want to setup nginx server to support ssl (https) and for instance install nginx to a different server path you can use some ./configure configuration options, for instance:

./configure –sbin-path=/usr/local/sbin –with-http_ssl_module

Now before you can start the nginx server, you should also set up the nginx init script;

5. Download and set a ready to use script with cmd:

debian:~# cd /etc/init.d
debian:/etc/init.d# wget https://www.pc-freak.net/files/nginx-init-script
debian:/etc/init.d# mv nginx-init-script nginx
debian:/etc/init.d# chmod +x nginx

6. Configure Nginx

Nginx is a really easy and simple server, just like the Russians, Simple but good!
By the way it's interesting to mention nginx has been coded by a Russian, so it's robust and hard as a rock as all the other Russian creations 🙂
Nginx configuration files in a default install as the one in my case are to be found in /usr/local/nginx/conf

In the nginx/conf directory you're about to find the following list of files which concern nginx server configurations:

deiban:/usr/local/nginx:~# ls -1
fastcgi.conf
fastcgi.conf.default
fastcgi_params
fastcgi_params.default
koi-utf
koi-win
mime.types
mime.types.default
nginx.conf
nginx.conf.default
scgi_params
scgi_params.default
uwsgi_params
uwsgi_params.default
win-utf

The .default files are just a copy of the ones without the .default extension and contain the default respective file directives.

In my case I'm not using fastcgi to serve perl or php scripts via nginx so I don't need to configure the fastcgi.conf and fastcgi_params files, the scgi_params and uwsgi_params conf files are actually files which contain nginx configuration directives concerning the use of nginx to process SSI (Server Side Include) scripts and therefore I skip configuring the SSI conf files.
koi-utf and koi-win are two files which usually you don't need to configure and aims the nginx server to support the UTF-8 character encoding and the mime.types conf is a file which has a number of mime types the nginx server will know how to handle.

Therefore after all being said the only file which needs to configured is nginx.conf

7. Edit /usr/local/nginx/conf/nginx.conf

debian:/usr/local/nginx:# vim /usr/local/nginx/conf/nginx.conf

Therein you will find the following default configuration:

#gzip on;

server {
listen 80;
server_name localhost;

#charset koi8-r;

#access_log logs/host.access.log main;

location / {
root html;
index index.html index.htm;
}
#error_page 404 /404.html;

# redirect server error pages to the static page /50x.html
#
error_page 500 502 503 504 /50x.html;
location = /50x.html {
root html;
}

In the default configuration above you need to modify only the above block of code as follows:

server {
listen 80;
server_name yoursitedomain.com;

#charset koi8-r;

#access_log logs/access.log main;

location / {
root /var/www/yoursitedomain.com/html;
index index.html index.htm;
}

Change the yoursitedomain.com and /var/www/yoursitedomain.com/html with your directory and website destinations.

8. Start nginx server with nginx init script

debian:/usr/local/nginx:# /etc/init.d/nginx start
Starting nginx:

This should bring up the nginx server, if something is miss configured you will notice also some error messages, as you can see in my case in above init script output, thanksfully there are no error messages.
Note that you can also start nginx directly via invoking /usr/local/nginx/sbin/nginx binary

To check if the nginx server has properly started from the command line type:

debian:/usr/local/nginx:~# ps ax|grep -i nginx|grep -v grep
9424 ? Ss 0:00 nginx: master process /usr/local/nginx/sbin/nginx
9425 ? S 0:00 nginx: worker process

Another way to check if the web browser is ready to serve your website file conten,t you can directly access your website by pointing your browser to with http://yoursitedomain.com/, you should get your either your custom index.html file or the default nginx greeting Welcome to nginx

9. Add nginx server to start up during system boot up

debian:/usr/local/nginx:# /usr/sbin/update-rc.d -f nginx defaults

That's all now you have up and running nginx and your static file serving will require you much less system resources, than with Apache.
Hope this article was helpful to somebody, feedback on it is very welcome!

Auto restart Apache on High server load (bash shell script) – Fixing Apache server temporal overload issues

Saturday, March 24th, 2012

auto-restart-apache-on-high-load-bash-shell-script-fixing-apache-temporal-overload-issues

I've written a tiny script to check and restart, Apache if the server encounters, extremely high load avarage like for instance more than (>25). Below is an example of a server reaching a very high load avarage:;

server~:# uptime
13:46:59 up 2 days, 18:54, 1 user, load average: 58.09, 59.08, 60.05
load average: 0.09, 0.08, 0.08

Sometimes high load avarage is not a problem, as the server might have a very powerful hardware. A high load numbers is not always an indicator for a serious problems. Some 16 CPU dual core (2.18 Ghz) machine with 16GB of ram could probably work normally with a high load avarage like in the example. Anyhow as most servers are not so powerful having such a high load avarage, makes the machine hardly do its job routine.

In my specific, case one of our Debian Linux servers is periodically reaching to a very high load level numbers. When this happens the Apache webserver is often incapable to serve its incoming requests and starts lagging for clients. The only work-around is to stop the Apache server for a couple of seconds (10 or 20 seconds) and then start it again once the load avarage has dropped to less than "3".

If this temporary fix is not applied on time, the server load gets increased exponentially until all the server services (ssh, ftp … whatever) stop responding normally to requests and the server completely hangs …

Often this server overloads, are occuring at night time so I'm not logged in on the server and one such unexpected overload makes the server unreachable for hours.
To get around the sudden high periodic load avarage server increase, I've written a tiny bash script to monitor, the server load avarage and initiate an Apache server stop and start with a few seconds delay in between.

#!/bin/sh
# script to check server for extremely high load and restart Apache if the condition is matched
check=`cat /proc/loadavg | sed 's/\./ /' | awk '{print $1}'`
# define max load avarage when script is triggered
max_load='25'
# log file
high_load_log='/var/log/apache_high_load_restart.log';
# location of inidex.php to overwrite with temporary message
index_php_loc='/home/site/www/index.php';
# location to Apache init script
apache_init='/etc/init.d/apache2';
#
site_maintenance_msg="Site Maintenance in progress - We will be back online in a minute";
if [ $check -gt "$max_load" ]; then>
#25 is load average on 5 minutes
cp -rpf $index_php_loc $index_php_loc.bak_ap
echo "$site_maintenance_msg" > $index_php_loc
sleep 15;
if [ $check -gt "$max_load" ]; then
$apache_init stop
sleep 5;
$apache_init restart
echo "$(date) : Apache Restart due to excessive load | $check |" >> $high_load_log;
cp -rpf $index_php_loc.bak_ap $index_php_loc
fi
fi

The idea of the script is partially based on a forum thread – Auto Restart Apache on High Loadhttp://www.webhostingtalk.com/showthread.php?t=971304Here is a link to my restart_apache_on_high_load.sh script

The script is written in a way that it makes two "if" condition check ups, to assure 100% there is a constant high load avarage and not just a temporal 5 seconds load avarage jump. Once the first if is matched, the script first tries to reduce the server load by overwritting a the index.php, index.html script of the website with a one stating the server is ongoing a maintenance operations.
Temporary stopping the index page, often reduces the load in 10 seconds of time, so the second if case is not necessery at all. Sometimes, however this first "if" condition cannot decrease enough the load and the server load continues to stay too high, then the script second if comes to play and makes apache to be completely stopped via Apache init script do 2 secs delay and launch the apache server again.

The script also logs about, the load avarage encountered, while the server was overloaded and Apache webserver was restarted, so later I can check what time the server overload occured.
To make the script periodically run, I've scheduled the script to launch every 5 minutes as a cron job with the following cron:

# restart Apache if load is higher than 25
*/5 * * * * /usr/sbin/restart_apache_on_high_load.sh >/dev/null 2>&1

I have also another system which is running FreeBSD 7_2, which is having the same overload server problems as with the Linux host.
Copying the auto restart apache on high load script on FreeBSD didn't work out of the box. So I rewrote a little chunk of the script to make it running on the FreeBSD host. Hence, if you would like to auto restart Apache or any other service on FreeBSD server get /usr/sbin/restart_apache_on_high_load_freebsd.sh my script and set it on cron on your BSD.

This script is just a temporary work around, however as its obvious that the frequency of the high overload will be rising with time and we will need to buy new server hardware to solve permanently the issues, anyways, until this happens the script does a great job 🙂

I'm aware there is also alternative way to auto restart Apache webserver on high server loads through using monit utility for monitoring services on a Unix system. However as I didn't wanted to bother to run extra services in the background I decided to rather use the up presented script.

Interesting info to know is Apache module mod_overload exists – which can be used for checking load average. Using this module once load avarage is over a certain number apache can stop in its preforked processes current serving request, I've never tested it myself so I don't know how usable it is. As of time of writting it is in early stage version 0.2.2
If someone, have tried it and is happy with it on a busy hosting servers, please share with me if it is stable enough?