Posts Tagged ‘script’

Howto check if mod_rewrite is installed and loaded in Apache 2.x and serving directories correctly

Wednesday, February 10th, 2010

During my professional experience as a system administrator, it was a common misfortune in newly
configured unix servers mod_rewrite not to be serving .htaccess files.
Everytime I had to fix issue in which mod_rewrite was not working I loosed a lot of my precious time
The same story happened once again I had to check why mod_rewrite is not configured correctly and I cannot
apply some redirection rules in WordPress necessery for me
to exercise some SEO on my wordpress blog .
Therefore this time I decided to blog a step by step check on in order to:

1. Determine if mod_rewrite is installed & loaded correctly in Apache
2. Find out if mod_rewrite is configured to serve .htaccess files correctly
Going through this two scenarios I would be able to determine why I cannot get wordpress SEO optimization
mod_rewrite redirection rules to work as they should.
Okay, so let’s go through the two scenarios:

1. Here is a tiny script in PHP to determine if mod_rewrite is installed and loaded in Apache correctly
To use the script save it somewhere in your Domain document root with a .php extension
Here is the code of the script as well:

< ?phpprint_r(apache_get_modules());?>

If your mod_rewrite module is configured correctly you’ll see it in the php array containing
all your apache loaded modules.

Without PHP from the shell in order to get installed Apache modules on Linux, the following command applies:

apache2ctl -t -D DUMP_MODULES

For apache 2.2.x
httpd (or apache.exe) -M will show static and shared modules loaded via LoadModule.
httpd -l will show only static (compiled in) modules

For apache 2.0.x
httpd (apache.exe) -l is available but -M is not.
You will need to manually check the LoadModule directives and the files.

2. Now we continue, further on with another script that has to be installed somewhere in Apache’s DocumentRoot
I decided to install it in a directory /test/ so in my case it’s installed in www.pc-freak.net/test/
Here is a link to the script you need to find out if mod_rewrite is configured to serve .htaccess files for your preferred domain name’s DocumentRoot.

Now save this file and again make sure it has a .php extension.

Now you need to create an .htaccess file in the directory where you have rewrite.php file stored.
The content of the .htaccess file should be the following:

RewriteEngine OnRewriteOptions InheritRewriteRule ^link([^/]*).html$ rewrite.php?link=$1 [L]

Make sure the permissions of the .htaccess are correct, for example the file should have at least read
permissions for your webserver.
So let’s execute:

chmod a+r .htaccess to ensure the newly created file has proper permissions
So let’s check if mod_rewrite is enabled for my domain DocumentRoot by visiting:
this link
Hopefully if all is okay you’ll see:
Congratulations!! You are using Apache mod_rewrite whenever you press the TEST2 link
on the upmentioned webpage.

In case if you get a 404 error message, then most probably you don’t have mod_rewrite configured
to serve .htaccess files for your domain.
This often happens because of missing:
AllowOverride All in your main Directory directives in your webserver configuration file.
In my case I had a problem where mod_rewrite rules were not red from the .htaccess file:
To solve my issue I had to change:

Directory /
AllowOverride None
Order Deny,Allow
Deny from all
/Directory
in my httpd.conf to

Directory /
AllowOverride All
Order Deny,Allow
Deny from all
/Directory

So well, That’s all Folks!

How to improve Linux kernel security with GrSecurity / Maximum Linux kernel security with GrSecurity

Tuesday, May 3rd, 2011

In short I’ll explain here what is Grsecurity http://www.grsecurity.net/ for all those who have not used it yet and what kind of capabilities concerning enhanced kernel security it has.

Grsecurity is a combination of patches for the Linux kernel accenting at the improving kernel security.

The typical application of GrSecurity is in the field of Linux systems which are administered through SSH/Shell, e.g. (remote hosts), though you can also configure grsecurity on a normal Linux desktop system if you want a super secured Linux desktop ;).

GrSecurity is used heavily to protect server system which require a multiple users to have access to the shell.

On systems where multiple user access is required it’s a well known fact that (malicious users, crackers or dumb script kiddies) get administrator (root) privileges with a some just poped in 0 day root kernel exploit.
If you’re an administrator of a system (let’s say a web hosting) server with multiple users having access to the shell it’s also common that exploits aiming at hanging in certain daemon service is executed by some of the users.
In other occasions you have users which are trying to DoS the server with some 0 day Denial of Service exploit.
In all this cases GrSecurity having a kernel with grsecurity is priceless.

Installing grsecurity patched kernel is an easy task for Debian and Ubuntu and is explained in one of my previous articles.
This article aims to explain in short some configuration options for a GrSecurity tightened kernel, when one have to compile a new kernel from source.

I would skip the details on how to compile the kernel and simply show you some picture screens with GrSecurity configuration options which are working well and needs to be set-up before a make command is issued to compile the new kernel.

After preparing the kernel source for compilation and issuing:

linux:/usr/src/kernel-source$ make menuconfig

You will have to select options like the ones you see in the pictures below:

[nggallery id=”8″]

After completing and saving your kernel config file, continue as usual with an ordinary kernel compilation, e.g.:

linux:/usr/src/kernel-source$ make
linux:/usr/src/kernel-source$ make modules
linux:/usr/src/kernel-source$ su root
linux:/usr/src/kernel-source# make modules_install
linux:/usr/src/kernel-source# make install
linux:/usr/src/kernel-source# mkinitrd -o initrd.img-2.6.xx 2.6.xx

Also make sure the grub is properly configured to load the newly compiled and installed kernel.

After a system reboot, if all is fine you should be able to boot up the grsecurity tightened newly compiled kernel, but be careful and make sure you have a backup solution before you reboot, don’t blame me if your new grsecurity patched kernel fails to boot! You’re on your own boy 😉
This article is written thanks to based originally on his article in Bulgarian. If you’re a Bulgarian you might also checkout static’s blog

Finding spam sending php scripts on multiple sites servers – Tracing and stopping spammer PHP scripts

Monday, April 14th, 2014

stop_php_mail-spam-find-spammer-and-stop-php-spammer-websites
Spam has become a severe issue for administrators, not only for mail server admins but also for webshosting adms. Even the most secure spam protected mail server can get affected by spam due to fact it is configured to relay mail from other servers acting as web hosting sites.

Webhosting companies almost always suffer seriously from spam issues and often their mail servers gets blocked (enter spam blacklists), because of their irresponsible clients uploading lets say old vulnerable Joomla, WordPress without Akismet or proper spam handling plugin,a CMS which is not frequently supported / updated or custom client insecure php code.

What I mean is Shared server A is often configured to sent mail via (mail) server B. And often some of the many websites / scripts hosted on server A gets hacked and a spam form is uploaded and tons of spam start being shipped via mail server B.

Of course on mail server level it is possible to configure delay between mail sent and adopt a couple of policies to reduce spam, but the spam protection issue can't be completely solved thus admin of such server is forced to periodically keep an eye on what mail is sent from hosting server to mail server.


If you happen to be one of those Linux (Unix) webhosting admins who find few thousand of spammer emails into mail server logs or your eMail server queue and you can't seem to find what is causing it, cause there are multiple websites shared hosting using mainly PHP + SQL and you can't identify what php script is spamming by reviewing  Apache log / PHP files. What you can do is get use of:

PHP mail.log directive

Precious tool in tracking spam issues is a PHP Mail.log parameter, mail log paramater is available since PHP version >= 5.3.0 and above.
PHP Mail.log parameter records all calls to the PHP mail() function including exact PHP headers, line numbers and path to script initiating mail sent.

Here is how it is used:
 

1. Create empty PHP Mail.log file

touch /var/log/phpmail.log

File has to be writtable to same user with which Apache is running in case of Apache with SuPHP running file has to be writtable by all users.

On Debian, Ubunut Linux:

chown www:data:www-data /var/log/phpmail.log

On CentOS, RHEL, SuSE phpmail.log has to be owned by httpd:

chown httpd:httpd /var/log/phpmail.log

On some other distros it might be chown nobody:nobody etc. depending on the user with which Apache server is running.


2. Add to php.ini configuration following lines

mail.add_x_header = On
mail.log = /var/log/phpmail.log

PHP directive instructs PHP to log complete outbund Mail header sent by mail() function, containing the UID of the web server or PHP process and the name of the script that sent the email;
 

(X-PHP-Originating-Script: 33:mailer.php)


i.e. it will make php start logging to phpmail.log stuff like:


mail() on [/var/www/pomoriemonasteryorg/components/com_xmap/2ktdz2.php:1]: To: info@globalremarketing.com.au — Headers: From: "Priority Mail" <status_93@pomoriemon
astery.org> X-Mailer: MailMagic2.0 Reply-To: "Priority Mail" <status_93@pomoriemonastery.com> Mime-Version: 1.0 Content-Type: multipart/alternative;boundary="——
—-13972215105347E886BADB5"
mail() on [/var/www/pomoriemonasteryorg/components/com_xmap/2ktdz2.php:1]: To: demil7167@yahoo.com — Headers: From: "One Day Shipping" <status_44@pomoriemonastery.
org> X-Mailer: CSMTPConnectionv1.3 Reply-To: "One Day Shipping" <status_44@pomoriemonastery.com> Mime-Version: 1.0 Content-Type: multipart/alternative;boundary="—
——-13972215105347E886BD344"
mail() on [/var/www/pomoriemonasteryorg/components/com_xmap/2ktdz2.php:1]: To: domainmanager@nadenranshepovser.biz — Headers: From: "Logistics Services" <customer.
id86@pomoriemonastery.com> X-Mailer: TheBat!(v3.99.27)UNREG Reply-To: "Logistics Services" <customer.id86@pomoriemonastery.com> Mime-Version: 1.0 Content-Type: mult
ipart/alternative;boundary="———-13972215105347E886BF43E"
mail() on [/var/www/pomoriemonasteryorg/components/com_xmap/2ktdz2.php:1]: To: bluesapphire89@yahoo.com — Headers: From: "Priority Mail" <status_73@pomoriemonaster
y.org> X-Mailer: FastMailer/Webmail(versionSM/1.2.6) Reply-To: "Priority Mail" <status_73@pomoriemonastery.com> Mime-Version: 1.0 Content-Type: multipart/alternativ
e;boundary="———-13972215105347E886C13F2"


On Debian / Ubuntu Linux to enable this logging, exec:

echo 'mail.add_x_header = On' >> /etc/php5/apache2/php.ini
echo 'mail.log = /var/log/phpmail.log' >> /etc/php5/apache2/php.ini


I find it useful to symlink /etc/php5/apache2/php.ini to /etc/php.ini its much easier to remember php location plus it is a standard location for many RPM based distros.

ln -sf /etc/php5/apache2/php.ini /etc/php.ini

Or another "Debian recommended way" to enable mail.add_x_header logging on Debian is via:

echo 'mail.add_x_header = On' >> /etc/php5/conf.d/mail.ini
echo 'mail.log = /var/log/phpmail.log' >> /etc/php5/conf.d/mail.ini

On Redhats (RHEL, CentOS, SuSE) Linux issue:

echo 'mail.add_x_header = On' >> /etc/php.ini
echo 'mail.log = /var/log/phpmail.log' >> /etc/php.ini

3. Restart Apache

On Debian / Ubuntu based linuces:

/etc/init.d/apache2 restart

P.S. Normally to restart Apache without interrupting client connections graceful option can be used, i.e. instead of restarting do:

/etc/init.d/apache2 graceful

On RPM baed CentOS, Fedora etc.:

/sbin/service httpd restart

or

apachectl graceful
 

4. Reading the log

To review in real time exact PHP scripts sending tons of spam tail it:

tail -f /var/log/phpmail.log


mail() on [/var/www/remote-admin/wp-includes/class-phpmailer.php:489]: To: theosfp813@hotmail.com — Headers: Date: Mon, 14 Apr 2014 03:27:23 +0000 Return-Path: wordpress@remotesystemadministration.com From: WordPress Message-ID: X-Priority: 3 X-Mailer: PHPMailer (phpmailer.sourceforge.net) [version 2.0.4] MIME-Version: 1.0 Content-Transfer-Encoding: 8bit Content-Type: text/plain; charset="UTF-8"
mail() on [/var/www/pomoriemonasteryorg/media/rsinstall_4de38d919da01/admin/js/tiny_mce/plugins/inlinepopups/skins/.3a1a1c.php:1]: To: 2070ccrabb@kiakom.net — Headers: From: "Manager Elijah Castillo" <elijah_castillo32@pomoriemonastery.com> X-Mailer: Mozilla/5.0 (Windows; U; Windows NT 5.0; es-ES; rv:1.9.1.7) Gecko/20100111 Thunderbird/3.0.1 Reply-To: "Manager Elijah Castillo" <elijah_castillo32@pomoriemonastery.com> Mime-Version: 1.0 Content-Type: multipart/alternative;boundary="———-1397463670534B9A76017CC"
mail() on [/var/www/pomoriemonasteryorg/media/rsinstall_4de38d919da01/admin/js/tiny_mce/plugins/inlinepopups/skins/.3a1a1c.php:1]: To: 20wmwebinfo@schools.bedfordshire.gov.uk — Headers: From: "Manager Justin Murphy" <justin_murphy16@pomoriemonastery.com> X-Mailer: Opera Mail/10.62 (Win32) Reply-To: "Manager Justin Murphy" <justin_murphy16@pomoriemonastery.com> Mime-Version: 1.0 Content-Type: multipart/alternative;boundary="———-1397463670534B9A7603ED6"
mail() on [/var/www/pomoriemonasteryorg/media/rsinstall_4de38d919da01/admin/js/tiny_mce/plugins/inlinepopups/skins/.3a1a1c.php:1]: To: tynyrilak@yahoo.com — Headers: From: "Manager Elijah Castillo" <elijah_castillo83@pomoriemonastery.com> X-Mailer: Mozilla/5.0 (Macintosh; U; Intel Mac OS X 10.5; pl; rv:1.9.1.9) Gecko/20100317 Thunderbird/3.0.4 Reply-To: "Manager Elijah Castillo" <elijah_castillo83@pomoriemonastery.com> Mime-Version: 1.0 Content-Type: multipart/alternative;boundary="———-1397463670534B9A7606308"
mail() on [/var/www/pomoriemonasteryorg/media/rsinstall_4de38d919da01/admin/js/tiny_mce/plugins/inlinepopups/skins/.3a1a1c.php:1]: To: 2112macdo1@armymail.mod.uk — Headers: From: "Manager Justin Murphy" <justin_murphy41@pomoriemonastery.com> X-Mailer: Mozilla/5.0 (Macintosh; U; Intel Mac OS X 10.5; pl; rv:1.9.1.9) Gecko/20100317 Thunderbird/3.0.4 Reply-To: "Manager Justin Murphy" <justin_murphy41@pomoriemonastery.com> Mime-Version: 1.0 Content-Type: multipart/alternative;boundary="———-1397463670534B9A76086D1"


As you can see there is a junky spam mails sent via some spammer script uploaded under name .3a1a1c.php, so to stop the dirty bastard, deleted the script:

rm -f /var/www/pomoriemonasteryorg/media/rsinstall_4de38d919da01/admin/js/tiny_mce/plugins/inlinepopups/skins/.3a1a1c.php

It is generally useful to also check (search) for all hidden .php files inside directoring storing multiple virtualhost websites, as often a weirdly named hidden .php is sure indicator of either a PHP Shell script kiddie tool or a spammer form.

Here is how to Find all Hidden Perl / PHP scripts inside /var/www:

find . -iname '.*.php'
./blog/wp-content/plugins/fckeditor-for-wordpress-plugin/ckeditor/plugins/selection/.0b1910.php
./blog/wp-content/plugins/fckeditor-for-wordpress-plugin/filemanager/browser/default/.497a0c.php
./blog/wp-content/plugins/__MACOSX/feedburner_feedsmith_plugin_2.3/._FeedBurner_FeedSmith_Plugin.php

find . -iname '.*.pl*'

….

Reviewing complete list of all hidden files is also often useful to determine shitty cracker stuff

 find . -iname ".*"

Debugging via  /var/log/phpmail.log enablement is useful but is more recommended on development and staging (QA) environments. Having it enable on productive server with high amounts of mail sent via PHP scripts or just on dedicated shared site server could cause both performance issues, hard disk could quickly get and most importantly could be a severe security hole as information from PHP scripts could be potentially exposed to external parties.

Linux: how to show all users crontab – List all cronjobs

Thursday, May 22nd, 2014

linux-unix-list-all-crontab-users-and-scripts
I'm doing another server services decomissioning and part of decomissioning plan is: Removing application and all related scripts from related machines (FTP, RSYNC, …). In project documentation I found a list with Cron enabled shell scripts:

#Cron tab excerpt:
1,11,21,31,41,51 * * * */webservices/tools/scripts/rsync_portal_sync.sh

that has to be deleted, however there was nowhere mentioned under what kind of credentials (with what kind of user) are the cron scripts running? Hence I had to look up all users that has cronjobs and find inside each user's cronjobs whether respective script is set to run. Herein I will explain shortly how I did that.

Cronjobs by default has few locations from where cronjobs are setupped depending on their run time schedule. First place I checked for the scripts is

/etc/crontabs # cat /etc/crontabs SHELL=/bin/sh
PATH=/usr/bin:/usr/sbin:/sbin:/bin:/usr/lib/news/bin
MAILTO=root
#
# check scripts in cron.hourly, cron.daily, cron.weekly, and cron.monthly
#
-*/15 * * * * root test -x /usr/lib/cron/run-crons && /usr/lib/cron/run-crons >/dev/null 2>&1
59 * * * * root rm -f /var/spool/cron/lastrun/cron.hourly
14 4 * * * root rm -f /var/spool/cron/lastrun/cron.daily
29 4 * * 6 root rm -f /var/spool/cron/lastrun/cron.weekly
44 4 1 * * root rm -f /var/spool/cron/lastrun/cron.monthly

I was not really user via what user is shell script run, therefore I looked first if someone doesn't set the script to run via crontab's standard locations for Daily, Hourly,Weekly and Monthly cronjobs:
 

a) Daily set cron jobs are in:

/etc/cron.daily/

b) Hourly set cron jobs:

/etc/cron.hourly

c) Weekly cron jobs are in:

/etc/cron.weekly/

d) Monthly cron jobs:

/etc/cron.monthly

There is also a location read by crontab for all Software (package distribution) specific cronjobs – all run under root user privileges.:

e) Software specific script cron jobs are in:

/etc/cron.d/  
As the system has about 327 users in /etc/passwd, checking each user's cronjob manually with:

# crontab -u UserName -l

was too much time consuming thus it is a good practice to list

/var/spool/cron/*

directory and to see which users has cron jobs defined


# ls -al /var/spool/cron/*
-rw——- 1 root root 11 2007-07-09 17:08 /var/spool/cron/deny

/var/spool/cron/lastrun:
total 0
drwxr-xr-x 2 root root 80 2014-05-22 11:15 .
drwx—— 4 root root 120 2008-02-25 15:45 ..
-rw-r–r– 1 root root 0 2014-05-22 04:15 cron.daily

/var/spool/cron/tabs:
total 8
drwx—— 2 root root 72 2014-04-03 03:43 .
drwx—— 4 root root 120 2008-02-25 15:45 ..
-rw——- 1 root root 4901 2014-04-03 03:43 root


/var/spool/cron – is crond (/usr/bin/cron/)'s spool directory.

# ls -al /var/spool/cron/tabs/ total 8
drwx------ 2 root root 72 2014-04-03 03:43 .
drwx------ 4 root root 120 2008-02-25 15:45 ..
-rw------- 1 root root 4901 2014-04-03 03:43 root

Above output shows only root superuser has defined crons.

Alternative way to check all user crontabs is via quick Linux one liner shell script show all user cron jobs

for i in $(cat /etc/passwd | sed -e "s#:# #g" | awk '{ print $1 }'); do
echo "user $i --- crontab ---";
crontab -u $i -l 2>&1 >/dev/null;
echo '----------';
done|less

Note that above short script has to run with root user. Enjoy 🙂

Linux watch Windows equivalent command bat script – How to Run a command every XXX seconds on Windows

Tuesday, May 27th, 2014

windows-watch-command-linux-watch-windows-equivalent-run-script-every-xxx-seconds-on-microsoft-windows
If you're a Linux administrator you're probably already quite used to watch command which allows to execute a program periodically, showing output fullscreen. Watch is very useful to run a specific command every XXX seconds, and see the results constantly updated. watch is very useful to keep an eye on growing files, i.e.: lets say keep an eye on SQL dump:

watch "ls -al some-dump-file.sql"

or keep an eye on how a directory keeps growing in real time

watch -n 5 "du -hsc /tmp"


Above command would tell watch to refresh du -hsc /tmp on a 5 seconds interval.

So a logical question pops up "Is there a command line equivalent to Linux's watch?" In Windows there is no native command equivalent of Linux watch but there is one liner bat (Batch) script to equivalent to emulate Linux watch in Windows. The Watch like script in Windows OS looks like so:

@ECHO OFF
:loop
tasklist timeout /t 2
goto loop


Use notepad and paste above batch script to any file and save it as whateverfile.bat, running it will make all processes to get listed occuring every 2 seconds (/t 2 – is an argumeent telling the loop to expire on every 2 seconds).

Modify the script to monitor whatever Windows command you like 🙂
Enjoy


Windows: VMWare Start / Stop from command line stop-vmware.bat / start-vmware.bat script

Wednesday, June 4th, 2014

vmware_start-stop-from-command-line-on-windows-os-bat-script
I'm experimenting with different Virtual Machines these days, because often running VMWare together with other Virtual Machines (like VirtualBox) might be causing crashes or VM instability – hence it is always best to have VMWare completely stopped. Unfortunately VMWare keeps running a number of respawning processes (vmnat.exe, vmnetdhcp.exe, vmware-authd.exe, vmware-usbarbitrator64.exe) which cannot be killed from Task Manager with Process KillEnd Tree option. Thus to make this services stop it is necessery run from cmd.exe (which is Run as Administrator):
 

NET STOP "VMware Workstation Server"
NET STOP "VMware USB Arbitration service"
NET STOP "VMware NAT Service"
NET STOP "VMware DHCP Service"
NET STOP "VMware Authorization Service"

If you will be doing regular START / STOP of VMWare on Windows servers it will be handy to create a little batch script stop-vmware.bat containing:
 

@ECHO OFF
NET STOP "VMware Workstation Server"
NET STOP "VMware USB Arbitration service"
NET STOP "VMware NAT Service"
NET STOP "VMware DHCP Service"
NET STOP "VMware Authorization Service"


Later whether it is necessery to start VMWare from Windows command line execute above services in reverse order (to prevent from getting warnings or errors on vmware dependent services.

NET START "VMware Authorization Service"
NET START "VMware DHCP Service"
NET START "VMware NAT Service"
NET START "VMware USB Arbitration service"
NET START "VMware Workstation Server"

To script it as a start script create file start-vmware.bat with:
 

NET START "VMware Authorization Service"
NET START "VMware DHCP Service"
NET START "VMware NAT Service"
NET START "VMware USB Arbitration service"
NET START "VMware Workstation Server"


Of course it is possible to also stop / start VMWare from GUI's Windows Services interface by righclicking on services with VMWare names and selecting "Start" / "Stop".

Shutdown tomcat server node in case of memory depletion – Avoiding Tomcat Out of memory

Friday, June 6th, 2014

fix-avoid-tomcat-out-of-memory-logo

Out Of Memory Errors, or OOMEs, are one of the most common problems faced by Apache Tomcat users. Tomcat cluster behind Apache unreachable (causing customer downtimes). OOME errors occur on production servers that are experiencing an unusually high spike of traffic.

Out of memory errors are usually a problem of application and not of Tomcat server. OMEs have become such a persistent topic of discussion in the Apache Tomcat community cause its so difficult to trace to their root cause. Usually 'incorrect' web app code causing Tomcat to run out of memory is usually technically correct.

Most common reasons for Out of Memory errors in application code are:
 

  •     the heap size being too small
  •     running out of file descriptors
  •     more open threads than the host OS allows
  •     code with high amounts of recursion
  •     code that loads a very large file into memory
  •     code that retaining references to objects or classloaders
  •     a large number of web apps and a small PermGen


The following java option -XX:OnOutOfMemoryError= could be added to any of tomcat java application servers in setenv.sh in  JAVA_OPTS= variable in case of regular Out of Memory errors occur making an application unstable.

-XX:OnOutOfMemoryError=<path_to_tomcat_shutdown_script.sh>

Where < path_to tomcat_shutdown_script.sh > is shutdown script(which performs kill <tomcat_pid> if normal shutdown fails) for the tomcat instance.

With this setup if any tomcat instance run out of memory it will be shutdown (shutdown script invoked) – as result the Apache proxy infront of Tomcats should not pass any further requests to this instance and application will visualize / work properly for end customers.

Usually a tomcat_shutdown_script.sh to invoke in case of OOM would initiate a Tomcat server restart something like:

for i in `ps -ef |grep tomcat |grep /my_path_to_my_instance | awk '{print $2}'`
do
kill -9 "$i"
#path and script to start tomcat
done

To prevent blank pages returned to customer because of shutdown_script.sh starting stopping Tomcat you can set in Reverse Apache Proxy something like:
 

<Proxy balancer://mycluster>
   BalancerMember ajp://10.16.166.48:11010/ route=delivery1 timeout=30 retry=1
   BalancerMember ajp://10.16.166.70:11010/ route=delivery2 timeout=30 retry=1
</Proxy>

Where in above example I assume, there are only two tomcat nodes, for more just add respective ones.

Note that if the deployed application along all servers is having some code making it crash all tomcat nodes can get shutdown all time and you can get in a client havoc 🙂

Linux: basic system CPU, Disk and Network resource monitoring via phpsysinfo lightweight script

Wednesday, June 18th, 2014

phpsysinfo-logo-simple-way-to-web-monitor-windows-linux-server-cpu-disk-network-resources

There are plenty of GNU / Linux softwares to monitor server performance (hard disk space, network and CPU load) and general hardware health both text based for SSH console) and from web.

Just to name a few for console precious tools, such are:

And for web based Linux / Windows server monitoring my favourite tools are:

phpsysinfo is yet another web based Linux monitoring software for small companies or home router use it is perfect for people who don't want to spend time learning how to configure complicated and robust multiple server monitoring software like Nagios or Icanga.

phpsysinfo is quick and dirty way to monitor system uptime, network, disk and memory usage, get information on CPU model, attached IDEs, SCSI devices and PCIs from the web and is perfect for Linux servers already running Apache and PHP.

1. Installing PHPSysInfo on Debian, Ubuntu and deb derivative Linux-es

PHPSysInfo is very convenient and could be prefered instead of above tools for the reason it is available by default in Debian and Ubuntu package repositories and installable via apt-get and it doesn't require any further configuration, to roll it you install you place a config and you forget it.
 

 # apt-cache show phpsysinfo |grep -i desc -A 2

Description: PHP based host information
 phpSysInfo is a PHP script that displays information about the
 host being accessed.


Installation is a piece of cake:

# apt-get install --yes phpsysinfo

Add phpsysinfo directives to /etc/apache2/conf.d/phpsysinfo.conf to make it accessible via default set Apache vhost domain under /phpsysinfo

Paste in root console:
 

cat > /etc/apache2/conf.d/phpsysinfo.conf <<-EOF
Alias /phpsysinfo /usr/share/phpsysinfo
<Location /phpsysinfo>
 Options None
 Order deny,allow
 Deny from all
 #Allow from localhost
 #Allow from 192.168.56.2
 Allow from all
</Location>
EOF


Above config will allow access to /phpsysinfo from any IP on the Internet, this could be a security hole, thus it is always better to either protect it with access .htaccess password login or allow it only from certain IPs, from which you will access it with something like:

Allow from 192.168.2.100

Then restart Apache server:

# /etc/init.d/apache2 restart


To access phpsysinfo monitoring gathered statistics, access it in a browser http://defaultdomain.com/phpsysinfo/

phpsysinfo_on_debian_ubuntu_linux-screenshot-quick-and-dirty-web-monitoring-for-windows-and-linux-os

2. Installing PHPSysinfo on CentOS, Fedora and RHEL Linux
 

Download and untar

# cd /var/www/html
# wget https://github.com/phpsysinfo/phpsysinfo/archive/v3.1.13.tar.gz
# tar -zxvf phpsysinfo-3.1.13.tar.gz
# ln -sf phpsysinfo-3.1.13 phpsysinfo
# mv phpsysinfo.ini.new phpsysinfo.ini


Install php php-xml and php-mbstring RPM packages
 

yum -y install php php-xml php-mbstring
...

Start Apache web service

[root@ephraim html]# /etc/init.d/httpd restart

[root@ephraim html]# ps ax |grep -i http
 8816 ?        Ss     0:00 /usr/sbin/httpd
 8819 ?        S      0:00 /usr/sbin/httpd

phpsysinfo-install-on-centos-rhel-fedora-linux-simple-monitoring

As PhpSysInfo is written in PHP it is also possible to install phpsysinfo on Windows.

phpsysinfo is not the only available simple monitoring server performance remotely tool, if you're looking for a little bit extended information and a better visualization interface alternative to phpsysinfo take a look at linux-dash.

In context of web monitoring other 2 web PHP script tools useful in remote server monitoring are:

OpenStatus – A simple and effective resource and status monitoring script for multiple servers.
LookingGlass – User-friendly PHP Looking Glass (Web interface to use Host (Nslookup), Ping, Mtr – Matt Traceroute)

Creating Dynamic SSH Tunnel on Windows with Plink – Scriptable SSH Tunnels on Windows

Friday, July 4th, 2014

creating-ssh-tunnel-on-windows-with-plink-ssh-tunnel-diagram-tunnel-email-traffic

In my earlier articles I've explained about Creating SSH Tunnels on Linux and BSD and how to create SSH Tunnels with Putty Terminal client on Windows.

Creating SSH Tunnels is a precious knowledge every advanced computer user, a system administrator or security expert should be well aware of.

Probably still there are plenty of people for which the SSH Tunnelling is something never heard of or even if heard it is a mythical term covered by ancient shadows 🙂

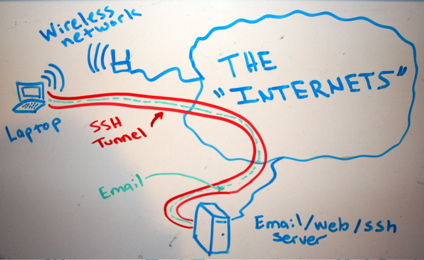
So What is an SSH Tunnel? – SSH Tunnels shortly explained.

A SSH tunnel consists of an encrypted tunnel created through a SSH protocol
connection
.

An SSH tunnel can be used to transfer unencrypted traffic over a
network through an encrypted channel
between two hosts (host A and Host B) usually using remote and local port.

Requirements for SSH tunnel

Where Host B has to be running a version of OpenSSH server on some reachable port from Host B, (lets say 22).
Host B OpenSSH server has to be with (enabled X11Forwarding X11Forwarding yes in /etc/ssh/sshd_config) and Host A needs to have some SSH client supporting port forwarding (ssh command on Linux – part of (openssh-client package) and on Windows – Putty / Plink or any other of the many available ssh tunneling clients).

Probably most common SSH Tunnel use is to bypass firewalls that prohibits or filter certain internet services.
In other words SSH Tunnels can be used to get around firewall filtering. If you never heard of Bypassing firewalls with port forwarding I recommend to check this article

We can use a ssh tunnel to securely transfer files between a FTP server and a client even though the FTP
protocol itself is not encrypted
, Tnnel traffic to an SQL server, Tunnel traffic from your Desktop PC to a Proxy
SSH tunnels can be used to tunnel outbound E-mail traffic back to your work PC to avoid having to change SMTP servers etc.

A very common SSH Tunnel use is by office workers who don't want their Custom Web browsing habbits and Web history be tracked,

For people who has to travel a lot tunneling SSH traffic from notebook to your home based SMTP is mandatory, otherwise your e-mail passwords, might end up captured by someone who manages the Free WI-FI used by you somewhere on the road or cafeteria. Another good case use of SSH Tunnel is to tunnel VNC traffic.

SSH Tunneling was historically very famous in days where IRC (Internet Relay Chat) and used to be common way (for people who want to prevent their real IP address from publicly visible) on the Internet.
SSH Tunneling is great way to maintain high communication security, however because it requires some basic technical knowledge most people neglect it or never heard of it, so I hope this article will give at least basic ideas to people new to tunneling.

How to create SSH Tunnels on Microsoft Windows

SSH Tunneling has been originally invented on UNIX / Linux platform, luckily nowdays it is easily possible to create SSH tunnels on almost any moden OS (including Mac OS X and M$ Windows).

Using Plink it is possible to create easily (batch) scriptable SSH tunnels on Windows

Generally here is example of basic plink use syntax:
 

plink.exe {remote-host} -P 22 -C -D 10080 -l username -pw password
 

To make a Tunnel with Plink to remote SSH Server (remote-ssh-server.com) listening for connections on port 22 on localhost 10022

"C:Program Files (x86)PuTTYplink.exe" -ssh remote-username@tunnel-to-ssh-server-host.com -pw PASSWORD123 -C -T -D 127.0.0.1:10022 -N

-D – option instructs Plink to make "Dynamic SOCKS-based port forwarding"
Dynamic Socks-based port forwarding will make your ssh client a simple socks server which listen to port 10022 for incoming connections.
-Ttells plink not to open interactive shell on remote server (disable pty allocation)
-Cenables traffic compression

Using the -D option you can prepare tunnel to traffic all your outgoing server traffic via the SSH tunneling host.

E. g. -D allows you to use the remote ssh server as a proxy server with no need for remote server to run anything except SSH service and have Internet connection.

-N – stands for "don't start shell/command SSH-2 only"

On success of SSH Tunnel establishing you will get a pop-up window similar to below screenshot (note that some of the messages in cmd line are from a batch script – if no batch script is used you wil only get a window with "Using Username":

plink_establishing_ssh_tunnel-on-microsoft-windows-screenshot

Note: That if you're about to be using Plink command frequently add it to your Windows SYSTEM PATH (check my previous article – how to add Putty to System PATH) to enable it invokable without writting the full command path location.

Once this Window is open if you still have doubt, where the tunnel is established, the quickest way to test whether tunnel is working is to open telnet to localhost port 10022.

In Windows command prompt type:
 

C:> telnet localhost 10022


You will get a remote server SSH version printed, like on below shot:

windows-testing-whether-ssh-tunnel-is-working-with-telnet-screenshot-black-screen

Now lets say now you would like to access the internet via just created SSH tunnel.
You can do it by simply setting Socks Proxy in your Firefox / Opera (or whatever browser you use).

Whether you want to run the SSH Tunnel permanent and periodically check whether tunnel is allve and respawn it in case plink quit, you can use a very simple batch script like one below:
 

@ECHO OFF
tasklist /FI "IMAGENAME eq plink.exe" 2>NUL | find /I /N "plink.exe">NUL

if "%ERRORLEVEL%"=="0"  ( echo Programm is running exiting
exit
)
echo "Not Running"
start /b "C:Program Files (x86)PuTTYplink.exe" -ssh remote-username@tunnel-to-ssh-server-host.com -pw Password123 -T -C -D 127.0.0.1:10022 -N"


If you're a Linux guy and you don't want to mess around with Plink but still want to create your SSH tunnels following SSH client UNIX command line syntax, setup the Cygwin port of OpenSSH for Windows.

Or if you're unsure whether remote server is always reachable (you're moving with your notebook from (Country) network to network), you can use also portqry – windows port scanner to check whether remote ssh server port is opened:
 

@ECHO OFF
tasklist /FI "IMAGENAME eq plink.exe" 2>NUL | find /I /N "plink.exe">NUL
if "%ERRORLEVEL%"=="0"  ( echo Programm is running exiting
pause
exit
)
portqry -n tunnel-to-ssh-server-host.com -p tcp -e 22
if %ERRORLEVEL%==0 echo tunnel-to-ssh-server-host.com Reachable Connecting ..
if NOT %ERRORLEVEL%==0 (echo tunnel-to-ssh-server-host.com.com Unreachable
exit)
echo "Not Running. Starting"
"C:Program Files (x86)PuTTYplink.exe" -ssh remote-username@tunnel-to-ssh-server-host.com -pw Password123 -T -C -D 127.0.0.1:10080 –N


Here is another sample use of Plink to create tunnel via SSH host tunnel-to-ssh-server-host.com  to listen for connections on localhost port 1234 and forward all incoming traffic to squid proxy server on 192.168.1.5 on port 3128.
 

C:Usersgeorgi>plink.exe -v -x -a -T -C -noagent -ssh -L 127.0.0.1:1234:192.168.1.5:3128 remote-username@tunnel-to-ssh-server-host.com

Setting then 127.0.0.1:1234 in  Firefox Proxy browser settings will make all traffic from your browser to flow securily to your own proxy server (letting you hide your "custom traffic" from company Web sniffers (Proxying) and Web filtering.
A remark to make here is 192.168.1.5 is (a internal server with Squid Proxy, configured to pass traffic to the internet ).

Here is a way to make tunnel between your remote SSH server and local Desktop PC to make Google queries without being logged by your ISP or company where you're working:

plink.exe "-v -x -a -T -C -noagent -ssh -L 127.
0.0.1:1234:95.158.130.242:443 -pw SecretPassword123 -l hipo www.pc-freak.net"

95.158.130.242 – is one of the IPs www.google.com resolves to
www.pc-freak.net – is name of my home router.

To make tunneled queries to Google then open in browser https://127.0.0.1:1234

using_localhost_ssh_tunnel_to_anonymously-search-in-google-plink-tunnel-for-security


If you're a lazy windows user and don't want to bother to make your tunnels from command line and you want need nice gui way to manage multiple tunnels – check out putty-tunnel-manager.

I myself am not a SSH Tunnel expert and thus Iwould be happy to learn further from people for some interesting cases and custom ways to do  SSH Tunnels. If you know of better advantageous ways to tunnel traffic, please share.

Happy tunneling ! 🙂

Make Apache webserver fix spelling mistyped URL errors and serve files case insensitive with mod_speling

Wednesday, July 16th, 2014

make_apache_fix_mistyped_spelling_urls_errors_and_serve_files_case_insensitive_mod_speling_logo
On most if not all modern GNU / Linux distributions, Apache webserver comes preinstalled with mod_speling.

What mod_speling does is it tries to find and serve files and directories for non-existing  (404 return code) urls with a similar name to passed URL. Other thing mod_speling does is it serves files case-insensitive, even though the UNIX / Linux filesystems are built to understand files case-sensitive.

mod_speling is a very useful module especially when files are being pushed (synchronized) to Apache visible from web document folder from operating systems like Windows whose filesystem doesn't store files case sensitive.

Let me give you a small example on M$ Windows a create file NewFile.html, NEWFILE.HTML, NeWfIlE.Html etc. are one and the same file newfile.html and not 3 different files like it is usually on UNIX / Linux filesystems.

If you happen to migrate old static Websites from Microsoft Internet Information Services (IIS) to UNIX / Linux based hosting. Often Html coders which create websites on Windows platform doesn't respect in website hyperlinks case-sensitive, because anyways Windows FS is case-insetive, thus moving the website to Linux host with Apache the website/s will end up with many 404 error pages, whose fixing for big static websites will be a real pain in the ass.

Also there might be need for mod_speling module enabled, for PHP / Python / Perl websites developed on MS Windows platform and tested on Windows host and then officially to be deployed on Linux.

Note that mod_speling name as a funny thing as actually the module is also converting mis-pelled / mis-typed Apache URLs:

If for example, someone tried to link to your website from a forum mistyping the URL address with mod_speling the mistyped URL could still be handled to open the real existing URL:

Lets say you have URL:
 

http://your-domain.com/files/what-Ever-fle.php


and the actual URL is:

http://your-domain.com/files/what-Ever-file.php


mod_speling will make Apache scan in /files/ for any files with similar name to what-Ever-fle.php and will open any similar matched file name, preventing you from the normal 404 error and therefore often serving exactly what it has to. Of course such a behavior could be unwanted in same cases for CMSes, which depend on 404 error code for proper operating, so be very sure when configuring mod_speling that this is exactly what you need.

mod_speling can be also useful sometimes for Search Engine Optimization – SEO, as it will show less 404 pages to Crawler search engine bots.

1. Enable mod_speling module on Debian GNU / Linux and Ubuntu

Enabling mod_speling in Apache in Debian / Ubuntu etc. debian based Linuxes is done with either creating symlink from /etc/apache2/mods-available/speling.load to /etc/apache2/mods-enabled/speling.load :
 

ln -sf /etc/apache2/mods-available/speling.load /etc/apache2/mods-enabled/speling.load

Or by using a2enmodDebian apache module enabling script:
 

a2ensite sitename


To enable mod_speling mis-speling resolve feature config directive is:


CheckSpelling on


To disable case sensitivity – as I said earlier helpful for migrations from Microsoft Windows hosts to Linux, use directive:

CheckCaseOnly on


To enable both use:

<IfModule mod_speling.c>
    CheckCaseOnly on
    CheckSpelling on
</IfModule>

Enabling mod_speling case-insensitivity and fixing mistypes in URL could be done from .htaccess, for any <Directory> (vhost) with enabled .htaccess with

AllowOverride All

To enable it for default set host in new Apache install place it in /etc/apache2/apache2.conf and /etc/apache2/sites-enabled/000-default

Then as usual to make the configuration changes take affect, restart Apache:
 

/etc/init.d/apache2 restart


2. Enablig mod_speling on CentOS, RHEL and Fedora Linux


Most of RPM based Linux distributions have already mod_speling by default in Apache, so there will be no need to explicitly enable the module within HTTPD.

To check whether mod_speling is already enabled in httpd issue:
 

/usr/sbin/httpd -M |grep -i mod_speling


If you don't get no output from command this means the module is not enabled. This is the case with CentOS Linux 6.5 for example …

To enable mod_speling on Apache level add in /etc/httpd/conf/httpd.conf

LoadModule speling_module modules/mod_speling.so

and restart webserver
 

/etc/init.d/httpd restart


If you get instead
 

/usr/sbin/httpd -M |grep -i mod_speling
speling_module (shared)


Then it is already loaded in HTTPD to enable the module for default domain add to /etc/httpd/conf/httpd.conf – within (<Directory "/var/www/html">),

<IfModule mod_speling.c>
    CheckCaseOnly on
    CheckSpelling on
</IfModule>

Or if you want to make it active for specific directories within /var/www/html/whatever-dir use either new <Directory ..> directive within Apache config, or enable .htaccess processing with AllowOverride All and place them in .htaccess . For complete mod_speling reference check on Apache's official website