Posts Tagged ‘host’

Linux: Virtualbox shared folder – how to share files from host to guest OS in Virtualbox

Monday, June 9th, 2014

add-shared-folder-in-virtualbox-linux-virtual-machine-on-top-of-windows-howto

If you just installed Debian / Ubuntu / CentOS Linux on top of Windows inside Virtualbox Virtual Machine and you're wondering how to Share files between Windows Host Operating System and Guest Operating System (Linux), here is how:

1. First make sure Virtualbox guest additions are installed

Besides installing Virtualbox guest additions which will enable you to resize VBox Window / enable copy paste between guest and host OS it is useful to have also Virtualbox extension packs which allows your Virtual Machine to be accessed remote via Remote Desktop Protocol (RDP) – the so called VRDP

2. From Virtualbox VM select folder on Windows hsot which will be shared

Selection of which Win folder to mount in Vbox is done via Virtualbox menus:
 

Machine -> Settings -> Shared Folder

virtualbox-windows-linux-guest-OS-how-to-shared_folder-screenshot2

virtualbox-windows-linux-guest-OS-how-to-shared_folder-screenshot

3. Launch Linux Virtual Machine and use mount command to mount shared folder

I like the practice of creating a new folder inside c:UsersgeorgiDownloadsShared_folder

Then fire up gnome-terminal / xterm whatever terminal you like and to mount shared folder inside emulated Linux issue:

mount -t vboxsf -o rw Shared_folder /mnt/Shared_folder/


This will mount Shared_folder in rw (read / write) mode, if you prefer to only mount Virtualbox Shared_folder for reading:

mount -t vboxsf -o ro Shared_folder /mnt/Shared_folder/

4. Configure Virtualbox Shared Folder to auto mount in Linux via fstab

As we all know automating mounts in Linux is done by adding line in /etc/fstab to automate Vbox Shared_Folder mount add new line to fstab like:
 

Shared_folder         /mnt/Shared_folder         vboxsf  defaults,rw    0 0

This will auto-mount in vbox shared folder read / write mode, to auto-mount it in read only mode:

Shared_folder         /mnt/Shared_folder         vboxsf  defaults,ro    0 0

  If you added it to /etc/fstab (and you didn't mount Shared Folder manually before), run

mount -a

to make Linux system re-read auto-mounts defined in fstab
 

The new mounted folder will appear in whenever said to be mounted. Enjoy 🙂


Preserve domain name after redirect with mod_rewrite and some useful mod rewrite redirect and other examples – Redirect domain without changing URL

Friday, July 11th, 2014

redirect_domain_name_without_changing_url_apache_rewrite_rule_preventing_host_in_ip_mod_rewrite
If you're a webhosting company sysadmin, sooner or later you will be asked by application developer or some client to redirect from an Apache webserver to some other webserver / URL's IP, in a way that the IP gets preserved after the redirect.

I'm aware of two major ways to do the redirect on webserver level:

1. To redirect From Apache host A to Webserver on host B using ReverseProxy mod_proxy

2. To use Mod Rewrite to redirect all client requests on host A to host B.

There is quite a lot to be said and is said and written online on using mod_rewrite to redirect URLs.
So in this article I will not say nothing new but just present some basic scenarios on Redirecting with mod rewrite and some use cases.
Hope this examples, will help some colleague sys-admin to solve some his crazy boss redirection tasks 🙂 I'm saying crazy boss because I already worked for a  start-up company which was into internet marketing and the CEO has insane SEO ideas, often impossible to achieve …

a) Dynamic URL Redirect from Apache host A to host B without changing domain name in browser URL and keeping everything after the query in

Lets say you want to redirect incoming traffic to DomainA to DomainB keeping whole user browser request, i.e.

Redirect:

http://your-domainA.com/whole/a/lot/of/sub/directory/query.php


Passthe the whole request including /whole/a/lot/of/sub/directory/query.php

so when Apache redirects to redirect to:

http://your-domainB.com/whole/a/lot/of/sub/directory/query.php

In browser 
To do it with Mod_Rewrite either you have to add in .htaccess mod_rewite rules:

RewriteEngine On
RewriteCond %{HTTP_HOST} ^your-domainA.com [OR]
RewriteCond %{HTTP_HOST} ^http://your-domainA.com
RewriteRule ^(.*) http://your-domainB.com/$1 [P]

or include this somewhere in VirtualHost configuration of your domain
 

Above mod_rewrite will make any request to your-domainA.com to forward to your-domainB.com while preserving the hostname in browser URL bar to old domain http://your-domainA.com, however still contet will be served by http://your-domainB.com
 

http://yourdomainA.com/YOUR-CUSTOM-REQUEST-ADDRESS


to redirect to

http://yourdomainB.com/YOUR-CUSTOM-REQUEST-ADDRESS


WARNING !!  If you're concerned about your SEO well positioning in search Engines, be sure to never ever use such redirects. Making such redirects will cause two domains to show up duplicate content
and will make Search Engines to reduce your Google, Yahoo, Yandex etc. Pagerank !!

Besides that such, redirect will use mod_rewrite on each and every redirect so from performance stand point it is a CPU killer (for such redirect using native mod_proxy ProxyPass is much more efficient – on websites with hundred of thousands of requests daily using such redirects will cause you to spend your  hardware badly  …)

P.S. ! Mod_Rewrite and Proxy modules needs to be previously enabled
On Debian Linux, make sure following links are existing and pointing to proper existing files from /etc/apache2/mods-available/ to /etc/apache2/mods-enabled

debian:~#  ls -al /etc/apache2/mods-available/*proxy*
-rw-r–r– 1 root root  87 Jul 26  2011 /etc/apache2/mods-available/proxy_ajp.load
-rw-r–r– 1 root root 355 Jul 26  2011 /etc/apache2/mods-available/proxy_balancer.conf
-rw-r–r– 1 root root  97 Jul 26  2011 /etc/apache2/mods-available/proxy_balancer.load
-rw-r–r– 1 root root 803 Jul 26  2011 /etc/apache2/mods-available/proxy.conf
-rw-r–r– 1 root root  95 Jul 26  2011 /etc/apache2/mods-available/proxy_connect.load
-rw-r–r– 1 root root 141 Jul 26  2011 /etc/apache2/mods-available/proxy_ftp.conf
-rw-r–r– 1 root root  87 Jul 26  2011 /etc/apache2/mods-available/proxy_ftp.load
-rw-r–r– 1 root root  89 Jul 26  2011 /etc/apache2/mods-available/proxy_http.load
-rw-r–r– 1 root root  62 Jul 26  2011 /etc/apache2/mods-available/proxy.load
-rw-r–r– 1 root root  89 Jul 26  2011 /etc/apache2/mods-available/proxy_scgi.load

debian:/etc/apache2/mods-avaialble:~# ls *proxy*
proxy.conf@  proxy_connect.load@  proxy_http.load@  proxy.load@


If it is is not enabled to enable proxy support in Apache on Debian / Ubuntu Linux, either create the symbolic links as you see them from above paste or issue with root:
 

a2enmod proxy_http
a2enmod proxy


b) Redirect Main Domain requests to other Domain specific URL
 

RewriteEngine On
RewriteCond %{HTTP_HOST} ^your-domainA.com
RewriteRule ^(.*) http://your-domainB.com/YOUR-CUSTOM-URL [P]

Note that no matter what kind of subdirectory you request on http://your-domain.com (lets say you type in http://your-domainA.com/My-monkey-sucks ) it will get redirected to:

http://your-domainB.com/YOUR-CUSTOM-URL

Sometimes this is convenient for SEO, because it can make you to redirect any requests (including mistakenly typed requests by users or Bot Crawlers to real existing landing page).

c) Redirecting an IP address to a Domain Name

This probably a very rare thing to do as usually a Domain Name is redirected to an IP, however if you ever need to redirect IP to Domain Name:

RewriteCond %{HTTP_HOST} ^##.##.##.##
RewriteRule (.*) http://your-domainB.com/$1 [R=301,L]

Replace ## with digits of your IP address, the is used to escape the (.) – dots are normally interpreted by mod_rewrite.

d) Rewritting URL extensions from .htm to .php, doc to docx etc.

Lets say you're updating an old website with .htm or .html to serve .php files with same names as old .htmls use following rewrite rules:. Or all your old .doc files are converted and replaced with .docx and you need to make Apache redirect all .doc requests to .docx.
 

Options +FollowSymlinks
RewriteEngine on
RewriteRule ^(.*).html$ $1.php [NC]

Options +FollowSymlinks
RewriteEngine on
RewriteRule ^(.*).doc$ $1.docx [NC]

The [NC] flag at the end means "No Case", or "case-insensitive"; Meaning it will not matter whether files are requested with capital or small letters, they will just show files if file under requested name is matched.

Using such a redirect will not cause Apache to redirect old files .html, .htm, .doc and they will still be accessible again creating duplicate content which will have a negavite impact on Search Engine Optimization.

The better way to do old extensioned files redirect is by using:

Options +FollowSymlinks
RewriteEngine on
RewriteRule ^(.+).htm$ http://your-domainB.com/$1.php [R,NC]

[R] flag would tell make mod_rewrite send HTTP "MOVED TEMPORARILY" redirection, aka, "302" to browser. This would cause search engines and other spidering entities will automatically update their links to the new locations.

e) Grabbing content from URL with Mod Rewrite and passing it to another domain

Lets say you want zip files contained in directory files/ to be redirected from your current webserver on domainA to domainB's download.php script and be passed as argument to the script

Options +FollowSymlinks
RewriteEngine on
RewriteRule ^files/([^/]+)/([^/]+).zip https://www.pc-freak.net/download.php?section=$1&file=$2 [R,NC]


f) Shortening URLs with mod_rewrite

This is ueful If you have a long URL address accessible via some fuzzy long hard to remember URL address and you want to make it acessible via a shorter URL without phyisally moving the files within a short named directory, do:

Options +FollowSymlinks
RewriteEngine On
RewriteRule ^james-brown /james-brown/files/download/download.php

Above rule would make requests coming to http://your-domain.com/james-brown?file=my.zip be opened via http://mysite/public/james-brown/files/download/download.php?file=my.zip

g) Get rid of the www in your domain name

Nowdays many people are used to typing www.your-domain.com, if this annoys you and you want them not to see in served URLs the annoying www nonsense, use this:

Options +FollowSymlinks
RewriteEngine on
RewriteCond %{http_host} ^www.your-domain.com [NC]
RewriteRule ^(.*)$ http://your-domain.com/$1 [R=301,NC]

That's mostly some common uses of mod rewrite redirection, there are thousands of nice ones. If you know others, please share?


References and thanks to:

How to redirect domain without changing the URL

More .htaccess tips and tricks – part 2


How to share your Windows local drives via Remote Desktop (RDP) – Safe file copy with RDP protocol

Tuesday, October 14th, 2014

remote-desktop-connection-options-button-screenshot

Just had a task to install Tomcat 7, Java JRE 1.7 and .NET Framework 3.5 and MS Visual C++ x86 on a Windows 2008 RC2 system situated behind a firewalled network NAT. To do the installation I had to use a special jump host (which was also a MS Windows system). The end system where installation had to occur did not have access to the Internet was in special DMZ-ed network so to install above 3 software packages I had to transfer them from my notebook to install host.
To depic what had to happen, I had to:

Transfer files from (host A – my notebook) -> via host (B – jump host) to host (C – the end install host).

Default Windows RDP Client command (mstsc.exe) supports transferring files between host A and RDP-ed host B via standard file copy / paste, so I tried transferring files between my work Windows PC to (jump host B), by copy pasting the files, but as the DotNetFx35Client.exe file was 261 Megabytes and the network between host A and B has some shapings and network firewalls the file transfer timed out. Copy / Paste method via RDP Protocol by default, doesn’t support Transfer Resume thus in order to transfer the 261 MB file, I tried Sharing C:Temp Folder and transfer that way, but unfortunately I didn’t have the permissions in that Windows Domain to create sharings (even though on the remote system I was already logged in with admin accounts). I’ve consulted a colleague on advise on how to transfer the files and I was told about a Win RDP client option to share drives.

Here is how to share your PC drive letters C: D: E: etc. via Remote Desktop Protocol


1. Run mstsc.exe

2. Click the Options button

remote-desktop-connection-options-button-screenshot

3. Click Local Resources tab

4. Click More button

remote-desktop-connection-more-options-button-screenshot

5. Click on Drives

remote-desktop-connection-share-windows-disk-drives-option-screenshot

Then after connecting to the Remote RDP host, all your local PC drive partitions C: D: E: will be visible as (attached) ones in mounted in My Computer / MS Explorer with assigned new drive letters

Once, I transferred the .NET Framework 3.5 while using the installer I was notified that .NET Framework 3.5 is by default included in Windows 8 and I need only to enable it.

To enable .NET Framework 3.5 in Windows 8 from Control Panel

Choose Programs, and then choose Turn Windows features on or off.

Select the .NET Framework 3.5 (includes .NET 2.0 and 3.0) check box.
enable-dot-net-framework-windows-8-windows-8.1-add-feature-screenshot

How to remove and disable BlueTooth support on Debian GNU / Linux servers

Thursday, October 18th, 2012

How to remove / disable bluetooth support on Debian GNU / Linux servers
If you running Debian Squeeze Linux (as server Apache, MySQL, Qmail etc.) on brand new purchased hardware with bluetooth support; you will notice default Linux kernel will detect and load modules for Bluetooth

This would not be a problem only if Bluetooth does not pose possible errors or (even at cases even maybe system hangs ups?). The actual reason in my case to want to disable bluetooth on a productive Linux server operating like host was I found out in dmesg produced output, some errors related to Bluetooth, here they are:


root@deb:~# dmesg|grep -i 'call trace' -A 8
[323406.744439] Call Trace:
[323406.744440] [] ? lapic_next_event+0x18/0x1d
[323406.744450] [] ? __report_bad_irq+0x30/0x7d
[323406.744453] [] ? note_interrupt+0x105/0x16e
[323406.744455] [] ? handle_fasteoi_irq+0x93/0xb5
[323406.744458] [] ? handle_irq+0x17/0x1d
[323406.744460] [] ? do_IRQ+0x57/0xb6
[323406.744463] [] ? ret_from_intr+0x0/0x11
[323406.744464]

I saw this error and similar ones occuring, every now and then obviously displaying something wents wrongs with IRQs related to BlueTooth Communication with Kernel (as it keeps processing requests loaded in system memory) …

Well anyways having the bluetooth kernel module loaded on memory just takes up few chunks of useless assigned memory.
I don't have intention to use bluetoothever in future on these host so I decided to completely remove bluetooth support on those Debian.

1. Remove blueetoh support on Debian GNU / Linux

First to check info about the loaded kernel module bluetooth.ko and its assigned module load alias run:


root@deb:~# /sbin/modinfo bluetooth
filename: /lib/modules/2.6.32-5-amd64/kernel/net/bluetooth/bluetooth.ko
alias: net-pf-31
license: GPL
version: 2.15
description: Bluetooth Core ver 2.15
author: Marcel Holtmann
srcversion: 9FD5BF98FC88505DC637909
depends: rfkill
vermagic: 2.6.32-5-amd64 SMP mod_unload modversions

Secondly disable memory preloaded bluetooth.ko on the current host with cmds:


root@deb:~# rmmod -f bnep
root@deb:~# rmmod -f l2cap
root@deb:~# rmmod -f sco
root@deb:~# rmmod -f bluetooth

Default way to control if Bluetooth (on host support is ON or OFF) is through /etc/default/bluetooth. Inside /etc/default/bluetooth is a control variable:


BLUETOOTH_ENABLED=1

To shut it off change its value to 0:


BLUETOOTH_ENABLED=0

Then to permanently prevent bluetooth.ko from being ever in future loaded its also good idea to blacklist modules – bnep, btusb, bluetooth:


root@deb:~# echo 'blacklist bnep' >> /etc/modprobe.d/bluetooth.conf
root@deb:~# echo 'blacklist btusb' >> /etc/modprobe.d/bluetooth.conf
root@deb:~# echo 'blacklist bluetooth' >> /etc/modprobe.d/bluetooth.conf

Onwards re-build, current kernel initramfs:


root@deb:~# update-initramfs -u -k `uname -r` -v
......
......

Next update boot init scripts with update-rc.d to make sure bluetooth (service / daemon) is not started:


root@deb:~# update-rc.d bluetooth remove
......

That's all bluetooth will not load up anymore on next boot and at present time will not take up useless mem space.

2. Re-enable disabled blueetooth on Debian Linux
 
I've been asked in one of comments, what to do If you need to re-enable bluetooth on your Debian Linux at some time in future, so here are the steps to turn back blueetooth on again


/etc/modprobe.d/bluetooth.conf

Change variable:

BLUETOOTH_ENABLED=0

to 

BLUETOOTH_ENABLED=1

Open  /etc/modprobe.d/bluetooth.conf and remove any blacklisted modules, e.g:

'blacklist bnep'
'blacklist btusb'
&39;blacklist bluetooth'

Rebuild again kernel ramfs

root@deb:~# update-initramfs -u -k `uname -r` -v
 
Enjoy 🙂

How to make GRE tunnel iptables port redirect on Linux

Saturday, August 20th, 2011

I’ve recently had to build a Linux server with some other servers behind the router with NAT.
One of the hosts behind the Linux router was running a Window GRE encrypted tunnel service. Which had to be accessed with the Internet ip address of the server.
In order < б>to make the GRE tunnel accessible, a bit more than just adding a normal POSTROUTING DNAT rule and iptables FORWARD is necessery.

As far as I’ve read online, there is quite of a confusion on the topic of how to properly configure the GRE tunnel accessibility on Linux , thus in this very quick tiny tutorial I’ll explain how I did it.

1. Load the ip_nat_pptp and ip_conntrack_pptp kernel module

linux-router:~# modprobe ip_nat_pptp
linux-router:~# modprobe ip_conntrack_pptp

These two modules are an absolutely necessery to be loaded before the remote GRE tunnel is able to be properly accessed, I’ve seen many people complaining online that they can’t make the GRE tunnel to work and I suppose in many of the cases the reason not to be succeed is omitting to load this two kernel modules.

2. Make the ip_nat_pptp and ip_nat_pptp modules to load on system boot time

linux-router:~# echo 'ip_nat_pptp' >> /etc/modules
linux-router:~# echo 'ip_conntrack_pptp' >> /etc/modules

3. Insert necessery iptables PREROUTING rules to make the GRE tunnel traffic flow

linux-router:~# /sbin/iptables -A PREROUTING -d 111.222.223.224/32 -p tcp -m tcp --dport 1723 -j DNAT --to-destination 192.168.1.3:1723
linux-router:~# /sbin/iptables -A PREROUTING -p gre -j DNAT --to-destination 192.168.1.3

In the above example rules its necessery to substitute the 111.222.223.224 ip address withe the external internet (real IP) address of the router.

Also the IP address of 192.168.1.3 is the internal IP address of the host where the GRE host tunnel is located.

Next it’s necessery to;

4. Add iptables rule to forward tcp/ip traffic to the GRE tunnel

linux-router:~# /sbin/iptables -A FORWARD -p gre -j ACCEPT

Finally it’s necessery to make the above iptable rules to be permanent by saving the current firewall with iptables-save or add them inside the script which loads the iptables firewall host rules.
Another possible way is to add them from /etc/rc.local , though this kind of way is not recommended as rules would add only after succesful bootup after all the rest of init scripts and stuff in /etc/rc.local is loaded without errors.

Afterwards access to the GRE tunnel to the local IP 192.168.1.3 using the port 1723 and host IP 111.222.223.224 is possible.
Hope this is helpful. Cheers 😉

Text Monitoring of connection server (traffic RX / TX) business in ASCII graphs with speedometer / Easy Monitor network traffic performance

Friday, May 4th, 2012

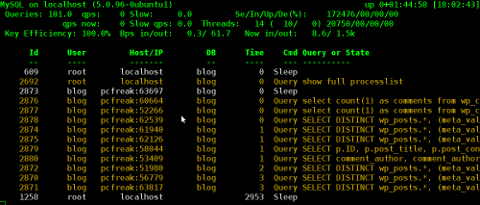
While reading some posts online related to MS-Windows TcpViewnetwork traffic analyzing tool. I've came across very nice tool for tracking connection speed for Linux (Speedometer). If I have to compare it, speedometer is somehow similar to nethogs and iftop bandwidth network measuring utilities .

What differentiates speedometer from iftop / nethogs / iptraf is it is more suitable for visualizing a network file or data transfers.
The graphs speedometer draws are way easier to understand, than iftop graphs.

Even complete newbies can understand it with no need for extraordinary knowledge in networking. This makes Speedometer, a top tool to visually see the amount of traffic flowing through server network interface (eth0) … (eth1) etc.

What speedometer shows is similar to the Midnight Commander's (mc) file transfer status bar, except the statistics are not only for a certain file transfer but can show overall statistics over server passing network traffic amount (though according to its manual it can be used to also track individual file transfers).

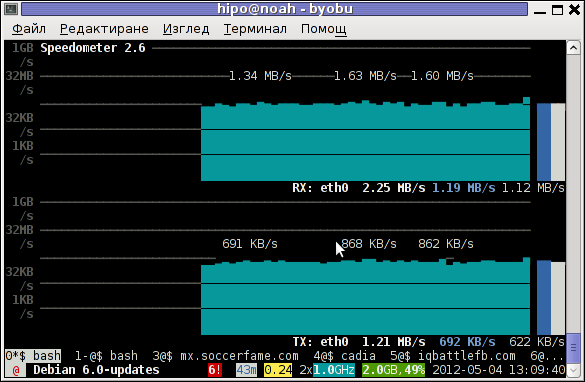
The simplicity for basic use makes speedometer nice tool to track for network congestion issues on Linux. Therefore it is a  must have outfit for every server admin. Below you see a screenshot of my terminal running speedometer on a remote server.

Speedometer ascii traffic track server network business screenshot in byobu screen like virtual terminal emulator

1. Installing speedometer on Debian / Ubuntu and Debian derivatives

For Debian and Ubuntu server administrators speedometer is already packaged as a deb so its installation is as simple as:

debian:~# apt-get --yes install speedometer
....

2. Installing speedometer from source for other Linux distributions CentOS, Fedora, SuSE etc.

Speedometer is written in python programming language, so in order to install and use on other OS Linux platforms, it is necessery to have installed (preferably) an up2date python programming language interpreter (python ver. 2.6 or higher)..
Besides that it is necessary to have installed the urwid -( console user interface library for Python) available for download via excess.org/urwid/


Hence to install speedometer on RedHat based Linux distributions one has to follow these steps:

a) Download & Install python urwid library

[root@centos ~]# cd /usr/local/src
[root@centos src]# wget -q http://excess.org/urwid/urwid-1.0.1.tar.gz
[root@centos src]# tar -zxvvf urwid-1.0.1.tar.gz
....
[root@centos src]# cd urwid-1.0.1
[root@centos urwid-1.0.1]# python setup.py install
running install
running build
running build_py
creating build
creating build/lib.linux-i686-2.4
creating build/lib.linux-i686-2.4/urwid
copying urwid/tests.py -> build/lib.linux-i686-2.4/urwid
copying urwid/command_map.py -> build/lib.linux-i686-2.4/urwid
copying urwid/graphics.py -> build/lib.linux-i686-2.4/urwid
copying urwid/vterm_test.py -> build/lib.linux-i686-2.4/urwid
copying urwid/curses_display.py -> build/lib.linux-i686-2.4/urwid
copying urwid/display_common.py -> build/lib.linux-i686-2.4/urwid
....

b) Download and install python-setuptools

python-setuptools is one other requirement of speedometer, happily on CentOS and Fedora the rpm package is already there and installable with yum:

[root@centos ~]# yum -y install python-setuptools
....

c) Download and install Speedometer

[root@centos urwid-1.0.1]# cd /usr/local/src/
[root@centos src]# wget -q http://excess.org/speedometer/speedometer-2.8.tar.gz
[root@centos src]# tar -zxvvf speedometer-2.8.tar.gz
.....
[root@centos src]# cd speedometer-2.8
[root@centos speedometer-2.8]# python setup.py install
Traceback (most recent call last):
File "setup.py", line 26, in ?
import speedometer
File "/usr/local/src/speedometer-2.8/speedometer.py", line 112
n = n * granularity + (granularity if r else 0)
^

While running the CentOS 5.6 installation of speedometer-2.8, I hit the
"n = n * granularity + (granularity if r else 0)
error.

After consultation with some people in #python (irc.freenode.net), I've figured out this error is caused due the outdated version of python interpreter installed by default on CentOS Linux 5.6. On CentOS 5.6 the python version is:

[root@centos ~]# python -V
Python 2.4.3

As I priorly said speedometer 2.8's minimum requirement for a python to be at v. 2.6. Happily there is quick way to update python 2.4 to python 2.6 on CentOS 5.6, as there is an RPM repository maintained by Chris Lea which contains RPM binary of python 2.6.

To update python 2.4 to python 2.6:

[root@centos speedometer-2.8]# rpm -Uvh http://yum.chrislea.com/centos/5/i386/chl-release-5-3.noarch.rpm[root@centos speedometer-2.8]# rpm --import /etc/pki/rpm-gpg/RPM-GPG-KEY-CHL[root@centos speedometer-2.8]# yum install python26

Now the newly installed python 2.6 is executable under the binary name python26, hence to install speedometer:

[root@centos speedometer-2.8]# python26 setup.py install
[root@centos speedometer-2.8]# chown root:root /usr/local/bin/speedometer
[root@centos speedometer-2.8]# chmod +x /usr/local/bin/speedometer

[root@centos speedometer-2.8]# python26 speedometer -i 1 -tx eth0

The -i will instruct speedometer to refresh the screen graphs once a second.

3. Using speedometer to keep an eye on send / received traffic network congestion

To observe, the amount of only sent traffic via a network interface eth0 with speedometer use:

debian:~# speedometer -tx eth0

To only keep an eye on received traffic through eth0 use:

debian:~# speedometer -rx eth0

To watch over both TX and RX (Transmitted and Received) network traffic:

debian:~# speedometer -tx eth0 -rx eth0

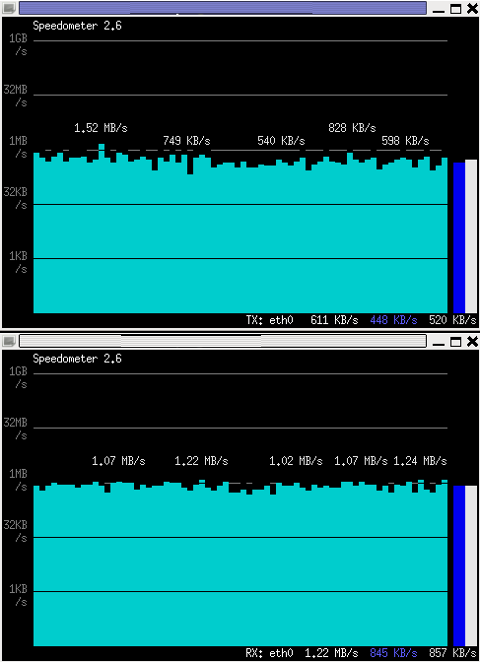
If you want to watch in separate windows TX and RX traffic while  running speedometer you can run in separate xterm windows speedometer -tx eth0 and speedometer -rx eth0, like in below screenshot:

Monitor Received and Transmitted server Network traffic in two separate xterm windows with speedometer ascii graphs

4. Using speedometer to test network maximum possible transfer speed between server (host A) and server (host B)

The speedometer manual suggests few examples one of which is:

How fast is this LAN?

host-a$ cat /dev/zero | nc -l -p 12345
host-b$ nc host-a 12345 > /dev/null
host-b$ speedometer -rx eth0

When I red this example in speedometer's manual, it wasn't completely clear to me what the author really meant, but a bit after when I thought over the example I got his point.

The idea behind this example is that a constant stream of zeros taken from /dev/zero will be streamed over via a pipe (|) to nc which will bind a port number 12345, anyone connecting from another host machine, lets say a server with host host-b to port 12345 on machine host-a will start receiving the /dev/zero streamed content.

Then to finally measure the streamed traffic between host-a and host-b machines a speedometer is started to visualize the received traffic on network interface eth0, thus measuring the amount of traffic flowing from host-a to host-b

I give a try to the exmpls, using for 2 test nodes my home Desktop PC, Linux running  arcane version of Ubuntu and my Debian Linux notebook.

First on the Ubuntu PC I issued
 

hipo@hip0-desktop:~$ cat /dev/zero | nc -l -p 12345
 

Note that I have previously had installed the netcat, as nc is not installed by default on Ubuntu and Debian. If you, don't have nc installed yet, install it with:

apt-get –yes install netcat

"cat /dev/zero | nc -l -p 12345" will not produce any output, but will display just a blank line.

Then on my notebook I ran the second command example, given in the speedometer manual:
 

hipo@noah:~$ nc 192.168.0.2 12345 > /dev/null

Here the 192.168.0.2 is actually the local network IP address of my Desktop PC. My Desktop PC is connected via a normal 100Mbit switch to my routing machine and receives its internet via  NAT. The second test machine (my laptop), gets its internet through a WI-FI connection received by a Wireless Router connected via a UTP cable to the same switch to which my Desktop PC is connected.

Finally to test / get my network maximum thoroughput I had to use:

hipo@noah:~$ speedometer -rx wlan0

Here, I  monitor my wlan0 interface, as this is my (laptop) wireless card interface over which I have connectivity to my local network and via which through the the WI-FI router I get connected to the internet.

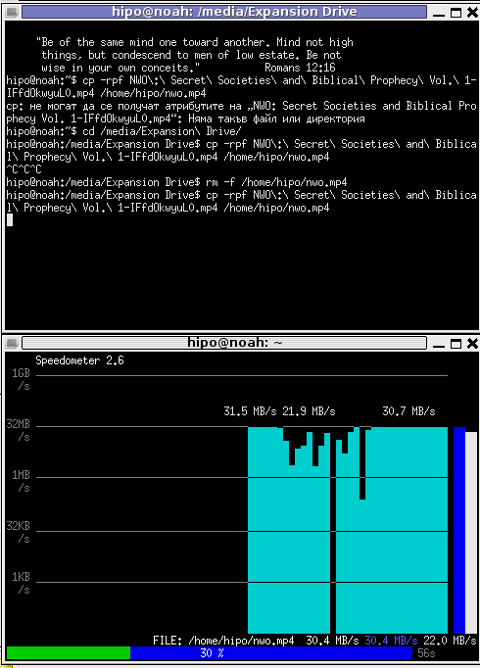
Below is a snapshot captured showing approximately what is the max network thoroughput from:

Desktop PC -> to my Thinkpad R61 laptop

Using Speedometer to test network thorougput between two network server hosts screenshot Debian Squeeze Linux

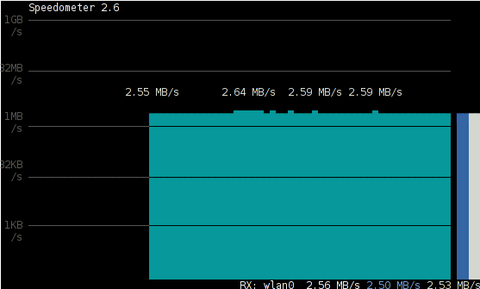
As you can see in the shot approximately the maximum network thoroughput is in between:
2.55MB/s min and 2.59MB/S max, the speed is quite low for a 100 MBit local network, but this is normal as most laptop wireless adapters hardly transfer traffic in more than 10 to 20 MBits per sec.

If the same nework thoroughput test is conducted between two machines both connected to a same 100 M/bit switch, the traffic should be at least a 8 MB/sec.

There is something, else to take in consideration that probably makes the provided example network thoroughput measuring a bit inaccurate. The fact that the /dev/zero content is stremed over is slowing down the zeroes sent over network because of the  pipe ( | ) use slows down the stream.

5. Using speedometer to visualize maximum writting speed to a local hard drive on Linux

In the speedometer manual, I've noticed another interesting application of this nifty tool.

speedometer can be used to track and visualize the maximum writing speed a hard disk drive or hard drive partition can support on Linux OS:

A copy paster from the manual text is as follows:

How fast can I write data to my filesystem? (with at least 1GB free)
dd bs=1000000 count=1000 if=/dev/zero of=bigfile &
speedometer bigfile

However, when I tried copy/pasting the example in terminal, to test the maximum writing speed to an external USB hard drive, only dd command was started and speedometer failed to initialize and display graphs of the file creation speed.

I've found a little "hack" that makes the man example work by adding a 3 secs sleep like so:

debian:/media/Expansion Drive# dd bs=1000000 count=1000 if=/dev/zero of=bigfile & sleep 3; speedometer bigfile

Here is a screenshot of the bigfile created by dd and tracked "in real time" by speedometer:

How fast is writting data to local USB expandable hard disk Debian Linux speedometer screenshot

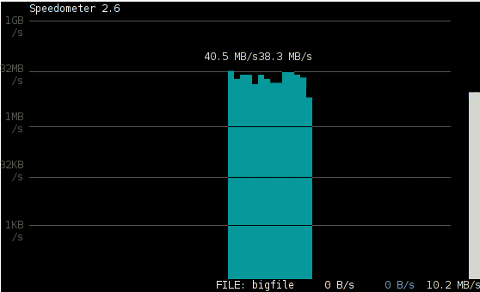
Actually the returned results from this external USB drive are, quite high, the possible reason for that is it is connected to my laptop over an USB protocol verion 3.

6. Using Speedometer to keep an eye on file download in progress

This application of speedometer is mostly useless especially on Linux where it is used as a Desktop.

However in some occasions if files are transferred over ssh or in non interactive FTP / Samba file transfers between Linux servers it can come handy.

To visualize the download and writing speed of lets say FTP transferred .AVI movie (during the actual file transfer) on the download host issue:

# speedometer Download-Folder/What-goes-around-comes-around.avi

7. Estimating approximate time for file transfer

There is another section in the speedometer manual pointing of the program use to calculate the time remaining for a file transfer.

The (man speedometer) provided example text is:

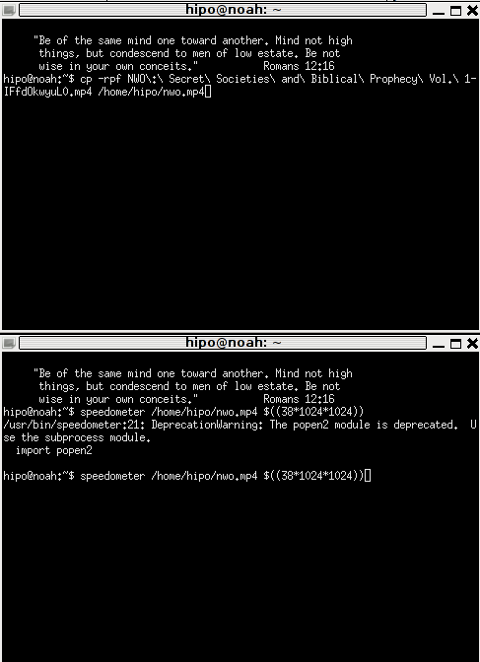
How long it will take for my 38MB transfer to finish?
speedometer favorite_episode.rm $((38*1024*1024))

At first glimpse it hard to understand (like the other manual example). A bit of reasoning and I comprehend what the man author meant by the obscure calculation:

$((38*1024*1024))

This is a formula used in which 38 has to be substituted with the exact file size amount of the transferred file. The author manual used a 38MB file so this is why he put $((38* … in the formula.

I give it a try – (just for the sake to see how it works) with a file with a size of 2500MB, in below two screenshot pictures I show my preparation to copy the file and the actual copying / "real time" transfer tracking with speedometer's status percentage completion bar.

xterm terminal copy file and estimate file copying operation speed on linux with speedometer preparation

Two xterm terminals one is copying a file the other one uses speedometer to estimate the time remaining to complete the file transfer from expansion USB hard drive to my laptop harddrive


Monitoring MySQL server queries and debunning performance (slow query) issues with native MySQL commands and with mtop, mytop

Thursday, May 10th, 2012

If you're a Linux server administrator running MySQL server, you need to troubleshoot performance and bottleneck issues with the SQL database every now and then. In this article, I will pinpoint few methods to debug basic issues with MySQL database servers.

1. Troubleshooting MySQL database queries with native SQL commands

a)One way to debug errors and get general statistics is by logging in with mysql cli and check the mysql server status:

# mysql -u root -p
mysql> SHOW STATUS;
+-----------------------------------+------------+
| Variable_name | Value |
+-----------------------------------+------------+
| Aborted_clients | 1132 |
| Aborted_connects | 58 |
| Binlog_cache_disk_use | 185 |
| Binlog_cache_use | 2542 |
| Bytes_received | 115 |
.....
.....
| Com_xa_start | 0 |
| Compression | OFF |
| Connections | 150000 |
| Created_tmp_disk_tables | 0 |
| Created_tmp_files | 221 |
| Created_tmp_tables | 1 |
| Delayed_errors | 0 |
| Delayed_insert_threads | 0 |
| Delayed_writes | 0 |
| Flush_commands | 1 |
.....
.....
| Handler_write | 132 |
| Innodb_page_size | 16384 |
| Innodb_pages_created | 6204 |
| Innodb_pages_read | 8859 |
| Innodb_pages_written | 21931 |
.....
.....
| Slave_running | OFF |
| Slow_launch_threads | 0 |
| Slow_queries | 0 |
| Sort_merge_passes | 0 |
| Sort_range | 0 |
| Sort_rows | 0 |
| Sort_scan | 0 |
| Table_locks_immediate | 4065218 |
| Table_locks_waited | 196 |
| Tc_log_max_pages_used | 0 |
| Tc_log_page_size | 0 |
| Tc_log_page_waits | 0 |
| Threads_cached | 51 |
| Threads_connected | 1 |
| Threads_created | 52 |
| Threads_running | 1 |
| Uptime | 334856 |
+-----------------------------------+------------+
225 rows in set (0.00 sec)

SHOW STATUS; command gives plenty of useful info, however it is not showing the exact list of queries currently processed by the SQL server. Therefore sometimes it is exactly a stucked (slow queries) execution, you need to debug in order to fix a lagging SQL. One way to track this slow queries is via enabling mysql slow-query.log. Anyways enabling the slow-query requires a MySQL server restart and some critical productive database servers are not so easy to restart and the SQL slow queries have to be tracked "on the fly" so to say.
Therefore, to check the exact (slow) queries processed by the SQL server (without restarting it), do
 

mysql> SHOW processlist;
+——+——+—————+——+———+——+————–+——————————————————————————————————+
| Id | User | Host | db | Command | Time | State | Info |
+——+——+—————+——+———+——+————–+——————————————————————————————————+
| 609 | root | localhost | blog | Sleep | 5 | | NULL |
| 1258 | root | localhost | NULL | Sleep | 85 | | NULL |
| 1308 | root | localhost | NULL | Query | 0 | NULL | show processlist |
| 1310 | blog | pcfreak:64033 | blog | Query | 0 | Sending data | SELECT comment_author, comment_author_url, comment_content, comment_post_ID, comment_ID, comment_aut |
+——+——+—————+——+———+——+————–+——————————————————————————————————+
4 rows in set (0.00 sec)
mysql>

SHOW processlist gives a good view on what is happening inside the SQL.

To get more complete information on SQL query threads use the full extra option:

mysql> SHOW full processlist;

This gives pretty full info on running threads, but unfortunately it is annoying to re-run the command again and again – constantly to press UP Arrow + Enter keys.

Hence it is useful to get the same command output, refresh periodically every few seconds. This is possible by running it through the watch command:

debian:~# watch "'show processlist' | mysql -u root -p'secret_password'"

watch will run SHOW processlist every 2 secs (this is default watch refresh time, for other timing use watch -n 1, watch -n 10 etc. etc.

The produced output will be similar to:

Every 2.0s: echo 'show processlist' | mysql -u root -p'secret_password' Thu May 10 17:24:19 2012

Id User Host db Command Time State Info
609 root localhost blog Sleep 3 NULL1258 root localhost NULL Sleep 649 NULL1542 blog pcfreak:64981 blog Query 0 Copying to tmp table \
SELECT p.ID, p.post_title, p.post_content,p.post_excerpt, p.pos
t_date, p.comment_count, count(t_r.o
1543 root localhost NULL Query 0 NULL show processlist

Though this "hack" is one of the possible ways to get some interactivity on what is happening inside SQL server databases and tables table. for administering hundred or thousand SQL servers running dozens of queries per second – monitor their behaviour few times aday using mytop or mtop is times easier.

Though, the names of the two tools are quite similar and I used to think both tools are one and the same, actually they're not but both are suitable for monitoring sql database execution in real time.

As a sys admin, I've used mytop and mtop, on almost each Linux server with MySQL server installed.
Both tools has helped me many times in debugging oddities with sql servers. Therefore my personal view is mytop and mtop should be along with the Linux sysadmin most useful command tools outfit, still I'm sure many administrators still haven't heard about this nice goodies.

1. Installing mytop on Debian, Ubuntu and other deb based GNU / Linux-es

mytop is available for easy install on Debian and across all debian / ubuntu and deb derivative distributions via apt.

Here is info obtained with apt-cache show

debian:~# apt-cache show mytop|grep -i description -A 3
Description: top like query monitor for MySQL
Mytop is a console-based tool for monitoring queries and the performance
of MySQL. It supports version 3.22.x, 3.23.x, 4.x and 5.x servers.
It's written in Perl and support connections using TCP/IP and UNIX sockets.

Installing the tool is done with the trivial:

debian:~# apt-get --yes install mytop
....

mtop used to be available for apt-get-ting in Debian Lenny and prior Debian releases but in Squeeze onwards, only mytop is included (probably due to some licensing incompitabilities with mtop??).

For those curious on how mtop / mytop works – both are perl scripts written to periodically connects to the SQL server and run commands similar to SHOW FULL PROCESSLIST;. Then, the output is parsed and displayed to the user.

Here how mytop running, looks like:

MyTOP showing queries running on Ubuntu 8.04 Linux - Debugging interactively top like MySQL

2. Installing mytop on RHEL and CentOS

By default in RHEL and CentOS and probably other RedHat based Linux-es, there is neither mtop nor mytop available in package repositories. Hence installing the tools on those is only available from 3rd parties. As of time of writting an rpm builds for RHEL and CentOS, as well as (universal rpm distros) src.rpm package is available on http://pkgs.repoforge.org/mytop/. For the sake of preservation – if in future those RPMs disappear, I made a mirror of mytop rpm's here

Mytop rpm builds depend on a package perl(Term::ReadKey), my attempt to install it on CentOS 5.6, returned following err:

[root@cenots ~]# rpm -ivh mytop-1.4-2.el5.rf.noarch.rpm
warning: mytop-1.4-2.el5.rf.noarch.rpm: Header V3 DSA signature: NOKEY, key ID 6b8d79e6
error: Failed dependencies:
perl(Term::ReadKey) is needed by mytop-1.4-2.el5.rf.noarch

The perl(Term::ReadKey package is not available in CentOS 5.6 and (probably other centos releases default repositories so I had to google perl(Term::ReadKey) I found it on http://rpm.pbone.net/ package repository, the exact url to the rpm dependency as of time of writting this post is:

ftp://ftp.pbone.net/mirror/yum.trixbox.org/centos/5/old/perl-Term-ReadKey-2.30-2.rf.i386.rpm

Quickest, way to install it is:

[root@centos ~]# rpm -ivh ftp://ftp.pbone.net/mirror/yum.trixbox.org/centos/5/old/perl-Term-ReadKey-2.30-2.rf.i386.rpmRetrieving ftp://ftp.pbone.net/mirror/yum.trixbox.org/centos/5/old/perl-Term-ReadKey-2.30-2.rf.i386.rpmPreparing... ########################################### [100%]
1:perl-Term-ReadKey ########################################### [100%]

This time mytop, install went fine:

[root@centos ~]# rpm -ivh mytop-1.4-2.el5.rf.noarch.rpm
warning: mytop-1.4-2.el5.rf.noarch.rpm: Header V3 DSA signature: NOKEY, key ID 6b8d79e6
Preparing... ########################################### [100%]
1:mytop ########################################### [100%]

To use it further, it is the usual syntax:

mytop -u username -p 'secret_password' -d database

CentOS Linux MyTOP MySQL query benchmark screenshot - vpopmail query

3. Installing mytop and mtop on FreeBSD and other BSDs

To debug the running SQL queries in a MySQL server running on FreeBSD, one could use both mytop and mtop – both are installable via ports:

a) To install mtop exec:

freebsd# cd /usr/ports/sysutils/mtop
freebsd# make install clean
....

b) To install mytop exec:

freebsd# cd /usr/ports/databases/mytop
freebsd# make install clean
....

I personally prefer to use mtop on FreeBSD, because once run it runs prompts the user to interactively type in the user/pass

freebsd# mtop

Then mtop prompts the user with "interactive" dialog screen to type in user and pass:

Mtop interactive type in username and password screenshot on FreeBSD 7.2

It is pretty annoying, same mtop like syntax don't show user/pass prompt:

freebsd# mytop
Cannot connect to MySQL server. Please check the:

* database you specified "test" (default is "test")
* username you specified "root" (default is "root")
* password you specified "" (default is "")
* hostname you specified "localhost" (default is "localhost")
* port you specified "3306" (default is 3306)
* socket you specified "" (default is "")
The options my be specified on the command-line or in a ~/.mytop
config file. See the manual (perldoc mytop) for details.
Here's the exact error from DBI. It might help you debug:
Unknown database 'test'

The correct syntax to run mytop instead is:

freebsd# mytop -u root -p 'secret_password' -d 'blog'

Or the longer more descriptive:

freebsd# mytop --user root --pass 'secret_password' --database 'blog'

By the way if you take a look at mytop's manual you will notice a tiny error in documentation, where the three options –user, –pass and –database are wrongly said to be used as -user, -pass, -database:

freebsd# mytop -user root -pass 'secret_password' -database 'blog'
Cannot connect to MySQL server. Please check the:

* database you specified "atabase" (default is "test")
* username you specified "ser" (default is "root")
* password you specified "ass" (default is "")
* hostname you specified "localhost" (default is "localhost")
* port you specified "3306" (default is 3306)
* socket you specified "" (default is "")a
...
Access denied for user 'ser'@'localhost' (using password: YES)

Actually it is interesting mytop, precededed historically mtop.
mtop was later written (probably based on mytop), to run on FreeBSD OS by a famous MySQL (IT) spec — Jeremy Zawodny .
Anyone who has to do frequent MySQL administration tasks, should already heard Zawodny's name.
For those who haven't, Jeremy used to be a head database administrators and developer in Yahoo! Inc. some few years ago.
His website contains plenty of interesting thoughts and writtings on MySQL server and database management
 

How to create ssh tunnels / ssh tunneling on Linux and FreeBSD with openssh

Saturday, November 26th, 2011

ssh-tunnels-port-forwarding-windows-linux-bypassing-firewall-diagram
SSH tunneling
allows to send and receive traffic using a dedicated port. Using an ssh traffic can have many reasons one most common usage reason is to protect the traffic from a host to a remote server or to access port numbers which are by other means blocked by firewall, e.g.: (get around firewall filtering)
SSH tunneling works only with TCP traffic. The way to make ssh tunnel is with cmds:

host:/root# ssh -L localhost:deshost:destport username@remote-server.net
host:/root# ssh -R restport:desthost:localport username@remote-server.net
host:/root# ssh -X username@remote-server.net

This command will make ssh to bind a port on localhost of the host host:/root# machine to the host desthost:destport (destination host : destinationport). Important to say deshost is the host destination visible from the remote-server.net therefore if the connection is originating from remote-server.net this means desthost will be localhost.
Mutiple ssh tunnels to multiple ports using the above example commands is possible. Here is one example of ssh tunneling
Let’s say its necessery to access an FTP port (21) and an http port (80), listening on remote-server.net In that case desthost will be localhost , we can use locally the port (8080) insetad of 80, so it will be no necessery to make the ssh tunnel with root (admin privileges). After the ssh session gets opened both services will be accessible on the local ports.

host:/home/user$ ssh -L 21:localhost:21 -L 8080:localhost:80 user@remote-server.net

That’s all enjoy 😉

How to disable Debian GNU / Linux (Squeeze) Apache 2 version reporting to improve security – Hide Apache server version

Friday, October 5th, 2012

Debian GNU / Linux's Apache default behavior is to report Apache server name, version and Linux distribution version and codename.
This is shown as a minor security leak in many Security Scanner (audit) software like Nessus. It reveals a vital information which could help malicious attacker later to use exploit if the version number in question is vulnerable.

The quickest way to check, either Apache versioning and distro info is disabled is with telnet:

hipo@noah:~/Desktop$ telnet www.pc-freak.net 80
Trying 83.228.93.76…
Connected to www.pc-freak.net.
Escape character is '^]'.
HEAD / HTTP/1.0

Connection closed by foreign host.
hipo@noah:~/Desktop$ telnet www.pc-freak.net 80
Trying 83.228.93.76…
Connected to www.pc-freak.net.
Escape character is '^]'.
HEAD / HTTP/1.0

HTTP/1.1 200 OK
Date: Fri, 05 Oct 2012 10:48:36 GMT
Server: Apache/2.2.16 (Debian)
X-Powered-By: PHP/5.3.3-7+squeeze14
Vary: Accept-Encoding
Connection: close
Content-Type: text/html

Disabling this Distro version codename and version number reporting on Debian is done by changing in file /etc/apache2/conf.d/security directives:


ServerTokens OS
ServerSignature On

to


ServerSignature Off
ServerTokens ProductOnly

Here important note to make is if you try adding:

ServerSignature Off and ServerTokens Prod straight in Debian general config /etc/apache2/apache2.conf, but did not change the settings set for the vars through /etc/apache2/conf.d/security; settings from /etc/apache2/conf.d/security will overwrite ServerSignature / ServerTokens settings set in /etc/apache2/apache2.conf

I tried this myself (forgotting about /etc/apache2/conf.d/security) and adding both variables straight in apache2.conf. After Apache restart Apache version number and type of distribution continued be returned by the WebServer.
I thought something specific changed in Debian Squeeze – Apache/2.2.16 so this two variables are probably not working so I did a quick research online seing other people complaining also unable to disable Apache ver and Linux distro version and looking for a reason why. Well anyways if you happen to also ponder, why ServerSignature Off and ServerTokens ProductOnly does not take effect keep in mind it is due to overwritten settings via /etc/apache2/conf.d/security, changing the values there and restarting Apache and you're done 🙂

To make sure 100% Apache is no longer returning exact version number and host installed distro type, use telnet again:

hipo@noah:~/Desktop$ telnet www.pc-freak.net 80
Trying 83.228.93.76…
Connected to www.pc-freak.net.
Escape character is '^]'.
HEAD / HTTP/1.0

Connection closed by foreign host.

How to make SSH tunnel with PuTTY terminal client

Monday, November 18th, 2013

Create-how to make ssh tunnel with Putty on microsoft windows Vista / 7 XP / 2000
Earlier I blogged how to create SSH tunnels on Linux. Another interesting thing is how to make SSH tunnels on Windows. This can be done with multiple SSH clients but probably quickest and most standard way is to do create SSH tunnel with Putty. So why would one want to make SSH tunnel to a Windows host? Lets say your remote server has a port filtered to the Internet but available to a local network to which you don't have direct access, the only way to access the port in question then is to create SSH tunnel between your computer and remote machine on some locally binded port (lets say you need to access port 80 on remote host and you will access it through localhost tunneled through 8080). Very common scenario where tunneling comes handy if you have a Tomcat server behind firewalled DMZ| / load balancer or Reverse Proxy. Usually on well secured networks direct access to Tomcat application server will be disabled to its listen port (lets say 11444). Another important great think of SSH tunnels is all information between Remote server and local PC are transferred in strong SSH crypted form so this adds extra security level to your communication.
Once "real life" case of SSH tunnel is whether you have to deploy an application which fails after deployment with no meaningful message but error is returned by Apache Reverse Proxy. To test directly tomcat best thing is to create SSH tunnel between remote host 11444 and local host through 11444 (or any other port of choice). Other useful case would be if you have to access directly via CLI interface an SQL server lets say MySQL (remote port 3306 filtered) and inaccessible with mysql cli or Oracle DB with Db listener on port 1521 (needed to accessed via sqlplus).

In that case Putty's Tunneling capabilities comes handy especially if you don't have a Linux box at hand.
To create new SSH tunnel in putty to MySQL port 3306 on localhost (3306) – be sure MySQL is not running on localhost 😉
Open Putty Navigate in left pane config bar to:

SSH -> Tunnels

Type in

Source Port

– port on which SSH tunnel will be binded on your Windows (localhost / 127.0.0.1) in this example case 3306.

Then for

Destination
– IP address or host of remote host with number of port to which SSH tunnel will be opened.

N.B. ! in order to make tunneling possible you will need to have opened access to SSH port of remote (Destination) host

make ssh tunnel on Microsoft Windows putty to remote filtered mysql shot

make ssh tunnels on Microsoft windows putty to remote filtered mysql 2 screenshot

open ssh tunnel via WINDOWS port 22 on microsoft windows 7 screenshot

Once click Open you will be prompted for username on remote host in my case to my local router 83.228.93.76. Once you login to remote host open command prompt and try to connect Windows Command prompt Start -> Run (cmd.exe) ;

C:\Users\\hipo> telnet localhost 3306

Connection should be succesful and you from there on assuming you have the MySQL cli version for windows installed you can use to login to remote SQL via SSH tunnel with;

C:\Users\\hipo> mysql -u root -h localhost -p

To later remove existing SSH Tunnel go again to SSH -> Tunnels press on SSH tunnel and choose Remove

Further you can craete multiple SSH tunnels for all services to remote host where access is needed. Important think to remember when creating multiple SSH connections is source port on localhost to remote machine should be unique