Posts Tagged ‘host’
Monday, August 8th, 2011 
I’ve recently built new mail qmail server with vpopmail to serve pop3 connectins and courierimap and courierimaps to take care for IMAP IMAPS.
I further used telnet to test if the Linux server pop3 service on (110) and imap on (143) worked fine, straight after the completed qmail install.
Here is how to test mail server with vpopmail listening for connections on pop3 port :
debian:~# telnet mail.mymailserver.com 110

Trying 111.222.333.444...

Connected to mail.mymailserver.com.

Escape character is '^]'.

+OK <2813.1312745988@mymailserver.com>

USER hipo@mymailserver.com

+OK

PASS here_goes_my_secret_pass

+OK

LIST

1 309783

2 64053

3 2119

4 64357

5 317893

RETR 1

My first mail content retrieved with RETR commandgoes here ....

quit

+OK

Connection closed by foreign host.
You see I have 5 messages in my mailbox, as you can see I used RETR command to check the content of my mail, this is handy as I can read my mails straight with telnet (if the mail is in plain text), of course it’s a bit more complicated if I have to read encrypted or html mail, though still its easy to write a tiny parser and pipe the content produced by telnet command to lynx or some other text based browser.
Now another sys admin handy tip is the use of telnet to check my mail servers IMAP servers is correctly operating.
Here is how:
debian:~# telnet mail.mymailserver.com 143

Trying 111.222.333.444...

Connected to localhost.

Escape character is '^]'.

* OK [CAPABILITY IMAP4rev1 UIDPLUS CHILDREN NAMESPACE THREAD=ORDEREDSUBJECT THREAD=REFERENCES SORT QUOTA IDLE ACL ACL2=UNION STARTTLS] Courier-IMAP ready. Copyright 1998-2010 Double Precision, Inc. See COPYING for distribution information.

01 LOGIN hipo@mymailserver.com here_goes_my_secret_pass

A OK LOGIN Ok.

02 LIST "" *

* LIST (Unmarked HasNoChildren) "." "INBOX"

02 OK LIST completed

03 SELECT INBOX

* FLAGS (Draft Answered Flagged Deleted Seen Recent)

* OK [PERMANENTFLAGS (* Draft Answered Flagged Deleted Seen)] Limited

* 5 EXISTS

* 5 RECENT

* OK [UIDVALIDITY 1312746907] Ok

* OK [MYRIGHTS "acdilrsw"] ACL

03 OK [READ-WRITE] Ok

04 STATUS INBOX (MESSAGES)

* STATUS "INBOX" (MESSAGES 5)

04 OK STATUS Completed.

05 FETCH 1 ALL

...

06 FETCH 1 BODY

...

07 FETCH 1 ENVELOPE

...
As you can see according to standard to send commands to IMAP server from console after a telnet connection you will have to always include a command line number like 01, 02, 03 .. etc.
Using such a line numbering is not obligitory and also letters like A, B, C could be use still line numbering with numbers is generally a good idea since it’s easier for reading on the screen.
Now line 02 shows you available mailboxes, line 03 SELECT INBOX selects the imap Inbox to be further operated with, 04 STATUS INBOX cmd displays status about current mailboxes in folder.
FETCH 1 ALL instructs the imap server to get list of all IMAP message headers. Next command in line 05 FETCH 1 BODY will display the message body of the first message in list.
The 07 FETCH 1 ENVELOPE will display the mail headers for the 1 message.
Few other IMAP commands which might be helpfun on connection are:
08 FETCH 1 FULL

09 FETCH * FULL
First one would fetch complete content of a message numbered one from the imap server and the second one 09 FETCH * FULL will get all the mail content for all messages located on the remote IMAP server.
The STATUS command aforementioned earlier could take the following list of arguments:
MESSAGES, UNSEEN, RECENT UIDNEXT UIDVALIDITY
These commands are a gold mine for me as a sysadmin as it helps quickly solve problems, hope they would help to somebody out there as well 😉
This way is a way shorter than bothering each time to check, if some customer e-mail account is improperly configured by creating setting up a new account in Thunderbird.
Tags: acl, ALL, bit, care, cmd, com, content, course, Deleted, double precision, Draft, first mail, FULL, handy tip, hipo, host, html mail, imap, imaps, Linux, linux server, Lynx, mail content, mail server service, mail servers, new mail, parser, PASS, pop, pop mail server, precision inc, quot, RETR, server pop3, starttls, sys admin, Telnet, text, vpopmail
Posted in Linux, Postfix, Qmail, System Administration | 2 Comments »
Tuesday, May 3rd, 2011 Every now and then my FreeBSD router dmesg ( /var/log/dmesg.today ) logs, gets filled with error messages like:
pid 86369 (httpd), uid 80, was killed: out of swap space

swap_pager_getswapspace(14): failed

swap_pager_getswapspace(16): failed

swap_pager_getswapspace(11): failed

swap_pager_getswapspace(12): failed

swap_pager_getswapspace(16): failed

swap_pager_getswapspace(16): failed

swap_pager_getswapspace(16): failed

swap_pager_getswapspace(16): failed

swap_pager_getswapspace(14): failed

swap_pager_getswapspace(16): failed

swap_pager_getswapspace(8): failed
Using swapinfo during the swap_pager_getswapspace(16): failed messages were logged in, I figured out that definitely the swap memory over-use is the bottleneck for the troubles, to find this I used the command:
freebsd# swapinfo

Device 1K-blocks Used Avail Capacity Type

/dev/ad0s1b 49712 45920 3792 92% Interleaved
After some investigation, I’ve figured out that the MySQL server is causing the kernel exceeded swap troubles.
My current MySQL server version is installed from the ports tree, whether I’m using the bsd port /usr/ports/databases/mysql51-server/ and it appears to work just fine.
However I have noticed that the mysql-server is missing a my.cnf file!, which means the mysql server is running under a mode with some kind of default configurations.
Strangely in the system process list it appeared it is using a default my.cnf file located in /var/db/mysql/my.cnf
Below you see the paste from the ps command:
ps axuww
freebsd# ps axuww | grep -i my.cnf | grep -v grep

mysql 7557 0.0 0.1 3464 1268 p1 I 12:03PM 0:00.01 /bin/sh /usr/local/bin/mysqld_safe --defaults-extra-file=/var/db/mysql/my.cnf --user=mysql --datadir=/var/db/mysql --pid-file=/var/db/mysql/pcfreak.pidmysql 7589 0.0 5.1 93284 52852 p1 I 12:03PM 0:59.01 /usr/local/libexec/mysqld --defaults-extra-file=/var/db/mysql/my.cnf --basedir=/usr/local --datadir=/var/db/mysql --user=mysql --pid-file=/var/db/mysql/pcfreak.pid --port=3306 --socket=/tmp/mysql.sock
Nevertheless it appeared the sql server is running the file /var/db/mysql/my.cnf conf was not existing! This was really weird for me as I’m used to have the default my.cnf from my previous experience with Linux servers!
Thus the next logical thing I did was to create my.cnf conf file in order to be able to have a proper limiting configuration for the sql server.
The FreeBSD my.cnf skele files are found in /usr/local/share/mysql/, here are the 4 files one can use as a starting basis for further configuration of the mysql-server.
freebsd# ls -al /usr/local/share/mysql/my-*.cnf

-r--r--r-- 1 root wheel 4948 Aug 12 2009 /usr/local/share/mysql/my-huge.cnf

-r--r--r-- 1 root wheel 20949 Aug 12 2009 /usr/local/share/mysql/my-innodb-heavy-4G.cnf

-r--r--r-- 1 root wheel 4924 Aug 12 2009 /usr/local/share/mysql/my-large.cnf

-r--r--r-- 1 root wheel 4931 Aug 12 2009 /usr/local/share/mysql/my-medium.cnf

-r--r--r-- 1 root wheel 2502 Aug 12 2009 /usr/local/share/mysql/my-small.cnf
I have chosen to use the my-medium.cnf as a skele to tune up, as my server is not high iron one e.g. the host I run the mysql is a (simple dual core 1.2Ghz system).
Further on I copied the /usr/local/share/mysql/my-medium.cnf to /var/db/mysql/my.cnf e.g.:
freebsd# cp -rpf /usr/local/share/mysql/my-medium.cnf /var/db/mysql/my.cnf
As a next step to properly tune up the default values of the newly copied my.cnf to my specific server I used the Tuning-Primer MySQL tuning script
Using tuning-primer.sh is really easy as all I did is download, launch it and follow the script suggestions to correct some of the values already in my.cnf
I have finally ended up with the following my.cnf after using tuning-primer.sh to optimize mysql server to work with my bsd host
Now I really hope the shitty swap_pager_getswapspace: failed errors would not haunt me once again by crashing my server and causing mem overheads.
Still I wonder why the port developer Alex Dupre – ale@FreeBSD.org choose not to provide the default mysql51-server conf with some kind of my.cnf file? I hope he had a good reason.
Tags: Aug, Avail, avail capacity, bottleneck, cause and solution, cnf, command ps, databases, default, default configurations, dmesg, error messages, failedswap, file, freebsd router, getswapspace, host, Interleaved, investigation, kernel, log, logs, memory, mysql server, mysqld, pcfreak, ports, ps command, root, script, server version, Strangely, swapinfo, system, tree, uid
Posted in FreeBSD, MySQL, System Administration | 2 Comments »
Thursday, April 19th, 2012 I'm doing replication for one server. Its not the first time I do configure replication between two MySQL database nodes, however since I haven't done it for a few years, my "know how" has mostly vanished so I had some troubles in setting it up. Once I followed some steps to configure replication I had to check if the two MASTER / Slave MySQL db nodes communicate properly. Hence I decided to drop a short post on that just in case if someone has to do the same or if I myself forget how I did it so I can check later on:
1. Check if MASTER MySQL server node is configured properly
The standard way to check a MySQL master node status info is with:
mysql> show master status;
+——————+———-+———————————————————+——————+
| File | Position | Binlog_Do_DB | Binlog_Ignore_DB |
+——————+———-+———————————————————+——————+
| mysql-bin.000007 | 106 | database1,database2,database3 | |
+——————+———-+———————————————————+——————+
1 row in set (0.00 sec)
By putting \G some extra status info is provided:
mysql> show master status\G;
*************************** 1. row ***************************
File: mysql-bin.000007
Position: 106
Binlog_Do_DB: database1,database2,database3
Binlog_Ignore_DB:
1 row in set (0.00 sec)
ERROR:
No query specified
2. Check if Slave MySQL node is configured properly
To check status of the slave the cmd is:
mysql> show slave status;
The command returns an output like:
mysql> show slave status;+———————————-+————-+————-+————-+—————+——————+———————+————————-+—————+———————–+——————+——————-+——————————————————-+———————+——————–+————————+————————-+—————————–+————+————+————–+———————+—————–+—————–+—————-+—————+——————–+——————–+——————–+—————–+——————-+—————-+———————–+——————————-+—————+—————+—————-+—————-+| Slave_IO_State | Master_Host | Master_User | Master_Port | Connect_Retry | Master_Log_File | Read_Master_Log_Pos | Relay_Log_File | Relay_Log_Pos | Relay_Master_Log_File | Slave_IO_Running | Slave_SQL_Running | Replicate_Do_DB | Replicate_Ignore_DB | Replicate_Do_Table | Replicate_Ignore_Table | Replicate_Wild_Do_Table | Replicate_Wild_Ignore_Table | Last_Errno | Last_Error | Skip_Counter | Exec_Master_Log_Pos | Relay_Log_Space | Until_Condition | Until_Log_File | Until_Log_Pos | Master_SSL_Allowed | Master_SSL_CA_File | Master_SSL_CA_Path | Master_SSL_Cert | Master_SSL_Cipher | Master_SSL_Key | Seconds_Behind_Master | Master_SSL_Verify_Server_Cert | Last_IO_Errno | Last_IO_Error | Last_SQL_Errno | Last_SQL_Error |+———————————-+————-+————-+————-+—————+——————+———————+————————-+—————+———————–+——————+——————-+——————————————————-+———————+——————–+————————+————————-+—————————–+————+————+————–+———————+—————–+—————–+—————-+—————+——————–+——————–+——————–+—————–+——————-+—————-+———————–+——————————-+—————+—————+—————-+—————-+| Waiting for master to send event | HOST_NAME.COM | slave_user | 3306 | 10 | mysql-bin.000007 | 106 | mysqld-relay-bin.000002 | 251 | mysql-bin.000007 | Yes | Yes | database1,database2,database3 | | | | | | 0 | | 0 | 106 | 407 | None | | 0 | No | | | | | | 0 | No | 0 | | 0 | |+———————————-+————-+————-+————-+—————+——————+———————+————————-+—————+———————–+——————+——————-+——————————————————-+———————+——————–+————————+————————-+—————————–+————+————+————–+———————+—————–+—————–+—————-+—————+——————–+——————–+——————–+—————–+——————-+—————-+———————–+——————————-+—————+—————+—————-+—————-+
As you can see the output is not too readable, as there are too many columns and data to be displayed and this doesn't fit neither a text console nor a graphical terminal emulator.
To get more readable (more verbose) status for the SQL SLAVE, its better to use command:
mysql> show slave status\G;
Here is a sample returned output:
mysql> show slave status\G;*************************** 1. row *************************** Slave_IO_State: Waiting for master to send event Master_Host: HOST_NAME.COM Master_User: slave_user Master_Port: 3306 Connect_Retry: 10 Master_Log_File: mysql-bin.000007 Read_Master_Log_Pos: 106 Relay_Log_File: mysqld-relay-bin.000002 Relay_Log_Pos: 251 Relay_Master_Log_File: mysql-bin.000007 Slave_IO_Running: Yes Slave_SQL_Running: Yes Replicate_Do_DB: database1,database2,database3 Replicate_Ignore_DB: Replicate_Do_Table: Replicate_Ignore_Table: Replicate_Wild_Do_Table: Replicate_Wild_Ignore_Table: Last_Errno: 0 Last_Error: Skip_Counter: 0 Exec_Master_Log_Pos: 106 Relay_Log_Space: 407 Until_Condition: None Until_Log_File: Until_Log_Pos: 0 Master_SSL_Allowed: No Master_SSL_CA_File: Master_SSL_CA_Path: Master_SSL_Cert: Master_SSL_Cipher: Master_SSL_Key: Seconds_Behind_Master: 0Master_SSL_Verify_Server_Cert: No Last_IO_Errno: 0 Last_IO_Error: Last_SQL_Errno: 0 Last_SQL_Error: 1 row in set (0.00 sec)ERROR: No query specified
If show master status or shwo slave status commands didn't reveal replication issue, one needs to stare at the mysql log for more info.
Tags: Auto, Cipher, cmd, condition, configure, Connect, Draft, event, exec, host, info, key, Master, master node, master slave, mysql server, name, Path, quot, Replicate, replication, Retry, server node, show, slave status, someone, Space, SQL, time, User
Posted in MySQL, System Administration, Web and CMS | 4 Comments »
Saturday, May 12th, 2012 After migrating databases data from FreeBSD MySQL 5.0.83 server to a Debian Squeeze Linux MySQL version 5.1.61, below is a mysql –version issued on both the FreeBSD and the Debian servers
freebsd# mysql --version

mysql Ver 14.12 Distrib 5.0.83, for portbld-freebsd7.2 (i386) using 5.2
debian:~# mysql --version

mysql Ver 14.14 Distrib 5.1.61, for debian-linux-gnu (i486) using readline 6.1
The data SQL dump from the FreeBSD server was dumped with following command arguments:
freebsd# mysqldump --opt --allow-keywords --add-drop-table --all-databases -u root -p > complete_db_dump.sql
Then I used sftp to transfer complete_db_dump.sql dump to the a brand new installed latest Debian Squeeze 6.0.2. The Debian server was installed using a "clean Debian install" without graphical environment with CD downloaded from debian.org's site.
On the Debian machine I imported the dump with command:
debian:~# mysq -u root -p < complete_db_dump.sql
Right After the dump was imported I re-started SQL server which was previously installed with:
debian:~# apt-get install mysql-server
The error I got after restarting the mysql server:
debian:~# #/etc/init.d/mysql restart
was:
 ERROR 1577 (HY000) at line 1: Cannot proceed because system tables used by Event Scheduler were found damaged at server start

ERROR 1547 (HY000) at line 1: Column count of mysql.proc is wrong. Expected 20, found 16. The table is probably corrupted
This error cost me a lot of nerves and searching in google to solve. It took me like half an hour of serious googling ,until I finally found the FIX!!!:
 debian:~# mysql_upgrade -u root -h localhost -p --verbose --force

Enter password:

Looking for 'mysql' as: mysql

Looking for 'mysqlcheck' as: mysqlcheck

Running 'mysqlcheck' with connection arguments: '--port=3306' '--socket=/var/run/mysqld/mysqld.sock' '--host=localhost'

Running 'mysqlcheck' with connection arguments: '--port=3306' '--socket=/var/run/mysqld/mysqld.sock' '--host=localhost'

bible.holy_bible OK

bible.holybible OK

bible.quotes_meta OK
Afterwards finally I had to restart the mysql server once again in order to finally get rid of the shitty:
ERROR 1547 (HY000) at line 1: Column count of mysql.proc is wrong. Expected 20, found 16. The table is probably corrupted error!
 debian:~# /etc/init.d/mysql restart

Stopping MySQL database server: mysqld.

Starting MySQL database server: mysqld.

Checking for corrupt, not cleanly closed and upgrade needing tables..
This solved the insane Column count of mysql.proc is wrong. Expected 20, found 16 once and for all!
Before I came with this fix I tried all kind of forum suggested fixes like:
 debian:~# mysql_upgrade -u root -p

Looking for 'mysql' as: mysql

Looking for 'mysqlcheck' as: mysqlcheck

This installation of MySQL is already upgraded to 5.1.61, use --force if you still need to run mysql_upgrade
 debian:~# mysql_upgrade -p

Looking for 'mysql' as: mysql

Looking for 'mysqlcheck' as: mysqlcheck

This installation of MySQL is already upgraded to 5.1.61, use --force if you still need to run mysql_upgrade
And few more, none of them worked the only one that worked was:
debian:~# #mysql_upgrade -u root -h localhost -p --verbose --force
I have to say big thanks to Mats Lindth wonderful blog post which provided me with the solution.
It seems, since Oracle bought the Community edition of MySQL thinks with this database server are getting more and more messy and backwards incompatible day by day.
Lately, I'm experiencing too much hassles with MySQL version incompitabilities. Maybe I should think for migrating permanently to Postgre …
By the way the ERROR 1547 (HY000) at line 1: Column count of mysql.proc is wrong. is most probably caused of some kind of password hashing incompitability between the password hashing between the BSD and Debian SQL versions, as mysql -u root -p < dump.sql, does override default stored user passwords in the mysql database tables… Such password, hashing issues were common in prior MySQL 4 to MySQL 5 migrations I've done, however since MySQL 5+ is already storing its password strings encrypted with md5 encryption I wonder why on earth this mess happens ….
Tags: Auto, COLUMN, column count, command arguments, connection, cost, count, debian linux, debian server, Draft, event, event scheduler, fix, freebsd server, google, googling, graphical environment, half an hour, host, host localhost, init, installation, line 1, linux gnu, localhost, machine, mysq, mysql server, mysqlcheck, mysqld, nerves, password, port 3306, quot, root, server start, sftp, Socket, SQL, squeeze, system tables, TABLE, verbose
Posted in Everyday Life, MySQL, System Administration, Web and CMS | 2 Comments »
Wednesday, May 16th, 2012 
I have a bunch of old html files all encoded in the historically obsolete Windows-cp1251. Windows-CP1251 used to be common used 7 years ago and therefore still big portions of the web content in Bulgarian / Russian Cyrillic is still transferred to the end users in this encoding.
This was just before the "UTF-8 revolution", where massively people started using UTF-8,
Well it was clear the specific national country text encoding standards will quickly be moved by to UTF-8 – Universal Encoding format which abbreviation stands for (Unicode Transformation Format).
Though UTF-8 was clear to be "the future", many web developers mostly because of their incompetency or using an old sources of learning how to writen in HTML continued to use windows-cp1251 in HTMLs. I'm even convinced, there are still developers out there who are writting websites for Bulgarian / Russian / Macedonian customers using obsolete encodings …
The smarter developers of those accustomed to windows-cp1251, KOI-8R etc. etc., were using the meta tag to specify the type of charset of the web page content with:
<meta http-equiv="content-type" content="text/html;charset=windows-cp1251">
or
<meta http-equiv="content-type" content="text/html;charset=koi-8r">
Anyhow, still many devs even didn't placed the windows-cp1251 in the head of the HTML …
The result for the system administrator is always a mess – a lot of webpages that are showing like unreadable signs and tons of unhappy customers.
As always the system administrator is considered responsible, for the programmer mistakes :). So instead of programmers fix their bad cooking, the admin has to fix it all!
One quick work around me as admin has applied to failing to display pages in Cyrillic using the Windows-cp1251 character encoding was to force windows-cp1251 as a default encoding for the whole virtualhost or Apache directory with Apache directives like:
<VirtualHost *:80>

ServerAdmin some_user@some_host.com

DocumentRoot /var/www/html

AddDefaultCharset windows-cp1251

ServerName the_host_name.com

ServerAlias www.the_host_name.com

....

....

<Directory>

AddDefaultCharset windows-cp1251

>/Directory>

</VirtualHost>
Though this mostly would, work there are some occasions, where only a particular html files from all the content served by Apache is encoded in windows-cp1251, if most of the content is already written in UTF-8, this could be a big issues as you cannot just change the UTF-8 globally to windows-cp1251, just because few pages are written in archaic encoding….
Since most of the content is displayed to the client by Apache (as prior explained) just fine, only particular htmls lets's ay single.html, single2.html etc. etc. are displayed with some question marks or some non-human readable "hieroglyphs".
Below is a screenshot from two pages returned to my browser in wrongly set htmls charset:

Improper Windows CP1251 delivered page in UTF-8 browser view
Improperly served encoding CP1251 delivered by Apache in non-utf-8 encoding
When this kind of issues occur, the only solution is to simply login to the server and use iconv command to convert all files returning unreadable content from whatever the non UTF-8 encoding is lets say in my case Bulgarian typeset of cp1251 to UTF-8
Here is how the iconv command to convert between windows-cp1251 to utf-8 the two sample files named single1.html and single2.html
server:/web# /usr/bin/iconv -f WINDOWS-1251 -t UTF-8 single1.html > single1.html.utf8

server:/web# mv single1.html single1.html.bak;

server:/web# mv single1.html.utf8 single1.html

server:/web# /usr/bin/iconv -f WINDOWS-1251 -t UTF-8 single2.html > single2.html.utf8

server:/web# mv single2.html single2.html.bak;

server:/web# mv single2.html.utf8 single2.html
I always, make copies of the original cp1251 encoded files (as you see mv single1.html single1.html.bak), because if something goes wrong with convertion I can easily revert back.
If there are 10 files with consequential numbers naming they can be converted using a short for loop, like so:
server:/web# for i $(seq 1 10); do

/usr/bin/iconv -f WINDOWS-1251 -t UTF-8 single$i.html > single$i.html.utf8;mv single$i.html single$i.html.bak

mv single$i.html.utf8 single$i.html

done
Just as earlier mentioned if single1.html, single2.html … has in the html <head>:
<meta http-equiv="Content-Type" content="text/html; charset=windows-1251">
You should open, each of the files in question and wipe out the line either by hand or use sed to wipe it in one loop if it has to be done for lets say 10 files named (single{1..10})
server:/web# for i in $(seq 1 10); do

sed '/<meta http-equiv="Content-Type" content="text\/html; charset=windows-1251>/d' single$i.txt > single$i.txt.new;

mv single$i.txt single$i.txt.bak;

mv single$i.txt.new single$i.txt
Well now,
Tags: Anyhow, apac, Auto, bak, character encoding, charset, charset windows, content type, Draft, end users, format, HEAD, host, html files, htmls, incompetency, mess, meta tag, page, programmer, programmers, quot, revolution, Russian, russian cyrillic, system administrator, tag, text, text html, Transformation, transformation format, type, unhappy customers, Universal, UTF, utf 8, Virtualhost, web content, web developers, web page content, work, writen
Posted in System Administration, Various, Web and CMS | 1 Comment »
Friday, July 13th, 2012 One of the QMAIL mail servers, setup-uped on a Debian host has been creating some auto configuration issues. Every-time a new mail user tries to use the embedded Thunderbird client auto configuration, the auto config fails leaving the client unable to use his Mailbox through POP3 or IMAP protocols.
Since about 2 years Thunderbird and many other modern pop3 and imap mail desktop and mobile clients are by default using the auto configuration and hence it was unthinkable to manually change settings for new clients with the QMAIl install; Besides that most of the Office users are always confused, whether they have to manually change SMTP or POP3 host for a server.
Below is a screenshot displaying the warning during email auto-configuration:
 The orange color in the button for the newly auto-detected smtp.mail-domain.com indicates, something is not right with the SMTP host.
Obviously, something was wrong with smtp.mail-domain.com, hence I checked where smtp.mail.domain.com resolves with host command. What I found was actually smtp.mail-domain.com Active ( A ) DNS records was pointing to an IP address, our company previously used for the mail server. At present time the correct mail server host name is mx.mail-domain.com and the QMAIL installation on mx.soccerfame.com is configured to be the actual SMTP server.
By default Thunderbird and many other POP3, IMAP mail clients, however automatically assume the default SMTP host for a mail server is to be configured under a host name smtp.mail-domain.com. This is really strange, especially when the primary MX record for mail-domain.com domain is pointing to mx.mail-domain.com, e.g.:
qmail:~# host -t MX mail-domain.com

soccerfame.com mail is handled by 10 mx.mail-domain.com.

soccerfame.com mail is handled by 20 mail.mail-domain.com.

soccerfame.com mail is handled by 30 mail-domain.com.
The whole warning was caused due to the fact mx.mail-domain.com was resolving to an IP like xxx.xxx.xxx.xxx, whether smtp.mail-domain.com was resolving to yyy.yyy.yyy.yyy
Both xxx.xxx.xxx.xxx and yyy.yyy.yyy.yyy hosts were configured to have a different qmail SMTP host i.e.:
The server under IP xxx.xxx.xxx.xxx – (mx.mail-domain.com) was configured in /var/qmail/control/me to be mx.mail-domain.com and the other old one yyy.yyy.yyy.yyy – (mail.mail-domain.com) had (mail.mail-domain.com) in /var/qmail/control/me
As smtp.mail-domain.com was actually being still resolved to mail.mail-domain.com, the EMAILs were improperly trying to be sent with a configured DNS hostname of smtp.mail-domain.com, where the actual one on the server was mail.mail-domain
It took, me about an hour of pondering what is causing the oddities until I got the here explained issue. As the DNS recors for the domain the sample mail-domain.com were handled by Godaddy, to fix the mess, I logged in to Godaddy and;
a) deleted – DNS record for smtp.mail-domain.com.
b) Created new CNAME record for smtp.mail-domain.com to be a domain alias for mx.soccerfame.com
A few minutes, afterwards I tried configuring once again the same email account in Thunderbird and this time both imap.mail-domain.com and smtp.mail-domain.com turned green; indicating everything is configured fine.
To be 100% sure all is working fine I first fetched, all email via the IMAP protocol without hassles and onwards sent a test email to my Gmail account; thanksfully the sent email was delivered to Gmail indicating both Get Mail and Send Mail functions worked now fine.
Tags: Auto, auto configuration, Button, client, com, comA, comsoccerfame, config, control, correct mail server, Desktop, DNS, dns records, Draft, Emails, everything, host, host command, imap protocols, installation, mail clients, mail domain, mail imap, mail mail, mail servers, mail user, mess, mobile clients, mx mail, mx record, nbsp, new mail, orange, pop3 host, qmail installation, right, screenshot, server host name, server smtp, smtp, smtp host, soccerfame, something, test, time
Posted in Qmail, System Administration | 4 Comments »
Sunday, June 10th, 2012 
Those who are in familiar with older UNIXes, UNIX BSD derivatives and GNU Linux should certainly remember the times, when we hackers used to talk to each other using talk service.
Those who don't know what talk command is it is a simple console / ssh utility to talk to another logged in users.
Talk is very similar to write and mesg one liner messasing utilities available for *nixes, the difference is it is intendted to provide interactive chat between the two logged in users. People who came to know UNIX or free software in older times most likely don't know talk, however I still remember how precious this tool was for communication back in the day.
I believe still it can be useful so I dediced to install ot on one FreeBSD host.
In order to have the talk service running on BSD it is necessery to have /usr/libexec/ntalkd installed on the system this however is installed by default with standard BSD OS installs, so no need for any external ports install to run it.
talk doesn't have it's own init script to start is not written to run as it own service but in order to run it is is necessery to enable it via inetd
Enabling it is done by;;;
1 — Editting /etc/inetd.conf
Inside the conf the line::
#ntalk dgram udp wait tty:tty /usr/libexec/ntalkd ntalkd
should be uncommented e.g, become ;;;
ntalk dgram udp wait tty:tty /usr/libexec/ntalkd ntalkd
2 — Restart inetd
freebsd# /etc/rc.d/inetd restart

Stopping inetd.

Starting inetd.
talk is planned to be used for peer to peer conversations over SSH so in a way it is the GRANDFATHER 🙂 of IRC, ICQ and Skype;;;
Here is an example on how talk is used ,, Let's say there are three logged in users
pcfreak# w

12:39PM up 3 days, 16:25, 3 users, load averages: 1.12, 0.91, 0.71

USER TTY FROM LOGIN@ IDLE WHAT

testuser p0 192.168.0.7 10:50AM - bash

hipo p3 192.168.0.8 12:23PM - w

root p4 :ttyp2:S.0 12:24PM - vim /usr/local/www/dat
I'm logged in with my username hipo and I would like to talk to testuser ;;;;
pcfreak% tty

/dev/ttyp3
You see I'm logged in on /dev/ttyp3 (this is the specific naming on BSDs) on Linux equivalent is /dev/tty3So to talk the other user testuser;;;;;-
$ talk testuser ttyp0

[No connection yet]

[Waiting for your party to respond]
The testuser logged in via SSH will then get a message ||;
Message from Talk_Daemon@pcfreak at 12:44 on 2012/06/10 ...

talk: connection requested by hipo@localhost

talk: respond with: talk hipo@localhost
To enter a talk session then the logged in testuser has to type:
$ talk hipo@localhost
Tags: Auto, BSD, bsd os, BSDs, Chat, connection, conversations, derivatives, dgram, doesn, Draft, editting, external ports, free software, gnu linux, hackers, hipo, host, init, init script, irc icq, Linux, load averages, localhost, mesg, necessery, need, ntalkd, p3, pcfreak, Restart, Skype, software, ssh, testuser, tool, unix, unix bsd, wait
Posted in FreeBSD | No Comments »
Friday, May 18th, 2012 A friend of mine, just mentioned about a program ASCIIPic – capable of converting graphic images in JPEG to plain text ASCII in Microsoft Windows OSes.
Yesterday I blogged about caca-utils (img2txt) – console tool to convert picture graphics to plain text ASCII , so knowing of the Windows freeware ASCIIPic existence catched my attention and I decided to give it a try to get idea what is situation with Images to ASCII text convertion in Windows? 🙂.
1. Generating ASCII from JPEG images with ASCII Pic
As I don't have a Microsoft Windows OS at hand, I downloaded it and run it on my Debian notebook with WINE (Wine Is Not an Emulator) MS-Windows emulator.
For my surprise the program run succesfuly its GUI interface and worked pretty smooth even emulated on Linux.

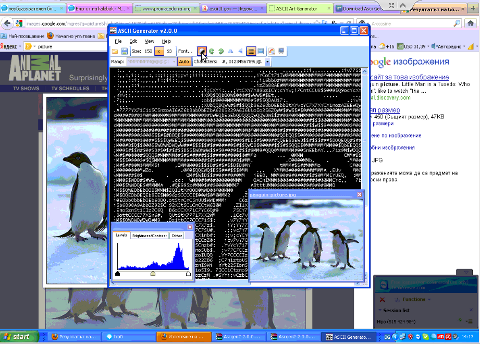
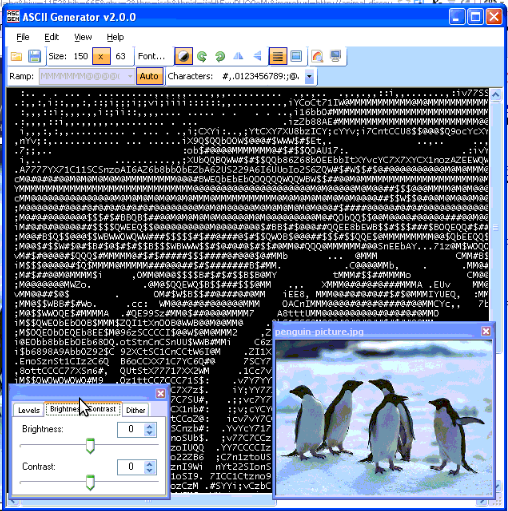
As of time of writting, the latest version of the freeware program available is 2.0. You see in above screenshot the program is pretty intutive to use. You select an Input file, an Output file and you're ready to Process the image to TXT.
One small note to make here is the program couldn't recognize as Input files images in PNG or GIF formats, it seems the only image formats the program recognizes as input are JPEG and BMP.

The converted images to ASCII results are quite unsatisfactory, I tried converting few pictures originally in size 1024×768 but the produced ASCII was messy huge (the program didn't automatically set height / width dimensions to 60×80 and therefore, when I revied the produced pictures, they were very ugly and hardly readable. It could be the same image looks better if reviewed in MS-Windows Notepad but I seriously doubt that …
I thought some improvement to the produced ASCII image might be possible from the app options so I played around with the Zoom, Negation, Brightness and Monochrome options, none of them had a drastic change on the output. Using any of the program options didn't make the output TXT "image" to look closer riginal JPEGs..

ASCII Pic official website contains a number of other tiny tools, like WinKill and RemoteShut, however most of the tools are already too obslete and useless just like ASCII Pic
If I have to compare ASCIIPic produced ASCII Images to libcaca's Linux img2txt, asciipic's ASCII images are a piece of crap.
2. jp2a command line tool image to ASCII generator
As of time of writting a good alternative program I found for Windows is jp2a
jp2a is a free GPL-ed software available for all major operating system architectures Linux, BSD, Mac OS X, Windows.
jp2a is a command line tool and lacks any GUI interface but if compared to ASCII Pic the output ASCII image is awesome.
jp2a Windows binary can be downloaded from here , also I've made a mirror of windows jp2a bin in case if it disappears here
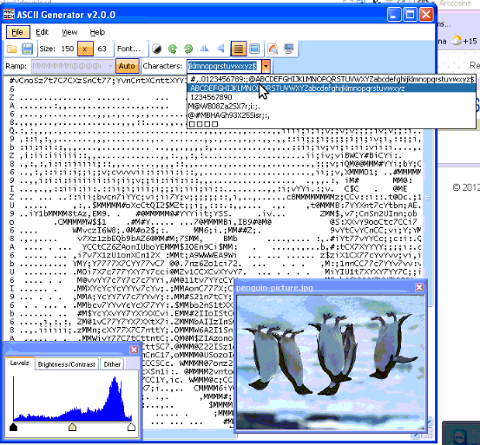
3. ASCII Generator 2 (asc2gen) – Windows GUI Images to ASCII generator
ASC 2 Gen is actually the best I can find program to convert images to ascii in Win as of time of writting.
Just like img2txt it generates pretty decent looking text images.
ASC2Gen failed to run emulated on my Linux host with wine version 1.0.1, hence to test it I used a a Windows host via teamviewer.
Below are few screenshots illustrating most of the options ASCII2GEN provides:
asc2gen penguins in inverted color set (black color text background)
ASC2GEN flipped backhed generated image to ASCII
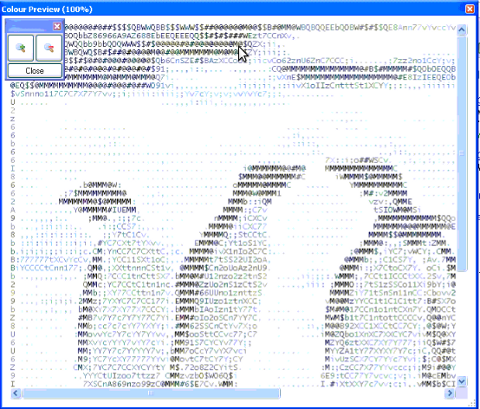
Picture to ASCII text converted with ASCII colors
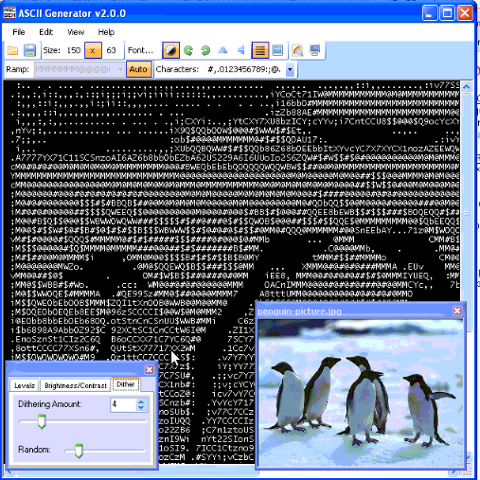
ascii2gen dithering level option shot
asc2gen contrast / brigthness atune shot
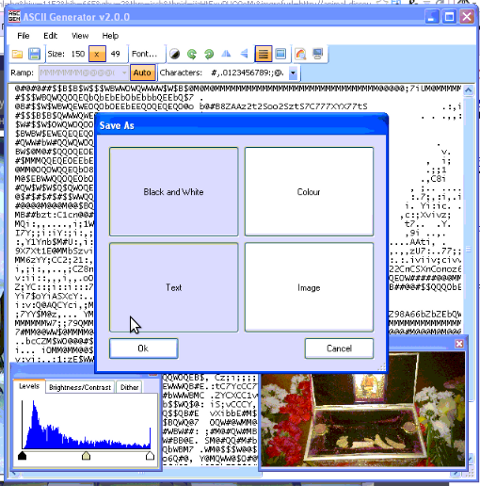
asc2gen save as options shot
Something else nice is it supports a lot of image file formats as input including (BMP and GIF) images.
I've also made a mirror of asc2gen v. 2.0.0 here
While researching online, I found plenty of other Image to ASCII geneartors, however as I didn't tested them I can't say if they are better ones.
Anyways I will be happy to hear if anyone knows other good ASCII generator alternative progs for Winblows?
Tags: ascii art, ascii image, ascii text, Auto, convertion, Draft, drastic change, emulator, existence, file, freeware, freeware program, GIF, gif formats, graphic images, gui interface, host, Image, image formats, images, img, input files, jpeg images, Microsoft, microsoft windows 2000, microsoft windows os, ms windows notepad, negation, Output, Pic, PicAs, picture, png, process, program options, quot, screenshot, shot, shotasc, text, text ascii, time, tool, width dimensions, wine, wine wine
Posted in Entertainment, Everyday Life, Various, Windows | 4 Comments »
Thursday, May 17th, 2012 
Probably, many don't know that it is possible to view normal graphical pictures (JPG, PNG, GIF, BMP) etc. in plain console tty.
Being able to view pictures in ASCII is something really nice especially for console geeks like me.
The images produced sometimes are a bit unreadable, if compared to the original graphics, but anyways most of the pictures looks pretty decent 🙂
Viewing in console / terminal images on GNU / Linux is possible thanks to a library called libcaca, caca labs libcaca project official website here.
Below is a shot description of libcaca:
hipo@noah:~$ apt-cache show libcaca0|grep 'Description' -A 4

Description: colour ASCII art library

libcaca is the Colour AsCii Art library. It provides high level functions

for colour text drawing, simple primitives for line, polygon and ellipse

drawing, as well as powerful image to text conversion routines.
In Debian, Ubuntu and other deb Linux distros viewing GUI images with no need for Xserver or any kind of window manager in plain ASCII is possible with cacaview.
cacaview is part of a package called caca-utils. caca-utils is providing few other great utilities for ASCII freaks 🙂 along with cacaview console ascii viewer prog.
The package> is available for Debian distributins since many years, so even on a very old Debians like Debian – (Potato, Woody, Sarge) the package is available in default free package repositories ready to install via apt
To install apt-get it as usual:
noah:~# apt-get --yes install caca-utils
Here is a list of the binaries the package provides:
hipo@noah:~$ dpkg -L caca-utils|grep -i /usr/bin/

/usr/bin/cacaserver

/usr/bin/cacaplay

/usr/bin/cacafire

/usr/bin/cacademo

/usr/bin/cacaview

/usr/bin/img2txt
1. cacaserver a tiny program allowing network streaming of applications written in caca
Belkow is a chop, from man cacaserver
cacaserver reads libcaca animation files in its standard input and
serves them as ANSI art on network port 51914. These animations can be
created by any libcaca program by setting the CACA_DRIVER environment
variable to raw and piping the program's standard output to cacaserver.
Clients can then connect to port 51914 using telnet or netcat to see
the output.
The example section of the manual points 1 example use of cacaserver to stream the console output from cacademo.
cacademo binary is a short presentation ASCII DEMO in the spirit of the old school assembly demos (demoscene) .
To run it to bind on port 51914 one has to type in bash shell:
hipo@noah:~$ CACA_DRIVER=raw cacademo | cacaserver

initialised network, listening on port 51914
Then to check out how the demo looks, open telnet connection to the cacaserver host; In my case the cacaserver is binded and streamed over IP 192.168.0.2:
hipo@debian:~$ telnet 192.168.0.2 51914
Immediately you got the demo shining; Below are two screenshots of the demo played after succesful telnet connection:
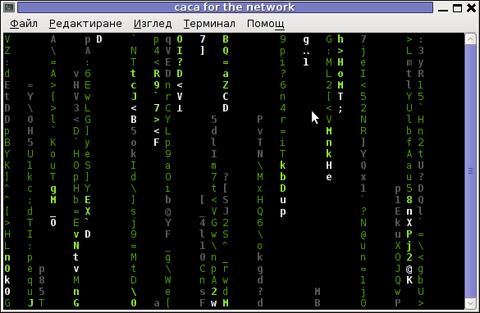
cacademo running over telnet network connection – Matrix
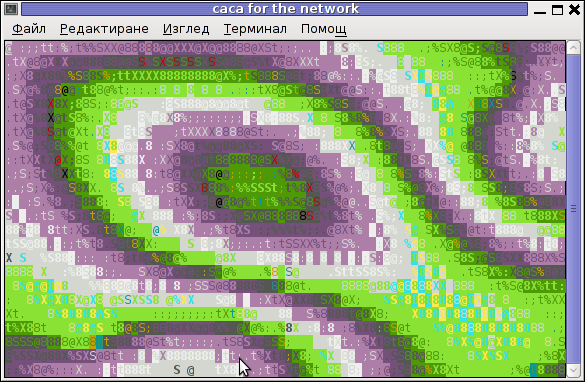
Blur spots cacademo shot of cacademo streamed via network
You see the demo looks quite awesome 🙂
2. Running cacafire to stream over network
Another possible example use of cacaserver is in conjunction with cacafire libcaca test application:
noah:~# CACA_DRIVER=raw cacafire | cacaserver

initialised network, listening on port 51914
cacafire is a short application written to render ASCII via libcaca and is just displaying a screen with ASCII (moving) burning fire.
It is quite spectacular if you, ask an unexpecting friend to connect to your host to 51914 🙂
Besides that bored sys admins, could run cacafire in console to hypnotize themselves watching dumb the burning fire screen for few hoursor just use it as a screensaver 😉
3. cacaview a program to display a graphic images in console using ASCII art
cacaview takes just one argument – the picture to be displayed.
Below is a screenshot of cacaview ran from my gnome-terminal displaying a ASCII text version of the MySQL server logo
hipo@noah:~$ cd /disk/pictures

hipo@noah:/disk/pictures$ cacaview mysql_logo.png

Whether cacaview is invoked in GUI, the libcaca X support is used, so the text image is visualized in new window with graphics, if however it is invoked in plain let's say tty1 libcaca displays the graphics pictures drawing it with only text characters.
Here is also a screenshot, I've made while viewing a GIF website logo in ASCII in plain tty console:
hipo@noah:~$ cacaview /disk/pictures/logo.gif
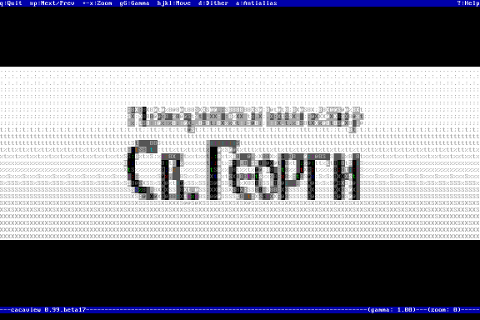
The logo is in cyrillic, so for latin speaking people some of the characters in the two words seen will be unreadable 🙂
cacaview even supports viewing, the next and previous picture in line, like in any modern graphics image viewer program.
To view a bunch of graphic pictures in ASCII with cacaview pass it *.*:
hipo@noah:~$ cacaview /disk/pictures/*.*
For simplicity the common unix * is also supported, so I find it quicker to do:
hipo@noah:~$ cacaview /disk/pictures/*
Showing pictures forward and backward (Previous / Next) picture is done with n and p kbd keys, whether;
 n - next;

p - previous
cacaview doesn't crash or stop but skip unknown file formats – if for instance encounters filenames which are not images; lets say you have *.rar archive files along with other pictures.
The complete list of keys cacaview supports are:
br />
KEYS
? show the help screen
n, p switch to next image, previous image
Left, Right, Up, Down or h, l, k, j
scroll the image around
+, – zoom in and out
z reset the zoom level to normal
f switch fullscreen mode (hide/show menu and status bars)
d toggle the dithering mode (no dithering, 4×4 ordered dithering, 8×8 ordered dithering and random dithering)
q exit the program
4. Converting graphics images to ASCII art like (plain text pictures)
The tool that does "the trick" is img2txt. img2txt has a bit more options while compared to the rest of the aforementioned tools.The following list of arguments are recognized:
- the size (font, height)
- brightness
- contrast
- gamma and dither
- format type of out the output pic
Anyways I found that the basic just in / out arguments passed are enough to produce pretty good results:
hipo@noah:~$ img2txt hipo_avatar.gif >hipo_avatar_pic.txt
The original hipo_avatar.gif file looks like so:

After above img2txt command is run and hipo_avatar_pic.txt to see the colorful output ASCII art img2txt produces, cat it:
hipo@noah:~$ cat hipo_avatar_pic.txt
The image result if screenshot looks quite beautiful and even, can be considered or used as an ART effect image (filter) 🙂

The picture colors are plain ANSI color, so in order to display properly the picture with colors on another computers or Operating System you will need at least basic support for ANSI colors.
Plenty of output file formats are supported by img2txt
Here is the complete list of supported output formats:
ansi : coloured ANSI
caca : internal libcaca format
utf8 : UTF8 with CR
utf8 : UTF8 with CRLF (MS Windows)
html : HTML with CSS and DIV support
html3 : Pure HTML3 with tables
irc : IRC with ctrl-k codes
bbfr : BBCode (French)
ps : Postscript
svg : Scalable Vector Graphics
tga : Targa Image
libcaca is available for FreeBSD too, but the caca-utils is not available as a port yet, though probably the deb or rpm packages can easily be ported to BSD.
Well that's all, Enjoy.
Tags: animation files, art, ascii art library, Auto, caca, colour, colour text, connection, conversion routines, demo, description, Disk, dpkg, Draft, ellipse, gnu linux, graphics utilities, gui images, hipo, host, JPG, level, level functions, libcaca, linux distros, nbsp, noah, original graphics, package, plain ascii, png, polygon, primitives, screen, screenshot, shot, shot description, show, something, support, terminal, text, text conversion, text mode, tiny program, xserver
Posted in Everyday Life, Linux, System Administration, Various | 1 Comment »
Thursday, May 3rd, 2012 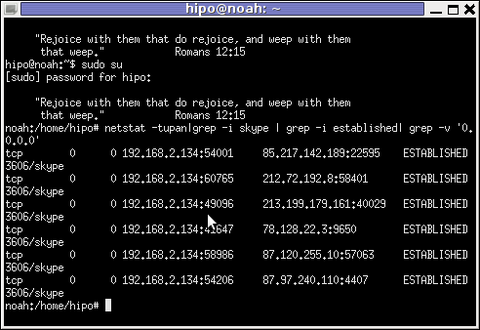
Before I explain how netstat and whois commands can be used to check information about a remote skype user – e.g. (skype msg is send or receved) in Skype. I will say in a a few words ( abstract level ), how skype P2P protocol is designed.
Many hard core hackers, certainly know how skype operates, so if this is the case just skip the boring few lines of explanation on how skype proto works.
In short skype transfers its message data as most people know in Peer-to-Peer "mode" (P2P) – p2p is unique with this that it doesn't require a a server to transfer data from one peer to another. Most classical use of p2p networks in the free software realm are the bittorrents.
Skype way of connecting to peer client to other peer client is done via a so called "transport points". To make a P-to-P connection skype wents through a number of middle point destinations. This transport points (peers) are actually other users logged in Skype and the data between point A and point B is transferred via this other logged users in encrypted form. If a skype messages has to be transferred from Peer A (point A) to Peer B (Point B) or (the other way around), the data flows in a way similar to:
A -> D -> F -> B
or
B -> F -> D -> A
(where D and F are simply other people running skype on their PCs).
The communication from a person A to person B chat in Skype hence, always passes by at least few other IP addresses which are owned by some skype users who happen to be located in the middle geographically between the real geographic location of A (the skype peer sender) and B (The skype peer receiver)..
The exact way skypes communicate is way more complex, this basics however should be enough to grasp the basic skype proto concept for most ppl …
In order to find the IP address to a certain skype contact – one needs to check all ESTABLISHED connections of type skype protocol with netsat within the kernel network stack (connection) queue.
netstat displays few IPs, when skype proto established connections are grepped:
noah:~# netstat -tupan|grep -i skype | grep -i established| grep -v '0.0.0.0'

tcp 0 0 192.168.2.134:59677 212.72.192.8:58401 ESTABLISHED 3606/skype

tcp 0 0 192.168.2.134:49096 213.199.179.161:40029 ESTABLISHED 3606/skype

tcp 0 0 192.168.2.134:57896 87.120.255.10:57063 ESTABLISHED 3606/skype
Now, as few IPs are displayed, one needs to find out which exactly from the list of the ESTABLISHED IPs is the the Skype Contact from whom are received or to whom are sent the messages in question.
The blue colored IP address:port is the local IP address of my host running the Skype client. The red one is the IP address of the remote skype host (Skype Name) to which messages are transferred (in the the exact time the netstat command was ran.
The easiest way to find exactly which, from all the listed IP is the IP address of the remote person is to send multiple messages in a low time interval (let's say 10 secs / 10 messages to the remote Skype contact).
It is a hard task to write 10 msgs for 10 seconds and run 10 times a netstat in separate terminal (simultaneously). Therefore it is a good practice instead of trying your reflex, to run a tiny loop to delay 1 sec its execution and run the prior netstat cmd.
To do so open a new terminal window and type:
noah:~# for i in $(seq 1 10); do \

sleep 1; echo '-------'; \

netstat -tupan|grep -i skype | grep -i established| grep -v '0.0.0.0'; \

done

-------

tcp 0 0 192.168.2.134:55119 87.126.71.94:26309 ESTABLISHED 3606/skype

-------

tcp 0 0 192.168.2.134:49096 213.199.179.161:40029 ESTABLISHED 3606/skype

tcp 0 0 192.168.2.134:55119 87.126.71.94:26309 ESTABLISHED 3606/skype

-------

tcp 0 0 192.168.2.134:49096 213.199.179.161:40029 ESTABLISHED 3606/skype

tcp 0 0 192.168.2.134:55119 87.126.71.94:26309 ESTABLISHED 3606/skype

...
You see on the first netstat (sequence) exec, there is only 1 IP address to which a skype connection is established, once I sent some new messages to my remote skype friend, another IP immediatelly appeared. This other IP is actually the IP of the person to whom, I'm sending the "probe" skype messages.
Hence, its most likely the skype chat at hand is with a person who has an IP address of the newly appeared 213.199.179.161
Later to get exact information on who owns 213.199.179.161 and administrative contact info as well as address of the ISP or person owning the IP, do a RIPE whois
noah:~# whois 213.199.179.161

% This is the RIPE Database query service.

% The objects are in RPSL format.

%

% The RIPE Database is subject to Terms and Conditions.

% See http://www.ripe.net/db/support/db-terms-conditions.pdf
% Note: this output has been filtered.
% To receive output for a database update, use the "-B" flag.
% Information related to '87.126.0.0 - 87.126.127.255'
inetnum: 87.126.0.0 - 87.126.127.255
netname: BTC-BROADBAND-NET-2
descr: BTC Broadband Service
country: BG
admin-c: LG700-RIPE
tech-c: LG700-RIPE
tech-c: SS4127-RIPE
status: ASSIGNED PA
mnt-by: BT95-ADM
mnt-domains: BT95-ADM
mnt-lower: BT95-ADM
source: RIPE # Filteredperson: Lyubomir Georgiev
.....
Note that this method of finding out the remote Skype Name IP to whom a skype chat is running is not always precise.
If for instance you tend to chat to many people simultaneously in skype, finding the exact IPs of each of the multiple Skype contacts will be a very hard not to say impossible task.
Often also by using netstat to capture a Skype Name you're in chat with, there might be plenty of "false positive" IPs..
For instance, Skype might show a remote Skype contact IP correct but still this might not be the IP from which the remote skype user is chatting, as the remote skype side might not have a unique assigned internet IP address but might use his NET connection over a NAT or DMZ.
The remote skype user might be hard or impossible to track also if skype client is run over skype tor proxy for the sake of anonymity
Though it can't be taken as granted that the IP address obtained would be 100% correct with the netstat + whois method, in most cases it is enough to give (at least approximate) info on a Country and City origin of the person you're skyping with.
Tags: Auto, client, connection, Draft, ESTABLISHED, explanation, few words, form, free software, geographic location, gnu linux, hackers, hard core, host, information, ip address, ip addresses, ips, level, Linux, location, message data, middle, netstat, noah, p2p, p2p networks, p2p protocol, peers, person, ppl, proto, Protocol, receiver, RIPEtech-c, sender, Skype, terminal, time, to, tupan, type, whois commands
Posted in Computer Security, Skype on Linux, System Administration | No Comments »


