Posts Tagged ‘Below’

How to configure mutual Apache WebServer SSL authentication – Two Way SSL mutual authentication for better security and stronger encryption

Tuesday, September 12th, 2017

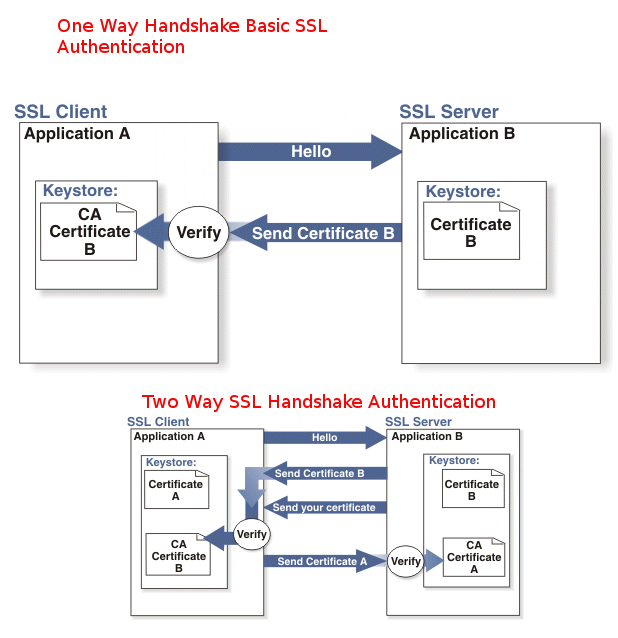
how-to-configure-one-way-and-two-way-handshake-authentication-apache-one-and-two-way-ssl-handshake-authentication-explained-diagram

In this post I'm about to explain how to configure Apache Web server for Two Way SSL Authentication alone and how to configure Two Way SSL Authentication for a Certain Domain URL Locations and the mixture of both One Way standar SSL authentication and Two Way Handshake Authentication .
 

Generally before starting I have to say most Web sites does not require a Mutual SSL  Authentication (the so called Two-Way SSL).

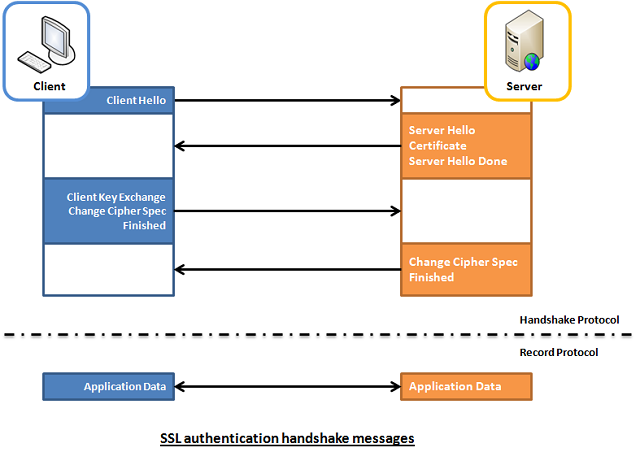
In most configurations Apache Web server is configured for One Way Basic authentication where The Web server authenticates to the Client usuall that's Browser program such as Mozilla  Firefox / Chrome / IE / Epiphany whatever presenting certificate signed by Trustable Certificate Authority such as VeriSign.
1WaySSL-clien-to-server-illustrated
 

The authority then autneticates to the browser that the Installed certificate on the Apache Web Server is trustable and the website is not a fraudulant, that is especially important for websites where sensitive data is being transferred, lets say Banks (Doing Money Transfers online), Hospitals (Transfelling your Medical results data) or purchasing something from Amazon.com, Ebay.Com, PayPal etc.

Once client validates the certificate the communication line gets encrypted based on Public Key, below diagram illustrates this.

Public Ke Cryptography diagram how it works

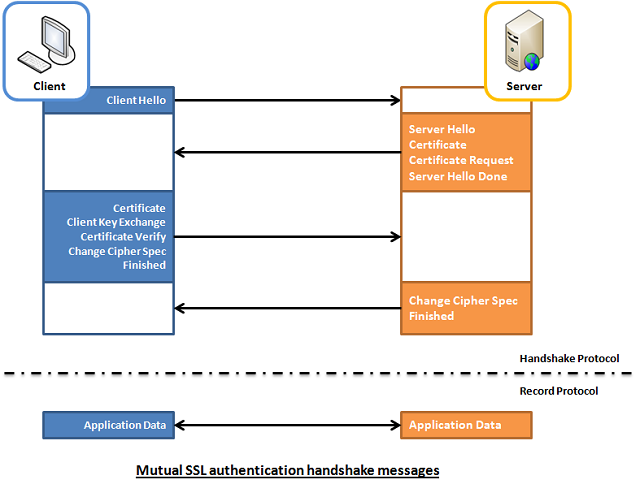
However in some casis where an additional Security Hardening is required, the Web Server might be configured to require additional certificate so the authentication between Client -> Server doesn't work by certificating with just a Server provided certificate but to work Two Ways, e.g. the Client might be setup to also have a Trusted Authority Certificate and to present it to server and send back this certificate to the Server as well for a mutual authentication and only once the certificate handshake between;

client -> server and server -> client
2WaySSL-client-to-server-and-server-to-client-mutual-authentication-illustration

is confirmed as successful the two could establish a trustable encypted SSL channel over which they can talk securely this is called
Two way SSL Authentication.


1. Configure Two Way SSL Authentication on Apache HTTPD
 

To be able to configure Two Way SSL Authentication handshake on Apache HTTPD just like with One way standard one, the mod_ssl Apache module have to enabled.

Enabling two-way SSL is usually not done on normal clients but is done with another server acting as client that is using some kind of REST API to connect to the server


The Apache directive used for Mutual Authentication is SSLVerifyClient directive (this is provided by mod_ssl)

the options that SSLVerifyClient receives are:

none: instructs no client Certificate is required
optional: the client is allowed to present a valid certificate but optionally
require: the client is always required to present a valid Certificate for mutual Authenticaton
optional_no_ca: the client is asked to present a valid Certificate however it has to be successfully verified.

In most of Apache configuratoins the 2 ones that are used are either none or require
because optional is reported to not behave properly with some of the web browsers and
optional_no_ca is not restrictive and is usually used just for establishing basic SSL test pages.

At some cases when configuring Apache HTTPD it is required to have a mixture of both One Way and Two Way Authentication, if that is your case the SSLVerifyClient none is to be used inside the virtual host configuration and then include SSLVerifyClient require to each directory (URL) location that requires a client certificate with mutual auth.

Below is an example VirtualHost configuration as a sample:


The SSLVerifyClient directive from mod_ssl dictates whether a client certificate is required for a given location:
 

<VirtualHost *:443>

SSLVerifyClient none
<Location /whatever_extra_secured_location/dir>
            …
            SSLVerifyClient require
</Location>
</VirtualHost>


Because earlier in configuration the SSLVerifyClient none is provided, the client will not be doing a Two Way Mutual Authentication for the whole domain but just the selected Location the client certificate will be not requested by the server for a 2 way mutual auth, but only when the client requests the Location setupped resouce a renegotiation will be done and client will be asked to provide certificate for the two way handshake authentication.

Keep in mind that on a busy servers with multitudes of connections this renegotiation might put an extra load on the server and this even can turn into server scaling issue on a high latency networks, because of the multiple client connects. Every new SSL renegotiation is about to assign new session ID and that could have a negative impact on overall performance and could eat you a lot of server memory.
To avoid this often it i suseful to use SSLRenegBufferSize directive which by default is set in Apache 2.2.X to 128 Kilobytes and for multiple connects it might be wise to raise this.

A mutual authentication that is done on a Public Server that is connected to the Internet without any DMZ might be quite dangerous thing as due to to the multiple renegotiations the server might end up easily a victim of Denial of Service (DOS) attack, by multiple connects to the server trying to consume all its memory …
Of course the security is not dependent on how you have done the initial solution design but also on how the Client software that is doing the mutual authentication is written to make the connections to the Web Server.


2. Configure a Mixture of One Way Standard (Basic) SSL Authentication together with Two Way Client Server Handshake SSL Authentication


Below example configuring is instructing Apache Webserver to listen for a mixture of One Way standard Client to browser authentication and once the client browser establishes the session it asks for renegotiation for every location under Main Root / to be be authenticated with a Mutual Two Way Handshake Authentication, then the received connection is proxied by the Reverse Proxy to the end host which is another proxy server listening on the same host on (127.0.0.1 or localhost) on port 8080.


<VirtualHost *:8001>
  ServerAdmin name@your-server.com
  SSLEngine on
  SSLCertificateFile /etc/ssl/server-cert.pem
  SSLCertificateKeyFile /etc/ssl/private/server-key.pem

  SSLVerifyClient require
  SSLVerifyDepth 10
  SSLCACertificateFile /home/etc/ssl/cacert.pem
  <location />
    Order allow,deny
    allow from all
    SSLRequire (%{SSL_CLIENT_S_DN_CN} eq "clientcn")
 </location>
  ProxyPass / http://127.0.0.1:8080/
  ProxyPassReverse / http://127.0.0.1:8080/
</VirtualHost>


3. So what other useful options do we have?


Keep Connections Alive

This is a good option but it may consume significant amount of memory. If Apache is using the prefork MPM (as many Webservers still do instead of Apache Threading), keeping all connections alive means multiple live processes. For example, if Apache has to support 1000 concurrent connections, each process consuming 2.7MB, an additional 2700MB should be considered. This may be of lesser significance when using other MPMs. This option will mitigate the problem but will still require SSL renegotiation when the SSL sessions will time out.

Another better approach in terms of security to the mixture of requirement for both One Side Basic SSL Authentication to a Webserver and Mutual Handshake SSL Auth is just to set different Virtualhosts one or more configuration to serve the One Way SSL authentication and others that are configured just to do the Mutual Two Way Handshake SSL to specified Locations.

4. So what if you need to set-up multiple Virtualhosts with SSL authentication on the Same IP address Apache (SNI) ?


For those who did not hear still since some time Apache Web Server has been rewritten to support SNI (Server Name Indication), SNI is really great feature as it can give to the webserver the ability to serve multiple one and two way handshake authentications on the same IP address. For those older people you might remember earlier before SNI was introduced, in order to support a VirtualHost with SSL encryption authentication the administrator had to configure a separate IP address for each SSL certificate on each different domian name.  

SNI feature can also be used here with both One Way standard Apache SSL auth or Two Way one the only downside of course is SNI could be a performance bottleneck if improperly scaled. Besides that some older browsers are not supporting SNI at all, so possibly for public services SNI is less recommended but it is better to keep-up to the good old way to have a separate IP address for each :443 set upped VirtualHost.
One more note to make here is SNI works by checking the Host Header send by the Client (browser) request
SSL with Virtual Hosts Using SNI.

SNI (Server Name Indication) is a cool feature. Basically it allows multiple virtual hosts with different configurations to listen to the same port. Each virtual host should specify a unique server name identification using the SeverName directive. When accepting connections, Apache will select a virtual host based on the host header that is part of the request (must be set on both HTTP and SSL levels). You can also set one of the virtual hosts as a default to serve clients that don’t support SNI. You should bear in mind that SNI has different support levels in Java. Java 1.7 was the first version to support SNI and therefore it should be a minimum requirement for Java clients.

5. Overall list of useful Options for Mutual Two Way And Basic SSL authentication
 

Once again the few SSL options for Apache Mutual Handhake Authentication

SSLVerifyClient -> to enable the two-way SSL authentication

SSLVerifyDepth -> to specify the depth of the check if the certificate has an approved CA

SSLCACertificateFile -> the public key that will be used to decrypt the data recieved

SSLRequire -> Allows only requests that satisfy the expression


Below is another real time example for a VirtualHost Apache configuration configured for a Two Way Handshake Mutual Authentication


For the standard One way Authentication you need the following Apache directives


SSLEngine on -> to enable the single way SSL authentication

SSLCertificateFile -> to specify the public certificate that the WebServer will show to the users

SSLCertificateKeyFIle -> to specify the private key that will be used to encrypt the data sent


6. Configuring Mutual Handshake SSL Authentication on Apache 2.4.x

Below guide is focusing on Apache HTTPD 2.2.x nomatter that it can easily be adopted to work on Apache HTTPD 2.4.x branch, if you're planning to do a 2 way handshake auth on 2.4.x I recommend you check SSL / TLS Apache 2.4.x Strong Encryption howto official Apache documentation page.

In meantime here is one working configuration for SSL Mutual Auth handshake for Apache 2.4.x:


<Directory /some-directory/location/html>
    RedirectMatch permanent ^/$ /auth/login.php
    Options -Indexes +FollowSymLinks

    # Anything which matches a Require rule will let us in

    # Make server ask for client certificate, but not insist on it
    SSLVerifyClient optional
    SSLVerifyDepth  2
    SSLOptions      +FakeBasicAuth +StrictRequire

    # Client with appropriate client certificate is OK
    <RequireAll>
        Require ssl-verify-client
        Require expr %{SSL_CLIENT_I_DN_O} eq "Company_O"
    </RequireAll>

    # Set up basic (username/password) authentication
    AuthType Basic
    AuthName "Password credentials"
    AuthBasicProvider file
    AuthUserFile /etc/apache2/htaccess/my.passwd

    # User which is acceptable to basic authentication is OK
    Require valid-user

    # Access from these addresses is OK
    Require ip 10.20.0.0/255.255.0.0
    Require ip 10.144.100
</Directory>

Finally to make the new configurations working depending you need to restart Apache Webserver depending on your GNU / Linux / BSD or Windows distro use the respective script to do it.

Enjoy!

Coptic Patriarch Preaching on Hope – We Christians should never loose hope! God is with us!

Sunday, March 17th, 2013

patriarch__Shenouda-of-coptic-oriental-orthodox-Church

Whoever believes in Christ he has an everlasting life, as Christ promised us. Faith, Hope and Love are the three essential things we should always keep in heart. I myself being a Christian often forget about importance of Hope. It is one of the spiritual weapons we Christians should hold firmly in our life. I've been in situation, where all around is failing and I'm miserable and powerless, in those moments I should remember more often the Holy Scripture advices that Hope should always be with us. Below preach is the words of Pope Shenouda the Coptic Oriental Church patriach, I believe we can only learn and astonish on his graceful words.


His Holiness Pope Shenouda Words on Hope – Hope Christians unfailing all time weapon

Let by this holy patriarch words, God bless Christians with a good hope. It is the beginning of the Great fasting in the Orthodox Church worldwide, so now we need hope more than ever! By the prayers of all saints oh Lord Jesus Christ, have mercy on us sinners …

Intel and IBM future tech world vision about the world, do we really want this?

Saturday, June 30th, 2012

the-hellish-future-as-envisioned-by-leading-it-companies-IBM-and-intel-and-the-slavery-of-Internet-of-Things

I'm quite a visionary person as such I'm always interested to prognosis on what the world might look like few years from now. Below are two videos showing IBM and Intel's vision on what might future bring us. I don't know about you but I'm strong in my conviction that I DON'T WANT TO LIVE IN SUCH WORLD. I'm pretty sure that many other people share my opinion that such a world is not fun and is far from what really we're supposed to live. The sad thing is the corporations are already powerful enough to impose their vision and make the vision reality.

It is my understanding that the main problem we have to solve is not how we can embed better or newer technology to change our life (for good?) but rather how we can get out of the trap of living in a fake world like the one displayed in the video. Obviously the vision of this two giant companies is not far from what we're forewarned in the holy bible in Revelation. In revelation we read that there will be a unified system, where everything and everyone on this earth will be market and whoever does not have the mark "of the beast" he will not be able to buy or sell within the system. This prophecy closely matches the vision of future marketing offered as a possible outcome by IBM. I don't think IBM have red in Revelation to get their idea on their infernal system shown within their vision of supermarket video

The logical conclusion might dirive therefore is there is a higher force who leads IBM (and possible most if not all of corporations) on creating the fake tech-nocrat culture society which is building right in front our eyes.
The destruction of real communities and the worsening conditions within the Orthodox Church are another symptom that the End Times as prophecised centuries before are closer than we think.

It is my firm believe that people who does understand about this problem should start uniting and say no to technology innovation that leads us in this technological trap ,,,,,

I'm sure even people who does not have a believe in Jesus Christ and are not Christian from other religions are also seeing that the direction this world has taken up is dark.
We should be very dumb and blind not to see that technology is boxing us and leading us to a modern day techno slavery …..

Intel | Future Technology | Vision

IBM's vision on how future market might look like

Enable printing from Windows and Macs remotely through Linux Print server – Share Brother Printer DCP-1610W with Linux CUPS and Samba Windows Share

Thursday, March 23rd, 2017

Brother-Printer-model-DCP-1610W-printer-scanner-and-copier-in-one-picture
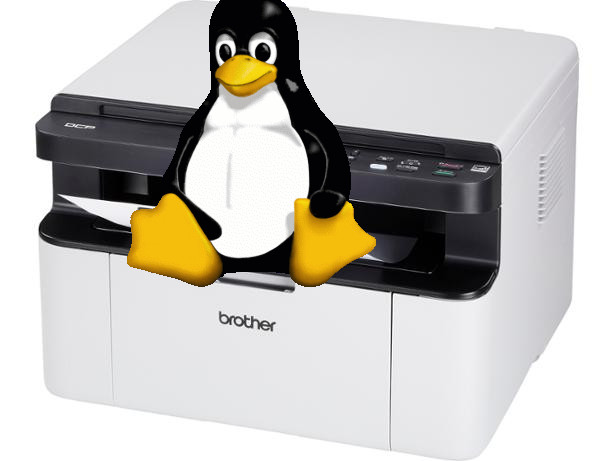
I've recently bought a new Printer model Brother DCP 1610W and as in my home I have already a small Linux router and a web server where this blog and a couple of other websites runs and I need multiple PC / notebook / mobile phone enabled people to print on the Printer easily pretty much like a Printing server for a Small Office environment.

To do that of course I needed it configured to be accessible remotely for print via LAN and Wireless network. The task is not a complex one and printing remotely over the network is a standard thing many company organizations / universities and univerities does for quite some time and hence nowadays most printers are network connect ready so you just have to place them inside your home or corporate network and use the time to configure them via their web configuration interface or even some have their own embedded wifi adapter, as well as many printers nowdays can even be ready to print directly by just connecting the Printer to the Wi-Fi network and installing its drivers on a Win host.

Anyhow the most common way for both home printer configurations and corporate I'm aware of still is to Share the printer via Windows Server or Win Server Domain so anyone connected to the Network to be able to Add the printer via Winblows.

In the case i'm going to describe below my home the Wi-Fi router is connected to an 5 Port Network Switch (HUB) which on its hand is connected to the Linux router which serves multiple things (a Linux router, a hosting server (web server and a database server hosted, a mail server, traffic proxy server, a firewall and a NAT router), I decided to Share the printer to Wi-Fi connected and LAN clients directly switched via an UTP cable to the switch by using the good old Linux Samba Sharing server.

I did not actually do that for a really long time hence before I started I did some quick research to get an idea on the general steps to partake to succeed in Sharing the Printer over the network of this Debian's Wiki SystemPrinting Guide was mostly helpful.


1. Downloading and Installing necessery Brother Printer deb packages
 

A small remark to make here is my Linux server is running Debian GNU / Linux and hence this article is giving details on how Printer can be Shared on Debian though a minor adaptation of the article should make it possible to install also on any RHEL / CentOS / SuSE etc. Redhat based RPM Linux distribution.)

First step to do is to download Brother printer vendor provided drivers as of moment of writting this article they're here

To download the drivers get the proper links and use wget or curl to download all the necessery .deb archives in lets say in /root/brother-printer-drivers e.g. before that create the folder with:
 

root@linux:/root# mkdir /root/brother-printer-drivers

Also it might be helpful for those who need some other Brother Printer Linux driver complete list of Brother Printer all Linux drivers as of time of writting this post is found on this URL here

Next you need to install following Brother printer driver deb packages brscan-skey brscan4 dcp1610wcupswrapper dcp1610wlpr

root@linux:/root# cd brother-printer-drivers
root@linux:/root/brother-printer-drivers# dpkg -i –force-all brscan-skey-0.2.4-1.amd64.deb

root@linux:/root# dpkg -i –force-all brscan4-0.4.4-1.amd64.deb

root@linux:/root# dpkg -i –force-all dcp1610wcupswrapper-3.0.1-1.i386.deb

root@linux:/root# dpkg -i –force-all dcp1610wlpr-3.0.1-1.i386.deb

root@linux/root# cd  ../


Once installed dpkg -l should show like so:
 

root@linux:/root# dpkg -l |grep -i brother
ii  brscan-skey                                0.2.4-1                      Brother Linux scanner S-KEY tool
ii  brscan4                                    0.4.4-1                      Brother Scanner Driver
ii  dcp1610wcupswrapper                        3.0.1-1                      Brother DCP-1610W CUPS wrapper driver
ii  dcp1610wlpr                                3.0.1-1                      Brother DCP-1610W LPR driver

Brother's vendor provided packages will install drivers under /opt/brother
 

root@linux:/root# ls -al /opt/brother/
общо 16
drwxr-xr-x 4 root root 4096 яну 26 13:58 ./
drwxr-xr-x 3 root root 4096 яну 26 13:55 ../
drwxr-xr-x 3 root root 4096 яну 26 13:58 Printers/
drwxr-xr-x 4 root root 4096 яну 26 13:58 scanner/


2. Installing CUPS Printing Service and related Filters and Postscript packages necessery for PDF processing on CUPS server side


root@linux:/root#  apt-get install –yes cups cups-client cups-common cups-pdf cups-ppdc foomatic-db foomatic-db-engine foomatic-filters foomatic-filters-ppds openprinting-ppds lpr hp-ppd hpijs cups-pdf ghostscript-cups

Your printing should work normally without cups-pdf and ghostscript-cups packages installed but I install them just in case if PDF processing is problematic you can skip that.

It is also useful to install sane and sane-utils packages if you're going to use the brother's scanner capabilities.

root@linux:/root# apt-get install –yes sane sane-utils

Note that considering that all packages installed fine and the CUPS service is running, this should have set a proper printer into /etc/printcap a short database used to describe printers. printcap file is being used by UNIX's spooling system and allows you to dynamic addition and deletion of printers, for Linux / *Nix hosts which have more than one printer connected and added in CUPs records for the various printer goes there.
With a single Brother DCP-1610W Printer like my case is you should have records similar to these:

root@linux:~/brother-printer-drivers# cat /etc/printcap
DCP1610W:\
        :mx=0:\
        :sd=/var/spool/lpd/DCP1610W:\
        :sh:\
        :lp=/dev/usb/lp0:\
        :if=/opt/brother/Printers/DCP1610W/lpd/filter_DCP1610W:


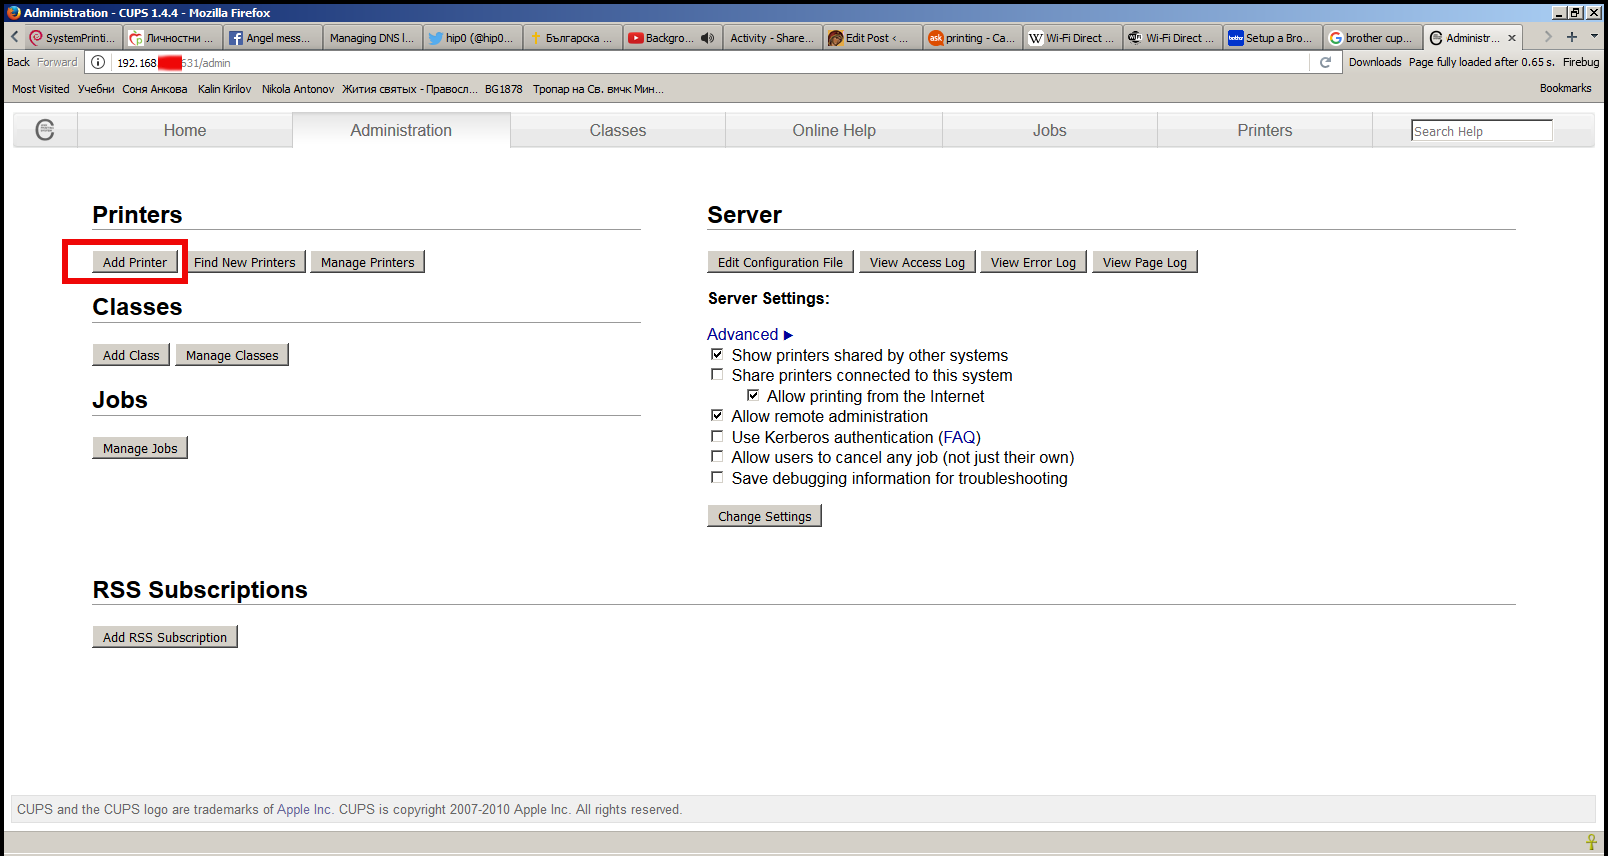
3. Adding a Printer in CUPS the easy way through CUPS Printing System Web Interface


CUPS has a nice web interface for setting up and administering printers and print queues.

Below is a selfexplanatory screenshot of Add Printer screen 

add-a-new-printer-cups-web-admin-interface-screenshot-in-a-firefox-browser  .


Use your favourite browser (Firefox, Opera, Chromium, lynx, elinks – yes the great news is console / terminal browsers are also supported well by cups web iface) to display interface and add a printer via the Administration screen. If you are asked for a username and password see here.

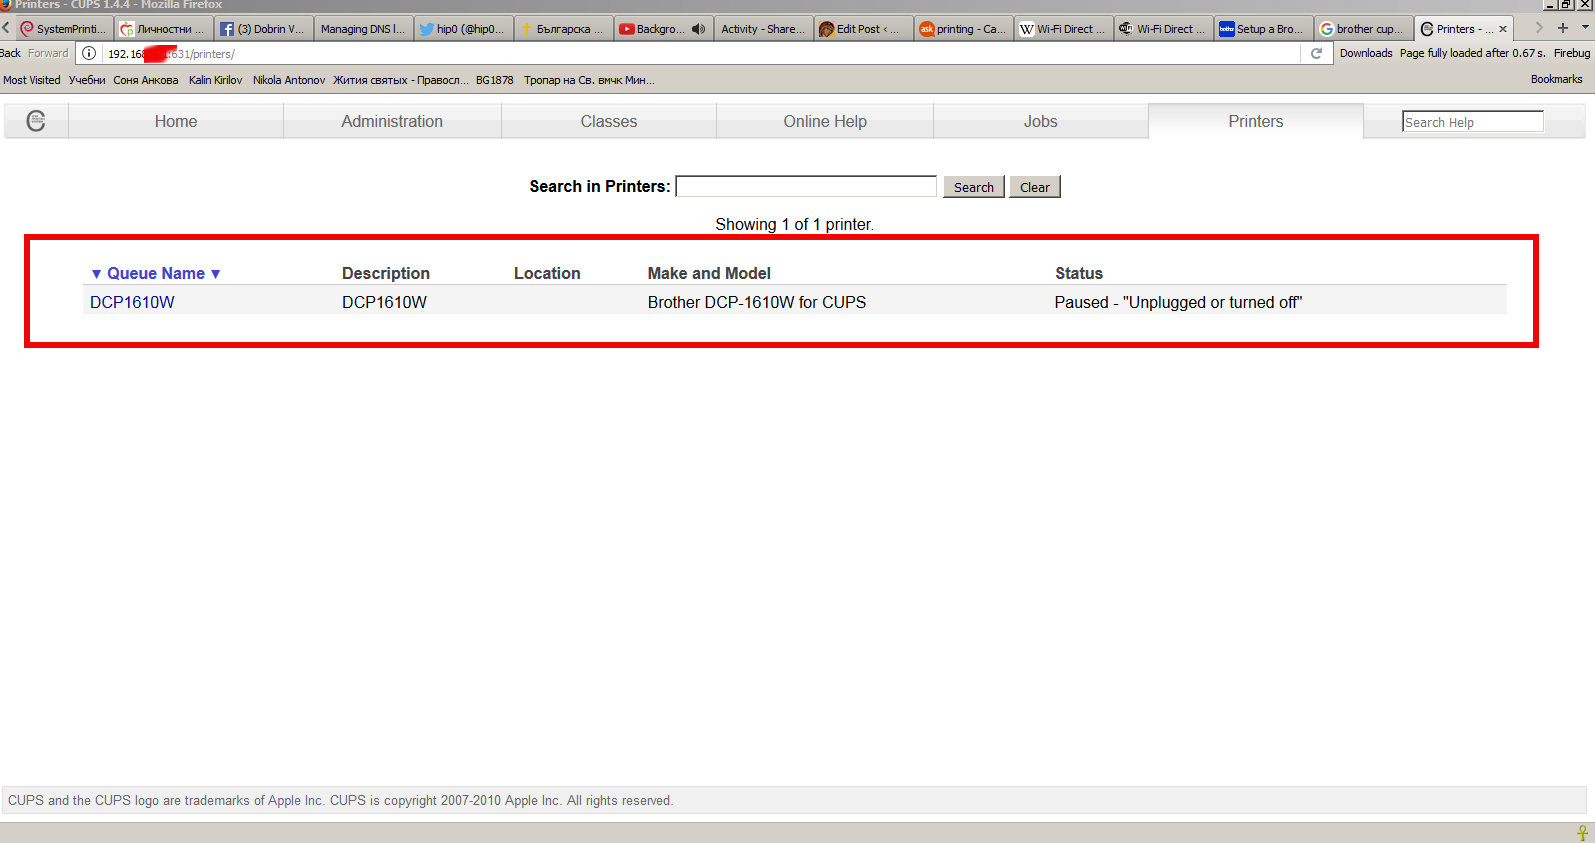
cups-web-admin-interface-accessed-in-browser-listing-brother-dcp1610w-printer-screenshot

There are three sections. The first is for local printers; that is, printers which are usually attached to the machine you are using. These are very often printers using a USB connection but can be parallel or serial port printers.

Adding a USB printer is a common occurance and one should automatically be detected as a local printer and a URI (Unified Resource Indicator) for its connection displayed on the next page.
 

The Other Network Printers section requires you to specify the destination for the remote print queue/printer, which could be on the local network or many kilometres away. AppSocket is almost always available on a network printer and other devices and requires only the IP address of the printer and a port number. An Internet Printing Protocol (IPP) URI is the preferrred choice for connecting to another CUPS server because it is CUPS' native protocol. ipp14 is the ipp backend from CUPS 1.4 and Debian-specific. It is provided because some devices do not work with the current ipp backend, which has a stricter adherence to the IPP standard. A Line Printer Daemon (LPD) URI could be considered if the remote printing service does not support IPP satisfactorily or at all. As before, when a remote print queue is doing the filtering choose RAW as the Make/Manufacturer.


4. Printer Status and Control testing whether CUPS printing is up and running


Once cups is installed and hopefully up and running you should see the cups process up and running to check it do:

root@linux:/root# /etc/init.d/cups status; ps axuwwf|grep -i cups|grep -v grep
Status of Common Unix Printing System: cupsd is running.
root      2815  0.0  0.0  75364  2912 ?        Ss   Mar17   0:00 /usr/sbin/cupsd -C /etc/cups/cupsd.conf

To get some further testing you can also use lpstat command and should get ouput similar to belows:
 

root@linux:/root# lpstat -t
scheduler is running
no system default destination
device for DCP1610W: usb://Brother/DCP-1610W%20series
DCP1610W accepting requests since Fri Mar 17 23:03:37 2017
printer DCP1610W disabled since Fri Mar 17 23:03:37 2017 –
        Unplugged or turned off

At the moment of issuing above command it shows printer is disabled because of moment of execution the printer was turned off for a while cause I was not needing it you should get usually an output of enabled and ready to print.

lpstat is also about to report whether a queue is accepting jobs and what is yet to be printed you can do


5. Install and Configure Samba Sharing Server on the Linux server


You can setup CUPS to allow Windows machines to print to a CUPS server using an http address.

First, install the samba package. When you are asked to use WINS, say yes.

root@linux:/root#  apt-get install samba

Next you might want to set setup your /etc/cups/cupsd.conf file by default CUPS would listen to LPD's port 631 if you don't have a strong firewall isolating you from the Internet on port 631 you might want to change that port to another one lets say to Port 49651.


I personally prefer keep the default port 631 and do use a robust firewall. If you want to change it modify config to something like:

# Our private connection we listen to Listen *:49651 # Allow machines on local network to use printers <Location /printers> Order allow,deny Allow 192.168.0.* Allow 192.168.1.* </Location>

If you like to filter access to CUPs daemon to receive Printing requests to be originating only from the local network place in smb.conf also something with your private network ranges:

# Allow machines on local network to use printers

<Location /printers>
Order allow,deny
Allow 192.168.0.*
Allow 192.168.1.*
Allow 192.168.2.*
</Location>
<Location />
  # Allow remote administration…
  Order allow,deny
##  Allow all
Allow 192.168.0.*
Allow 192.168.1.*
Allow 192.168.2.*
</Location>
<Location />
  # Allow remote administration…
  Order allow,deny
##  Allow all
Allow 192.168.0.*
Allow 192.168.1.*
Allow 192.168.2.*
</Location>
<Location /admin>
  # Allow remote administration…
  Order allow,deny
##  Allow all
Allow 192.168.0.*
Allow 192.168.1.*
Allow 192.168.2.*
</Location>


This will listen on port 49651 from any network. You may use some other port number besides 631. Note that the dynamic and/or private ports as specified by the IANA are in the range 49152 through 65535. Also, this will only allow computers from the local network to print to the CUPS printers.
 

6. Use CUPS Printing server to print over the network directly


Next you need to restart the CUPS daemon once again as it will be used for samba printing


# service cups restart


Now on each Windows machine, Choose that you want to install a network printer and that you want to install a printer on the Internet or home/office network. The URL you will use should be smth like:


http://<cups_server_hostname>:49651/printers/DCP1610W


Lastly, select the Brother downloaded from Internet or the one that's available on the Install CD, for any other vendor printer if it is lets say HP Printer or Canon to install use the respective provided driver or as a last resort use the Generic section driver labeled MS Publisher Color Printer.


7. Configure Samba to Share CUPS network enabled printer


I've done a minor changes in default installed /etc/samba/smb.conf to make the printer accessible from The Samba server here is the main things to consider changing:
 

# Change this to the workgroup/NT-domain name your Samba server will part of
   workgroup = WORKGROUP

#   security = user
security = share

[printers]
   comment = PC Freak Printer
   browseable = yes
   path = /var/spool/samba
   printable = yes
   guest ok = yes
   read only = yes
   create mask = 0700

# Windows clients look for this share name as a source of downloadable
# printer drivers
[print$]
   comment = Printer Drivers
   path = /var/lib/samba/printers
   browseable = yes
   read only = yes
   guest ok = yes


Next restart Samba server to make the new setting take affect:
 

root@linux:/# /etc/init.d/samba restart
Stopping Samba daemons: nmbd smbd.
Starting Samba daemons: nmbd smbd.
root@linux:/# ps axu|grep -E "smb|nmb"
root     21887  0.0  0.0 169588  1904 ?        Ss   16:53   0:00 /usr/sbin/nmbd -D
root     21892  0.0  0.0 197560  3272 ?        Ss   16:53   0:00 /usr/sbin/smbd -D
root     21894  0.0  0.0 197560  1564 ?        S    16:53   0:00 /usr/sbin/smbd -D
root     21899  0.0  0.0 112368   840 pts/6    S+   16:53   0:00 grep -E smb|nmb

root@linux:/#

Complete current smb.conf configuration I use to make the Brother Printer DCP 1610W accesible via network share is here

This section needs updating as you can setup print server via samba print sharing just by uploading drivers.

When printing to windows printers in an NT domain using SMB the Device URI should use similar to:


smb://username:password@domain/server/printername


This allows Samba to authenticate against a domain controller for acces to the printer queue.

In my case as you can see in below smb.conf configuration I've configured Samba security = share which will allow anyone to access the samba server without authentication so you can omit  username:password@ part

One good way to determine the printername  (in case you are not sure of) is to use smbclient command line tool. computername refers to the name of the machine that shares the printer:


smbclient -L copmputername


computername is the name of the samba server machine or its IP address


E.g.
 

hipo@linux:~$ smbclient -L //192.168.0.1/
Enter Attitude's password:
Domain=[WORKGROUP] OS=[Unix] Server=[Samba 3.5.6]

        Sharename       Type      Comment
        ———       —-      ——-
        print$          Disk      Printer Drivers
        IPC$            IPC       IPC Service (pcfreak server)
        DCP1610W        Printer   DCP1610W
Domain=[WORKGROUP] OS=[Unix] Server=[Samba 3.5.6]

        Server               Comment
        ———            ——-
        PCFREAK              pcfreak server

        Workgroup            Master
        ———            ——-
        WORKGROUP            WORKGROUP


Check the ouput for entries of Type "Printer":


The resulting (Linux / Mac OS) Samba Share access URL from the output above would be

smb://192.168.0.1/DCP1610W


8. Adding Printer to your Windows machines to enable actual Remote Samba Sharing printing

Assuming you already know the Printer share name, here is what I needed to do to have the Printer Added on each of Windows Desktop PCs and Notebooks


Control Panel -> Devices and Printers -> Add a printer -> (Add a Network wireless or bluetooth printer)

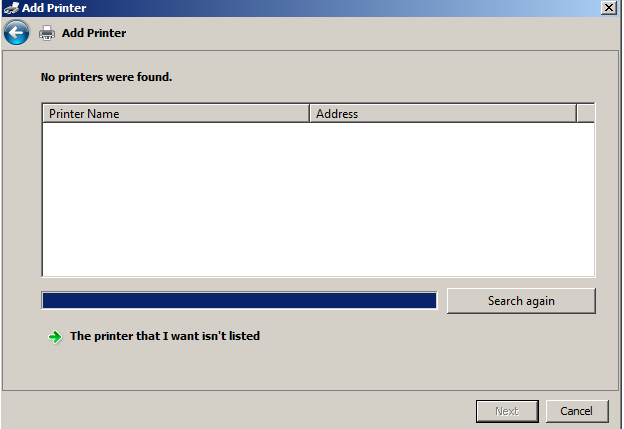
Then instead of Searching the printer to click on:

The printer that I wasn't listed

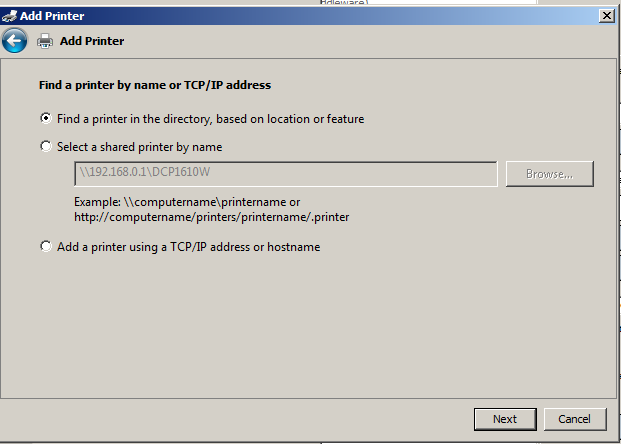
add-samba-network-share-brother-dcp-1610w-printer-to-windows-7-machine-no-printer-found-from-add-printer

Then type in the URL or IP (as in my case) leading to the printer as you see in below screenshot:


9. Printer Samba Sharing Using Macintosh notebook as the Client and Debian as the Server


1. Assuming you have cups to set up the printer on Debian as described above.

2. On the Mac (OS X 10.4+) start Print and Fax from System Preferences. Use the + button to add a printer.

3. Look first in the "Default" tab. If the automagic printer-sharing has worked, and your Mac is connected to the local network properly, then the Debian-based printer should already be visible in the list.

Just select it and use the recommended print driver. If you face problems you can try to play with
Gutenprint Printer drivers to make it printing.

4. If your printer is not visible in the Default tab, then try adding it on the "IP" tab.

Pick IPP as the protocol, give the plain IP address of the server in the address box (in my case that's 192.168.0.1, and in the Queue box put
"printers/DCP1610W

Put whatever helps you identify the printer in the Name and Location boxes (fields), and choose a printer driver than matches Brother DCP1610W or with another printer installed whatever you used to set up the printer on Debian .
Finally Pray that God help you to make it work and press the Add button. If you prayed honestly and repenting for your sins perhaps you will have mercy and it will work, of course if not try to research online on how to fix it further by God's grace.

Note that making printing work on Mac is a little bit of tricky and it might cause you some extra effort / nerves to complete.


10. Some other Useful maintanance commands you might need in future CUPS Printer queue jobs maintance


For displaying or setting print queue options and defaults:

lpoptions -p <print_queue_name> -l

Stopping and starting print queues. Acceptance and rejection of jobs sent to a destination:
 

cupsdisable <print_queue_name>
cupsenable <print_queue_name>
cupsaccept <print_queue_name>
cupsreject <print_queue_name>


To Cancel all jobs on a destination and additionally delete job data files:

cancel -a <print_queue_name>
cancel -a -x <print_queue_name>

That's all folks, Thanks God the printer should be working. Enjoy!

How much memory users uses in GNU / Linux and FreeBSD – Commands and Scripts to find user memory usage on Linux

Tuesday, February 17th, 2015


how-much-memory-users-use-in-gnu-linux-freebsd-command-to-find-and-show-ascending-descending-usage-of-system-memory-tux-memory-logo


If you have to administrate a heterogenous network with Linux and FreeBSD or other UNIX like OSes you should sooner or later need for scripting purposes to have a way to list how much memory separate users take up on your system. Listing memory usage per user is very helpful for admins who manager free-shells or for companies where you have developers, developing software directly on the server via ssh. Being able to check which process eats up most memory is essential for every UNIX / Linux sysadmin, because often we as admins setup (daemons) on servers and we forgot about their existence, just to remember they exist 2 years later and see the server is crashing because of memory exhaustion. Tracking server bottlenecks where RAM memory and Swapping is the bottleneck is among the main swiss amry knives of admins. Checking which user occupies all server memory is among the routine tasks we're forced to do as admins, but because nowdays servers have a lot of memory and we put on servers often much more memory than ever will be used many admins forget to routinely track users / daemons memory consumption or even many probably doesn't know how.  Probably all are aware of the easiest wy to get list of all users memory in console non interactively with free command, e.g.:
 

free -m
             total       used       free     shared    buffers     cached
Mem:         32236      26226       6010          0        983       8430
-/+ buffers/cache:      16812      15424
Swap:        62959        234      62725


but unfortunately free command only shows overall situation with memory and doesn't divide memory usage by user

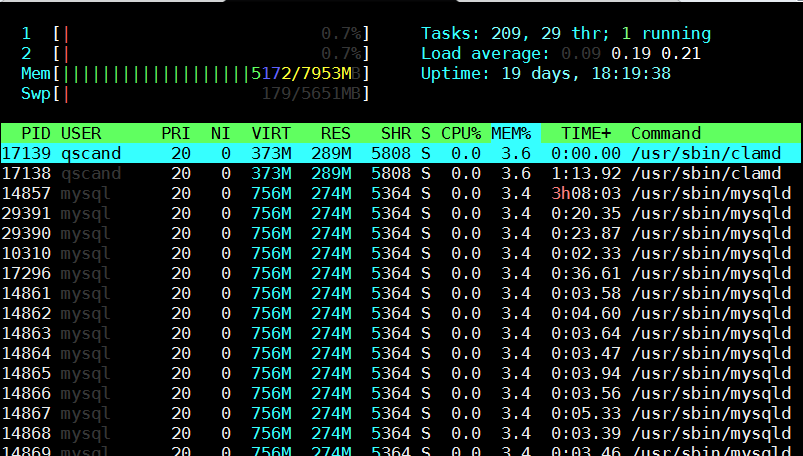
Thus probably to track memory users the only known way for most pepole is to (interactively) use good old top command or if you like modern (colorful) visualization with htop:

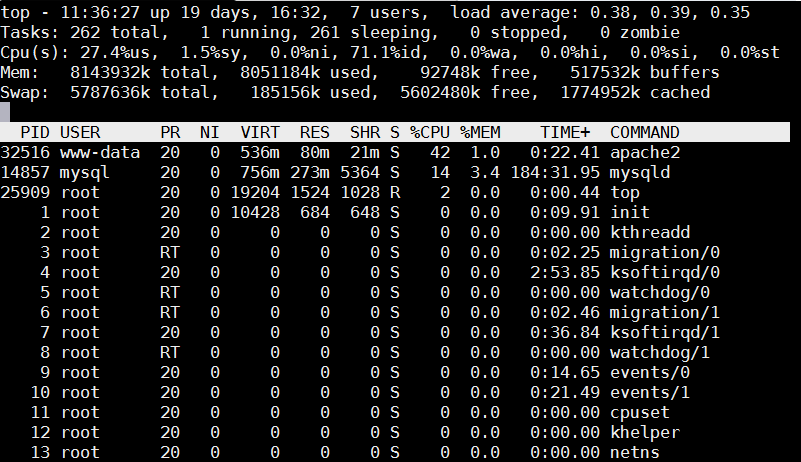
debian:~# top


linux-check_memory_usage_by_logged-in-user-with-top-process-command-gnu-linux-freebsd-screenshot

Once top runs interactive press 'm' to get ordered list of processes which occupy most system memory on Linux server.Top process use status statistics will refresh by default every '3.0' seconds to change that behavior to '1' second press  s and type '1.0'. To get Sort by Memory Use in htop also press 'm'
 

[root@mail-server ~]# htop


htop_show_users_memory_usage_order_ascending-gnu-linux-screenshot


However if you need to be involved in scripting and setting as a cron job tasks to be performed in case if high memroy consumption by a service you will need to use few lines of code. Below are few examples on how Linux user memory usage can be shown with ps cmd.

Probably the most universal way to see memory usage by users on Debian / Ubuntu / CentOS / RHEL and BSDs (FreeBSD / NetBSD) is with below one liner:


server:~# ps hax -o rss,user | awk '{a[$2]+=$1;}END{for(i in a)print i” “int(a[i]/1024+0.5);}' | sort -rnk2
daemon 0
debian-tor 63
dnscache 1
dnslog 0
hipo 21
messagebus 1
mysql 268
ntp 2
privoxy 1
proftpd 1
qmaill 0
qmailq 0
qmailr 0
qmails 0
qscand 291
root 94
shellinabox 1
snmp 1
statd 1
vpopmail 80
www-data 6765


Output is in MBs

Below is output from machine where this blog is running, the system runs ( Apache + PHP + MySQL Webserver + Qmail Mail server and Tor) on Debian GNU / Linux.

 To get more human readable (but obscure to type – useful for scripting) output list of which user takes how much memory use on deb / rpm etc. based Linux :


server:~# echo "USER                 RSS      PROCS" ; echo "——————– ——– —–" ; \
ps hax -o rss,user | awk '{rss[$2]+=$1;procs[$2]+=1;}END{for(user in rss) printf “%-20s %8.0f %5.0f\n”, user, rss[user]/1024, procs[user];}' | sort -rnk2


USER                 RSS      PROCS
——————– ——– —–
www-data                 6918   100
qscand                    291     2
mysql                     273     1
root                       95   120
vpopmail                   81     4
debian-tor                 63     1
hipo                       21    15
ntp                         2     1
statd                       1     1
snmp                        1     1
shellinabox                 1     2
proftpd                     1     1
privoxy                     1     1
messagebus                  1     1
dnscache                    1     1
qmails                      0     2
qmailr                      0     1
qmailq                      0     2
qmaill                      0     4
dnslog                      0     1
daemon                      0     2


It is possible to get the list of memory usage listed in percentage proportion, with a tiny for bash loop and some awk + process list command
 

TOTAL=$(free | awk '/Mem:/ { print $2 }')
for USER in $(ps haux | awk '{print $1}' | sort -u)
do
    ps hux -U $USER | awk -v user=$USER -v total=$TOTAL '{ sum += $6 } END { printf "%s %.2f\n", user, sum / total * 100; }'
done

107 1.34
115 2.10
119 1.34
daemon 1.32
dnscache 1.34
dnslog 1.32
hipo 1.59
mysql 4.79
ntp 1.34
privoxy 1.33
proftpd 1.32
qmaill 1.33
qmailq 1.33
qmailr 1.32
qmails 1.33
qscand 4.98
root 1.33
snmp 1.33
statd 1.33
vpopmail 2.35
www-data 86.48

Also a raw script which can be easily extended to give you some custom information on memory use by user list_memory_use_by_user.sh is here.
You can also want to debug further how much memory a certain users (lets say user mysql and my username hipo) is allocating, this can easily be achieved ps like so:
 

root@pcfreak:~# ps -o size,pid,user,command -u mysql –sort -size
 SIZE   PID USER     COMMAND
796924 14857 mysql   /usr/sbin/mysqld –basedir=/usr –datadir=/var/lib/mysql –plugin-dir=/usr/lib/mysql/plugin –user=mysql –pid-file=/var/run/mysqld/mysqld.pid –socket=/var/run/mysqld/mysqld.sock –port=3306


root@pcfreak~# ps -o size,pid,user,command -u hipo –sort -size|less
 SIZE   PID USER     COMMAND
13408 19063 hipo     irssi
 3168 19020 hipo     SCREEN
 2940  2490 hipo     -bash
 1844 19021 hipo     /bin/bash
 1844 19028 hipo     /bin/bash
 1844 19035 hipo     /bin/bash
 1844 19042 hipo     /bin/bash
 1844 19491 hipo     /bin/bash
 1844 22952 hipo     /bin/bash
  744  2487 hipo     sshd: hipo@pts/0
  744  2516 hipo     sshd: hipo@notty
  524  2519 hipo     screen -r
  412  2518 hipo     /usr/lib/openssh/sftp-server

You see from below output user running with www-data (this is Apache Webserver user in Debian) is eating 86.48% of overall system memory and MySQL server user is using only 4.79% of available memory

Output is shown in Megabytes per username memory usage, and user memory usage is ordered (stepping-down / descentive) from top to bottom

Getting more thoroughful and easier to read reporting without beeing a 31337 bash coder you can install and use on Linux smem – memory reporting tool .

SMEM can provide you with following memory info:

  • system overview listing
  • listings by process, mapping, user
  • filtering by process, mapping, or user
  • configurable columns from multiple data sources
  • configurable output units and percentages
  • configurable headers and totals
  • reading live data from /proc
  • reading data snapshots from directory mirrors or compressed tarballs
  • lightweight capture tool for embedded systems
  • built-in chart generation


Installing smem on Debian 6 / 7 / Ubuntu 14.04 / Turnkey Linux etc. servers is done with standard:


debian:~# apt-get install –yes smem
….


To install smem on CentOS 6 / 7:


[root@centos ~ ]# yum -y install smem
….


On Slackware and other Linux-es where smem is not available as a package you can install it easily from binary archive with:


cd /tmp/
wget http://www.selenic.com/smem/download/smem-1.3.tar.gz
tar xvf smem-1.3.tar.gz
sudo cp /tmp/smem-1.3/smem /usr/local/bin/
sudo chmod +x /usr/local/bin/smem


Two most common smem uses are:


root@mail:~# smem -u
User     Count     Swap      USS      PSS      RSS
dnslog       1       44       48       54      148
qmaill       4      232      124      145      464
hipo        11    13552     8596     9171    13160
qscand       2     4500   295336   295602   297508
root       188   217312  4521080  4568699  7712776


Below command shows (-u – Report memory usage by user, -t – show totals, -k – show unix suffixes)

root@mail:~# smem -u -t -k
User     Count     Swap      USS      PSS      RSS
dnslog       1    44.0K    48.0K    54.0K   148.0K
qmaill       4   232.0K   124.0K   145.0K   464.0K
hipo        11    13.2M     8.4M     9.0M    12.9M
qscand       2     4.4M   288.4M   288.7M   290.5M
root       188   212.2M     4.3G     4.4G     7.4G
—————————————————
           206   230.1M     4.6G     4.6G     7.7G


To get users memory use by percentage with smem:
 

root@mail:~# smem -u -p
User     Count     Swap      USS      PSS      RSS
dnslog       1    0.00%    0.00%    0.00%    0.00%
qmaill       4    0.00%    0.00%    0.00%    0.01%
hipo        11    0.17%    0.11%    0.11%    0.16%
qscand       2    0.05%    3.63%    3.63%    3.66%
root       194    2.64%   56.18%   56.77%   95.56%

It is also useful sometimes when you want to debug system overloads caused by external hardware drivers loaded into kernel causing issues to get list of system wide memory use sorted by user


 root@mail:~# smem -w -p
Area                           Used      Cache   Noncache
firmware/hardware             0.00%      0.00%      0.00%
kernel image                  0.00%      0.00%      0.00%
kernel dynamic memory        38.30%     36.01%      2.28%
userspace memory             60.50%      0.98%     59.53%
free memory                   1.20%      1.20%      0.00%


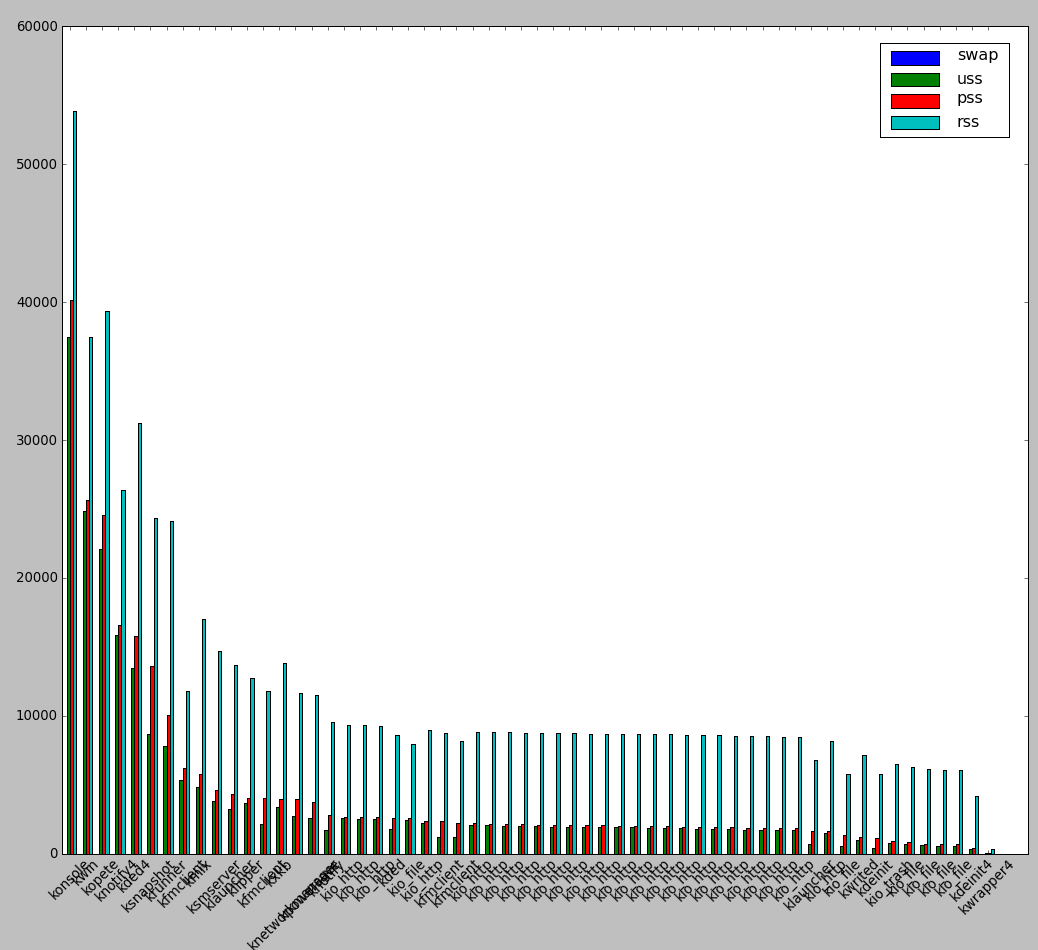
smem is very nice as if you're running it on a Desktop Linux system with Xserver installed you can see also graphical output of memory use by application:
 

root@desktop-pc:~# smem –bar pid -c "pss uss"


smem_graphical_representation-of-which-user-application-is-consuming-most-memory-gnu-linux-kde-screenshot-smem-command-line-tool

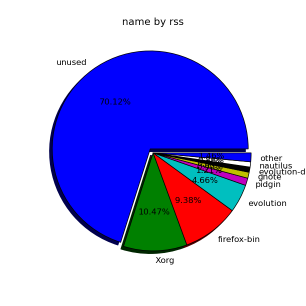
smem can even generate graphical pie charts to visualize better memory use
 

root@desktop-pc:~# smem -P '^k' –pie=name


generate-graphical-staticstics-linux-memory-use-by-pie-chart

If there is a high percentage shown in firmware/hardware this means some buggy module is loaded in kernel eating up memory, to fix it debug further and remove the problematic module.
userspace memory actually shows the percantage of memory out of all server available RAM that is being consumed by applications (non kernel and other system processes which make the system move). You see in above example the kernel itself is consuming about 40% of system overall available memory. 

We all know the SWAP field stands for hard disk drive used as a memory when system is out, but there are 3 fields which smem will report which will be probably unclear for most here is also explanation on what USS / PSS / RSS means?

RSS is the Resident Set Size and is used to show how much memory is allocated to that process and is in RAM. It does not include memory that is swapped out. It does include memory from shared libraries as long as the pages from those libraries are actually in memory. It does include all stack and heap memory too.

There is also PSS (proportional set size). This is a newer measure which tracks the shared memory as a proportion used by the current process. So if there were two processes using the same shared library from before.

USS stands for Unique set size, USS is just the unshared page count, i.e. memory returned when process is killed 

PSS = Proportional set size, (PSS),  is a more meaningful representation of the amount of memory used by libraries and applications in a virtual memory system.  
Because large portions of physical memory are typically shared among multiple applications, the standard measure of memory usage known as resident set size (RSS) will significantly overestimate memory usage. The parameter PSS instead measures each application’s “fair share” of each shared area to give a realistic measure. For most admins checking out the output from RSS (output) should be enough, it will indicate which user and therefore which daemon is eating up all your memory and will help you to catch problematic services which are cause your server to run out of RAM and start swapping to disk.

How to read ext2 / ext3 / ext4 Linux filesystem and Mac OS X HFS+ partitions from Windows

Thursday, November 27th, 2014

access-linux-drives-filesystem-disks-from-microsoft-windows-howto-picture
If you are using a Dual-boot PC with installed M$ Windows and GNU .Linux OS storing many of your Documents / Music / Movie data on Linux's ext3 / ext4 filesystem partition  but using often also Windows PC for Professional Graphic Design or Photoshop CS5 / Coreldraw Graphics Suite X7 / 3D Studio / Adobe Drewmweaver you will certainly want to be able to mount (Map drive) as a drive Linux partitions ext3 / ext4 or Mac OS's HFS+ read / use it straight from Windows.

Below are few softs that does allow mounting Mac and Linux (Debian, Ubuntu, Fedora, SuSE etc.) partitions on Windows

1. Mapping Linux ext3 and ext4 as a Windows drive

There are number of programs that can map Linux partition as a drive / directly explore Linux FS content. Most famous (free) ones are:

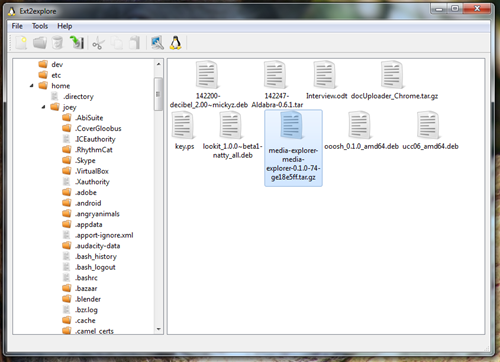
  • Ext2Explore (also known as Ext2Read) – Probably best historically known Windows driver that does Linux ext FS reading 


    ext2explore-access-ubuntu-debian-fedora-suse-linux-from-your-windows-screenshot
     

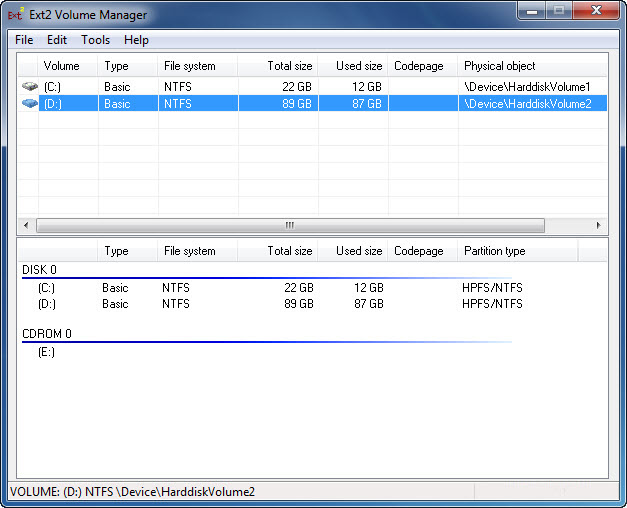
  • Ext2FSD – Open source file system driver for Windows (2K / XP / WIN7 / WIN8 – both x86 and 64 bit arch) supports ext2 / ext3 FSs and even CIFS protocol shares over network mounts. Ext4 filesystems are supported in read only mode only. It supports many language codepage utf8, cp936, cp950 etc..- Cyrillic file names shown correctly 🙂


    ext2fsd-mount-linux-partitions-in-microsoft-windows-screenshot
     

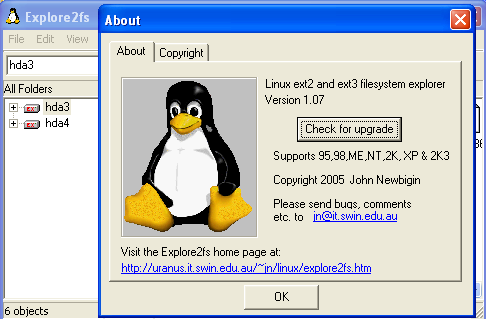
  • Explore2FS – GUI explorer tool for accessing ext2 and ext3 filesystems. It runs under all versions of Windows and can read almost any ext2 and ext3 filesystem.


    explore2fs-linux-partitions-from-widnows-screenshot
     

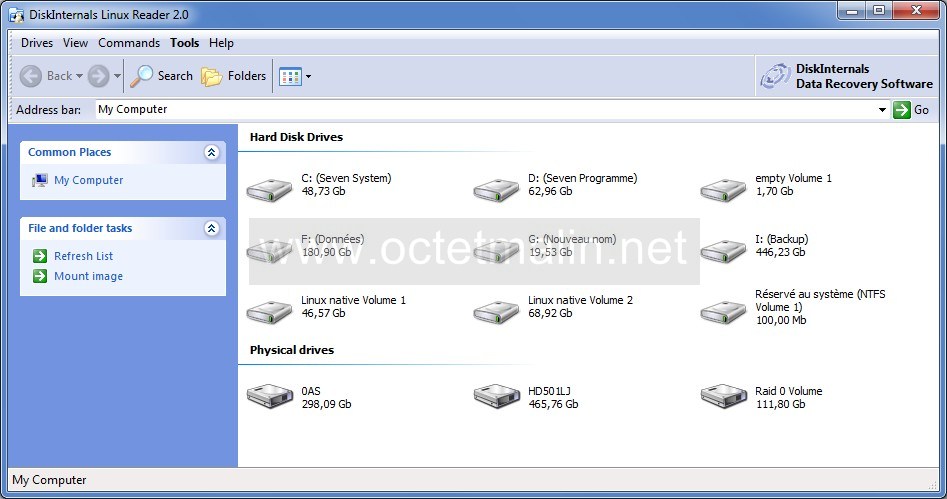
  • Disk Internals Linux reader – A freeware tool for reading and extracting files from EXT2/EXT3/EXT4, HFS, UFS2, Reiser4, and ReiserFS partitions in Windows.


    disk-internals-linux-reader-2.0-screenshot-proprietary-linux-filesystem-reader-mounter-for-windows


Other useful multiplatorm Linux FS reader unfortunately proprietary one is ParagonExtFS – proprietary software having version for both Win OS and Mac (Supports also mounting Linux partitionons Mac).

Note that if you copy some files using some of above tools to Windows permissions held in Linux could screw up, so it is not a good idea to try backup Linux configuration files to Windows's partitions 🙂

2. Read Copy files from Mac OS HFS+ filesystem to Windows

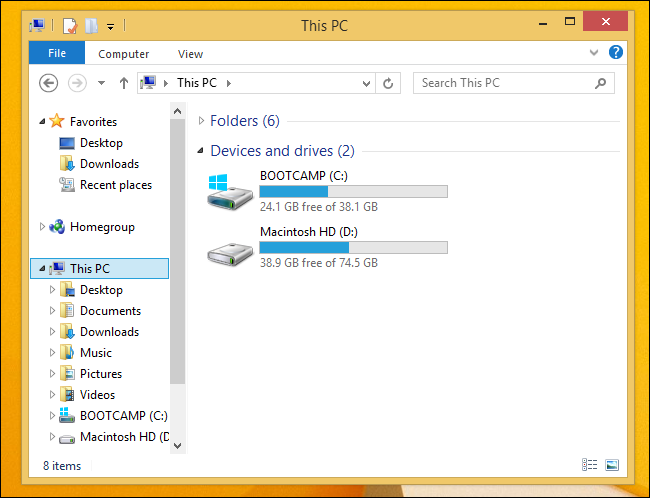
Apple has Boot Camp driver package which allows Mac OS's HFS+ to be viewable from Windows.

reading-Mac-OSX-HFS-plus-partitions-from-ms-windows-with-bootcamp-driver

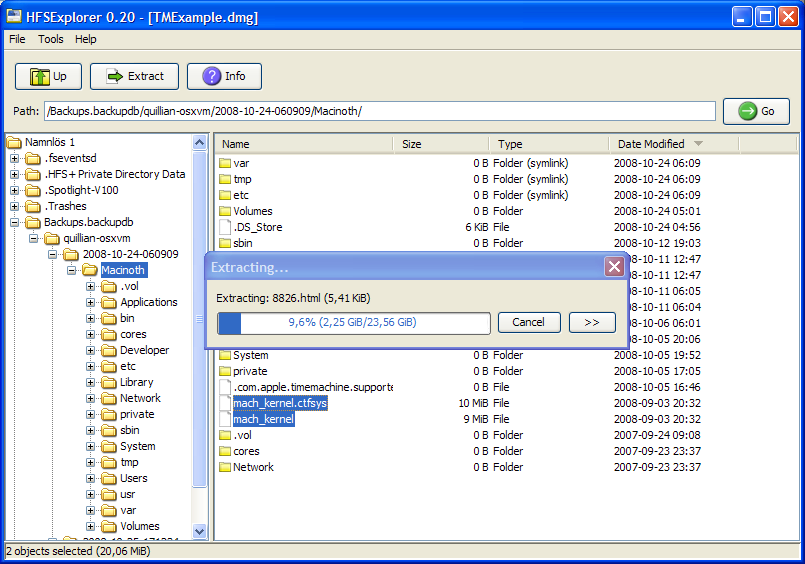
For people who don't intend to continuosly read data HFS+ it might be better to not load Boot Camp but use:

hfsexplorer-explorero-allowing-read-access-to-mac-osx-from-ms-windows-os

 Only problem with Boot Camp and HFSExplorer is it allows you to read data from Mac OS filesystem only read only.If you want to write to HFS+ filesystem from Windows you will need:

  • Proprietary Paragon HFS+ (or)

Fix 503 AUTH first (#5.5.1) mail receive errors in Qmail

Friday, September 2nd, 2011

I have one qmail rocks install based on Thibbs Qmalrocks tutorial

I had to do some changes, to:
/etc/service/qmail-smtpd/run and /etc/service/qmail-smtpdssl/run init scripts.

After a qmail restart suddenly qmail stopped receiving any mail messages and my sent messages was returned with an error:

Connected to xx.xxx.xx.xx but sender was rejected.
Remote host said: 503 AUTH first (#5.5.1)

After investigating the issue I finally found, that one value I’ve changed in /etc/service/qmail-smtpd/run and /etc/service/qmail-smtpdssl was causing the whole mess:

The problematic variable was:

REQUIRE_AUTH=1

To solve the issue I had to disable the value which it seems, I have enabled by mistake.

Below is a quote from http://qmail.jms1.net which explains what REQUIRE_AUTH shell variable does:

Setting REQUIRE_AUTH=1 will make the service not accept ANY mail unless the client has sent a valid AUTH command. This also prevents incoming mail from being accepted for your own domains, so do not use this setting if the service is accepting “normal” mail from the outside world.
Restarting via qmailctl restart and qmail started receiving messages normal 😉

Graphical representation of Open Source history generated from SVN and GIT commits with Gource – Software version control visualization

Thursday, September 1st, 2011

A friend of mine has sent me a link to awesome videos produced with an open source tool called Gource

The tool is really awesome as its capable of producing amazing graphical visualizations from source tree repositories obtained from software SVN or GIT repositories

Someone used it to create a wonderful videos and relate the graphical visualization with wondeful music to show graphically the Software development for the main Free Software Projects. 😉

The points which move around in videos are graphical representation of the repository source, the nodes which buzzle around are users who commit source in the project repositories.
The whole graphical representation is being generated based on all the latest source hold inside the software repository, on top of the videos its visible the date of each of the source commits.
Below are few of the nice videos, the rest are available for checkout in Youtube, Enjoy! 😉

OpenOffice Development – Graphical representation

PHP Development – Graphical representation

History of Python development since 1990 with Gource

Development of MySQL 2000-2010 – Graphical representation

Perl development history in less then 4 minutes. Visualized with gource.