Posts Tagged ‘log’

How to Turn Off, Suppress PHP Notices and Warnings – PHP error handling levels via php.ini and PHP source code

Friday, April 25th, 2014

php-logo-disable-warnings-and-notices-in-php-through-htaccess-php-ini-and-php-code

PHP Notices are common to occur after PHP version upgrades or where an obsolete PHP code is moved from Old version PHP to new version. This is common error in web software using Frameworks which have been abandoned by developers.

Having PHP Notices to appear on a webpage is pretty ugly and give a lot of information which might be used by malicious crackers to try to break your site thus it is always a good idea to disable PHP Notices. There are plenty of ways to disable PHP Notices

The easiest way to disable it is globally in all Webserver PHP library via php.ini (/etc/php.ini) open it and make sure display_errors is disabled:

display_errors = 0

or

display_errors = Off

Note that that some claim in PHP 5.3 setting display_errors to Off will not work as expected. Anyways to make sure where your loaded PHP Version display_errors is ON or OFF use phpinfo();

It is also possible to disable PHP Notices and error reporting straight from PHP code you need code like:


<?php
// Turn off all error reporting
error_reporting(0);
?>


or through code:


ini_set('display_errors',0);


PHP has different levels of error reporting, here is complete list of possible error handling variables:


<?php
// Report simple running errors

error_reporting(E_ERROR | E_WARNING | E_PARSE);

// Reporting E_NOTICE can be good too (to report uninitialized
// variables or catch variable name misspellings …)

error_reporting(E_ERROR | E_WARNING | E_PARSE | E_NOTICE);

// Report all errors except E_NOTICE
// This is the default value set in php.ini

error_reporting(E_ALL ^ E_NOTICE);
// Report all PHP errors (see changelog)

error_reporting(E_ALL);
// Report all PHP errors error_reporting(-1);
// Same as error_reporting(E_ALL);

ini_set('error_reporting', E_ALL); ?>

The level of logging could be tuned on Debian Linux via /etc/php5/apache2/php.ini or if necessary to set PHP log level in PHP CLI through /etc/php5/cli/php.ini with:

error_reporting = E_ALL & ~E_NOTICE


If you need to remove to remove exact warning or notices from PHP without changing the way  PHPLib behaves is to set @ infront of variable or function that is causing NOTICES or WARNING:
For example:
 

@yourFunctionHere();
@var = …;


Its also possible to Disable PHP Notices and Warnings using .htaccess file (useful in shared hosting where you don't have access to global php.ini), here is how:

# PHP error handling for development servers
php_flag display_startup_errors off
php_flag display_errors off
php_flag html_errors off
php_flag log_errors on
php_flag ignore_repeated_errors off
php_flag ignore_repeated_source off
php_flag report_memleaks on
php_flag track_errors on
php_value docref_root 0
php_value docref_ext 0
php_value error_log /home/path/public_html/domain/php_errors.log
php_value error_reporting -1
php_value log_errors_max_len 0

This way though PHP Notices and Warnings will be suppressed errors will get logged into php_error.log

How to detect failing storage LUN on Linux – multipath

Wednesday, April 16th, 2014

detect-failing-lun-on-linux-failing-scsi-detection

If you login to server and after running dmesg – show kernel log command you get tons of messages like:

# dmesg


end_request: I/O error, dev sdc, sector 0
sd 0:0:0:1: SCSI error: return code = 0x00010000
end_request: I/O error, dev sdb, sector 0
sd 0:0:0:0: SCSI error: return code = 0x00010000
end_request: I/O error, dev sda, sector 0
sd 0:0:0:2: SCSI error: return code = 0x00010000
end_request: I/O error, dev sdc, sector 0
sd 0:0:0:1: SCSI error: return code = 0x00010000
end_request: I/O error, dev sdb, sector 0
sd 0:0:0:0: SCSI error: return code = 0x00010000
end_request: I/O error, dev sda, sector 0
sd 0:0:0:2: SCSI error: return code = 0x00010000
end_request: I/O error, dev sdc, sector 0
sd 0:0:0:1: SCSI error: return code = 0x00010000
end_request: I/O error, dev sdb, sector 0
sd 0:0:0:0: SCSI error: return code = 0x00010000
end_request: I/O error, dev sda, sector 0


In /var/log/messages there are also log messages present like:

# cat /var/log/messages
...


Apr 13 09:45:49 sl02785 kernel: end_request: I/O error, dev sda, sector 0
Apr 13 09:45:49 sl02785 kernel: klogd 1.4.1, ———- state change ———-
Apr 13 09:45:50 sl02785 kernel: sd 0:0:0:1: SCSI error: return code = 0x00010000
Apr 13 09:45:50 sl02785 kernel: end_request: I/O error, dev sdb, sector 0
Apr 13 09:45:55 sl02785 kernel: sd 0:0:0:2: SCSI error: return code = 0x00010000
Apr 13 09:45:55 sl02785 kernel: end_request: I/O error, dev sdc, sector 0


This is a sure sign something is wrong with SCSI hard drives or SCSI controller, to further debug the situation you can use the multipath command, i.e.:


multipath -ll | grep -i failed
_ 0:0:0:2 sdc 8:32 [failed][faulty]
_ 0:0:0:1 sdb 8:16 [failed][faulty]
_ 0:0:0:0 sda 8:0 [failed][faulty]


As you can see all 3 drives merged (sdc, sdb and sda) to show up on 1 physical drive via the remote network connectedLUN to the server is showing as faulty. This is a clear sign something is either wrong with 3 hard drive members of LUN – (Logical Unit Number) (which is less probable)  or most likely there is problem with the LUN network  SCSI controller. It is common error that LUN SCSI controller optics cable gets dirty and needs a physical clean up to solve it.

In case you don't know what is storage LUN? – In computer storage, a logical unit number, or LUN, is a number used to identify a logical unit, which is a device addressed by the SCSI protocol or protocols which encapsulate SCSI, such as Fibre Channel or iSCSI. A LUN may be used with any device which supports read/write operations, such as a tape drive, but is most often used to refer to a logical disk as created on a SAN. Though not technically correct, the term "LUN" is often also used to refer to the logical disk itself.

What LUN's does is very similar to Linux's Software LVM (Logical Volume Manager).

Linux / BSD: Check if Apache web server is listening on port 80 and 443

Tuesday, June 3rd, 2014

apache_check_if_web_server_running_port-80-and-port-443-logo-linux-and-bsd-check-apache-running
If you're configuring a new Webserver or adding a new VirtualHost to an existing Apache configuration you will need to restart Apache with or without graceful option once Apache is restarted to assure Apache is continuously running on server (depending on Linux distribution) issue:

1. On Debian Linux / Ubuntu servers

# ps axuwf|grep -i apache|grep -v grep

root 23280 0.0 0.2 388744 16812 ? Ss May29 0:13 /usr/sbin/apache2 -k start
www-data 10815 0.0 0.0 559560 3616 ? S May30 2:25 _ /usr/sbin/apache2 -k start
www-data 10829 0.0 0.0 561340 3600 ? S May30 2:31 _ /usr/sbin/apache2 -k start
www-data 10906 0.0 0.0 554256 3580 ? S May30 0:20 _ /usr/sbin/apache2 -k start
www-data 10913 0.0 0.0 562488 3612 ? S May30 2:32 _ /usr/sbin/apache2 -k start
www-data 10915 0.0 0.0 555524 3588 ? S May30 0:19 _ /usr/sbin/apache2 -k start
www-data 10935 0.0 0.0 553760 3588 ? S May30 0:29 _ /usr/sbin/apache2 -k start


2. On CentOS, Fedora, RHEL and SuSE Linux and FreeBSD

ps ax | grep httpd | grep -v grep


7661 ? Ss 0:00 /usr/sbin/httpd
7664 ? S 0:00 /usr/sbin/httpd
7665 ? S 0:00 /usr/sbin/httpd
7666 ? S 0:00 /usr/sbin/httpd
7667 ? S 0:00 /usr/sbin/httpd
7668 ? S 0:00 /usr/sbin/httpd
7669 ? S 0:00 /usr/sbin/httpd
7670 ? S 0:00 /usr/sbin/httpd
7671 ? S 0:00 /usr/sbin/httpd


Whether a new Apache IP Based VirtualHosts are added to already existing Apache and you have added new

Listen 1.1.1.1:80
Listen 1.1.1.1:443

directives, after Apache is restarted to check whether Apache is listening on port :80 and :443
 

netstat -ln | grep -E ':80|443'

tcp        0      0 0.0.0.0:80              0.0.0.0:*               LISTEN
tcp        0      0 0.0.0.0:443            0.0.0.0:*               LISTEN


Meaning of 0.0.0.0 is that Apache is configured to Listen on Any Virtualhost IPs and interfaces. This output is usually returned whether in Apache config httpd.conf / apache2.conf webserver is configured with directive.

Listen *:80
 

If in netstat output there is some IP poping up for example  "192.168.1.1:http", this means that only connections to the "192.168.1.1" IP address will be accepted by Apache.

Another way to look for Apache in netstat (in case Apache is configured to listen on some non-standard port number) is with:

netstat -l |grep -E 'http|www'

tcp        0      0 *:www                   *:*                     LISTEN


As sometimes it might be possible that Apache is listening but its processes are in in defunct (Zommbie) state it is always a good idea, also to check if pages server by Apache are opening in browser (check it with elinks, lynx or curl)

To get more thorough information on Apache listened ports, protocol, user with which Apache is running nomatter of Linux distribution use lsof command:
 

/usr/bin/lsof -i|grep -E 'httpd|http|www'

httpd     6982 nobody    3u  IPv4  29388359      0t0  TCP www.pc-freak.net:https (LISTEN)
httpd    18071 nobody    3u  IPv4 702790659      0t0  TCP www.pc-freak.net:http (LISTEN)
httpd    18071 nobody    4u  IPv4 702790661      0t0  TCP www.pc-freak.net.net:https (LISTEN)


If Apache is not showing up even though restarted check what is going wrong in the error logs:

– on Debian standard error log is /var/log/apache2/error.log
– On RHEL, CentOS, SuSE std. error log is in /var/log/httpd/error.log
– on FeeBSD /var/log/httpd-error.log


Disable php notice logging / stop variable warnings in error.log on Apache / Nginx / Lighttpd

Monday, July 28th, 2014

disable_php_notice_warnings_logging_in-apache-nginx-lighttpd
At one of companies where I administrate few servers, we are in process of optimizing the server performance to stretch out the maximum out of server hardware and save money from unnecessery hardware costs and thus looking for ways to make server performance better.

On couple of web-sites hosted on few of the production servers, administrating, I've noticed dozens of PHP Notice errors, making the error.log quickly grow to Gigabytes and putting useless hard drive I/O overhead. Most of the php notice warnings are caused by unitialized php variables.

I'm aware having an unitialized values is a horrible security hole, however the websites are running fine even though the notice warnings and currently the company doesn't have the necessery programmers resource to further debug and fix all this undefined php vars, thus what happens is monthly a couple of hundreds megabytes of useless same php notice warnings are written in error.log.

That  error.log errors puts an extra hardship for awstats which is later generating server access statistics while generating the 404 errors statistics and thus awstats script has to read and analyze huge files with plenty of records which doesn't have nothing to do with 404 error

We found this PHP Notice warnings logged is one of the things we can optimize had to be disabled.

Here is how this is done:
On the servers running Debian Wheezy stable to disable php notices.

I had to change in /etc/php5/apache2/php.ini error_reporting variable.

Setting was to log everything (including PHP critical errors, warning and notices) like so:
 

vi /etc/php5/apache2/php.ini

error_reporting = E_ALL & ~E_DEPRECATED

to

error_reporting = E_COMPILE_ERROR|E_ERROR|E_CORE_ERROR


On CentOS, RHEL, SuSE based servers, edit instead /etc/php.ini.

This setting makes Apache to only log in error.log critical errors, php core dump (thread) errors and php code compilation (interpretation errors)

To make settings take affect on Debian host Apache webserver:

/etc/init.d/apache2 restart

On CentOS, RHEL Linux, had to restart Apache with:

/etc/init.d/httpd restart

For other servers running Nginx and Lighttpd webservers, after changing php.ini:

service nginx reload
service lighttpd restart

To disable php notices errors only on some websites, where .htaccess enabled, you can use also place in website DocumentRoot .htaccess:
 

php_value error_reporting 2039


Other way to disable via .htaccess is by adding to it code:
 

php_flag display_errors off


Also for hosted websites on some of the servers, where .htaccess is disabled, enabling / disabling php notices can be easily triggered by adding following php code to index.php

define('DEBUG', true);

if(DEBUG == true)
{
    ini_set('display_errors', 'On');
    error_reporting(E_ALL);
}
else
{
    ini_set('display_errors', 'Off');
    error_reporting(0);
}


Fix “tar: Error exit delayed from previous errors” and its cause and solution

Monday, August 18th, 2014

fix-solve-tar-error-delayed-exit-from-previous-errors-tarball-error

tar: Error exit delayed from previous errors

error is a very common error encountered when creating archives (or backing up server configurations / websites / sql binary data). The error is quite unexplanatory and whenever creating files verbose in order to see the files added to archve in "real time" with lets say:

tar -czvf /tmp/filename_backup_date-of-backup.tar.gz /home/websites /home/sql


its pretty hard to track on exactly which file is the backup producing the Error exit delayed from previous errors, this is especially the case whenever adding to archive directories containing millions of tiny few kilobyte sized files. Many novice on uncautious Linux admins , might simply ignore the warning if they're in a hurry / are having excessive work to be done as there will be .tar.gz backup produced and whenever uncompressed most of the files are there and the backup error would seem not of a big issue.

However as backuping files is vital stuff, especially when moving the files from a server to be decomissioned you have to be extra careful and make the backup properly, e.g. figure out the cause of the error, to do so log the full output of tar operations with tee command, like so:

tar -czvf /tmp/filename_backup_date-of-backup.tar.gz /home/websites/ /home/sql | tee /tmp/backup_tar_full_output.log

Then you will have to review the file and lookup for errors with less search string – / (slash) – look for "error" and "permission den" keywords and this should point you to what is causing the error. In cases when millions of files are to be archived, the log might grow really big and hard to process, therefore a much quicker way to understand what's happening is to only log and show in shell standard output last file error with > (shell redirect):
 

tar -czvf /tmp/filename_backup_date-of-backup.tar.gz /home/websites /home/sql > /tmp/backup_failure-cause.log


tar: www.ur-website.com-http/2.0.63/conf/tnsnames.ora.20080918: Cannot open: Permission denied
tar: Removing leading `/' from member names

The error indicates clearly the cause of error is lack of Permissions to read the file tnsnames.ora.20080918 so solution is to either grant permissions to non-root user with (chmod / chown) cmds, in my case grant perms to user hipo with which tar is ran, or run again the website backup with superuser, I usually just run with root user to prevent tampering with original permissions, e.g. to solve the error, either:

$ su root
# tar -czvf /tmp/filename_backup_date-of-backup.tar.gz /home/websites /home/sql

Or even better if sudo is installed and user is added to /etc/sudoers file

$ sudo tar -czvf /tmp/filename_backup_date-of-backup.tar.gz /home/websites /home/sql


Though permission errors is the most often reason for:

tar: Error exit delayed from previous errors, you should keep in mind that in some cases the error might be caused due to failing RAID membered disk drive or single hdd failure on systems that are not in some RAID array


Set up Modsecurity on Debian 7 GNU / Linux to mitigate websites virus infections / Cross Site Scripting and SQL Injects

Friday, September 6th, 2013

mod security raise up your Apache webserver security and protect against cross site scripting javascript hacks and viruses

There are plenty of tutorials around on how to install and configure modsecurity  So This tutorial is nothing new, but I decided to write it since, I had to install mod_security on Debian Wheezy to protect a Debian Linux server websites from being periodically infected with Viruses / XSS / Backdoored Javascripts and Trojan horses.

Everyone who used Debian stable distribution knows the packages included in it are usually about 2 years older than latest available. Situation with latest Debian stable Wheezy  is same, but anyways even a bit outdated my experience so far is mod_security does a great job of protecting Apache sites …

1. Install libapache-mod-security and other libraries (not obligitory), but useful on most Apache + PHP servers

  Run below commands to add xml and rest of useful Apache stuff:


apt-get install libxml2 libxml2-dev libxml2-utils
apt-get install libaprutil1 libaprutil1-dev

Above commands will install a bunch of other dependency packages.

Next install mod-security deb. Run below command, to install and activate modsecurity. Note that installing libapache-mod-security will also automatically restart the Apache server.
 

apt-get install libapache-mod-security

Next to enable all functionality of modsecurity headers Apache module is required as well, activate it with:

 
a2enmod headers
service apache2 restart

2. Make sure mod_security Apache config looks like


<IfModule security2_module>
# Default Debian dir for modsecurity's persistent data
SecDataDir /var/cache/modsecurity
# Include all the *.conf files in /etc/modsecurity.
# Keeping your local configuration in that directory
# will allow for an easy upgrade of THIS file and
# make your life easier
Include "/etc/modsecurity/*.conf"
</IfModule>

Important part of conf is  "Include "/etc/modsecurity/*.conf"" line. /etc/modsecurity directory is main place to set up and configure modsecurity. This configuration file, combined with mod-security.load, do everything necessary to load the modsecurity into Apache server.

3.Enable and Load modsecurity default configuration rules:

So far, modsecurity is loaded into the apache server, but isn't stopping any attempts of hack scripts / Viruses / or automated tools to exploit Vulnerabilities in Web Applications. To make modsecurity start filtering requests, should activate  modsecurity specific configuration and load some regular expression rules.
First to do is enable "recommended" modsecurity configuration file:
 

Code:
cd /etc/modsecurity
mv modsecurity.conf-recommended modsecurity.conf

Default configuration from recommended conf enables modsecurity in an "examine only" mode. In order to make full use of the module, we have to make a few changes. With  favorite text editor open modsecurity.conf (mine is vim)and make the following change:

Code:
SecRuleEngine On

This makes modsecurity to block requests based on its (pre-written) developer rules. Other settings in this file that are useful to know about are the debug controls, very useful, whether you have to debug problems with sites not properly opening due to server enabled mod_security.
 

Code:
#SecDebugLog /opt/modsecurity/var/log/debug.log
#SecDebugLogLevel 3

This controls how much information is stored in modsecurity's "audit log as well as keeps track of attacks launched to server. Default debug level of 3 is pretty much and stores "everything". This is dangerous as a huge logs are produces on  busy servers.
 

Code:
SecAuditLogParts ABIJDEFHZ

4. Enable extra modsecurity prevention rules

Modsecurity works by using rules by pre-defined patterns used to recognize when your website/s is being probed or attacked. Once installed modsecurity base package as a dependency modsecurity-crs package is installed. modsecurity-crs contains addition free core rule set. Current Core rule from modsecurity.org are newer than version included with wheezy,  thus rules lack a bit behind but this is only option whether using default debian bundled packge otherwise manual modsecurity recompile is required. We all know how bad it is to custom compile software on production machines, so custom compile experiments are really bad idea.

CRS (Core Rule Set) is installed in /usr/share/modsecurity-crs. This directory contains an "activated_rules" directory present also in /etc/modsecurity

Quickest way to activate rules is by symlinking from the actual config and rule files into the /etc/modsecurity config directory.

We'll be making links from the /usr/share/modsecurity location into /etc/modsecurity to activate some other useful modsec useful rules. First link main crs config file:
 

ln -s /usr/share/modsecurity-crs/modsecurity_crs_10_setup.conf /etc/modsecurity/modsecurity_crs_10_setup.conf

This file provides some basic configuration directives for crs.

Futher on, link each rule file in the base_rules and optional_rules directories using 2 tiny bash loops.


cd /usr/share/modsecurity-crs/base_rules
for f in * ; do sudo ln -s /usr/share/modsecurity-crs/base_rules/$f /etc/modsecurity/$f ; done
cd /usr/share/modsecurity-crs/optional_rules
for f in * ; do sudo ln -s /usr/share/modsecurity-crs/optional_rules/$f /etc/modsecurity/$f ; done

With that done, there's one more edit to check if modsecurity blocking works as expected. Open the /etc/modsecurity/modsecurity.conf file and add the following lines at the end (this is from the free, modsecurity pdf book, link provided below)


SecRule ARGS "MY_UNIQUE_TEST_STRING"\
"phase:1,log,deny,status:503"

Finally after all configuration rules are loaded to modsec, Usual Apache restart is required:

 
/etc/init.d/apache2 restart

Whether no fatal errors pop up and Apache starts normally, now modsecurity should be properly running.

5. Verify if modsecurity is set-up and kicking ass

To verify installation, open a browser and access some of hosted websites  like this:
http://www.your-server-domain.com/?test=MY_UNIQUE_TEST_STRING

A sure sign that modsec works is  503 "Service Temporarily Unavailable" message from Apache. Alternatively  examine server's modsec audit log file (default location in /var/log/apache2/modsec_audit.log) (grep the string MY_UNIQUE_TEST_STRING. You should see full transcript of the communication between your browser and server logged. Depending on amount of site traffic gets make sure to monitor  size of file for some minutes to make sure it doesn't grow too big and it doesn't fill up quickly your HDD.

Well now all fine your Apache server security is better for sure and by God's grace you should not have to deal with hundreds of hours of sites recovery after a bunch of client's websites are hacked.

Feedback and comments are mostly welcome. Enjoy 😉

How to disable / block sites with Squid Proxy ACL rules on Debian GNU / Linux – Setup Transparent Proxy

Wednesday, October 16th, 2013

Squid transparant proxy disabling blocking websites with Squid proxy

Often when configuring new Firewall router for a network its necessary to keep log on HTTP (Web) traffic passing by the router. The best way to do this in Linux is by using Proxy server. There are plenty of different Proxy (Caching) servers for GNU / Linux. However the most popular one is Squid (WWW Proxy Cache). Besides this its often a requirement in local office networks that Proxy server is transparent (invisible for users) but checking each and every request originating from the network. This scenario is so common in middle sized and small sized organizations that its a must that every Linux admin is ready to easily configure it. In most of my experience so far I used Debian Linux, so in this post I will explain how to configure Transparent Squid Proxy with configured ACL block rules for employee's time wasting services like facebook / youtube / vimeo etc.

Here is diagram I found on a skullbox.net showing graphically below Squid setup:

Squid as transparent proxy behind nat firewall diagram

1. Install Squid Proxy Server

Squid is available as Debian package since a long time, so on Deb Linux installing Squid is a piece of cake.

debian-server:~# apt-get install --yes squid
...


2. Create /var/cache/proxy directory and set proper permissions necessary for custom config

debian-server:~# mkdir /var/cache/proxy
debian-server:~# chown -R proxy:proxy /var/cache/proxy

3. Configure Squid Caching Server

By default debian package extract script does include default squid.conf which should be substituted with my custom squid.conf. A Minor user changes has to be done in config, download my squid.conf from here and overwrite default squid.conf in /etc/squid/squid.conf. Quickest way to do it is through:

debian-server:~# cd /etc/squid
debian-server:/etc/squid# mv /etc/squid/squid.conf /etc/squid/squid.conf.orig
debian-server:/etc/squid# wget -q https://www.pc-freak.net/files/squid.conf
debian-server:/etc/squid# chown -R root:root squid.conf

Now open squid.conf and edit lines:

http_port 192.168.0.1:3128

Change 192.168.0.1 which is IP assigned to eth1 (internal NAT-ted interface) with whatever IP of local (internal network) is. Some admins prefer to use 10.10.10.1 local net addressing.
Below in configuration, there are some IPs from 192.168.0.1-255 network configured through Squid ACLs to have access to all websites on the Internet. To tune such IPs you will have to edit lines after (1395) after comment

# allow access to filtered sites to specific ips


4. Disabling sites that pass through the proxy server

Create file /etc/disabled-sites i.e.:

debian-server:~# touch /etc/disabled-sites

and place inside all siles that would like to be inaccessible for local office network either through text editor (vim / pico etc.) or by issuing:

debian-server:~# echo 'facebook.com' >> /etc/disabled-sites
debian-server:~# echo ''youtube.com' >> /etc/disabled-sites
debian-server:~# echo 'ask.com' >> /etc/disabled-sites

5. Restart Squid to load configs

debian-server:~# /etc/init.d/squid restart
[ ok ] Restarting Squid HTTP proxy: squid.

6. Making Squid Proxy to serve as Transparent proxy through iptables firewall Rules

Copy paste below shell script to lets say /etc/init.d/squid-transparent-fw.sh
 

#!/bin/bash
IPT=/sbin/iptables;

IN=INPUT;
OUT=OUTPUT;
FORW=FORWARD;

AC=ACCEPT;
REJ=REJECT;
DRP=DROP;
RED=REDIRECT;
MASQ=MASQUERADE;
POSTR=POSTROUTING;
PRER=PREROUTING;
OUT_IFACE=eth2;
OUT_B_IFACE=eth0;
IN_IFACE=eth1;
MNG=mangle;

ALL_NWORKS='0/0';
LOCALHOST='127.0.0.1';

# forward to squid.
$IPT -t nat -I $PRER -p tcp -s 192.168.0.0/24 -d ! 192.168.0.1 –dport www -j $RED –to 3128
$IPT -t nat -I $PRER -p tcp -s 192.168.0.0/24 -d ! 192.168.0.1 –dport 3128 -j $RED –to 3128

# Reject connections to squid from the untrusted world.
# rules for order.
$IPT -A $IN -p tcp -s 83.228.93.76 -d $ALL_NWORKS –dport 65221 -j $AC

$IPT -A $IN -p tcp -s $ALL_NWORKS –dport 65221 -j $REJ
$IPT -A $IN -i $OUT_B_IFACE -p tcp -s $ALL_NWORKS –dport 3128 -j $REJ

Easiest way to set up squid-transparent-fw.sh firewall rules is with:

debian-server:~# cd /etc/init.d/
debian-server:/etc/init.d# wget -q https://www.pc-freak.net/files/squid-transparent-fw.sh
debian-server:/etc/init.d# chmod +x squid-transparent-fw.sh
debian-server:/etc/init.d/# bash squid-transparent-fw.sh
Then place line /etc/init.d/squid-transparent-fw.sh into /etc/rc.local before exit 0
 

That's all now Squid Transparent Proxy will be up and running and the number of sites listed in disabled-sites will be filtered for Office employees returning a status of Access Denied.

Access Denied msg

Gets logged in /var/log/squid/access.log example of Denied access for Employee with IP 192.168.0.155 is below:

192.168.0.155 - - [16/Oct/2013:16:50:48 +0300] "GET http://youtube.com/ HTTP/1.1" 403 1528 TCP_DENIED:NONE

Various other useful information on what is cached is also available via /var/log/squid/cache.log and /var/log/squid/store.log

Another useful thing of using Transparent Squid Proxy is that you can always keep track on exact websites opened by Employees in Office so you can easily catch people trying to surf p0rn websites or some obscenity.

Hope this post helps some admin out there 🙂 Enjoy

swap_pager_getswapspace: failed, MySQL troubles on FreeBSD 7.2 cause and solution

Tuesday, May 3rd, 2011

Every now and then my FreeBSD router dmesg ( /var/log/dmesg.today ) logs, gets filled with error messages like:

pid 86369 (httpd), uid 80, was killed: out of swap space
swap_pager_getswapspace(14): failed
swap_pager_getswapspace(16): failed
swap_pager_getswapspace(11): failed
swap_pager_getswapspace(12): failed
swap_pager_getswapspace(16): failed
swap_pager_getswapspace(14): failed
swap_pager_getswapspace(16): failed
swap_pager_getswapspace(8): failed

Using swapinfo during the swap_pager_getswapspace(16): failed messages were logged in, I figured out that definitely the swap memory over-use is the bottleneck for the troubles, to find this I used the command:

freebsd# swapinfo
Device 1K-blocks Used Avail Capacity Type
/dev/ad0s1b 49712 45920 3792 92% Interleaved

After some investigation, I’ve figured out that the MySQL server is causing the kernel exceeded swap troubles.

My current MySQL server version is installed from the ports tree, whether I’m using the bsd port /usr/ports/databases/mysql51-server/ and it appears to work just fine.

However I have noticed that the mysql-server is missing a my.cnf file!, which means the mysql server is running under a mode with some kind of default configurations.

Strangely in the system process list it appeared it is using a default my.cnf file located in /var/db/mysql/my.cnf

Below you see the paste from the ps command:

ps axuww freebsd# ps axuww | grep -i my.cnf | grep -v grep
mysql 7557 0.0 0.1 3464 1268 p1 I 12:03PM 0:00.01 /bin/sh /usr/local/bin/mysqld_safe --defaults-extra-file=/var/db/mysql/my.cnf --user=mysql --datadir=/var/db/mysql --pid-file=/var/db/mysql/pcfreak.pidmysql 7589 0.0 5.1 93284 52852 p1 I 12:03PM 0:59.01 /usr/local/libexec/mysqld --defaults-extra-file=/var/db/mysql/my.cnf --basedir=/usr/local --datadir=/var/db/mysql --user=mysql --pid-file=/var/db/mysql/pcfreak.pid --port=3306 --socket=/tmp/mysql.sock

Nevertheless it appeared the sql server is running the file /var/db/mysql/my.cnf conf was not existing! This was really weird for me as I’m used to have the default my.cnf from my previous experience with Linux servers!

Thus the next logical thing I did was to create my.cnf conf file in order to be able to have a proper limiting configuration for the sql server.

The FreeBSD my.cnf skele files are found in /usr/local/share/mysql/, here are the 4 files one can use as a starting basis for further configuration of the mysql-server.

freebsd# ls -al /usr/local/share/mysql/my-*.cnf
-r--r--r-- 1 root wheel 4948 Aug 12 2009 /usr/local/share/mysql/my-huge.cnf
-r--r--r-- 1 root wheel 20949 Aug 12 2009 /usr/local/share/mysql/my-innodb-heavy-4G.cnf
-r--r--r-- 1 root wheel 4924 Aug 12 2009 /usr/local/share/mysql/my-large.cnf
-r--r--r-- 1 root wheel 4931 Aug 12 2009 /usr/local/share/mysql/my-medium.cnf
-r--r--r-- 1 root wheel 2502 Aug 12 2009 /usr/local/share/mysql/my-small.cnf

I have chosen to use the my-medium.cnf as a skele to tune up, as my server is not high iron one e.g. the host I run the mysql is a (simple dual core 1.2Ghz system).

Further on I copied the /usr/local/share/mysql/my-medium.cnf to /var/db/mysql/my.cnf e.g.:

freebsd# cp -rpf /usr/local/share/mysql/my-medium.cnf /var/db/mysql/my.cnf

As a next step to properly tune up the default values of the newly copied my.cnf to my specific server I used the Tuning-Primer MySQL tuning script

Using tuning-primer.sh is really easy as all I did is download, launch it and follow the script suggestions to correct some of the values already in my.cnf

I have finally ended up with the following my.cnf after using tuning-primer.sh to optimize mysql server to work with my bsd host

Now I really hope the shitty swap_pager_getswapspace: failed errors would not haunt me once again by crashing my server and causing mem overheads.

Still I wonder why the port developer Alex Dupre – ale@FreeBSD.org choose not to provide the default mysql51-server conf with some kind of my.cnf file? I hope he had a good reason.

How to find and kill Abusers on OpenVZ Linux hosted Virtual Machines (Few bash scripts to protect OpenVZ CentOS server from script kiddies and easify the daily admin job)

Friday, July 22nd, 2011

OpenVZ Logo - Anti Denial Of Service shell scripts

These days, I’m managing a number of OpenVZ Virtual Machine host servers. Therefore constantly I’m facing a lot of problems with users who run shit scripts inside their Linux Virtual Machines.

Commonly user Virtual Servers are used as a launchpad to attack hosts do illegal hacking activities or simply DDoS a host..
The virtual machines users (which by the way run on top of the CentOS OpenVZ Linux) are used to launch a Denial service scripts like kaiten.pl, trinoo, shaft, tfn etc.

As a consequence of their malicious activities, oftenly the Data Centers which colocates the servers are either null routing our server IPs until we suspend the Abusive users, or the servers go simply down because of a server overload or a kernel bug hit as a result of the heavy TCP/IP network traffic or CPU/mem overhead.

Therefore to mitigate this abusive attacks, I’ve written few bash shell scripts which, saves us a lot of manual check ups and prevents in most cases abusers to run the common DoS and “hacking” script shits which are now in the wild.

The first script I’ve written is kill_abusers.sh , what the script does is to automatically look up for a number of listed processes and kills them while logging in /var/log/abusers.log about the abusive VM user procs names killed.

I’ve set this script to run 4 times an hour and it currently saves us a lot of nerves and useless ticket communication with Data Centers (DCs), not to mention that reboot requests (about hanged up servers) has reduced significantly.
Therefore though the scripts simplicity it in general makes the servers run a way more stable than before.

Here is OpenVZ kill/suspend Abusers procs script kill_abusers.sh ready for download

Another script which later on, I’ve written is doing something similar and still different, it does scan the server hard disk using locate and find commands and tries to identify users which has script kiddies programs in their Virtual machines and therefore are most probably crackers.
The scripts looks up for abusive network scanners, DoS scripts, metasploit framework, ircds etc.

After it registers through scanning the server hdd, it lists only files which are preliminary set in the script to be dangerous, and therefore there execution inside the user VM should not be.

search_for_abusers.sh then logs in a files it’s activity as well as the OpenVZ virtual machines user IDs who owns hack related files. Right after it uses nail mailing command to send email to a specified admin email and reports the possible abusers whose VM accounts might need to either be deleted or suspended.

search_for_abusers can be download here

Honestly I truly liked my search_for_abusers.sh script as it became quite nice and I coded it quite quickly.
I’m intending now to put the Search for abusers script on a cronjob on the servers to check periodically and report the IDs of OpenVZ VM Users which are trying illegal activities on the servers.

I guess now our beloved Virtual Machine user script kiddies are in a real trouble ;P
 

How to test if USB Camera is working with Cheese on GNU / Linux

Friday, December 23rd, 2011

I just bought an USB Camera (my notebook doesn't include an embedded camera). The camera is some infamous brand chineese name Eilondo
and on the camera all that is written is SUPER USB2.0 1.3 mega pixel

I bought exactly this camera because I was said by the shop reseller that the camera works without any driver installations on Windows XP and Windows Vista

On my Debian Squeeze GNU / Linux it was detected in dmesg without any troubles, here is how the camera got detected in my kernel log :

debian:~# dmesg |tail -n 10
[25385.734932] usb 2-1: USB disconnect, address 4
[25388.905049] usb 2-1: new high speed USB device using ehci_hcd and address 5
[25389.050753] usb 2-1: New USB device found, idVendor=1e4e, idProduct=0102
[25389.050757] usb 2-1: New USB device strings: Mfr=1, Product=2, SerialNumber=0
[25389.050760] usb 2-1: Product: USB2.0 Camera
[25389.050762] usb 2-1: Manufacturer: Etron Technology, Inc.
[25389.050936] usb 2-1: configuration #1 chosen from 1 choice
[25389.056056] uvcvideo: Found UVC 1.00 device USB2.0 Camera (1e4e:0102)
[25389.058242] uvcvideo: UVC non compliance - GET_DEF(PROBE) not supported. Enabling workaround.
[25389.059113] input: USB2.0 Camera as /devices/pci0000:00/0000:00:1d.7/usb2/2-1/2-1:1.0/input/input26

I was troubled by the message uvcvideo: UVC non compliance – GET_DEF(PROBE) not supported. Enabling workaround. , and hence looked for an application to test if the camera can recored properly.

While checking in packages available in Software Center , I found a plenty of programs under the search keyword Camera
I however decided to test it using just one application Cheese A tool to take pictures and videos from your webcam which I've seen to be quite popular among Liunx users.
Cheese is part of GNOME Desktop, so that was another reason I decided to give it a try. I was pleasently surprised about how good these tiny but functional proggie is.

To run Cheese in GNOME I nagivated to the menus:

Applications -> Sound & Video -> Cheese Webcam Booth

Just in case if Cheese is not installed, installing it with apt:

debian:~# apt-get install cheese

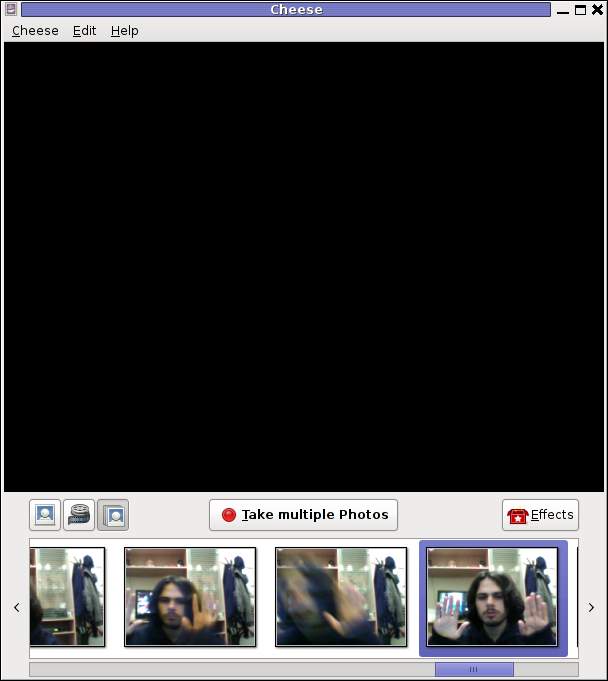
Cheese has capabilities to take pictures, a consequential photos take up, as well as create Video movies.

Cheese take camera testing tool Debian GNU Linux

The program has support to apply 12 Effects / (Masks) to add some fun to the pictures or video snapshots.

Test Video Camera on Debian Linux Cheese Effects

Probably the best thing about Cheese is its simplistic interface, which for me personally is a main criterion to evaluate a program quality ;).