Posts Tagged ‘log’
Thursday, January 5th, 2012 While configuring JWchat domain, I've come across around an error:
pcfg_openfile: unable to check htaccess file, ensure it is readable
The exact error I got in /var/log/apache2/error.log looked like so:
[crit] [client xxx.xxx.xxx.xxx] (13)Permission denied: /var/lib/ejabberd/.htaccess pcfg_openfile: unable to check htaccess file, ensure it is readable, referer: http://jabber.mydomain.com/
The error message suggested /var/lib/ejabberd/.htaccess – is missing or not readable, however after checking i've seen .htaccess existed as well as was readable:
debian:~# ls -al /var/lib/ejabberd/.htaccess

-rw-r--r-- 1 www-data www-data 114 2012-01-05 07:44 /var/lib/ejabberd/.htaccess
At first glimpse it seems like the message is misleading and not true, however when I switched to www-data user (the user with which Apache runs on Debian), I've figured out the error meaning of unreadability is exactly correct:
www-data@debian:$ ls -al /var/lib/ejabberd/.htaccess

ls: cannot access /var/lib/ejabberd/.htaccess: Permission denied
This permission denied was quite strange, especially when considering the .htaccess is readable for all users:
debian:~# ls -al /var/lib/ejabberd/.htaccess

-rw-r--r-- 1 www-data www-data 114 2012-01-05 07:44 /var/lib/ejabberd/.htaccess
After a thorough look on what might go wrong, thanksfully I've figured it out. The all issues were caused by wrong permissions of /var/lib/ejabberd/.htaccess .You can see below the executable flag for all users (including apache's www-data) is missing :
debian:/var/lib# ls -ld /var/lib/ejabberd/drw-r--r-- 3 ejabberd ejabberd 4096 2012-01-05 07:45 /var/lib/ejabberd/
Solving the error, hence is as easy as adding +x flag to /var/lib/ejabberd :
debian:/var/lib# chmod +x /var/lib/ejabberd
Another way to fix the error is to chmod to 755 to the directory which holds .htaccess:
From now onwards pcfg_openfile: unable to check htaccess file, ensure it is readable err is no more 😉
Tags: apache, Auto, Cannot, cause and solution, client, domain, Draft, drw, ejabberd, ERROR, error message, exact error, first glimpse, glimpse, htaccessAfter, jwchat, ld, lib, log, look, message, pcfg, Permission, readableThe, solution, unreadability, var, way, www data, xxx
Posted in Linux, System Administration, Various, Web and CMS | No Comments »
Friday, October 14th, 2011 After setupping a brand new Qmail installation following the QmailRocks Thibs Qmail Debian install guide , I’ve come across unexpected re-occuring error message in /var/log/qmail/qmail-smtpdssl/ , here is the message:
@400000004e9807b10d8bdb7c command-line: exec sslserver -e -vR -l my-mailserver-domain.com -c 30 -u 89 -g 89

-x /etc/tcp.smtp.cdb 0 465 rblsmtpd -r zen.spamhaus.org -r dnsbl.njabl.org -r dnsbl.sorbs.net -r bl.spamcop.net qmail-smtpd

my-mailserver-domain.com /home/vpopmail/bin/vchkpw /bin/true 2>&1

@400000004e9807b10dae2ca4 sslserver: fatal: unable to load certificate
I was completely puzzled initially by the error as the sertificate file /var/qmail/control/servercert.pem was an existing and properly self generated one. Besides that qmail daemontools init script /service/qmail-smtpd/run was loading the file just fine, where the same file failed to get loaded when sslserver command with the cert argument was invoked via /service/qmail-smtpdssl/run
It took me quite a while to thoroughfully investigate on what’s wrong with the new qmail install. Thanksfully after almost an hour of puzzling I found it out and I was feeling as a complete moron to find that the all issues was caused by incorrect permissions of the /var/qmail/control/servercert.pem file.
Here are the incorrect permissions the file possessed:
linux:~# ls -al /var/qmail/control/servercert.pem

-rw------- 1 qmaild qmail 2311 2011-10-12 13:21 /var/qmail/control/servercert.pem
To fix up the error I had to allow all users to have reading permissions over servercert.pem , e.g.:
linux:~# chmod a+r /var/qmail/control/servercert.pem
After adding all users readable bit on servercert.pem the file permissions are like so:
linux:~# ls -al /var/qmail/control/servercert.pem

-rw-r--r-- 1 qmaild qmail 2311 2011-10-12 13:21 /var/qmail/control/servercert.pem
Consequently I did a qmail restart to make sure the new readable servercert.pem will get loaded from the respective init script:
linux:~# qmailctl restart

* Stopping qmail-smtpdssl.

* Stopping qmail-smtpd.

* Sending qmail-send SIGTERM and restarting.

* Restarting qmail-smtpd.

* Restarting qmail-smtpdssl.
Now the annoying sslserver: fatal: unable to load certificate message is no more and all works fine, Hooray! 😉
Tags: amp, argument, certificate, com, control, dae, dnsbl, error message, exec, file, gnu linux, guide, incorrect permissions, init, installation, Linux, log, moron, njabl, pem, pemTo, qmail installation, qmailctl, qmaild, QmailRocks, rblsmtpd, reading, rw 1, script, script service, sertificate, smtp, spamhaus, sslserver, Stopping, vr, zen
Posted in Linux, Qmail, System Administration | 3 Comments »
Friday, December 9th, 2011 While reading some log files on one of the co-located servers at UK2.net , I’ve noticed dmesg log was filling in with tons of junk messages like:
[4288245.609762] IPv6 addrconf: prefix with wrong length 48

[4288445.984153] IPv6 addrconf: prefix with wrong length 48

[4288646.296110] IPv6 addrconf: prefix with wrong length 48

[4288846.609119] IPv6 addrconf: prefix with wrong length 48

[4289046.922604] IPv6 addrconf: prefix with wrong length 48

[4289247.267273] IPv6 addrconf: prefix with wrong length 48

[4289447.545800] IPv6 addrconf: prefix with wrong length 48

[4289647.857789] IPv6 addrconf: prefix with wrong length 48

[4289848.169308] IPv6 addrconf: prefix with wrong length 48

[4290048.595104] IPv6 addrconf: prefix with wrong length 48

[4290248.808497] IPv6 addrconf: prefix with wrong length 48

[4290449.103503] IPv6 addrconf: prefix with wrong length 48

[4290649.418747] IPv6 addrconf: prefix with wrong length 48

[4290849.742731] IPv6 addrconf: prefix with wrong length 48
After checking the message to make sure it would not suddeny lead to server hang ups I figured out the message is not dangerous but just an annoying warning that some other (routing) host on the same network as mine is advertising something using IPv6, that doesn’t fit with my IPv6 server config.
Actually the server doesn’t use the IPv6 configuration at all, and the assigned configuration is just some kind of auto set IPv6 IP address.
The server, where this message appeared is powered by 64 bit Debian GNU / Linux Squeeze
To resolve the annoying message, 5 of the kernel sysctl settings needs to be modified with cmds:
debian:~# sysctl net.ipv6.conf.all.accept_ra=0

debian:~# sysctl net.ipv6.conf.all.autoconf=0

debian:~# sysctl net.ipv6.conf.lo.autoconf=0

debian:~# sysctl net.ipv6.conf.eth0.autoconf=0

debian:~# sysctl net.ipv6.conf.eth1.autoconf=0
Furthermore to prevent the IPv6 addrconf: prefix with wrong length 48 to re-appear after future server reboots / boots the two sysctl values of course needs to be included in /etc/sysctl.conf e.g.:
debian:~# echo 'net.ipv6.conf.all.accept_ra = 0' >> /etc/sysctl.conf

debian:~# echo 'net.ipv6.conf.all.autoconf = 0' >> /etc/sysctl.conf

echo 'net.ipv6.conf.lo.autoconf = 0' >> /etc/sysctl.conf

echo 'net.ipv6.conf.eth0.autoconf = 0' >> /etc/sysctl.conf

echo 'net.ipv6.conf.eth1.autoconf = 0' >> /etc/sysctl.conf
My server has 2 etherhet interfaces, eth0 and eth1 that’s the reason I had to set up autoconf kernel the two vars net.ipv6.conf.eth0.autoconf and net.ipv6.conf.eth1.autoconf , for more interfaces more kernel vars (eth2, eth3) etc. needs to be set to “0”
I’ve seen posts online of people complaining about a similar errors to IPv6 addrconf: prefix with wrong length 48, like:
IPv6 addrconf: prefix with wrong length 96

IPv6 addrconf: prefix with wrong length 128
The solution to this messages is also done by setting the above described sysctl kernel vars. Setting the vars will suppress the messages which by the way with time could take up A LOT of disk space and fills /var/log/dmesg with this useless message, hence applying the “fix” is a must 😉
Another thing, I’ve noticed while I was researching about the error and the respective fix is that people on other deb based distributions like Ubuntu as well as on Fedora GNU / Linux had also experienced the issue.
Tags: addrconf, annoying message, autoconf, bit, boots, confdebian, config, confMy, course, Disk, dmesg, doesn, eth, GNU, host, ipv6 configuration, junk messages, kernel, Linux, log, lot, prefix, quot, ra, reason, servers, something, squeeze, suddeny, time, Ubuntu, ups
Posted in Linux, System Administration | 1 Comment »
Monday, June 21st, 2010 If you are a system administrator, you have probably wondered at least once ohw to configure your Linux server to automatically reboot itself if it crashes, is going through a mass CPU overload, e.g. the server load average “hits the sky”.
I just learned from a nice article found here that there is a kernel variable which when enabled takes care to automatically restart a crashed server with the terrible Kernel Panic message we all know.
The variable I’m taking about is kernel.panic for instance kernel.panic = 20 would instruct your GNU Linux kernel to automatically reboot if it experiences a kernel panic system crash within a time limit of 20 seconds.
To start using the auto-reboot linux capabilities on a kernel panic occurance just set the variable to /etc/sysctl.conf
debian-server:~# echo 'kernel.panic = 20' >> /etc/sysctl.conf
Now we will also have to enable the variable to start being use on the system, so execute:
debian-server:~# sysctl -p
There you go automatic system reboots on kernel panics is now on.
Now to further assure yourself the linux server you’re responsible of will automatically restart itself on a emergency situation like a system overload I suggest you check Watchdog
You might consider checking out this auto reboot tutorial which explains in simple words how watchdog is installed and configured.
On Debian installing and maintaining watchdog is really simple and comes to installing and enabling the watchdog system service, right afteryou made two changes in it’s configuration file /etc/watchdog.conf
To do so execute:
debian-server:~# apt-get install watchdog

debian-server:~# echo "file = /var/log/messages" >> /etc/watchdog.conf

debian-server:~# echo "watchdog-device = /dev/watchdog" >> /etc/watchdog.conf
Well that should be it, you might also need to load some kernel module to monitor your watchdog.
On my system the kernel modules related to watchdog are located in:
/lib/modules/2.6.26-2-amd64/kernel/drivers/watchdog/
If not then you should certainly try the software watchdog linux kernel module called softdog , to do so issue:
debian-server:~# /sbin/modprobe softdog
It’s best if you load the module while the softdog daemon is disabled.
If you consider auto loadig the softdog software watchdog kernel driver you should exec:
debian-server:~# echo 'softdog' >> /etc/modules
Finally a start of the watchdog is necessery:
debian-server:~# /etc/init.d/watchdog start

Stopping watchdog keepalive daemon....

Starting watchdog daemon....
That should be all your automatic system reboots should be now on! 🙂
Tags: auto reboot, care, configuration file, configure, crash, debian gnu, debian server, emergency, emergency situation, file, gnu linux, How to automatically reboot (restart) Debian GNU Lenny Linux on kernel panic, init, instance, kernel panic, kernel panics, limit, linux capabilities, linux kernel, linux server, log, log messages, modprobe, nbsp, necessery, ohw, quot, server load, sky, software, software watchdog with kernel module softdog, some general CPU overload or system crash, squeeze, Stopping, system administrator, system crash, system overload, time, time limit, tutorial, Watchdog, watchdog system
Posted in Linux, System Administration | 6 Comments »
Tuesday, August 23rd, 2011 I’ve been working on a servers running Windows 2003 and Windows 2008 these days.
As I wanted to be more flexible on what I can do from the command line I decided to install GNUwin (provides port of GNU tools), most of which are common part of any Linux distribution).
Having most of the command line flexibility on a Windows server is a great thing, so I would strongly recommend GNUWin to any Windows server adminsitrator out there.
Actually it’s a wonderful thing that most of the popular Linux tools can easily be installed and used on Windows for more check GnuWin32 on sourceforge
One of the reasons I installed Gnuwin was my intention to use the good old Linux tail command to keep an eye interactive on the IIS server access log files, which by the way for IIS webserver are stored by default in C:WindowsSystem32LogFilesW3SVC1*.log
I’ve managed to install the GNUWin following the install instructions, not with too much difficulties. The install takes a bit of time, cause many packs containing different parts of the GNUWin has to be fetched.
To install I downloaded the GNUWin installer available from GNUWin32’s website and instructed to extracted the files into C:Program FilesGnuwin
Then I followed the install instructions suggestions, e.g.:
C:> cd c:Program FilesGnuWin

C:Program FilesGnuWin> download.bat

...

C:Program FilesGnuWin> install c:gnuwin32

...
After the installation was succesfully completed on the two Windows machines, both of which by the way are running 64 bit Windows, it was necessery to add the newly installed GNU .exe files to my regular cmd.exe PATH variable in order to be able to access the sed, tail and the rest of the gnuwin32 command line tools.
In order to add C:GnuWin32bin directory to the windows defined Command line Path , I had to do the following:
a. Select (Properties) for My Computer
Start (button) -> My Computer (choose properties)
b. Select the My Computer Advanced (tab)
Then, from the My Computer pane press on Advanced tab
c. Next press on Environment Variables
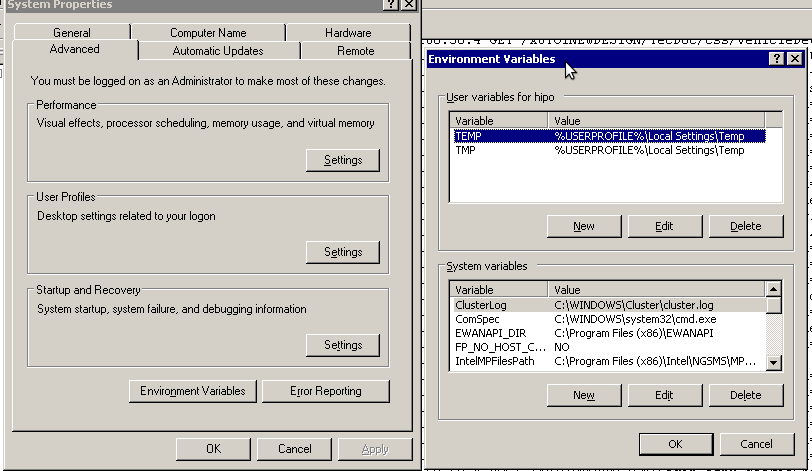
You see in above’s screenshot the Environment Variables config dialog, to add the new path location in System Variables sectiom, between the list I had to add the c:GNUwin32bin path locatiion. To find I pressed on Edit button scrolled down to find the Variable and hence added at the end of the long list defined paths.
After adding in GNUwin, the Windows path looks like this:
C:Program Files (x86)EWANAPI;C:WINDOWSsystem32;C:WINDOWS;C:WINDOWSSystem32Wbem;C:Program Files (x86)IntelNGSMSMPFiles;C:Program Files (x86)Microsoft SQL Server100ToolsBinn;C:Program FilesMicrosoft SQL Server100ToolsBinn;C:Program FilesMicrosoft SQL Server100DTSBinn;C:Program Files (x86)Microsoft SQL Server100ToolsBinnVSShellCommon7IDE;C:Program Files (x86)Microsoft Visual Studio 9.0Common7IDEPrivateAssemblies;C:Program Files (x86)Microsoft SQL Server100DTSBinn;C:WINDOWSsystem32WindowsPowerShellv1.0;C:gnuwin32bin
Further on, I launched the tail command to intercatively take an eye on who is accessing the IIS webserver.
Sadly this worked not, trying to use tail with the IIS ex10116.log log;
C:WindowsSystem32LogfilesW3SVC1> tail -f ex10116.log
Spit an error tail: ex10116.log: Bad file descriptor
Since I couldn’t use tail -f I looked for alternative and a quick search led me to Tail 4 Win32 . Lest the name suggests it is supposed to work on 32 bit arch Windows the version on tailforwin32’s website is working perfectly fine on 64 bit Windows as well.
What it does is to simulate a normal tail -f command inside a very simplistic window interface. You see it in action with opened IIS log on below’s screenshot:
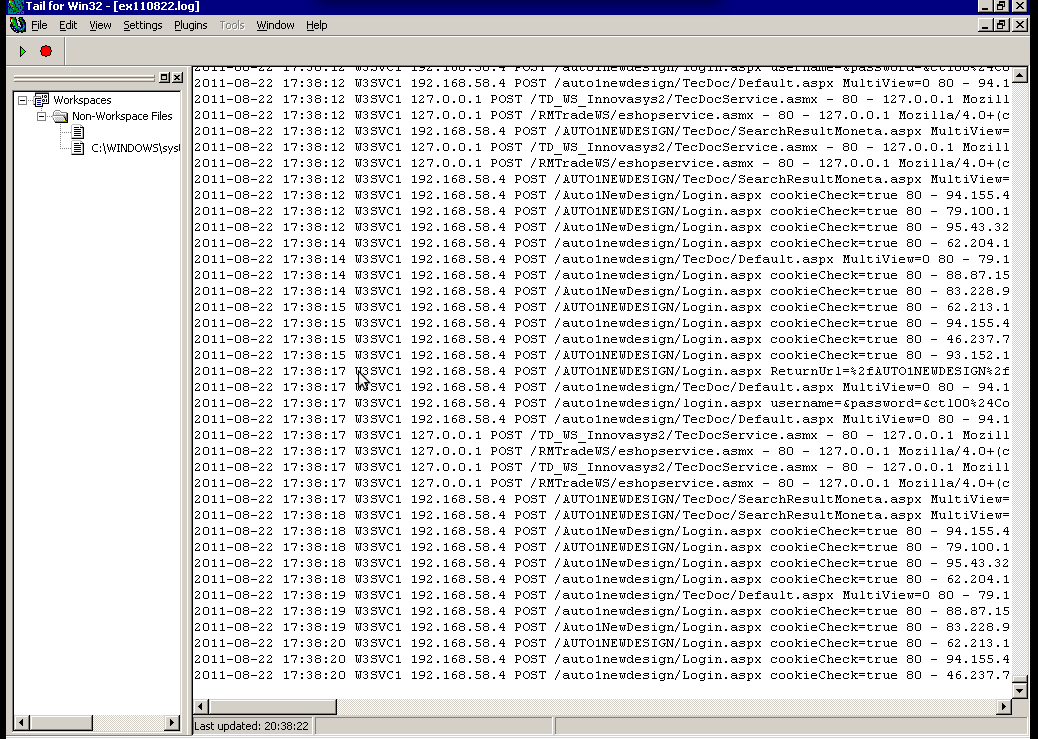
Finally my goal is achieved and I can take an eye interactively on IIS logs. End of the article, hope it wasn’t too boring 😉
Tags: bin directory, binary files, Button, c program, command line tools, Computer, distribution, download, exe files, eye, Files, flexibility, gnu tools, gnuwin, gnuwin32, IDE, IIS, installation, line path, linux distribution, linux tools, log, Microsoft, necessery, Path, program, screenshot, select properties, sourceforgeOne, SQL, start button, tail, time, time cause, two windows, windows machines, windows server, wonderful thing
Posted in System Administration, Windows | 1 Comment »
Monday, April 19th, 2010 1. First it’s necessery to have the mrtg debian package installed.
If it’s not installed then we have to install it:
debian-server:~# apt-get install mrtg
2. Second download the qmailmrtg source binary
To download the latest current source release of qmailmrtg execute:
debian-server:~# wget http://www.inter7.com/qmailmrtg7/qmailmrtg7-4.2.tar.gz
It’s a pity qmailmrtg is not available for download via debian repositories.
3. Third download the qmail.mrtg.cfg configuration file
debian-server~# wget https://www.pc-freak.net/files/qmail.mrtg.cfg
Now you have to put the file somewhere, usually it’s best to put it in the /etc/ directory.
Make sure the file is existing in /etc/qmail.mrtg.cfg
4. Untar compile and install qmailmrtg binary
debian-server:~# tar -xzvvf qmailmrtg7-4.2.tar.gz

...

debian-server:~# make && make install
strip qmailmrtg7
cp qmailmrtg7 /usr/local/bin
rm -rf *.o qmailmrtg7 checkq core
cc checkq.c -o checkq
./checkq
cc -s -O qmailmrtg7.c -o qmailmrtg7
qmailmrtg7.c: In function ‘main’:
qmailmrtg7.c:69: warning: incompatible implicit declaration of
built-in function ‘exit’
qmailmrtg7.c:93: warning: incompatible implicit declaration of
built-in function ‘exit’
qmailmrtg7.c:131: warning: incompatible implicit declaration of
built-in function ‘exit’
qmailmrtg7.c:137: warning: incompatible implicit declaration of
built-in function ‘exit’
5. Set proper file permissions according to the user you indent to execute qmailmrtg as
I personally execute it as root user, if you intend to do so as well set a permissions to
/etc/qmail.mrtg.cfg of 700.
In order to do that issue the command:
debian-server:~# chmod 700 /etc/qmail.mrtg.cfg
6. You will now need to modify the qmail.mrtg.cfg according to your needs
There you have to set a proper location where the qmailmrtg shall generate it’s html data files.
I use the /var/www/qmailmrtg qmailmrtg log file location. If you will do so as wellyou have to create the directory.
7. Create qmailmrtg html log files directory
debian-server:~# mkdir /var/log/qmailmrtg
8. Now all left is to set a proper cron line to periodically invoke qmailmrtg in order to generate qmail activity statistics.
Before we add the desired root’s crontab instructions we have to open the crontab for edit, using the command.
debian-server:~# crontab -u root -e
I personally use and recommend the following line as a line to be added to root’s crontab.
0-55/5 * * * * env LANG=C /usr/bin/mrtg /etc/qmail.mrtg.cfg > /dev/null
9. Copy index.html from qmailmrtg source directory to /var/log/qmailmrtg
debian-server:/usr/local/src/qmailmrtg7-4.2# cp -rpf index.html /var/log/qmailmrtg
10. Last step is to make sure Apache’s configuration contains lines that will enable you to access the qmail activity statistics.
The quickest way to do that in Debian running Apache 2.2 is to edit /etc/apache2/apache2.conf and add a directory Alias as follows
Alias /qmailmrtg/ "/var/www/qmailmrtg/"
Now after Apache restart
/etc/init.d/apache2 restart
You should be now able to access the qmail mrtg qmail log statistics through your Apache’s default configured host.
For instance, assuming your default configured Apache host is domain.com. You’ll be able to reach the qmailmrtg statistics through an url like:
http://domain.com/qmailmrtg/
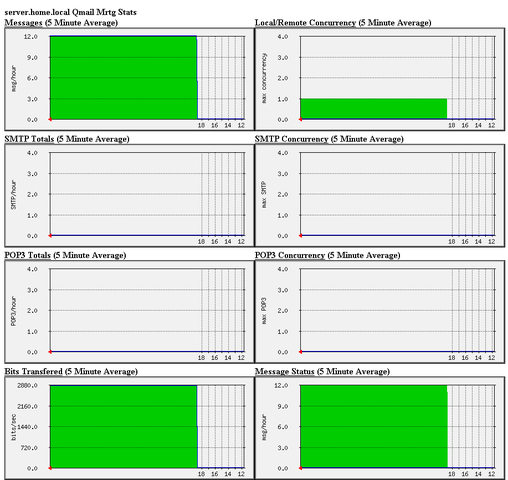
After I verified and ensured myself qmail mrtg is working correctly after all the above explained steps partook I wasn’t happy with some headlines in the index.html and the html tile of qmailmrtg,
so as a last step I manually edited the /var/www/qmailmrtg/index.html to attune it to my likings.
Here is a screenshot of the qmailmrtg web statistics in action.
Tags: amp, checkq, configuration file, cron, current source, debian package, debian repositories, declaration, default, download, exit, file, file permissions, freak, function, graph, host, html data, implicit declaration, indent, index, Installing qmailmrtg (qmail graph statistics on qmail activity) on Debian Lenny, loc, location, log, mrtg, necessery, package, proper location, rf, root, root user, Set, source release, statistics, strip, untar, wget
Posted in System Administration | 6 Comments »
Wednesday, August 10th, 2011 
I’m in charge of dozen of Linux servers these days and therefore am required to restart many of the servers with a support ticket (because many of the Data Centers where the servers are co-located does not have a web interface or IPKVM connected to the server for that purpose). Therefore the server restart requests in case of crash sometimes gets processed in few hours or in best case in at least half an hour.
I’m aware of the existence of Hardware Watchdog devices, which are capable to detect if a server is hanged and auto-restart it, however the servers I administrate does not have Hardware support for Watchdog timer.
Thanksfully there is a free software project called Watchdog which is easily configured and mitigates the terrible downtimes caused every now and then by a server crash and respective delays by tech support in Data Centers.
I’ve recently blogged on the topic of Debian Linux auto-restart in case of kernel panic , however now i had to conifgure watchdog on some dozen of CentOS Linux servers.
It appeared installation & configuration of Watchdog on CentOS is a piece of cake and comes to simply following few easy steps, which I’ll explain quickly in this post:
1. Install with yum watchdog to CentOS
[root@centos:/etc/init.d ]# yum install watchdog

...
2. Add to configuration a log file to log watchdog activities and location of the watchdog device
The quickest way to add this two is to use echo to append it in /etc/watchdog.conf:
[root@centos:/etc/init.d ]# echo 'file = /var/log/messages' >> /etc/watchdog.conf

echo 'watchdog-device = /dev/watchdog' >> /etc/watchdog.conf
3. Load the softdog kernel module to initialize the software watchdog via /dev/watchdog
[root@centos:/etc/init.d ]# /sbin/modprobe softdog
Initialization of softdog should be indicated by a line in dmesg kernel log like the one above:
[root@centos:/etc/init.d ]# dmesg |grep -i watchdog

Software Watchdog Timer: 0.07 initialized. soft_noboot=0 soft_margin=60 sec (nowayout= 0)
4. Include the softdog kernel module to load on CentOS boot up
This is necessery, because otherwise after reboot the softdog would not be auto initialized and without it being initialized, the watchdog daemon service could not function as it does automatically auto reboots the server if the /dev/watchdog disappears.
It’s better that the softdog module is not loaded via /etc/rc.local but the default CentOS methodology to load module from /etc/rc.module is used:
[root@centos:/etc/init.d ]# echo modprobe softdog >> /etc/rc.modules

[root@centos:/etc/init.d ]# chmod +x /etc/rc.modules
5. Start the watchdog daemon service
The succesful intialization of softdog in step 4, should have provided the system with /dev/watchdog, before proceeding with starting up the watchdog daemon it’s wise to first check if /dev/watchdog is existent on the system. Here is how:
[root@centos:/etc/init.d ]# ls -al /dev/watchdogcrw------- 1 root root 10, 130 Aug 10 14:03 /dev/watchdog
Being sure, that /dev/watchdog is there, I’ll start the watchdog service.
[root@centos:/etc/init.d ]# service watchdog restart

...
Very important note to make here is that you should never ever configure watchdog service to run on boot time with chkconfig. In other words the status from chkconfig for watchdog boot on all levels should be off like so:
[root@centos:/etc/init.d ]# chkconfig --list |grep -i watchdog

watchdog 0:off 1:off 2:off 3:off 4:off 5:off 6:off
Enabling the watchdog from the chkconfig will cause watchdog to automatically restart the system as it will probably start the watchdog daemon before the softdog module is initialized. As watchdog will be unable to read the /dev/watchdog it will though the system has hanged even though the system might be in a boot process. Therefore it will end up in an endless loops of reboots which can only be fixed in a linux single user mode!!! Once again BEWARE, never ever activate watchdog via chkconfig!
Next step to be absolutely sure that watchdog device is running it can be checked with normal ps command:
[root@centos:/etc/init.d ]# ps aux|grep -i watchdog

root@hosting1-fr [~]# ps axu|grep -i watch|grep -v greproot 18692 0.0 0.0 1816 1812 ? SNLs 14:03 0:00 /usr/sbin/watchdog

root 25225 0.0 0.0 0 0 ? ZN 17:25 0:00 [watchdog] <defunct>
You have probably noticed the defunct state of watchdog, consider that as absolutely normal, above output indicates that now watchdog is properly running on the host and waiting to auto reboot in case of sudden /dev/watchdog disappearance.
As a last step before, after being sure its initialized properly, it’s necessery to add watchdog to run on boot time via /etc/rc.local post init script, like so:
[root@centos:/etc/init.d ]# echo 'echo /sbin/service watchdog start' >> /etc/rc.local
Now enjoy, watchdog is up and running and will automatically restart the CentOS host 😉
Tags: CentOS, crash, data, dmesg, existence, file, free software project, half an hour, hardware support, host, init, installation, installation configuration, kernel panic, Linux, linux server, linux servers, log, log messages, modprobe, necessery, piece of cake, root, server crash, server downtime, software, support, support ticket, tech support, ticket, time, topic, Watchdog, watchdog timer, web interface, yum
Posted in Linux, System Administration | 1 Comment »
Wednesday, July 27th, 2011 If you have used KVM, before you certainly have faced the requirement asked by many Dedicated Server Provider, for establishment of a PPTP (mppe / mppoe) or the so called Microsoft VPN tunnel to be able to later access via the tunnel through a Private IP address the web based Java Applet giving control to the Physical screen, monitor and mouse on the server.
This is pretty handy as sometimes the server is not booting and one needs a further direct access to the server physical Monitor.
Establishing the Microsoft VPN connection on Windows is a pretty trivial task and is easily achieved by navigating to:
Properties > Networking (tab) > Select IPv4 > Properties > Advanced > Uncheck "Use default gateway on remote network".
However achiving the same task on Linux seemed to be not such a trivial, task and it seems I cannot find anywhere information or precise procedure how to establish the necessery VPN (ptpt) ms encrypted tunnel.
Thanksfully I was able to find a way to do the same tunnel on my Debian Linux, after a bunch of experimentation with the ppp linux command.
To be able to establish the IPMI VPN tunnel, first I had to install a couple of software packages, e.g.:
root@linux:~# apt-get install ppp pppconfig pppoeconf pptp-linux
Further on it was necessery to load up two kernel modules to enable the pptp mppe support:
root@linux:~# modprobe ppp_mppe
root@linux:~# modprobe ppp-deflate
I’ve also enabled the modules to be loading up during my next Linux boot with /etc/modules to not be bother to load up the same modules after reboot manually:
root@linux:~# echo ppp_mppe >> /etc/modules

root@linux:~# echo ppp-deflate >> /etc/modules
Another thing I had to do is to enable the require-mppe-128 option in /etc/ppp/options.pptp.
Here is how:
root@linux:~# sed -e 's$#require-mppe-128$require-mppe-128$g' /etc/ppp/options.pptp >> /tmp/options.pptp

root@linux:~# mv /tmp/options.pptp /etc/ppp/options.pptp

root@linux:~# echo 'nodefaultroute' >> /etc/ppp/options.pptp
In order to enable debug log for the ppp tunnel I also edited /etc/syslog.conf and included the following configuration inside:
root@linux:~# vim /etc/syslog.conf

*.=debug;

news.none;mail.none -/var/log/debug

*.=debug;*.=info;

*.=debug;*.=info;

root@linux:~# killall -HUP rsyslogd
The most important part of course is the command line with ppp command to connect to the remote IP via the VPN tunnel ;), here is how I achieved that:
root@linux:~# pppd debug require-mppe pty "pptp ipmiuk2.net --nolaunchpppd" file /etc/ppp/options.pptp user My_Dedi_Isp_Given_Username password The_Isp_Given_Password
This command, brings up the ppp interface and makes the tunnel between my IP and the remote VPN target host.
Info about the tunnel could be observed with command:
ifconfig -a ppp

ppp0 Link encap:Point-to-Point Protocol

inet addr:10.20.254.32 P-t-P:10.20.0.1 Mask:255.255.255.255

UP POINTOPOINT RUNNING NOARP MULTICAST MTU:1496 Metric:1

RX packets:7 errors:0 dropped:0 overruns:0 frame:0

TX packets:12 errors:0 dropped:0 overruns:0 carrier:0

collisions:0 txqueuelen:3

RX bytes:70 (70.0 B) TX bytes:672 (672.0 B)
One more thing before I could finally access the IPMI’s web interface via the private IP was to add routing to the private IP address via the tunnel other side IP address:
# 10.20.0.1 P-t-P IP address

ip route add 10.20.1.124/32 dev ppp0
Now logically one would thing the Web interface to login and use the Java Applet to connect to the server would be accessible but no IT wasn’t !
It took me a while to figure out what is the problem and if not the guys in irc.freenode.net ##networking helped me I would never really find out why http://10.20.1.124/ and https://10.20.1.124/ were inaccessible.
Strangely enough both ports 80 and 443 were opened on 10.20.1.124 and it seems like working, however though I can ping both 10.20.1.124 and 10.20.0.1 there was no possible way to access 10.20.1.124 with TCP traffic.
Routing to the Microsoft Tunnel was fine as I’ve double checked all was fine except whether I tried accessing the IPMI web interface the browser was trying to open the URL and keeps opening like forever.
Thanksfully after a long time of futile try outs, a tip was suggested by a good guy in freenode nick named ne2k
To make the TCP connection in the Microsoft Tunnel work and consequently be able to access the webserver on the remote IPMI host, one needs to change the default MTU set for the ppp0 tunnel interface.
Here is how:
ip link set ppp0 mtu 1438
And tadam! It’s done now IPKVM is accessible via http://10.20.1.124 or https://10.20.1.124 web interface. Horay ! 🙂
Tags: connection, control, debian linux, default gateway, direct access, encrypted tunnel, establishment, gateway, info, information, IPMI, Java, java applet, kernel modules, kvm, linux boot, log, Microsoft, microsoft vpn, modprobe, necessery, none, ppp, ppp linux, ppp options, precise procedure, private ip address, ptpt, root, root linux, screen, server provider, software packages, tab, tmp, trivial task, VPN, vpn connection
Posted in Linux, System Administration | 1 Comment »
Saturday, July 23rd, 2011 
I’ve been in a situation today, where one Linux server’s hard drive SCSI driver or the physical drive is starting to break off where in dmesg kernel log, I can see a lot of errors like:
[178071.998440] sd 0:0:0:0: [sda] Result: hostbyte=DID_BAD_TARGET driverbyte=DRIVER_OK,SUGGEST_OK
[178071.998440] end_request: I/O error, dev sda, sector 89615868
I tried a number of things to remount the hdd which was throwing out errors in read only mode, but almost all commands I typed on the server were either shown as missng or returning an error:
Input/output error
Just ot give you an idea what I mean, here is a paste from the shell:
linux-server:/# vim /etc/fstab

-bash: vim: command not found

linux-server:/# vi /etc/fstab

-bash: vi: command not found

linux-server:/# mcedit /etc/fstab

-bash: /usr/bin/mcedit: Input/output error

linux-server:/# fdisk -l

-bash: /sbin/fdisk: Input/output error
After I’ve tried all kind of things to try to diagnose the server and all seemed failing, I thought next a reboot might help as on server boot the filesystems will get checked with fsck and fsck might be able to fix (at least temporary) the mess.
I went on and tried to restart the system, and guess what? I got:
/sbin/reboot init Input/output error
I hoped that at least /sbin/shutdown or /sbin/init commands might work out and since I couldn’t use the reboot command I tried this two as well just to get once again:
linux-server:/# shutdown -r now

bash: /sbin/shutdown: Input/output error

linux-server:/# init 6

bash: /sbin/init: Input/output error
You see now the situation was not pinky, it seemed there was no way to reboot the system …
Moreover the server is located in remote Data Center and I the tech support there is conducting assigned task with the speed of a turtle.
The server had no remote reboot, web front end or anything and thefore I needed desperately a way to be able to restart the machine.
A bit of research on the issue has led me to other people who experienced the /sbin/reboot init Input/output error error mostly caused by servers with failing hard drives as well as due to HDD control driver bugs in the Linux kernel.
As I was looking for another alternative way to reboot my Linux machine in hope this would help. I came across a blog post Rebooting the Magic Way – http://www.linuxjournal.com/content/rebooting-magic-way
As it was suggested in Cory’s blog a nice alternative way to restart a Linux machine without using reboot, shutdown or init cmds is through a reboot with the Magic SysRQ key combination
The only condition for the Magic SysRQ key to work is to have enabled the SysRQ – CONFIG_MAGIC_SYSRQ in Kernel compile time.
As of today luckily SysRQ Magic key is compiled and enabled by default in almost all modern day Linux distributions in this numbers Debian, Fedora and their derivative distributions.
To use the sysrq kernel capabilities as a mean to restart the server, it’s necessery first to activate the sysrq through sysctl, like so:
linux-server:~# sysctl -w kernel.sysrq=1

kernel.sysrq = 1
I found enabling the kernel.sysrq = 1 permanently in the kernel is also quite a good idea, to achieve that I used:
echo 'kernel.sysrq = 1' >> /etc/sysctl.conf
Next it’s wise to use the sync command to sync any opened files on the server as well stopping as much of the server active running services (MySQL, Apache etc.).
linux-server:~# sync
Now to reboot the Linux server, I used the /proc Linux virtual filesystem by issuing:
linux-server:~# echo b > /proc/sysrq-trigger
Using the echo b > /proc/sysrq-trigger simulates a keyboard key press which does invoke the Magic SysRQ kernel capabilities and hence instructs the kernel to immediately reboot the system.
However one should be careful with using the sysrq-trigger because it’s not a complete substitute for /sbin/reboot or /sbin/shutdown -r commands.
One major difference between the standard way to reboot via /sbin/reboot is that reboot kills all the running processes on the Linux machine and attempts to unmount all filesystems, before it proceeds to sending the kernel reboot instruction.
Using echo b > /proc/sysrq-trigger, however neither tries to umount mounted filesystems nor tries to kill all processes and sync the filesystem, so on a heavy loaded (SQL data critical) server, its use might create enormous problems and lead to severe data loss!
SO BEWARE be sure you know what you’re doing before you proceed using /proc/sysrq-trigger as a way to reboot ;).
Tags: dmesg, drive, drive scsi, driverbyte, emergency, errorJust, fdisk, filesystems, fsck, hard drive, hdd, hostbyte, init, input output, kernel, Linux, log, machine, mcedit, number, pinky, reboot web, remote reboot, remount, request, Result, sda, sector, server boot, server shutdown, Shell, shell linux, target, tech support, turtle, vim, web front
Posted in Linux, System Administration | 5 Comments »
Friday, May 20th, 2011 After a failed attempt to enable some wrapper scripts to enable domain keys support in a qmail powered mail server my qmail server suddenly stopped being able to normally send mail.
The exact error message which was logged in /var/log/qmail/current was:
@400000004dd66fcc16a088ac delivery 1: deferral: Sorry,_message_has_wrong_owner._(#4.3.5)/
This qmail messed happened after I substituted /var/qmail/bin/qmail-queue and /var/qmail/bin/qmail-remote with two respective wrapper shell scripts which were calling for the original qmail-queue and qmail-remote binaries under the names qmail-queue.orig and qmail-queue.orig
Restoring back qmail-queue.orig to /var/qmail/bin/qmail-queue and qmail-remote.orig to /var/qmain/bin/qmail-remote and restarting the mail server broke my qmail install.
After a bunch of nerves trying to isolate what is causing the error I found out that by mistake I forgot to copy the qmail-queue and qmail-remote permissions and ownership.
Thus I had to check another qmail working installation’s permissions for both binaries and fix the permissions to be equivalent to the permissions:
debian:~# ls -al /var/qmail/bin/qmail-remote
-rwx–x–x 1 root qmail 50464 2011-05-20 12:56 /var/qmail/bin/qmail-remote*
debian:~# ls -al /var/qmail/bin/qmail-queue
-rws–x–x 1 qmailq qmail 20392 2011-05-20 12:56 /var/qmail/bin/qmail-queue*
The exact chmod and chmod commands I issued to solve the shitty issues were as follows:
First I fixed the qmail-queue and qmail-remote ownership:
debian:~# chown qmailq:qmail /var/qmail/bin/qmail-queue

debian:~# chown root:qmail /var/qmail/bin/qmail-remote
Second I set the proper file permissions:
# make the qmail-queue binary suid

debian:~# chmod u+s /var/qmail/bin/qmail-queue

debian:~# chmod 611 /var/qmail/bin/qmail-queue

debian:~# chmod 611 /var/qmail/bin/qmail-remote
Third and last I did a restart of the qmail server and tested it sends properly
debian:~# /usr/bin/qmailctl stop

Stopping qmail...

qmail-send

qmail-smtpd

debian:~# /usr/bin/qmailctl start

Starting qmail
Finally to test that the qmail server qmail-queue was queing and sending with qmail-remote I used the system mail command like so:
debian:~# mail -s "test email" testuser@www.pc-freak.net

asdfafdsdf

.

Cc:
Afterwards the mail was properly received on my mail account testuser@www.pc-freak.net immediately.
In my /var/log/qmail/current log file all seemed fine:
@400000004dd6702a2eb2b064 starting delivery 1: msg 85281596 to remote testuser@www.pc-freak.net

@400000004dd6702a2eb2b834 status: local 0/20 remote 1/20

@400000004dd6702b34cc809c delivery 1: success: 83.228.93.76_accepted_message./Remote_host_said:_250_ok_

1305899099_qp_65293/

@400000004dd6702b34cc886c status: local 0/20 remote 0/20

@400000004dd6702b34cc8c54 end msg 85281596
The test mail was properly received on my mail account testuser@www.pc-freak.net immediately.
It took me like half an hour to figure out what exactly is wrong with the permissions in situations like this I really wanted to change all my qmail installs with postfix and forget forever I ever used qmail …
Tags: binaries, chmod commands, chown root, email, exact error message, failure, failure message, file, host, installation, log, mail delivery failure, mail server, mistake, msg, nerves, orig, ownership, properlydebian, qmailctl, queue, Remote, root, rws, rwx, Shell, shell scripts, sorry message, status, system, test, testuser, Third, wrapper, wrapper scripts
Posted in Linux, System Administration | No Comments »


