Posts Tagged ‘need’

Windows unable to delete file, file locked unlocking with Unlocker tiny tool

Wednesday, April 13th, 2016

Windows-Unlocker-program-show-what-program-or-software-is-locking-your-file-why-file-cant-be-deleted-file-locked

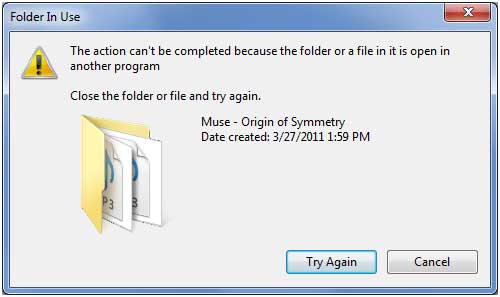
If you want to delete some file on a Windows server or Desktop but you get the a dialog with an error saying:

"This action can't be completed because the folder or a file in it is open in another program"

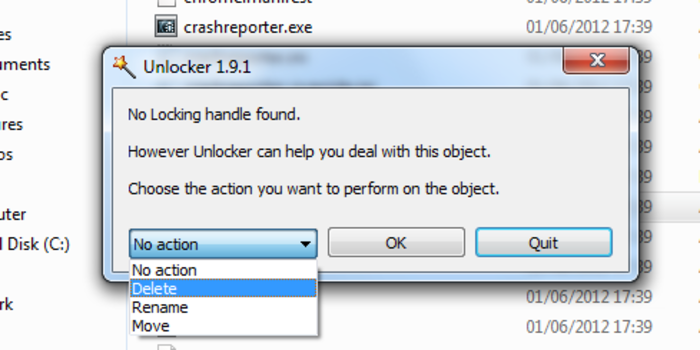
windows-unable-to-delete-file-file-locked-get-what-is-locking-it-and-unlock-the-file-with-Unlocker-tiny-desktop-graphic-tool-0

Then you need to find out which Program is preventing the file from deletion / locking the file, I've earlier blogged on how to check which process locks file with tasklist or wmic Windows commands

However some users might prefer to not bother with command line check what is locking a file and then killing the Process manually with taskmanager (taskmgr.exe) but do both file unlocking from one single gui interface, that's especially for lazy novice users, gamers and most of Desktop Windows users.

If you're one of those lazy users you will appriace

Unlocker – a useful utility for unlocking files, it will help you figure out which file is using a file what program is using the file you're prevented to delete.
Unlocker is the tool for you if you get any of below error messages, when you try to delete a file:


  • Cannot delete folder: It is being used by another person or program
  • Cannot delete file: Access is denied
  • There has been a sharing violation.
  • The source or destination file may be in use.
  • The file is in use by another program or user.
  • Make sure the disk is not full or write-protected and that the file is not currently in use.
     

windows-unable-to-delete-file-file-locked-get-what-is-locking-it-and-unlock-the-file-with-Unlocker-tiny-desktop-graphic-tool-1

If you stumble unto an locked file once you download and install Unlocker tool and launch the tool ( in case it disappers in future a mirror of Unlocker tool here ).
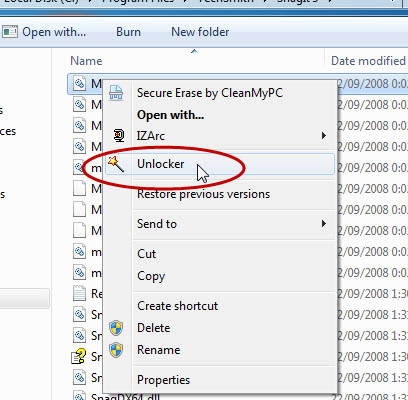
Once installed if you click properties over the file which is refused to be deleted you will get a new menu such as in below screenshot:

NB! Beware while installing Unlocker you might be offered to install a bunch of malware (make sure you deselect it). Also Unlocker's site is made in a way so the Download button could easily be confused with some Google Adsense

unlocker-windows-menu-added-to-properties-options-screenshot

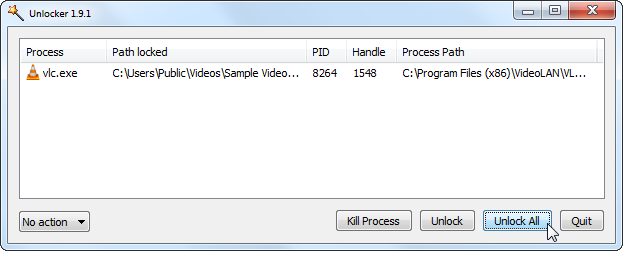
Click on the file that is being locked and choose the Unlocker button, for example if you have a bunch of Videos installed and the video is being locked by VLC clicking on the file you will be shown VLC like in below screenshot


Unlocker-screenshot-locked-file-because-movie-opened-in-VLC

As you see you're shown the Process PID that is being used by the file the full path to the locking program and you have the option to quickly kill the process or unlock the file. Note that at some cases unlocking a file used by some critical program lets say Microsoft Word / Excel or OneNote could cause you a data loss, so before unlocking a file make sure you know what you're doing.

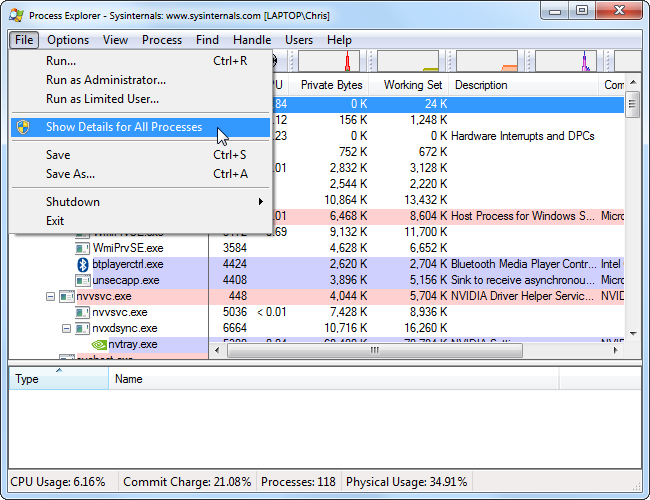
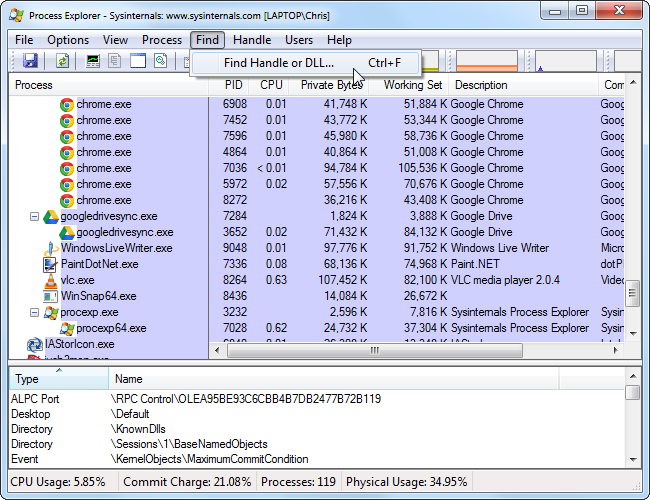
For more advanced users that still prefer GUI to find out what is Locking a file you can also check out Microsoft Process Explorer (advabced task manager) like tool.
If you haven't tried Process Explorer be sure to take a look at it as its a great tool for Win SysAdmins:

Process Explorer is very handy if you want to explore which .DLL (Windows Libraries) are used by a Process / Program

Windows-process-explorer-an-advanced-task-manager-for-windows-and-handy-tool-to-see-what-external-libraries-and-files-a-program-is-using.png

Windows-process-explorer-an-advanced-task-manager-for-windows-and-handy-tool-to-see-what-external-libraries-and-files-a-program-is-using-1


How to force logrorate process logs / Make logrotate changes take effect immediately

Sunday, April 10th, 2016

how-to-force-logrorate-to-process-logs-make-logrorate-changes-take-effect-immediately-log-rotate-300x299

Dealing with logrorate as admins we need to change or add new log-rorate configurations (on most Linux distributions configs are living uder
/etc/logrotate.d/
 

logrotate uses crontab to work. It's scheduled work, not as daemon, so usually no need to reload its configuration.
When the crontab executes logrotate, it will use your new config file automatically.

Most of the logrotate setups I've seen on various distros runs out of the /etc/cron.daily

$ ls -l /etc/cron.daily/logrotate 
-rwxr-xr-x 1 root root 180 May 18  2014 /etc/cron.daily/logrotate

Here is content of cron job scheduled script:

$ cat /etc/cron.daily/logrorate

#!/bin/sh /usr/sbin/logrotate /etc/logrotate.conf EXITVALUE=$? if [ $EXITVALUE != 0 ]; then /usr/bin/logger -t logrotate "ALERT exited abnormally with [$EXITVALUE]" fi exit 0

Configurations change to lograte configs takes effect on next crontab run,
but what If you need to test your config you can also execute logrotate
on your own with below ommand:


logrotate -vf /etc/logrotate.conf 

If you encounter some issues with just modified or newly added logrorate script to check out the status of last logrorate executing bunch of log-rotate scripts run on Debian  / Ubuntu etc. deb based Linux:

cat /var/lib/logrotate/status

Or on RHEL, Fedora, CentOS Linux


cat /var/lib/logrotate.status

logrotate state -- version 2


"/var/log/syslog" 2016-4-9
"/var/log/dpkg.log" 2016-4-1
"/var/log/unattended-upgrades/unattended-upgrades.log" 2012-9-20
"/var/log/unattended-upgrades/unattended-upgrades-shutdown.log" 2013-5-17
"/var/log/apache2/mailadmin.www.pc-freak.net-access.log" 2012-9-19
"/var/log/snort/portscan.log" 2012-9-12
"/var/log/apt/term.log" 2016-4-1
"/var/log/squid/access.log" 2015-3-21
"/var/log/mysql/mysql-slow.log" 2016-4-9
"/var/log/debug" 2016-4-3
"/var/log/mysql.log" 2016-4-9
"/var/log/squid/store.log" 2015-3-21
"/var/log/apache2/mailadmin.www.pc-freak.net-error.log" 2012-9-19
"/var/log/daemon.log" 2016-4-3
"/var/log/munin/munin-update.log" 2016-4-9
"/var/log/unattended-upgrades/unattended-upgrades*.log" 2013-5-16
"/var/log/razor-agent.log" 2015-2-19
"/var/log/btmp" 2016-4-1
"/var/log/squid/*.log" 2014-11-24
"/var/log/munin/munin-graph.log" 2016-4-9
"/var/log/mysql/mysql.log" 2012-9-12
"/var/log/munin/munin-html.log" 2016-4-9
"/var/log/clamav/freshclam.log" 2016-4-3
"/var/log/munin/munin-node.log" 2016-1-23
"/var/log/mail.info" 2016-4-3
"/var/log/apache2/other_vhosts_access.log" 2016-4-3
"/var/log/exim4/rejectlog" 2012-9-12
"/var/log/squid/cache.log" 2015-3-21
"/var/log/messages" 2016-4-3
"/var/log/stunnel4/stunnel.log" 2012-9-19
"/var/log/apache2/php_error.log" 2012-10-21
"/var/log/ConsoleKit/history" 2016-4-1
"/var/log/rsnapshot.log" 2013-4-15
"/var/log/iptraf/*.log" 2012-9-12
"/var/log/snort/alert" 2012-10-17
"/var/log/privoxy/logfile" 2016-4-3
"/var/log/auth.log" 2016-4-3
"/var/log/postgresql/postgresql-8.4-main.log" 2012-10-21
"/var/log/apt/history.log" 2016-4-1
"/var/log/pm-powersave.log" 2012-11-1
"/var/log/proftpd/proftpd.log" 2016-4-3
"/var/log/proftpd/xferlog" 2016-4-1
"/var/log/zabbix-agent/zabbix_agentd.log" 2016-3-25
"/var/log/alternatives.log" 2016-4-7
"/var/log/mail.log" 2016-4-3
"/var/log/kern.log" 2016-4-3
"/var/log/privoxy/errorfile" 2013-5-28
"/var/log/aptitude" 2015-5-6
"/var/log/apache2/access.log" 2016-4-3
"/var/log/wtmp" 2016-4-1
"/var/log/pm-suspend.log" 2012-9-20
"/var/log/snort/portscan2.log" 2012-9-12
"/var/log/mail.warn" 2016-4-3
"/var/log/bacula/log" 2013-5-1
"/var/log/lpr.log" 2012-12-12
"/var/log/mail.err" 2016-4-3
"/var/log/tor/log" 2016-4-9
"/var/log/fail2ban.log" 2016-4-3
"/var/log/exim4/paniclog" 2012-9-12
"/var/log/tinyproxy/tinyproxy.log" 2015-3-25
"/var/log/munin/munin-limits.log" 2016-4-9
"/var/log/proftpd/controls.log" 2012-9-19
"/var/log/proftpd/xferreport" 2012-9-19
"/var/spool/qscan/qmail-queue.log" 2013-5-15
"/var/log/user.log" 2016-4-3
"/var/log/apache2/error.log" 2016-4-3
"/var/log/exim4/mainlog" 2012-10-16
"/var/log/privoxy/jarfile" 2013-5-28
"/var/log/cron.log" 2016-4-3
"/var/log/clamav/clamav.log" 2016-4-3


The timestamp date next to each of the rotated service log is when the respective log was last rorated

It is also a handy thing to rorate only a certain service log, lets say clamav-server, mysql-server, apache2 and nginx


logrorate /etc/logrorate.d/clamav-server
logrorate /etc/logrorate.d/mysql-server
logrotate /etc/logrotate.d/nginx

Check Windows Operating System install date, Full list of installed and uninstalled programs from command line / Check how old is your Windows installation?

Tuesday, March 29th, 2016

when-was-windows-installed-check-howto-from-command-line
Sometimes when you have some inherited Windows / Linux OS servers or Desktops, it is useful to be aware what is the Operating System install date. Usually the install date of the OS is closely to the date of purchase of the system this is especially true for Windows but not necessery true for Liunx based installs.

Knowing the install date is useful especially if you're not sure how outdated is a certain operating system. Knowing how long ago a current installation was performed could give you some hints on whether to create a re-install plans in order to keep system security up2date and could give you an idea whether the system is prone to some common errors of the time of installation or security flaws.


1. Check out how old is Windows install?

Finding out the age of WIndows installation can be performed across almost all NT 4.0 based Windowses and onwards, getting Winblows install date is obtained same way on both Windows XP / Vista/  7  and 8.

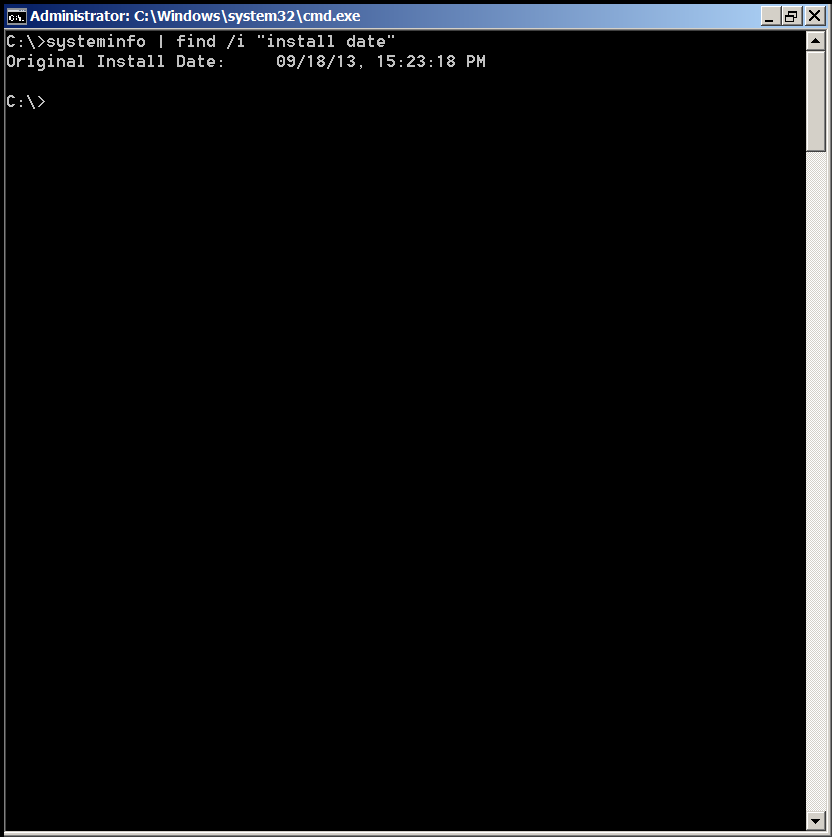
Besides many useful things such as detailed information about the configuration of your PC / notebook systeminfo could also provide you with install date, to do so just run from command line (cmd.exe).
 

C:\Users\hipo> systeminfo | find /i "install date"
Original Install Date:     09/18/13, 15:23:18 PM


check-windows-os-install-date-from-command-line-howto-screenshot

If you need to get the initial Windows system install date however it might be much better to use WMIC command to get the info:


C:\Users\hipo>WMIC OS GET installdate
InstallDate
20130918152318.000000+180


The only downside of using WMIC as you can see is it provides the Windows OS install date in a raw unparsed format, but for scripters that's great.

2. Check WIndows Installed and Uinstalled software and uptime from command line

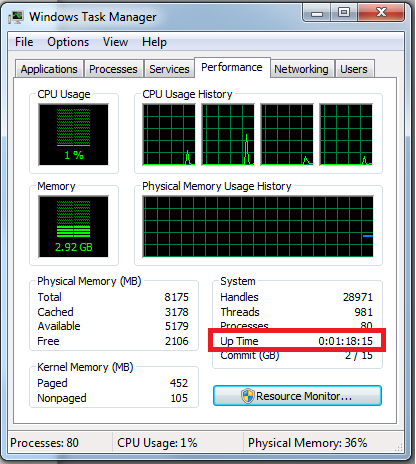
One common other thing next to Windows install date is what is the Windows uptime, the easiest way to get that is to run Task Manager in command line run taskmgr

windows-task-manager-how-to-check-windows-operating-system-uptime-easily

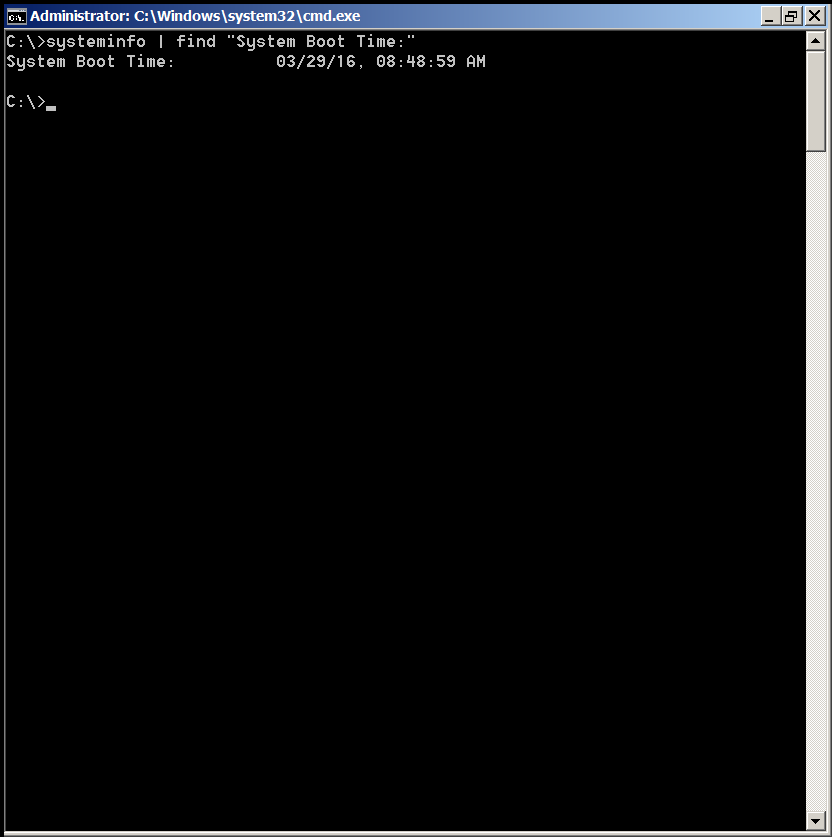
For those who want to get the uptime from windows command line for scripting purposes, this can be done again with systeminfo cmd, i.e.:


C:\> systeminfo | find "System Boot Time:"
System Boot Time:          03/29/16, 08:48:59 AM


windows-os-command-to-get-system-uptime-screenshot

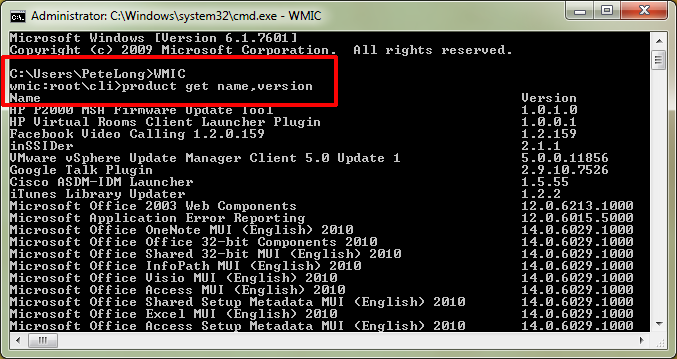
Other helpful Windows command liners you might want to find out about is getting all the Uninstalled and Installed programs from command line this again is done with WMIC


C:\> wmic /OUTPUT:my_software.txt product get name


get-a-full-list-of-installed-software-programs-on-windows-xp-vista-7-8-command-howto-screenshot

Alternative way to get a full list of installed software on Windows OS is to use Microsoft/SysInternals psinfo command:


C:\> psinfo -s > software.txt
C:\> psinfo -s -c > software.csv


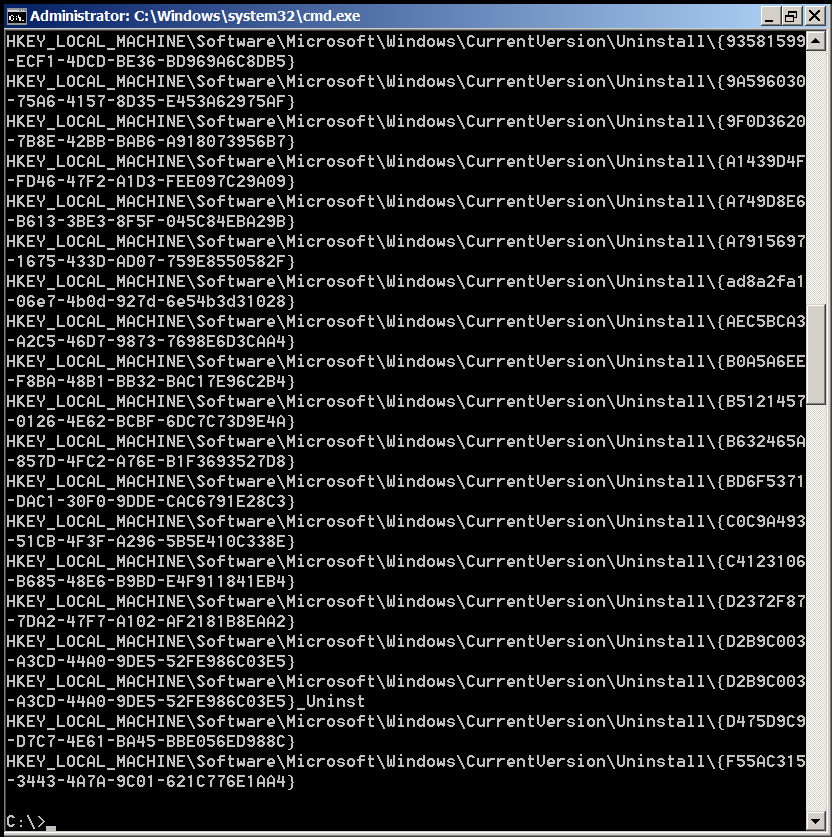
If you need to get a complete list of Uinstalled Software using command line (e.g. for batch scripting) purposes, you can query that from Windows registry, like so:


C:\>reg query HKEY_LOCAL_MACHINE\Software\Microsoft\Windows\CurrentVersion\Uninstall


Command Output will be something like on below shot:

windows-OS-show-get-full-list-of-uninstalled-programs-using-a-command-line-screenshot

Well that's all folks 🙂


Word 2011 Check spelling for Mac OS X 2011 – Word check text in Mac OS X Office

Monday, February 29th, 2016

office-for-mac-2011-logo
 

If you happen to be running Mac OS X powered notebook and have recently installed Microsoft Office 2011 for Mac OS because you used to migrate from a Windows PC, you will probably suprrised that your Native Language Dictionary check you used heavily on Windows might be not performing on Mac.
This was exactly the case with my wife Svetlana and as she is not a computer expert and I'm the IT support at home I had to solve it somehow.

Luckily Office 2011 for Mac OS X which I have installed earlier comes with plenty of foreign-languages such as Russian, Bulgarian, Czech, French, German, UK English, US English etc.
Proofing tools is very handy especially for people like my wife who is natively Belarusian and is in process of learning Bulgarian, thus often in need to check Bulgarian words spelling.

By Default the Check spelling on Office package was set to English, there is a quick way to change this to a certain text without changing the check-spelling default from English, the key shortcut to use is:

I. Press Mac command (key) + A – To select All text in opened document (in our case text was in Bulgarian)

command-a-mac-os-x

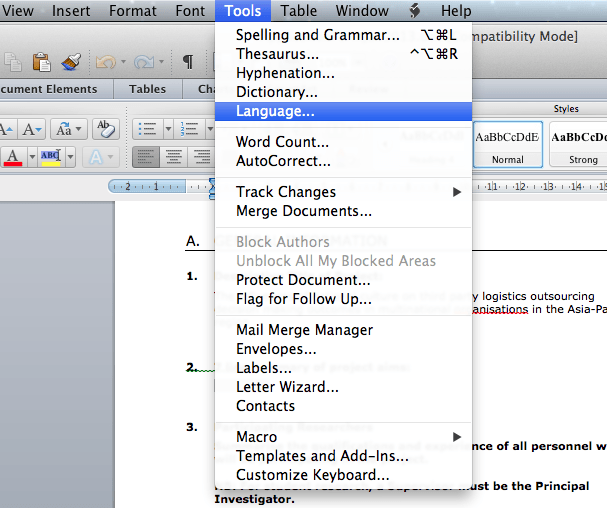
Click Word window menu and:
 

Choose Tools→Language


and select Bulgarian (or whatever language you need check spelling for.

If you need to change the Language default for all time, again you can do it from Tools


 Tools→Language


language-menu-on-mac-os-x-microsoft-word-office-2011-package-screenshot

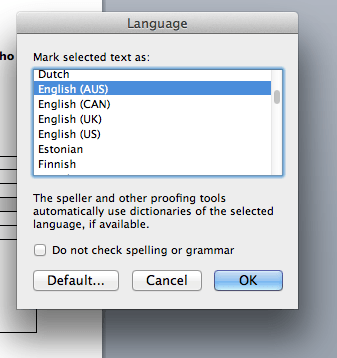
II. The Language dialog will appear and you'll see a list of languages to choose. 

select-language-menu-screenshot-ms-word-2011-on-mac-os-x

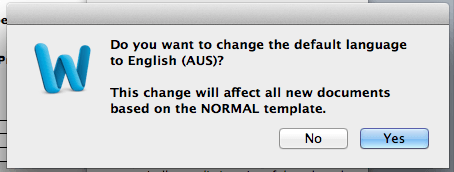
III. Next a Pop-up Dialog will ask you whether you're sure you want to change the default language to the language of choice in my case this was Russian.

language-default-dialog-mac-osx-word-2011-office-on-mac-change-default-spelling-language

That's it check spelling default will be aplpied now to Word normal template, so next time you open a document your default spelling choice will set

Apache Webserver disable file extension – Forbid / Deny access in Apache config to certain file extensions for a Virtualhost

Monday, March 30th, 2015


If you're a Webhosting company sysadmin like me and you already have configured directory listing for certain websites / Vhosts and those files are mirrored from other  development webserver location but some of the uploaded developer files extensions which are allowed to be interptered such as php include files .inc / .htaccess mod_rewrite rules / .phps / .html / .txt need to be working on the dev / test server but needs to be disabled (excluded) from delivery or interpretting for some directory on the prod server.

Open Separate host VirtualHost file or Apache config (httpd.conf / apache2.conf)  if all Vhosts  for which you want to disable certain file extensions and add inside:

<Directory "/var/www/sploits">
        AllowOverride All

</Directory>


Extension Deny Rules such as:

For disabling .inc files from inclusion from other PHP sources:
 

<Files  ~ "\.inc$">
  Order allow,deny
  Deny from all
</Files>


To Disable access to .htaccess single file only


<Files ~ "^\.htaccess">
  Order allow,deny
  Deny from all
</Files>


To Disable .txt from being served by Apache and delivered to requestor browser:


<Files  ~ "\.txt$">
  Order allow,deny
  Deny from all
</Files>


To Disable any left intact .html from being delivered to client:


<Files  ~ "\.html$">
  Order allow,deny
  Deny from all
</Files>


Do it for as many extensions as you need.
Finally to make changes affect restart Apache as usual:

If on Deb based Linux issue:

/etc/init.d/apach2 restart


On CentOS / RHEL and other Redhats / RedHacks 🙂

/etc/init.d/httpd restart

How to get rid of Debian and Ubuntu GNU / Linux obsolete configuration files and system directories

Wednesday, October 19th, 2011

debian_ubuntu-linux-get-rid-of-obsolete-files
I've been using Debian GNU / Linux on my Thinkpad laptop for almost 3 years and half. Initially the Debian version which I had installed was a stable Debian Lenny. As I was mostly dissatisfied of the old versions of the programs, I migrated to testing / unstable
Testing / unstables shipped program versions were a bit better but still back in the day I wanted to get advantage of the latest program versions so for a while I switched to unstable .
Later I regretted for this bad idea, after the migration to Unstable, it was too buggy to run on a notebook one uses for everyday work.
Then to revert back to a bit stable I downgraded to testing unstable again.
When Debian launched Debian Squeeze I set in my /etc/apt/sources.list file software repositories to be the one for the stable Debian Squeeze.

As you can see, I've done quite a lot of "experiments" and "excersises". Many packages were installed, then removed, some became obsolete with time others I just temporary installed out of curiosity. Anyways as a result I ended up with many packages uninstalled / removed , which still kept some of their directory structres and configurations on the machine.

Today, I decided to check how many of these obsolete packages are still present in dpkg database and I was shocked to find out 412 debs were still in my package database! To check the number I used cmd:

root@noah:~# dpkg -l | grep -i '^rcs.*$'|wc -l

Considering the tremendous number of packs waiting to be purged, I decided to get rid of this old and already unnecessery files for the sake of clarity, besides that removing the old already uninstalled packages removes old configuration files, readmes, directories and frees some little space and therefore frees some inodes 😉

Before proceeding to remove them, I carefully reviewed and all the package names which I was about to completely purge in order to make sure there is no package with a configuration files I might need in future:

root@noah:~# dpkg -l |grep -i '^rcs.*$'
...
After reviewing all the deb packages possessing the rc – (remove candidate) flag, I used the following bash one liners to remove the obsolete deb packages:

root@noah:~# for i in $(dpkg -l |grep -i '^rcs.*$'|awk '{ print $2 }'); do echo dpkg --purge $i done...
root@noah:~# for i in $(dpkg -l |grep -i '^rcs.*$'|awk '{ print $2 }'); do dpkg --purge $i done

First line will just print out what will be purged with dpkg , so after I checked it out I used the second one to purge all the RC packs.

How to install nginx webserver from source on Debian Linux / Install Latest Nginx on Debian

Wednesday, March 23rd, 2011

Nginx install server logo
If you're running a large website consisting of a mixture of php scripts, images and html. You probably have noticed that using just one Apache server to serve all the content is not that efficient

Each Apache child (I assume you're using Apache mpm prefork consumes approximately (20MB), this means that each client connection would consume 20 mb of your server memory.
This as you can imagine is truly a suicide in terms of memory. Each request for a picture, css or simple html file would ask Apache to fork another process and will consume (20mb of extra memory form your server mem capacity)!.

Taking in consideration all this notes and the need for some efficiency here, the administrator should normally think about dividing the processing of the so called static content from the dynamic content served on the server.

Apache is really a nice webserver software but with all the loaded modules to serve dynamic content, for instance php, cgi, python etc., it's becoming not the best solution for handling a (css, javascript, html, flv, avi, mov etc. files).

Even a plain Apache server installation without (libphp, mod_rewrite mod deflate etc.) is still not dealing efficiently enough with the aforementioned static files content

Here comes the question if Apache is not that quick and efficient in serving static files, what then? The answer is caching webserver! By caching the regular static content files, your website visitors will benefit by experiencing shorter webserver responce files in downloading static contents and therefore will generally hasten your website and improve the end user's experience.

There are plenty of caching servers out there, some are a proprietary software and some are free software.

However the three most popular servers out there for static file content serving are:

  • Squid,
  • Varnish
  • Nginx

In this article as you should have already found out by the article title I'll discuss Nginx

You might ask why exactly Nginx and not some of the other twos, well simply cause Squid is too complicated to configure and on the other hand does provide lower performance than Nginx. On the other hand Varnish is also a good solution for static file webserver, but I believe it is not tested enough. However I should mention that my experience with testing varnish on my own home router is quite good by so far.

If you're further interested into varhisn cache I would suggest you checkout www.varhisn-cache.org .

Now as I have said a few words about squid and varhisn let's proceed to the essence of the article and say few words about nginx

Here is a quote describing nginx in a short and good manner directly extracted from nginx.com

nginx [engine x] is a HTTP and reverse proxy server, as well as a mail proxy server written by Igor Sysoev. It has been running for more than five years on many heavily loaded Russian sites including Rambler (RamblerMedia.com). According to Netcraft nginx served or proxied 4.70% busiest sites in April 2010. Here are some of success stories: FastMail.FM, WordPress.com.

By default nginx is available ready to be installed in Debian via apt-get, however sadly enough the version available for install is pretty much outdated as of time of writting the nginx debian version in lenny's deb package repositories is 0.6.32-3+lenny3

This version was release about 2 years ago and is currently completely outdated, therefore I found it is not a good idea to use this old and probably slower release of nginx and I jumped further to install my nginx from source:
Nginx source installation actually is very simple on Linux platforms.

1. As a first step in order to be able to succeed with the install from source make sure your system you have installed the packages:

debian:~# apt-get install libpcre3 libpcre3-dev libpcrecpp0 libssl-dev zlib1g-dev build-essential

2. Secondly download latest nginx source code tarball

Check out on http://nginx.com/download the latest stable release of nginx and further issue the commands below:

debian:~# cd /usr/local/src
debian:/usr/local/src# wget http://nginx.org/download/nginx-0.9.6.tar.gz

3.Unarchive nginx source code

debian:/usr/local/src#tar -zxvvf nginx-0.9.6.tar.gz
...

The nginx server requirements for me wasn't any special so I proceeded and used the nginx ./configure script which is found in nginx-0.9.6

4. Compline nginx server

debian:/usr/local/src# cd nginx-0.9.6
debian:/usr/local/src/nginx-0.9.6# ./configure && make && make install
+ Linux 2.6.26-2-amd64 x86_64
checking for C compiler ... found
+ using GNU C compiler
+ gcc version: 4.3.2 (Debian 4.3.2-1.1)
checking for gcc -pipe switch ... found
...
...

The last lines printed by the nginx configure script are actually the major interesting ones for administration purposes the default complation options in my case were:

Configuration summary
+ using system PCRE library
+ OpenSSL library is not used
+ md5: using system crypto library
+ sha1 library is not used
+ using system zlib library

nginx path prefix: "/usr/local/nginx"
nginx binary file: "/usr/local/nginx/sbin/nginx"
nginx configuration prefix: "/usr/local/nginx/conf"
nginx configuration file: "/usr/local/nginx/conf/nginx.conf"
nginx pid file: "/usr/local/nginx/logs/nginx.pid"
nginx error log file: "/usr/local/nginx/logs/error.log"
nginx http access log file: "/usr/local/nginx/logs/access.log"
nginx http client request body temporary files: "client_body_temp"
nginx http proxy temporary files: "proxy_temp"
nginx http fastcgi temporary files: "fastcgi_temp"
nginx http uwsgi temporary files: "uwsgi_temp"
nginx http scgi temporary files: "scgi_temp"

If you want to setup nginx server to support ssl (https) and for instance install nginx to a different server path you can use some ./configure configuration options, for instance:

./configure –sbin-path=/usr/local/sbin –with-http_ssl_module

Now before you can start the nginx server, you should also set up the nginx init script;

5. Download and set a ready to use script with cmd:

debian:~# cd /etc/init.d
debian:/etc/init.d# wget https://www.pc-freak.net/files/nginx-init-script
debian:/etc/init.d# mv nginx-init-script nginx
debian:/etc/init.d# chmod +x nginx

6. Configure Nginx

Nginx is a really easy and simple server, just like the Russians, Simple but good!
By the way it's interesting to mention nginx has been coded by a Russian, so it's robust and hard as a rock as all the other Russian creations 🙂
Nginx configuration files in a default install as the one in my case are to be found in /usr/local/nginx/conf

In the nginx/conf directory you're about to find the following list of files which concern nginx server configurations:

deiban:/usr/local/nginx:~# ls -1
fastcgi.conf
fastcgi.conf.default
fastcgi_params
fastcgi_params.default
koi-utf
koi-win
mime.types
mime.types.default
nginx.conf
nginx.conf.default
scgi_params
scgi_params.default
uwsgi_params
uwsgi_params.default
win-utf

The .default files are just a copy of the ones without the .default extension and contain the default respective file directives.

In my case I'm not using fastcgi to serve perl or php scripts via nginx so I don't need to configure the fastcgi.conf and fastcgi_params files, the scgi_params and uwsgi_params conf files are actually files which contain nginx configuration directives concerning the use of nginx to process SSI (Server Side Include) scripts and therefore I skip configuring the SSI conf files.
koi-utf and koi-win are two files which usually you don't need to configure and aims the nginx server to support the UTF-8 character encoding and the mime.types conf is a file which has a number of mime types the nginx server will know how to handle.

Therefore after all being said the only file which needs to configured is nginx.conf

7. Edit /usr/local/nginx/conf/nginx.conf

debian:/usr/local/nginx:# vim /usr/local/nginx/conf/nginx.conf

Therein you will find the following default configuration:

#gzip on;

server {
listen 80;
server_name localhost;

#charset koi8-r;

#access_log logs/host.access.log main;

location / {
root html;
index index.html index.htm;
}
#error_page 404 /404.html;

# redirect server error pages to the static page /50x.html
#
error_page 500 502 503 504 /50x.html;
location = /50x.html {
root html;
}

In the default configuration above you need to modify only the above block of code as follows:

server {
listen 80;
server_name yoursitedomain.com;

#charset koi8-r;

#access_log logs/access.log main;

location / {
root /var/www/yoursitedomain.com/html;
index index.html index.htm;
}

Change the yoursitedomain.com and /var/www/yoursitedomain.com/html with your directory and website destinations.

8. Start nginx server with nginx init script

debian:/usr/local/nginx:# /etc/init.d/nginx start
Starting nginx:

This should bring up the nginx server, if something is miss configured you will notice also some error messages, as you can see in my case in above init script output, thanksfully there are no error messages.
Note that you can also start nginx directly via invoking /usr/local/nginx/sbin/nginx binary

To check if the nginx server has properly started from the command line type:

debian:/usr/local/nginx:~# ps ax|grep -i nginx|grep -v grep
9424 ? Ss 0:00 nginx: master process /usr/local/nginx/sbin/nginx
9425 ? S 0:00 nginx: worker process

Another way to check if the web browser is ready to serve your website file conten,t you can directly access your website by pointing your browser to with http://yoursitedomain.com/, you should get your either your custom index.html file or the default nginx greeting Welcome to nginx

9. Add nginx server to start up during system boot up

debian:/usr/local/nginx:# /usr/sbin/update-rc.d -f nginx defaults

That's all now you have up and running nginx and your static file serving will require you much less system resources, than with Apache.
Hope this article was helpful to somebody, feedback on it is very welcome!

Windows batch read variable – equivalent of Linux read line command

Wednesday, March 12th, 2014

bat-file-icon-windows-read-variable
If you need to do some basic batch scripting sooner or later you will have to insert input from command line to a variable. In Linux this is done with read command, i.e.:
$ echo -n "Type a password for admin:";
$ read line;
$ echo $line;

So here is how to do the same if you need it for a Windows Batch (.BAT) file

C:\\Users\\> Set /p string='What do you want to ask?:'
'What do you want to ask?:'

This will define the string variable, to later print out the variable use:
> echo %string%
variable input output