Posts Tagged ‘plugin’

Solving “Cannot redeclare show_subscription_checkbox() (previously declared in .. wp-content/plugins/subscribe-to-comments/subscribe-to-comments.php”

Monday, March 21st, 2011

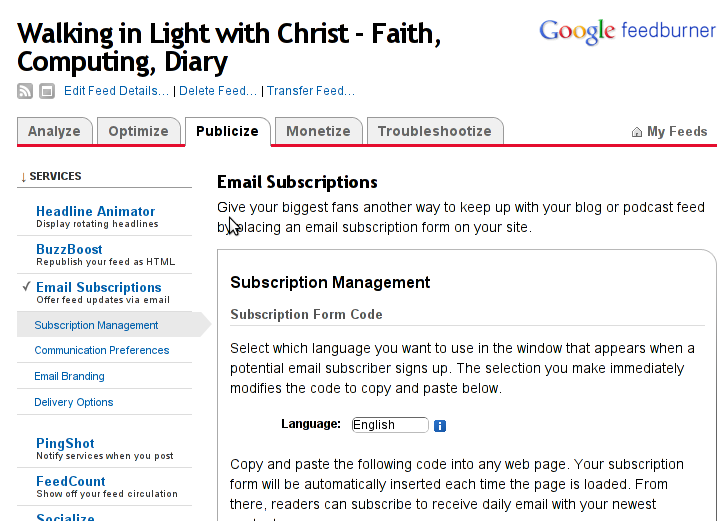
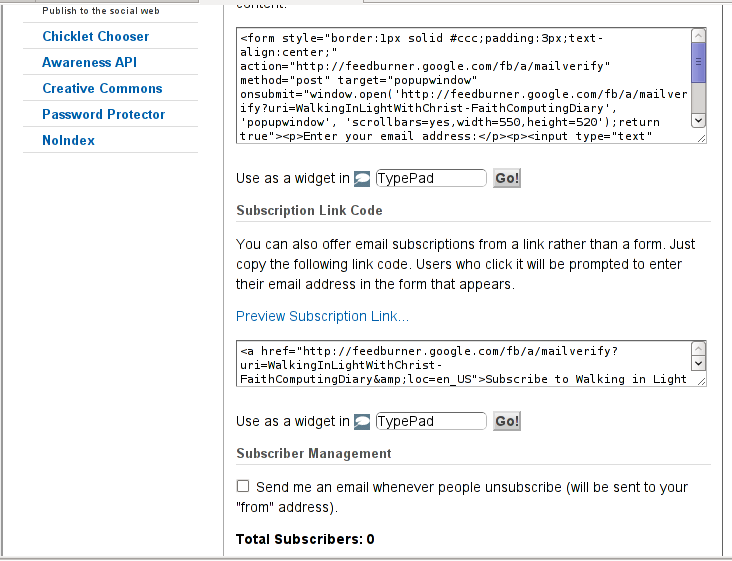
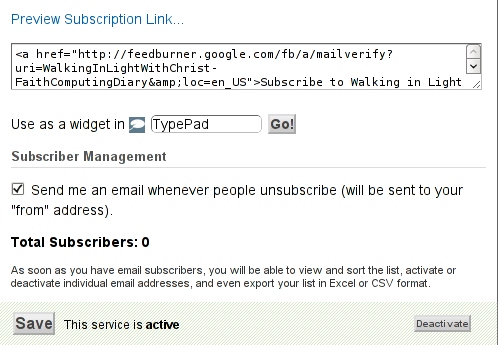
I’m trying to install subscribe-to-comments wordpress plugin in order to make my users to easily set a tick and receive new emails if somebody replies to their comments in my blog. Pitily downloading and trying to install the subscribe-to-comments wordpress plugin was failing after it’s activation with an error message:

PHP Fatal error: Cannot redeclare show_subscription_checkbox() (previously declared in /var/www/blog/wp-content/plugins/subscribe-to-comments/subscribe-to-comments.php:12) in /var/www/blog/wp-content/plugins/subscribe-to-comments.php on line 58"

I did my best to edit the subscribe-to-comments.php to fix up the fatal error but it was no go, so after a bunch of research I’ve found out somebody created a new version of the plugin under the name subscribe-to-comments-reloaded .

I’ve proceeded and gave a try to subscribe-to-comments-reloaded as a substitute to the old broken subscribe-to-comments .

Enabling the subscribe-to-commets-reloaded worked out of the box and the plugin now works perfectly fine and even better is enabling all the functionaity of the subscribe-to-comments
Cheers 🙂

How to add extra plugins, effects, brushes and functionality to GIMP on GNU / Linux

Tuesday, February 28th, 2012

How to add extra plugins, effects brushes and functionality to GIMP on Debian and Ubuntu Linux / GIMP logo head pictureThese days, I'm playing with The GIMP. I've been a GNU / Linux, FreeBSD user for already 11 years now but as I'm doing mostly system administration and I don't have much expertise in Panting or Computer Graphical Design, I've never put much time to learn more in the interesting area of graphical design. Hence until just recently, Just until now, I've never spend time with the GIMP (GNU Image Manipulation Program) and never realized how powerful this great program is. The more I learn about GIMP functionalities and how it works the more it makes me determined to learn some basic web design 🙂

The functionality which The GIMP offers in a basic install is quite rich, however by default on most Debian and Ubuntu installations many of the great plugins which easifies the way to edit pictures is missing.

Example for a very valuable functionality which is not present with standard gimp package installed on Debian and Ubuntu are:
 

Here I will mention here few words on:

  • GIMP FX-Foundry Collection

GIMP FX-Foundry is a thoroughful collection of GIMP scripts (addon plugins), that automates many of the operations which requires a professional web design skills and gives an easy intuitive interface through which very robust "high level" graphic design can be accomplished. This additional GIMP extensions helps to create very unique design in just few simple steps, as well as gives multiple tools for the sake of easy pro design creation. For anyone looking for quick edit of images with GIMP FX-Foundry is a must have GIMP plugins extension. The script pack is located on http://gimpfx-foundry.sourceforge.net/

To install FX-Foundry scripts collection on Debian / Ubuntu / Linux Mint and other based Linux distributions:

debian:~# apt-get install --yes gimp-plugin-registry
...

gimp-plugin-registry package name is based on GIMP Plugin registry's website
. Gimp plugin registry contains many helpful design goodies 🙂

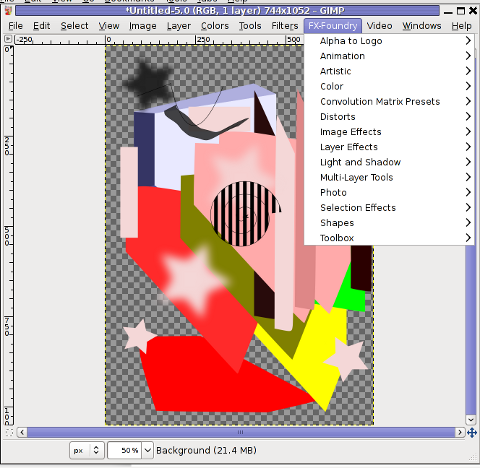
Once installed you will notice GIMP with a new menu on the main menus bar reading FX-Foundry :

GIMP Screenshot GNU Linux Debian additional FX Foundry menu

GIMP FX Foundry extensionos package contains 124 scripts for additional graphics manipulation. The collection contains less scripts than the ones provided by gimp-plugin-registry. package has 156 scripts inside.

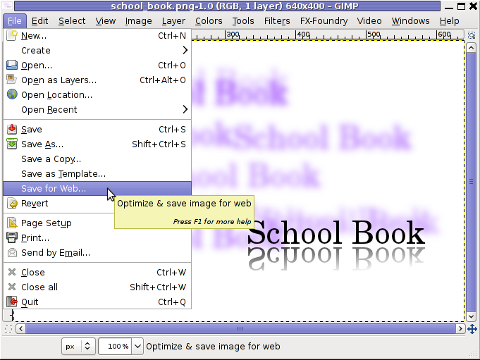
One of the most helpful GIMP addition from the package is the inclusion of Save for Web button under:

File -> Save for Web

GIMP Save for Web menu suitable for reduced size images for HTML image producing on Debian GNU / Linux screenshot

Another very helpful .deb package which adds up to GIMP's design possibilities is gimp-data-extras .

gimp-data-extras adds 111 new GIMP Fill in Patterns , which can be used through the Blend Tool to Fill selected areas with color gradients.

To install gimp-data-extras on Debian:

debian:~# apt-get install --yes gimp-data-extras
...

Generally once installed this package will add to GIMP – an extra set of brushes, palettes, and gradients for The GIMP as you can read in the package description.

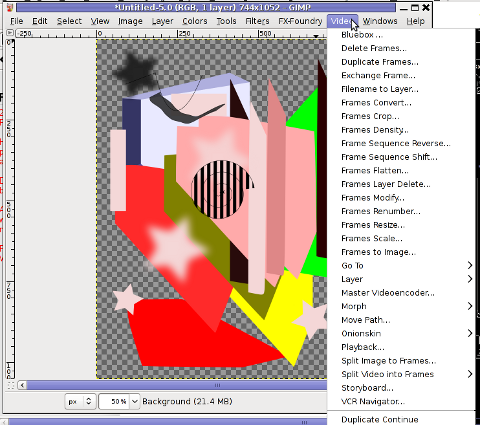
I was also quite stunned to find out the good old GIMP is capable of basic Video editting!!

On Debian and Ubuntu there is a package called gimp-gap which once installed adds an extra Video menu.

GIMP Screenshot GNU Debian linux adding GIMP extra Video editting capabilities

I've not tested the GIMP video editting capabilities yet, however I intend to learn something about it immediately when I have some free time left. You see the enormous list of Video editting possibilities GIMP obtaines with gimp-gap which btw stands for (The GIMP Animation Package).

To install gimp-gap:

debian:~# apt-get install --yes gimp-gap

I've noticed also the following list of others useful GIMP additions (mainly helpful in Web, Brochure and Logo Graphic Design) to install them:

debian:~# apt-get --yes install gimp-gmic gimp-ufraw gtkam-gimp gimp-gluas \gimp-dimage-color gimp-dds gimp-dcraw gimp-cbmplugs flegita-gimp gimp-texturize \gimp-resynthesizer gimp-lensfun gimp-gutenprint gtkam-gimp mrwtoppm-gimp

Here is the package description of the packages above command will install:

  • gimp-cbmplugs – plugins for The GIMP to import/export Commodore 64 files
  • gimp-data-extras – An extra set of brushes, palettes, and gradients for The GIMP
  • gimp-dcraw – GIMP plug-in for loading RAW digital photos
  • gimp-dds – DDS (DirectDraw Surface) plugin for the gimp
  • gimp-dimage-color – GIMP plugin to convert Minolta DiMAGE pictures to sRGB colour space
  • gimp-gap – The GIMP Animation Package
  • gimp-gluas – Lua environment plug-in for GIMP
  • gimp-gmic – GIMP plugin for GREYC's Magic Image Converter
  • gimp-gutenprint – print plugin for the GIMP
  • gimp-lensfun – Gimp plugin to correct lens distortion using the lensfun library
  • gimp-normalmap – Normal map plugin for GIMP
  • gimp-plugin-registry – repository of optional extensions for GIMP
  • gimp-resynthesizer – Gimp plugin for texture synthesis
  • gimp-texturize – generates large textures from a small sample
  • gimp-ufraw – gimp importer for raw camera images
  • flegita-gimp – Gnome Gimp scan plugin.
  • gtkam-gimp – gtkam gimp plugin to open digital camera pictures
  • mrwtoppm-gimp – GIMP-plugin to support Minolta DiMAGE 5/7/7i RAW images

Now after installing all this plugins and seeing all GIMP's power, I'm starting to wonder why are still people ranting Adobe PhotoShop is feature rich.
That's all, enjoy the great new GIMP features. Happy picture editting 😉

How to add multi-lingual (multi language) support in Joomla 1.5

Friday, June 3rd, 2011

Joomfish MultiLanguage Support enable plugin

If you are facing the task to build a multi-language enabled Joomla website like me then I think my experience on building a multi-language website with Joomla CMS might be beneficial to you.

In order to build a multi-language website in Joomla you will have to use Joom!Fish multilanguage Joomla support plugin.

The plugin is a bit buggy, but in overall it will allow you to build a multi language website and consequently add the page different languate translations.

To install the plugin on your 1.5 Joomla based install;

1. Download the JoomFish plugin

Install it the usual joomla way joomla plugins are installed, via;

Extensions -> Install/Uninstall

2. Enable the Joom!Fish plugin

To do so navigate to;

Extensions -> Module Manager

Enable the module by ticking under the Enabled column on the line where you read Language Selection

3. Install Language packs for all languages which should be supported by JoomFish

Now as the JoomFish Language selection module is enabled, one needs to install the necessery Joomla Language Packs for all the languages which the Joomla based website is planned to support.

In my case I neede a three lingual website, which will support only the Languages:
 

  • Bulgarian
  • Russian
  • and

  • English

Thus I went on Joomla! Extensions Directory – extensions.joomla.org and downloaded the the three language packs I needed (English, Russian and Bulgarian).

Again the Installation of the language packs is trivial and is done through the Joomla’s:

Extensions -> Install/Uninstall

After installation to find out all the languages your Joomla installation will support you can navigate inside Joomla admin to:

Extensions -> Install/Uninstall -> Languages
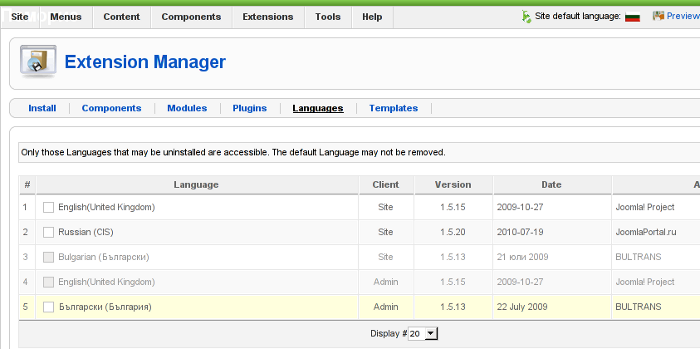
Screenshot of my installed list of Joomla Language packs Screenshot of my installed list of Joomla Language Packs (Multi-Language setup)

Another way to check the list of enabled installed languages supported in your Joomla is via the menu:

Site -> Control Panel -> Language Manager

Something important here is to a default language is set in the Language Manager

4. Create translations from default installed language to the rest of the installed ones

Go to the JoomFish component through the menus:

Components -> Joom!Fish -> Control Panel

If all your language packs are correctly installed and enabled so far you should notice them listed while clicking on Content Languages

If all the Joomla Languages which your website is supposed to support are not there, this means something is generally wrong with installed lanaguage packs and you need to go back few steps and check what might be wrong, hopefully that’s not the case 😉

To immediately start translating your Joomla website to another from one language to another one, use the control menus:

Components -> Joom!Fish -> Translation

Here is screenshot on how this menu would look like:
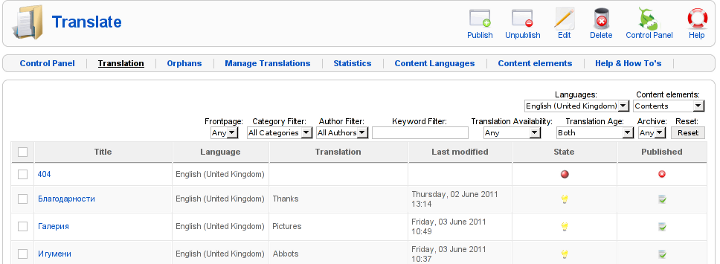
Joomla JoomFish Plugin Translate Menu Screenshot

Notice in the above screenshot the Languages: and Content Elements dropdown menus, this ones are actually the two menus used for all language translations.

One needs to select under Languages: menu the Language to which will be translated to, while in Content Elements: has to be choseen the exact site elements which are about to be translated.

The Content Elements: necessery to be translated in most of the cases would be just Menus and Contents

Translating that will have your website user frontend be completely translated info the foreign language choosen in the Languages: dialog.

After finalizing the translations of all Articles available in Menus and Contents make sure the translation is Published, by selecting the Published tick, below I show you an example language translation edit of an article, on the left side you see the Published tick which need to be enabled, for translation to appear officially in Joomla.
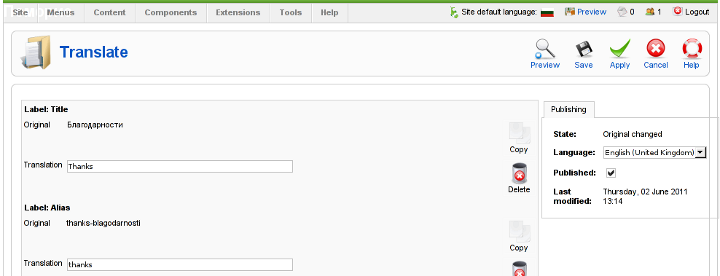
Joomla Joomfish published tick enabled screenshot

After completing all the translations of elements offered by the translation window, save the translation by pressing the Apply buttonFurther on you can check the website in a new tab, if everything is okay with translations, on the down left corner of the website footer you should notice the flags of enabled languages to appear.
Clicking on each of the languages should show you the website in the language choosen (if you have previously done the translation to the respective menus).

5. Solving a minor bug in JoomlaFish which prevents translated language text to display on webpages

During translation of my website from Bulgarian to English, I have noticed a bug of JoomFish, even though I did the translation of all my Menus and website Content elements and saved the translations, refreshing the website in a new tab and choosing the desired translation was constantly displaying the error message:

“There are no translations available”

I was not able to find a good explanation on the Internet on why exactly and how this bug occurs, but by some experiments I come up with a workaround.

If you get the “There are no translations available” after properly configuring Joom!Fish Multilang support, in order to solve the error you will have to select temporary a different default website language from the one currently specified by your website.

(E.g.) go to jooma admin panel location:

Site -> Control Panel -> Language Manager

and trigger the default language configured to some of the other available ones. After reverting back in a couple of seconds this setting to your desired default language the annoying: “There are no translations available” message will disappear and your translated content will appear on the website.

6. Changing the location of language flags (language links) in Joomla’s JoomFish

I have seen plenty of people online looking for a solution on how they can change the default image flags location, which by default is placed a place which is not that intuitive and visible by the user.

Maybe I did not searched enough but from my quick research it appears there is no information available on how the placement of language flags switching menu can be changed.

Even though I couldn’t find a solution to change the langage flags in JoomFish , after a bunch of experiments I find a way to do it! 🙂

The placement of Language selector buttons can be easily adjusted through following the Joomla Admin menu:

Extensions -> Module Mamager -> Language Selection

After opening the Language Selection , you will notice the Position: dropdown menu setting. The setting has a bunch of optionsand allows you to choose the best preferred placement of the language selector flag buttons, just take few minutes to experiment which settingfits you best and choose the one most suitable to you and you’re done! 😉

Honestly I never imagined that building a multi-lingual website with Joomla will be such a piece of cake.

The only drawback with JoomFish, is the way language translation is implemented as it is not enough user friendly, anyways having the option to build multi language website for free using open source CMS solution is great. Ain’t it? 🙂
How to fix php “Fatal error: Class ‘SimpleXMLElement’ not found” and “Fatal error: Class ‘JLoader’ not found” on FreeBSD

Tuesday, June 21st, 2011

One of the contact forms running on a FreeBSD server configured to work on top of Apache+MySQL suddenly stopped working.

The errors that appeared on the webpage during a page request to the form url was:

Fatal error: Class 'SimpleXMLElement' not found in /var/www/joomla/plugins/system/plugin_googlemap2_helper.php on line 2176 Fatal error: Class 'JLoader' not found in /var/www/joomla/plugins/libraries/loader.php on line 161

As you see in the output the website which was causing the issues was running a Joomla version 1.5.23 Stable configured with RSForm!ver 1.5.x (as a contact form solution) and Google Maps version 2.13b plugins.

The Google Map from Google Maps plugin and the RSform were configured to appear on one physical configured article in Joomla and seemed to work just until now. However yesterday suddenly the error messages:
Fatal error: Class ‘SimpleXMLElement’ not found
Fatal error: Class ‘JLoader’ not found

came out of nothing, it’s really strange as I don’t remember doing any changes to either Joomla or the PHP installation on this server.
There is one more guy who has access to the Joomla installation which I suspect might have changed something in the Joomla, but this scenario is not very likely.

Anyways as the problem was there I had to fix it up. Obviously as the error message Fatal error: Class ‘SimpleXMLElement’ not found reported the server php simplexml was missing!

Just to assure myself the php simplexml extension is not present on the server I used the classical method of setting up a php file with phpinfo(); in it to check all the installed php extensions on the server.

Finally to solve the issue I had to install the module from ports php5-simplexml , e.g.:

freebsd# cd /usr/ports/textproc/php5-simplexml
freebsd# make install clean

Afterwards to make the new settings take place I did restart of my Apache server:

freebsd# /usr/local/etc/rc.d/apache2 restart
Syntax OK
Stopping apache2.
Waiting for PIDS: 63883.
Performing sanity check on apache2 configuration:
Syntax OK
Starting apache2.

Now my Joomla contact form is back to normal 😉

If someone has any idea why this error occured without any php or server modifications, and how comes that all worked fine beforehand even though I did not have the simplexml module instlaled on the server o_O, I would be enormously greatful.

How to change default Comments and No Comments location in WordPress in wordpress default theme

Tuesday, April 5th, 2011

For a number of time I’ve been planning to change my blog comments placement. Until this very day however I’ve kept the default wordpress theme’s Comments button placement.

I realize the default Comments button placement is a bit hard to see and not that much intuitive for the user that enters my blog for a first time.

My first guess was that there might be somewhere a wordpress plugin which will allow me to adjust my comments button placement.
After some research online and a realization that probably there is no such plugin existing yet. I’ve forced myself to tune it up myself.

It was clear to me that in order to change the it will be necessery to edit the WordPress templates files. I’m not a designer and when I hear about templates I usually get scared, however I took the time to take a look at the default wordpress template and find out actually that template modifications is actually rather easier than I thought.

My previous idea was that in order to edit templates you have to be some kind of CSS and HTML guru (which I’m not). Nevertheless it seems that in order to play and adjust in a good way the templates you don’t need ot be a pro.
Even an uneducated fool like myself can easily do almost everything he thinks of throughout few lines of code in the wp templates.

To get back to the major topic thanks God after a bit of review and reading of wordpress.org documentation and some user forums. I’ve figured out that in order to change my Comments placement you need to modify the file:
 

  • blog/wp-content/themes/default/index.php

In index.php find the line starting with:

You will notice within this opened paragraph the php code:

<?php the_tags('Tags: ', ', ', '
'); ?> Posted in <?php the_category(', ') ?>
| <?php edit_post_link('Edit', '', ' | '); ?>
<?php comments_popup_link('No Comments »', '1 Comment »', '% Comments »'); ?>

This is the actual default theme php code that makes the wordpress Comments or No Comments that maes the comments appear on the blog.

Now I’ve decided to let this be as it is but add one more Comment button to wordpress on a different location that is more appealing to my blog visitors

After quick evaluation I’ve determined that probably the best location that the Comments button should have is right after the end of the post text

If you think my idea for button placement is appropriate, to set this location for the Comments button, you will have to find the follwoing code in index.php:

<div class="entry">
<?php the_content('Read the rest of this entry »'); ?>
</div>

Right after the end of this code place the following code:

<?php comments_popup_link('No Comments »', '1 Comment »', '% Comments »'); ?>
</div>

How to add manually adsense code to your wordpress blog in blog index and single page posts

Thursday, April 7th, 2011

I’ve recently realized that the Easy Adsenser plugin which I used to place google adsense advertisements on my blog, is probably stealing some portion of my clicks.

There were some fraud reports on wordpress.org by people who have found out the author of Easy Adsenser rips clicks, by showing sometimes his own ad code even if the plugin is configured to not grant any clicks as a donation to the plugin author.
I don’t know how true this story is and I don’t have the time to observe the whole plugin code to say for sure if the rumors about clicks stealing are true.

However as I’m paying my internet access (that guarantees) by blog to stay online with some adsense advertisements and the adsense revenues are either equal to my internet tax or a bit higher (depending on the month), it’s quite unpleasent to hear someone is stealing from the ads clicks which still generate very low revenue.

Thus I took the time to read some blog posts online which gave me some hints on how can I directly place the google adsense advertisement code into the theme template files

My goal was to place one google adsense ad to appear right after the title of each article and one to appear as a vertical bar in the end of my sidebar.

In this article in short I’ll explain how I achieved this banner placement via the default wordpress template which obviously I use on my blog.

Let’s start:

1. Add adsense to the index page of the blog

Edit your blog/wp-content/themes/default/index.php file

Therein find the code:

<div id="content" class="narrowcolumn" role="main">

and right after this line put the following php code:

<?php
$postnum = 1;
$showadsense1 = 1;
?>

This code is necessery to assure the adsense code only appears on the first blog post from the blog index page

2. Find the code:

<small><?php the_time('F jS, Y') ?> <!-- by

Immediately after the code place the php code:

<?php if ($postnum == $showadsense1) {
echo '<div class="adsense" style="float:right;margin:12px;">;paste here your adsense code ...</div>';
} ?>

<?php $postnum++; ?>

Now with this changes, 1 adsense advertisements should start appearing right after your first and only on your blog post, next step is to place manually one more vertical adsense banner.

2. Place adsense vertical bannre in wordpress blog sidebar

Login with admin user to wordpress and navigate to:

Appearance -> Widgets

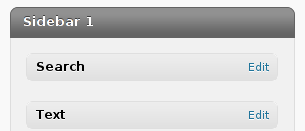
Among the available widgets you will notice the widget called Text click over: Add to add this widget to the list of widgets to appear on your blog sidebar.

Afterwards look up over the Sidebar list of widgets find the newly added Text widget and click over Edit to modify it’s content.

Further on put a Title for the widget or choose to leave the title field as blank if you don’t want a name to appear.
On the next textbox just paste your adsense code and you’re done. A simple refresh of your wordpress blog index page should show you a vertical banner with your adsense code.
! Note that if you have recently issued the adsense code it will take about 10-20 minutes until the banner starts showing up.

Until now wordpress is configured to show adsense adverts on the blog main page, as a next step we need to place the same adsense adverts to appear whether a single blog post is reviewed (opened).

Place an adsense advertisements to single posts opened

For that purpose it’s necessery to edit the file single.php it’s again located in blog/wp-content/themes/default

Once again you will first need to find the code:

if (have_posts())

Put the code after the end of the line on a new line:

<?php
// below code is for adsense
$postnum = 1;
$showadsense1 = 1;
?>

Next lookup in the file for the code:

<h2><?php the_title(); ?></h2>

On a new line after it place:

<?php if ($postnum == $showadsense1) { echo '<div class="adsense" style="float:right;margin:12px;"><script type="text/javascript"> place here your adsense code </div>';
} ?>

<?php $postnum++; ?>

That’s all now the adsense advertisements will be also showing on the single blog posts reviews found via some search engine (google, yahoo etc.).

Hope this article will be helpful to somebody, if so drop me a thanks line in comments 😉