Posts Tagged ‘software’

Web and Middleware JBoss Training at Hewlett Packard – Intro to JBoss JAVA application server

Thursday, November 21st, 2013

jboss application server logo- serve java servlet pages on Linux and Windows

I and my TEAM Web and Middleware Implementation Team @Hewlett Packard are assigned an online training to follow on topic of JBoss Application server.It is my first online training of this kind where a number of people are streamed a video from a trainer who explains in real time concepts of JBossA Community Drive open source middleware (Application Server), since some time JBoss is known under a new name (WildFly).

Wildfly new name of jboss application java servlet server

In short what is JBoss? – It is an application server similar to Apache Tomcat  -an open source software implementation of the Java Servlet and JavaServer Pages technologies.

Apache Tomcat java servlet application server logo

In case you wonder about what is Middleware it is a buzzword well established in Corporate world referring to all kind of servers in the middle between Servers on pure OS and hardware Level and end client. Middleware includes all kind of Web and Application servers like Apache, JBoss, Tomcat, Adobe's WebLogic Webserver, IBM WebSphere application server etc..

What this means is JBOSS is very similar to Tomcat but it is designed to run interpret through (Java Virtual Machine), higher scale of Java Applications and then return content to a a web browser. In other words if you need to have a Webserver with support for Java VM. JBoss is one of the open source technologies available which can be a substitute for Tomcat. In Fact Jboss itself started as a fork of Tomcat and n owadays, Jboss has an implementation of Tomcat embedded into itself. Jboss is mainly developed and supported by Redhat. It has 3 major releases used in IT Companies. Jboss 5, JBoss 6 and JBoss 7. In most production server systems running some kind of Java servlets currently still Jboss ver. 5 and Jboss v. 6 is used. Just like Tomcat, the server is messy in its structure. But if we have to compare Tomcat with Jboss then JBoss is at least 100 times more messy and hard to configure tune than Tomcat. Actually after getting to know JBoss 6 I would not advice anyone to use this Application server. Its too complex and all configuration and performance tuning is done through hundred of XML so it is like a hell for the usual System Administrator who likes clearness and simplicity. JBoss has a Web configuration interface which in version 7 is a bit advanced and easier to configure and get to know the server compared to previous versions. But same web interface for older releases is lousy and not nice. Just like Tomcat, JBoss supports clustering, here is full list of all features it supports:

  • Full clustering support for both traditional J2EE applications and EJB 3.0 POJO applications
  • Automatic discovery. Nodes in cluster find each other with no additional configuration.
  • Cluster-wide replicated JNDI context
  • Failover and load-balancing for JNDI, RMI and all EJB types
  • Stateful Session Bean state replication
  • HTTP Session replication
  • High Availability JMS
  • Farming. Distributed deployment of JBoss components. Deploying on one node deploys on all nodes.
     

Looks like JBoss is among the few Application Servers supporting deployment of Java JSP, WAR Archive files, SAR Archives, JMS (Java Message Service), JNDI (Java Naming and Directory Interface). Jboss supports load balancing between clustered nodes, supports SOAP, Java servlet faces and Java MQ (Messaging Queue). JBoss can be installed on GNU / Linux, FreeBSD and Windows. So far from what I've learned for JBOSS I prefer not to use it and don't recommend this Application server to anyone. Its too complex and doesn't worth the effort to learn. Proprietary products like WebLogic and Webspehere are in light years better.

Is Free software communistic in essence. My 5 cents rant on Free Software’s ideology

Wednesday, October 9th, 2013

linux-because-microsoft-is-for-capitalists-running-dos

I've seen people online blaming Stallman and Free Software Movement for being communistic. I've thought over it for a while so decided to give my 5 cents rant on that. Obviously there is still people in America who doesn't make difference between capitalism, communism and socialism. Yes it is true, GNU / Linux and Free Software are socialistic in essence and obviously Stallman's ideas are close to Socialists ideas, but for sure in his essence its not against capitalism and even less against democracy. So why there are still people recognizing free software as communistic? I think it is due to their mis-understanding that Free Software doesn't stand for making people equal but it is for giving chance to everyone who has interest to learn and doesn't have the financial possibility to do it. By its existince free software gives the poor Afrika's population legal way to install and use software free of charge. The idea of free software is purely scientific, there are plenty of researchers who denied patenting their invention because they wanted to share their findings with the world like Willhelm Roentgen's finding of X-rays. FS is for giving to society it is for software for people who should not be necessary divided by social status or bank account. Free Software puts out bariers since its fosters a spirit of community so much lost in our very divided century, it makes people involved in FS opened to itself and being friends no matter of social status. It is to make people free to choose and do whatever they like with each software it is about transperancy and equal start to programmers and computer enthusiasts. I'll be curious to hear people's opinion?

FastStone nice alternative picture freeware viewer software to Windows Photo Viewer

Tuesday, October 22nd, 2013

Faststone Windows 7 Vista Win 8 free good picture iewer program logo
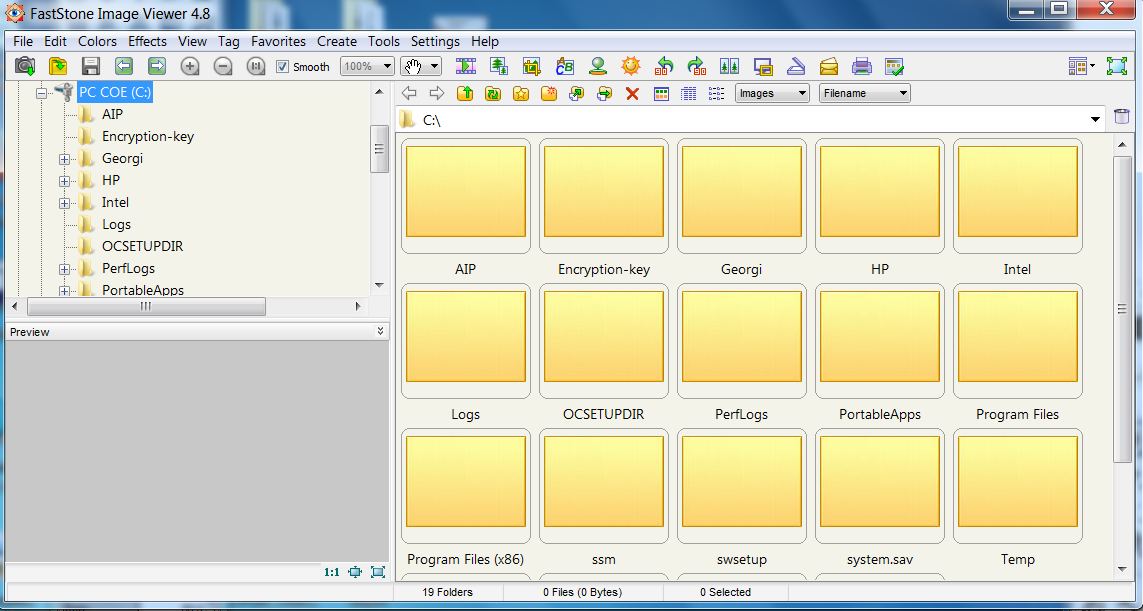
I'm forced to use Windows in my work place in HP and occasionally have to open pictures. Default Windows viewer Windows Photo Viewer is very limited in what it can do. It can't even Rotate a picture so I find it a good idea to find a good alternative. Historically I liked to use IrfanView Freeware but I saw a colleague to use FastStone Image Viewer and I decided to give it a try. It looks more function rich than IrfanView so I install it and intend to use it as primary picture viewer on HP work Elitebook 8470p with Windows 7

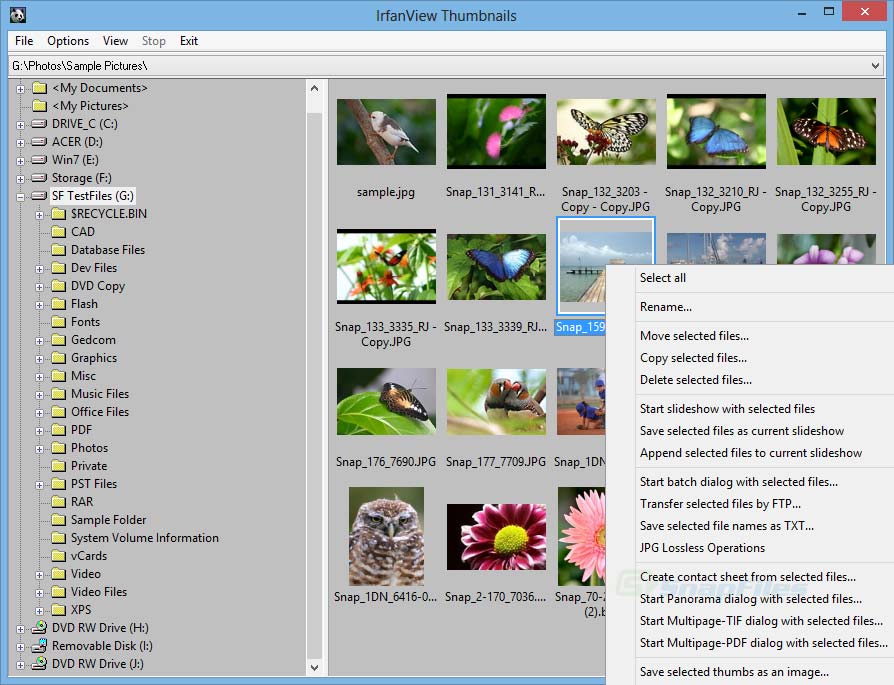
Irfanview windows 8 picture viewer alternative to default Microsoft Picture Viewer screenshot

I strongly recommend the program to anyone looking for a good alternative to 'woody' Windows Image Viewer and who for some reason wants alternative to Irfanview.

FastStone has all the basic features I need like Crop image, Rotate Image etc. by using it I don't have to run GIMP for simple image manipulations. Another good reason to use FastStone is many of well known shortcut keys are similar to Proprietary (Non-Free) ACDSee which I used to heavily used in old days when I was still using Windows 98 so it feels using it quite confortable. Other thing is FastStone manages quite well non-standard RAW formats from various Cameras.

FastStone image pictureviewer windows good windows Image Viewer alternative to Windows default image viewer program and IrfanView
 
FastStone has even a bunch of standard Effects to apply to a picture, play with Shadows Lightning and most of basic professional File manipulation embedded. Hope someone will benefit out of the post and will start using it.

Enjoy

Downloading your favourity flash video from Youtube with a simple command (youtube-dl)

Wednesday, April 13th, 2011

downloading-flash-videos-from-youtube-on-linux-and-bsd-youtube-downloader-logo
Watching videos in youtube today and already for about 2 years is the de-facto hype.
There is almost none a day passed without almost each one of us has watched a dozen videos in Youtube.

Watching videos in youtube has become even more addictive for many than the early days of Internet Relay Chats (IRC)

As youtube is very accessible for people and it’s a comparativily easy way people share more and more with the day.
There is no question that the business idea of youtube is great and youtube generates millions of dollars for Google day by day, however I have a serious objection here! All is good the only pitfall is that you don’t own the youtube videos you watch!

Youtube’s story is not that different from the story of the cloud computing threat to internet users Freedom

The good thing here is that we’re not still completely dependant on youtube and there is still way to retrieve your favourite youtube video and store it for later watching or distribution.

Probably the most famous browser plugin that allows files retrieval from youtube, as most people know is DownloadHelper .

However using download helper is browser dependant, you need to use the browser to save the plugin and I don’t find it to be the best way to download a youtube video.

Since the old days I have started using Linux, I’ve been quite addicted to as many things on my linux as possible from the command line (terminal / console) (CLI) .

In that manner of thoughts it was a real delight for me to find out that a group of free software developer guys has come up with a command line tool that allows downloads of youtube videos straight from terminal, the great software is called youtube-dl and at the moment of this post writting it’s to be found on the URL address:

http://rg3.github.com/youtube-dl/

Youtube-dl is written in python so, it requires the Python interpreter, version 2.5 in order to properly run on Unix, Mac OS X or even on Windows!

The fact that it’s written in python has made the little shiny tool quite a multi-platform one.
To start using immediately the tool on a Debian or Ubuntu Linux you will have to install python (even though in most cases you must have it already installed):

1. To make sure you have python interpreter installed issue the cmd:

debian:~# apt-get install python
Building dependency tree
Reading state information... Done
python is already the newest version.
0 upgraded, 0 newly installed, 0 to remove and 0 not upgraded.

As you can see from above apt-get’s output I do have it installed so nothing gets installed.

2. As a next step I used links to download the youtube-dl python script, like so:

debian:~# links https://github.com/rg3/youtube-dl/raw/2011.03.29/youtube-dl >> youtube-dl
Use the links interface to save youtube-dl and use gzip to ungzip it
debian:~# gzip -d youtube-dl.gz
debian:~# chmod +x youtube-dl

Now to make it system wide accessible I have copied the youtube-dl to /usr/local/bin , whether I selected /usr/local/bin as a location as this location is predetermined to contain mostly files which does not belong to a regular deb package.

3. Move youtube-dl to /usr/local/bin

debian:~# mv youtube-dl /usr/local/bin

4. Test the newly installed youtube-dl command line youtube retrieval tool:

debian:~# ./youtube-dl https://www.youtube.com/watch?v=g7tvI6JCXD0
[youtube] Setting language
[youtube] g7tvI6JCXD0: Downloading video webpage
[youtube] g7tvI6JCXD0: Downloading video info webpage
[youtube] g7tvI6JCXD0: Extracting video information
[download] Destination: g7tvI6JCXD0.flv
[download] 53.3% of 22.62M at 33.23k/s ETA 05:25
[download] 100.0% of 22.62M at 31.91k/s ETA 00:00 [u

As you might have noticed from the above youtube-dl command output the newly retrieved youtube file will be saved under a name g7tvI6JCXD0.flv

The line I passed to youtube-dl is directly taken from my browser and pasted to console, the file downloading from youtube took me about 10 minutes but this is mostly because of some kind of youtube server speed restrictions …

In general at least I have this video for later, watching, so after a while I can watch it once again without loosing a lot of time trying to remember what was the video headline name

5. To use youtube-dl in a bit advanced way you can for instance invoke the command with options like:

debian:~# ./youtube-dl -l -w -c https://www.youtube.com/watch?v=g7tvI6JCXD0
[youtube] Setting language
[youtube] g7tvI6JCXD0: Downloading video webpage
[youtube] g7tvI6JCXD0: Downloading video info webpage
[youtube] g7tvI6JCXD0: Extracting video information
[download] Destination: BSD is Dying, Jason Dixon, NYCBSDCon 2007-g7tvI6JCXD0.flv
[download] 4.4% of 22.62M at 1.43M/s ETA 00:15

As you can see now youtube-dl was even able to detect the downloaded video file name and store it on the computer with a correct name 😉

I would recommend you also to check out the youtube-dl help page, to do use command: youtube-dl –help
 

Tracking I/O hard disk server bottlenecks with iostat on GNU / Linux and FreeBSD

Tuesday, March 27th, 2012

Hard disk overhead tracking on Linux and FreeBSD with iostat

I've earlier wrote an article How to find which processes are causing hard disk i/o overhead on Linux there I explained very rawly few tools which can be used to benchmark hard disk read / write operations. My prior article accent was on iotop and dstat and it just mentioned of iostat. Therefore I've wrote this short article in attempt to explain a bit more thoroughfully on how iostat can be used to track problems with excessive server I/O read/writes.

Here is the command man page description;
iostatReport Central Processing Unit (CPU) statistics and input/output statistics for devices, partitions and network filesystems

I will further proceed with few words on how iostat can be installed on various Linux distros, then point at few most common scenarious of use and a short explanation on the meaning of each of the command outputs.

1. Installing iostat on Linux

iostat is a swiss army knife of finding a server hard disk bottlenecks. Though it is a must have tool in the admin outfut, most of Linux distributions will not have iostat installed by default.
To have it on your server, you will need to install sysstat package:

a) On Debian / Ubuntu and other Debian GNU / Linux derivatives to install sysstat:

debian:~# apt-get --yes install sysstat

b) On Fedora, CentOS, RHEL etc. install is with yum:

[root@centos ~]# yum -y install sysstat

c) On Slackware Linux sysstat package which contains iostat is installed by default. 

d) In FreeBSD, there is no need for installation of any external package as iostat is part of the BSD world (bundle commands).
I should mention bsd iostat and Linux's iostat commands are not the same and hence there use to track down hard disk bottlenecks differs a bit, however the general logic of use is very similar as with most tools in BSD and Linux.

2. Checking a server hard disk for i/o disk bottlenecks on G* / Linux

Once having the sysstat installed on G* / Linux systems, the iostat command will be added in /usr/bin/iostat
a) To check what is the hard disk read writes per second (in megabytes) use:

debian:~# /usr/bin/iostat -m
Linux 2.6.32-5-amd64 (debian) 03/27/2012 _x86_64_ (8 CPU)
avg-cpu: %user %nice %system %iowait %steal %idle
15.34 0.36 2.76 2.66 0.00 78.88
Device: tps MB_read/s MB_wrtn/s MB_read MB_wrtn
sda 63.89 0.48 8.20 6730223 115541235
sdb 64.12 0.44 8.23 6244683 116039483
md0 2118.70 0.22 8.19 3041643 115528074

In the above output the server, where I issue the command is using sda and sdb configured in software RAID 1 array visible in the output as (md0)

The output of iostat should already be easily to read, for anyone who didn't used the tool here is a few lines explanation of the columns:

The %user 15.34 meaning is that 15.34 out of 100% possible i/o load is generad by system level read/write operations.
%nice – >Show the percentage of CPU utilization that occurred while executing at the user level with nice priority.
%iowait – just like the top command idle it shows the idle time when the system didn't have an outstanding disk I/O requests.
%steal – show percentage in time spent in time wait of CPU or virtual CPUs to service another virtual processor (high numbers of disk is sure sign for i/o problem).
%idle – almost the same as meaning to %iowait
tps – HDD transactions per second
MB_read/s (column) – shows the actual Disk reads in Mbytes at the time of issuing iostat
MB_wrtn/s – displays the writes p/s at the time of iostat invocation
MB_read – shows the hard disk read operations in megabytes, since the server boot 'till moment of invocation of iostat
MB_wrtn – gives the number of Megabytes written on HDD since the last server boot filesystem mount

The reason why the Read / Write values for sda and sdb are similar in this example output is because my disks are configured in software RAID1 (mirror)

The above iostat output reveals in my specific case the server is experiencing mostly Disk writes (observable in the high MB_wrtn/s 8.19 md0 in the above sample output).

It also reveals, the I/O reads experienced on that server hard disk are mostly generated as a system (user level load) – see (%user 15.34 and md0 2118.70).

For all those not familiar with system also called user / level load, this is all kind of load which is generated by running programs on the server – (any kind of load not generated by the Linux kernel or loaded kernel modules).

b) To periodically keep an eye on HDD i/o operations with iostat, there are two ways:

– Use watch in conjunction with iostat;

[root@centos ~]# watch "/usr/bin/iostat -m"
Every 2.0s: iostat -m Tue Mar 27 11:00:30 2012
Linux 2.6.32-5-amd64 (centos) 03/27/2012 _x86_64_ (8 CPU)
avg-cpu: %user %nice %system %iowait %steal %idle
15.34 0.36 2.76 2.66 0.00 78.88
Device: tps MB_read/s MB_wrtn/s MB_read MB_wrtn
sda 63.89 0.48 8.20 6730255 115574152
sdb 64.12 0.44 8.23 6244718 116072400
md0 2118.94 0.22 8.20 3041710 115560990
Device: tps MB_read/s MB_wrtn/s MB_read MB_wrtn
sda 55.00 0.01 25.75 0 51
sdb 52.50 0.00 24.75 0 49
md0 34661.00 0.01 135.38 0 270

Even though watch use and -d might appear like identical, they're not watch does refresh the screen, executing instruction similar to the clear command which clears screen on every 2 seconds, so the output looks like the top command refresh, while passing the -d 2 will output the iostat command output on every 2 secs in a row so all the data is visualized on the screen. Hence -d 2 in cases, where more thorough debug is necessery is better. However for a quick routine view watch + iostat is great too.

c) Outputting extra information for HDD input/output operations;

root@debian:~# iostat -x
Linux 2.6.32-5-amd64 (debian) 03/27/2012 _x86_64_ (8 CPU)
avg-cpu: %user %nice %system %iowait %steal %idle
15.34 0.36 2.76 2.66 0.00 78.88
Device: rrqm/s wrqm/s r/s w/s rsec/s wsec/s avgrq-sz avgqu-sz await svctm %util
sda 4.22 2047.33 12.01 51.88 977.44 16785.96 278.03 0.28 4.35 3.87 24.72
sdb 3.80 2047.61 11.97 52.15 906.93 16858.32 277.05 0.03 5.25 3.87 24.84
md0 0.00 0.00 20.72 2098.28 441.75 16784.05 8.13 0.00 0.00 0.00 0.00

This command will output extended useful Hard Disk info like;
r/s – number of read requests issued per second
w/s – number of write requests issued per second
rsec/s – numbers of sector reads per second
b>wsec/s – number of sectors wrote per second
etc. etc.

Most of ppl will never need to use this, but it is good to know it exists.

3. Tracking read / write (i/o) hard disk bottlenecks on FreeBSD

BSD's iostat is a bit different in terms of output and arguments.

a) Here is most basic use:

freebsd# /usr/sbin/iostat
tty ad0 cpu
tin tout KB/t tps MB/s us ni sy in id
1 561 45.18 44 1.95 14 0 5 0 82

b) Periodic watch of hdd i/o operations;

freebsd# iostat -c 10
tty ad0 cpu
tin tout KB/t tps MB/s us ni sy in id
1 562 45.19 44 1.95 14 0 5 0 82
0 307 51.96 113 5.73 44 0 24 0 32
0 234 58.12 98 5.56 16 0 7 0 77
0 43 0.00 0 0.00 1 0 0 0 99
0 485 0.00 0 0.00 2 0 0 0 98
0 43 0.00 0 0.00 0 0 1 0 99
0 43 0.00 0 0.00 0 0 0 0 100
...

As you see in the output, there is information like in the columns tty, tin, tout which is a bit hard to comprehend.
Thanksfully the tool has an option to print out only more essential i/o information:

freebsd# iostat -d -c 10
ad0
KB/t tps MB/s
45.19 44 1.95
58.12 97 5.52
54.81 108 5.78
0.00 0 0.00
0.00 0 0.00
0.00 0 0.00
20.48 25 0.50

The output info is quite self-explanatory.

Displaying a number of iostat values for hard disk reads can be also achieved by omitting -c option with:

freebsd# iostat -d 1 10
...

Tracking a specific hard disk partiotion with iostat is done with:

freebsd# iostat -n /dev/ad0s1a
tty cpu
tin tout us ni sy in id
1 577 14 0 5 0 81
c) Getting Hard disk read/write information with gstat

gstat is a FreeBSD tool to print statistics for GEOM disks. Its default behaviour is to refresh the screen in a similar fashion like top command, so its great for people who would like to periodically check all attached system hard disk and storage devices:

freebsd# gstat
dT: 1.002s w: 1.000s
L(q) ops/s r/s kBps ms/r w/s kBps ms/w %busy Name
0 10 0 0 0.0 10 260 2.6 15.6| ad0
0 10 0 0 0.0 10 260 2.6 11.4| ad0s1
0 10 0 0 0.0 10 260 2.8 12.5| ad0s1a
0 0 0 0 0.0 0 0 0.0 20.0| ad0s1b
0 0 0 0 0.0 0 0 0.0 0.0| ad0s1c
0 0 0 0 0.0 0 0 0.0 0.0| ad0s1d
0 0 0 0 0.0 0 0 0.0 0.0| ad0s1e
0 0 0 0 0.0 0 0 0.0 0.0| acd0

It even has colors if your tty supports colors 🙂

Another useful tool in debugging the culprit of excessive hdd I/O operations is procstat command:

Here is a sample procstat run to track (httpd) one of my processes imposing i/o hdd load:

freebsd# procstat -f 50404
PID COMM FD T V FLAGS REF OFFSET PRO NAME
50404 httpd cwd v d -------- - - - /
50404 httpd root v d -------- - - - /
50404 httpd 0 v c r------- 56 0 - -
50404 httpd 1 v c -w------ 56 0 - -
50404 httpd 2 v r -wa----- 56 75581 - /var/log/httpd-error.log
50404 httpd 3 s - rw------ 105 0 TCP ::.80 ::.0
50404 httpd 4 p - rw---n-- 56 0 - -
50404 httpd 5 p - rw------ 56 0 - -
50404 httpd 6 v r -wa----- 56 25161132 - /var/log/httpd-access.log
50404 httpd 7 v r rw------ 56 0 - /tmp/apr8QUOUW
50404 httpd 8 v r -w------ 56 0 - /var/run/accept.lock.49588
50404 httpd 9 v r -w------ 1 0 - /var/run/accept.lock.49588
50404 httpd 10 v r -w------ 1 0 - /tmp/apr8QUOUW
50404 httpd 11 ? - -------- 2 0 - -

Btw fstat is sometimes helpful in identifying the number of open files and trying to estimate which ones are putting the hdd load.
Hope this info helps someone. If you know better ways to track hdd excessive loads on Linux / BSD pls share 'em pls.
 

How to disable ACPI on productive Linux servers to decrease kernel panics and increase CPU fan lifespan

Tuesday, May 15th, 2012

Linux TUX ACPI logo / Tux Hates ACPI logohttps://www.pc-freak.net/images/linux_tux_acpi_logo-tux-hates-acpi.png

Why would anyone disable ACPI support on a server machine??
Well  ACPI support kernel loaded code is just another piece of code constantly being present in the memory,  that makes the probability for a fatal memory mess up leading to  a fatal bug resulting in system crash (kernel panic) more likely.

Many computers ship with buggy or out of specifications ACPI firmware which can cause a severe oddities on a brand new bought piece of comp equipment.

One such oddity related to ACPI motherboard support problems is if you notice your machine randomly powering off or failing to boot with a brand new Linux installed on it.

Another reason to switch off ACPI code will would to be prevent the CPU FAN rotation from being kernel controlled.

If the kernel controls the CPU fan on  high CPU heat up it will instruct the fan to rotate quickly and on low system loads it will bring back the fan to loose speed.
 This frequent switch of FAN from high speed to low speed  increases the probability for a short fan damage due to frequent changes of fan speed. Such a fan damage leads often to  system outage due to fan failure to rotate properly.

Therefore in my view it is better ACPI support is switched off completely on  servers. On some servers ACPI is useful as it can be used to track CPU temperature with embedded motherboard sensors with lm_sensors or any piece of hardwre vendor specific software provided. On many machines, however lm_sensors will not properly recognize the integrated CPU temperature sensors and hence ACPI is mostly useless.

There are 3 ways to disable fully or partially ACPI support.

- One is to disable it straight for BIOS (best way IMHO)
- Disable via GRUB or LILO passing a kernel parameter
- Partial ACPI off-ing - /disabling the software that controls the CPU fan/

1. Disable ACPI in BIOS level

Press DEL, F1, F2, F10 or whatever the enter bios key combination is go through all the different menus (depending on the vios BENDOR) and make sure every occurance of ACPI is set to off / disable whatever it is called.

Below is a screenshot of menus with ACPI stuff on a motherboard equipped with Phoenix AwardBIOS:
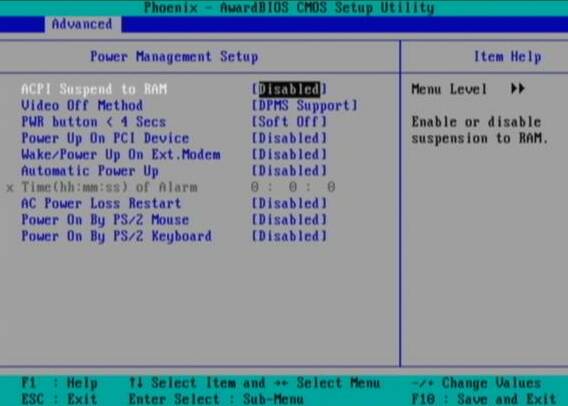
BIOS ACPI Disable power Off Phoenix BIOS

This is the in my opinon best and safest way to disable ACPI power saving, Unfortunately some newer PCs lack the functionality to disable ACPI; (probably due to the crazy "green" policy the whole world is nowdays mad of).

If that's the case with you, thanksfully there is a "software way" to disable ACPI via passing kernel options via GRUB and LILO boot loaders.

2. Disabling ACPI support on kernel boot level through GRUB boot loader config

There is a tiny difference in command to pass in order to disable  ACPI depending on the Linux installed  GRUB ver. 1.x or GRUB 2.x.

a) In GRUB 0.99 (GRUB version 1)

Edit file /etc/grub/menu.lst or /etc/grub/grub.conf (location differs across Linux distribution). Therein append:

acpi=off

to the end of kernel command line.

Here is an example of a kernel command line with ACPI not disabled (example taken from CentOS server grub.conf):

[root@centos ~]# grep -i title -A 4 /etc/grub/grub.conf
title Red Hat Enterprise Linux Server (2.6.18-36.el5)
root (hd0,0)
kernel /vmlinuz-2.6.18-36.el5 ro root=/dev/VolGroup00/LogVol00 console=ttyS0,115200n8
initrd /initrd-2.6.18-36.el5.img

The edited version of the file with acpi=off included should look like so:

title Red Hat Enterprise Linux Server (2.6.18-36.el5)
root (hd0,0)
kernel /vmlinuz-2.6.18-36.el5 ro root=/dev/VolGroup00/LogVol00 console=ttyS0,115200n8 acpi=off
initrd /initrd-2.6.18-36.el5.img

The kernel option root=/dev/VolGroup00/LogVol00 means the the server is configured to use LVM (Logical Volume Manager).

b) Disabling ACPI on GRUB version 1.99 +

This version is by default installed on newer Ubuntu and Debian Linux-es.

In grub 1.99 on latest Debian Squeeze, the file to edit is located in /boot/grub/grub.cfg. The file is more messy than with its predecessor menu.lst (grub 0.99).
Thanks God there is no need to directly edit the file (though this is possible), but on newer Linuces (as of time of writting the post), there is another simplied grub config file /etc/grub/config

Hence to add the acpi=off to 1.99 open /etc/grub/config find the line reading:

GRUB_CMDLINE_LINUX_DEFAULT="quiet"

and append the "acpi=off" option, e.g. the line has to change to:

GRUB_CMDLINE_LINUX_DEFAULT="quiet acpi=off"

On some servers it might be better to also disable APIC along with ACPI:

Just in case you don't know what is the difference between ACPI and APIC, here is a short explanation:

ACPI = Advanced Configuration and Power Interface

APIC = Advanced Programmable Interrupt Controllers

ACPI is the system that controls your dynamic speed fans, the power button behavior, sleep states, etc.

APIC is the replacement for the old PIC chip that used to come imbedded on motherboards that allowed you to setup interrupts for your soundcard, ide controllers, etc.

Hence on some machines experiencing still problems with even ACPI switched off, it is helpful  to disable the APIC support too, by using:

acpi=off noapic noacpi

Anyways, while doing the changes, be very very cautious or you might end up with un-boot-able server. Don't blame me if this happens :); be sure you have a backup option if server doesn't boot.

To assure faultless kernel boot, GRUB has ability to be configured to automatically load up a second kernel if 1st one fails to boot, if you need that read the grub documentation on that.

To load up the kernel with the new setting, give it a restart:

[root@centos ~]# shutdown -r now
....

3. Disable ACPI support on kernel boot time on Slackware or other Linuxes still booting kernel with LILO

Still, some Linux distros like Slackware, decided to keep the old way and use LILO (LInux LOader) as a default boot loader.

Disabling ACPI support in LILO is done through /etc/lilo.conf

By default in /etc/lilo.conf, there is a line:

append= acpi=on

it should be changed to:

append= acpi=off

Next to load up the new acpi disabled setting, lilo has to be reloaded:

slackware:~# /sbin/lilo -c /etc/lilo.conf
....

Finally a reboot is required:

slackware:~# reboot
....

(If you don't have a physical access or someone near the server you better not 🙂 )

4. Disable ACPI fan control support on a running Linux server without restart

This is the most secure work-around, to disabling the ACPI control over the machine CPU fan, however it has a downside that still the ACPI code will be loaded in the kernel and could cause kernel issues possibly in the long run – lets say the machine has uptime of more than 2 years…

The acpi support on a user level  is controlled by acpid or haldaemon (depending on the Linux distro), hence to disable the fan control on servers this services has to be switched off:

a) disabling ACPI on Debian and deb based Linux-es

As of time of writting on Debian Linux servers acpid (Advanced Configuration and Power Interface event daemon) is there to control how power management will be handled. To disable it stop it as a service (if running):

debian:~# /etc/init.d/acpid stop

To permanently remove acpid from boot up on system boot disable it with update-rc.d:

debian:~# update-rc.d acpid disable 2 3 4 5
update-rc.d: using dependency based boot sequencing
insserv: Script iptables is broken: incomplete LSB comment.
insserv: missing `Required-Start:' entry: please add even if empty.
insserv: warning: current start runlevel(s) (empty) of script `acpid' overwrites defaults (2 3 4 5).
insserv: warning: current stop runlevel(s) (2 3 4 5) of script `acpid' overwrites defaults (empty).
insserv: missing `Required-Start:' entry: please add even if empty.

b) disabling ACPI on RHEL, Fedora and other Redhat-s (also known as RedHacks 🙂 )

I'm not sure if this is safe,as many newer rpm based server system services,  might not work properly with haldaemon disabled.

Anyways you can give it a try if when it is stopped there are issues just bring it up again.

[root@rhel ~]# /etc/init.d/haldaemon stop

If all is fine with the haldaemon switched off (hope so), you can completely disable it to load on start up with:

[root@centos ~]# /sbin/chkconfig --level 2 3 4 5 haldaemon off

Disabling ACPI could increase a bit your server bills, but same time decrease losses from downtimes, so I guess it worths its costs 🙂


Creator of Linux kernel Linus Torvalds with a biblical name, Pope Linus second Pope of Rome

Thursday, February 16th, 2012

Western Roman Catholic Pope Linus picture, Pope after Saint apostle Peter

Linus's name is encountered once in the Scriptures (The Holy Bible) in the second book part of the New Testament scriptures:

I really like King James English version of the bible, here is the text extracted from there, mentioning Linus's name:

2 Timothy 4:21
Doe thy diligence to come before winter. Eubulus greeteth thee,
and Pudens, and Linus, and Claudia, and all the brethren. (From KJV 1611 Translation)

Here is a modernized version of the same verse taken from the New American Standard Bible Version (1995):

2 Timothy 4:21
Make every effort to come before winter. Eubulus greets you,
also Pudens and Linus and Claudia and all the brethren.

- New American Standard Version (1995)

Other curious fact maybe, even uknown to Linus Torvalds himself is Saint Linus used to be the first bishop of Rome, after the Apostles bishopship.
This makes Saint Linus the second in place Roman Catholic Pope after Saint Peter in early Western Church. There are some early sources which says Pope Clement I was the second pope of Rome, however probably this sources are erroneous, since some very important early written sources like the Apostolic Constitutions states Linus was the first bishop of Rome and was ordained by St. Paul. The same documents says Pope Linus was succeeded by Pope Clement – ordained by saint Peter.

Below's paste is taken directly from BibleGateway.com cofirming about Pope Linus being the sacond Roman Catholic Pope:

Linus
(a net), a Christian at Rome, known to St. Paul and to
Timothy, (2 Timothy 4:21) who was the first bishop of Rome after the apostles. (A.D. 64.)

Something Pope Linus is known with is, to have issued a church decree that woman should cover their heads in church.This ancient church tradition is still observed more or less in the Orthodox Church. It is not known much about how Saint Pope ruled the early Western Church but since the western and eastern Church used to be in communion in these early days, this means the nowdays Roman Catholic saint Linus is probably a saint in the Eastern Orthodox Church as well.
According to some unprovable written sources Pope Linus later suffered martyrdom and was buried in Vatican Hill next to saint apostle Peter.

St. Linus according to Church tradition passed away in the 1st securury A.D.
Below's paste is taken directly from BibleGateway.com a multilingual website location for reading the bible

Linus
(a net), a Christian at Rome, known to St. Paul and to
Timothy, (2 Timothy 4:21) who was the first bishop of Rome after the apostles. (A.D. 64.)

I've merged a picture of how saint Linus used to look with one of the pictures of Linus Torvalds. It's rather funny they actually look alike 😉 🙂 🙂

Saint Linus and Linus Torvalds creator of GNU Linux kernel

The creator of GNU/Linux kernel Linus Torvalds might not be a saint in Christian sense, but his deed is definitely saintly as he initiated the creation of the Linux kernel and decided to share its source and publish it under GPL (General Public License).
The phenomenon of GNU / Linux Free Operating System existent today and specific type of development is definitely a miracle. The general philosophy of sharing with neighbor your software is also very close to the Christian philosophy of sharing. Actually too many of the ideas of the free software and "open source" movements resemble purely Christian ideas.

The software sharing philosophy has become a reality thanks to Richard Stallman and his GNU Project, however the existence of GNU / Linux as a complete operating system become reality thanks to the Linus torvalds kernel efforts which is known under the code name Linux. Talking about names, maybe not much will know, that Linux kernel used to have a different name in the early stage of its development, its first code name was FreaX

How to change MySQL server root password

Friday, July 29th, 2011

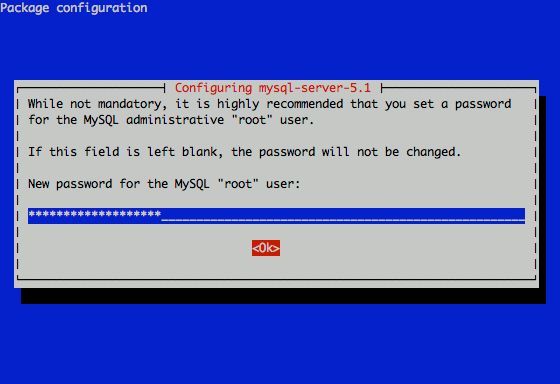
MySQL pass dialog Debian

I had to change my mysql root password for one of the servers since during the install I mispasted the password in the MySQL password prompt I needed the pwd to be changed.

Here is how I changed it to my desired one:

linux:~# /usr/bin/mysqladmin -u root -p'OLD_PASSWORD_STRING' password NEW_PASSWORD_STRING
linux:~#

The password gets changed immediately 😉

If a new password has to be set to a passwordless mysql server, the command to be issued is:

linux:~# /usr/bin/mysqladmin -u root password PASSWORD_STRING

Changing the MySQL password is also possible with mysql cli, after connecting to the sql server, though this method is a bit more time consuming. Here is how to do it from mysql console:

linux:~# mysql -u root -p
Server version: 5.1.49-3 (Debian)

Copyright (c) 2000, 2010, Oracle and/or its affiliates. All rights reserved.
This software comes with ABSOLUTELY NO WARRANTY. This is free software,
and you are welcome to modify and redistribute it under the GPL v2 license

Type ‘help;’ or ‘h’ for help. Type ‘c’ to clear the current input statement.
mysql> use mysql;
mysql> update user set password=PASSWORD(“NEW_PASSWORD”) where User=’root’;mysql> flush privileges;

Of course it’s possible to do change the root pass via phpmyadmin
Cheers 😉

Finding nearest package software repository in Debian GNU / Linux

Thursday, September 6th, 2012

finding debian Ubuntu package repository icon

I’m about to chage the good old computeres until this very moment this blog and few other website were running on. Right now, I’m installing the brand new machine Lenovo ThinkCentre Edge great and hopefully powerful enough machine to take care for the periodic occuring high traffic loads which break up webserver or SQL server. Well anyways, I just installed latest Debian GNU / Linux on this brand new piece of iron. During install I couldn’t connect the PC to network so Debian install was unable to determine, the nearest Debian package repository, hence after completing install and anually configuring Debian network . Because during install the system had no connection with the Internet, no proper package repository definitions were present in /etc/apt/sources.list, hence I had to find the nearest package software repository. Normally one can check in Debian official WorldWide Mirror sites full address list and determine by some rationalization with ping or / and a manual package download which repo is quickest. There is thanksfully a better automated way one can determine the closest deb Debian / Ubuntu located repository with netselect-apt.

Here is apt-cache description:

debian:~# apt-cache search netselect-apt
netselect-apt - speed tester for choosing a fast Debian mirror

Using the tool is trivial, just install, run it and it does all 4 u 🙂

1. Install netselect-apt

debian:~# apt-get install --yes netselect-apt

2. Run it

debian:~# netselect-apt
....
130/debian/); keeping only under first name.
netselect: 2 (2 active) nameserver request(s)...

Duplicate address 200.236.31.3 (http://debian.c3sl.ufpr.br/debian/, http://ftp.br.debian.org/debian/); keeping only under first name.
netselect: 1 (1 active) nameserver request(s)...
Running netselect to choose 1 out of 383 addresses.
.............................................
The fastest server seems to be:
http://debian.telecoms.bg/debian/

Writing sources.list.
sources.list exists, moving to sources.list.1346964774
Done.

As you can see from output, the tool finds the quickest download deb repository and generate /etc/apt/sources.list file in current directory, where it is run in, in this exact case it creates it in root user home dir – e.g. in /root/ directory. Once the repo address is found you can copy paste it with some text editor to /etc/apt/sources.list or move it over /etc/apt/sources.list;

debian:~# cp -rpf /etc/apt/sources.list /etc/apt/sources.list.$(date +%d_%m_%Y|sed -e 's/^ *//')
debian:~# mv /root/sources.list /etc/apt/sources.list

Just in case as I always make first copy of original sources.list, this is not necessery but IMHO a generally good sysadmin habit 🙂

Besides netselect-apt, which automatically choose between all available list of software repo servers, there is also netselect tool. netselect does basically the same the only difference is one has to manually pass by as arguments deb package repositories and the tool then does tests and returns which is the overall quickest deb download source.

netselect is definitely useful if you have started few own mirror of repositories and want to determine which is the best among them.

Here is how netselect is used:

# netselect -vv ftp.fceia.unr.edu.ar ftp.kulnet.kuleuven.ac.be \
ftp.cdrom.com ftp.debian.org ftp.de.debian.org
ftp.fceia.unr.edu.ar 2792 ms 23 hops 100% ok ( 1/ 1) [ 9213]
ftp.kulnet.kuleuven.ac.be 9999 ms 30 hops 0% ok
ftp.cdrom.com 94 ms 8 hops 100% ok (10/10) [ 169]
ftp.debian.org 46 ms 15 hops 100% ok (10/10) [ 115]
ftp.de.debian.org 9999 ms 30 hops 0% ok

According to above output, the “best reachable” (quickest) repository is the one to which are the least miliseconds – ftp.debian.org

Thanks to- https://www.wzdftpd.net/blog/index.php? -for the nice Debian package box picture – all copyrights belong to respective authors and licensing.
Cheers ! 🙂

How to convert Adobe PDF file format to Microsoft Word DOC on MS Windows 2000 / XP / Vista / 7

Tuesday, July 24th, 2012

How to convert PDF to DOC on Microsoft Windows XP, MS Windows 7, Win Vista convert PDF to MS DOC 2003, ABBYY Covert Page
I had to convert Adobe PDF file to Microsoft Word ( .doc) file on Microsoft Windows OS for a friend. There is plenty of software available to convert PDF to DOC on Windows, as well as few web-site services claiming to convert correcly PDF to DOC. Converting PDF to DOC is easy and can be done with Open Office, however the reverse process is a real pain in the ass. I tried a dozen of free web serviecs to convert an ancient Latin writting PDF to DOC but none of them couldn’t properly convert it. Failing with the web services as a tool to convert, I’ve turned to seeking a tool that will do the trick. After trying few PDF to DOC converters which failed to produce a properly structed edittable DOC from the PDF file, I’ve come across ABBYY PDF Transformer 2.0. Abbyy PDF Transformer finally did it …

I’ve tried hard to look for a free software good PDF to DOC converter alternative for Windows but it seems as of time of writing this post there is no GPLed free software that does properly convert PDFs to MS WORD DOC ….

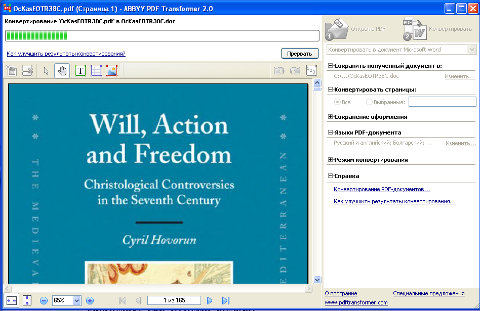
Using Abbyy PDF Transformer 2.0 is a piece of cake all I had to do is select the PDF file (pressing Open PDF) and then click on Convert (in right bottom corner). Below is a shot of Abby PDF transformer in action.

How to convert PDF to DOC on Microsoft Windows XP, MS Windows 7, Win Vista convert PDF to MS DOC 2003, abby pdf converter in action