Posts Tagged ‘software’

how to archive with Windows default zip (compress) algorithm

Tuesday, April 1st, 2014

windows-sent-to-compressed-file
I'm working on a decomissioning project (for those who hear decomissioning for a first time – in corporate world this means removal of service/s or assigned resources of a server or a physical server hardware that is not to be used in future or is obsolete). The decomissioning includes removal of Apache Tomcat (Software Configuration Item CI – in HP terms) from Microsoft Windows 2007 – Service Pack 2.
Part of decomissioning is of course to create backup of Tomcat Application server and for that I needed to create compressed archive of Tomcat instances. Usually I do archives on Windows using Winrar or Winzip but this time as the server productive server has the minimum installed there was no any external vendor produced archiving software available.

My memories from past were that there is a native compressing program embedded into Windows as I've unzipped compressed archives on Win hosts with no need for external WinZip. However until so far I never did .ZIP archive with no available external uncompress software.

Using Winzip or Winrar so far to make archive from a number of files I used to select files to enter Archive press right mouse button and select Create Archive (Add To Archive) so I expected this will work whenever no Winrar, however there was no obvious button like this, so I googled a bit to find out how is that possible ending up on Article from Microsoft titled "Compress and uncompress files (zip files)", there is a dumb proof video teaching Compressing files with Microsoft default ZIP program is done by the the weird "Send To" menu 🙂 

Selecting files to enter Archive;
> (Click Right Mouse Button) -> (Send To Compressed Zipped Folder)

compress_zipped_folder_with_windows_default_archive_algorithm how to archive with windows default compress archive

Honestly If I didn't checked the net probably I will never think of looking it there.

How to Turn Off, Suppress PHP Notices and Warnings – PHP error handling levels via php.ini and PHP source code

Friday, April 25th, 2014

php-logo-disable-warnings-and-notices-in-php-through-htaccess-php-ini-and-php-code

PHP Notices are common to occur after PHP version upgrades or where an obsolete PHP code is moved from Old version PHP to new version. This is common error in web software using Frameworks which have been abandoned by developers.

Having PHP Notices to appear on a webpage is pretty ugly and give a lot of information which might be used by malicious crackers to try to break your site thus it is always a good idea to disable PHP Notices. There are plenty of ways to disable PHP Notices

The easiest way to disable it is globally in all Webserver PHP library via php.ini (/etc/php.ini) open it and make sure display_errors is disabled:

display_errors = 0

or

display_errors = Off

Note that that some claim in PHP 5.3 setting display_errors to Off will not work as expected. Anyways to make sure where your loaded PHP Version display_errors is ON or OFF use phpinfo();

It is also possible to disable PHP Notices and error reporting straight from PHP code you need code like:


<?php
// Turn off all error reporting
error_reporting(0);
?>


or through code:


ini_set('display_errors',0);


PHP has different levels of error reporting, here is complete list of possible error handling variables:


<?php
// Report simple running errors

error_reporting(E_ERROR | E_WARNING | E_PARSE);

// Reporting E_NOTICE can be good too (to report uninitialized
// variables or catch variable name misspellings …)

error_reporting(E_ERROR | E_WARNING | E_PARSE | E_NOTICE);

// Report all errors except E_NOTICE
// This is the default value set in php.ini

error_reporting(E_ALL ^ E_NOTICE);
// Report all PHP errors (see changelog)

error_reporting(E_ALL);
// Report all PHP errors error_reporting(-1);
// Same as error_reporting(E_ALL);

ini_set('error_reporting', E_ALL); ?>

The level of logging could be tuned on Debian Linux via /etc/php5/apache2/php.ini or if necessary to set PHP log level in PHP CLI through /etc/php5/cli/php.ini with:

error_reporting = E_ALL & ~E_NOTICE


If you need to remove to remove exact warning or notices from PHP without changing the way  PHPLib behaves is to set @ infront of variable or function that is causing NOTICES or WARNING:
For example:
 

@yourFunctionHere();
@var = …;


Its also possible to Disable PHP Notices and Warnings using .htaccess file (useful in shared hosting where you don't have access to global php.ini), here is how:

# PHP error handling for development servers
php_flag display_startup_errors off
php_flag display_errors off
php_flag html_errors off
php_flag log_errors on
php_flag ignore_repeated_errors off
php_flag ignore_repeated_source off
php_flag report_memleaks on
php_flag track_errors on
php_value docref_root 0
php_value docref_ext 0
php_value error_log /home/path/public_html/domain/php_errors.log
php_value error_reporting -1
php_value log_errors_max_len 0

This way though PHP Notices and Warnings will be suppressed errors will get logged into php_error.log

Save data from failing hard disk on Linux – Rescuing data from failing disk with bad blocks

Wednesday, April 16th, 2014

save-data-from-failing-hard-drive-data-recovery-badblocks-linux_1.jpg
Sooner or later your Linux Desktop or Linux server hard drive will start breaking up, whether you have a hardware or software RAID 1, 6 or 10 you can  and good hard disk health monitoring software you can react on time but sometimes as admins we have to take care of old servers which either have RAID 0 or missing RAID configuration and or disk firmware is unable to recognize failing blocks on time and remap them. Thus it is quite useful to have techniques to save data from failing hard disk drives with physical badblocks.

With ddrescue tool there is still hope for your Linux data though disk is full of unrecoverable I/O errors.

apt-cache show ddrescue
 

apt-cache show ddrescue|grep -i description -A 12

Description: copy data from one file or block device to another
 dd_rescue is a tool to help you to save data from crashed
 partition. Like dd, dd_rescue does copy data from one file or
 block device to another. But dd_rescue does not abort on errors
 on the input file (unless you specify a maximum error number).
 It uses two block sizes, a large (soft) block size and a small
 (hard) block size. In case of errors, the size falls back to the
 small one and is promoted again after a while without errors.
 If the copying process is interrupted by the user it is possible
 to continue at any position later. It also does not truncate
 the output file (unless asked to). It allows you to start from
 the end of a file and move backwards as well. dd_rescue does
 not provide character conversions.


To use ddrescue for saving data first thing is to shutdown the Linux host boot the system with a Rescue LiveCD like SystemRescueCD – (Linux system rescue disk), Knoppix (Most famous bootable LiveCD / LiveDVD), Ubuntu Rescue Remix or BackTrack LiveCD – (A security centered "hackers" distro which can be used also for forensics and data recovery), then mount the failing disk (I assume disk is still mountable :). Note that it is very important to mount the disk as read only, because any write operation on hard drive increases chance that it completely becomes unusable before saving your data!

To make backup of your whole hard disk data to secondary mounted disk into /mnt/second_disk

# mkdir /mnt/second_disk/rescue
# mount /dev/sda2 /mnt/second_disk/rescue
# dd_rescue -d -r 10 /dev/sda1 /mnt/second_disk/rescue/backup.img
# mount -o loop /mnt/second_disk/rescue/backup.img

In above example change /dev/sda2 to whatever your hard drive device is named.

Whether you have already an identical secondary drive attached to the Linux host and you would like to copy whole failing Linux partition (/dev/sda) to the identical drive (/dev/sdb) issue:

ddrescue -d -f -r3 /dev/sda /dev/sdb /media/PNY_usb/rescue.logfile

If you got just a few unreadable files and you would like to recover only them then run ddrescue just on the damaged files:

ddrescue -d –R -r 100 /damaged/disk/some_dir/damaged_file /mnt/secondary_disk/some_dir/recoveredfile

-d instructs to use direct I/O
-R retrims the error area on each retry
-r 100 sets the retry limit to 100 (tries to read data 100 times before resign)

Of course this is not always working as on some HDDs recovery is impossible due to hard physical damages, if above command can't recover a file in 10 attempts it is very likely that it never succeeds …

A small note to make here is that there is another tool dd_rescue (make sure you don't confuse them) – which is also for recovery but GNU ddrescue performs better with recovery.
How ddrescue works is it keeps track of the bad sectors, and go back and try to do a slow read of that data in order to read them.
By the way BSD users would happy to know there is ddrescue port already, so data recovery on BSDs *NIX filesystems if you're a Windows user you can use ddrescue to recover data too via Cygwin.
Of course final data recovery is also very much into God's hands so before launching ddrescue, don't forget to say a prayer 🙂

Best Windows tools to Test (Benchmark) Hard Drives, SSD Drives and RAID Storage Controllers

Wednesday, April 23rd, 2014

atto-windows-hard-disk-benchmark-freeware-tool-screenshot-check-hard-disk-speed-windows
Disk Benchmarking is very useful for people involved in Graphic Design, 3D modelling, system admins  and anyone willing to squeeze maximum of his PC hardware.

If you want to do some benchmarking on newly built Windows server targetting Hard Disk performance, just bought a new hard SSD (Solid State Drives) and you want to test how well Hard Drive I/O operations behave or you want to see a regular HDD benchmarking of group of MS Windows PCs and plan hardware optiomization, check out ATTO Disk Benchmark.

So why exactly ATTO Benchmark? – Cause it is one of the best Windows Free Benchmark tools on the internet.

ATTO is a widely-accepted Disk Benchmark freeware utility to help measure storage system performance. ATTO though being freeware is among top tools utilized in industry. It is very useful in comparing different Hard Disk vendors speed, measure Windows storage systems performance with various transfer sizes and test lengths for reads and writes.

ATTO Disk Benchmark is used by manufacturers of Hardware RAID controllers, its precious tool to test Windows storage controllers, host bus adapters (HBAs).

Here is ATTO Benchmark tool specifications (quote from their webstie):
 

  • Transfer sizes from 512KB to 8MB
  • Transfer lengths from 64KB to 2GB
  • Support for overlapped I/O
  • Supports a variety of queue depths
  • I/O comparisons with various test patterns
  • Timed mode allows continuous testing
  • Non-destructive performance measurement on formatted drives
  • Transfer sizes from 512KB to 8MB
  • Transfer lengths from 64KB to 2GB
  • Support for overlapped I/O
  • Supports a variety of queue depths
  • I/O comparisons with various test patterns
  • Timed mode allows continuous testing
  • Non-destructive performance measurement on formatted drives
  • – See more at: http://www.attotech.com/disk-benchmark/#sthash.rRlgSTOE.dpuf

Here is mirrored latest version of ATTO Disk for Download. Once you get your HDD statistics you will probably want to compare to other people results. On  TomsHardware's world famous Hardware geek site there are plenty of Hard Drives performance Charts

Of course there are other GUI alternatives to ATTO Benchmark one historically famous is NBench

NBench

nbench_benchmark_windows_hard-drive-cpu-and-memory

Nbench is nice little benchmarking program for Windows NT. Nbench reports the following components of performance:

CPU speed: integer and floating operations/sec
L1 and L2 cache speeds: MB/sec
main memory speed: MB/sec
disk read and write speeds: MB/sec

SMP systems and multi-tasking OS efficiency can be tested using up to 20 separate threads of execution.

For Console Geeks or Windows server admins there are also some ports of famous *NIX Hard Disk Benchmarking tools:

NTiogen

NTiogen benchmark was written by Symbios Logic, It's Windows NT port of their popular UNIX benchmark IOGEN. NTIOGEN is the parent processes that spawns the specified number of IOGEN processes that actually do the I/O.
The program will display as output the number of processes, the average response time, the number of I/O operations per second, and the number of KBytes per second. You can download mirror copy of Ntiogen here


There are plenty of other GUI and Console HDD Benchmarking Win Tools, i.e.:

IOMeter (ex-developed by Intel and now abandoned available as open source available on SourceForge)

iometer-benchmark-disk-storage-speed-windows
 

Bench32 – Comprehensive benchmark that measures overall system performance under Windows NT or Windows 95, now obsolete not developed anymore abandoned by producer company.

ThreadMark32 – capable of bench (ex developed and supported by ADAPTEC) but also already unsupported

IOZone – filesystem benchmark tool. The benchmark generates and measures a variety of file operations. Iozone has been ported to many machines and runs under many operating systems.
 

N! B! Important note to make here is above suggested tools will provide you more realistic results than the proprietary vendor tools shipped by your hardware vendor. Using proprietary software produced by a single vendor makes it impossible to analyze and compare different hardwares, above HDD benchmarking tools are for "open systems", e.g. nomatter what the hardware producer is produced results can be checked against each other.
Another thing to consider is even though if you use any of above tools to test and compare two storage devices still results will be partially imaginary, its always best to conduct tests in Real Working Application Environments. If you're planning to launch a new services structure always test it first and don't rely on preliminary returned soft benchmarks.

if you know some other useful benchmarking software i'm missing please share.

What is VT-x (Intel Virtualization) and AMD V (AMD Virtualization)

Wednesday, June 4th, 2014

what-is-vt-x-inel-amd-virtualization-amd-v
As I'm lately educating myself in field of Virtualziation and Virtual Machines, the interesting question poped up What is Virtualization on a Hardware Level and what are Intel's and AMD technologies supporting it?


  • Intel Virtualialization (Vt-x)

Is Intel's hardware assistance for processors running virtualization platforms. Intel's Virtualization for short is know as VT-x. Intel VT-x extensions are probably the best recognized extensions, adding migration, priority and memory handling capabilities to a wide range of Intel processors.
Intel VT includes series of extensions for hardware virtualization adding virtualization support to Intel chipsets, so that Virtual Machines could assign specific I/O Devices. Intel VT includes a series of extensions for hardware virtualization Intel Virtualization is better described here.
 

  • AMD-V (AMD virtualization)


Is a set of hardware extensions for the X86 processor architecture. Advanced Micro Dynamics (AMD) designed the extensions to perform repetitive tasks normally performed by software and improve resource use and virtual machine (VM) performance. Early virtualization efforts relied on software emulation to replace hardware functionality. But software emulation can be a slow and inefficient process. Because many virtualization tasks were handled through software, VM behavior and resource control were often poor, resulting in unacceptable VM performance on the server. AMD Virtualization (AMD-V) technology was first announced in 2004 and added to AMD's Pacifica 64-bit x86 processor designs. By 2006, AMD's Athlon 64 X2 and Athlon 64 FX processors appeared with AMD-V technology, and today, the technology is available on Turion 64 X2, second- and third-generation Opteron, Phenom and Phenom II processors. Just like with Intel Virtualization AMD-V Technology enables extra hardware support for assignment of specifics I/O on per virtualized OS. AMD V Virtualization is described more thoroughly here


Run 2 and more Skypes simultaneously on Mac OS X – Run multiple Skype acccounts on same Mac

Saturday, June 21st, 2014

run-2-and-more-skypes-simultaneously-on-mac-os-x-multiple-skype-account-login-on-mac
For people running Mac OS X, the question of 
how is it possible to use 2 skype accounts in parallel on Mac probably makes good sense?

I don't own a Mac notebook and thefore I'm a Mac newbie, however, I'm into situation where I and my wife Svetlana went (for 3 days) to my hometown Dobrich and we have with us only her Mac OS X powered Mac Book air.


One user is already logged in Skype, (my wife) is expecting some relatives and friends to contact us and  same time I had to login to check few servers via ssh and discuss some server downtime issues from yesterday in Skype .
Thus we
need 2 skype instances to run separately on her Macbook air powered PC with Mac OS X Leopard
 

Earlier I've blogged how to make 2 and more Skype accounts work simultaneously on one Windows PC because I had to set it up for a company, in this short article I will explain how is possible to run many skype clients on Mac OS X.


1. Open Mac Terminal from Finder

finder-terminal-screenshot-mac-os-x-leopard-run-many-skypes-mac-os

2. In Terminal run the first Skype Instance

Type in Terminal:

open /Applications/Skype.app/Contents/MacOS/Skype

3. Run Second Skype instance

In older Skype Mac OS versions, I read the

/secondary

Skype command option was there and could be used to run a second parallel skype instance on Mac, however in newer releases this option was removed and if you try to invoke it warning window pops up saying an instance is already running.

mac-os-x-you-have-another-copy-of-skype-running-screenshot

To get around the issue and run the second Skype, quickest way is to run another Skype client under privileged user through sudo command (this is unsecure – but anyways as Mac OS is proprietary and we don't have access to code and probably there are tons of spy and report software integrated into the OS, it doesn't really matter.)

mac-os-x-skype-run-screenshot-pic

To get around the issue and run the second Skype, quickest way is to run another Skype client under privileged user through sudo command (this is unsecure – but anyways as Mac OS is proprietary and we don't have access to code and probably there are tons of spy and report software integrated into the OS, it doesn't really matter.)

4. Script it into 2nd_skype.sh for later use

To run and use two parallel skypes regularly it might be useful to make shell script out of it and place it somewhere, 2nd_skype.sh script should be something like:


#!/bin/bash
open /Applications/Skype.app/Contents/MacOS/Skype
sudo /Applications/Skype.app/Contents/MacOS/Skype

Then make the script executable with:

chmod a+x 2nd_skype.sh

5. Run more than 2 Skypes (Run multiple Skypes on same Mac PC hack)

There is another "hack" method with deleting the Skype.pid (Process ID). Skype recognize where it is running by checking its Skype.pid on start up.

Deleting the pid after each next Skype client launch,  allow the user to run as many Skypes as you want on Mac OS X but it is not clear for how long it time it will work.

rm -f ~/Library/Application Support/Skype/Skype.pid

Then launch again Skype in background from Mac Terminal

open -nW '/Application/Skype.app' &

In case if you wonder why the open command is used, since above line could be run also directly and Skype will pop-up, by using open command you instruct the program to detach itself from Terminal from which it run, so later if Terminal is closed Skype app. will not terminate.

Another approach is to create, a many users lets say 5 users and use the Skype sudo run method each client with a separate user.

sudo user1 /Applications/Skype.app/Contents/MacOS/Skype
sudo user2 /Applications/Skype.app/Contents/MacOS/Skype
sudo user3 /Applications/Skype.app/Contents/MacOS/Skype
sudo user4 /Applications/Skype.app/Contents/MacOS/Skype

sudo user5 /Applications/Skype.app/Contents/MacOS/Skype

I enclose the script with the custom icon (Skype) ready to be launched and Voila, on script launch Skype multiple login prompts pops up.

For the lazy ones who don't want to tamper with writting scripts or doing hacks to run Skype multiple times on Mac there is even a Multi Skype Launcher app for Mac.


Install TorrentFlux Bit Torrent Web management interface on Debian / Ubuntu Linux

Tuesday, July 15th, 2014

torrent flux logo
Torrentflux
is web based, feature-rich BitTorrent download manager.
Torrentflux is a must have installed server software for anyone who does regular torrent downloads and want to access the downloads from anywhere on the internet.

TorrentFlux is a PHP based BitTorrent controller that runs on a web
 server. It can manage all of your BitTorrent downloads from anywhere
 through a convenient and easy-to-use web interface.
 .
 TorrentFlux uses a MySQL database to manage the downloads.

 TorrentFlux enables you to run BitTorrent downloads unattended on a monitor-less or remote server 24 hours a day, while still maintaining complete control from any web browser. Now you can control your  downloading on your firewall, or keep up with downloads while on  vacation. It uses the BitTornado client to download files, and also  requires a web server with PHP.
 
 Some of the Torrentflux features:

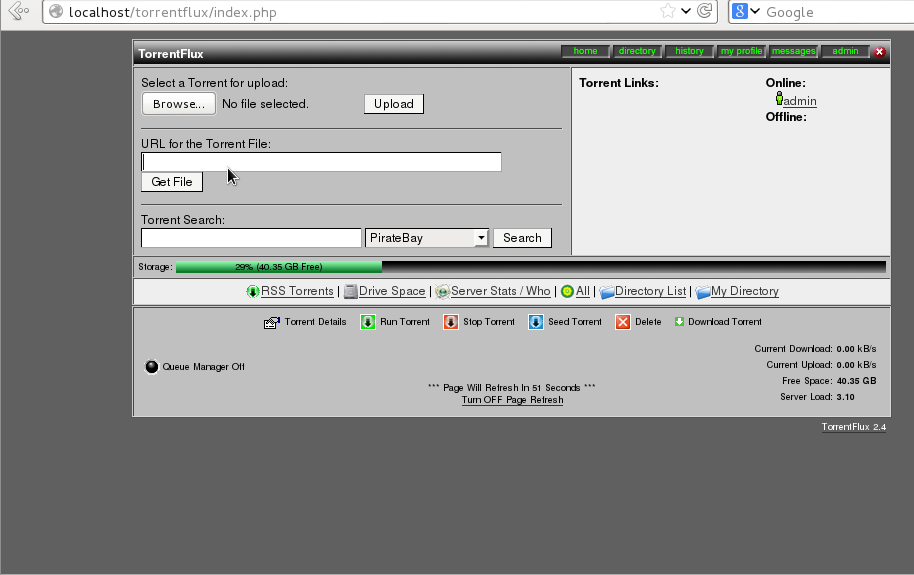
   * Upload Torrents via URL or File Upload
   * Start, Stop, and Delete Torrents with ease
   * Advanced Torrent start options (ports, speeds, etc.)
   * Multi-user interface
   * RSS Feeds, download Torrents files with a click
   * Run several torrents at once
   * View Download Progress of all torrents at a glance
   * View drive space at a glance
   * View Torrent file meta information
   * Built-in User management and Security
   * Private Messaging
   * Themes (selectable per user)
   * Upload History


Before installing Bittorrent you will need to have a running version of Debian, Ubuntu or any other debian derivative (though it can easily be run on any Linux distro). To install AMP (Apache MySQL Server, PHP) you can follow first part of my previous article Installing Usual PHP Apache MySQL for new Debian GNU / Linux installs.

So what for is TorrentFlux Useful?
Torrenflux is precious and must have if you have to access filtered torrent from outside of your homecountry and you have a running server already in your home country in that I was using TorrentFlux to access Bulgarian Zamunda.Net Torrent Tracker from Holland and was downloading first movies from the Bulgarian Torrent Tracker to my Fluxbox installed on my Dobrich home router and then used FTP to transfer movies to the Netherlands. Talking about many people choose to also install VSFTP and use it together with Torrentflux …

1. Install TorrentFlux and its dependencies (BitTornado, Bittorrent, Zip, Unzip, Bzip etc.) the "Debian Way"


On my Debian 7 Wheezy home machine  I run

apt-get install –yes bzip2 php5-gd php5-cli unrar-free grep python net-tools mawk wget unzip cksfv vlc-nox uudeview python-crypto libxml-simple-perl libxml-dom-perl libdbd-mysql-perl bittorrent bittornado


a) Install TorrentFlux the Debian Way

apt-get install –yes torrentflux


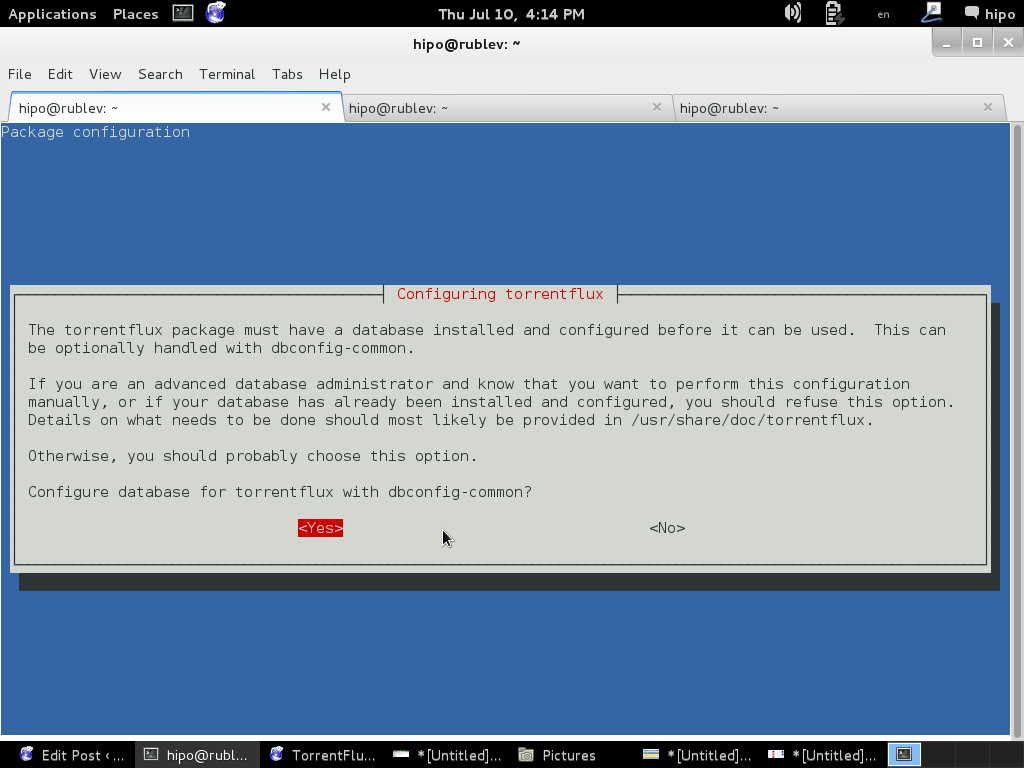
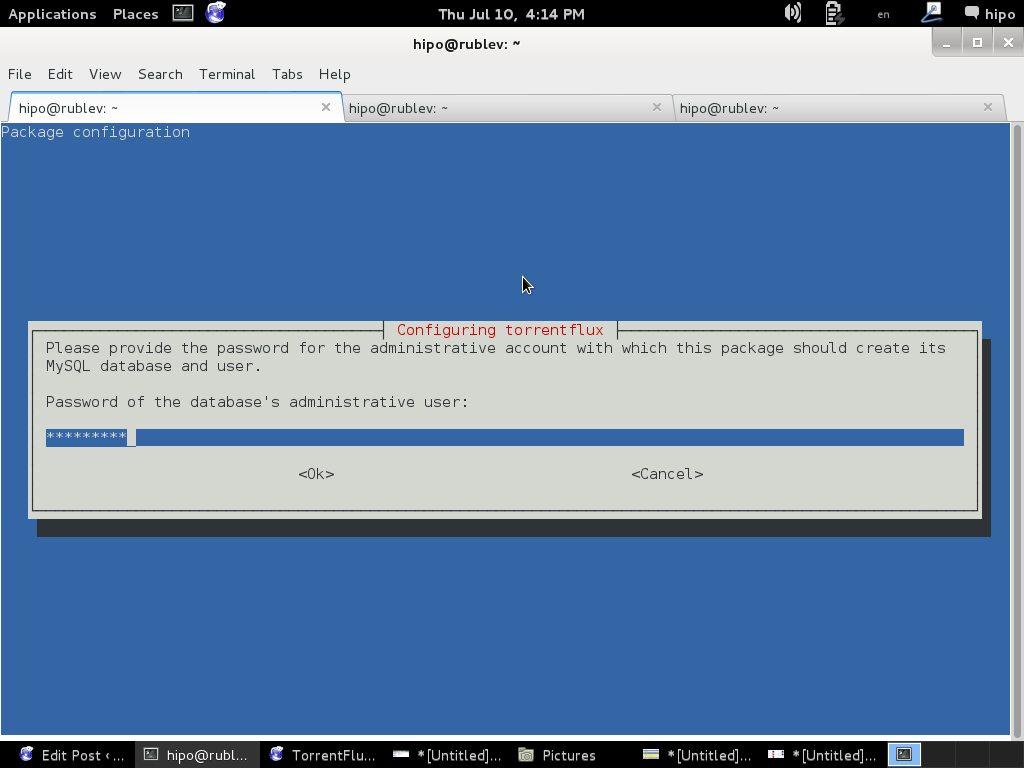
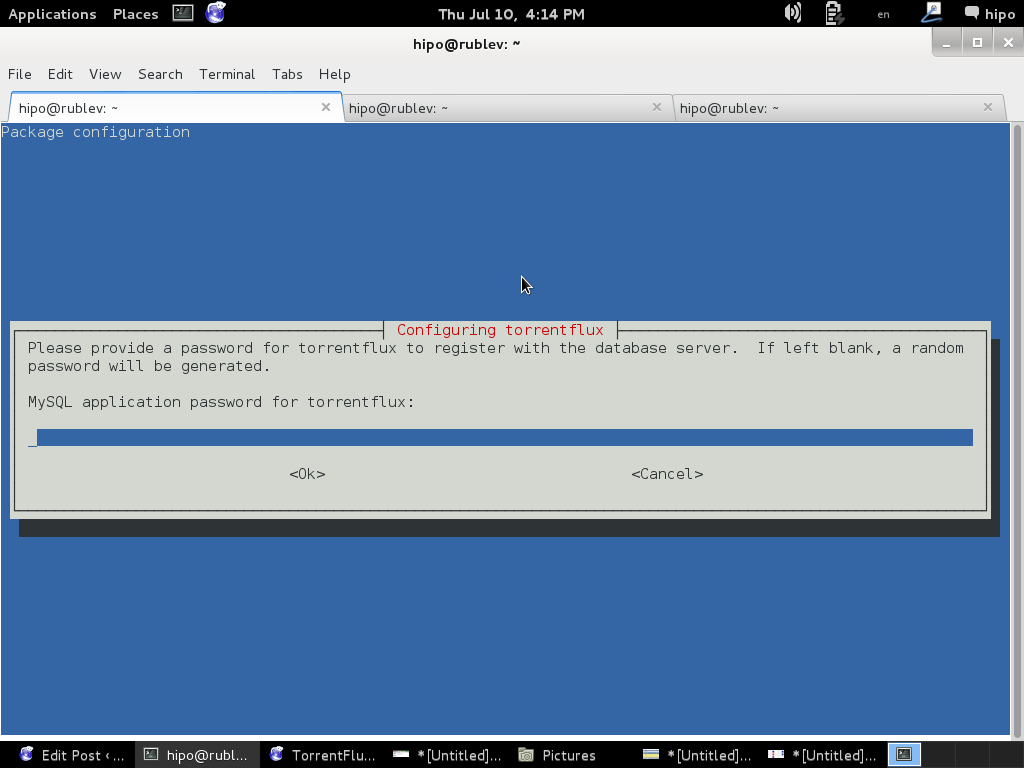
You will be prompted with a coule of screens, to set a new MySQL database user and password and SQL database, as well as offered to restart Apache to make Torrentflux accessible like as on below screenshots.

configuring-torrentflux-debian-linux-screenshot-2


configuring-torrentflux-debian-linux-screenshot 3

configuring-torrentflux-debian-linux-screenshot-4

To make new installed torrentflux accessible from web you will either have to configure it via some new Apache VirtualHost or make a symbolic link to /usr/share/torrentflux/www :
 

cd /var/www/
ln -sf /usr/share/torrentflux/www/ torrentflux


That's all you're all done to access torrentflux either access it via your default configured webserver domain name or via localhost if you're logged in to same pc where installing.

http://www.your-domain.com/torrentflux

or

http://127.0.0.1/torrentflux

configuring-torrentflux-after-first-login-in-web-debian-linux

2. Install latest Torrentflux version from source

Alternatively if you want to have the latest version (because the Debian version is part of the stable distribution is a little bit outdated you will have to fetch Torrentflux-b4rt and unarchive it:

cd /tmp/
wget http://download.berlios.de/tf-b4rt/torrentflux-b4rt_1.0-beta2.tar.bz2

tar -xjf torrentflux-b4rt_1.0-beta2.tar.bz2

mv torrentflux-b4rt_1.0-beta2 /opt/torrentflux

Then to make torrentflux visible from web server I had to create a symbolic link to installation directory:
 

ln -sf /opt/torrentflux/html /var/www/torrentflux

For further initial configuration its necessery to make Torrentflux config writtable by www-data (the user with which Apache is running on Debian).


chown -R www-data:www-data /var/www/torrentflux/inc/config/


Next it its required to create somewhere download folder where TorrentFlux will keep downloaded Torrents

mkdir /var/lib/torrentflux


Apache HTTP server will have to have write ther:

chown -R www-data:www-data /var/lib/torrentflux


If you already haven't restarted Apache earlier in installing TorrentFlux pre-requirements, you will have to do it now:


/etc/init.d/apache2 restart


As TorrentFlux depends on its MySQL backend, we need to also create manually TorrentFlux database username and a password
 

export SQL_DB='torrentflux';
TFLUXSQL_USERNAME='torrentflux';
TFLUX_SQL_PWD='any-secret-password';

echo "CREATE DATABASE IF NOT EXISTS $SQL_DB DEFAULT CHARACTER SET utf8 DEFAULT COLLATE utf8_unicode_ci"
| mysql –user=root –password

echo "GRANT ALL PRIVILEGES ON $SQL_DB.*
TO $TFLUXSQL_USERNAME@localhost
IDENTIFIED BY $TFLUX_SQL_PWD;" | mysql –user=root –password


Substitute with your Database, Username and Password above shell variables – $SQL_DB, $TFLUX_USERNAME, $TFLUX_SQL_PWD

To configure TorrentFlux access it in browser:

http://your-domain.com/torrentflux
 

By accessing it for a first time, you will redirected to setup.php, in case something goes wrong and yuo're not redirected (probably some mod_rewrite issues add setup.php to url – e.g., acess –

http://your-domain.com/torrentflux/setup.php

I will not enter details, about Web config, because everything there is pretty clear.

Just in short – you will have to now choose:

Choose Database
Choose Database Information of database (put in the exact name of TorrentFlux databse previously created)
Uncheck the box for "Create new database"
Choose as a download location upper created directory – /var/lib/torrentflux

If you get an error on software dependencies screen for missing unrar – just install it
VLC may show an error as well, that's not a problem because VLC is probably not to be used.
Finally after completion of all, you will get an error that setup.php cannot be deleted.
 

To prevent, someone to re-configure it through http://your-domain/torrentflux/setup.php URL remove setup.php


rm /var/www/torrentflux/setup.php

To prevent someone rewrite anything in config file from web we have to revert back config/ folder not to be writable by Apache


chown -R root:root /var/www/torrentflux/inc/config/

Now in browser to access torrentflux type:


http://ipofyourbox/torrentflux

/torrentflux should redirect you to login.php if for some reason it doesn't type it manually in URL.

First account you will login is the super user account, you can allow multiple users to use it by adding multiple accounts.

torrentflux-install-on-debian-ubuntu-gnu-linux-web-management-torrent-interface

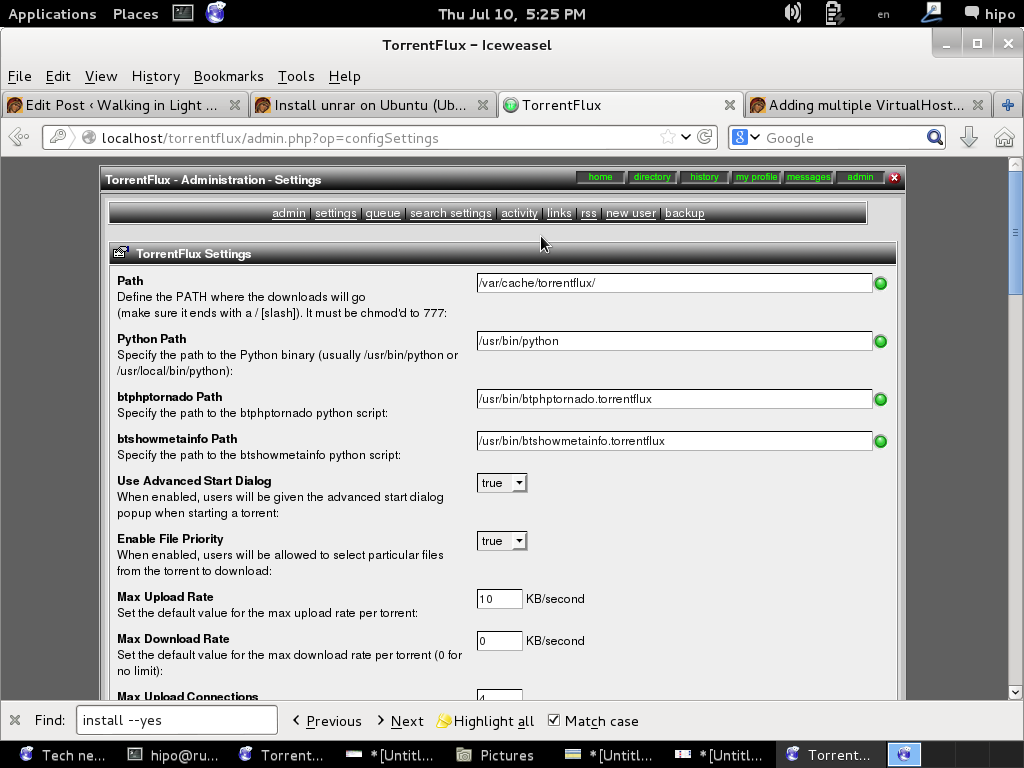
As you will see there is plety of configuration options to play with.

You will definitely want to look in Server Page, some very important page to look is the Transfer Page – from there you can adjust the bandwidth of your connection on 100Mbit network this would be 12500 – to use the maximum possible connection provided by your ISP set the max bandwidth to 0. You have the option to also set a default bittorrent client, by default this will be bittornado.


If you have troubles downloading from TorrentTrackers make sure your router is configured to forward port 49160 to 49300

Now if you have a lot of storage create accounts also for your friends and enjoy torrentflux 🙂


Malwarebytes a good Anti-Spyware anti-malware Windows program

Saturday, December 11th, 2010

malwarebytes_a_good_Anti-Spyware-anti-malware-windows-program-clean-your-pc-from-malwares-and-viruses
Dave just recommended me a nice software which is able to easily extinguish most of the nowdaysterrible spyware soft.
I had previously installed a cracked version of Spyware Doctor on this Windows machine and it was interesting that even though it’s so seriously praised the Spyware Doctor wasn’t able to find a bunch of stupid spyware.
Talking about Spyware what is a Spyware? Why is not a spyware a virus?

Anyways, I guess they just came up with a hype word to just market some more software as an anti-spyware soft.

To clean up your windows pc with go straigh to Malwarebytes download it and install it.
The full version of malwarebytes is paid but the good news is that the free version available for download lacks only the service of an integrated windows agent to constantly track your pc if a spyware is trying to enter from a website.

Just until recently I used to use the good old Spybot but this program is not anymore finding most of the malicious stuff, so I guess this malwarebytes is something I should install more often on Windows pcs I had to fix up.

safemode_with_networking_windows-PC-boot-option-screen-screenshot

If running Spyware Bytes, doesn’t succeed in cleaining the PC (and just if you want to have better guarantee that Malware will not auto-load on the PC again), run the PC in Safe Mode With Networking or just Safe Mode (keep pressing F8) before Windows boots and then run Malware Bytes again.

Pravetz and Puldin – The first serial produced 8 / 16 bit Bulgarian Computers – Retro Computing in Bulgaria

Sunday, March 16th, 2008

pravetz-16-cm-5508-bulgarian-16-bit-computer
A friend of mine gave me an interesting link it’s about Pravetz A computer systems which were an absolute hit here in Bulgaria, they are produced here and we should be proud we had our Bulgarian computers. Here is the link Pravetz! 🙂

pravetz-16-bulgarian-computer-peripherals-and-hardware-pictures
Pravetz was a was copy of Apple ][ (Pravetz 8A, 8C, 8M), Oric (Pravets 8D) and IBM-PC (Pravetz 16 also known as XT)
Pravetz was named after a town of Pravetz which is the homeplace of the ex-Bulgarian communist party leader and President of Socialist Bulgaria Todor Jivkov. Pravetz had a huge production quantities as about 200 000 were exported to coutnries from Soviet Union block. My generation people about 30 have grown with Pravetz and many nowadays IT specialists in Bulgaria had learned computer basics on 8 or 16 bit Pravetz machine. Its compatability with DOS made it a great game-station PC. Owning Pravetz PC at communist times was considered as a sign of elitism as only Police station and highest authorities or people close to party leaders had one of those even in 1995 still owning a Pravetz PC was considered an extra-ordinary think.

Pravetz 16 was part of the MIK-16 family of computers, which included:
– Pravetz 16 (the one on the picture, 4.77Mhz)
– Pravetz 16A (1x Floppy, 1x 5MB HDD)
– Pravetz 16H (improved one, 8Mhz, 1 or 2 Half size floppies + 1x HDD 20MB – half size)
– Pravetz-286

The first version of Pravetz 16 had a built-in Basic on a ROM chip, which loaded if no OS was present. The 16A did not have a built-in Basic. 
The 20 Megabytes HDD was a revolution, for almost 4 years the HDD never show any errors. There was a CGA (Color Graphics Adapter) built-in control, and i had a 16-color display (or monochrome black and green display based on the model). This machine was excellent for making DOS-programing, and was used till the middle of the 90’s, mostly in government facilities.

The following software was available for Pravetz:

-programing languages (BASIC-16, PASCAL, Cobol,Ada);
-dBASE systems (Micro-PC-2);
-Text editors (Text-16, MicroTEXT-16, DOKS-2);
-Electronic schedules (Superplan-16, MicroPLAN/16);
-information-searching systems (INFOS);
-Administration automatisation (MIS);
-Integrated products (MULTIPACK);
-Machine graphics;
-CAD (GraphCAD, PLOT-1);
-communication utilities;
-learning&enjoy programs;
-specialised products. 

Many people were installing MS-DOS 5.0 or 7.0 or DR-DOS and using the PC with DOS programs, where most compatible with XT were working just fine. My own monitor was monochrome and had problems with displaying some color gammas and thus in Games some of the colors were not displayed. However owning a Pravetz was amazing thing at that time, it was a mania and a building block of a whole PC-geek generation that emerged from Pravetz Culture.

At that time in the distant 1988 when Bulgaria was still highly industrialized country in Plovdiv we were producing another made in Bulgarian Computer called Puldin (Puldin is the ancient name of the city of Plovdiv Bulgaria).
What was unique about Puldin was it was computer completely built from scratch with its own hardware and software architecture.

Puldin was produced in 4 modifications 601-A/U/M/T, the RAM memory was 64KB, the ROM was from 4KB up to 68KB depend on the model, the video output could be connected to normal TV, there was LAN card, Printer centronics output, Cassete input, RS232, Floppy disk, etc.

puldin-unique-made-in-bulgaria-computer-software-and-hardware-pc-architecture

As you can see in above screenshot the keyboard was slightly different from Pravetz one it gives an impression of unique design (Apple Mac styled) 🙂
Though keyboard looks nice it was terrible to use, there was no tactile click feed back so you basically don’t know if you pressed the key, fortunately later models had connector for external IBM-PC keyboard with keys, which make the work easier.The computer was already unefficient as in 1988  there were already lot of computers on the market including IBM-PC with 16 bit processor running at the remarkable 4.77Mhz.
Puldin processor was a Motorola 6800 copies named CM601 at that time produced in Botevgrad. It was running UniDOS which was basically a made from scratch MS-DOS alternative.
The computer was equipped with Assembler, BASIC, Pascal, Editor, Diagnostic tools, even DBase equivalent. Puldin was produced in small volume ~ 30 000 – 50000 computers mainly shipped to Russia as Russia was main market for Bulgarian products at that time. Software developed on Puldin could be moved to IBM-PC by using Pascal P-code and this was highly revolutionary as it had capabilities similar to Java long before Java was existent.
Computer was developed by 6 developers which were students at that time and they made it as enthusiasts without taking a penny for it. One of the software developers who worked on Puldin was also author of Eagle DOS for Apple ][ (Pravetz82) and UniDOS for Puldin and now has his own company selling computers http://eagle.bg.
The guy who wrote the Assembler BIOS and Basic ROM for Puldin – Todor Todorov became more famous with his virus works instead of what he did for Puldin the now mythological Dark Avanger