Posts Tagged ‘use’

Deny DHCP Address by MAC on Linux

Thursday, October 8th, 2020

Deny DHCP addresses by MAC ignore MAC to not be DHCPD leased on GNU / Linux howto

I have not blogged for a long time due to being on a few weeks vacation and being in home with a small cute baby. However as a hardcore and a bit of dumb System administrator, I have spend some of my vacation and   worked on bringing up the the www.pc-freak.net and the other Websites hosted as a high availvailability ones living on a 2 Webservers running on a Master to Master MySQL Replication backend database, this is oll hosted on  servers, set to run as a round robin DNS hosts on 2 servers one old Lenove ThinkCentre Edge71 as well as a brand new real Lenovo server Lenovo ThinkServer SD350 with 24 CPUs and a 32 GB of RAM
To assure Internet Connectivity is having a good degree of connectivity and ensure websites hosted on both machines is not going to die if one of the 2 pair configured Fiber Optics Internet Providers Bergon.NET has some Issues, I've rented another Internet Provider Line is set bought from the VIVACOM Mobile Fiber Internet provider – that is a 1 Gigabit Fiber Optics Line.
Next to that to guarantee there is no Database, Webserver, MailServer, Memcached and other running services did not hit downtimes due to Electricity power outage, two Powerful Uninterruptable Power Supplies (UPS)  FPS Fortron devices are connected to the servers each of which that could keep the machine and the connected switches and Servers for up to 1 Hour.

The machines are configured to use dhcpd to distributed IP addresses and the Main Node is set to distribute IPs, however as there is a local LAN network with more of a personal Work PCs, Wireless Devices and Testing Computers and few Virtual machines in the Network and the IPs are being distributed in a consequential manner via a ISC DHCP server.

As always to make everything work properly hence, I had again some a bit weird non-standard requirement to make some of the computers within the Network with Static IP addresses and the others to have their IPs received via the DHCP (Dynamic Host Configuration Protocol) and add some filter for some of the Machine MAC Addresses which are configured to have a static IP addresses to prevent the DHCP (daemon) server to automatically reassign IPs to this machines.

After a bit of googling and pondering I've done it and some of the machines, therefore to save others the efforts to look around How to set Certain Computers / Servers Network Card MAC (Interfaces) MAC Addresses  configured on the LAN network to use Static IPs and instruct the DHCP server to ingnore any broadcast IP addresses leases – if they're to be destined to a set of IGNORED MAcs, I came up with this small article.

Here is the DHCP server /etc/dhcpd/dhcpd.conf from my Debian GNU / Linux (Buster) 10.4


option domain-name "pcfreak.lan";
option domain-name-servers 8.8.8.8, 8.8.4.4, 208.67.222.222, 208.67.220.220;
max-lease-time 891200;
authoritative;
class "black-hole" {
    match substring (hardware, 1, 6);
    ignore booting;
}
subclass "black-hole" 18:45:91:c3:d9:00;
subclass "black-hole" 70:e2:81:13:44:11;
subclass "black-hole" 70:e2:81:13:44:12;
subclass "black-hole" 00:16:3f:53:5d:11;
subclass "black-hole" 18:45:9b:c6:d9:00;
subclass "black-hole" 16:45:93:c3:d9:09;
subclass "black-hole" 16:45:94:c3:d9:0d;/etc/dhcpd/dhcpd.conf
subclass "black-hole" 60:67:21:3c:20:ec;
subclass "black-hole" 60:67:20:5c:20:ed;
subclass "black-hole" 00:16:3e:0f:48:04;
subclass "black-hole" 00:16:3e:3a:f4:fc;
subclass "black-hole" 50:d4:f5:13:e8:ba;
subclass "black-hole" 50:d4:f5:13:e8:bb;
subnet 192.168.0.0 netmask 255.255.255.0 {
        option routers                  192.168.0.1;
        option subnet-mask              255.255.255.0;
}
host think-server {
        hardware ethernet 70:e2:85:13:44:12;
        fixed-address 192.168.0.200;
}
default-lease-time 691200;
max-lease-time 891200;
log-facility local7;

To spend you copy paste efforts a file with Deny DHCP Address by Mac Linux configuration is here
/home/hipo/info
Of course I have dumped the MAC Addresses to omit a data leaking but I guess the idea behind the MAC ADDR ignore is quite clear

The main configuration doing the trick to ignore a certain MAC ALenovo ThinkServer SD350ddresses that are reachable on the Connected hardware switch on the device is like so:

class "black-hole" {
    match substring (hardware, 1, 6);
    ignore booting;
}
subclass "black-hole" 18:45:91:c3:d9:00;


The Deny DHCP Address by MAC is described on isc.org distribution lists here but it seems the documentation on the topic on how to Deny / IGNORE DHCP Addresses by MAC Address on Linux has been quite obscure and limited online.

As you can see in above config the time via which an IP is freed up and a new IP lease is done from the server is severely maximized as often DHCP servers do use a max-lease-time like 1 hour (3600) seconds:, the reason for increasing the lease time to be to like 10 days time is that the IPs in my network change very rarely so it is a waste of CPU cycles to do a frequent lease.

default-lease-time 691200;
max-lease-time 891200;


As you see to Guarantee resolving works always as expected I have configured – Google Public DNS and OpenDNS IPs

option domain-name-servers 8.8.8.8, 8.8.4.4, 208.67.222.222, 208.67.220.220;


One hint to make is, after setting up all my desired config in the standard config location /etc/dhcp/dhcpd.conf it is always good idea to test configuration before reloading the running dhcpd process.


root@pcfreak: ~# /usr/sbin/dhcpd -t
Internet Systems Consortium DHCP Server 4.4.1
Copyright 2004-2018 Internet Systems Consortium.
All rights reserved.
For info, please visit https://www.isc.org/software/dhcp/
Config file: /etc/dhcp/dhcpd.conf
Database file: /va/home/hipo/infor/lib/dhcp/dhcpd.leases
PID file: /var/run/dhcpd.pid
 

That's all folks with this sample config the IPs under subclass "black-hole", which are a local LAN Static IP Addresses will never be offered leasess anymore from the ISC DHCP.
Hope this stuff helps someone, enjoy and in case if you need a colocation of a server or a website hosting for a really cheap price on this new set High Availlability up described machines open an inquiry on https://web.www.pc-freak.net.


Installing usual Software Tools and Development header files and libraries on a newly installed Debian Server

Thursday, February 11th, 2010

installing-usual-software-tools-and-development-header-files-and-libraries-on-newly-installed-Debian-Ubuntu-server
Today I start my work as a system administrator for a new IT company.
My first duties include configuration and installation of some usual programs
used in everyday's sys admin job.
In that manner of thoughts I have long ago realized there is a common group of
tools and software I had to install on almost each and every new configured
Debian GNU / Linux running Server.
Here is a list of packages I usually install on new Debian systems,
even though this exact commands are expected to be executed on Debian (5.0) Lenny
I believe they are quite accurate for Debian Testing and Debian Testing/Unstable,
bleeding edge distributions.
Before I show you the apt-get lines with all the packages, I would advice you to install
and use netselect-apt to select the fastest Debian package mirror near you
So to install and use run the following commands;

aptitude install netselect-apt
netselect-apt -n lenny

Now as netselect-apt would have tested for the fastest mirror and created sources.list
file in your current directory, open the sources.list file and decide what should enter your
official /etc/apt/sources.list file or in other words merge the two files as you like.
Good, now as we have a fast mirror to download our packages let's continue further with the
packages to install.
Excecute the following command to install some of the basic tools and packages:

# install some basic required tools, software and header files
debian-server:~# apt-get install tcpdump mc ncurses-dev htop iftop iptraf nmap tcpdump apache2 apachetop
mysql-server-5.0 phpmyadmin vnstat rsync traceroute tcptrace e2fsprogs hddtemp finger mtr-tiny
netcat screen imagemagick flex snort mysql-server-5.0 sysstat lm-sensors alien rar unrar util-linux curl
vim lynx links elinks sudo autoconf gcc build-essential dpkg-dev webalizer awstats

Herein I'll explain just a few of the installed package and their install
purpose,as they could be unknown to some of the people out there.

apachetop - monitors apache log file in real time similar to gnu top
iftop - display bandwidth usage on selected interface interactively
vnstat - show inbound & outbound traffic usage on selected network interfaces
e2fsprogs - some general tools for creation of ext2 file systems etc.
hddtemp - Utility to monitor hard drive temperature
mtr-tiny - matt's traceroute great traceroute proggie
netcat - TCP/IP swiss army knife, quite helpful for network maintance tasks
snort - an Intrusion Detecting System
build-essential - installs basic stuff required for most applications compiled from source code
sysstat - generates statistics about server load each and every ten minutes, check man for more
lm-sensors - enables you to track your system hardware sensors information and warn in CPU heatups etc.

I believe the rest of them are no need to be explained, if you're not familiar with them check the manuals.
So far so good but this is not all I had to install, as you probably know most Apache webservers nowadays
are running PHP and are using a dozen of PHP libraries / extensions not originally bundled with PHP install
Therefore here are some more packages related to php to install that would install some more php goodies.

# install some packages required for many php enabled applications
debian-esrver:~# apt-get install php-http php-db php-mail php-net-smtp php-net-socket php-pear php-xml-parser
php5-curl php5-gd php5-imagick php5-mysql php5-odbc php5-recode php5-sybase php5-xmlrpc php5-dev

As I said that is mostly the basic stuff that is a must have on most of the Debian servers I have
configured this days, of course this is not applicable to all situations, however I hope
this would be of use to somebody out there.

How to build Linux logging bash shell script write_log, logging with Named Pipe buffer, Simple Linux common log files logging with logger command

Monday, August 26th, 2019

how-to-build-bash-script-for-logging-buffer-named-pipes-basic-common-files-logging-with-logger-command

Logging into file in GNU / Linux and FreeBSD is as simple as simply redirecting the output, e.g.:
 

echo "$(date) Whatever" >> /home/hipo/log/output_file_log.txt


or with pyping to tee command


echo "$(date) Service has Crashed" | tee -a /home/hipo/log/output_file_log.txt


But what if you need to create a full featured logging bash robust shell script function that will run as a daemon continusly as a background process and will output
all content from itself to an external log file?
In below article, I've given example logging script in bash, as well as small example on how a specially crafted Named Pipe buffer can be used that will later store to a file of choice.
Finally I found it interesting to mention few words about logger command which can be used to log anything to many of the common / general Linux log files stored under /var/log/ – i.e. /var/log/syslog /var/log/user /var/log/daemon /var/log/mail etc.
 

1. Bash script function for logging write_log();


Perhaps the simplest method is just to use a small function routine in your shell script like this:
 

write_log()
LOG_FILE='/root/log.txt';
{
  while read text
  do
      LOGTIME=`date "+%Y-%m-%d %H:%M:%S"`
      # If log file is not defined, just echo the output
      if [ “$LOG_FILE” == “” ]; then
    echo $LOGTIME": $text";
      else
        LOG=$LOG_FILE.`date +%Y%m%d`
    touch $LOG
        if [ ! -f $LOG ]; then echo "ERROR!! Cannot create log file $LOG. Exiting."; exit 1; fi
    echo $LOGTIME": $text" | tee -a $LOG;
      fi
  done
}


  •  Using the script from within itself or from external to write out to defined log file


echo "Skipping to next copy" | write_log


2. Use Unix named pipes to pass data – Small intro on what is Unix Named Pipe.


Named Pipe –  a named pipe (also known as a FIFO (First In First Out) for its behavior) is an extension to the traditional pipe concept on Unix and Unix-like systems, and is one of the methods of inter-process communication (IPC). The concept is also found in OS/2 and Microsoft Windows, although the semantics differ substantially. A traditional pipe is "unnamed" and lasts only as long as the process. A named pipe, however, can last as long as the system is up, beyond the life of the process. It can be deleted if no longer used.
Usually a named pipe appears as a file, and generally processes attach to it for IPC.


Once named pipes were shortly explained for those who hear it for a first time, its time to say named pipe in unix / linux is created with mkfifo command, syntax is straight foward:
 

mkfifo /tmp/name-of-named-pipe


Some older Linux-es with older bash and older bash shell scripts were using mknod.
So idea behind logging script is to use a simple named pipe read input and use date command to log the exact time the command was executed, here is the script.


#!/bin/bash
named_pipe='/tmp/output-named-pipe';
output_named_log='
/tmp/output-named-log.txt ';

if [ -p $named_pipe ]; then
rm -f $named_pipe
fi
mkfifo $named_pipe

while true; do
read LINE <$named_pipe
echo $(date): "$LINE" >>/tmp/output-named-log.txt
done


To write out any other script output and get logged now, any of your output with a nice current date command generated output write out any output content to the loggin buffer like so:


echo 'Using Named pipes is so cool' > /tmp/output-named-pipe
echo 'Disk is full on a trigger' > /tmp/output-named-pipe

  • Getting the output with the date timestamp

# cat /tmp/output-named-log.txt
Mon Aug 26 15:21:29 EEST 2019: Using Named pipes is so cool
Mon Aug 26 15:21:54 EEST 2019: Disk is full on a trigger


If you wonder why it is better to use Named pipes for logging, they perform better (are generally quicker) than Unix sockets.


3. Logging files to system log files with logger


If you need to do a one time quick way to log any message of your choice with a standard Logging timestamp, take a look at logger (a part of bsdutils Linux package), and is a command which is used to enter messages into the system log, to use it simply invoke it with a message and it will log your specified output by default to /var/log/syslog common logfile


root@linux:/root# logger 'Here we go, logging'
root@linux:/root # tail -n 3 /var/log/syslog
Aug 26 15:41:01 localhost CRON[24490]: (root) CMD (chown qscand:qscand -R /var/run/clamav/ 2>&1 >/dev/null)
Aug 26 15:42:01 localhost CRON[24547]: (root) CMD (chown qscand:qscand -R /var/run/clamav/ 2>&1 >/dev/null)
Aug 26 15:42:20 localhost hipo: Here we go, logging


If you have took some time to read any of the init.d scripts on Debian / Fedora / RHEL / CentOS Linux etc. you will notice the logger logging facility is heavily used.

With logger you can print out message with different priorities (e.g. if you want to write an error message to mail.* logs), you can do so with:
 

 logger -i -p mail.err "Output of mail processing script"


To log a normal non-error (priority message) with logger to /var/log/mail.log system log.


 logger -i -p mail.notice "Output of mail processing script"


A whole list of supported facility named priority valid levels by logger (as taken of its current Linux manual) are as so:


FACILITIES AND LEVELS
       Valid facility names are:

              auth
              authpriv   for security information of a sensitive nature
              cron
              daemon
              ftp
              kern       cannot be generated from userspace process, automatically converted to user
              lpr
              mail
              news
              syslog
              user
              uucp
              local0
                to
              local7
              security   deprecated synonym for auth

       Valid level names are:

              emerg
              alert
              crit
              err
              warning
              notice
              info
              debug
              panic     deprecated synonym for emerg
              error     deprecated synonym for err
              warn      deprecated synonym for warning

       For the priority order and intended purposes of these facilities and levels, see syslog(3).


If you just want to log to Linux main log file (be it /var/log/syslog or /var/log/messages), depending on the Linux distribution, just type', even without any shell quoting:


logger 'The reason to reboot the server Currently was a System security Update


So what others is logger useful for?

 In addition to being a good diagnostic tool, you can use logger to test if all basic system logs with its respective priorities work as expected, this is especially
useful as I've seen on a Cloud Holsted OpenXEN based servers as a SAP consultant, that sometimes logging to basic log files stops to log for months or even years due to
syslog and syslog-ng problems hungs by other thirt party scripts and programs.
To test test all basic logging and priority on system logs as expected use the following logger-test-all-basic-log-logging-facilities.sh shell script.


#!/bin/bash
for i in {auth,auth-priv,cron,daemon,kern, \
lpr,mail,mark,news,syslog,user,uucp,local0 \
,local1,local2,local3,local4,local5,local6,local7}

do        
# (this is all one line!)


for k in {debug,info,notice,warning,err,crit,alert,emerg}
do

logger -p $i.$k "Test daemon message, facility $i priority $k"

done

done

Note that on different Linux distribution verions, the facility and priority names might differ so, if you get

logger: unknown facility name: {auth,auth-priv,cron,daemon,kern,lpr,mail,mark,news, \
syslog,user,uucp,local0,local1,local2,local3,local4, \
local5,local6,local7}

check and set the proper naming as described in logger man page.


4. Using a file descriptor that will output to a pre-set log file


Another way is to add the following code to the beginning of the script

#!/bin/bash
exec 3>&1 4>&2
trap 'exec 2>&4 1>&3' 0 1 2 3
exec 1>log.out 2>&1
# Everything below will go to the file 'log.out':

The code Explaned

  •     Saves file descriptors so they can be restored to whatever they were before redirection or used themselves to output to whatever they were before the following redirect.
    trap 'exec 2>&4 1>&3' 0 1 2 3
  •     Restore file descriptors for particular signals. Not generally necessary since they should be restored when the sub-shell exits.

          exec 1>log.out 2>&1

  •     Redirect stdout to file log.out then redirect stderr to stdout. Note that the order is important when you want them going to the same file. stdout must be redirected before stderr is redirected to stdout.

From then on, to see output on the console (maybe), you can simply redirect to &3. For example
,

echo "$(date) : Do print whatever you want logging to &3 file handler" >&3


I've initially found out about this very nice bash code from serverfault.com's post how can I fully log all bash script actions (but unfortunately on latest Debian 10 Buster Linux  that is prebundled with bash shell 5.0.3(1)-release the code doesn't behave exactly, well but still on older bash versions it works fine.

Sum it up


To shortlysummarize there is plenty of ways to do logging from a shell script logger command but using a function or a named pipe is the most classic. Sometimes if a script is supposed to write user or other script output to a a common file such as syslog, logger command can be used as it is present across most modern Linux distros.
If you have a better ways, please drop a common and I'll add it to this article.


Ansible Quick Start Cheatsheet for Linux admins and DevOps engineers

Wednesday, October 24th, 2018

ansible-quick-start-cheetsheet-ansible-logo

Ansible is widely used (Configuration management, deployment, and task execution system) nowadays for mass service depoyments on multiple servers and Clustered environments like, Kubernetes clusters (with multiple pods replicas) virtual swarms running XEN / IPKVM virtualization hosting multiple nodes etc. .

Ansible can be used to configure or deploy GNU / Linux tools and services such as Apache / Squid / Nginx / MySQL / PostgreSQL. etc. It is pretty much like Puppet (server / services lifecycle management) tool , except its less-complecated to start with makes it often a choose as a tool for mass deployment (devops) automation.

Ansible is used for multi-node deployments and remote-task execution on group of servers, the big pro of it it does all its stuff over simple SSH on the remote nodes (servers) and does not require extra services or listening daemons like with Puppet. It combined with Docker containerization is used very much for later deploying later on inside Cloud environments such as Amazon AWS / Google Cloud Platform / SAP HANA / OpenStack etc.

Ansible-Architechture-What-Is-Ansible-Edureka

0. Instaling ansible on Debian / Ubuntu Linux


Ansible is a python script and because of that depends heavily on python so to make it running, you will need to have a working python installed on local and remote servers.

Ansible is as easy to install as running the apt cmd:


# apt-get install –yes ansible
 

The following additional packages will be installed:
  ieee-data python-jinja2 python-kerberos python-markupsafe python-netaddr python-paramiko python-selinux python-xmltodict python-yaml
Suggested packages:
  sshpass python-jinja2-doc ipython python-netaddr-docs python-gssapi
Recommended packages:
  python-winrm
The following NEW packages will be installed:
  ansible ieee-data python-jinja2 python-kerberos python-markupsafe python-netaddr python-paramiko python-selinux python-xmltodict python-yaml
0 upgraded, 10 newly installed, 0 to remove and 1 not upgraded.
Need to get 3,413 kB of archives.
After this operation, 22.8 MB of additional disk space will be used.

apt-get install –yes sshpass


Installing Ansible on Fedora Linux is done with:


# dnf install ansible –yes sshpass


On CentOS to install:
 

# yum install ansible –yes sshpass

sshpass needs to be installed only if you plan to use ssh password prompt authentication with ansible.

Ansible is also installable via python-pip tool, if you need to install a specific version of ansible you have to use it instead, the package is available as an installable package on most linux distros.

Ansible has a lot of pros and cons and there are multiple articles already written on people for and against it in favour of Chef or Puppet As I recently started learning Ansible. The most important thing to know about Ansible is though many of the things can be done directly using a simple command line, the tool is planned for remote installing of server services using a specially prepared .yaml format configuration files. The power of Ansible comes of the use of Ansible Playbooks which are yaml scripts that tells ansible how to do its activities step by step on remote server. In this article, I'm giving a quick cheat sheet to start quickly with it.
 

1. Remote commands execution with Ansible
 

First thing to do to start with it is to add the desired hostnames ansible will operate with it can be done either globally (if you have a number of remote nodes) to deploy stuff periodically by using /etc/ansible/hosts or use a custom host script for each and every ansible custom scripts developed.

a. Ansible main config files

A common ansible /etc/ansible/hosts definition looks something like that:


# cat /etc/ansible/hosts
[mysqldb]
10.69.2.185
10.69.2.186
[master]
10.69.2.181
[slave]
10.69.2.187
[db-servers]
10.69.2.181
10.69.2.187
[squid]
10.69.2.184

Host to execute on can be also provided via a shell variable $ANSIBLE_HOSTS
b) is remote hosts reachable / execute commands on all remote host

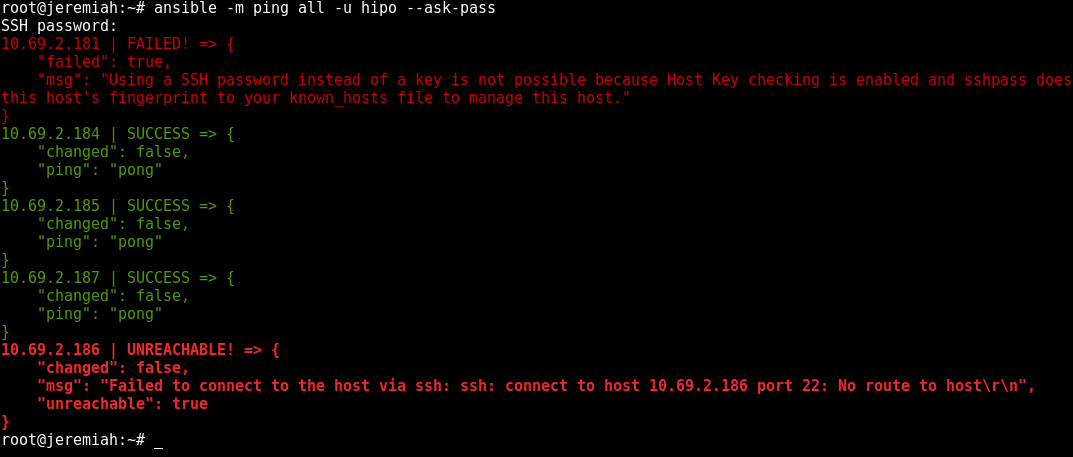
To test whether hour hosts are properly configure from /etc/ansible/hosts you can ping all defined hosts with:


ansible all -m ping


ansible-check-hosts-ping-command-screenshot

This makes ansible try to remote to remote hosts (if you have properly configured SSH public key authorization) the command should return success statuses on every host.


ansible all -a "ifconfig -a"


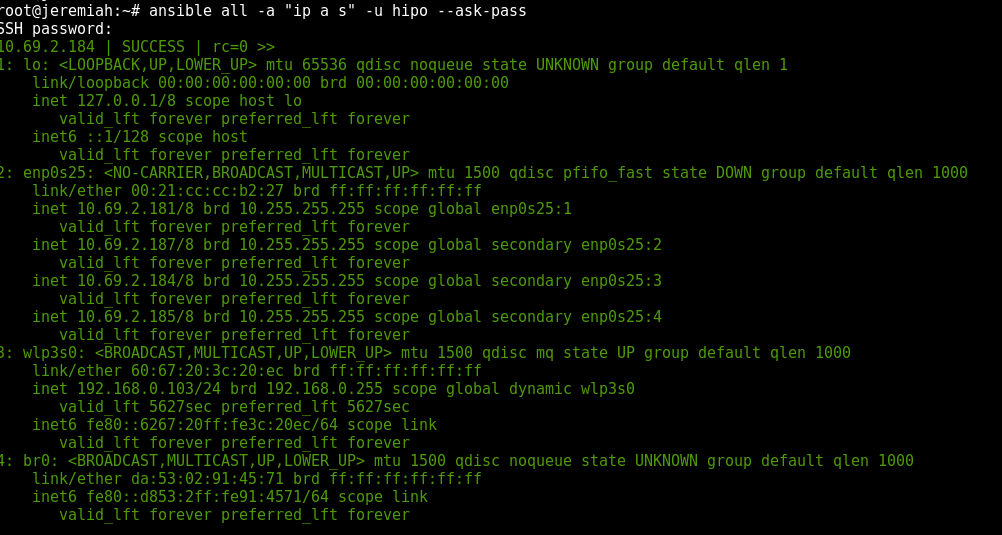
If you don't have SSH keys configured you can also authenticate with an argument (assuming) all hosts are configured with same password with:


ansible all –ask-pass -a "ip all show" -u hipo –ask-pass


ansible-show-ips-ip-a-command-screenshot-linux

If you have configured group of hosts via hosts file you can also run certain commands on just a certain host group, like so:


ansible <host-group> -a <command>

It is a good idea to always check /etc/ansible/ansible.cfg which is the system global (main red ansible config file).

c) List defined host groups
 

ansible localhost -m debug -a 'var=groups.keys()'
ansible localhost -m debug -a 'var=groups'

d) Searching remote server variables


# Search remote server variables
ansible localhost -m setup -a 'filter=*ipv4*'


ansible localhost -m setup -a 'filter=ansible_domain'


ansible all -m setup -a 'filter=ansible_domain'


# uninstall package on RPM based distros
ansible centos -s -m yum -a "name=telnet state=absent"
# uninstall package on APT distro
ansible localhost -s -m apt -a "name=telnet state=absent"


2. Debugging – Listing information about remote hosts (facts) and state of a host


# All facts for one host
ansible -m setup
  # Only ansible fact for one host
ansible
-m setup -a 'filter=ansible_eth*'
# Only facter facts but for all hosts
ansible all -m setup -a 'filter=facter_*'


To Save outputted information per-host in separate files in lets say ~/ansible/host_facts


ansible all -m setup –tree ~/ansible/host_facts


3. Playing with Playbooks deployment scripts


a) Syntax Check of a playbook yaml


ansible-playbook –syntax-check


b) Run General Infos about a playbook such as get what a playbook would do on remote hosts (tasks to run) and list-hosts defined for a playbook (like above pinging).


ansible-playbook –list-hosts
ansible-playbook
–list-tasks


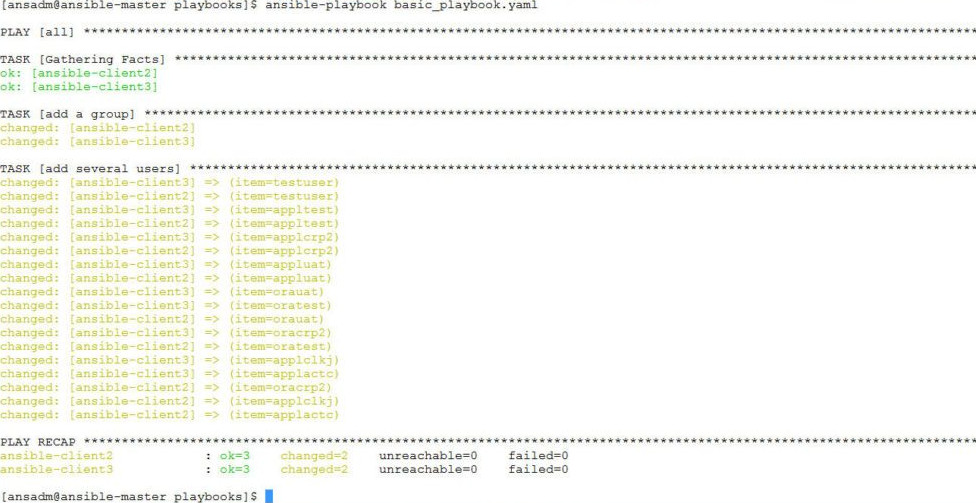
To get the idea about what an yaml playbook looks like, here is example from official ansible docs, that deploys on remote defined hosts a simple Apache webserver.


– hosts: webservers
  vars:
    http_port: 80
    max_clients: 200
  remote_user: root
  tasks:
  – name: ensure apache is at the latest version
    yum:
      name: httpd
      state: latest
  – name: write the apache config file
    template:
      src: /srv/httpd.j2
      dest: /etc/httpd.conf
    notify:
    – restart apache
  – name: ensure apache is running
    service:
      name: httpd
      state: started
  handlers:
    – name: restart apache
      service:
        name: httpd
        state: restarted

To give it a quick try save the file as webserver.yml and give it a run via ansible-playbook command
 

ansible-playbook -s playbooks/webserver.yml


The -s option instructs ansible to run play on remote server with super user (root) privileges.

The power of ansible is its modules, which are constantly growing over time a complete set of Ansible supported modules is in its official documenation.

Ansible-running-playbook-Commands-Task-script-Successful-output-1024x536

There is a lot of things to say about playbooks, just to give the brief they have there own language like a  templates, tasks, handlers, a playbook could have one or multiple plays inside (for instance instructions for deployment of one or more services).

The downsides of playbooks are they're so hard to write from scratch and edit, because yaml syntaxing is much more stricter than a normal oldschool sysadmin configuration file.
I've stucked with problems with modifying and writting .yaml files and I should say the community in #ansible in irc.freenode.net was very helpful to help me debug the obscure errors.

yamllint (The YAML Linter tool) comes handy at times, when facing yaml syntax errors, to use it install via apt:
 

# apt-get install –yes yamllint


a) Running ansible in "dry mode" just show what ansible might do but not change anything
 

ansible-playbook playbooks/PLAYBOOK_NAME.yml –check


b) Running playbook with different users and separate SSH keys


ansible-playbook playbooks/your_playbook.yml –user ansible-user
 
ansible -m ping hosts –private-key=~/.ssh/keys/custom_id_rsa -u centos


c) Running ansible playbook only for certain hostnames part of a bigger host group


ansible-playbook playbooks/PLAYBOOK_NAME.yml –limit "host1,host2,host3"


d) Run Ansible on remote hosts in parallel

To run in raw of 10 hosts in parallel
 

# Run 10 hosts parallel
ansible-playbook <File.yaml> -f 10            


e) Passing variables to .yaml scripts using commandline

Ansible has ability to pre-define variables from .yml playbooks. This variables later can be passed from shell cli, here is an example:

# Example of variable substitution pass from command line the var in varsubsts.yaml if present is defined / replaced ansible-playbook playbooks/varsubst.yaml –extra-vars "myhosts=localhost gather=yes pkg=telnet"


4. Ansible Galaxy (A Docker Hub) like large repository with playbook (script) files


Ansible Galaxy has about 10000 active users which are contributing ansible automation playbooks in fields such as Development / Networking / Cloud / Monitoring / Database / Web / Security etc.

To install from ansible galaxy use ansible-galaxy

# install from galaxy the geerlingguy mysql playbook
ansible-galaxy install geerlingguy.mysql


The available packages you can use as a template for your purpose are not so much as with Puppet as Ansible is younger and not corporate supported like Puppet, anyhow they are a lot and does cover most basic sysadmin needs for mass deployments, besides there are plenty of other unofficial yaml ansible scripts in various github repos.

Install and use personal Own Cloud on Debian Linux for better shared data security – OwnCloud a Free Software replacement for Google Drive

Thursday, August 23rd, 2018

owncloud-self-hosted-cloud-file-sharing-and-storage-service-for-gnu-linux-howto-install-on-debian

Basicly I am against the use of any Cloud type of service but as nowadays Cloud usage is almost inevitable and most of the times you need some kind of service to store and access remotely your Data from multiple devices such as DropBox, Google Drive, iCloud etc. and using some kind of infrastructure to execute high-performance computing is invitable just like the Private Cloud paid services online are booming nowdays, I decided to give a to research and test what is available as a free software in the field of Clouding (your data) 🙂

Undoubfully, it is really nice fact that there are Free Software / Open Source alternatives to run your Own personal Cloud to store your data from multiple locations on a single point.

The most popular and leading Cloud Collaboration service (which is OpenSource but unfortunately not under GPLv2 / GPV3 – e.g. not fully free software) is OwnCloud.

ownCloud is a flexible self-hosted PHP and Javascript based web application used for data synchronization and file sharing (where its remote file access capabilites are realized by Sabre/Dav an open source WebDav server.
OwnCloud allows end user to easily Store / Manage files, Calendars, Contacts, To-Do lists (user and group administration via OpenID and LDAP), public URLs can be easily, created, the users can interact with browser-based ODF (Open Document Format) word processor , there is a Bookmarking, URL Shortening service integrated, Gallery RSS Feed and Document Viewer tools such as PDF viewer etc. which makes it a great alternative to the popular Google Drive, iCloud, DropBox etc.

The main advantage of using a self-hosted Cloud is that Your data is hosted and managed by you (on your server and your hard drives) and not by some God knows who third party provider such as the upmentioned.
In other words by using OwnCloud you manage your own data and you don't share it ot on demand with the Security Agencies with CIA, MI6, Mussad … (as it is very likely most of publicly offered Cloud storage services keeps track on the data stored on them).

The other disadvantage of Cloud Computing is that the stored data on such is usually stored on multiple servers and you can never know for sure where your data is physically located, which in my opinion is way worse than the option with Self Hosted Cloud where you know where your data belongs and you can do whatever you want with your data keep it secret / delete it or share it on your demand.

OwnCloud has its clients for most popular Mobile (Smart Phone) platforms – an Android client is available in Google Play Store as well as in Apple iTunes besides the clients available for FreeBSD OS, the GNOME desktop integration package and Raspberry Pi.

For those who are looking for additional advanced features an Enterprise version of OwnCloud is also available aiming business use and included software support.

Assuming you have a homebrew server or have hired a dedidacted or VPS server (such as the Ones we provide) ,Installing OwnCloud on GNU / Linux is a relatively easy
task and it will take no more than 15 minutes to 2 hours of your life.
In that article I am going to give you a specific instructions on how to install on Debian GNU / Linux 9 but installing on RPM based distros is similar and straightfoward process.
 

1. Install MySQL / MariaDB database server backend
 

By default OwnCloud does use SQLite as a backend data storage but as SQLite stores its data in a file and is becoming quickly slow, is generally speaking slowre than relational databases such as MariaDB server (or the now almost becoming obsolete MySQL Community server).
Hence in this article I will explain how to install OwnCloud with MariaDB as a backend.

If you don't have it installed already, e.g. it is a new dedicated server install MariaDB with:
 

server:~# apt-get install –yes mariadb-server


Assuming you're install on a (brand new fresh Linux install – you might want to install also the following set of tools / services).


server:~# systemctl start mariadb
server:~# systemctl enable mariadb
server:~# mysql_secure_installation


mysql_secure_installation – is to finalize and secure MariaDB installation and set the root password.
 

2. Create necessery database and users for OwnCloud to the database server
 

linux:~# mysql -u root -p
MariaDB [(none)]> CREATE DATABASE owncloud CHARACTER SET utf8;
MariaDB [(none)]> GRANT ALL PRIVILEGES ON owncloud.* TO 'owncloud'@'localhost' IDENTIFIED BY 'owncloud_passwd';
MariaDB [(none)]> FLUSH PRIVILEGES;
MariaDB [(none)]> \q


3. Install Apache + PHP necessery deb packages
 

As of time of writting the article on Debian 9.0 the required packages for a working Apache + PHP install for OwnCloud are as follows.


server:~# apt-get install –yes apache2 mariadb-server libapache2-mod-php7.0 \
openssl php-imagick php7.0-common php7.0-curl php7.0-gd \
php7.0-imap php7.0-intl php7.0-json php7.0-ldap php7.0-mbstring \
php7.0-mcrypt php7.0-mysql php7.0-pgsql php-smbclient php-ssh2 \
php7.0-sqlite3 php7.0-xml php7.0-zip php-redis php-apcu


4. Install Redis to use as a Memory Cache for accelerated / better performance ownCloud service


Redis is an in-memory kept key-value database that is similar to Memcached so OwnCloud could use it to cache stored data files. To install latest redis-server on Debian 9:
 

server:~# apt-get install –yes redis-server

5. Install ownCloud software packages on the server

Unfortunately, default package repositories on Debian 9 does not provide owncloud server packages but only some owncloud-client packages are provided, that's perhaps the packages issued by owncloud does not match debian packages.

As of time of writting this article, the latest available OwnCloud server  version package for Debian is OC 10.

a) Add necessery GPG keys

The repositories to use are provided by owncloud.org, to use them we need to first add the necessery gpg key to verify the binaries have a legit checksum.
 

server:~# wget -qO- https://download.owncloud.org/download/repositories/stable/Debian_9.0/Release.key | sudo apt-key add –


b) Add owncloud.org repositories in separete sources.list file


server:~# echo 'deb https://download.owncloud.org/download/repositories/stable/Debian_9.0/ /' | sudo tee /etc/apt/sources.list.d/owncloud.list


c) Enable https transports for the apt install tool


server:~# apt-get –yes install apt-transport-https


d) Update Debian apt cache list files and install the pack


server:~# apt-get update


server:~# apt-get install –yes owncloud-files


By default owncloud store file location is /var/www/owncloud but on many servers that location is not really appropriate because /var/www might be situated on a hard drive partition whose size is not big enough, if that's the case just move the folder to another partition and create a symbolic link in /var/www/owncloud pointing to it …


6. Create necessery Apache configurations to make your new self-hosted cloud accessible
 

a) Create Apache config file


server:~# vim /etc/apache2/sites-available/owncloud.conf


Alias /owncloud "/var/www/owncloud/"

<Directory /var/www/owncloud/>
Options +FollowSymlinks
AllowOverride All

<IfModule mod_dav.c>
Dav off
</IfModule>

SetEnv HOME /var/www/owncloud
SetEnv HTTP_HOME /var/www/owncloud

</Directory>

b) Enable Mod_Dav (WebDAV) if it is not enabled yet


server:~# ln -sf ../mods-available/dav_fs.conf
server:~# ln -sf ../mods-available/dav_fs.load
server:~# ln -sf ../mods-available/dav.load
server:~# ln -sf ../mods-available/dav_lock.load

c) Set proper permissions for /var/www/owncloud to make upload work properly


chown -R www-data: /var/www/owncloud/


d) Restart Apache WebServer (to make new configuration affective)


server:~# /etc/init.d/apache2 restart


7. Finalize  OwnCloud Install
 

Access OwnCloud Web Interface to finish the database creation and set the administrator password for the New Self-Hosted cloud
 

http://Your_server_ip_address/owncloud/

By default the Web interface is accessible in unencrypted (insecure) http:// it is a recommended practice (if you already don't have an HTTPS SSL certificate install for the IP or the domain to install one either a self-signed certificate or even better to use LetsEncrypt CertBot to easily create a valid SSL for free for your domain


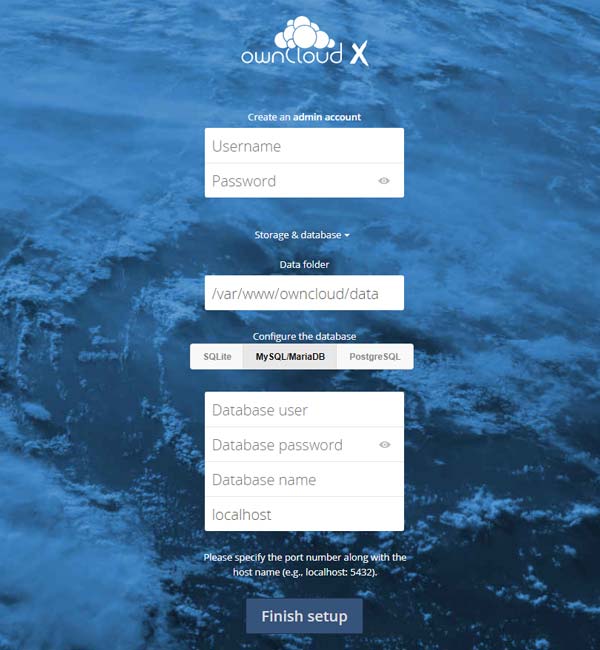
installing-OwnCloud-Web-Config-User-Pass-interface-Owncloud-10-on-Debian-9-Linux-howto

Just fill in in your desired user / pass and pass on the database user / password / db name (if required you can set also a different location for the data directory from the default one /var/www/owncloud/data.

Click Finish Setup and That's all folks!

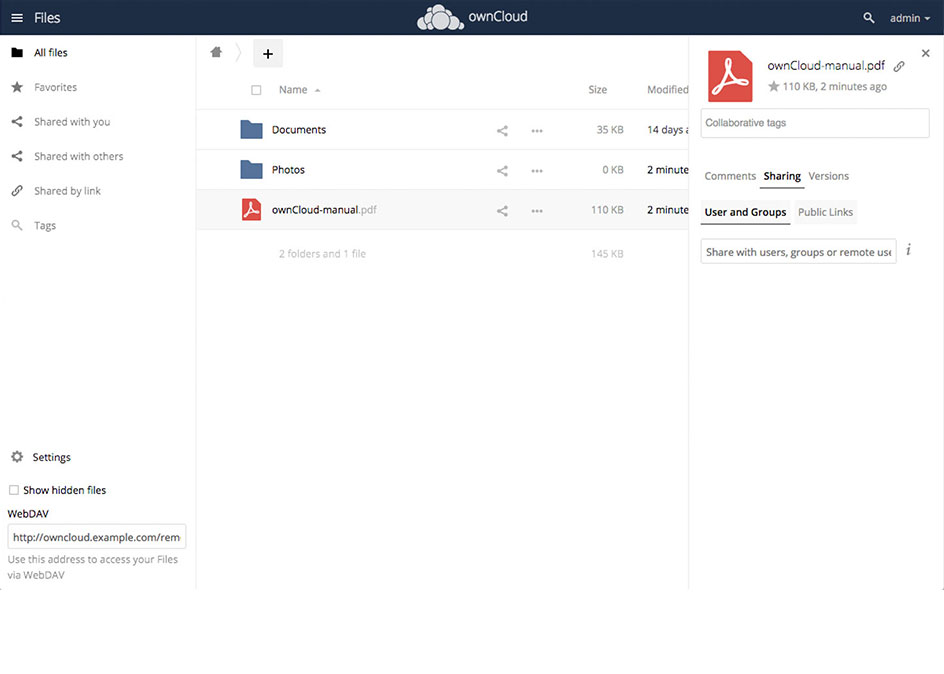
owncloud-server-web-ui-interface

OwnCloud is successfully installed on the server, you can now go and download a Mobile App or Desktop application for whatever OS you're using and start using it as a Dropbox replacement. In a certain moment you might want to consult also the official UserManual documentation as you would probably need further information on how to manage your owncloud.

Enjoy !

A lightweight Email Client Graphical client for old computers with Linux (Claws)

Sunday, August 12th, 2018

claws-email-logo-best-email-leightweight-client-for-older-computer-configurations-with-linux.

If you happen to be system administrating an old computers with some 512 Megabytes of RAM or 1 Gigabyte of Memory with preinstalled some archaic version of GNU / Linux distro such as Slackware, Calderra Linux,  Debian / Ubuntu / Fedora etc. and there is suddenly need to use this PCs with a decent graphical email client for its existing GUI environment LXDE / XFCE / WindowMaker / Mate etc. then Mozilla Thunderbird

Definitely won't be the client of choice especially if you have to add 5 or 10 email accounts (with a few hundred of emails laying on the remote mail server) to be periodically fetched via POP3 or IMAP protocol.

Of course there is always the option to just use a simple Text Email clients such as Fetchmail, PINE or MUTT and unload the PCs memory and CPU with the simplistic text interface however as most people are totally unacquainted with Linux console or terminal, for most that won't be the option of choice.
 

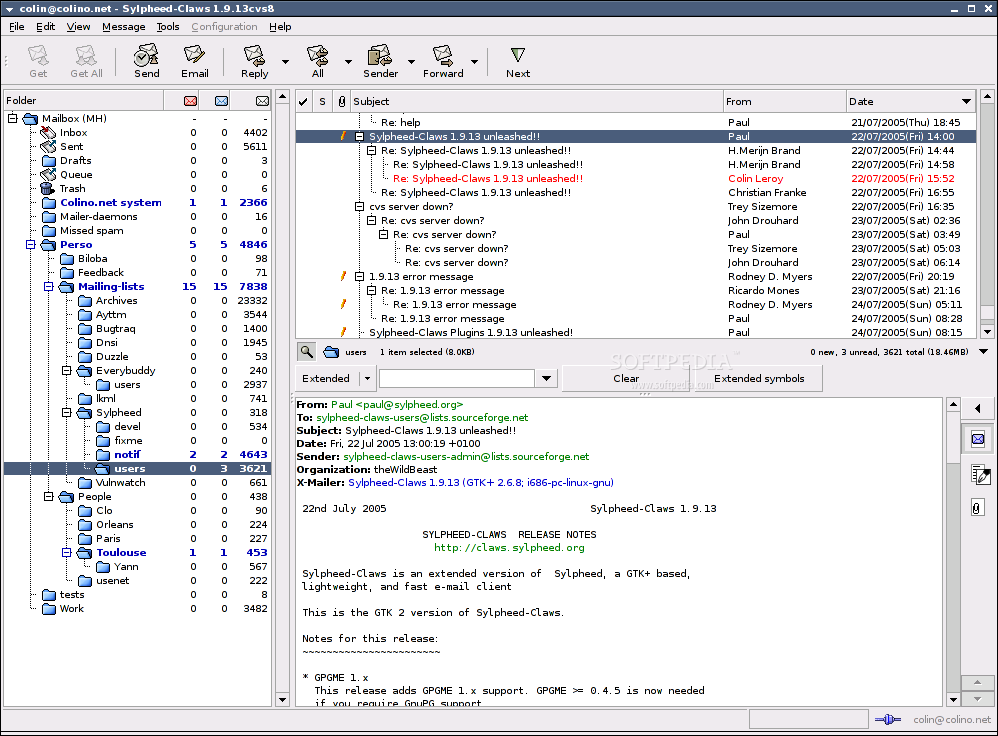
  • So what is the best solution for a lightweight Graphical Email Client for Linux for Old Computers ?


!!! Say Hello to Sylpheed CLAWS EMail Desktop client !!!

Best-Email-client-for-old-computers-with-Linux-Sylpheed-Claws_1-screenshot-on-Window-Maker


linux:~# apt-cache show claws-mail|grep -i descrip -A 3 -B 1
Breaks: claws-mail-extra-plugins (<< 3.9.1-1)
Description-en: Fast, lightweight and user-friendly GTK+2 based email client
 Claws Mail is a powerful and full-featured mail client formerly called
 Sylpheed-Claws. It is also extensible using loadable plugins, which can
 provide support for additional features, like other storage formats,
 feed reader, calendar management, mail filtering, etc.

Description-md5: f9d9f85803d938ab3d5fbc85f90e263a
Multi-Arch: foreign
Homepage: http://www.claws-mail.org
Section: mail


A. Installing Claws Email on Debian Linux distribution
 

Assuming you need to install claws on Debian based Linux distributions;


debian:~# apt-get install –yes claws-mail


B. Installing Claws on Fedora Linux distribution

For older Fedora Linux:
 

[root@fedora ~:]# yum install claws-mail


On a newer Fedora Linux installations (for those who are already used to Claws and migrate to a newer computer with a fresh Fedora install)
 

[root@fedora ~:]# dhf install claws-mail


Note that newer versions of Fedora Linux the default yum package manager has been substituted for the newer and (said to be more) advanced dhf
 

C. Installing Claws email on Slackware Linux

Claws Mail is also available as a (Tar XZ – That's a slackware highly compressed .tar.gz equivallent which saves a lot of space for its packages), to install on slack get the package from the CD / DVD or download from internet and:


darkstar:~# installpkg claws-mail*.txz


By the way Claws mail might be also the email client of choice (for those who don't have to be bound by the slavery of Office 365 / Microsoft Office and transporters and Active Domain Controller Directory with Outlook Express.

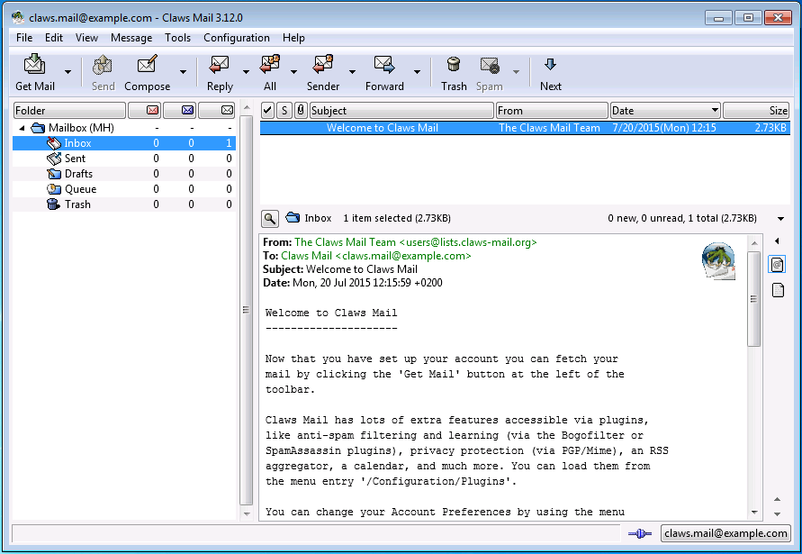
windows_claws-email-lightweight-email-client-screenshot

Even on old Computers with Microsoft Windows Claws email (which has also a Windows 32 Bit Port) might be among the best options for those who value their computer resources and interface simplicity and hence want to save memory and CPU load.

That is it,  try and enjoy Sylpheed Claws !


How to check Linux OS install date / How long ago was Linux installed

Sunday, October 22nd, 2017

If you're sysadmin who inherited a few hundreds of Linux machines from a previous admin and you're in process of investigating how things were configured by the previous administrator one of the crucial things to find out might be

How Long ago was Linux installed?

Here is how to check the Linux OS install date.

The universal way nomatter the Linux distribution is to use fullowing command:


root@pcfreak:~# tune2fs -l /dev/sda1 | grep 'Filesystem created:'
Filesystem created:       Thu Sep  6 21:44:22 2012


Above command assumes the Linux's root partition / is installed on /dev/sda1 however if your case is different, e.g. the primary root partition is installed on /dev/sda2 or /dev/sdb1 / dev/sdb2 etc. just place the right first partition into the command.

If primary install root partition is /dev/sdb1 for example:
 

root@pcfreak:~# tune2fs -l /dev/sdb1 | grep 'Filesystem created:'


To find out what is the root partition of the Linux server installed use fdisk command:


root@pcfreak:~# fdisk -l


Disk /dev/sda: 465,8 GiB, 500107862016 bytes, 976773168 sectors
Units: sectors of 1 * 512 = 512 bytes
Sector size (logical/physical): 512 bytes / 512 bytes
I/O size (minimum/optimal): 512 bytes / 512 bytes
Disklabel type: dos
Disk identifier: 0x00051eda

Device     Boot     Start       End   Sectors   Size Id Type
/dev/sda1  *         2048 965193727 965191680 460,2G 83 Linux
/dev/sda2       965195774 976771071  11575298   5,5G  5 Extended
/dev/sda5       965195776 976771071  11575296   5,5G 82 Linux swap / Solaris

Disk /dev/sdb: 111,8 GiB, 120034123776 bytes, 234441648 sectors
Units: sectors of 1 * 512 = 512 bytes
Sector size (logical/physical): 512 bytes / 512 bytes
I/O size (minimum/optimal): 512 bytes / 512 bytes
Disklabel type: dos
Disk identifier: 0x00000000


Other ways to check the Linux OS install date on Debian / Ubuntu / Mint etc. deb. based GNU / Linux


Deban based Linux distributions do create an initial /var/log/installer directory containing various install information such as hardware-summary, partition, initial installed deb packages, exact version of Linux distribution, and the way it was installed either it was installed from an ISO image, or it was network install etc.


root@pcfreak:~# ls -al /var/log/installer/
total 1228
drwxr-xr-x  3 root root   4096 sep  6  2012 ./
drwxr-xr-x 72 root root  12288 окт 22 06:26 ../
drwxr-xr-x  2 root root   4096 sep  6  2012 cdebconf/
-rw-r–r–  1 root root  17691 sep  6  2012 hardware-summary
-rw-r–r–  1 root root    163 sep  6  2012 lsb-release
-rw——-  1 root root 779983 sep  6  2012 partman
-rw-r–r–  1 root root  51640 sep  6  2012 status
-rw——-  1 root root 363674 sep  6  2012 syslog


If those directory is missing was wiped out by the previous administrator, to clear up traces of his previous work before he left job another possible way to find out exact install date is to check timestamp of /lost+found directory;
 

root@pcfreak:~# ls -ld /lost+found/
drwx—— 2 root root 16384 sep  6  2012 /lost+found//


Check OS Linux install date on (Fedora, CentOS, Scientific Linux, Oracle and other Redhat RPM based Distros)


[root@centos: ~]# rpm -qi basesystem
Name        : basesystem
Version     : 10.0
Release     : 7.el7
Architecture: noarch
Install Date: Mon 02 May 2016 19:20:58 BST
Group       : System Environment/Base
Size        : 0
License     : Public Domain
Signature   : RSA/SHA256, Tue 01 Apr 2014 14:23:16 BST, Key ID     199e2f91fd431d51
Source RPM  : basesystem-10.0-7.el7.src.rpm
Build Date  : Fri 27 Dec 2013 17:22:15 GMT
Build Host  : ppc-015.build.eng.bos.redhat.com
Relocations : (not relocatable)
Packager    : Red Hat, Inc. <http://bugzilla.redhat.com/bugzilla>
Vendor      : Red Hat, Inc.
Summary     : The skeleton package which defines a simple Red Hat Enterprise Linux system
Description :
Basesystem defines the components of a basic Red Hat Enterprise Linux
system (for example, the package installation order to use during
bootstrapping). Basesystem should be in every installation of a system,
and it should never be removed.


Check Windows install date / Howto find install time and date / Check how old is Windows

Sunday, October 22nd, 2017

how-to-find-windows-install-date-change-windows-install-date-change-file-folder-creation-date-howto

Just like us people operating systems have age, they have stages of young, teenage, grow up and old 🙂

Finding out how old is Windows as Operating System is important task for Windows system administrator and Tech support and can help you decide whether the OS requires a fresh reinstall as Windows is known historically to start misbehaving with its aging and especially for Computer Technicians / Support that have Windows Support clients or for Computer Clubs support guys, it is a among the good practices to re-install Windows every few years (every 3 / 4 years for servers to 7 years for Win Servers) and for Desktop or Gamers PCs the lifecycle of OS often much less, a reinstall is required every 2, 2.5 years or so.

Of course Desktop PC Windows users are much more prone to the requirement for frequent reinstalls, because they tend to install a lot of shit cracked, software games and a lot of ugly stuff, that infests the PC and fills up registry with a lot of broken and useless content.

Finding out, the install date of Programs (Applications) in Windows


1. In registry: HKEY_LOCAL_MACHINESoftwareMicrosoftWindowsCurrentVersionUninstall

InstallDate
YYYYMMDD (eg 20090301 for here March 1, 2009)


2. Through Control Panel -> Programs and Features

From Column:

"Installed on"


Determine the install date of Windows
 

1. In command line you have to issue:
 

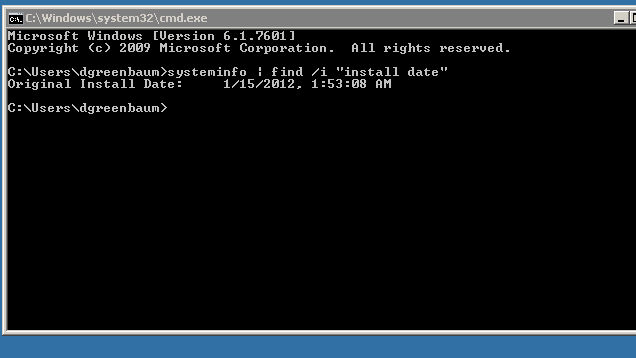
systeminfo|find /i "original"


systeminfo-find-original-windows-server-screenshot-get-windows-install-date-howto

Note that this command will work on Windows Servers 2003, 2007, 2010 and Windows XP, 7, 8 but will show empty result on Windows 10


2. In cmd (command prompt):
 

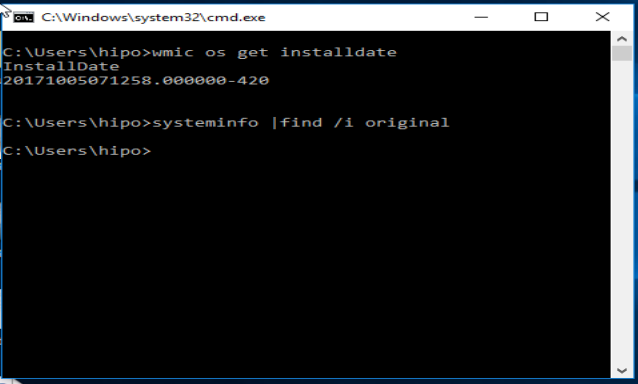
WMIC OS GET installdate


systeminfo-find-original-windows-server-screenshot-get-windows-install-date-howto1


Reult you will get will be like:
20131019011658

Deciphered this Windows install date is on: 2013(year) 10(month) 19(date) 01(hour) 16(minutes) 58(seconds)
 

3. Another way to get the OS install date via Windows Registers:


HKLMSOFTWAREMicrosoftWindows NTCurrentVersionInstallDate


You will find  therea record number like 1414160971, to get the actual date you have to convert that to decimal
Конвертира се в decimal, и примерно излиза: 1414160971

To convert for those who have GNU / Linux or *BSD at hand the easiest way to convert it is to use below command that converts from unix timestampt to readable date command output:


echo 1414160971 | gawk '{print strftime("%c", $0)}'
24.10.2014 (fr) 17:29:31 EEST


For those that doesn't have GNU / Linux at hand you can use this online tool for conversion unix timestamp to readable output


How to edit creation date, and date of file or folder edit in Windows?

Как да се редактира дата на създаване, дата на редактиране на файл или папка под Windows:

Well why would you want to change the creation date of Windows install or creation date of file or folder edit in Windows?
Well just for the fun or because it can 🙂

Actually a lot of Windows white hats and mostly Script Kiddies (malicious crackers) do use this feature to falsify changed files in Windows lets say system files or any other Windows file, sometimes dumping the install date could be useful in computer data theft investigations or by crackers (please don't mix it with hackers, because term hacker is to be coined for a genius programmers and playful people).

It is possible to do a lot if not everything via Windows registry but perhaps the best way is to use a simple tool Attribute Changer, that is capable to change Windows file, folder and windows install creation date.