It was a day full of waiting. The Admin/tech support personel in sofia is a real pain in the ass. I waited half a day for a simple debian base install. The guy installed debian over already installed freebsd on a server we sent destined for colocation in evolink. The machine is great dual 3ghz Xeon with 3 x 70 gb SCSI discs. In 4:00 o’clock I received a mail with username and password of the server, but the system was unaccessible for 1 more hour. I got really nervous I received tons of calls from the boss, our project Manager, Vladi the PHP programmer. I logged to the server in 5:00 and configured apache with mysql upto 10:00 o’clock then did a little walk with nomen in the central park and drinked one beer per capita. I had to meet Static and Amri in 6:00 o’clock but I was busy configuring the new rack so I missed a great oportunity to have fun with old friends. ORDER has to come back to Bulgaria, today or even he maybe is already in Varna. I’m quite impatient to see him! In the afternoon I went to some spiritual downfalls but now Thanks to God I’m alive and well. The pozvanete site already points to the new rack so I hope the machine would be able to serve it’s goal perfect. This will be made clear in the morning. Soon I’m going to bed. Glory be to God for fulfilling me with his love and sustaining my life and keeping me from evil! END—–
Posts Tagged ‘username’
Troubled Day
Thursday, April 5th, 2007How to enable Automatic login in GNOME GDM 2 on GNU / Linux
Thursday, January 26th, 2012I needed to enable automatic passwordless login in my Debian GNU/Linux …
GNOME and GDM desktop environments developed a lot through the last few years, achieving these simple task was doable only through gdm manual configurations. Nowdays creatiion of user to login without any password is easy via easy to use GUI program.
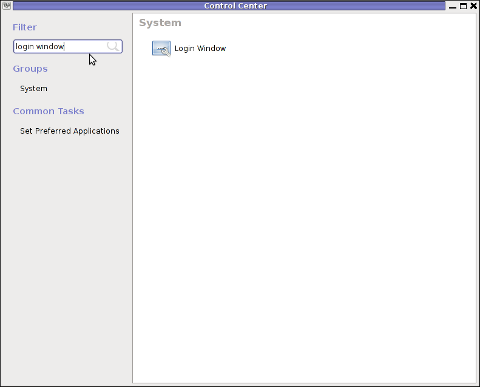
In this article I'll explain, few ways to enable automatic login in GNOMEThe quickest way is to navigate in GNOMEs gnome-control-center -> Login Window submenu
To do so launch gnome-control-center – press (ALT+F2) keys and type in gnome-control-center, or launch via command line in gnome-terminal or xterm:
hipo@debian:~$ gnome-control-center
While inside the control center find en launch the Login Window as in the screenshot below:
Login Window configuration can be also done directly by launching gdmsetup from command line e.g.:
hipo@debian:~$ /usr/sbin/gdmsetup

...
gdmsetup will further pop up a window asking to type in the root password to allow you to customize, how gdm will deal with user logins.
For who might not know gnome well architecture, gdmsetup is part of the gdm (Gnome Display Manager) package and is the default login program used to login the end user in most of the modern Linux based distributions as well as BSDs. gdm logins the users on many of the free software OS desktop environments like GNOME, LXDE, XFCE… Just to name a few of the many Linuces counting on GDM to handle the user logins: Ubuntu, Xubuntu, Fedora, Debian, Linux Mint, OpenSUSE etc.
Once the Login Windows Prefences appears go to the Security tab.
As you can see in the screenshot, what you can do with gdmsetup it is pretty self-explanatory:
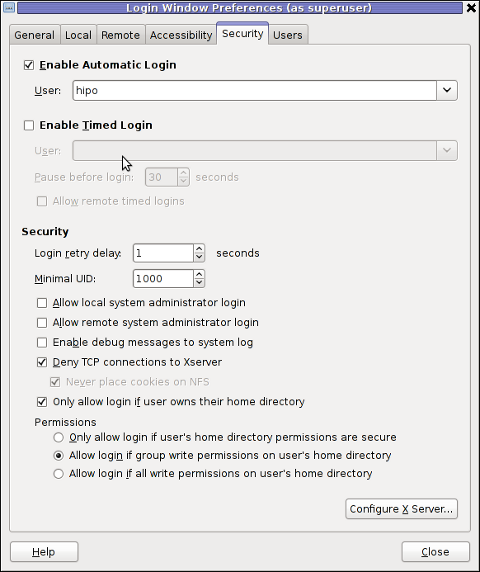
The two options of interests for user authorization without pass are:
a. Enable Automatic Login
To enable:- put a tick on Enable Automatic Login
– from user dropdown menu, choose the user which has to be configured
b. Enable Timed Login
Enable Automatic Login lets the user login without any user password input, immediately after the configured username is typed in (if gdm is with type username prompt).
In case where the usernames are represented by Avatars, (like its in most user friendly Linux distributions), once clicked avatar the user is logged in.
When Enable Timed Login is ticked and a username is choosen or typed, instead of immediately logging the user on click or username input, the user logging is delayed with a number of set seconds .
Enabling the Automatic and / or Timed Login is doable also using few simple configurations directives in /etc/gdm/custom.conf. In many distros /etc/gdm/custom.conf will be not existing and hence the file has to be created.
To enable delayed autologin without password for a user using gdm config:
Create the file with a text editor ( vim, joe, nano )whatever your favourity and place inside:
[daemon]

TimedLoginEnable=true

TimedLogin=hipo

TimedLoginDelay=30
The above gdm config vars can also be placed inside /etc/gdm/gdm.conf but for the sake of clarity its better if custom.conf is used.
If you don't want to bother with a text editor copy paste inside any terminal lets say mlterm :
echo '[daemon]' >> /etc/gdm/custom.conf
echo 'TimedLoginEnable=true' >> /etc/gdm/custom.conf
echo 'TimedLogin=hipo' >> /etc/gdm/custom.conf
echo 'TimedLoginDelay=30' >> /etc/gdm/custom.conf
To enable auto-login for a user on a first PC boot in /etc/gdm/custom.conf put:
[daemon]

AutomaticLoginEnable=true

AutomaticLogin=hipo
An auto login can also be done by using the TimedLoginDelay gdm config directive by putting insetad of the previous code a code like:
[daemon]

TimedLoginEnable=true

TimedLogin=hipo

TimedLoginDelay=0
Where hipo is my desired username that will autolog, and as you see the LoginDelay is 0 (e.g. no gdm login delay)
I attempted to also allow autologin for several users with some cinfigurations like:
[daemon]

AutomaticLoginEnable=true

AutomaticLogin=hipo

AutomaticLogin=other-username
as well as configurations like:
[daemon]

TimedLoginEnable=true

TimedLogin=hipo

TimedLogin=other-username

TimedLoginDelay=0
In gdm3, the location of GDM config files should be /etc/gdm3/ directory, anyways the configurations directives should be working just like in gdm2
After any configuration changes to gdm.conf or custom.conf to load the new settings in gdm a gdm daemon restart is necessery with cmd:
root@debian:~# /etc/init.d/gdm restart

...
Note that, weirdly not using the gdm init script and trying to kill -HUP $(pidof gdm) / killall -9 gdm will not make gdm to load its new configurations. So always restart via /etc/init.d/gdm restart after gdm conf change.
Another alternative method to achieve login without a password input is by creating a passwordless user account on the system. This method is not recommended though, especially for machines with real IP addresses visible from the Internet (with lets say enabled) SSHD access.
Using a passwordless system account can expose the system to a severe security risk!!! Anyways, for systems not running telnet/sshd or any other system remote access service creating a user without an empty password might be not such a bad idea.
To make a user auto login without any password input /etc/shadow file (storing all user account information) needs an edit.
This is an example user entry taken from /etc/shadow:
test:$6$OPdvXArZ$ktujC6bBh9JNaCz8E9v61yNeWcJHqQiuNk8eBzevcwcIl8KFvQzJ6aBCvVpIs0Lf5MAbHjjqftUeN9crWUfxs.:15275:0:99999:7:::Now to make the test user login directly without any pass input, one can just remove his encrypted password string. After the change the user line in /etc/shadow, should be:
test::15275:0:99999:7:::
If the user is created just from scratch e.g. (a new user) that needs to login passwordless in GDM, create it without password:
root@debian:~# adduser -d newusername
To sum it up the good thing about the remove password hash method to auto login a user is that it will allow user or users login across all Display Managers (not only GDM specific).
The bad side is it is very insecure and therefore in most times a really bad practice.
I guess the described ways to login without password in Gdm on FreeBSD should similar, unfortunately right now I have not access to BSD running desktop to test it. If someone has tested it and can confirm it works it will be great to drop a comment.
Using rsync to copy / synchronize files or backups between Linux / BSD / Unix servers
Monday, November 21st, 2011![]()
Many of us have already taken advantage of the powerful Rsync proggie, however I'm quite sure there are still people who never used rsync to transfer files between servers.. That's why I came with this small post to possibly introduce rsync to my blog readers.
Why Rsync and not Scp or SFTP? Well Rsync is designed from the start for large files transfer and optimized to do the file copying job really efficient. Some tests with scp against rsync will clearly show rsync's superiority.
Rsync is also handy to contiue copying of half copied files or backups and thus in many cases saves bandwidth and machine hdd i/o operations.
The most simple way to use rsync is:
server:~# rsync -avz -e ssh remoteuser@remotehost:/remote/directory /local/directory/
Where remoteuser@remotehost — is the the username and hostname of remote server to copy files to.
/remote/directory — is the directory where the rsync copied files should be stored
/local/directory — is the local directory from which files will be copied to remote directory
If not a preliminary passwordless ssh key (RSA / DSA) authentication is configured on remote server, the above command will prompt for a password otherwise the rsync will start doing the transfer.
If one needs to have a RSA or DSA (public / private key) passwordless SSH key authentication , a RSA key first should be generated and copied over to the remote server, like so:
server:~# ssh-keygen -t dsa
...
server:~# ssh-copy-id -i ~/.ssh/id_dsa.pub root@remotehost
...
That's all folks, enjoy rsyncing 😉
Howto remote access Windows PC which is behind Vivacom ADSL (Commtrend SmartAX MT882 router) modem with VNC server
Wednesday, May 11th, 2011I had been assigned the not easy task to make a Windows XP Pro which is located behind an ADSL modem to be remotely accessible via VNC
The Windows is connected to the Bulgarian Vivacom Intrnet provider through their ADSL service and hence there is an ADSL router modem which is configured to disallow all inbuond connections by default.
The Windows Pro PC where the VNC server was needed to be accessible did not have a real IP address (e.g. was assigned a virtual IP address by the ADSL modem.
The exact ADSL model used to connect the computer via a lan cable to the internet was Huawei SmartAX MT882
As the device is owned by Vivacom (the ex BTK tele communication company) I did not have any admin user and pass credentials for the ADSL modem to configure the ADSL router to do a port NAT forwarding of port 5800 and 5900 used by the VNC software I installed on the PC (TightVNC)
Nevertheless the missing user and password I decided to check in google if I can find some default passwords that Vivacom ADSL modems are configured to work with
After a few minutes spend in Google I already had found few passwords which were said to work fine with the Vivacom ADSL router.
Here are the passwords I found for the Vivacom ADSL Internet modems:
ZTE ZXDSL 832
username: root
password:GSrootaccess
ZTE ZXDSL 831
username:root
password:GSrootaccess
ZTE
username:root
password:831access
Huawei SmartAX MT882
username:root
password:MT882rootaccess
ZTE ZXDSL-531b
username: root
password:warmWLspot
I tried some old school brute force techniques 😉 by trying all the passwords via the ADSL web interface located on http://192.168.1.1 (I was not sure which model the Vivacom ADSL modem is as on the router there was nothing written concerning the modem type but only the Vivacom logo was present.
After a bit of time I already knew that the ADSL modem model, user and pass was:
Huawei SmartAX MT882
-------------------------------
user: root
pass: MT882rootaccess
My next step was to configure port forwarding for the SmartAX MT882 ADSL in order to achieve from modem’s web administrator I had to follow the menus:
Advanced Setup -> Virtual Servers
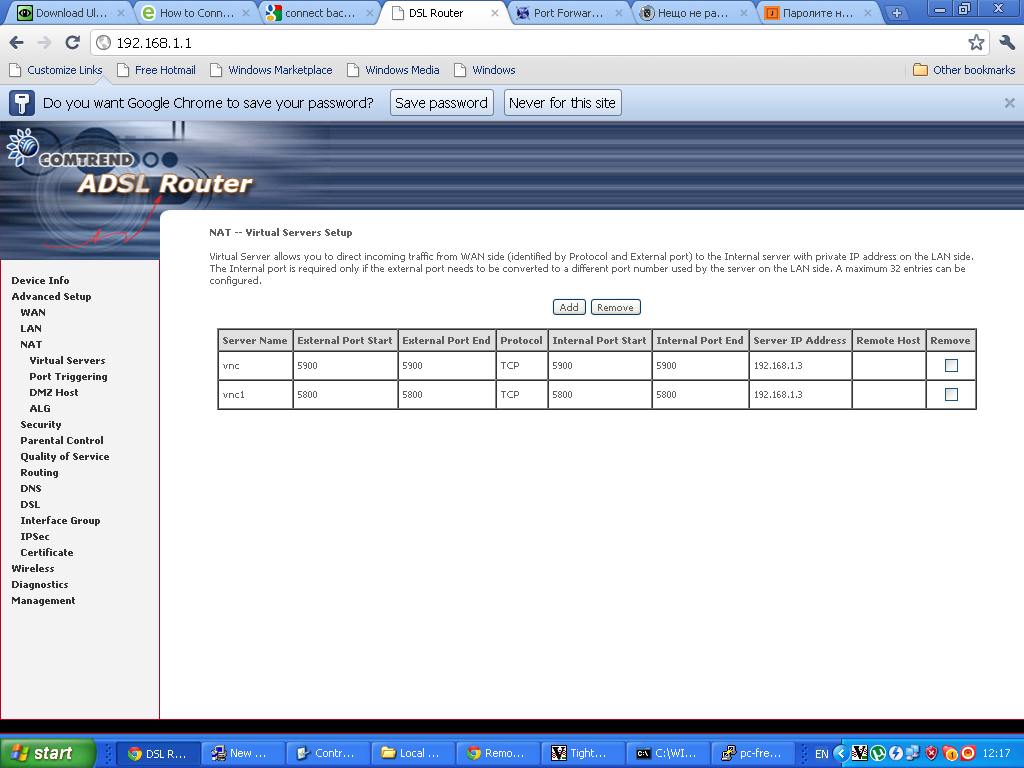
Next in the NAT — Virtual Servers section I pressed the Add button to create new automatic redirection (port forwarding) rule.
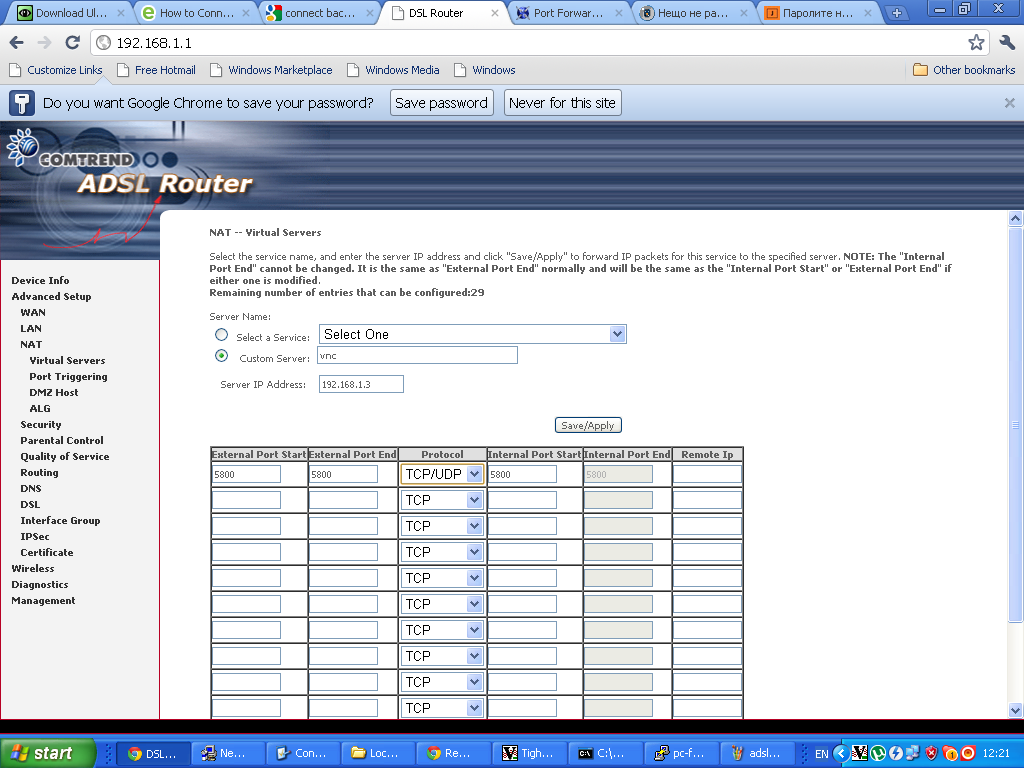 Configuring ADSL SmartAX MT882 TightVNC NAT port redirection screenTightVNC requires also NAT port redirection rule for port 5900 in order to be able to connect to the VNC server behind the dsl, so analogically I added a Virtual Server NAT rule for port 5900.
Note that the private IP address of the Windows host was assigned by the ADSL router to the ip 192.168.1.3
Further on I expected the adsl port forwarding created rule would now allow me to connect to the VNC server on the pc located behind the dsl firewall, but I was wrong… even though all seemed to be configured just fine in the ADSL router still the port unmbers 5800 and 5900 were showing up as closed during nmap scan as well as a simple telnet connection to port 5800 and 5900 failed to get established.
My logical assumption was that some configured Firewall on the Windows PC is blocking port connections to 5800 and 5900 thus I decided to check the default Windows Firewall settings as a first possible cause for the vnc ports being blocked.
I did that via the Windows menus:
Start -> Settings -> Control Panel -> Windows Firewall
However weirly enought it seemed the Windows Firewall was disabled e.g. the Off (not recommended) option was set for the firewall.
A bunch of other lookup over all the running system and services on the windows hosts I have found the PC is protected by NOD32 Antivirus – Personal Firewall
The default behaviour of NOD32’s Persnal firewall was extremely restrictive and I found it’s causing a port filter of the 5800 and 5900 vnc connection ports.
To solve the filtering nod32 did I had to open NOD32 and navigate to the following menus:
Setup -> Personal Firewall -> Configure rules and Zones
In the Zone and rule setup menu config window I had to further press on:
New button to add new personal firewall rule.
In the New rule: menu I filled in the following info:
In the General tab:
Name: vnc
Direction: Both
Action: Allow
In the tab Local
I pressed over the Add Port
Number: 5800
in the Remote tab once again I had to fill in:
Number: 5800
Then to confirm settings just pressed OK
Next on I added in the same manner an allow rule for port 5900.
After this settings I restarted the NOD32 firewall to make sure the new settings takes place by pressing over the Personal firewall button Disable filtering: allow all traffic and right after enabling the firewall once again.
Now remote tightvnc connections to the Windows XP Pro pc works like a charm once again, Thanks God 😉


How to add OpenID functionality to WordPress Comments / What is OpenID?
Tuesday, February 14th, 2012I've recently decided to add Comment as OpenID functionality to my wordpress blog. The reasons to do that is that I myself have today created an OpenID account. Already million of people have OpenID account without even knowing. Most major search engines and social websites like Google, Yahoo, Live Journal, Hyves, Blogger, Flicker, MySpace automatically creates an OpenID account for newly registered users.
It is up to the user to check with each of the aforementioned providers what is the URL of their OpenID account.
Even though OpenID popularity is steadly rising, I'm sure there are still plenty of users who did not heard, used or noticed OpenID yet.
So What the heck is OpenID?
For all those who still haven't heard about it, OpenID is a universal web site login system With just one "unified" OpenID account the user can login to multiple websites with no need to create multiple accounts across each and every different website on the internet.
The only requirement for the user to be able to use OpenID is that the website in question to have (support) for OpenID credential and the user to have existing OpenID account.
Therefore using one single OpenID you can sign in as a certain user to multiple websites on the internet with no need for annoying registration process to each and every new website you encounter. Another benefit OpenID gives to the user is that you don't have to memorize or keep notes of a tens or thousands of different login accounts across the many different websites on the net.
Using OpenID also saves the user from troubles with forgotten password or username as just one OpenID login is used to login you everywhere.
For WordPress blogging platform the Russian Igor Korolev, has written a wordpress plugin – comments-to-wordpress . This plugin adds support for OpenID authentication in WordPress comments.
Here is how to OpenID to WordPress:
1. Download the comments-with-wordpress plugin and unzipAs of writting of this article latest comments-to-wordpress plugin is ver. 1.4.
Download the plugin to blog path directory lets say, /var/www/blog/wp-content/plugins/ and unzip:
# cd /var/www/blog/wp-content/plugins

# wget http://downloads.wordpress.org/plugin/comments-with-openid.zip

...

# unzip comments-with-openid.zip

...
I've also done a mirror for download of comments-with-openid 1.4 here
2. Enable Comments with OpenID wp plugin
Next the plugin has to be Enabled, just like any other wordpress plugin via admin menus:
Plugins -> Inactive -> Comments with OpenID (enable)
Once the plugin is enaabled it is necessery to add some code with a text editor in file /var/www/blog/wp-content/themes/default/comments.php
Small noet to make here: If you're not using the default WordPress theme (like I do), you will have to edit the /themes/your-theme-name/comments.php instead.
Inside the file look for the form input fields:
<p> <input type="text" name="author" ....

...

<p> <input type="text" name="email" id="email" ....

...

<p> <input type="text" name="url" id="url" ....

...
Before the html tags code:
Paste the following code:
<?php comments_with_openid(); ?>
Save the comments.php file and you Identification for new comments with OpenID will appear in your wordpress Comments form.
The OpenID plugin will add a number of service OpenIDs to choose between like you can see in my blog's plugin section or the screenshot below:
The URL https://www.google.com/accounts/o8/id is just a sample and showed because I clicked on the Google icon. If you have a Google profile you can check the exact ID and use it as URL there. Simply if your browser is logged in Gmail and you have Google profile. OpenID should work. As you can see the plugin supports a number of services which already support OpenID auth, the list of services can be easily extended by adding minor changes in …/plugins/comments-with-openid/comments-with-openid.php
There is also another wordpress plugin with the openid name – http://wordpress.org/extend/plugins/openid/
Downloading and enabling the other openid plugin also adds support for OpenID login in your http://your-url.com/wp-admin/ login page.
Installing the OpenID plugin is needed especially if you're a blogger blogging on 5 or 10 different topic oriented blogs, once downloading and installing the OpenID plugin will allow you to login across the blog ring without loosing time or bothering to remember different passwords across all the blogs. Here is a screenshot of the /wp-admin wordpress login page with the OpenID wp plugin enabled:
As of time of writting according to http://openid.net/get-an-openid/what-is-openid/'s website there are over 50000 major websites on the net already accepting OpenID login.
Of course as every technlogy OpenID is not perfect and along with its convenience in some cases it could impose security hole. OpenID opponents claim under some circumstances OpenID is prone to forgery, XSS (cross site scripting) and XSFR attacks. Everyone who is about to use OpenID should be also aware of the great security risk it impose if one OpenID account gets stolen through sniffing, this could mean multiple websites can be accesses with the one single OpenID by the malicious user and a lot of confidential data owned by the user can be revealed or deleted …
With this said I think OpenID is not a recommended login technology for Windows users, as windows is famous for being vulnerable to so many Viruses and Spyware/Malware etc..
With non-free software OSes like MS Windows, the user never cannot for sure if the system is infected, hence using OpenID to transfer credentials over the internet or store an OpenID SSL/(TLS) certificate to identify in websites is TOO DANGEROUS!
Hope this article was helpful. Cya
Tags: authentication, Auto, benefit, code, Comment, Draft, file, functionality, google, hyves, igor korolev, Journal, login, login accounts, major search engines, need, openid, password, php, platform, plugin, popularity, quot, Russian, Search, support, tens, text, type, universal web, url, username, wget, what the heck, Wordpress, writting, Yahoo
Posted in System Administration, Web and CMS, Wordpress | 2 Comments »