Posts Tagged ‘google’
Saturday, February 18th, 2012 I've hit an interesting article in Wikipedia called Comparison of BSD operating systems
The article explains basic difference between different BSD (Berkley Software Distributions) and what is the primary accent of each of the BSD (free software OS) distributions. It also reveals basic details about the history and how each of the BSD's came to existence. I recommend to anyone interested in free software as it is just a great reading for everybody interested in FOSS.
The most interesting part of the wiki thread is a bar chart, provided by BSD Certification Group research conducted in September 2005.
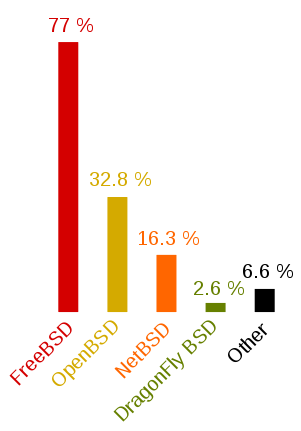
The above diagram is showing the proportion of users of each BSD variant from the BSD usage survey prior conducted
The research is already 6 years old, and unfortunately as of time of writting seems to be the only publicly available. Though being outdated, I believe generally the bar charts distributions along different BSD variants would be mostly true. The only big difference will be probably in PC-BSD which is not even on the diagram should have outbeaten DragonflyBSD's use. Since there is no public data available for 2012 and the years 2005 – 2012 for the use percantage of each of the BSD distributions, I've thought about a pseudo way to get some general statistics on each of the BSD distributions popularity. The methodology to gather the required statistics comes to simply, type in Google each of the BSD variant "code names" (e.g. freebsd, netbsd, openbsd etc.) and look at the number of results returned. It seems logical the more results distribution keyword searched returns, the bigger the probability of more users to be involved in developing or using the respective BSD variant.
Below you see the results, I've gathered in my quick "google research":
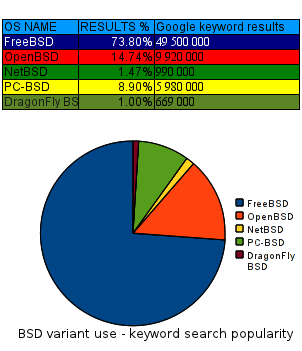
As you can see in the above data FreeBSD is still probably leading the BSD use, the public interest to OpenBSD – BSD focused on security has significantly grow since the last 6 years. Next it is seen the PC-BSD users base has probably tremendously increased and according to the Google results returned it is probably on a 3rd place by users interest (use?) followed by NetBSD with only 1.47% of all the BSD users. Lastly with only 0.99%, orders Dragonfly BSD which no longer is so popular as a Desktop BSD based OS as it used to be back in 2005.
Again the presented diagram results are based on only on the factor of Google BSD variant popularity and hence shouldn't be consired too trustworthy, still I'm sure it gives a general idea on how used is each of the BSD variants as of Jan 2012. Tags: Auto, bar charts, Berkley, bsd distributions, bsd variant, bsd variants, Certification, certification group, code names, comparison, distribution type, distributions, Draft, DragonflyBSD, everybody, existence, foss, general statistics, google, google research, Group, group research, interest, NetBSD, OpenBSD, pc bsd, percantage, place, primary accent, probability, proportion, pseudo, public interest, reading, software, software distributions, survey, thread, time, type, usage survey, Wikipedia
Posted in FreeBSD, System Administration, Various | No Comments »
Friday, December 3rd, 2010 ‘ve used the RSForms to build some custom Joomla Contact forms.
The RSForms was recommended to me by a friend and actually it’s a pretty cool and quick way to create forms.
I’ve installed it and played a bit with it to create a custom forms for one of the website I had to bring up just recently.
After the contact form was ready however there was a problem with sending emails. It took me quite a while to find out how to solve the problemwith contact not able to mail whatever is filled in.
First time I tried the RSForms after filling in the details and pressing the submit button,I got the error message;
Could not instantiate mail function.
I should say that, I’m running a QMAIL email server on the server where I have the Joomla & RSForms installed and configured.
I’ve came up with a solution to this issue after some research in Google
In order to solve that you will have to login to your Joomla administrator and
Navigate to:
Site -> Global Configuration -> Server
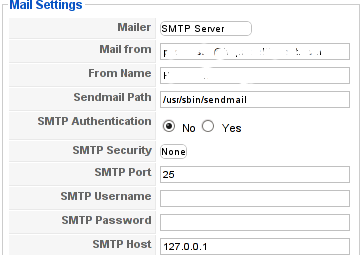
Whenever it opens up you should be seing the Mail Settings on the bottom right corner;
From there you will have to change the Mailer from PHP Mail Function to SMTP Server
To give you a better idea check out the screenshot of the Mail Settings below:
Changing this simple setting resolved the Could not instantiate mail function for me.
Right after I tested the RSForms to send my filled in form content but this time the PHPMAILER_RECIPIENTS_FAILED message was there;
This error was caused actually by a mistake I made in the configuration of the Custom RSForm I have prepared;
In Components -> RSForm!Pro -> Manage forms whenever I was preparing my form I’ve made a mistake in the User Emails customized field in my custom prepared form in the To: field I had a wrong variable set (a different value was set from the E-mail caption I’ve set on).
Solving this solved the issue. Even though the PHPMAILER_RECIPIENTS_FAILED was gone now, next I was unpleasently surprised by another error message which prevented the Contact form to properly send the input data:
Now I had to fight with the error;
PHPMAILER_FROM_FAILED
It took me a while and a lot of forums reading before I figure it out again my custom prepared RSForm had an issue;
The problem was in the Admin Emails customization of the form in the From: fill in box I had mistakenly typed in proper email, setting a proper email there solved the issue;
I’ve red online many suggested solutions to the issue which dealt with changes in the the file joomla/components/com_contact/controller.php around line 112, 162 etc.
I should say that before I found and solved the actual problem I’ve tried modifing this file also but with zero success.
Sometimes Linux is so complicated, it really pisses me of, why is not life easier? 😐
Tags: amp, bottom right corner, Button, Components, contact forms, content, cool, custom, email server, Emails, error message, file, form, function, Global, global configuration, google, How to fix "Could not instantiate mail function", login, mail function, mail settings, Manage, mistake, php, phpmailer, PHPMAILER_RECIPIENTS_FAILED and PHPMAILER_FROM_FAILED on Joomla and RSforms, problemwith, RECIPIENTS, screenshot, site, time, User, value
Posted in Joomla, Programming, System Administration, Various | 2 Comments »
Monday, December 20th, 2010 A joomla installation I’m managing needed to have created a sitemap.xml
From a SEO perspective sitemap.xml and sitemap.xml.gz are absolutely necessary for a website to bewell indexed in google.
After some investigation I’ve found out a perfect program that makes generation of sitemap.xml in joomla a piece of cake.
All necessary to be done for the sitemap.xml to be created comes to download and install of JCrawler
What makes JCrawler even better is that it’s open source program.
To install Jcrawler go in the joomla administrator panel:
Extensiosn -> Install/Uninstall
You will see the Install from URL on the bottom, there place the link to the com_jcrawler.zip installation archive, for instance you can place the link of the downloaded copy of com_jcrawler.zip I’ve mirrored on www.pc-freak.net ,by placing it on https://www.pc-freak.net/files/com_jcrawler.zip
The installation will be done in a few seconds and you will hopefully be greated with a Installation Success message.
Last thing to do in order to have the sitemap.xml in your joomla based website generated is to navigate to:
Components -> JCrawler
There a screen will appear where you can customize certain things related to the sitemap.xml generation, I myself used the default options and continued straight to the Start button.
Further on a screen will appear asking you to Submit the newly generated sitemap to; Google, MSN, Ask.com, Moreover and Yahoo , so press the Submit button.
That’s all now your joomla website will be equipped with sitemap.xml, enjoy!
Tags: bewell, Button, com, customize, default options, download, downloaded copy, Extensiosn, freak, google, gz, How to build website sitemap (sitemap.xml) in Joomla, Install, installation, installation archive, installation success, investigation, JCrawler, link, MSN, open source program, order, panel, perspective, piece of cake, Press, Start, start button, success message, Uninstall, xml, Yahoo, zip installation
Posted in Joomla, Linux, SEO, Various | 7 Comments »
Tuesday, March 15th, 2011 Just in case if you are looking for a quick way to set Google Analytics on newly installed Joomla powered site, here is how:
1. Download the Google Analytics Tracking Module
The module is available from Joomla Extensions on joomla.org
At the current time of writting you need to download the analytics_tracking15,zip file
2. Install the Google Analytics Tracking Module;
Login as joomla admin and navigate to;
Extensions -> Install
Place the analytics_tracking15.zip url to the Install URL: field.
Again as of time of writting you need to place https://www.pc-freak.net/files/analytics_tracking15.zip;
3. Open the Module Manager
Extensions -> Module Manager
4. Click over Google Analytics Tracking Module
On the right pane you will notice in the Module Parameters the Analytics_uacct_code field. In the uacct_code field you need to paste your UA obtained from your created google-analytics account.
This code is usually something like UA-2101595-10
Now place your code their and press the save green button located near the right top of the screen. You should see the text in blue Item Saved which would indicate your UA code is stored already in the Google Analytics Tracking Module, now press the Cancel button located again on the right top.
As a last step before the Google analytics is set-up on the Joomla you need to enable the plugin to do you need to press over the tick left sided from the text reading Google Analytics Tracking Module in the Module Manager
5. Click over the Enabled button in Module Manager;
Google Analytics Tracking Module -> Enabled
Cheers! Now, your Joomla website visitors count will start logging to Google Analytics.
Tags: analytics, Button, Cancel, cancel button, Cheers, Click, current time, Enabled, file, freak, google, google analytics, green button, How to easy place Google Analytics to track website visitors on Joomla, Install, Item, login, Module, module parameters, Open, org, Parameters, plugin, Press, reading, something, text reading, tick, time, ua, uacct, way, website visitors, writting, zip file
Posted in Joomla, Linux, SEO, System Administration, Various, Web and CMS | 1 Comment »
Tuesday, May 31st, 2011 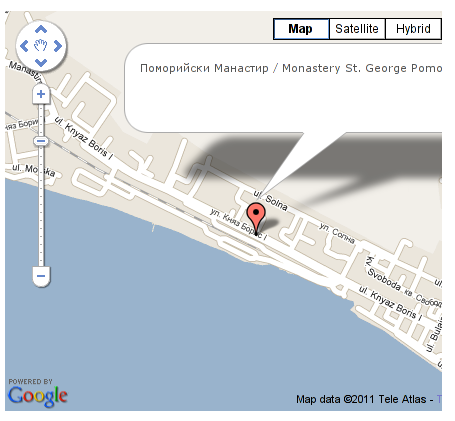
It’s a wise idea that every website has a address location map on it’s website, for that reason Google maps is just great.
To install Google maps capability to joomla one can use a plugin called Google Maps .
You can straighly download Joomla’s Googlemap plugin from here
Afterwards use Extension Manager to install the plugin e.g. follow:
Extensions -> Install/Uninstall (Choose File)
and click on Upload File & Install button.
To further enable and configure the Joomla Googlemap plugin you will have to go to the location:
Extensions -> Plugin Manager
Therein you will have to find and enable the Google Maps plugin which is to be found in the column named Plugin Manager
On my Joomla installation the plugin was located in the second page with modules, so if you don’t find the module on the listing with modules on the first page, make sure you scroll to the bottom of the page and click on Next button.
Therein in the list you will most likely notice Google Maps use the Enable button to enable it.
Next step is to configure the plugin, to do so press on the plugin name Google Maps
All configuration necessery here is to place Googlemaps API Key in the respective field (you will see it among config options).
Issuing a new Google Maps api key takes just few seconds, if you already have a gmail account just go to http://code.google.com/apis/maps/signup.html and take few seconds to issue the key.
You will get the key right on your gmail account after being issued (to repeat myself issuing takes few seconds so no worrier here).
Once having the key place it in the Googlemaps API Key field and configuring Address (which is one of the list of many options the plugin provides) you will be done with configuration.
To display a google map the location you just configured go to the Article Manager , select the article where you want the google mapslocation picture of your address to appear and type in the Article something like:
{mosmap|text='Exact street address location'|zoom='15'|zoomType='Large'|zoomNew='0'}
After you saved the article a very nice Google map showing you the location’s streets will appear on your web page in the article link where placed.
You can further conifgure a number of things related to the google maps just embedded into joomla, one thing you might want to play with is the zoom level.You see in below’s code is equal to 15, e.g. zoom=’15’
Set it to another one if you want to regulate your googlemaps zoom level.
For more thoroughful options take a look at the extensive plugin documentation and play with the many settings
Tags: address location, amp, article manager, Button, capability, config, config options, download, Extension, Gmail, gmail account, google, google map, google maps, Googlemap, Googlemaps, Install, installation, key, key field, level, location, ManagerTherein, Maps, necessery, page, plugin, plugin name, reason, street, type, upload, wise idea, worrier
Posted in Joomla, Various, Web and CMS | 2 Comments »
Tuesday, June 21st, 2011 One of the contact forms running on a FreeBSD server configured to work on top of Apache+MySQL suddenly stopped working.
The errors that appeared on the webpage during a page request to the form url was:
Fatal error: Class 'SimpleXMLElement' not found in /var/www/joomla/plugins/system/plugin_googlemap2_helper.php on line 2176 Fatal error: Class 'JLoader' not found in /var/www/joomla/plugins/libraries/loader.php on line 161
As you see in the output the website which was causing the issues was running a Joomla version 1.5.23 Stable configured with RSForm!ver 1.5.x (as a contact form solution) and Google Maps version 2.13b plugins.
The Google Map from Google Maps plugin and the RSform were configured to appear on one physical configured article in Joomla and seemed to work just until now. However yesterday suddenly the error messages:
Fatal error: Class ‘SimpleXMLElement’ not found
Fatal error: Class ‘JLoader’ not found
came out of nothing, it’s really strange as I don’t remember doing any changes to either Joomla or the PHP installation on this server.
There is one more guy who has access to the Joomla installation which I suspect might have changed something in the Joomla, but this scenario is not very likely.
Anyways as the problem was there I had to fix it up. Obviously as the error message Fatal error: Class ‘SimpleXMLElement’ not found reported the server php simplexml was missing!
Just to assure myself the php simplexml extension is not present on the server I used the classical method of setting up a php file with phpinfo(); in it to check all the installed php extensions on the server.
Finally to solve the issue I had to install the module from ports php5-simplexml , e.g.:
freebsd# cd /usr/ports/textproc/php5-simplexml

freebsd# make install clean
Afterwards to make the new settings take place I did restart of my Apache server:
freebsd# /usr/local/etc/rc.d/apache2 restart

Syntax OK

Stopping apache2.

Waiting for PIDS: 63883.

Performing sanity check on apache2 configuration:

Syntax OK

Starting apache2.
Now my Joomla contact form is back to normal 😉
If someone has any idea why this error occured without any php or server modifications, and how comes that all worked fine beforehand even though I did not have the simplexml module instlaled on the server o_O, I would be enormously greatful.
Tags: apache mysql, apache server, Auto, classical method, contact forms, Draft, error message, error messages, fatal error, file, form, form solution, freebsd server, google, google map, google maps, installation, JLoader, loader, Map, Maps, page, page request, php, php extensions, php file, php installation, php simplexml, phpinfo, place, plugin, ports, request, server php, simplexml, something, Stable, Stopping, system, url, Waiting, yesterday
Posted in FreeBSD, Joomla, System Administration, Web and CMS | No Comments »
Thursday, April 7th, 2011 I’ve recently realized that the Easy Adsenser plugin which I used to place google adsense advertisements on my blog, is probably stealing some portion of my clicks.
There were some fraud reports on wordpress.org by people who have found out the author of Easy Adsenser rips clicks, by showing sometimes his own ad code even if the plugin is configured to not grant any clicks as a donation to the plugin author.
I don’t know how true this story is and I don’t have the time to observe the whole plugin code to say for sure if the rumors about clicks stealing are true.
However as I’m paying my internet access (that guarantees) by blog to stay online with some adsense advertisements and the adsense revenues are either equal to my internet tax or a bit higher (depending on the month), it’s quite unpleasent to hear someone is stealing from the ads clicks which still generate very low revenue.
Thus I took the time to read some blog posts online which gave me some hints on how can I directly place the google adsense advertisement code into the theme template files
My goal was to place one google adsense ad to appear right after the title of each article and one to appear as a vertical bar in the end of my sidebar.
In this article in short I’ll explain how I achieved this banner placement via the default wordpress template which obviously I use on my blog.
Let’s start:
1. Add adsense to the index page of the blog
Edit your blog/wp-content/themes/default/index.php file
Therein find the code:
<div id="content" class="narrowcolumn" role="main">
and right after this line put the following php code:
<?php

$postnum = 1;

$showadsense1 = 1;

?>
This code is necessery to assure the adsense code only appears on the first blog post from the blog index page
2. Find the code:
<small><?php the_time('F jS, Y') ?> <!-- by
Immediately after the code place the php code:
<?php if ($postnum == $showadsense1) {

echo '<div class="adsense" style="float:right;margin:12px;">;paste here your adsense code ...</div>';

} ?>
<?php $postnum++; ?>
Now with this changes, 1 adsense advertisements should start appearing right after your first and only on your blog post, next step is to place manually one more vertical adsense banner.
2. Place adsense vertical bannre in wordpress blog sidebar
Login with admin user to wordpress and navigate to:
Appearance -> Widgets
Among the available widgets you will notice the widget called Text click over: Add to add this widget to the list of widgets to appear on your blog sidebar.
Afterwards look up over the Sidebar list of widgets find the newly added Text widget and click over Edit to modify it’s content.
Further on put a Title for the widget or choose to leave the title field as blank if you don’t want a name to appear.
On the next textbox just paste your adsense code and you’re done. A simple refresh of your wordpress blog index page should show you a vertical banner with your adsense code.
! Note that if you have recently issued the adsense code it will take about 10-20 minutes until the banner starts showing up.
Until now wordpress is configured to show adsense adverts on the blog main page, as a next step we need to place the same adsense adverts to appear whether a single blog post is reviewed (opened).
Place an adsense advertisements to single posts opened
For that purpose it’s necessery to edit the file single.php it’s again located in blog/wp-content/themes/default
Once again you will first need to find the code:
if (have_posts())
Put the code after the end of the line on a new line:
<?php

// below code is for adsense

$postnum = 1;

$showadsense1 = 1;

?>
Next lookup in the file for the code:
<h2><?php the_title(); ?></h2>
On a new line after it place:
<?php if ($postnum == $showadsense1) { echo '<div class="adsense" style="float:right;margin:12px;"><script type="text/javascript"> place here your adsense code </div>';

} ?>
<?php $postnum++; ?>
That’s all now the adsense advertisements will be also showing on the single blog posts reviews found via some search engine (google, yahoo etc.).
Hope this article will be helpful to somebody, if so drop me a thanks line in comments 😉
Tags: adsense, advertisement, advertisements, banner placement, blog, class, code, code lt, content themes, div id, file, filesMy, fraud, fraud reports, goal, google, google adsense, index, index page, internet access, internet tax, js, margin, necessery, page, page posts, php, place, plugin, plugin code, quot, right, role, sidebar, someone, start 1, story, template, time, unpleasent, vertical bar, wordpress blog
Posted in SEO, System Administration, Web and CMS, Wordpress | 2 Comments »
Saturday, April 9th, 2011 I have noticed that many blogs nowdays offer an email subscription box to simplify the subscription procedure for the blog readers.
My blog was lacking this feature so I took the time to find out how can I add an e-mail subscription box field on my blog.
My research has shown me that the easiest way to add the subscription box is by using Google’s Feedburner RSS service .
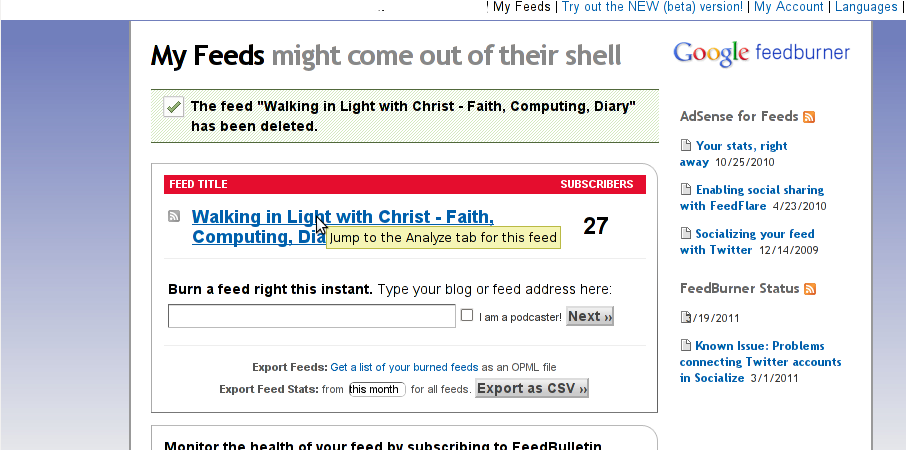
I’ve been using Google FeedBurner for quite some time and I’ve already 27 subscriptions with it.
Earlier when I added a FeedBurner subsciption to my blog I’ve blogged about it, so if you’re not acquainted on how to add FeedBurner service to your blog, you might want to read my previous article Adding RSS Feed to WordPress in conjunction with FeedBurner / WordPress add-to-any-subscribe plugin
In this article I will explain in short step by step, how to add the subscrpition email box to your wordpress I assume, that the reader has already enabled and configured registration with Feedburner, if you still haven’t just skip few lines above and check my previous article.
I would hereby skip the explanation of why feedburner as an RSS is so advantageous for every blog owner and readers and skip further to the email subscription procedure step by step instructions:
Step 1: Login to your FeedBurner Account
In my case my feedburner account url is accessed via the URL http://feeds.feedburner.com/WalkingInLightWithChrist-FaithComputingDiary
I have been properly logged in to my feedburner, so to view statistics of my current feeds subscription and to configure various variables of feedburner I had to access the URL address: http://feedburner.google.com/fb/a/myfeeds, a very quick shortcut to my feedburner account settings is also avaialable by simply accessing the URL: http://feedburner.com
Step 2: Click on the link that says My Feeds
If you have configured feeds for your feedburner you will get the list of feedburner feeds, (one could have multiple feeds, let’s say if you have a couple of blogs or sites and you use one feedburner account to podcast your feeds for each of the separated blogs or sites.
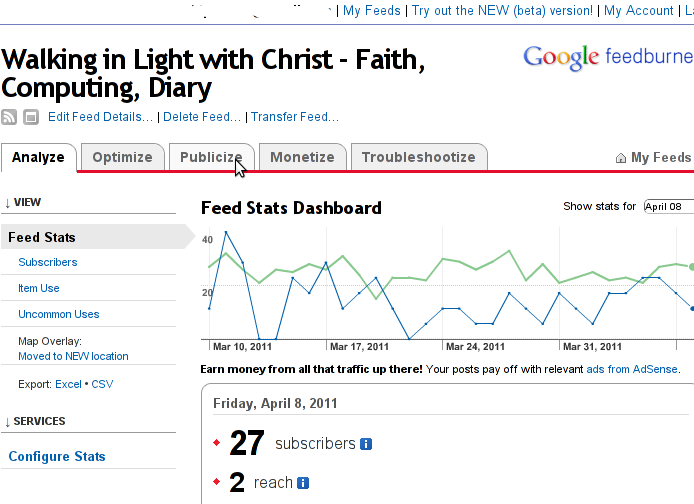
Step 3: Click over the feed you want to have the feedburner email subscription box
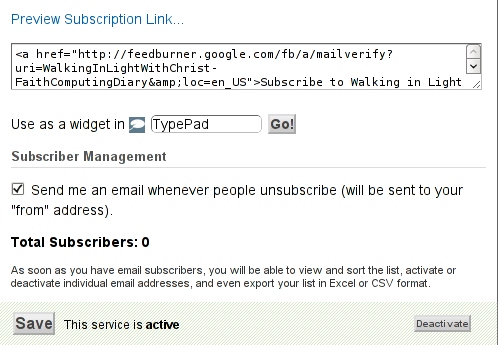
Below you see the screenshot of my configured feedburner feed:
Right after clicking on your configured feed in my case Walking in Light With Christ – Faith, Computing, Diary you will see the screen:
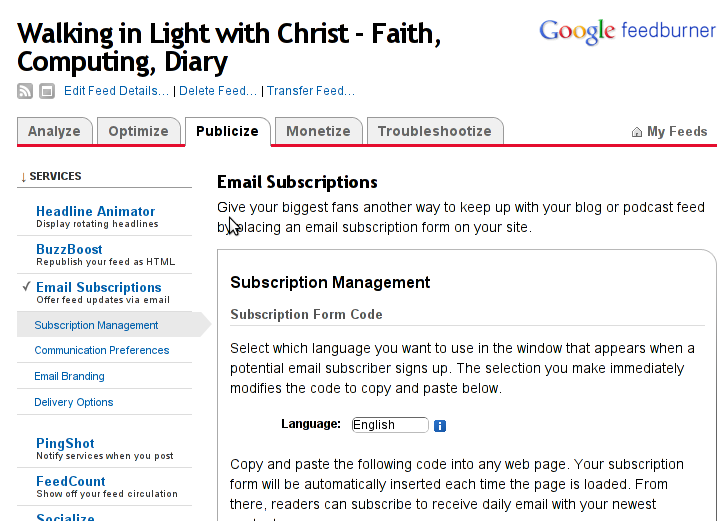
Step 4: Click on Publicize menu
You will see the following two screens while scrolling with your browser:
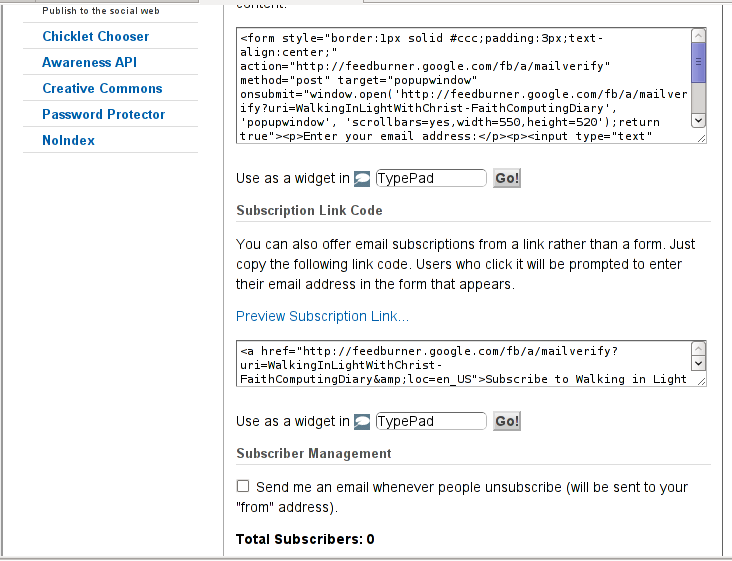
You see in the second screenshot above there is a textbox with a html form code, to set the feedburner subscription to appear on your blog you need to copy/paste this code and put it on your blog.
After copy/pasting the code, don’t forget to scroll down in your browser and save the email subscription generated form settings, (NB! if you don’t save it it want be working even if you install it on your blog).
Here is the Save button screenshot:
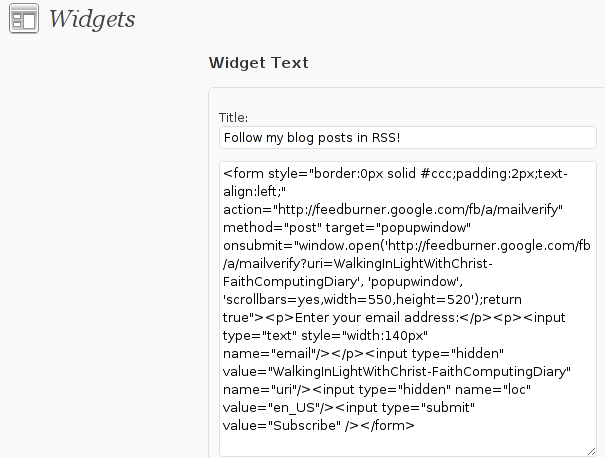
Step 5: Setting up feedburner email textbox to wordpress
In order to set up the just copied html and css form code you need to login to your wordpress blog admin and go to:
Appearance -> Widgets
Scroll over the Available Widgets list, find the Text Widget and press the Add button to include the Text Widget to your blog sidebar.
Further on the same Widgets page, go to the Sidebar menu find the just added Text Widget and click over the Edit link:

Here is my screenshot of the edit screen of the Text Widget:
Step 6. Add the feedburner email subscription box to single posts blog views
This step is not a requirement, but I found it for myself to be vital, as it might rise some more subscribers to my blog, if my blog readers finds individual indexed pages in Google.
This step is also highly dependant on the wordpress theme you use, I use the old wordpress default theme and it’s default behaviour is not to show up the wordpress sidebar, whether an individual wordpress post is clicked over, therefore to enable my feedburner subscription box for individual posts I also need to place the form code obtained from Feedburner.com’s to my templates single.php
If you’re using some kind of theme that doesn’t have the non-sidebar single post behaviour you might skip forward this step, otherwise just continue on reading.
To include the feedburner email form subscription to my single posts I edited blog/wp-content/themes/default/single.php
In the single.php file find the code:
<?php comments_template(); ?>
Immediately after the above code place your feedburner form code, like you see in below screenshot:

Step 7: Modify your form code css and javascript to make your feedburner more accustomed for your needs
Again this step is voluntary and is not necessery I’ve disliked the default way the form is formatted so I played a bit with few of it’s values to customize it to my likings, the things which I have changed a bit in the provided feedburner form code was:
- Remove the Delivered by Feedburner text from the form
-
>To do so in the issued feedburner form code below when you copy the code paste it to some text editor and remove from the code the text:<p>Delivered by <a href=”http://feedburner.google.com” target=”_blank”>FeedBurner</a></p>
- – Change the subsciption box width and height:
-
style=”width:140px”Changed that to:style=”width:120px”also I’ve changed:’scrollbars=yes,width=550,height=520’to:’scrollbars=yes,width=450,height=420’Another point of interest for adjustmnets in the feedburner for are in the form code:
- Remove feedburner subscription form default bordering
-
form style=”border:1px solid #ccc;padding:3px;text-align:center;”I’ve changed that to:form style=”border:0px solid #ccc;padding:2px;text-align:center;”By changing the css values border:1px to border:0px I have instructed the subscription box to show up without borders.
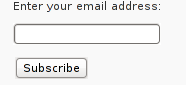
That’s all now refresh in your browser and check if the feedburner email subscription form is showing up properly to your wordpress.
To completely ensure yourself it works correctly try to subscribe yourself to the form and during your next blog post you should receive an email notifying you about the newly written article.
You can see, my blog feedburner subscription form on the blog right sidebar or on the below picture:
Hope that article will help somebody out there.
Tags: account settings, blogs, Button, Click, code, configure, conjunction, e mail, explanation, feature, Feed, Feedburner, form, google, mail subscription, menu, php, plugin, podcast, quite some time, screen, screenshot, scroll, sidebar, statistics, step 1, step 2, subsciption, subscription procedure, subscriptions, subscrpition, time, url, url address, variables, Wordpress
Posted in Various, Web and CMS, Wordpress | 7 Comments »
Saturday, June 18th, 2011 After installing the Tweet Old Post wordpress plugin and giving it, I’ve been returned an error of my PHP code interpreter:
Call to undefined function: curl_init()
As I’ve consulted with uncle Google’s indexed forums 😉 discussing the issues, I’ve found out the whole issues are caused by a missing php curl module
My current PHP installation is installed from the port tree on FreeBSD 7.2. Thus in order to include support for php curl it was necessery to install the port /usr/ports/ftp/php5-curl :
freebsd# cd /usr/ports/ftp/php5-curl

freebsd# make install clean
(note that I’m using the php5 port and it’s surrounding modules).
Fixing the Call to undefined function: curl_init() on Linux hosts I suppose should follow the same logic, e.g. one will have to install php5-curl to resolve the issue.
Fixing the missing curl_init() function support on Debian for example will be as easy as using apt to install the php5-curl package, like so:
debian:~# apt-get install php5-curl

...
Now my tweet-old-post curl requirement is matched and the error is gone, hooray 😉
Tags: call to undefined function, Debian, ERROR, fatal error, freebsd, function, google, hooray, init function, installation, interpreter, issue, Linux, linux hosts, logic, Module, necessery, note, Old, order, package, php code, php installation, plugin, port, ports, post, requirement, support, tree, usr
Posted in FreeBSD, Linux, Wordpress | No Comments »
Monday, October 3rd, 2011 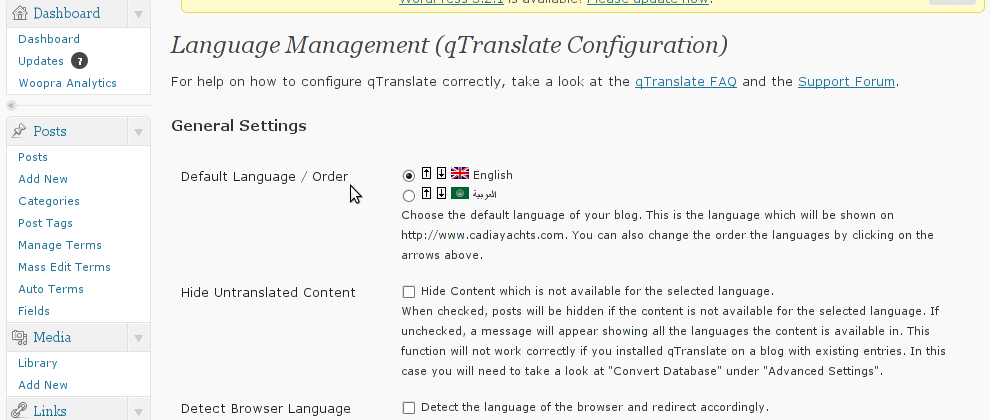
Lately, I have to deal with some wordpress based installs in big part of my working time. One of the wordpress sites needed to have added a multi language support.
My first research in Google pointed me to WPML Multilingual CMS The WordPress Multilingual Plugin
WPML Multilingual CMS looks nice and easy to use but unfortunately its paid, the company couldn’t afford to pay for the plugin so I looked forward online for a free alternative and stumbled upon QTranslate
QTranslate is free and very easy to install. Its installed the wordpress classic way and the installation went smoothly, e.g.:
1. Download and unzip QTranslate
# cd /var/www/blog/wp-content/plugins

/var/www/blog/wp-content/plugins# wget http://downloads.wordpress.org/plugin/qtranslate.2.5.24.zip

...

/var/www/blog/wp-content/plugins# unzip qtranslate.2.5.24.zip

...
Just for fun and in case the plugin disappears in future, a mirror of Qtranslate 2.5.24 is found here
2. Enable QTranslate from wordpress admin
Plugins -> Inactive -> qTranslate (Activate)
After activating the plugin, there is a Settings button from which qTranslate‘s various plugin parameteres can be tuned.
In my case my site had to support both English and Arabic, so from the settings I added support for Arabic translation to the wordpress install.
Adding Arabic is done in the following way:
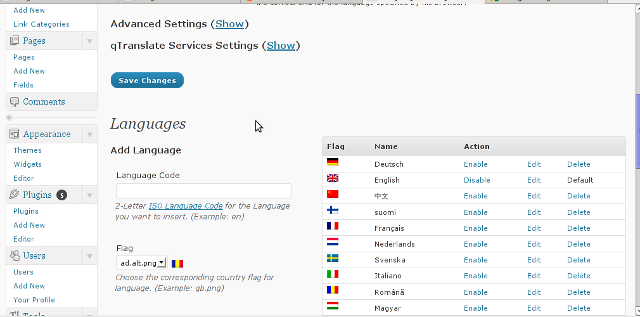
a. From the Language Management (qTranslate Configuration) from the Languages menu and the Languages (Add Languages) I had to choose a language code (in my case a language code of ar – for Arabic). Next I had to choose the Arabic flag from the follow up flag list.
In next text box Name , again I had to fill Arabic, for Locale en_US.UTF-8
The following Date Format and Time Format text boxes are optional so I left them blank.
To complete the process of adding the Arabic as a new language wordpress should support I pressed the Add Language button and the Arabic got added as a second language.
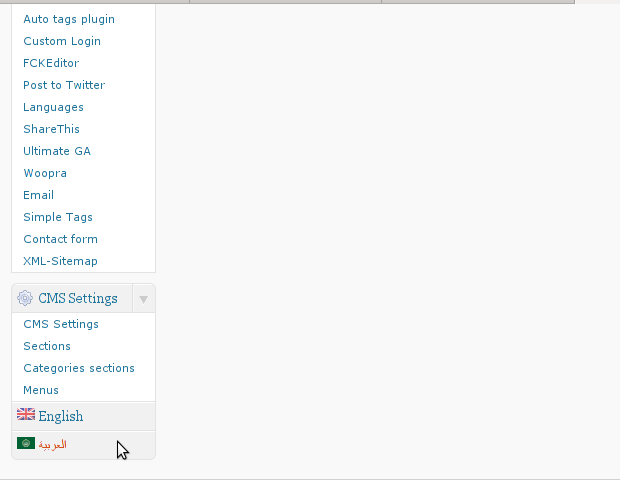
Afterwards the Arabic was added as second language, on the bottom of the left wordpress menu pane a button allowing a switch between English, Arabic appeared (see below screenshot):
Finally to make Arabic appear as a second language of choice on the website I added it as a Widget in the Widgets menu from the AWidgets menu:
Appearance -> Widgets
In widgets I added qTranslate Language Chooser to the Sidebar without putting any kind of Title for qtranslate widget .
I found it most helpful to choose the Text and Image as an option on how to display the Language switching in the wp.
Tags: Activate, alternative, arabi, Arabic, arabic translation, Button, cms, code, company, Date, downloads, flag, flag list, format, fun, google, Inactive, installation, language button, language code, language management, language support, languages, menu, mirror, multilingual, new language, plugin, Plugins, screenshot, second language, settings button, support, text, text boxes, time, time format, time one, unzip, UTF, utf 8, wget, Wordpress, working time
Posted in Various, Web and CMS, Wordpress | 2 Comments »


