Posts Tagged ‘root’

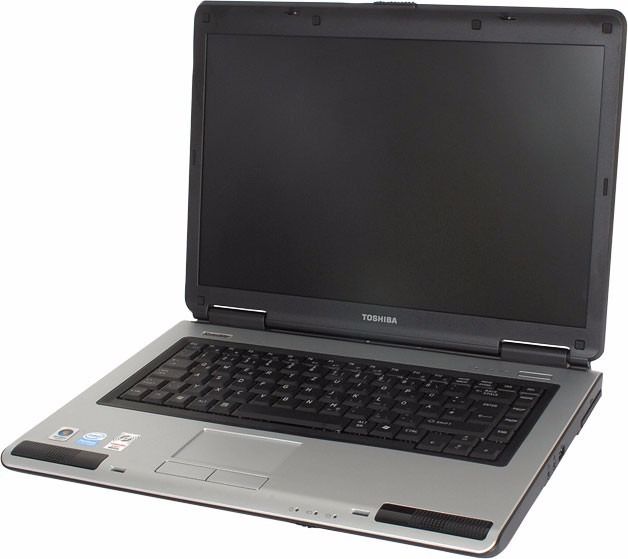
xorg on Toshiba Satellite L40 14B with Intel GM965 video hangs up after boot and the worst fix ever / How to reinstall Ubuntu by keeping the old personal data and programs

Wednesday, April 27th, 2011

black screen ubuntu troubles

I have updated Ubuntu version 9.04 (Jaunty) to 9.10 and followed the my previous post update ubuntu from 9.04 to Latest Ubuntu

I expected that a step by step upgrade from a release to release will work like a charm and though it does on many notebooks it doesn't on Toshiba Satellite L40

The update itself went fine, whether I used the update-manager -d and followed the above pointed tutorial, however after a system restart the PC failed to boot the X server properly, a completely blank screen with blinking cursor appeared and that was all.

I restarted the system into the 2.6.35-28-generic kernel rescue-mode recovery kernel in order to be able to enter into physical console.

Logically the first thing I did is to check /var/log/messages and /var/log/Xorg.0.log but I couldn't find nothing unusual or wrong there.

I suspected something might be wrong with /etc/X11/xorg.conf so I deleted it:

ubuntu:~# rm -f /etc/X11/xorg.conf

and attempted to re-create the xorg.conf X configuration with command:

ubuntu:~# dpkg-reconfigure xserver-xorg

This command was reported to be the usual way to reconfigure the X server settings from console, but in my case (for unknown reasons) it did nothing.

Next the command which was able to re-generate the xorg.conf file was:

ubuntu:~# X -configure

The command generates a xorg.conf sample file in /root/xorg.conf.* so I used the conf to put it in /etc/X11/xorg.conf X's default location and restarted in hope that this would fix the non-booting issue.

Very sadly again the black screen of death appeared on the notebook toshiba screen.
I further thought of completely wipe out the xorg.conf in hope that at least it might boot without the conf file but this worked out neither.

I attempted to run the Xserver with a xorg.conf configured to work with vesa as it's well known vesa X server driver is supposed to work on 99% of the video cards, as almost all of them nowdays are compatible with the vesa standard, but guess what in my case vesa worked not!

The only version of X I can boot in was the failsafe X screen mode which is available through the grub's boot menu recovery mode.

Further on I decided to try few xorg.conf which I found online and were reported to work fine with Intel GM965 internal video , and yes this was also unsucessful.

Some of my other futile attempts were: to re-install the xorg server with apt-get, reinstall the xserver-xorg-video-intel driver e.g.:

ubuntu:~# apt-get install --reinstall xserver-xorg xserver-xorg-video-intel

As nothing worked out I was completely pissed off and decided to take an alternative approach which will take a lot of time but at least will probably be succesful, I decided to completely re-install the Ubuntu from a CD after backing up the /home directory and making a list of available packages on the system, so I can further easily run a tiny bash one-liner script to install all the packages which were previously existing on the laptop before the re-install:

Here is how I did it:

First I archived the /home directory:

ubuntu:/# tar -czvf home.tar.gz home/
....

For 12GB of data with some few thousands of files archiving it took about 40 minutes.

The tar spit archive became like 9GB and I hence used sftp to upload it to a remote FTP server as I was missing a flash drive or an external HDD where I can place the just archived data.

Uploading with sftp can be achieved with a command similar to:

sftp user@yourhost.com
Password:
Connected to yourhost.com.
sftp> put home.tar.gz

As a next step to backup in a file the list of all current installed packages, before I can further proceed to boot-up with the Ubuntu Maverich 10.10 CD and prooceed with the fresh install I used command:

for i in $(dpkg -l| awk '{ print $2 }'); do
echo $i; done >> my_current_ubuntu_packages.txt

Once again I used sftp as in above example to upload my_current_update_packages.txt file to my FTP host.

After backing up all the stuff necessery, I restarted the system and booted from the CD-rom with Ubuntu.
The Ubuntu installation as usual is more than a piece of cake and even if you don't have a brain you can succeed with it, so I wouldn't comment on it 😉

Right after the installation I used the sftp client once again to fetch the home.tar.gz and my_current_ubuntu_packages.txt

I placed the home.tar.gz in /home/ and untarred it inside the fresh /home dir:

ubuntu:/home# tar -zxvf home.tar.gz

Eventually the old home directory was located in /home/home so thereon I used Midnight Commander ( the good old mc text file explorer and manager ) to restore the important user files to their respective places.

As a last step I used the my_current_ubuntu_packages.txt in combination with a tiny shell script to install all the listed packages inside the file with command:

ubuntu:~# for i in $(cat my_current_ubuntu_packagespackages.txt); do
apt-get install --yes $i; sleep 1;
done

You will have to stay in front of the computer and manually answer a ncurses interface questions concerning some packages configuration and to be honest this is really annoying and time consuming.

Summing up the overall time I spend with this stupid Toshiba Satellite L40 with the shitty Intel GM965 was 4 days, where each day I tried numerous ways to fix up the X and did my best to get through the blank screen xserver non-bootable issue, without a complete re-install of the old Ubuntu system.
This is a lesson for me that if I stumble such a shitty issues I will straight proceed to the re-install option and not loose my time with non-sense fixes which would never work.

Hope the article might be helpful to somebody else who experience some problems with Linux similar to mine.

After all at least the Ubuntu Maverick 10.10 is really good looking in general from a design perspective.
What really striked me was the placement of the close, minimize and maximize window buttons , it seems in newer Ubuntus the ubuntu guys decided to place the buttons on the left, here is a screenshot:

Left button positioning of navigation Buttons in Ubuntu 10.10

I believe the solution I explain, though very radical and slow is a solution that would always work and hence worthy 😉
Let me hear from you if the article was helpful.

How to install Toshiba Satellite L40 B14 Wireless Adapter ( ID 0bda:8197 Realtek Semiconductor Corp. RTL8187B) on Ubuntu and Debian Linux

Thursday, April 28th, 2011

https://www.pc-freak.net/images/toshiba-satellite-l40

How to install Toshiba L40 B14 Wireless Adapter ( ID 0bda:8197 Realtek Semiconductor Corp. RTL8187B) on Ubuntu and Debian Linux
I've been struggling for more than 10 hours to fix up issues on a Ubuntu Maverick-Meerkaat with a rtl8187B Wireless Adapter

The RTL8187B almost drove me mad. I could see the wlan0 which meant the kernel is detecting the device, I could even bring it up with ifconfig wlan0 up , however when I tried it in gnome's network-manager or wicd the wireless networks were not showing up.

Trying to scan for networks using the commands:


ubuntu:~# iwlist wlan0 scan

was also unsuccesful, trying to bring up and down the wireless wlan0 interface with:


ubuntu:~# iwconfig wlan0 up

or


ubuntu:~# iwconfig wlan0 down

Both returned the error:
iwconfig: unknown command "up" and iwconfig: unknown command "down"

Running simply iwconfig was properly returning information about my Wireless Interface wlan0 :


wlan0 IEEE 802.11bg ESSID:off/any
Mode:Managed Access Point: Not-Associated Tx-Power=20 dBm
Retry long limit:7 RTS thr:off Fragment thr:off
Encryption key:off
Power Management:off

The exact information I could get about the wireless device was via the command:


ubuntu:~# lsusb | grep realtek
Bus 001 Device 002: ID 0bda:8197 Realtek Semiconductor Corp. RTL8187B Wireless Adapter

Trying manually to scan for wireless networks from console or gnome-terminal with command returned also the below weird results:


ubuntu:~# iwconfig wlan0 scan
iwconfig: unknown command "scan"

More oddly tunning wlan0 interface with commands like:


ubuntu:~# iwconfig wlan0 mode managed
ubuntu:~# iwconfig wlan0 essid ESSID
ubuntu:~# iwconfig wlan0 rate 11M

were succesful …

I read a bunch of documentation online concerning the wireless card troubles on Ubuntu, Gentoo, Debian etc.

Just few of all the resources I've read and tried are:

http://rtl-wifi.sourceforge.net/wiki/Main_Page (Returning empty page already a lot resource)
http://rtl8187b.sourceforge.net (A fork of rtl-wifi.sourceforge.net which is still available though it was not usable)

Some of the other resources which most of the people recommended as a way to properly install the RTL8187B wireless driver on linux was located on the website:

http://datanorth.net/~cuervo/rtl8187b/ (Trying to access this page returned a 404 error e.g. this page is no-longer usable)

I found even a webpage in Ubuntu Help which claimed to explain how to properly install and configure the RTL8187B wireless driver on which is below:

https://help.ubuntu.com/community/WifiDocs/Device/RealtekRTL8187b

Even the Ubuntu help instructions were pointing me to the broken cuervo's website URL

Anyways I was able to find the rtl8187b-modified-dist.tar.gz online and made a mirror of rtl8187b-modified-dist.tar.gz which you can download here

Another rtl8187b driver I found was on a toshiba website made especailly for the wireless linux drivers:

http://linux.toshiba-dme.co.jp/linux/eng/pc/sat_PSPD0_report.htm

The questionable file which was claimed to properly be able to make the Realtek Semiconductor Corp. RTL8187B Wireless Adapter to work out was called rl8187b-modified-804.tar.gz.
I've made a mirror of rtl8187b-modified-804.tar.gz is here

None of the driver archives rtl8187b-modified-dist.tar.gz and rl8187b-modified-804.tar.gz that was supposed to make the Toshiba L40 realtek wireless to work out, after compiling and installing the drivers from source worked out …

Both archives produced plenty of error messages and it seems on newer kernels like the one on this notebook:

Linux zlatina 2.6.35-28-generic #50-Ubuntu SMP Fri Mar 18 19:00:26 UTC 2011 i686 GNU/Linux, they're no longer usable.

The compile errors I got when I tried compiling the rtl8187b driver provided by the archive rtl8187b-modified-dist were:


root@ubuntu:/home/zlatina/rtl8187b-modified# sh makedrv
rm -fr *.mod.c *.mod *.o .*.cmd *.mod.* *.ko *.o *~
make -C /lib/modules/2.6.35-28-generic/build M=/home/zlatina/rtl8187b-modified/ieee80211 CC=gcc modules
make[1]: Entering directory `/usr/src/linux-headers-2.6.35-28-generic'
scripts/Makefile.build:49: *** CFLAGS was changed in "/home/zlatina/rtl8187b-modified/ieee80211/Makefile". Fix it to use EXTRA_CFLAGS. Stop.
make[1]: *** [_module_/home/zlatina/rtl8187b-modified/ieee80211] Error 2
make[1]: Leaving directory `/usr/src/linux-headers-2.6.35-28-generic'
make: *** [modules] Error 2
rm -fr *.mod.c *.mod *.o .*.cmd *.ko *~
make -C /lib/modules/2.6.35-28-generic/build M=/home/zlatina/rtl8187b-modified/rtl8187 CC=gcc modules
make[1]: Entering directory `/usr/src/linux-headers-2.6.35-28-generic'
scripts/Makefile.build:49: *** CFLAGS was changed in "/home/zlatina/rtl8187b-modified/rtl8187/Makefile". Fix it to use EXTRA_CFLAGS. Stop.
make[1]: *** [_module_/home/zlatina/rtl8187b-modified/rtl8187] Error 2
make[1]: Leaving directory `/usr/src/linux-headers-2.6.35-28-generic'
make: *** [modules] Error 2
root@ubuntu:/home/zlatina/rtl8187b-modified#

Another driver I tried which was found on aircrack-ng.org's website was rtl8187_linux_26.1010.zip

Here are the error messages I experienced while I tried to compile the realtek wireless driver from the archive rtl8187_linux_26.1010.0622.2006


compilation terminated.
make[2]: *** [/home/zlatina/rtl8187_linux_26.1010.0622.2006/beta-8187/r8187_core.o] Error 1
make[1]: *** [_module_/home/zlatina/rtl8187_linux_26.1010.0622.2006/beta-8187] Error 2
make[1]: Leaving directory `/usr/src/linux-headers-2.6.35-28-generic'
make: *** [modules] Error 2

I tried a number of fix ups hoping to solve the compile error messages, but my efforts were useless, as it seems many things has changed in newer Ubuntu versions and they could no longer be compiled.

As I realized I couldn't make the native drivers provided by the above sources compile, I decided to give a try to the Windows drivers for Realtek 8187B with ndiswrapper, a link for download of Realtek 8187B (RTL8187B_XP_6.1163.0331.2010_Win7_62.1182.0331.2010_UI_1.00.0179 is found here

I untarred the
RTL8187B_XP driver
and used ndiswrapper to load driver like so:


root@ubuntu:~# tar -zxvf
RTL8187B_XP_6.1163.0331.2010_Win7_....L.tar.gz
root@ubuntu:/home/zlatina/RTL8187B#
root@ubuntu:/home/zlatina/RTL8187B# cd Driver/WinXP
root@ubuntu:/home/zlatina/RTL8187B/Driver/WinXP# ndiswrapper -i net8187b.inf

In order to test the RTL8178B Windows driver I used:


root@ubuntu:~# ndiswrapper -l
net8187b : driver installed
device (0BDA:8197) present (alternate driver: rtl8187)

To finally load the Windows XP RTL8187B driver on the Ubuntu I used again ndiswrapper:


root@ubuntu:~# ndiswrapper -m

Further on I used the ndisgtk graphical ndiswrapper interface to once again test if the Windows driver is working on the Ubuntu and it seemed like it is working, however still my wicd was unable to find any wireless network ….

There were many online documentation which claimed that the driver for rtl8187b works out of the box on newer kernel releases (kernel versions > 2.6.24)

Finally I found out there is a driver which is a default one with the Ubuntu e.g. rtl8187.ko , I proceeded and loaded the module:


root@ubuntu:~# modprobe rtl8187

I also decided to check out if the hardware switch button of the Toshiba Satellite L40 notebook is not switched off and guess what ?! The Wireless ON/OFF button was switched OFF!!! OMG …

I switched on the button and wicd immediately started showing up the wireless networks …

To make the rtl8187 module load on Ubuntu boot up, I had to issue the command:


root@ubuntu:~# echo 'rtl8187' >> /etc/modules

Voila after all this struggle the wireless card is working now, it's sad I had to loose about 10 hours of time until I come with the simple solution of using the default provided ubuntu driver rtl8187 , what is strange is how comes that it does not load up automatically.

Thanks God it works now.

Share SCREEN terminal session in Linux / Screen share between two or more users howto

Wednesday, October 11th, 2017

share-screen-terminal-session-in-linux-share-linux-unix-shell-between-two-or-more-users


1. Short Intro to Screen command and what is Shared Screen Session

Do you have friends who want to learn some GNU / Linux or BSD basics remotely? Do you have people willing to share a terminal session together for educational purposes within a different network? Do you just want to have some fun and show off yourself between two or more users?

If the answer to the questions is yes, then continue on reading, otherwise if you're already aware how this is being done, just ignore this article and do something more joyful.

So let me start.

Some long time ago when I was starting to be a Free Software user and dedicated enthusiast, I've been given by a friend an interesting freeshell hosting access and I stumbled upon / observed an interesting phenomenon, multiple users like 5 or 10 were connected simultaneously to the same shell sharing their command line.

I can't remember what kind of shell I happen to be sharing with the other logged in users with the same account, was that bash / csh / zsh or another one but it doesn't matter, it was really cool to find out multiple users could be standing together on GNU / Linux and *BSD with the same account and use the regular shell for chatting or teaching each others  new Linux / Unix commands e.g. being able to type in shell simultaneously.

The multiple shared shell session was possible thanks to the screen command

For those who hear about screen for a first time, here is the package description:


# apt-cache show screen|grep -i desc -A 1
Description-en: terminal multiplexer with VT100/ANSI terminal emulation
 GNU Screen is a terminal multiplexer that runs several separate "screens" on

Description-md5: 2d86b86ed6058a04c540802e49312f40
Homepage: https://savannah.gnu.org/projects/screen
root@jericho:/usr/local/src/pure-python-otr# apt-cache show screen|grep -i desc -A 2
Description-en: terminal multiplexer with VT100/ANSI terminal emulation
 GNU Screen is a terminal multiplexer that runs several separate "screens" on
 a single physical character-based terminal. Each virtual terminal emulates a


Description-md5: 2d86b86ed6058a04c540802e49312f40
Homepage: https://savannah.gnu.org/projects/screen
Tag: hardware::input:keyboard, implemented-in::c, interface::text-mode,


There is plenty of things to use screen for as it provides you a way to open Virtual Terminals into a single ssh or physical console TTY login session and I've been in love with screen command since day 1 I found out about it.

To start using screen just invoke it into a shell and enter a screen command combinations that make various stuff for you.


2. Some of the most useful Daily Screen Key Combinations for the Sys Admin


To do use the various screen options, use the escape sequence (CTRL + Some Word), following by the command. For a full list of all of the available commands, run man screen, however
for the sake of interest below short listing shows some of most useful screen key combination invoked commands:


Ctrl-a a Passes a Ctrl-a through to the terminal session running within screen.
Ctrl-a c Create a new Virtual shell screen session within screen
Ctrl-a d Detaches from a screen session.
Ctrl-a f Toggle flow control mode (enable/disable Ctrl-Q and Ctrl-S pass through).
Ctrl-a k Detaches from and kills (terminates) the screen session.
Ctrl-a q Passes a Ctrl-q through to the terminal session running within screen (or use Ctrl-a f to toggle whether screen captures flow control characters).
Ctrl-a s Passes a Ctrl-s through to the terminal session running within screen (or use Ctrl-a f to toggle whether screen captures flow control characters).
Ctrl-a :kill Also detaches from and kills (terminates) the screen session.
Ctrl-a :multiuser on Make the screen session a multi-user session (so other users can attach).
Ctrl-a :acladd USER Allow the user specified (USER) to connect to a multi-user screen session.
Ctrl-a p Move around multiple opened Virtual terminals in screen (Move to previous)
Ctrl-a n Move backwards in multiple opened screen sessions under single shell connection


I have to underline strongly for me personally, I'm using the most


CTRL + A + D (to detach session),

CTRL + A + C to open new session within screen (I tend to open multiple sessions for multiple ssh connections with this),

CTRL + A + P, CTRL +  A + N – I use this twoto move around all my open screen Virtual sessions.
 

3. HOW TO ACTUALLY SHARE TERMINAL SESSION BETWEEN MULTIPLE USERS?


3.1 Configuring Shared Sessions so other users can connect

You need to  have a single user account on a Linux or Unix like server lets say that might be the /etc/passwd, /etc/shadow, /etc/group account screen and you have to give the password to all users to be participating into the shared screen shell session.

E.g. create new system account screen

root@jericho:~# adduser screen
Adding user `screen' …
Adding new group `screen' (1001) …
Adding new user `screen' (1001) with group `screen' …
The home directory `/home/screen' already exists.  Not copying from `/etc/skel'.
Enter new UNIX password:
Retype new UNIX password:
passwd: password updated successfully
Changing the user information for screen
Enter the new value, or press ENTER for the default
    Full Name []: Screen user to give users shared access to /bin/bash
    Room Number []:
    Work Phone []:
    Home Phone []:
    Other []:
Is the information correct? [Y/n] Y

Now distribute the user / pass pair around all users who are to be sharing the same virtual bash session via screen and instruct each of them to run:

hipo@jericho:~$  screen -d -m -S shared-session
hipo@jericho:~$

hipo@jericho:~$ screen -list

There is a screen on:
    4095.shared-session    (10.10.2017 20:22:22)    (Detached)
1 Socket in /run/screen/S-hipo.


3.2. Attaching to just created session
 

Simply login with as many users you need with SSH to the remote server and instruct them to run the following command to re-attach to the just created new session by you:

hipo@jericho:~$ screeen -x

That's all folks now everyone can type in simultaneously and enjoy the joys of the screen shared session.

If for some reasons more than one session is created by the simultaneously logged in users either as an exercise or by mistake i.e.:

hipo@jericho:~$ screen -list

There are screens on:
    4880.screen-session    (10.10.2017 20:30:09)    (Detached)
    4865.another-session    (10.10.2017 20:29:58)    (Detached)
    4847.hey-man    (10.10.2017 20:29:49)    (Detached)
    4831.another-session1    (10.10.2017 20:29:45)    (Detached)
4 Sockets in /run/screen/S-hipo.

You have to instruct everyone to connect actually to the exact session we need, as screen -x will ask them to what session they like to connect.

In that case to connect to screen-session, each user has to run with their account:

hipo@jericho:~$ screen -x shared-session


If under some circumstances it happened that there is more than one opened shared screen virtual session, for example screen -list returns:


hipo@jericho:~$ screen -list
There are screens on:
    5065.screen-session    (10.10.2017 20:33:20)    (Detached)
    4095.screen-session    (10.10.2017 20:30:08)    (Detached)

All users have to connect to the exact screen-session created name and ID, like so:

hipo@jericho:~$ screen -x 4095.screen-session


Here is the meaning of used options


-d option instructs screen to detach,
-m makes it multiuser session so other users can attach
-S argument is just to give the screen session a name
-list Sesssion gives the screen-session ID

Once you're over with screen session (e.g. all users that are learning and you show them stuff and ask them to test by themselves and have completed, scheduled tasks), to kill it just press CTRL + A + K
 

4. Share screen /bin/bash shell session with another user

Sharing screen session between different users is even more useful to the shared session of one user as you might have a *nix server with many users who might attach to your opened session directly, instead of being beforehand instructed to connect with a single user.

That's perfect also for educational purposes if you want to learn some Linux to a class of people, as you can use their ordinary accounts and show them stuff on a Linux / BSD  machine.

Assuming that you follow and created already screen-session with screen cmd

hipo@jericho:~$ screen -list
There is a screen on:
        5560.screen-session      (10.10.2017 20:41:06)   (Multi, attached)
1 Socket in /run/screen/S-hipo.

hipo@jericho:~$

Next attach to the session

bunny@jericho:~$ screen -r shared-session
bunny@jericho:~$ Ctrl-a :multiuser on
bunny@jericho:~$ Ctrl-a :acladd user2
bunny@jericho:~$ screen -x UserNameHere/shared-session
 

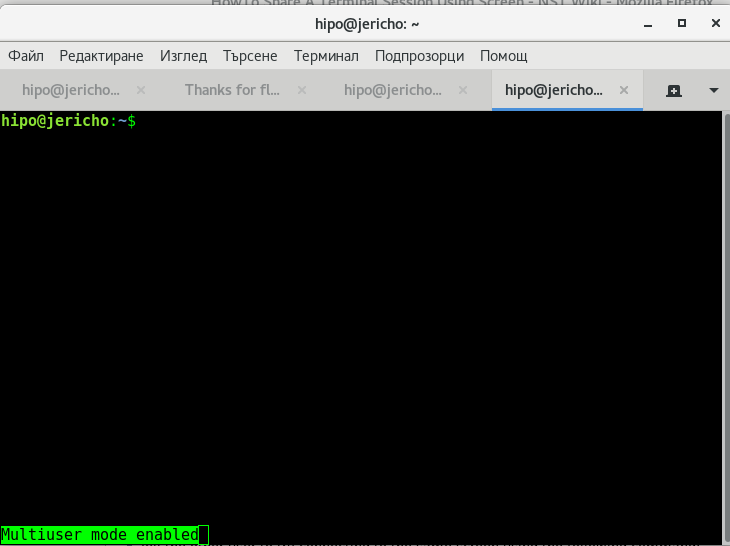
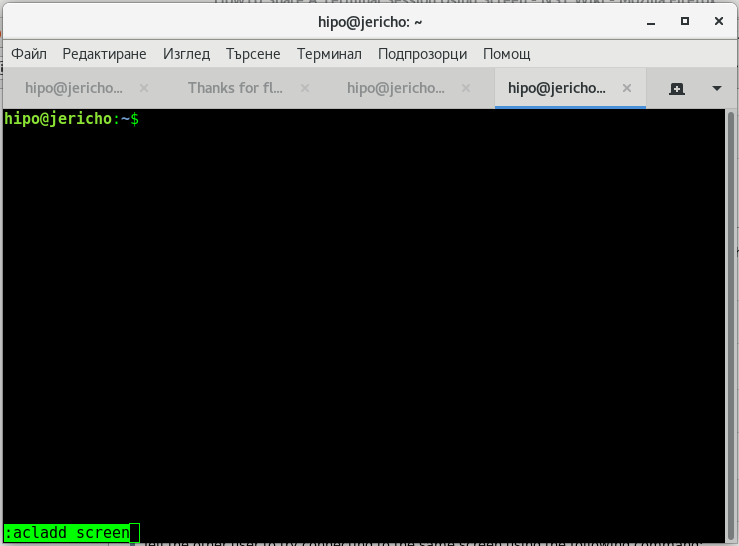
Here are 2 screenshots on what should happen if you had done above command combinations correctly:

screen-share-session-to-multi-users-screenshot-multiuser-on-on-gnome-terminal2

screen-share-session-to-multi-users-screenshot-multiuser-on-on-gnome-terminal3

In order to be able to share screen Virtual terminal ( VTY ) sessions between separate (different) logged in users, you have to have screen command be suid (SUID bit for screen is disabled in most Linux distributions for security reasons).

Without making SUID the screen binary file, you are to get the error:

hipo@jericho:/home/hipo$ screen -x hipo/shared

Must run suid root for multiuser support.

If you are absolutely sure you know what you're doing here is how to make screen command sticky bit:


root@jericho:/home/hipo# which screen
root@jericho:/home/hipo# /usr/bin/screen
root@jericho:/home/hipo# root@jericho:/home/hipo# root@jericho:/home/hipo# chmod u+s $(which screen)
chmod 755 /var/run/screen
root@jericho:/home/hipo# rm -fr /var/run/screen/*
exit

No space left on device with free disk space / Why no space left on device while there is plenty of disk space on drive – Running out of Inodes

Tuesday, November 17th, 2015

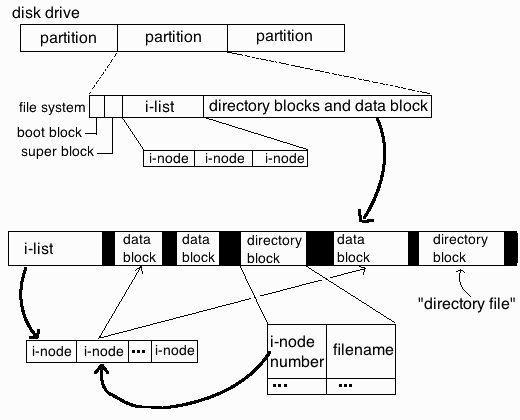
no_space_left-on-device-while-there-is-disk-space-running-out-of-file-inodes-unix_linux_file_system_diagram.gif


On one of the servers, I'm administrating the websites started showing some Mysql database table corrup errors like:


Table './database_name/site_news_list_com' is marked as crashed and last (automatic?) repair failed

The server is using Oracle MySQL server community stable edition on Debian GNU / Linux 6.0, so I first thought during work the server crashed either due to some bug issue in MySQL or it crashed due to some PHP cron job that did something messy. Thus to solve the crashed tables, tried using mysqlcheck tool which helped pretty fine, at many times whether there were database / table corruptions. I've run the following set of mysqlcheck commands with root (superuser) in a bash shell after logging in through SSH:

:

server:~# /usr/bin/mysqlcheck –defaults-extra-file=/etc/mysql/debian.cnf \–check –all-databases -u root -p`grep -i password /root/.my.cnf |sed -e 's#password=##g'`>> /var/log/cronwork.log
server:~# /usr/bin/mysqlcheck –defaults-extra-file=/etc/mysql/debian.cnf –analyze –all-databases -u root -p`grep -i password /root/.my.cnf |sed -e 's#password=##g'`>> /var/log/cronwork.log
server:~# /usr/bin/mysqlcheck –defaults-extra-file=/etc/mysql/debian.cnf \–auto-repair –optimize –all-databases -u root -p`grep -i password /root/.my.cnf |sed -e 's#password=##g'`>> /var/log/cronwork.log
server:~# /usr/bin/mysqlcheck –defaults-extra-file=/etc/mysql/debian.cnf \–optimize –all-databases -u root -p`grep -i password /root/.my.cnf |sed -e 's#password=##g'`>> /var/log/cronwork.log


In order for above commands to work, I've created the /root/.my.cnf containing my root (mysql CLI) mysql username and password, e.g. file has content like below:


[client]
user=root
password=MySecretPassword8821238


Btw a good note here is its generally a good idea (if you want to have consistent mysql databases) to automatically execute via a cron job 2 times a month, I've in root cronjob the following:


crontab -u root -l |grep -i mysqlcheck
04 06 5,10,15,20,25,1 * * /usr/bin/mysqlcheck –defaults-extra-file=/etc/mysql/debian.cnf \–check –all-databases –silent -u root -p`grep -i password /root/.my.cnf |sed -e 's#password=##g'`>> /var/log/cronwork.log 07 06 5,10,15,20,25,1 * * /usr/bin/mysqlcheck –defaults-extra-file=/etc/mysql/debian.cnf –analyze –all-databases –silent -u root -p`grep -i password /root/.my.cnf |sed -e 's#password=##g'`>> /var/log/cronwork.log 12 06 5,10,15,20,25,1 * * /usr/bin/mysqlcheck –defaults-extra-file=/etc/mysql/debian.cnf \–auto-repair –optimize –all-databases –silent -u root -p`grep -i password /root/.my.cnf |sed -e 's#password=##g'`>> /var/log/cronwork.log 17 06 5,10,15,20,25,1 * * /usr/bin/mysqlcheck –defaults-extra-file=/etc/mysql/debian.cnf \–optimize –all-databases –silent -u root -p`grep -i password /root/.my.cnf |sed -e 's#password=##g'`>> /var/log/cronwork.log


Strangely I got a lot of errors that some .MYI / .MYD .frm temp files, necessery for the mysql tables recovery can't be written inside /home/mysql/database_name

That was pretty weird and I thought there might be some issues with permissions, causing the inability to write, due to some bug or something so I went straight and checked /home/mysql/database_name permissions, e.g.::


server:/home/mysql/database_name# ls -ld soccerfame
drwx—— 2 mysql mysql 36864 Nov 17 12:00 soccerfame
server:/home/mysql/database_name# ls -al1|head -n 10
total 1979012
drwx—— 2 mysql mysql 36864 Nov 17 12:00 .
drwx—— 36 mysql mysql 4096 Nov 17 11:12 ..
-rw-rw—- 1 mysql mysql 8712 Nov 17 10:26 1_campaigns_diez.frm
-rw-rw—- 1 mysql mysql 14672 Jul 8 18:57 1_campaigns_diez.MYD
-rw-rw—- 1 mysql mysql 1024 Nov 17 11:38 1_campaigns_diez.MYI
-rw-rw—- 1 mysql mysql 8938 Nov 17 10:26 1_campaigns.frm
-rw-rw—- 1 mysql mysql 8738 Nov 17 10:26 1_campaigns_logs.frm
-rw-rw—- 1 mysql mysql 883404 Nov 16 22:01 1_campaigns_logs.MYD
-rw-rw—- 1 mysql mysql 330752 Nov 17 11:38 1_campaigns_logs.MYI


As seen from above output, all was perfect with permissions, so it should have been something else, so I decided to try to create a random file with touch command inside /home/mysql/database_name directory:


touch /home/mysql/database_name/somefile-to-test-writtability.txt touch: cannot touch ‘/scr1/data/somefile-to-test-writtability.txt‘: No space left on device


Then logically I thought the /home/mysql/ mounted ext4 partition got filled, because of crashed SQL database or a bug thus, checked with disk free command df whether there is enough space on server:

server:~# df -h
Filesystem Size Used Avail Use% Mounted on
/dev/md1 20G 7.6G 11G 42% /
udev 10M 0 10M 0% /dev
tmpfs 13G 1.3G 12G 10% /run
tmpfs 32G 0 32G 0% /dev/shm
tmpfs 5.0M 0 5.0M 0% /run/lock
tmpfs 32G 0 32G 0% /sys/fs/cgroup
/dev/md2 256G 134G 110G 55% /home

Well that's weird? Obviously only 55% of available disk space is used and available 134G which was more than enough so I got totally puzzled why, files can't be written.

Then very logically, I thought it might be that /home directory has remounted as read only, because the SSD memory disk on server is failing and checked for errors in dmesg, i.e.:


server:~# dmesg|grep -i error


Also checked how exactly was partition mounted, to check whether it is (RO) read-only:


server:~# mount -l|grep -i /home
/dev/md2 on /home type ext4 (rw,relatime,discard,data=ordered)


Now everything become even more weirder, as obviously the disk continued to be claiming no space left on device, while in reality there was plenty of disk space.

Then after running a quick research on the internet for the no space left on device with free disk space, I've come across this great superuser.com thread which let me realize the partition run out of inodes and that's why no new file inodes could be assigned and therefore, the linux kernel is refusing to write the file on ext4 partition.

For those who haven't heard of Linux Partition Inodes here is link to Wikipedia and a quick quote:


In a Unix-style file system, the inode is a data structure used to represent a filesystem object, which can be one of various things including a file or a directory. Each inode stores the attributes and disk block location(s) of the filesystem object's data.[1] Filesystem object attributes may include manipulation metadata (e.g. change,[2] access, modify time), as well as owner and permission data (e.g. group-id, user-id, permissions).[3]
Directories are lists of names assigned to inodes. The directory contains an entry for itself, its parent, and each of its children.


Once I understood it is the inodes, I checked how many of them are occupied with cmd:


server:~# df -i /home
Filesystem Inodes IUsed IFree IUse% Mounted on
/dev/md2 17006592 17006592 0 100% /home


You see, there were 0 (zero) free file inodes on server and that was the reason for no space left on device while there was actually free disk space

To clean up (free) some inodes on partition, first thing I did is to delete all old logs which were inside /home and files I positively know not to be necessery, then to find which directories allocating most innodes used:


server:~# find . -xdev -type f | cut -d "/" -f 2 | sort | uniq -c | sort -n


If you're on a regular old fashined IDE Hard Drive and not SSD or you have too much files inside this command will take really long …:

Therefore a better solution might be to frist:

a) Try to find root folders with large inodes count:

for i in /home/*; do echo $i; find $i |wc -l; done
Try to find specific folders:


You should get output like:


/home/new_website
606692
/home/common
73
/home/pcfreak
5661
/home/hipo
33
/home/blog
13570
/home/log
123
/home/lost+found
1

b) Then once you know the directory allocating most inodes, run the command again to see the sub-directories with most files (eating) partition innodes:


for i in /home/webservice/*; do echo $i; find $i |wc -l; done


One usual large folder which could free you some nodes is the linux source headers, but in my case it was simply a lot of tiny old logs being logged on the system for few years in the past without cleaning:

After deleting the log dirs and cache folder in my case /home/new_website/{log,cache}:

server:~# rm -rf /home/new_website/log/*
server:~# rm -rf /home/new_website/cache/*


a) Then, stopping Apache webserver to check prevent Apache to use MySQl databases while running database repair and restaring MySQL:
 

server:~# /etc/init.d/apache2 stop Restarting MySQL server
..
server:~# /etc/init.d/mysql restart
..


b) And re-issuing MySQL Check / Repair / Optimize database commands:


mysqlcheck –defaults-extra-file=/etc/mysql/debian.cnf \–check –all-databases -u root -p`grep -i password /root/.my.cnf |sed -e 's#password=##g'`>> /var/log/cronwork.log

mysqlcheck –defaults-extra-file=/etc/mysql/debian.cnf –analyze –all-databases -u root -p`grep -i password /root/.my.cnf |sed -e 's#password=##g'`>> /var/log/cronwork.log

mysqlcheck –defaults-extra-file=/etc/mysql/debian.cnf \–auto-repair –optimize –all-databases -u root -p`grep -i password /root/.my.cnf |sed -e 's#password=##g'`>> /var/log/cronwork.log

mysqlcheck –defaults-extra-file=/etc/mysql/debian.cnf \–optimize –all-databases -u root -p`grep -i password /root/.my.cnf |sed -e 's#password=##g'`>> /var/log/cronwork.log

c) And finally starting the Apache Webserver again:
 

server:~# /etc/init.d/apache2 start


Some innodse got freed up:
 

server:~# df -i /home Filesystem Inodes IUsed IFree IUse% Mounted on
/dev/md2 17006592 16797196 209396 99% /home


And hooray by God's Grace and with help of prayers of The most Holy Theotokos (Virgin) Mary, websites started again !

Adding another level of security to your shared Debian Linux webhosting server with SuPHP

Tuesday, April 7th, 2015

suphp_improve-apache-security-protect-against-virus-internal-server-infections-suphp-webserver-logo

There are plenty of security schemes and strategies you can implement if you're a Shared Web Hosting company sysadmin however probably the most vital one is to install on Apache + PHP Webserver SuPHP module.

# apt-cache show suphp-common|grep -i descrip -A 4

Description: Common files for mod suphp Suphp consists of an Apache module (mod_suphp for either Apache 1.3.x or Apache 2.x) and a setuid root binary (suphp) that is called by the Apache module to change the uid of the process executing the PHP interpreter to the owner of the php script.

So what SuPHP actuall  does is to run separate CPanel / Kloxo etc. Users with separate username and groupid permissions coinciding with the user present in /etc/passwd , /etc/shadow files existing users, thus in case if someone hacks some of the many customer sites he would be able to only write files and directories under the user with which the security breach occured.

On servers where SuPHP is not installed, all  systemusers are using the same UserID / GuID to run PHP executable scripts under separate domains Virtualhost which are coinciding with Apache (on Debian / Ubuntu  uid, gid – www-data) or on (CentOS / RHEL / Fedora etc. – user apache) so once one site is defaced  exploited by a worm all or most server websites might end up infected with a Web Virus / Worm which will be trying to exploit even more sites of a type running silently in the background.  This is very common scenarios as currently there are donezs of PHP / CSS / Javasripts / XSS vulnerability exploited on VPS and Shared hosting servers due to failure of a customer to update his own CMS  scripts / Website  (Joomla, Wordpress, Drupal etc.) and the lack of resource to regularly monitor all customer activities / websites.

Therefore installing SuPHP Apache module is essential one to install on new serverslarge hosting providers as it saves the admin a lot of headache from spreading malware across all hosted servers sites ..
Some VPS admins that are security freaks tend to also install SuPHP module together with many chrooted Apache / LiteSpeed / Nginx webservers each of which running in a separate Jailed environment.

Of course using SuPHP besides giving a improved security layer to the webserver has its downsides such as increased load for the server and making Apache PHP scripts being interpretted a little bit slower than with plain Apache + PHP but performance difference while running a site on top of SuPHP is often not so drastic so you can live it up ..

Installing SuPHP on a Debian / Ubuntu servers is a piece of cake, just run the as root superuser, usual:
 

# apt-get install libapache2-mod-suphp


Once installed only thing to make is to turn off default installed Apache PHP module (without SuPHP compiled support and restart Apache webserver):
 

# a2dismod php5 …

# /etc/init.d/apache2 restart


To test the SuPHP is properly working on the Apache Webserver go into some of many hosted server websites DocumentRoot

And create new file called test_suphp.php with below content:

# vim test_suphp.php
<?php
system('id');
?>

Then open in browser http://whatever-website/test_suphp.php assuming that system(); function is not disabled for security reasons in php.ini you should get an User ID, GroupID bigger than reserved system IDs on GNU / Linux e.g. ID > UID / GID 99

Its also a good idea to take a look into SuPHP configuration file /etc/suphp/suphp.conf and tailor options according to your liking 

If different hosted client users home directories are into /home directory, set in suphp.conf

;Path all scripts have to be in

docroot=/home/


Also usually it is a good idea to set 

umask=0022 

Check your Server Download / Upload Internet Speed from Console on Linux / BSD / Unix howto

Tuesday, March 17th, 2015

tux-check-internet-network-download-upload-speed-on-linux-console-terminal-linux-bsd-unix
If you've been given a new dedicated server from a New Dedicated-Server-Provider or VPS with Linux and you were told that a certain download speed to the Server is guaranteed from the server provider, in order to be sure the server's connection to the Internet told by service provider is correct it is useful to run a simple measurement console test after logging in remotely to the server via SSH.

Testing connection from Terminal is useful because as you probably know most of Linux / UNIX servers doesn't have a GUI interface and thus it is not possible to test Internet Up / Down Bandwidth through speedtest.net.
 

1. Testing Download Internet Speed given by ISP / Dedi-Server Provider from Linux Console

For the download speed (internet) test the historical approach was to just try downloading the Linux kernel source code from www.kernel.org with some text browser such as lynx or links count the seconds for which the download is completed and then multiple the kernel source archive size on the seconds to get an approximate bandwidth per second, however as nowdays internet connection speeds are much higher, thus it is better to try to download some Linux distribution iso file, you can still use kernel tar archive but it completed too fast to give you some good (adequate) statistics on Download bandwidth.

If its a fresh installed Linux server probably you will probably not have links / elinks and lynx text internet browers  installed so install them depending on deb / rpm distro with:

If on Deb Linuz distro:


root@pcfreak:/root# apt-get install –yes links elinks lynx


On RPM Based Linuz distro:


[root@fedora ~]# yum install -y lynx elinks links


Conduct Internet  Download Speed with links
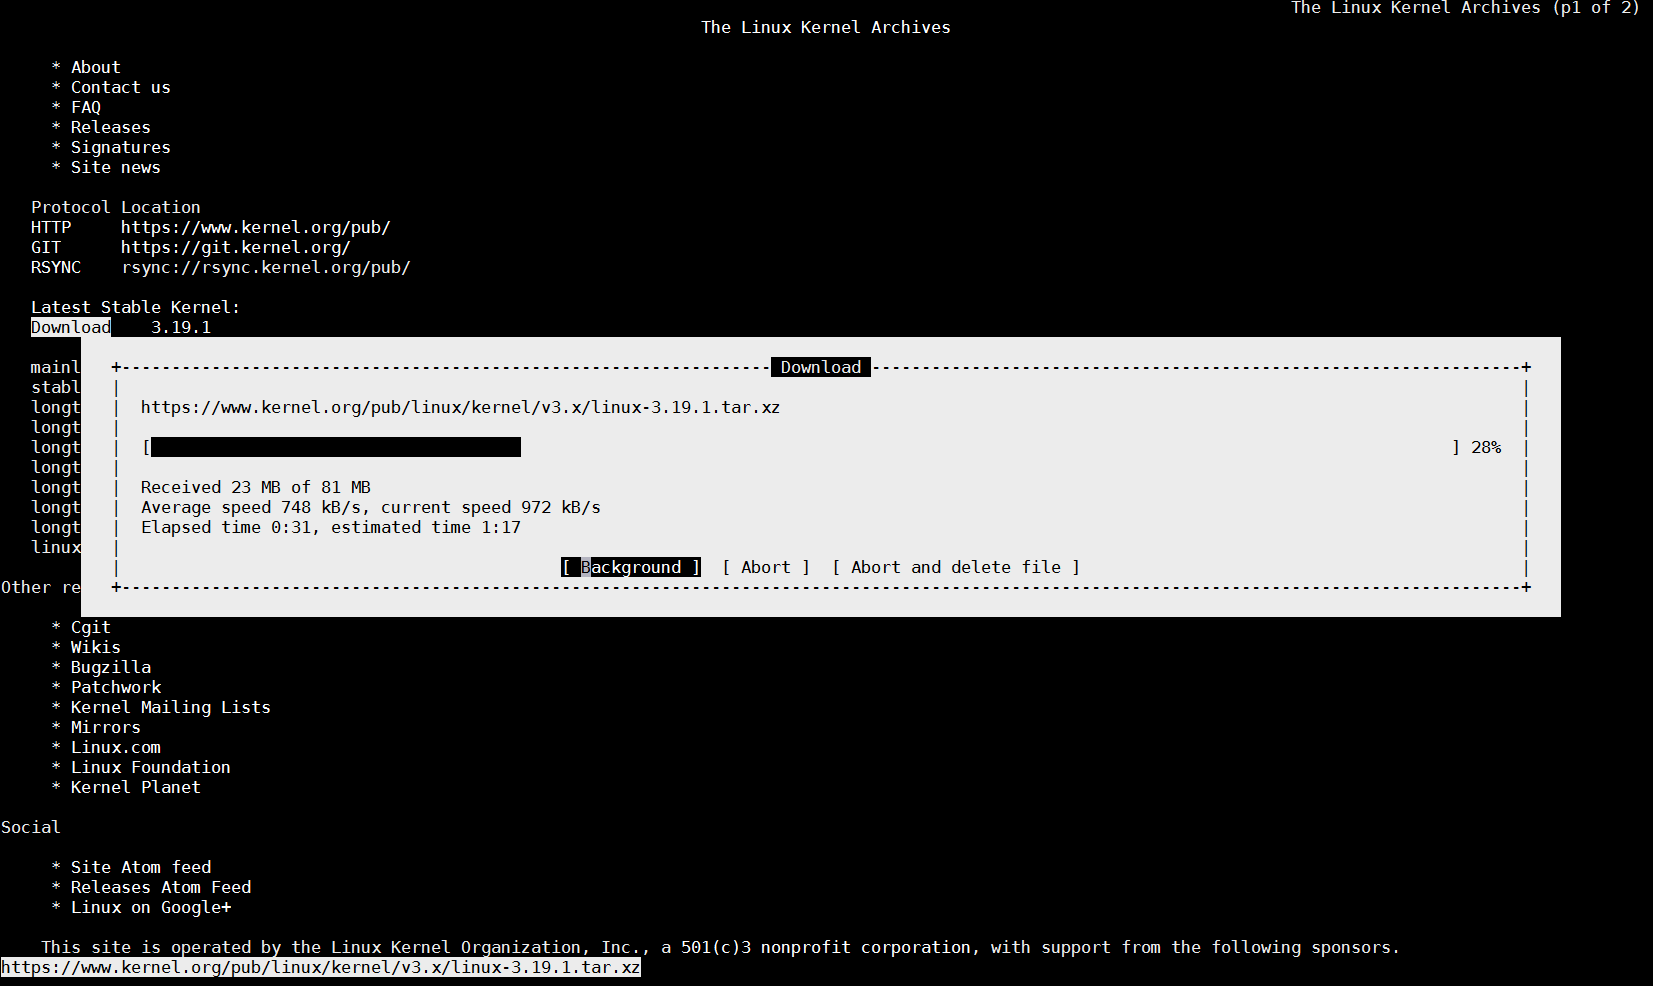
root@pcfreak:/root# links https://www.kernel.org/pub/linux/kernel/v3.x/linux-3.19.1.tar.xz

check_your_download_speed-from-console-linux-with-links-text-browser

(Note that the kernel link is current latest stable Kernel source code archive in future that might change, so try with latest archive.)

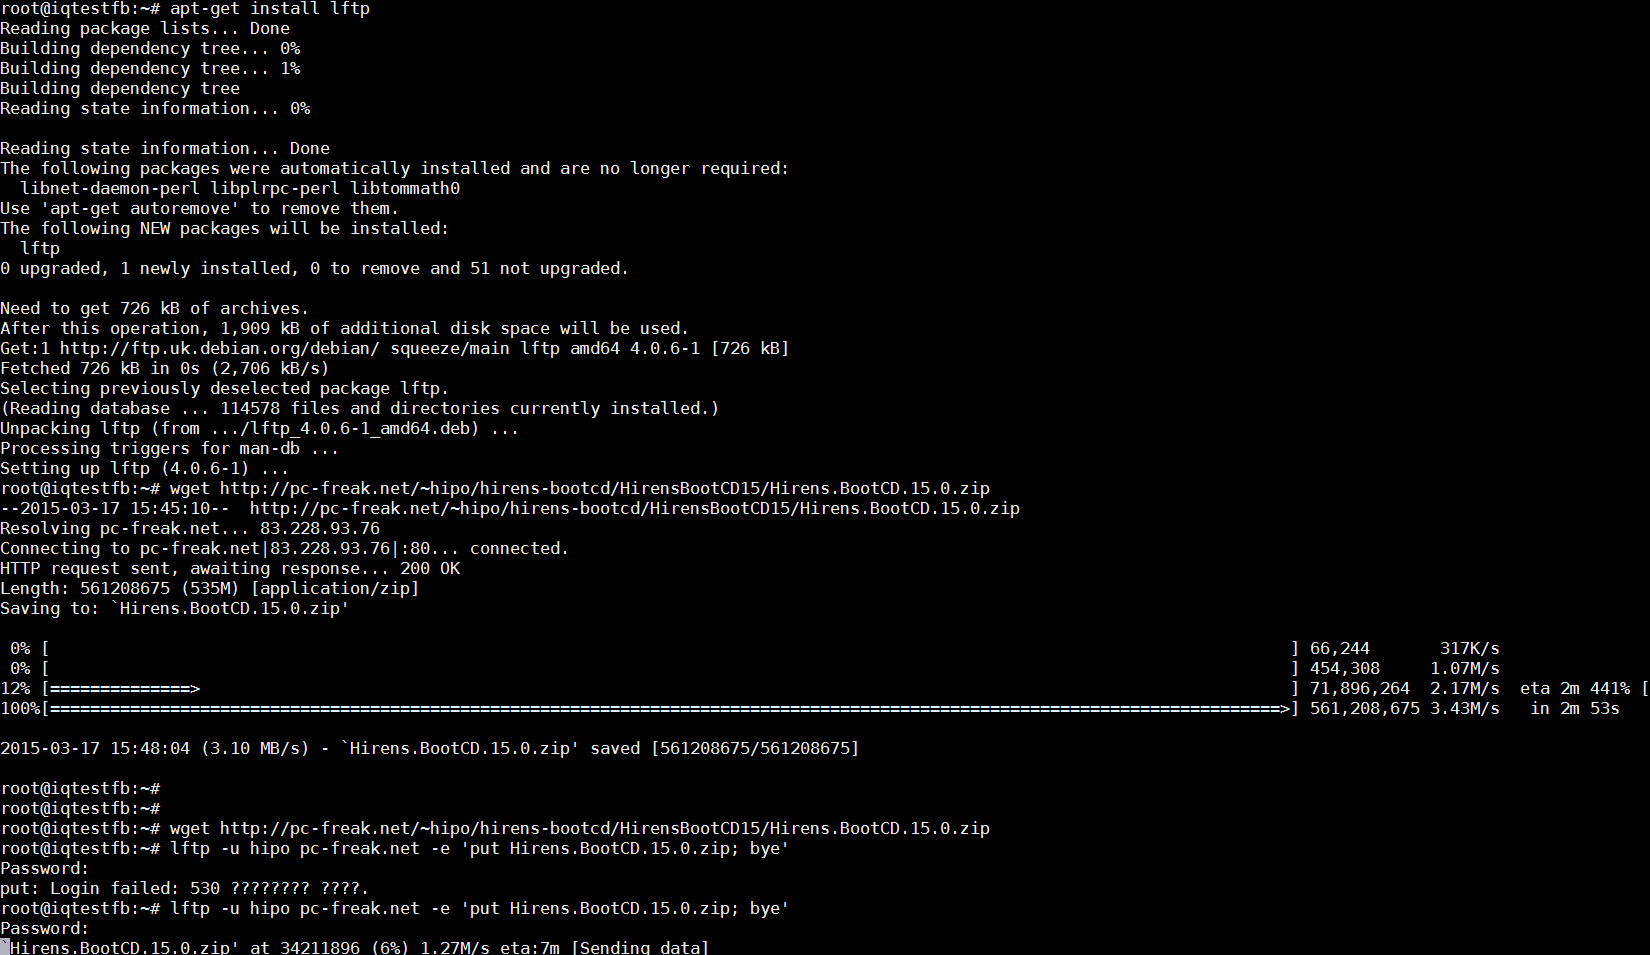
You can also use non-interactive tool such as wget curl or lftp to measure internet download speed

To test Download Internet Speed with wget without saving anything to disk set output to go to /dev/null 


root@pcfreak:~# wget -O /dev/null https://www.pc-freak.net//~hipo/hirens-bootcd/HirensBootCD15/Hirens.BootCD.15.0.zip


check_bandwidth_download-internet-speed-with-wget-from-console-non-interactively-on-linux

You see the Download speed is 104 Mbit/s this is so because I'm conducting the download from my local 100Mbit network.

For the test you can use my mirrored version of Hirens BootCD

2. Testing Uplink Internet speed provided by ISP / Server Provider from Linux (SSH) Console

To test your uplink speed you will need lftp or iperf command tool.


root@pcfreak:~# apt-cache show lftp|grep -i descr -A 12
Description: Sophisticated command-line FTP/HTTP client programs
 Lftp is a file retrieving tool that supports FTP, HTTP, FISH, SFTP, HTTPS
 and FTPS protocols under both IPv4 and IPv6. Lftp has an amazing set of
 features, while preserving its interface as simple and easy as possible.
 .
 The main two advantages over other ftp clients are reliability and ability
 to perform tasks in background. It will reconnect and reget the file being
 transferred if the connection broke. You can start a transfer in background
 and continue browsing on the ftp site. It does this all in one process. When
 you have started background jobs and feel you are done, you can just exit
 lftp and it automatically moves to nohup mode and completes the transfers.
 It has also such nice features as reput and mirror. It can also download a
 file as soon as possible by using several connections at the same time.


root@pcfreak:/root# apt-cache show iperf|grep -i desc -A 2
Description: Internet Protocol bandwidth measuring tool
 Iperf is a modern alternative for measuring TCP and UDP bandwidth performance,
 allowing the tuning of various parameters and characteristics.


To test Upload Speed to Internet connect remotely and upload any FTP file:


root@pcfreak:/root# lftp -u hipo www.pc-freak.net -e 'put Hirens.BootCD.15.0.zip; bye'


uploading-file-with-lftp-screenshot-test-upload-internet-speed-linux

On Debian Linux to install iperf:


root@pcfreak:/root# apt-get install –yes iperf


On latest CentOS 7 and Fedora (and other RPM based) Linux, you will need to add RPMForge repository and install with yum


[root@centos ~]# rpm -ivh  rpmforge-release-0.5.3-1.el7.rf.x86_64.rpm

[root@centos ~]# yum -y install iperf


Once having iperf on the server the easiest way currently to test it is to use
serverius.net speedtest server –  located at the Serverius datacenters, AS50673 and is running on a 10GE connection with 5GB cap.


root@pcfreak:/root# iperf -c speedtest.serverius.net -P 10
————————————————————
Client connecting to speedtest.serverius.net, TCP port 5001
TCP window size: 16.0 KByte (default)
————————————————————
[ 12] local 83.228.93.76 port 54258 connected with 178.21.16.76 port 5001
[  7] local 83.228.93.76 port 54252 connected with 178.21.16.76 port 5001
[  5] local 83.228.93.76 port 54253 connected with 178.21.16.76 port 5001
[  9] local 83.228.93.76 port 54251 connected with 178.21.16.76 port 5001
[  3] local 83.228.93.76 port 54249 connected with 178.21.16.76 port 5001
[  4] local 83.228.93.76 port 54250 connected with 178.21.16.76 port 5001
[ 10] local 83.228.93.76 port 54254 connected with 178.21.16.76 port 5001
[ 11] local 83.228.93.76 port 54255 connected with 178.21.16.76 port 5001
[  6] local 83.228.93.76 port 54256 connected with 178.21.16.76 port 5001
[  8] local 83.228.93.76 port 54257 connected with 178.21.16.76 port 5001
[ ID] Interval       Transfer     Bandwidth
[  9]  0.0-10.2 sec  4.05 MBytes  3.33 Mbits/sec
[ 10]  0.0-10.2 sec  3.39 MBytes  2.78 Mbits/sec
[ 11]  0.0-10.3 sec  3.75 MBytes  3.06 Mbits/sec
[  4]  0.0-10.3 sec  3.43 MBytes  2.78 Mbits/sec
[ 12]  0.0-10.3 sec  3.92 MBytes  3.18 Mbits/sec
[  3]  0.0-10.4 sec  4.45 MBytes  3.58 Mbits/sec
[  5]  0.0-10.5 sec  4.06 MBytes  3.24 Mbits/sec
[  6]  0.0-10.5 sec  4.30 MBytes  3.42 Mbits/sec
[  8]  0.0-10.8 sec  3.92 MBytes  3.03 Mbits/sec
[  7]  0.0-10.9 sec  4.03 MBytes  3.11 Mbits/sec
[SUM]  0.0-10.9 sec  39.3 MBytes  30.3 Mbits/sec


You see currently my home machine has an Uplink of 30.3 Mbit/s per second, that's pretty nice since I've ordered a 100Mbits from my ISP (Unguaranteed Bandwidth Connection Speed) and as you might know it is a standard practice for many Internet Proviers to give Uplink speed of 1/4 from the ISP provided overall bandwidth 1/4 would be 25Mbi/s, meaning my ISP (Bergon.NET) is doing pretty well providing me with even more than promised (ordered) bandwidth.

Iperf is probably the choice of most sysadmins who have to do regular bandwidth in local networks speed between 2 servers or test  Internet Bandwidth speed on heterogenous network with Linux / BSDs / AIX / HP-UX (UNIXes). On HP-UX and AIX and other UNIXes for which iperf doesn't have port you have to compile it yourself.

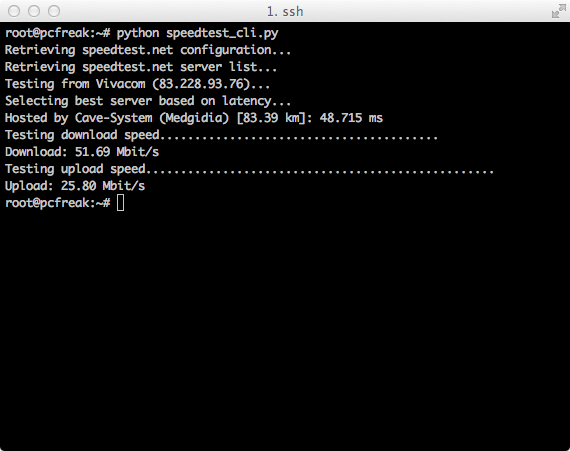
If you don't have root /admin permissions on server and there is python language enterpreter installed you can use speedtest_cli.py script to test internet throughput connectivity
speedtest_cli uses speedtest.net to test server up / down link just in case if script is lost in future I've made ownload mirror of speedtest_cli.py is here

Quickest way to test net speed with speedtest_cli.py:


$ lynx -dump https://raw.github.com/sivel/speedtest-cli/master/speedtest_cli.py > speedtest_cli.py
$ chmod +x speedtest_cli.py
python speedtest_cli.py

speedtest_cli_pyhon_script_screenshot-on-gnu-linux-test-internet-network-speed-on-unix

How to renew self signed QMAIL toaster and QMAIL rocks expired SSL pem certificate

Friday, September 2nd, 2011

qmail_toaster_logo-fix-qmail-rocks-expired-ssl-pem-certificate

One of the QMAIL server installs, I have installed very long time ago. I've been notified by clients, that the certificate of the mail server has expired and therefore I had to quickly renew the certificate.

This qmail installation, SSL certificates were located in /var/qmail/control under the names servercert.key and cervercert.pem

Renewing the certificates with a new self signed ones is pretty straight forward, to renew them I had to issue the following commands:

1. Generate servercert encoded key with 1024 bit encoding

debian:~# cd /var/qmail/control
debian:/var/qmail/control# openssl genrsa -des3 -out servercert.key.enc 1024
Generating RSA private key, 1024 bit long modulus
...........++++++
.........++++++
e is 65537 (0x10001)
Enter pass phrase for servercert.key.enc:
Verifying - Enter pass phrase for servercert.key.enc:

In the Enter pass phrase for servercert.key.enc I typed twice my encoded key password, any password is good, here though using a stronger one is better.

2. Generate the servercert.key file

debian:/var/qmail/control# openssl rsa -in servercert.key.enc -out servercert.key
Enter pass phrase for servercert.key.enc:
writing RSA key

3. Generate the certificate request

debian:/var/qmail/control# openssl req -new -key servercert.key -out servercert.csr
debian:/var/qmail/control# openssl rsa -in servercert.key.enc -out servercert.key
Enter pass phrase for servercert.key.enc:writing RSA key
root@soccerfame:/var/qmail/control# openssl req -new -key servercert.key -out servercert.csr
You are about to be asked to enter information that will be incorporated
into your certificate request.
What you are about to enter is what is called a Distinguished Name or a DN.
There are quite a few fields but you can leave some blank
For some fields there will be a default value,
If you enter '.', the field will be left blank.
-----
Country Name (2 letter code) [AU]:UK
State or Province Name (full name) [Some-State]:London
Locality Name (eg, city) []:London
Organization Name (eg, company) [Internet Widgits Pty Ltd]:My Company
Organizational Unit Name (eg, section) []:My Org
Common Name (eg, YOUR name) []:
Email Address []:admin@adminmail.com

Please enter the following 'extra' attributes
to be sent with your certificate request
A challenge password []:
An optional company name []:

In the above prompts its necessery to fill in the company name and location, as each of the prompts clearly states.

4. Sign the just generated certificate request

debian:/var/qmail/control# openssl x509 -req -days 9999 -in servercert.csr -signkey servercert.key -out servercert.crt

Notice the option -days 9999 this option instructs the newly generated self signed certificate to be valid for 9999 days which is quite a long time, the reason why the previous generated self signed certificate expired was that it was built for only 365 days

5. Fix the newly generated servercert.pem permissions debian:~# cd /var/qmail/control
debian:/var/qmail/control# chmod 640 servercert.pem
debian:/var/qmail/control# chown vpopmail:vchkpw servercert.pem
debian:/var/qmail/control# cp -f servercert.pem clientcert.pem
debian:/var/qmail/control# chown root:qmail clientcert.pem
debian:/var/qmail/control# chmod 640 clientcert.pem

Finally to load the new certificate, restart of qmail is required:

6. Restart qmail server

debian:/var/qmail/control# qmailctl restart
Restarting qmail:
* Stopping qmail-smtpd.
* Sending qmail-send SIGTERM and restarting.
* Restarting qmail-smtpd.

Test the newly installed certificate

To test the newly installed SSL certificate use the following commands:

debian:~# openssl s_client -crlf -connect localhost:465 -quiet
depth=0 /C=UK/ST=London/L=London/O=My Org/OU=My Company/emailAddress=admin@adminmail.com
verify error:num=18:self signed certificate
verify return:1
...
debian:~# openssl s_client -starttls smtp -crlf -connect localhost:25 -quiet
depth=0 /C=UK/ST=London/L=London/O=My Org/OU=My Company/emailAddress=admin@adminmail.com
verify error:num=18:self signed certificate
verify return:1
250 AUTH LOGIN PLAIN CRAM-MD5
...

If an error is returned like 32943:error:140770FC:SSL routines:SSL23_GET_SERVER_HELLO:unknown protocol:s23_clnt.c:607: this means that SSL variable in the qmail-smtpdssl/run script is set to 0.

To solve this error, change SSL=0 to SSL=1 in /var/qmail/supervise/qmail-smtpdssl/run and do qmailctl restart

The error verify return:1 displayed is perfectly fine and it's more of a warning than an error as it just reports the certificate is self signed.

How to find and Delete Duplicate files in directory on Linux server with find and fdupes command

Monday, March 16th, 2015

search-duplcate-files-linux-command-and-graphical-tools-how-to-find-duplicate-files-on-linux-mac-and-windows-os

Linux / UNIX find command is very helpful to do a lot of tasks to us admins such as Deleting empty directories to free up occupied inodes or finding and printing only empty files within a root file system within all sub-directories
There is too much of uses of find, however one that is probably rarely used known by sysadmins find command use is how to search for duplicate files on a Linux server:
 

find -not -empty -type f -printf “%s\n” | sort -rn | uniq -d | xargs -I{} -n1 find -type f -size {}c -print0 | xargs -0 md5sum | sort | uniq -w32 –all-repeated=separate

If you're curious how does duplicate files finding works, they are found by comparing file sizes and MD5 signatures, followed by a byte-by-byte comparison.

Most common application of below command is when you want to search and get rid of some old obsolete files which you forgot to delete such as old /etc/ configurations, old SQL backups and PHP / Java / Python programming code files etc.

If you have to do a regular duplicate file find on multiple servers Linux servers perhaps you should install and use  fdupes command.
On Debian Linux to install it:

root@pcfreak:/# apt-cache show fdupes|grep -i descr -A 4
Description: identifies duplicate files within given directories
 FDupes uses md5sums and then a byte by byte comparison to find
 duplicate files within a set of directories. It has several useful
 options including recursion.
Homepage: http://code.google.com/p/fdupes/


root@www.pc-freak.net:/# apt-get install –yes fdupes

To search for duplicate files with fdupes in lets /etc/ just run fdupes without arguments:


root@pcfreak:/# fdupes /etc/
/etc/magic
/etc/magic.mime

/etc/odbc.ini
/etc/.pwd.lock
/etc/environment
/etc/odbcinst.ini

/etc/shadow-
/etc/shadow


If you want to look up for all duplicate files within root directory:
 

root@pcfreak:/# fdupes -r /etc/
Building file list /


You can also find duplicate files for multiple directories by just passing all directories as arguments to fdupes


root@pcfreak:/# fdupes -r /etc/ /usr/ /root /disk /nfs_mount /nas


The -r argument (makes a recursive subdirectory search for duplicates), if you want to also see what is the size of duplicate files found add -S option


fdupes -r -S /etc/ /usr/ /root /disk /nfs_mount /nas


If you want to delete all duplicate files within lets say /etc/


root@pcfreak:/# fdupes -d /etc/

fdupes is also available and installable also on RPM based Linux distros Fedora / RHEL / CentOS etc., install on CentOS with:
 

[root@centos~ ]# yum -y install fdupes


There is also a port available for those who want to run it on FreeBSD on BSD install it from ports:


freebsd# cd /usr/ports/sysutils/fdupes
freebsd# make install clean


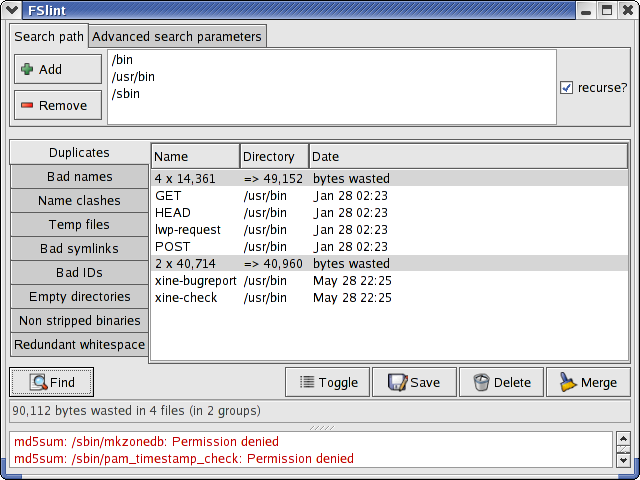
If you have a GUI environment installed on the server and you don't want to bother with command line to search for all duplicate files under main filesystem and other lint (junk) files take a look at FSlint

FSlint-2.02-search-for-duplicate-and-lint-files-linux-gui-tool

If you're looking for a GUI cross platform duplicate file finder tool that runs on all major used Operating Systems Mac OS X / Windows / Linux take a look at dupeGuru


MySQL: How to check user privileges and allowed hosts to connect with mysql cli

Wednesday, April 2nd, 2014

how-to-check-user-privileges-and-allowed-hosts-to-connect-with-mysql-cli

On a project there are some issues with root admin user unable to access the server from remote host and the most probable reason was there is no access to the server from that host thus it was necessary check mysql root user privilegse and allowed hosts to connect, here SQL query to do it:
 

mysql> select * from `user` where  user like 'root%';
+——————————–+——+——————————————-+————-+————-+————-+————-+————-+———–+————-+—————+————–+———–+————+—————–+————+————+————–+————+———————–+——————+————–+—————–+——————+——————+—————-+———————+——————–+——————+————+————–+———-+————+————-+————–+—————+————-+—————–+———————-+
| Host                           | User | Password                                  | Select_priv | Insert_priv | Update_priv | Delete_priv | Create_priv | Drop_priv | Reload_priv | Shutdown_priv | Process_priv | File_priv | Grant_priv | References_priv | Index_priv | Alter_priv | Show_db_priv | Super_priv | Create_tmp_table_priv | Lock_tables_priv | Execute_priv | Repl_slave_priv | Repl_client_priv | Create_view_priv | Show_view_priv | Create_routine_priv | Alter_routine_priv | Create_user_priv | Event_priv | Trigger_priv | ssl_type | ssl_cipher | x509_issuer | x509_subject | max_questions | max_updates | max_connections | max_user_connections |
+——————————–+——+——————————————-+————-+————-+————-+————-+————-+———–+————-+—————+————–+———–+————+—————–+————+————+————–+————+———————–+——————+————–+—————–+——————+——————+—————-+———————+——————–+——————+————+————–+———-+————+————-+————–+—————+————-+—————–+———————-+
| localhost                      | root | *5A07790DCF43AC89820F93CAF7B03DE3F43A10D9 | Y           | Y           | Y           | Y           | Y           | Y         | Y           | Y             | Y            | Y         | Y          | Y               | Y          | Y          | Y            | Y          | Y                     | Y                | Y            | Y               | Y                | Y                | Y              | Y                   | Y                  | Y                | Y          | Y            |          |            |             |              |             0 |           0 |               0 |                    0 |
| server737                        | root | *5A07790DCF43AC89820F93CAF7B03DE3F43A10D9 | Y           | Y           | Y           | Y           | Y           | Y         | Y           | Y             | Y            | Y         | Y          | Y               | Y          | Y          | Y            | Y          | Y                     | Y                | Y            | Y               | Y                | Y                | Y              | Y                   | Y                  | Y                | Y          | Y            |          |            |             |              |             0 |           0 |               0 |                    0 |
| 127.0.0.1                      | root | *5A07790DCF43AC89820F93CAF7B03DE3F43A10D9 | Y           | Y           | Y           | Y           | Y           | Y         | Y           | Y             | Y            | Y         | Y          | Y               | Y          | Y          | Y            | Y          | Y                     | Y                | Y            | Y               | Y                | Y                | Y              | Y                   | Y                  | Y                | Y          | Y            |          |            |             |              |             0 |           0 |               0 |                    0 |
| server737.server.myhost.net | root | *5A07790DCF43FC89820A93CAF7B03DE3F43A10D9 | Y           | Y           | Y           | Y           | Y           | Y         | Y           | Y             | Y            | Y         | Y          | Y               | Y          | Y          | Y            | Y          | Y                     | Y                | Y            | Y               | Y                | Y                | Y              | Y                   | Y                  | Y                | Y          | Y            |          |            |             |              |             0 |           0 |               0 |                    0 |
| server4586                        | root | *5A07790DCF43AC89820F93CAF7B03DE3F43A10D9 | N           | N           | N           | N           | N           | N         | N           | N             | N            | N         | N          | N               | N          | N          | N            | N          | N                     | N                | N            | N               | N                | N                | N              | N                   | N                  | N                | N          | N            |          |            |             |              |             0 |           0 |               0 |                    0 |
| server4586.myhost.net              | root | *5A07790DCF43AC89820F93CAF7B03DE3F43A10D9 | N           | N           | N           | N           | N           | N         | N           | N             | N            | N         | N          | N               | N          | N          | N            | N          | N                     | N                | N            | N               | N                | N                | N              | N                   | N                  | N                | N          | N            |          |            |             |              |             0 |           0 |               0 |                    0 |
+——————————–+——+——————————————-+————-+————-+————-+————-+————-+———–+————-+—————+————–+———–+————+—————–+————+————+————–+————+———————–+——————+————–+—————–+——————+——————+—————-+———————+——————–+——————+————+————–+———-+————+————-+————–+—————+————-+—————–+———————-+
6 rows in set (0.00 sec)

mysql> exit


Here is query explained:

select * from `user` where  user like 'root%'; query means:

select * – show all
from `user` – from user database
where user like 'root%' – where there is match in user column to any string starting with 'root*',