Posts Tagged ‘root’
Monday, May 21st, 2012 
I'm running FreeBSD with Apache and PHP on it and I got in dmesg (kernel log), following error:
freebsd# dmesg|grep -i vm.pmap.shpgperproc

Approaching the limit on PV entries, consider increasing either the vm.pmap.shpgperproc or the vm.pmap.pv_entry_max tunable.

Approaching the limit on PV entries, consider increasing either the vm.pmap.shpgperproc or the vm.pmap.pv_entry_max tunable.

Approaching the limit on PV entries, consider increasing either the vm.pmap.shpgperproc or the vm.pmap.pv_entry_max tunable.

Approaching the limit on PV entries, consider increasing either the vm.pmap.shpgperproc or the vm.pmap.pv_entry_max tunable.

Approaching the limit on PV entries, consider increasing either the vm.pmap.shpgperproc or the vm.pmap.pv_entry_max tunable.
The exact FreeBSD, Apache and php versions I have installed are:
freebsd# uname -a ; httpd -V ; php –version
FreeBSD pcfreak 7.2-RELEASE-p4 FreeBSD 7.2-RELEASE-p4 #0: Fri Oct 2 12:21:39 UTC 2009 root@i386-builder.daemonology.net:/usr/obj/usr/src/sys/GENERIC i386
Server version: Apache/2.0.64
Server built: Mar 13 2011 23:36:25Server's Module Magic Number: 20050127:14
Server loaded: APR 0.9.19, APR-UTIL 0.9.19
Compiled using: APR 0.9.19, APR-UTIL 0.9.19
Architecture: 32-bit
Server compiled with….
-D APACHE_MPM_DIR="server/mpm/prefork"
-D APR_HAS_SENDFILE
-D APR_HAS_MMAP
-D APR_HAVE_IPV6 (IPv4-mapped addresses enabled)
-D APR_USE_FLOCK_SERIALIZE
-D APR_USE_PTHREAD_SERIALIZE
-D SINGLE_LISTEN_UNSERIALIZED_ACCEPT
-D APR_HAS_OTHER_CHILD
-D AP_HAVE_RELIABLE_PIPED_LOGS
-D HTTPD_ROOT="/usr/local"
-D SUEXEC_BIN="/usr/local/bin/suexec"
-D DEFAULT_PIDLOG="/var/run/httpd.pid"
-D DEFAULT_SCOREBOARD="logs/apache_runtime_status"
-D DEFAULT_LOCKFILE="/var/run/accept.lock"
-D DEFAULT_ERRORLOG="logs/error_log"
-D AP_TYPES_CONFIG_FILE="etc/apache2/mime.types"
-D SERVER_CONFIG_FILE="etc/apache2/httpd.conf"
PHP 5.3.5 with Suhosin-Patch (cli) (built: Mar 14 2011 00:29:17)
Copyright (c) 1997-2009 The PHP Group
Zend Engine v2.3.0, Copyright (c) 1998-2010 Zend Technologies
with eAccelerator v0.9.6.1, Copyright (c) 2004-2010 eAccelerator, by eAccelerator
After a bunch of research a FreeBSD forums thread , I've found the fix suggested by a guy.
The solution suggested in the forum is to raise up vm.pmap.pv_entry_ma to vm.pmap.pv_entry_max=1743504, however I've noticed this value is read only and cannot be changed on the BSD running kernel;
freebsd# sysctl vm.pmap.pv_entry_max=1743504

sysctl: oid 'vm.pmap.pv_entry_max' is read only
Instead to solve the;
Approaching the limit on PV entries, consider increasing either the vm.pmap.shpgperproc or the vm.pmap.pv_entry_max tunable.
, I had to add in /boot/loader.conf
vm.pmap.pde.mappings=68

vm.pmap.shpgperproc=500

vm.pmap.pv_entry_max=1743504
Adding this values through /boot/loader.conf set them on kernel boot time. I've seen also in the threads the consider increasing either the vm.pmap.shpgperproc is also encountered on FreeBSD hosts running Squid, Dansguardion and other web proxy softwares on busy hosts.
This problems are not likely to happen for people who are running latest FreeBSD releases (>8.3, 9.x), I've read in same above post in newer BSD kernels the vm.pmap is no longer existing in newer kernels.
Tags: apache 2, apache2, architecture, Auto, boot time, BSD, dmesg, Draft, eeBSDI, errorlog, Fix Approaching, flock, freebsd, freebsd apache, Fri, GENERIC, grep, httpd, kernel, limit, loader, logs apache, magic number, Mar, mime types, mmap, Module, mpm, net usr, number, Oct, patc, pcfreak, php version, php versions, PV, RELEASE-p, root, scoreboard, sendfile, serialize, server, server config, server version, shpgperproc, suexec, threads, uname, UTC, vm, Zend
Posted in FreeBSD, System Administration | No Comments »
Sunday, May 20th, 2012 
My home run machine MySQL server was suddenly down as I tried to check my blog and other sites today, the error I saw while trying to open, this blog as well as other hosted sites using the MySQL was:
Error establishing a database connection
The topology, where this error occured is simple, I have two hosts:
1. Apache version 2.0.64 compiled support externally PHP scripts interpretation via libphp – the host runs on (FreeBSD)
2. A Debian GNU / Linux squeeze running MySQL server version 5.1.61
The Apache host is assigned a local IP address 192.168.0.1 and the SQL server is running on a host with IP 192.168.0.2
To diagnose the error I've logged in to 192.168.0.2 and weirdly the mysql-server was appearing to run just fine:
debian:~# ps ax |grep -i mysql
31781 pts/0 S 0:00 /bin/sh /usr/bin/mysqld_safe
31940 pts/0 Sl 12:08 /usr/sbin/mysqld –basedir=/usr –datadir=/var/lib/mysql –user=mysql –pid-file=/var/run/mysqld/mysqld.pid –socket=/var/run/mysqld/mysqld.sock –port=3306
31941 pts/0 S 0:00 logger -t mysqld -p daemon.error
32292 pts/0 S+ 0:00 grep -i mysql
Moreover I could connect to the localhost SQL server with mysql -u root -p and it seemed to run fine. The error Error establishing a database connection meant that either something is messed up with the database or 192.168.0.2 Mysql port 3306 is not properly accessible.
My first guess was something is wrong due to some firewall rules, so I tried to connect from 192.168.0.1 to 192.168.0.2 with telnet:
freebsd# telnet 192.168.0.2 3306
Trying 192.168.0.2…
Connected to jericho.
Escape character is '^]'.
Host 'webserver' is blocked because of many connection errors; unblock with 'mysqladmin flush-hosts'
Connection closed by foreign host.
Right after the telnet was initiated as I show in the above output the connection was immediately closed with the error:
Host 'webserver' is blocked because of many connection errors; unblock with 'mysqladmin flush-hosts'Connection closed by foreign host.
In the error 'webserver' is my Apache machine set hostname. The error clearly states the problems with the 'webserver' apache host unable to connect to the SQL database are due to 'many connection errors' and a fix i suggested with mysqladmin flush-hosts
To temporary solve the error and restore my normal connectivity between the Apache and the SQL servers I logged I had to issue on the SQL host:
mysqladmin -u root -p flush-hostsEnter password:
Thogh this temporar fix restored accessibility to the databases and hence the websites errors were resolved, this doesn't guarantee that in the future I wouldn't end up in the same situation and therefore I looked for a permanent fix to the issues once and for all.
The permanent fix consists in changing the default value set for max_connect_error in /etc/mysql/my.cnf, which by default is not too high. Therefore to raise up the variable value, added in my.cnf in conf section [mysqld]:
debian:~# vim /etc/mysql/my.cnf

...

max_connect_errors=4294967295
and afterwards restarted MYSQL:
debian:~# /etc/init.d/mysql restart

Stopping MySQL database server: mysqld.

Starting MySQL database server: mysqld.

Checking for corrupt, not cleanly closed and upgrade needing tables..
To make sure the assigned max_connect_errors=4294967295 is never reached due to Apache to SQL connection errors, I've also added as a cronjob.
debian:~# crontab -u root -e

00 03 * * * mysqladmin flush-hosts
In the cron I have omitted the mysqladmin -u root -p (user/pass) input options because for convenience I have already stored the mysql root password in /root/.my.cnf
Here is how /root/.my.cnf looks like:
debian:~# cat /root/.my.cnf

[client]

user=root

password=a_secret_sql_password
Now hopefully, this would permanently solve SQL's 'failure to accept connections' due to too many connection errors for future.
Tags: apache version, Auto, basedir, bin, cnf, connection, connectionThe, daemon, database connection, debian gnu, default, Draft, due, error error, firewall rules, fix, freebsd, GNU, guess, host, host name, hostname, lib, Linux, local ip address, localhost, machine, mysql server, mysqladmin, mysqld, mysqlMoreover, nbsp, occured, password, port 3306, root, root password, running, server version, sl 12, Socket, something, SQL, sql server, squeeze, support, topology, value, webserver
Posted in MySQL, System Administration, Web and CMS | No Comments »
Tuesday, January 17th, 2012 
My beloved sister was complaining games were failing to properly be played with wine emulator , therefore I decided to be kind and help her by installing a Windows XP to run inside a Virtual Machine.My previous install experiments with running MS Windows XP on Linux was on Debian using QEMU virtualmachine emulator.
However as Qemu is a bit less interactive and slower virtualmachine for running Windows (though I prefer it for being completely free software), this time I decided to install the Windows OS with Virtualbox.
My hope was using VirtualBox would be a way easier but I was wrong… I've faced few troubles and I thought many people who initially try to install Virtualbox VM to run Windows on Ubuntu and other Debian based Linux distros will probably experience the same problems as mine, so here is how this article was born.
Here is what I did to have a VirtualBox OS emulator to run Windows XP SP2 on Ubuntu 11.10 Linux
1. Install Virtualbox required packages with apt
root@ubuntu:~# apt-get install virtualbox virtualbox-dkms virtualbox-guest-dkms
root@ubuntu:~# apt-get install virtualbox-ose-dkms virtualbox-guest-utils virtualbox-guest-x11

...
If you prefer more GUI or lazy to type commands, the Software Package Manager can also be used to straight install the same packages.
virtualbox-dkms virtualbox-guest-dkms packages are the two which are absolutely necessery in order to enable VirtualBox to support installing Microsoft Windows XP. DKMS modules are also necessery to be able to emulate some other proprietary (non-free) operating systems.
The DKMS packages provide a source for building Vbox guest (OS) additional kernel modules. They also require the kernel source to be install otherwise they fail to compile.
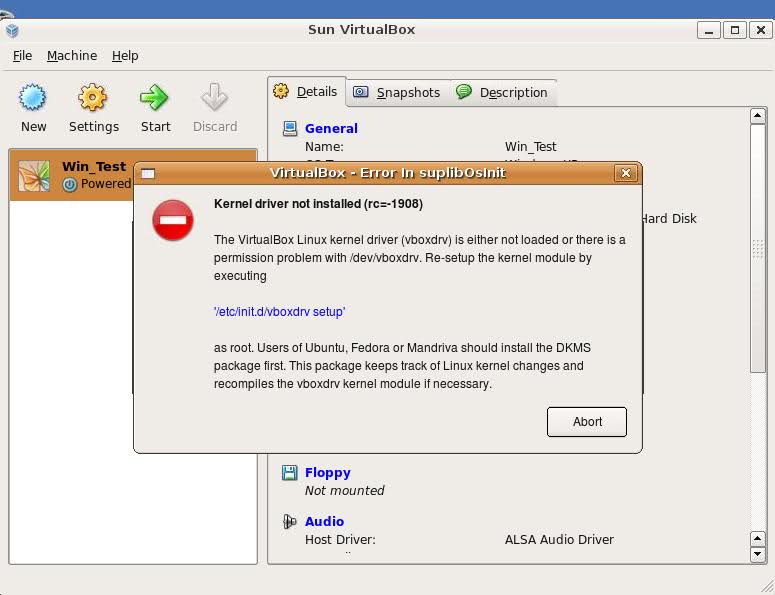
Failing to build the DKMS modules will give you error every time you try to create new VirtualMachine container for installing a fresh Windows XP.
The error happens if the two packages do not properly build the vboxdrv extra Vbox kernel module while the Windows XP installer is loaded from a CD or ISO. The error to pop up is:
Kernel driver not installed (rc=-1908)
The VirtualBox Linux kernel driver (vboxdrv) is either not loaded or there is a permission problem with /dev/vboxdrv. Please reinstall the kernel module by executing
To fix the error:
2. Install latest Kernel source that corresponds to your current kernel version
root@ubuntu:~# apt-get install linux-headers-`uname -r`

...
Next its necessery to rebuild the DKMS modules using dpkg-reconfigure:
3. Rebuild VirtualBox DKMS deb packages
root@ubuntu:~# dpkg-reconfigure virtualbox-dkms

...

root@ubuntu:~# dpkg-reconfigure virtualbox-guest-dkms

...

root@ubuntu:~# dpkg-reconfigure virtualbox-ose-dkms

...
Hopefully the copilation of vboxdrv kernel module should complete succesfully.
To test if all is fine just load the module:
4. Load vboxdrv virtualbox kernel module
root@ubuntu:~# modprobe vboxdrv

root@ubuntu:~#
If you get some error during loading, this means vboxdrv failed to properly compile, try read thoroughfully what the error is and fix it) ;).
As a next step the vboxdrv has to be set to load on every system boot.
5. Set vboxdrv to load on every Ubuntu boot
root@ubuntu:~# echo 'vboxdrv' >> /etc/modules
I am not sure if this step is required, it could be /etc/init.d/virtualbox init script automatically loads the module, anyways putting it to load on boot would do no harm, so better do it.
That's all now, you can launch VirtualBox and use the New button to initiate a new Virtual Machine, I will skip explaining how to do the configurations for a Windows XP as most of the configurations offered by default would simply work without any tampering.
After booting the Windows XP installer I simply followed the usual steps to install Windows and all went smoothly.
Below you see a screenshot showing the installed Windows XP Virtualbox saved VM session. The screenshot letters are in Bulgarian as my sisters default lanaguage for Ubuntu is bulgarian 😉
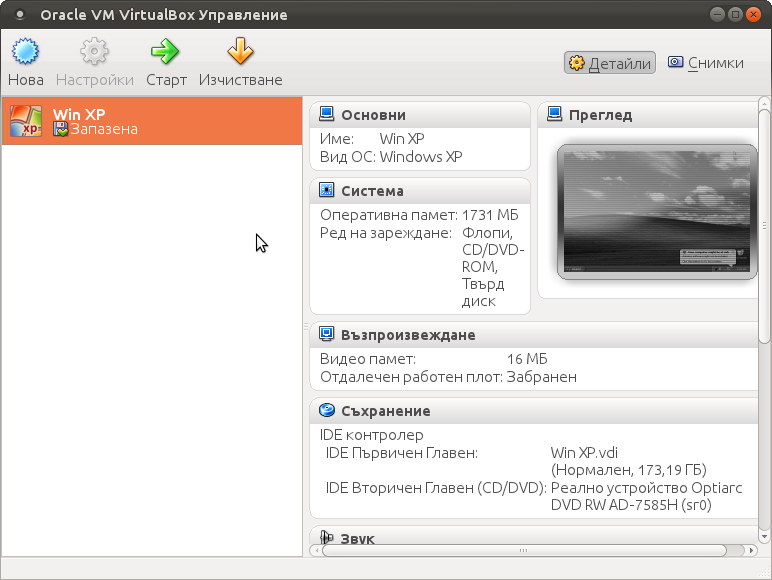
I hope this article helps someone out there. Please drop me a comment if you experience any troubles with it. Cya 🙂
Tags: Auto, beloved sister, DKMS, Draft, Failing, free operating systems, guest os, How to, init, init script, Install, ISO, kernel modules, kernel source, Linux, loading, Microsoft, microsoft windows, ms windows, necessery, Permission, qemu, root, screenshot, Set, software, software package, system boot, time, type, Ubuntu, uname, vbox, Virtual, virtual machine, VirtualBox, virtualmachine, vm, Windows, windows os, windows xp, windows xp sp2, wine, x11
Posted in Linux, Linux and FreeBSD Desktop, Linux Audio & Video | 1 Comment »
Tuesday, January 17th, 2012
Right after installing Windows XP inside VirtualBox, I've found out everything works fine except the screen. Even though pressing (Right CTRL + F) was changing the Windows XP running window to FullScreen the XP screen was taking only a part of the whole screen area, where almost half of the screen was visible as simply staying blank.
A bit of research and I found the issue is caused by missing VirtualBoxGuestAdditions .
VBoxAdditions is a package which should be installed inside the VirtualBox by navigating to Devices -> Install Guest Additions
Virtualbox offers a download of a VboxGuestAdditions_4.1.2_Ubuntu.iso from url;
http://dlc.sun.edgesuite.net/virtualbox/4.1.2_Ubuntu/VBoxGuestAdditions_4.1.2_Ubuntu.iso, anyways this download fails since the URL is currently unavailable.
To fix this two ways are possible:
1. Download VBoxGuestAdditions.iso from here and put it in directory /usr/share/virtualbox , e.g.:
root@ubuntu:~# cd /usr/share/virtualbox

root@ubuntu:/usr/share/virtualbox# wget https://www.pc-freak.net/files/VBoxGuestAdditions.iso

...
2. Download and install virtualbox-guest-additions-iso_4.1.2-1_all.deb
root@ubuntu:~# wget https://www.pc-freak.net/files/virtualbox-guest-additions-iso_4.1.2-1_all.deb

...

root@ubuntu:~# dpkg -i virtualbox-guest-additions-iso_4.1.2-1_all.deb

...
Next to enable and install guest additions once again use menus:
Devices -> Install Guest Additions

The screen to appear next will be similar to:
Further on follow the few dialogs to complete the installations and integration of Guest Additions and restart the Virtual machine and hooray the Windows will appear in Full screen in VirtualBox ! 😉
Tags: additions, area, deb, dialogs, dlc, download, dpkg, edgesuite, everything, freak, FULL, fullscreen, half, hooray, How to, Install, installing windows, integration, iso 2, issue, Linux, menus, net, package, root, screen, share, sun, two ways, Ubuntu, usr, Virtual, virtual machine, VirtualBox, VirtualBoxGuestAdditions, wget, windows xp
Posted in Linux, Linux and FreeBSD Desktop, System Administration, Virtual Machines | 1 Comment »
Wednesday, October 19th, 2011 
I've been using Debian GNU / Linux on my Thinkpad laptop for almost 3 years and half. Initially the Debian version which I had installed was a stable Debian Lenny. As I was mostly dissatisfied of the old versions of the programs, I migrated to testing / unstable
Testing / unstables shipped program versions were a bit better but still back in the day I wanted to get advantage of the latest program versions so for a while I switched to unstable .
Later I regretted for this bad idea, after the migration to Unstable, it was too buggy to run on a notebook one uses for everyday work.
Then to revert back to a bit stable I downgraded to testing unstable again.
When Debian launched Debian Squeeze I set in my /etc/apt/sources.list file software repositories to be the one for the stable Debian Squeeze.
As you can see, I've done quite a lot of "experiments" and "excersises". Many packages were installed, then removed, some became obsolete with time others I just temporary installed out of curiosity. Anyways as a result I ended up with many packages uninstalled / removed , which still kept some of their directory structres and configurations on the machine.
Today, I decided to check how many of these obsolete packages are still present in dpkg database and I was shocked to find out 412 debs were still in my package database! To check the number I used cmd:
root@noah:~# dpkg -l | grep -i '^rcs.*$'|wc -l
Considering the tremendous number of packs waiting to be purged, I decided to get rid of this old and already unnecessery files for the sake of clarity, besides that removing the old already uninstalled packages removes old configuration files, readmes, directories and frees some little space and therefore frees some inodes 😉
Before proceeding to remove them, I carefully reviewed and all the package names which I was about to completely purge in order to make sure there is no package with a configuration files I might need in future:
root@noah:~# dpkg -l |grep -i '^rcs.*$'

...
After reviewing all the deb packages possessing the rc – (remove candidate) flag, I used the following bash one liners to remove the obsolete deb packages:
root@noah:~# for i in $(dpkg -l |grep -i '^rcs.*$'|awk '{ print $2 }'); do echo dpkg --purge $i done...

root@noah:~# for i in $(dpkg -l |grep -i '^rcs.*$'|awk '{ print $2 }'); do dpkg --purge $i done
First line will just print out what will be purged with dpkg , so after I checked it out I used the second one to purge all the RC packs.
Tags: bad idea, bit, buggy, candidate, clarity, cmd, configuration files, curiosity, deb packages, debian version, debs, dpkg, everyday work, file, half, How to, inodes, laptop, Linux, little space, machine, need, noah, number, old versions, package, package database, package names, program versions, purge, quot, root, software, software repositories, squeeze, system, system directories, testing, time, Ubuntu, work
Posted in Linux, Linux and FreeBSD Desktop, Linux Audio & Video, System Administration, Various | 3 Comments »
Monday, January 23rd, 2012 
1. Add Medibuntu package repository
root@ubuntu:~# wget --output-document=/etc/apt/sources.list.d/medibuntu.list \

http://www.medibuntu.org/sources.list.d/$(lsb_release -cs).list \

&& apt-get --quiet update \

&& apt-get --yes --quiet --allow-unauthenticated install medibuntu-keyring \

&& apt-get --quiet update
2. Enable Ubuntu to play Restricted DVD
root@ubuntu:~# apt-get install --yes libdvdread4

...

root@ubuntu:~# /usr/share/doc/libdvdread4/install-css.sh
After that VLC will be ready to play DVDs for some programs which was compiled without DVD, source rebuilt is required.
If DVDs hang you might need to set a Region Code with regionset:
# regionset
3. Install non-free codecs
root@ubuntu:~# apt-get install non-free-codecs
4. Install Chromium ffmpeg nonfree codecs
root@ubuntu:~# apt-get install chromium

root@ubuntu:~# apt-get install chromium-codecs-ffmpeg-nonfree
5. Install w32codecs / w64codecs
Depending on the Ubuntu Linux installation architecture 32/64 bit install w32codecs or w64codecs
For 32 bit (x86) Ubuntu install w32codecs:
root@ubuntu:~# apt-get install w32codecs
For 64 bit arch Ubuntu:
root@ubuntu:~# apt-get install w64codecs
6. Install ubuntu-restricted-extras meta package
root@ubuntu:~# apt-get install ubuntu-restricted-extras
7. Install cheese for webcam picture/video snapshotting
root@ubuntu:~# apt-get install cheese
8. Install GIMP, Inkscape, xsane,sane, shotwell etc.
root@ubuntu:~# apt-get --yes install sane xsane gimp inkscape gimp-data-extras gimp-plugin-registry \

blender gcolor2 showtwell bluefish kompozer
9. Install multimedia Sound & Video utilities
Install Subtitle editor, video editiking , sound editing, mp3 player, iso mounters, DVD/CD Burners
root@ubuntu:~# apt-get install rhythmbox banshee smplayer mplayer \

realplayer audacity brasero jokosher istanbuk gtk-recordMyDesktop \acetoneisohexedit furiusisomount winff fala audacious dvdstyler lives hydrogen

subtitleeditor gnome-subtitles electricsheep k3b
10. Install CD / DVD RIP tools
root@ubuntu:~# apt-get install acidrip sound-juicer ogmrip thoggen
11. Install chat messanger programs, Browsers, mail pop3 clients, torrent, emulators, ftp clients etc.
apt-get install seamonkey thunderbird transmission transmission-gtk gbgoffice kbedic \

pidgin openoffice.org gxine mozilla-plugin-vlc wine dosbox samba filezilla amsn ntp \epiphany-browser ntpdate desktop-webmail alltray chmsee gftp xchat-gnome ghex \gnome-genius bleachbit arista
12. Install Non-Free Flash Player
Unfortunately Gnash is not yet production ready and crashes in many websites …
root@ubuntu:~# apt-get install flashplugin-nonfree flashplugin-nonfree-extrasound swfdec-gnome
13. Install Archive / Unarchive management programs
root@ubuntu:~# apt-get install unace unrar zip unzip p7zip-full p7zip-rar sharutils rar uudeview \

mpack lha arj cabextract file-roller
15. Install VirtualBox and QEmu
root@ubuntu:~# apt-get install qemu-launcher qemu-kvm-extras virtualbox virtualbox-ose \

virtualbox-ose-guest-dkms virtualbox-ose-guest-dkms
This should be enough to use Ubuntu normally for multimedia Desktop just as MS Windows for most of the daily activities.
Am I missing some important program?
Tags: amp, architecture, audacity, Auto, banshee, bit, blender, bluefish, cd burners, Chromium, Draft, editing, editing mp3, ffmpeg, free codecs, gcolor, inkscape, Install, installation, ISO, libdvdread, Linux, linux multimedia, list, lsb, Medibuntu, meta package, org, output document, package, player, plugin registry, regionset, repository, root, sane, shafter, shotwell, showtwell, smplayer, Sound, sound editing, Sound Video, subtitle editor, sudo, Ubuntu, ubuntu linux, Ubuntu Linux Multimedia, video, video utilities, VirtualBox, VLC, wget, WinFF, x86
Posted in Linux, Linux and FreeBSD Desktop, Linux Audio & Video, System Administration | 4 Comments »
Monday, June 11th, 2012 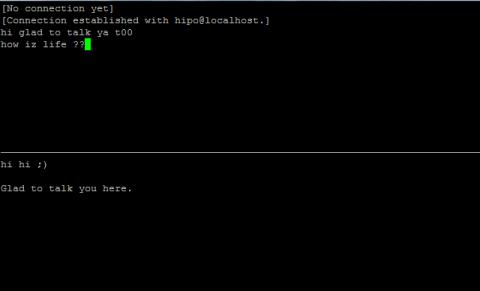
After writting in previous article on how talk be used to handle interactive chat console sessions on FreeBSD, I thought of dropping a few lines on how same is done on Debian, so here is how:
1.; Install talk and talkd
noah:/home/hipo# apt-get --yes install talk talkd

Reading package lists... Done

Building dependency tree

Reading state information... Done

The following NEW packages will be installed:

talk talkd

0 upgraded, 2 newly installed, 0 to remove and 93 not upgraded.

Need to get 19.0 kB/42.3 kB of archives.

After this operation, 201 kB of additional disk space will be used.

Get:1 http://ftp.nl.debian.org/debian/ stable/main talkd amd64 0.17-14 [19.0 kB]

Fetched 19.0 kB in 0s (67.1 kB/s)

Selecting previously deselected package talk.

(Reading database ... 90%

Unpacking talk (from .../talk_0.17-14_amd64.deb) ...

Selecting previously deselected package talkd.

Unpacking talkd (from .../talkd_0.17-14_amd64.deb) ...

Processing triggers for man-db ...

Setting up talk (0.17-14) ...

update-alternatives: using /usr/bin/netkit-ntalk to provide /usr/bin/talk (talk) in auto mode.

Setting up talkd (0.17-14) ...
2.;; Check and make sure talk and ntalkd lines are present in /etc/inetd.conf
noah:/home/hipo# grep -i talk /etc/inetd.conf

#:BSD: Shell, login, exec and talk are BSD protocols.

talk dgram udp wait nobody.tty /usr/sbin/in.talkd in.talkd

ntalk dgram udp wait nobody.tty /usr/sbin/in.ntalkd in.ntalkd
Now you probably wonder why are there two lines in /etc/inetd.conf for ))
in.talkd and in.ntald
in.talkd daemon's aim is to deliver talk sessions between logged in users on one Linux host with few logged in users willing to talk to each other locally;;
Wheter in.ntalkd is designed to serve interactive user talks between the host where in.ntalkd is installed and remote systems ruwhich have the talk client program installed. Of course in order for remote talks to work properly the firewall (if such has to be modified to allow in.ntalkd chats. I've never used in.ntalkd and on most machines having in.ntald hanging around from inetd, could be a potential security hole so, for people not planning to initiate remote TALKs between Unix / Linux / BSD hosts on a network it is a good practice the ntalkd line seen above in inetd.conf to be commented out ::;
noah:/home/hipo# grep -i talk /etc/inetd.conf

#:BSD: Shell, login, exec and talk are BSD protocols.

talk dgram udp wait nobody.tty /usr/sbin/in.talkd in.talkd

#ntalk dgram udp wait nobody.tty /usr/sbin/in.ntalkd in.ntalkd
3.;;; Restart openbsd-inetd init script and talk is ready to use
noah:~# /etc/init.d/openbsd-inetd restart

* Restarting internet superserver inetd
Onwards to use talk between two users the syntax is same like on other BSD, as a matter of fact TALK – console / terminal interactive chat originally was developed for the 4.2BSD UNIX release ;; the Linux code is a port of this BSD talk and not rewrite from scratch.
Using talk between two logged in users on pts/1 (lets say user test) and tty1 (user logged as root) is done with:
noah:~$ tty

noah:~$ talk root@localhost tty1

/dev/pts/1
On tty1 the user has to have enabled Talk sessions request, by default this behaviour in Debian and probably other Debian based Linuxes (Ubuntu) for instance is configured to have talks disabled, i,e ,,,
root@noah:~# mesg

is n
Enabling it on root console is done with:
root@noah:~# mesg y
Once enabled the root will be able to see the TALK service requests on tty1 otherwise, the user gets nothing. With enabled messaging the root user will get on his tty:
Message from TalkDaemon@his_machine...

talk: connection requested by your_name@your_machine.

talk: respond with: talk your_name@your_machine
So on the root console to reply back to talk chat request:
noah:~$ talk hipo@localhost
Tags: aim, Auto, auto mode, building, configured, confnoah, daemon, deb, debian gnu, dependency, dependency tree, dgram, Disk, disk space, DoneBuilding, Draft, exec, Fetched, freebsd, gnu linux, inetd, information, Install, Installing, interactive user, localhost, login, mesg, network, noah, nobody, ntalk, ntalkd, operation, package, protocols, reading database, reading package, request, root, root user, sbin, sessions, Shell, shell login, state information, tree, tty, wait, work, writting
Posted in Curious Facts, Everyday Life, Linux, Various | No Comments »
Saturday, April 28th, 2012 
If there is necessity to look for a string in all hidden files with all sub-level subdirectories (be aware this will be time consuming and CPU stressing) use:
hipo@noah:~$ grep -rli 'PATH' .*
./.gftp/gftprc
./.gftp/cache/cache.OOqZVP
….
Sometimes its necessery to only grep for variables within the first-level directories (lets say you would like to grep a 'PATH' variable set, string within the $HOME directory, the command is:
hipo@noah:~$ grep PATH .[!.]*
.profile:PATH=/bin:/usr/bin/:${PATH}
.profile:export PATH
.profile:# set PATH so it includes user's private bin if it exists
.profile: PATH="$HOME/bin:$PATH"
.profile.language-env-bak:# set PATH so it includes user's private bin if it exists
.profile.language-env-bak: PATH="$HOME/bin:$PATH"
.viminfo:?/PATH.xcyrillic: XNLSPATH=/usr/X11R6/lib/X11/nls
.xcyrillic: export XNLSPATH
The regular expression .[!.]*, means exclude any file or directory name starting with '..', e.g. match only .* files
Note that to use the grep PATH .[!.]* on FreeBSD you will have to use this regular expression in bash shell, the default BSD csh or tsch shells will not recognize the regular expression, e.g.:
grep PATH '.[!.]*'
grep: .[!.]*: No such file or directory
Hence on BSD, if you need to look up for a string within the home directory, hidden files: .profile .bashrc .bash_profile .cshrc run it under bash shell:
freebsd# /usr/local/bin/bash
[root@freebsd:/home/hipo]# grep PATH .[!.]*
.bash_profile:# set PATH so it includes user's private bin if it exists
.bash_profile:# PATH=~/bin:"${PATH}"
.bash_profile:# do the same with …
Another easier to remember, alternative grep cmd is:
hipo@noah:~$ grep PATH .*
.profile:PATH=/bin:/usr/bin/:${PATH}
.profile:export PATH
.profile:# set PATH so it includes user's private bin if it exists
.profile: PATH="$HOME/bin:$PATH"
….
Note that grep 'string' .* is a bit different in meaning, as it will not prevent grep to match filenames with names ..filename1, ..filename2 etc.
Though grep 'string' .* will work note that it will sometimes output some unwanted matches if filenames with double dot in the beginning of file name are there …
That's all folks 🙂
Tags: Auto, bash shell, bit, BSD, cache cache, cmd, consuming, csh, cshrc, directory name, Draft, export path, expression, file, freebsd, gftp, grep, hipo, home directory, How to, level directories, Linux, MANPATHAnother, nbsp, necessery, noah, note, Path, path profile, private bin, profile path, quot, regular expression, rli, root, set path, Shell, shrc, text, text strings, time, time consuming, tsch, value, XNLSPATH, XNLSPATHThe, zcompdump
Posted in FreeBSD, Linux, System Administration | 2 Comments »
Wednesday, March 28th, 2012 
On many busy servers, you might encounter in /var/log/syslog or dmesg kernel log messages like
nf_conntrack: table full, dropping packet
to appear repeatingly:
[1737157.057528] nf_conntrack: table full, dropping packet.

[1737157.160357] nf_conntrack: table full, dropping packet.

[1737157.260534] nf_conntrack: table full, dropping packet.

[1737157.361837] nf_conntrack: table full, dropping packet.

[1737157.462305] nf_conntrack: table full, dropping packet.

[1737157.564270] nf_conntrack: table full, dropping packet.

[1737157.666836] nf_conntrack: table full, dropping packet.

[1737157.767348] nf_conntrack: table full, dropping packet.

[1737157.868338] nf_conntrack: table full, dropping packet.

[1737157.969828] nf_conntrack: table full, dropping packet.

[1737157.969928] nf_conntrack: table full, dropping packet

[1737157.989828] nf_conntrack: table full, dropping packet

[1737162.214084] __ratelimit: 83 callbacks suppressed
There are two type of servers, I've encountered this message on:
1. Xen OpenVZ / VPS (Virtual Private Servers)
2. ISPs – Internet Providers with heavy traffic NAT network routers
I. What is the meaning of nf_conntrack: table full dropping packet error message
In short, this message is received because the nf_conntrack kernel maximum number assigned value gets reached.
The common reason for that is a heavy traffic passing by the server or very often a DoS or DDoS (Distributed Denial of Service) attack. Sometimes encountering the err is a result of a bad server planning (incorrect data about expected traffic load by a company/companeis) or simply a sys admin error…
– Checking the current maximum nf_conntrack value assigned on host:
linux:~# cat /proc/sys/net/ipv4/netfilter/ip_conntrack_max

65536
– Alternative way to check the current kernel values for nf_conntrack is through:
linux:~# /sbin/sysctl -a|grep -i nf_conntrack_max

error: permission denied on key 'net.ipv4.route.flush'

net.netfilter.nf_conntrack_max = 65536

error: permission denied on key 'net.ipv6.route.flush'

net.nf_conntrack_max = 65536
– Check the current sysctl nf_conntrack active connections
To check present connection tracking opened on a system:
:
linux:~# /sbin/sysctl net.netfilter.nf_conntrack_count

net.netfilter.nf_conntrack_count = 12742
The shown connections are assigned dynamicly on each new succesful TCP / IP NAT-ted connection. Btw, on a systems that work normally without the dmesg log being flooded with the message, the output of lsmod is:
linux:~# /sbin/lsmod | egrep 'ip_tables|conntrack'

ip_tables 9899 1 iptable_filter

x_tables 14175 1 ip_tables
On servers which are encountering nf_conntrack: table full, dropping packet error, you can see, when issuing lsmod, extra modules related to nf_conntrack are shown as loaded:
linux:~# /sbin/lsmod | egrep 'ip_tables|conntrack'

nf_conntrack_ipv4 10346 3 iptable_nat,nf_nat

nf_conntrack 60975 4 ipt_MASQUERADE,iptable_nat,nf_nat,nf_conntrack_ipv4

nf_defrag_ipv4 1073 1 nf_conntrack_ipv4

ip_tables 9899 2 iptable_nat,iptable_filter

x_tables 14175 3 ipt_MASQUERADE,iptable_nat,ip_tables
II. Remove completely nf_conntrack support if it is not really necessery
It is a good practice to limit or try to omit completely use of any iptables NAT rules to prevent yourself from ending with flooding your kernel log with the messages and respectively stop your system from dropping connections.
Another option is to completely remove any modules related to nf_conntrack, iptables_nat and nf_nat.
To remove nf_conntrack support from the Linux kernel, if for instance the system is not used for Network Address Translation use:
/sbin/rmmod iptable_nat

/sbin/rmmod ipt_MASQUERADE

/sbin/rmmod rmmod nf_nat

/sbin/rmmod rmmod nf_conntrack_ipv4

/sbin/rmmod nf_conntrack

/sbin/rmmod nf_defrag_ipv4
Once the modules are removed, be sure to not use iptables -t nat .. rules. Even attempt to list, if there are any NAT related rules with iptables -t nat -L -n will force the kernel to load the nf_conntrack modules again.
Btw nf_conntrack: table full, dropping packet. message is observable across all GNU / Linux distributions, so this is not some kind of local distribution bug or Linux kernel (distro) customization.
III. Fixing the nf_conntrack … dropping packets error
– One temporary, fix if you need to keep your iptables NAT rules is:
linux:~# sysctl -w net.netfilter.nf_conntrack_max=131072
I say temporary, because raising the nf_conntrack_max doesn't guarantee, things will get smoothly from now on.
However on many not so heavily traffic loaded servers just raising the net.netfilter.nf_conntrack_max=131072 to a high enough value will be enough to resolve the hassle.
– Increasing the size of nf_conntrack hash-table
The Hash table hashsize value, which stores lists of conntrack-entries should be increased propertionally, whenever net.netfilter.nf_conntrack_max is raised.
linux:~# echo 32768 > /sys/module/nf_conntrack/parameters/hashsize
The rule to calculate the right value to set is:
hashsize = nf_conntrack_max / 4
– To permanently store the made changes ;a) put into /etc/sysctl.conf:
linux:~# echo 'net.netfilter.nf_conntrack_count = 131072' >> /etc/sysctl.conf

linux:~# /sbin/sysct -p
b) put in /etc/rc.local (before the exit 0 line):
echo 32768 > /sys/module/nf_conntrack/parameters/hashsize
Note: Be careful with this variable, according to my experience raising it to too high value (especially on XEN patched kernels) could freeze the system.
Also raising the value to a too high number can freeze a regular Linux server running on old hardware.
– For the diagnosis of nf_conntrack stuff there is ;
/proc/sys/net/netfilter kernel memory stored directory. There you can find some values dynamically stored which gives info concerning nf_conntrack operations in "real time":
linux:~# cd /proc/sys/net/netfilter

linux:/proc/sys/net/netfilter# ls -al nf_log/

total 0

dr-xr-xr-x 0 root root 0 Mar 23 23:02 ./

dr-xr-xr-x 0 root root 0 Mar 23 23:02 ../

-rw-r--r-- 1 root root 0 Mar 23 23:02 0

-rw-r--r-- 1 root root 0 Mar 23 23:02 1

-rw-r--r-- 1 root root 0 Mar 23 23:02 10

-rw-r--r-- 1 root root 0 Mar 23 23:02 11

-rw-r--r-- 1 root root 0 Mar 23 23:02 12

-rw-r--r-- 1 root root 0 Mar 23 23:02 2

-rw-r--r-- 1 root root 0 Mar 23 23:02 3

-rw-r--r-- 1 root root 0 Mar 23 23:02 4

-rw-r--r-- 1 root root 0 Mar 23 23:02 5

-rw-r--r-- 1 root root 0 Mar 23 23:02 6

-rw-r--r-- 1 root root 0 Mar 23 23:02 7

-rw-r--r-- 1 root root 0 Mar 23 23:02 8

-rw-r--r-- 1 root root 0 Mar 23 23:02 9
IV. Decreasing other nf_conntrack NAT time-out values to prevent server against DoS attacks
Generally, the default value for nf_conntrack_* time-outs are (unnecessery) large.
Therefore, for large flows of traffic even if you increase nf_conntrack_max, still shorty you can get a nf_conntrack overflow table resulting in dropping server connections. To make this not happen, check and decrease the other nf_conntrack timeout connection tracking values:
linux:~# sysctl -a | grep conntrack | grep timeout

net.netfilter.nf_conntrack_generic_timeout = 600

net.netfilter.nf_conntrack_tcp_timeout_syn_sent = 120

net.netfilter.nf_conntrack_tcp_timeout_syn_recv = 60

net.netfilter.nf_conntrack_tcp_timeout_established = 432000

net.netfilter.nf_conntrack_tcp_timeout_fin_wait = 120

net.netfilter.nf_conntrack_tcp_timeout_close_wait = 60

net.netfilter.nf_conntrack_tcp_timeout_last_ack = 30

net.netfilter.nf_conntrack_tcp_timeout_time_wait = 120

net.netfilter.nf_conntrack_tcp_timeout_close = 10

net.netfilter.nf_conntrack_tcp_timeout_max_retrans = 300

net.netfilter.nf_conntrack_tcp_timeout_unacknowledged = 300

net.netfilter.nf_conntrack_udp_timeout = 30

net.netfilter.nf_conntrack_udp_timeout_stream = 180

net.netfilter.nf_conntrack_icmp_timeout = 30

net.netfilter.nf_conntrack_events_retry_timeout = 15

net.ipv4.netfilter.ip_conntrack_generic_timeout = 600

net.ipv4.netfilter.ip_conntrack_tcp_timeout_syn_sent = 120

net.ipv4.netfilter.ip_conntrack_tcp_timeout_syn_sent2 = 120

net.ipv4.netfilter.ip_conntrack_tcp_timeout_syn_recv = 60

net.ipv4.netfilter.ip_conntrack_tcp_timeout_established = 432000

net.ipv4.netfilter.ip_conntrack_tcp_timeout_fin_wait = 120

net.ipv4.netfilter.ip_conntrack_tcp_timeout_close_wait = 60

net.ipv4.netfilter.ip_conntrack_tcp_timeout_last_ack = 30

net.ipv4.netfilter.ip_conntrack_tcp_timeout_time_wait = 120

net.ipv4.netfilter.ip_conntrack_tcp_timeout_close = 10

net.ipv4.netfilter.ip_conntrack_tcp_timeout_max_retrans = 300

net.ipv4.netfilter.ip_conntrack_udp_timeout = 30

net.ipv4.netfilter.ip_conntrack_udp_timeout_stream = 180

net.ipv4.netfilter.ip_conntrack_icmp_timeout = 30
All the timeouts are in seconds. net.netfilter.nf_conntrack_generic_timeout as you see is quite high – 600 secs = (10 minutes).
This kind of value means any NAT-ted connection not responding can stay hanging for 10 minutes!
The value net.netfilter.nf_conntrack_tcp_timeout_established = 432000 is quite high too (5 days!)
If this values, are not lowered the server will be an easy target for anyone who would like to flood it with excessive connections, once this happens the server will quick reach even the raised up value for net.nf_conntrack_max and the initial connection dropping will re-occur again …
With all said, to prevent the server from malicious users, situated behind the NAT plaguing you with Denial of Service attacks:
Lower net.ipv4.netfilter.ip_conntrack_generic_timeout to 60 – 120 seconds and net.ipv4.netfilter.ip_conntrack_tcp_timeout_established to stmh. like 54000
linux:~# sysctl -w net.ipv4.netfilter.ip_conntrack_generic_timeout = 120

linux:~# sysctl -w net.ipv4.netfilter.ip_conntrack_tcp_timeout_established = 54000
This timeout should work fine on the router without creating interruptions for regular NAT users. After changing the values and monitoring for at least few days make the changes permanent by adding them to /etc/sysctl.conf
linux:~# echo 'net.ipv4.netfilter.ip_conntrack_generic_timeout = 120' >> /etc/sysctl.conf

linux:~# echo 'net.ipv4.netfilter.ip_conntrack_tcp_timeout_established = 54000' >> /etc/sysctl.conf
Tags: Auto, callbacks, connection, conntrack, count, DDoS, denial of service, denial of service attack, dmesg, Draft, error message, flood, heavy traffic, host, host linux, instance, internet providers, ipt, ipv, ipv4, ISPs, kernel, Linux, linux cd, linux kernel, log, log messages, Mar, maximum number, message, nat network, nbsp, necessery, network routers, option, packet, quot, ratelimit, Resolving, root, root root, sbin, servers, support, syslog, TABLE, time, traffic load, Translation, type, value, var, virtual private servers, wait, work, xen
Posted in Computer Security, Linux, Networking, System Administration, Virtual Machines | 10 Comments »
Monday, August 1st, 2011 
It seems DjbDNS on Debian Squeeze has been not included as a Debian package. There is still possibility to install djbdns from an older deb package or install it from source. I however decided to install it from source as finding the old Debian package for Lenny and Etch takes time, plus I'm running an amd64 version of Debian and this might even more complicate the situation.
Installing it from source is not really a Debian way but at least it works.
In this article I assume that daemontools and ucspi-tcp are preliminary installed, if not one needs to install them with:
debian:~# apt-get install ucspi-tcp daemontools daemontools-run

...
The above two ones are required as DJBDNS is originally made to run through djb's daemontools.
Here is the exact step I took to have it installed as local caching DNS server on a Debian Squeeze server:
1. Download and untar DjbDNS
debian:~# wget -q http://cr.yp.to/djbdns/djbdns-1.05.tar.gz
debian:~# tar -zxvvf djbdns-1.05.tar.gz

...
2. Add DjbDNS users to /etc/passwd
Creating the below two users is not arbitrary but it's recommendable.
echo 'dnscache:*:54321:54321:dnscache:/dev/null:/dev/null' >> /etc/passwd

echo 'dnslog:*:54322:54322:dnslog:/dev/null:/dev/null' >> /etc/passwd
3. Compile DJBDNS nameserver
First it's necessery to use the below echo command to work around a common Linux bug:
debian:~# cd djbdns-1.05

debian:/root/djbdns-1.05# echo gcc -O2 -include /usr/include/errno.h > conf-cc
Next let's make it:
debian:/root/djbdns-1.05# make
4. Install the compiled djbdns binaries
debian:/root/djbdns-1.05# make setup check

# here comes some long install related output
If no errors are produced by make setup check this means that the djbdns should have installed itself fine.
As installation is compileted it's a good idea to report about the newly installed DjbDNS server if running a mail server. This info is used by Dan Bernstein to gather statistical data about the number of installations of djbdns servers throughout the world.
5. Do some general configurations to the newly installed DJBDNS
Now let's copy the list of the IP addresses of the global DNS root servers in /etc/.
debian:/root/djbdns-1.05# cp -rpf dnsroots.global /etc/
debian:/root/djbdns-1.05# ./dnscache-conf dnscache dnslog /etc/dnscache 0.0.0.0
dnscache-conf will generate some default configuration files for djbdns in /etc/dnscache
Next allow the networks which should be able to use the just installed djbdns server as a caching server:
debian:/root/djbdns-1.05# cd /etc/dnscache/root/ip

debian:/etc/dnscache/root# touch 192.168.1

debian:/root/djbdns-1.05# touch 123.123
First command will allow all ips in range 192.168.1.* to be able to access the DNS server and the second command will allow all ips from 123.123.1-255.1-255 to be able to query the server.
Some further fine tunning can be done from the files:
/etc/dnscache/env/CACHESIZE and /etc/dnscache/env/DATALIMIT
As a last step, before it's running, we have to link the /etc/dnscache to daemontools like so:
debian:/root/djbdns-1.05# ln -sf /etc/dnscache /etc/service/dnscache
If the daemontools is not linked to be accessible via /etc/service it's also a good to link it there:
debian:~# ln -sf /etc/service /
Now the DJBDNS should be running fine, to test if it's running without errors through daemontools I used:
debian:~# ps ax|grep -i readproc

5358 pts/18 R+ 0:00 grep -i readproc

11824 ? S 0:00 readproctitle service errors: ...........
If no errors are displayed it's configured and running to also test if it's capable of resolving I used the host command:
debian:~# host www.pc-freak.net localhost

Using domain server:

Name: localhost

Address: 127.0.0.1#53

Aliases:
www.pc-freak.net has address 83.228.93.76
www.pc-freak.net mail is handled by 0 mail.www.pc-freak.net.
Now the DJBDNS is properly installed and if you test it for a while with time host somehost.com localhost , you will see how quick it is in resolving.
The advantage of running DJBDNS is it does not require almost no maintance, its rock solid and great just like all other Dan Bernstein's written software.
Enjoy 😉
Tags: binaries, Cachening, Cachening Localhost Proxy, Compile, configure, configured, cr, daemontools, dan bern, dan bernstein, deb package, debian cd, debian package, djb, djbdns, DNS, dns server, echo command, efficiency, errno, etc passwd, etch, host, How to, Install, installation, Linux, linux bug, mail server, necessery, package, passwdecho, possibility, root, running, squeeze, statistical data, tar gz, tcp, time, Touch, untar, wget, yp, zxvvf
Posted in Linux, Performance Tuning, System Administration, Web and CMS | 4 Comments »


