If you want to run multiple virtual machines on GNU / Linux server or your Linux powered Desktop you have the possibility to use a couple of Virtual Machines just to name a few VirtualBox and VMWare are the option the native way to do it is using the Linux kernel via a loadable kernel module called KVM (Kernel-based Virtual Machine).
Though Oracle's Virtualbox generally works and you could add new test beds virtual machines (install multiple Linux / *BSD OS) it is not fully Free Software and not even fully open source licensed, VMWare even though superior as a Virtualization product is proprietary and its application costs a lot of money which not each develpoper or small / mid-sized company could afford.
Once the kvm.ko module is loaded your Linux kernel turns into a full-featured Virtual Machine Hypervisor.
Starting with Linux kernel 2.6.X the KVM Hypervisor is available and easy to install virtually all modern Linux distributions Redhat / CentOS Debian / Ubuntu etc. support it and its up to running few commands to install and start using the Power of Kernel embedded Virtualization.
KVM could be used to run in parallel multiple Operating Systems such as Windows / Linux / FreeBSD and others of BSDs family, each running under a separate virtual machine with its private dedicated (isolated), disc, graphic card, network card etc.
To start up I assume you have already installed some kind of Linux distribution either locally or on a remote dedicated server.
1. Installing KVM on Debian GNU / Linux / Ubuntu / Mint and other deb based distros
Using APT tool install below packages:
root@jeremiah:~# apt install –yes qemu-kvm libvirt-clients libvirt-daemon-system bridge-utils libguestfs-tools genisoimage virtinst libosinfo-bin
2. Installing virt-manager GUI to manage Virtual servers
root@jeremiah:~# apt-cache show virt-manager|grep -i desc -A 1
Description-en: desktop application for managing virtual machines
It presents a summary view of running domains and their live performance &
—
Description-md5: 9f7f584744b77cdacc2291f2a8ac220e
Homepage: http://virt-manager.et.redhat.com/
root@jeremiah:~# apt install –yes virt-manager
3. Configure bridged networking to allow access to newly configured VMs
Bridging has to be added via /etc/network/interfaces therefore it is a good idea to create a backup of it before modifying:
# cp -rpf /etc/network/interfaces /etc/network/interfaces.bakup-$(echo $(date '+%Y-%m-%d-%H'))
# vim /etc/network/interfaces
auto br0
iface br0 inet static
address 10.15.44.26
netmask 255.255.255.192
broadcast 10.15.44.63
dns-nameservers 10.0.80.11 10.0.80.12
# set static route for LAN
post-up route add -net 10.0.0.0 netmask 255.0.0.0 gw 10.18.44.1
post-up route add -net 161.26.0.0 netmask 255.255.0.0 gw 10.18.44.1
bridge_ports eth0
bridge_stp off
bridge_fd 0
bridge_maxwait 0
# br1 setup with static wan IPv4 with ISP router as a default gateway
auto br1
iface br1 inet static
address 192.168.222.51
netmask 255.255.255.248
broadcast 192.168.222.55
gateway 192.168.222.49
bridge_ports eth1
bridge_stp off
bridge_fd 0
bridge_maxwait 0
Once file is saved in vim editor restart the networking.
# systemctl restart network.manager
To verify whether the bridge has been succesfully upped.
root@jeremiah:/home/hipo/kvm# brctl show
bridge name bridge id STP enabled interfaces
virbr0 8000.525400cb1cd1 yes virbr0-nic
4. List all installable Virtual OS images
root@jeremiah:/home/hipo/kvm# virt-builder -list
centos-6 x86_64 CentOS 6.6
centos-7.0 x86_64 CentOS 7.0
centos-7.1 x86_64 CentOS 7.1
centos-7.2 aarch64 CentOS 7.2 (aarch64)
centos-7.2 x86_64 CentOS 7.2
centos-7.3 x86_64 CentOS 7.3
centos-7.4 x86_64 CentOS 7.4
centos-7.5 x86_64 CentOS 7.5
cirros-0.3.1 x86_64 CirrOS 0.3.1
cirros-0.3.5 x86_64 CirrOS 0.3.5
debian-6 x86_64 Debian 6 (Squeeze)
debian-7 sparc64 Debian 7 (Wheezy) (sparc64)
debian-7 x86_64 Debian 7 (wheezy)
debian-8 x86_64 Debian 8 (jessie)
debian-9 x86_64 Debian 9 (stretch)
fedora-18 x86_64 Fedora® 18
fedora-19 x86_64 Fedora® 19
fedora-20 x86_64 Fedora® 20
fedora-21 aarch64 Fedora® 21 Server (aarch64)
fedora-21 armv7l Fedora® 21 Server (armv7l)
fedora-21 ppc64 Fedora® 21 Server (ppc64)
fedora-21 ppc64le Fedora® 21 Server (ppc64le)
fedora-21 x86_64 Fedora® 21 Server
fedora-22 aarch64 Fedora® 22 Server (aarch64)
fedora-22 armv7l Fedora® 22 Server (armv7l)
fedora-22 i686 Fedora® 22 Server (i686)
fedora-22 x86_64 Fedora® 22 Server
fedora-23 aarch64 Fedora® 23 Server (aarch64)
fedora-23 armv7l Fedora® 23 Server (armv7l)
fedora-23 i686 Fedora® 23 Server (i686)
fedora-23 ppc64 Fedora® 23 Server (ppc64)
fedora-23 ppc64le Fedora® 23 Server (ppc64le)
fedora-23 x86_64 Fedora® 23 Server
fedora-24 aarch64 Fedora® 24 Server (aarch64)
fedora-24 armv7l Fedora® 24 Server (armv7l)
fedora-24 i686 Fedora® 24 Server (i686)
fedora-24 x86_64 Fedora® 24 Server
fedora-25 aarch64 Fedora® 25 Server (aarch64)
fedora-25 armv7l Fedora® 25 Server (armv7l)
fedora-25 i686 Fedora® 25 Server (i686)
fedora-25 ppc64 Fedora® 25 Server (ppc64)
fedora-25 ppc64le Fedora® 25 Server (ppc64le)
fedora-25 x86_64 Fedora® 25 Server
fedora-26 aarch64 Fedora® 26 Server (aarch64)
fedora-26 armv7l Fedora® 26 Server (armv7l)
fedora-26 i686 Fedora® 26 Server (i686)
fedora-26 ppc64 Fedora® 26 Server (ppc64)
fedora-26 ppc64le Fedora® 26 Server (ppc64le)
fedora-26 x86_64 Fedora® 26 Server
fedora-27 aarch64 Fedora® 27 Server (aarch64)
fedora-27 armv7l Fedora® 27 Server (armv7l)
fedora-27 i686 Fedora® 27 Server (i686)
fedora-27 ppc64 Fedora® 27 Server (ppc64)
fedora-27 ppc64le Fedora® 27 Server (ppc64le)
fedora-27 x86_64 Fedora® 27 Server
fedora-28 i686 Fedora® 28 Server (i686)
fedora-28 x86_64 Fedora® 28 Server
freebsd-11.1 x86_64 FreeBSD 11.1
scientificlinux-6 x86_64 Scientific Linux 6.5
ubuntu-10.04 x86_64 Ubuntu 10.04 (Lucid)
ubuntu-12.04 x86_64 Ubuntu 12.04 (Precise)
ubuntu-14.04 x86_64 Ubuntu 14.04 (Trusty)
ubuntu-16.04 x86_64 Ubuntu 16.04 (Xenial)
ubuntu-18.04 x86_64 Ubuntu 18.04 (bionic)
opensuse-13.1 x86_64 openSUSE 13.1
opensuse-13.2 x86_64 openSUSE 13.2
opensuse-42.1 x86_64 openSUSE Leap 42.1
opensuse-tumbleweed x86_64 openSUSE Tumbleweed
5. Create Virtual Machine OS-es from scratch with virt-builder
Below we'll create two images one for Fedora 28 and 1 for Debian 9 using the virt-builder (a tool to build virtual images quickly), the images that could be used are shown through below virt-builder –list command.
# iso='fedora-28';
# iso1='debian-9';
# sudo virt-builder $iso \
–size=10G \
–format qcow2 -o /var/lib/libvirt/images/$iso-vm1.qcow2 \
–hostname $iso-vm1 \
–network \
–timezone Europe/Sofia
[ 3.3] Downloading: http://libguestfs.org/download/builder/fedora-28.xz
[ 5.2] Planning how to build this image
[ 5.2] Uncompressing
[ 20.8] Resizing (using virt-resize) to expand the disk to 10.0G
[ 50.8] Opening the new disk
[ 53.7] Setting a random seed
[ 53.7] Setting the hostname: fedora-28-vm1
[ 53.7] Setting the timezone: Europe/Sofia
[ 53.7] Setting passwords
virt-builder: Setting random password of root to YMTkxaJIkEU24Ytf
[ 54.7] Finishing off
Output file: /var/lib/libvirt/images/fedora-28-vm1.qcow2
Output size: 10.0G
Output format: qcow2
Total usable space: 9.3G
Free space: 8.2G (87%)
# sudo virt-builder $iso1 \
–size=10G \
–format qcow2 -o /var/lib/libvirt/images/$iso-vm1.qcow2 \
–hostname $iso1-vm1 \
–network \
–timezone Europe/Sofia
[ 3.2] Downloading: http://libguestfs.org/download/builder/debian-9.xz
[ 4.1] Planning how to build this image
[ 4.1] Uncompressing
[ 16.9] Resizing (using virt-resize) to expand the disk to 10.0G
[ 40.1] Opening the new disk
[ 42.9] Setting a random seed
virt-builder: warning: random seed could not be set for this type of guest
[ 42.9] Setting the hostname: debian-9-vm1
[ 43.6] Setting the timezone: Europe/Sofia
[ 43.6] Setting passwords
virt-builder: Setting random password of root to JtzEYGff9KxL5jCR
[ 44.3] Finishing off
Output file: /var/lib/libvirt/images/debian-9-vm1.qcow2
Output size: 10.0G
Output format: qcow2
Total usable space: 9.8G
Free space: 9.0G (91%)
vim bridged.xml
<network>
<name>br0</name>
<forward mode="bridge"/>
<bridge name="br0"/>
</network>
# sudo virsh net-define –file bridged.xml
# sudo virsh net-autostart br0
# sudo virsh net-start br0
Above two commands will download pre-packaged KVM isos and store them inside /var/lib/libvirt/images/ you see also the root (administrator) password for both ISOs printed out.
root@jeremiah:/home/hipo/kvm# ls -ld /var/lib/libvirt/images/*
-rw-r–r– 1 root root 10739318784 Oct 12 23:45 /var/lib/libvirt/images/debian-9-vm1.qcow2
-rw-r–r– 1 root root 10739318784 Oct 12 23:46 /var/lib/libvirt/images/fedora-28-vm1.qcow2
To access directly the new created VMs as we have specified the –vnc option it is possible to directly vnc to the new host with VNC client (in linux I use vncviewer), on Windows you can use something like TightVNC.
6. Use official Linux distributions ISO boot files to install into KVM VM
Those who would like to run inside KVM VM Linux could do it directly using installable ISO files and install the set of Linux with the required packages, just like installing a fresh new Linux on a bare-metal machine.
To do so download your ISO image from the net (either from official distro website or a mirror website, in case if you need to spin an older version) and use virt-install to run the installer inside KVM.
root@jeremiah:~# cd /var/lib/libvirt/boot/;
root@jeremiah:~# wget http://mirrors.netix.net/centos/7.5.1804/isos/x86_64/CentOS-7-x86_64-DVD-1804.iso
…
# sudo virt-install \
–virt-type=kvm \
–name centos7 \
–ram 2048 \
–vcpus=2 \
–os-variant=centos7.0 \
–virt-type=kvm \
–hvm \
–cdrom=/var/lib/libvirt/boot/CentOS-7-x86_64-DVD-1804.iso \
–network=bridge=br0,model=virtio \
–network=bridge=br1,model=virtio \
–graphics vnc \
–disk path=/var/lib/libvirt/images/centos7.qcow2,size=40,bus=virtio,format=qcow2
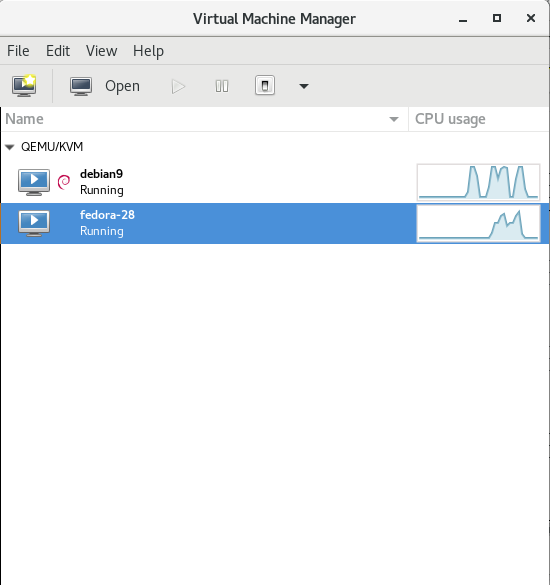
7. List newly created VMs with Virsh command
root@jeremiah:/home/hipo/kvm# virsh list –all
Id Name State
—————————————————-
3 fedora-28 running
– debian9 shut off
The –all parameter lists all available VMs ready to spin, if you want to check what are the VMs that are only running use instead:
root@jeremiah:/home/hipo/kvm# virsh list
Id Name State
—————————————————-
3 fedora-28 running
8. Install Virtual Machine OS-es
Below lines will install 2 Virtual machines one Fedora 28 and Debian 9
os='fedora-28';
virt-install –import –name $os \
–ram 2048 \
–vcpu 2 \
–disk path=/var/lib/libvirt/images/$os-vm1.qcow2,format=qcow2 \
–os-variant fedora-unknown \
–network=bridge=br0,model=virtio \
–noautoconsole \
–hvm \
–graphics vnc
os='debian9';
virt-install –import –name $os \
–ram 2048 \
–vcpu 2 \
–disk path=/var/lib/libvirt/images/$os-vm1.qcow2,format=qcow2 \
–os-variant debian9 –network=bridge=br0,model=virtio \
–noautoconsole \
–hvm \
–graphics vnc
To deploy more just change the virtual machine type in os variable and modify the –os-variant variable to match the distribution name, to get the correct –os-variant variables that can be passed use osinfo-query below is output of the cmd:
root@jeremiah:/home/hipo/kvm# osinfo-query os
Short ID | Name | Version | ID
———————-+—————————————————-+———-+—————————————–
altlinux1.0 | Mandrake RE Spring 2001 | 1.0 | http://altlinux.org/altlinux/1.0
altlinux2.0 | ALT Linux 2.0 | 2.0 | http://altlinux.org/altlinux/2.0
altlinux2.2 | ALT Linux 2.2 | 2.2 | http://altlinux.org/altlinux/2.2
altlinux2.4 | ALT Linux 2.4 | 2.4 | http://altlinux.org/altlinux/2.4
altlinux3.0 | ALT Linux 3.0 | 3.0 | http://altlinux.org/altlinux/3.0
altlinux4.0 | ALT Linux 4.0 | 4.0 | http://altlinux.org/altlinux/4.0
altlinux4.1 | ALT Linux 4.1 | 4.1 | http://altlinux.org/altlinux/4.1
altlinux5.0 | ALT Linux 5.0 | 5.0 | http://altlinux.org/altlinux/5.0
altlinux6.0 | ALT Linux 6.0 | 6.0 | http://altlinux.org/altlinux/6.0
altlinux7.0 | ALT Linux 7.0 | 7.0 | http://altlinux.org/altlinux/7.0
centos6.0 | CentOS 6.0 | 6.0 | http://centos.org/centos/6.0
centos6.1 | CentOS 6.1 | 6.1 | http://centos.org/centos/6.1
centos6.2 | CentOS 6.2 | 6.2 | http://centos.org/centos/6.2
centos6.3 | CentOS 6.3 | 6.3 | http://centos.org/centos/6.3
centos6.4 | CentOS 6.4 | 6.4 | http://centos.org/centos/6.4
centos6.5 | CentOS 6.5 | 6.5 | http://centos.org/centos/6.5
centos6.6 | CentOS 6.6 | 6.6 | http://centos.org/centos/6.6
centos6.7 | CentOS 6.7 | 6.7 | http://centos.org/centos/6.7
centos6.8 | CentOS 6.8 | 6.8 | http://centos.org/centos/6.8
centos6.9 | CentOS 6.9 | 6.9 | http://centos.org/centos/6.9
centos7.0 | CentOS 7.0 | 7.0 | http://centos.org/centos/7.0
debian1.1 | Debian Buzz | 1.1 | http://debian.org/debian/1.1
debian1.2 | Debian Rex | 1.2 | http://debian.org/debian/1.2
debian1.3 | Debian Bo | 1.3 | http://debian.org/debian/1.3
debian2.0 | Debian Hamm | 2.0 | http://debian.org/debian/2.0
debian2.1 | Debian Slink | 2.1 | http://debian.org/debian/2.1
debian2.2 | Debian Potato | 2.2 | http://debian.org/debian/2.2
debian3 | Debian Woody | 3 | http://debian.org/debian/3
debian3.1 | Debian Sarge | 3.1 | http://debian.org/debian/3.1
debian4 | Debian Etch | 4 | http://debian.org/debian/4
debian5 | Debian Lenny | 5 | http://debian.org/debian/5
debian6 | Debian Squeeze | 6 | http://debian.org/debian/6
debian7 | Debian Wheezy | 7 | http://debian.org/debian/7
debian8 | Debian Jessie | 8 | http://debian.org/debian/8
debian9 | Debian Stretch | 9 | http://debian.org/debian/9
debiantesting | Debian Testing | testing | http://debian.org/debian/testing
fedora-unknown | Fedora | unknown | http://fedoraproject.org/fedora/unknown
fedora1 | Fedora Core 1 | 1 | http://fedoraproject.org/fedora/1
fedora10 | Fedora 10 | 10 | http://fedoraproject.org/fedora/10
fedora11 | Fedora 11 | 11 | http://fedoraproject.org/fedora/11
fedora12 | Fedora 12 | 12 | http://fedoraproject.org/fedora/12
fedora13 | Fedora 13 | 13 | http://fedoraproject.org/fedora/13
fedora14 | Fedora 14 | 14 | http://fedoraproject.org/fedora/14
fedora15 | Fedora 15 | 15 | http://fedoraproject.org/fedora/15
fedora16 | Fedora 16 | 16 | http://fedoraproject.org/fedora/16
fedora17 | Fedora 17 | 17 | http://fedoraproject.org/fedora/17
fedora18 | Fedora 18 | 18 | http://fedoraproject.org/fedora/18
fedora19 | Fedora 19 | 19 | http://fedoraproject.org/fedora/19
fedora2 | Fedora Core 2 | 2 | http://fedoraproject.org/fedora/2
fedora20 | Fedora 20 | 20 | http://fedoraproject.org/fedora/20
fedora21 | Fedora 21 | 21 | http://fedoraproject.org/fedora/21
fedora22 | Fedora 22 | 22 | http://fedoraproject.org/fedora/22
fedora23 | Fedora 23 | 23 | http://fedoraproject.org/fedora/23
fedora24 | Fedora 24 | 24 | http://fedoraproject.org/fedora/24
fedora25 | Fedora 25 | 25 | http://fedoraproject.org/fedora/25
fedora26 | Fedora 26 | 26 | http://fedoraproject.org/fedora/26
fedora3 | Fedora Core 3 | 3 | http://fedoraproject.org/fedora/3
fedora4 | Fedora Core 4 | 4 | http://fedoraproject.org/fedora/4
fedora5 | Fedora Core 5 | 5 | http://fedoraproject.org/fedora/5
fedora6 | Fedora Core 6 | 6 | http://fedoraproject.org/fedora/6
fedora7 | Fedora 7 | 7 | http://fedoraproject.org/fedora/7
fedora8 | Fedora 8 | 8 | http://fedoraproject.org/fedora/8
fedora9 | Fedora 9 | 9 | http://fedoraproject.org/fedora/9
freebsd1.0 | FreeBSD 1.0 | 1.0 | http://freebsd.org/freebsd/1.0
freebsd10.0 | FreeBSD 10.0 | 10.0 | http://freebsd.org/freebsd/10.0
freebsd10.1 | FreeBSD 10.1 | 10.1 | http://freebsd.org/freebsd/10.1
freebsd10.2 | FreeBSD 10.2 | 10.2 | http://freebsd.org/freebsd/10.2
freebsd10.3 | FreeBSD 10.3 | 10.3 | http://freebsd.org/freebsd/10.3
freebsd10.4 | FreeBSD 10.4 | 10.4 | http://freebsd.org/freebsd/10.4
freebsd11.0 | FreeBSD 11.0 | 11.0 | http://freebsd.org/freebsd/11.0
freebsd11.1 | FreeBSD 11.1 | 11.1 | http://freebsd.org/freebsd/11.1
freebsd2.0 | FreeBSD 2.0 | 2.0 | http://freebsd.org/freebsd/2.0
freebsd2.0.5 | FreeBSD 2.0.5 | 2.0.5 | http://freebsd.org/freebsd/2.0.5
freebsd2.2.8 | FreeBSD 2.2.8 | 2.2.8 | http://freebsd.org/freebsd/2.2.8
freebsd2.2.9 | FreeBSD 2.2.9 | 2.2.9 | http://freebsd.org/freebsd/2.2.9
freebsd3.0 | FreeBSD 3.0 | 3.0 | http://freebsd.org/freebsd/3.0
freebsd3.2 | FreeBSD 3.2 | 3.2 | http://freebsd.org/freebsd/3.2
freebsd4.0 | FreeBSD 4.0 | 4.0 | http://freebsd.org/freebsd/4.0
freebsd4.1 | FreeBSD 4.1 | 4.1 | http://freebsd.org/freebsd/4.1
freebsd4.10 | FreeBSD 4.10 | 4.10 | http://freebsd.org/freebsd/4.10
freebsd4.11 | FreeBSD 4.11 | 4.11 | http://freebsd.org/freebsd/4.11
freebsd4.2 | FreeBSD 4.2 | 4.2 | http://freebsd.org/freebsd/4.2
freebsd4.3 | FreeBSD 4.3 | 4.3 | http://freebsd.org/freebsd/4.3
freebsd4.4 | FreeBSD 4.4 | 4.4 | http://freebsd.org/freebsd/4.4
freebsd4.5 | FreeBSD 4.5 | 4.5 | http://freebsd.org/freebsd/4.5
freebsd4.6 | FreeBSD 4.6 | 4.6 | http://freebsd.org/freebsd/4.6
freebsd4.7 | FreeBSD 4.7 | 4.7 | http://freebsd.org/freebsd/4.7
freebsd4.8 | FreeBSD 4.8 | 4.8 | http://freebsd.org/freebsd/4.8
freebsd4.9 | FreeBSD 4.9 | 4.9 | http://freebsd.org/freebsd/4.9
freebsd5.0 | FreeBSD 5.0 | 5.0 | http://freebsd.org/freebsd/5.0
freebsd5.1 | FreeBSD 5.1 | 5.1 | http://freebsd.org/freebsd/5.1
freebsd5.2 | FreeBSD 5.2 | 5.2 | http://freebsd.org/freebsd/5.2
freebsd5.2.1 | FreeBSD 5.2.1 | 5.2.1 | http://freebsd.org/freebsd/5.2.1
freebsd5.3 | FreeBSD 5.3 | 5.3 | http://freebsd.org/freebsd/5.3
freebsd5.4 | FreeBSD 5.4 | 5.4 | http://freebsd.org/freebsd/5.4
freebsd5.5 | FreeBSD 5.5 | 5.5 | http://freebsd.org/freebsd/5.5
freebsd6.0 | FreeBSD 6.0 | 6.0 | http://freebsd.org/freebsd/6.0
freebsd6.1 | FreeBSD 6.1 | 6.1 | http://freebsd.org/freebsd/6.1
freebsd6.2 | FreeBSD 6.2 | 6.2 | http://freebsd.org/freebsd/6.2
freebsd6.3 | FreeBSD 6.3 | 6.3 | http://freebsd.org/freebsd/6.3
freebsd6.4 | FreeBSD 6.4 | 6.4 | http://freebsd.org/freebsd/6.4
freebsd7.0 | FreeBSD 7.0 | 7.0 | http://freebsd.org/freebsd/7.0
freebsd7.1 | FreeBSD 7.1 | 7.1 | http://freebsd.org/freebsd/7.1
freebsd7.2 | FreeBSD 7.2 | 7.2 | http://freebsd.org/freebsd/7.2
freebsd7.3 | FreeBSD 7.3 | 7.3 | http://freebsd.org/freebsd/7.3
freebsd7.4 | FreeBSD 7.4 | 7.4 | http://freebsd.org/freebsd/7.4
freebsd8.0 | FreeBSD 8.0 | 8.0 | http://freebsd.org/freebsd/8.0
freebsd8.1 | FreeBSD 8.1 | 8.1 | http://freebsd.org/freebsd/8.1
freebsd8.2 | FreeBSD 8.2 | 8.2 | http://freebsd.org/freebsd/8.2
freebsd8.3 | FreeBSD 8.3 | 8.3 | http://freebsd.org/freebsd/8.3
freebsd8.4 | FreeBSD 8.4 | 8.4 | http://freebsd.org/freebsd/8.4
freebsd9.0 | FreeBSD 9.0 | 9.0 | http://freebsd.org/freebsd/9.0
freebsd9.1 | FreeBSD 9.1 | 9.1 | http://freebsd.org/freebsd/9.1
freebsd9.2 | FreeBSD 9.2 | 9.2 | http://freebsd.org/freebsd/9.2
freebsd9.3 | FreeBSD 9.3 | 9.3 | http://freebsd.org/freebsd/9.3
freedos1.2 | FreeDOS 1.2 | 1.2 | http://freedos.org/freedos/1.2
gnome-continuous-3.10 | GNOME 3.10 | 3.10 | http://gnome.org/gnome-continuous/3.10
gnome-continuous-3.12 | GNOME 3.12 | 3.12 | http://gnome.org/gnome-continuous/3.12
gnome-continuous-3.14 | GNOME 3.14 | 3.14 | http://gnome.org/gnome-continuous/3.14
gnome3.6 | GNOME 3.6 | 3.6 | http://gnome.org/gnome/3.6
gnome3.8 | GNOME 3.8 | 3.8 | http://gnome.org/gnome/3.8
macosx10.0 | MacOS X Cheetah | 10.0 | http://apple.com/macosx/10.0
macosx10.1 | MacOS X Puma | 10.1 | http://apple.com/macosx/10.1
macosx10.2 | MacOS X Jaguar | 10.2 | http://apple.com/macosx/10.2
macosx10.3 | MacOS X Panther | 10.3 | http://apple.com/macosx/10.3
macosx10.4 | MacOS X Tiger | 10.4 | http://apple.com/macosx/10.4
macosx10.5 | MacOS X Leopard | 10.5 | http://apple.com/macosx/10.5
macosx10.6 | MacOS X Snow Leopard | 10.6 | http://apple.com/macosx/10.6
macosx10.7 | MacOS X Lion | 10.7 | http://apple.com/macosx/10.7
mageia1 | Mageia 1 | 1 | http://mageia.org/mageia/1
mageia2 | Mageia 2 | 2 | http://mageia.org/mageia/2
mageia3 | Mageia 3 | 3 | http://mageia.org/mageia/3
mageia4 | Mageia 4 | 4 | http://mageia.org/mageia/4
mageia5 | Mageia 5 | 5 | http://mageia.org/mageia/5
mageia6 | Mageia 6 | 6 | http://mageia.org/mageia/6
mandrake10.0 | Mandrake Linux 10.0 | 10.0 | http://mandriva.com/mandrake/10.0
mandrake10.1 | Mandrake Linux 10.1 | 10.1 | http://mandriva.com/mandrake/10.1
mandrake10.2 | Mandrake Linux 10.2 | 10.2 | http://mandriva.com/mandrake/10.2
mandrake5.1 | Mandrake Linux 5.1 | 5.1 | http://mandriva.com/mandrake/5.1
mandrake5.2 | Mandrake Linux 5.2 | 5.2 | http://mandriva.com/mandrake/5.2
mandrake5.3 | Mandrake Linux 5.3 | 5.3 | http://mandriva.com/mandrake/5.3
mandrake6.0 | Mandrake Linux 6.0 | 6.0 | http://mandriva.com/mandrake/6.0
mandrake6.1 | Mandrake Linux 6.1 | 6.1 | http://mandriva.com/mandrake/6.1
mandrake7.0 | Mandrake Linux 7.0 | 7.0 | http://mandriva.com/mandrake/7.0
mandrake7.1 | Mandrake Linux 7.1 | 7.1 | http://mandriva.com/mandrake/7.1
mandrake7.2 | Mandrake Linux 7.2 | 7.2 | http://mandriva.com/mandrake/7.2
mandrake8.0 | Mandrake Linux 8.0 | 8.0 | http://mandriva.com/mandrake/8.0
mandrake8.1 | Mandrake Linux 8.1 | 8.1 | http://mandriva.com/mandrake/8.1
mandrake8.2 | Mandrake Linux 8.2 | 8.2 | http://mandriva.com/mandrake/8.2
mandrake9.0 | Mandrake Linux 9.0 | 9.0 | http://mandriva.com/mandrake/9.0
mandrake9.1 | Mandrake Linux 9.1 | 9.1 | http://mandriva.com/mandrake/9.1
mandrake9.2 | Mandrake Linux 9.2 | 9.2 | http://mandriva.com/mandrake/9.2
mandriva2006.0 | Mandriva Linux 2006.0 | 2006.0 | http://mandriva.com/mandriva/2006.0
mandriva2007 | Mandriva Linux 2007 | 2007 | http://mandriva.com/mandriva/2007
mandriva2007.1 | Mandriva Linux 2007 Spring | 2007.1 | http://mandriva.com/mandriva/2007.1
mandriva2008.0 | Mandriva Linux 2008 | 2008.0 | http://mandriva.com/mandriva/2008.0
mandriva2008.1 | Mandriva Linux 2008 Spring | 2008.1 | http://mandriva.com/mandriva/2008.1
mandriva2009.0 | Mandriva Linux 2009 | 2009.0 | http://mandriva.com/mandriva/2009.0
mandriva2009.1 | Mandriva Linux 2009 Spring | 2009.1 | http://mandriva.com/mandriva/2009.1
mandriva2010.0 | Mandriva Linux 2010 | 2010.0 | http://mandriva.com/mandriva/2010.0
mandriva2010.1 | Mandriva Linux 2010 Spring | 2010.1 | http://mandriva.com/mandriva/2010.1
mandriva2010.2 | Mandriva Linux 2010.2 | 2010.2 | http://mandriva.com/mandriva/2010.2
mandriva2011 | Mandriva Linux 2011 | 2011 | http://mandriva.com/mandriva/2011
mbs1.0 | Mandriva Business Server 1.0 | 1.0 | http://mandriva.com/mbs/1.0
mes5 | Mandriva Enterprise Server 5.0 | 5.0 | http://mandriva.com/mes/5.0
mes5.1 | Mandriva Enterprise Server 5.1 | 5.1 | http://mandriva.com/mes/5.1
msdos6.22 | Microsoft MS-DOS 6.22 | 6.22 | http://microsoft.com/msdos/6.22
netbsd0.8 | NetBSD 0.8 | 0.8 | http://netbsd.org/netbsd/0.8
netbsd0.9 | NetBSD 0.9 | 0.9 | http://netbsd.org/netbsd/0.9
netbsd1.0 | NetBSD 1.0 | 1.0 | http://netbsd.org/netbsd/1.0
netbsd1.1 | NetBSD 1.1 | 1.1 | http://netbsd.org/netbsd/1.1
netbsd1.2 | NetBSD 1.2 | 1.2 | http://netbsd.org/netbsd/1.2
netbsd1.3 | NetBSD 1.3 | 1.3 | http://netbsd.org/netbsd/1.3
netbsd1.4 | NetBSD 1.4 | 1.4 | http://netbsd.org/netbsd/1.4
netbsd1.5 | NetBSD 1.5 | 1.5 | http://netbsd.org/netbsd/1.5
netbsd1.6 | NetBSD 1.6 | 1.6 | http://netbsd.org/netbsd/1.6
netbsd2.0 | NetBSD 2.0 | 2.0 | http://netbsd.org/netbsd/2.0
netbsd3.0 | NetBSD 3.0 | 3.0 | http://netbsd.org/netbsd/3.0
netbsd4.0 | NetBSD 4.0 | 4.0 | http://netbsd.org/netbsd/4.0
netbsd5.0 | NetBSD 5.0 | 5.0 | http://netbsd.org/netbsd/5.0
netbsd5.1 | NetBSD 5.1 | 5.1 | http://netbsd.org/netbsd/5.1
netbsd6.0 | NetBSD 6.0 | 6.0 | http://netbsd.org/netbsd/6.0
netbsd6.1 | NetBSD 6.1 | 6.1 | http://netbsd.org/netbsd/6.1
netbsd7.0 | NetBSD 7.0 | 7.0 | http://netbsd.org/netbsd/7.0
netbsd7.1 | NetBSD 7.1 | 7.1 | http://netbsd.org/netbsd/7.1
netbsd7.1.1 | NetBSD 7.1.1 | 7.1.1 | http://netbsd.org/netbsd/7.1.1
netware4 | Novell Netware 4 | 4 | http://novell.com/netware/4
netware5 | Novell Netware 5 | 5 | http://novell.com/netware/5
netware6 | Novell Netware 6 | 6 | http://novell.com/netware/6
openbsd4.2 | OpenBSD 4.2 | 4.2 | http://openbsd.org/openbsd/4.2
openbsd4.3 | OpenBSD 4.3 | 4.3 | http://openbsd.org/openbsd/4.3
openbsd4.4 | OpenBSD 4.4 | 4.4 | http://openbsd.org/openbsd/4.4
openbsd4.5 | OpenBSD 4.5 | 4.5 | http://openbsd.org/openbsd/4.5
openbsd4.8 | OpenBSD 4.8 | 4.8 | http://openbsd.org/openbsd/4.8
openbsd4.9 | OpenBSD 4.9 | 4.9 | http://openbsd.org/openbsd/4.9
openbsd5.0 | OpenBSD 5.0 | 5.0 | http://openbsd.org/openbsd/5.0
openbsd5.1 | OpenBSD 5.1 | 5.1 | http://openbsd.org/openbsd/5.1
openbsd5.2 | OpenBSD 5.2 | 5.2 | http://openbsd.org/openbsd/5.2
openbsd5.3 | OpenBSD 5.3 | 5.3 | http://openbsd.org/openbsd/5.3
openbsd5.4 | OpenBSD 5.4 | 5.4 | http://openbsd.org/openbsd/5.4
openbsd5.5 | OpenBSD 5.5 | 5.5 | http://openbsd.org/openbsd/5.5
openbsd5.6 | OpenBSD 5.6 | 5.6 | http://openbsd.org/openbsd/5.6
openbsd5.7 | OpenBSD 5.7 | 5.7 | http://openbsd.org/openbsd/5.7
openbsd5.8 | OpenBSD 5.8 | 5.8 | http://openbsd.org/openbsd/5.8
openbsd5.9 | OpenBSD 5.9 | 5.9 | http://openbsd.org/openbsd/5.9
openbsd6.0 | OpenBSD 6.0 | 6.0 | http://openbsd.org/openbsd/6.0
openbsd6.1 | OpenBSD 6.1 | 6.1 | http://openbsd.org/openbsd/6.1
openbsd6.2 | OpenBSD 6.2 | 6.2 | http://openbsd.org/openbsd/6.2
opensolaris2009.06 | OpenSolaris 2009.06 | 2009.06 | http://sun.com/opensolaris/2009.06
opensuse-factory | openSUSE | factory | http://opensuse.org/opensuse/factory
opensuse-unknown | openSUSE | unknown | http://opensuse.org/opensuse/unknown
opensuse10.2 | openSUSE 10.2 | 10.2 | http://opensuse.org/opensuse/10.2
opensuse10.3 | openSUSE 10.3 | 10.3 | http://opensuse.org/opensuse/10.3
opensuse11.0 | openSUSE 11.0 | 11.0 | http://opensuse.org/opensuse/11.0
opensuse11.1 | openSUSE 11.1 | 11.1 | http://opensuse.org/opensuse/11.1
opensuse11.2 | openSUSE 11.2 | 11.2 | http://opensuse.org/opensuse/11.2
opensuse11.3 | openSUSE 11.3 | 11.3 | http://opensuse.org/opensuse/11.3
opensuse11.4 | openSUSE 11.4 | 11.4 | http://opensuse.org/opensuse/11.4
opensuse12.1 | openSUSE 12.1 | 12.1 | http://opensuse.org/opensuse/12.1
opensuse12.2 | openSUSE 12.2 | 12.2 | http://opensuse.org/opensuse/12.2
opensuse12.3 | openSUSE 12.3 | 12.3 | http://opensuse.org/opensuse/12.3
opensuse13.1 | openSUSE 13.1 | 13.1 | http://opensuse.org/opensuse/13.1
opensuse13.2 | openSUSE 13.2 | 13.2 | http://opensuse.org/opensuse/13.2
opensuse42.1 | openSUSE Leap 42.1 | 42.1 | http://opensuse.org/opensuse/42.1
opensuse42.2 | openSUSE Leap 42.2 | 42.2 | http://opensuse.org/opensuse/42.2
opensuse42.3 | openSUSE Leap 42.3 | 42.3 | http://opensuse.org/opensuse/42.3
opensusetumbleweed | openSUSE Tumbleweed | tumbleweed | http://opensuse.org/opensuse/tumbleweed
rhel-atomic-7.0 | Red Hat Enterprise Linux Atomic Host 7.0 | 7.0 | http://redhat.com/rhel-atomic/7.0
rhel-atomic-7.1 | Red Hat Enterprise Linux Atomic Host 7.1 | 7.1 | http://redhat.com/rhel-atomic/7.1
rhel-atomic-7.2 | Red Hat Enterprise Linux Atomic Host 7.2 | 7.2 | http://redhat.com/rhel-atomic/7.2
rhel2.1 | Red Hat Enterprise Linux 2.1 | 2.1 | http://redhat.com/rhel/2.1
rhel2.1.1 | Red Hat Enterprise Linux 2.1 Update 1 /etc/bind/masters/elinvent.com | 2.1.1 | http://redhat.com/rhel/2.1.1
rhel2.1.2 | Red Hat Enterprise Linux 2.1 Update 2 | 2.1.2 | http://redhat.com/rhel/2.1.2
rhel2.1.3 | Red Hat Enterprise Linux 2.1 Update 3 | 2.1.3 | http://redhat.com/rhel/2.1.3
rhel2.1.4 | Red Hat Enterprise Linux 2.1 Update 4 | 2.1.4 | http://redhat.com/rhel/2.1.4
rhel2.1.5 | Red Hat Enterprise Linux 2.1 Update 5 | 2.1.5 | http://redhat.com/rhel/2.1.5
rhel2.1.6 | Red Hat Enterprise Linux 2.1 Update 6 | 2.1.6 | http://redhat.com/rhel/2.1.6
rhel2.1.7 | Red Hat Enterprise Linux 2.1 Update 7 | 2.1.7 | http://redhat.com/rhel/2.1.7
rhel3 | Red Hat Enterprise Linux 3 | 3 | http://redhat.com/rhel/3
rhel3.1 | Red Hat Enterprise Linux 3 Update 1 | 3.1 | http://redhat.com/rhel/3.1
rhel3.2 | Red Hat Enterprise Linux 3 Update 2 | 3.2 | http://redhat.com/rhel/3.2
rhel3.3 | Red Hat Enterprise Linux 3 Update 3 | 3.3 | http://redhat.com/rhel/3.3
rhel3.4 | Red Hat Enterprise Linux 3 Update 4 | 3.4 | http://redhat.com/rhel/3.4
rhel3.5 | Red Hat Enterprise Linux 3 Update 5 | 3.5 | http://redhat.com/rhel/3.5
rhel3.6 | Red Hat Enterprise Linux 3 Update 6 | 3.6 | http://redhat.com/rhel/3.6
rhel3.7 | Red Hat Enterprise Linux 3 Update 7 | 3.7 | http://redhat.com/rhel/3.7
rhel3.8 | Red Hat Enterprise Linux 3 Update 8 | 3.8 | http://redhat.com/rhel/3.8
rhel3.9 | Red Hat Enterprise Linux 3 Update 9 | 3.9 | http://redhat.com/rhel/3.9
rhel4.0 | Red Hat Enterprise Linux 4.0 | 4.0 | http://redhat.com/rhel/4.0
rhel4.1 | Red Hat Enterprise Linux 4.1 | 4.1 | http://redhat.com/rhel/4.1
rhel4.2 | Red Hat Enterprise Linux 4.2 | 4.2 | http://redhat.com/rhel/4.2
rhel4.3 | Red Hat Enterprise Linux 4.3 | 4.3 | http://redhat.com/rhel/4.3
rhel4.4 | Red Hat Enterprise Linux 4.4 | 4.4 | http://redhat.com/rhel/4.4
rhel4.5 | Red Hat Enterprise Linux 4.5 | 4.5 | http://redhat.com/rhel/4.5
rhel4.6 | Red Hat Enterprise Linux 4.6 | 4.6 | http://redhat.com/rhel/4.6
rhel4.7 | Red Hat Enterprise Linux 4.7 | 4.7 | http://redhat.com/rhel/4.7
rhel4.8 | Red Hat Enterprise Linux 4.8 | 4.8 | http://redhat.com/rhel/4.8
rhel4.9 | Red Hat Enterprise Linux 4.9 | 4.9 | http://redhat.com/rhel/4.9
rhel5.0 | Red Hat Enterprise Linux 5.0 | 5.0 | http://redhat.com/rhel/5.0
rhel5.1 | Red Hat Enterprise Linux 5.1 | 5.1 | http://redhat.com/rhel/5.1
rhel5.10 | Red Hat Enterprise Linux 5.10 | 5.10 | http://redhat.com/rhel/5.10
rhel5.11 | Red Hat Enterprise Linux 5.11 | 5.11 | http://redhat.com/rhel/5.11
rhel5.2 | Red Hat Enterprise Linux 5.2 | 5.2 | http://redhat.com/rhel/5.2
rhel5.3 | Red Hat Enterprise Linux 5.3 | 5.3 | http://redhat.com/rhel/5.3
rhel5.4 | Red Hat Enterprise Linux 5.4 | 5.4 | http://redhat.com/rhel/5.4
rhel5.5 | Red Hat Enterprise Linux 5.5 | 5.5 | http://redhat.com/rhel/5.5
rhel5.6 | Red Hat Enterprise Linux 5.6 | 5.6 | http://redhat.com/rhel/5.6
rhel5.7 | Red Hat Enterprise Linux 5.7 | 5.7 | http://redhat.com/rhel/5.7
rhel5.8 | Red Hat Enterprise Linux 5.8 | 5.8 | http://redhat.com/rhel/5.8
rhel5.9 | Red Hat Enterprise Linux 5.9 | 5.9 | http://redhat.com/rhel/5.9
rhel6.0 | Red Hat Enterprise Linux 6.0 | 6.0 | http://redhat.com/rhel/6.0
rhel6.1 | Red Hat Enterprise Linux 6.1 | 6.1 | http://redhat.com/rhel/6.1
rhel6.2 | Red Hat Enterprise Linux 6.2 | 6.2 | http://redhat.com/rhel/6.2
rhel6.3 | Red Hat Enterprise Linux 6.3 | 6.3 | http://redhat.com/rhel/6.3
rhel6.4 | Red Hat Enterprise Linux 6.4 | 6.4 | http://redhat.com/rhel/6.4
rhel6.5 | Red Hat Enterprise Linux 6.5 | 6.5 | http://redhat.com/rhel/6.5
rhel6.6 | Red Hat Enterprise Linux 6.6 | 6.6 | http://redhat.com/rhel/6.6
rhel6.7 | Red Hat Enterprise Linux 6.7 | 6.7 | http://redhat.com/rhel/6.7
rhel6.8 | Red Hat Enterprise Linux 6.8 | 6.8 | http://redhat.com/rhel/6.8
rhel6.9 | Red Hat Enterprise Linux 6.9 | 6.9 | http://redhat.com/rhel/6.9
rhel7.0 | Red Hat Enterprise Linux 7.0 | 7.0 | http://redhat.com/rhel/7.0
rhel7.1 | Red Hat Enterprise Linux 7.1 | 7.1 | http://redhat.com/rhel/7.1
rhel7.2 | Red Hat Enterprise Linux 7.2 | 7.2 | http://redhat.com/rhel/7.2
rhel7.3 | Red Hat Enterprise Linux 7.3 | 7.3 | http://redhat.com/rhel/7.3
rhel7.4 | Red Hat Enterprise Linux 7.4 | 7.4 | http://redhat.com/rhel/7.4
rhl1.0 | Red Hat Linux 1.0 | 1.0 | http://redhat.com/rhl/1.0
rhl1.1 | Red Hat Linux 1.1 | 1.1 | http://redhat.com/rhl/1.1
rhl2.0 | Red Hat Linux 2.0 | 2.0 | http://redhat.com/rhl/2.0
rhl2.1 | Red Hat Linux 2.1 | 2.1 | http://redhat.com/rhl/2.1
rhl3.0.3 | Red Hat Linux 3.0.3 | 3.0.3 | http://redhat.com/rhl/3.0.3
rhl4.0 | Red Hat Linux 4.0 | 4.0 | http://redhat.com/rhl/4.0
rhl4.1 | Red Hat Linux 4.1 | 4.1 | http://redhat.com/rhl/4.1
rhl4.2 | Red Hat Linux 4.2 | 4.2 | http://redhat.com/rhl/4.2
rhl5.0 | Red Hat Linux 5.0 | 5.0 | http://redhat.com/rhl/5.0
rhl5.1 | Red Hat Linux 5.1 | 5.1 | http://redhat.com/rhl/5.1
rhl5.2 | Red Hat Linux 5.2 | 5.2 | http://redhat.com/rhl/5.2
rhl6.0 | Red Hat Linux 6.0 | 6.0 | http://redhat.com/rhl/6.0
rhl6.1 | Red Hat Linux 6.1 | 6.1 | http://redhat.com/rhl/6.1
rhl6.2 | Red Hat Linux 6.2 | 6.2 | http://redhat.com/rhl/6.2
rhl7 | Red Hat Linux 7 | 7 | http://redhat.com/rhl/7
rhl7.1 | Red Hat Linux 7.1 | 7.1 | http://redhat.com/rhl/7.1
rhl7.2 | Red Hat Linux 7.2 | 7.2 | http://redhat.com/rhl/7.2
rhl7.3 | Red Hat Linux 7.3 | 7.3 | http://redhat.com/rhl/7.3
rhl8.0 | Red Hat Linux 8.0 | 8.0 | http://redhat.com/rhl/8.0
rhl9 | Red Hat Linux 9 | 9 | http://redhat.com/rhl/9
sled10 | SUSE Linux Enterprise Desktop 10 | 10 | http://suse.com/sled/10
sled10sp1 | SUSE Linux Enterprise Desktop 10 SP1 | 10.1 | http://suse.com/sled/10.1
sled10sp2 | SUSE Linux Enterprise Desktop 10 SP2 | 10.2 | http://suse.com/sled/10.2
sled10sp3 | SUSE Linux Enterprise Desktop 10 SP3 | 10.3 | http://suse.com/sled/10.3
sled10sp4 | SUSE Linux Enterprise Desktop 10 SP4 | 10.4 | http://suse.com/sled/10.4
sled11 | SUSE Linux Enterprise Desktop 11 | 11 | http://suse.com/sled/11
sled11sp1 | SUSE Linux Enterprise Desktop 11 SP1 | 11.1 | http://suse.com/sled/11.1
sled11sp2 | SUSE Linux Enterprise Desktop 11 SP2 | 11.2 | http://suse.com/sled/11.2
sled11sp3 | SUSE Linux Enterprise Desktop 11 SP3 | 11.3 | http://suse.com/sled/11.3
sled11sp4 | SUSE Linux Enterprise Desktop 11 SP4 | 11.4 | http://suse.com/sled/11.4
sled12 | SUSE Linux Enterprise Desktop 12 | 12 | http://suse.com/sled/12
sled12sp1 | SUSE Linux Enterprise Desktop 12 SP1 | 12.1 | http://suse.com/sled/12.1
sled12sp2 | SUSE Linux Enterprise Desktop 12 SP2 | 12.2 | http://suse.com/sled/12.2
sled9 | SUSE Linux Enterprise Desktop 9 | 9 | http://suse.com/sled/9
sles10 | SUSE Linux Enterprise Server 10 /etc/bind/masters/elinvent.com | 10 | http://suse.com/sles/10
sles10sp1 | SUSE Linux Enterprise Server 10 SP1 | 10.1 | http://suse.com/sles/10.1
sles10sp2 | SUSE Linux Enterprise Server 10 SP2 | 10.2 | http://suse.com/sles/10.2
sles10sp3 | SUSE Linux Enterprise Server 10 SP3 | 10.3 | http://suse.com/sles/10.3
sles10sp4 | SUSE Linux Enterprise Server 10 SP4 | 10.4 | http://suse.com/sles/10.4
sles11 | SUSE Linux Enterprise Server 11 | 11 | http://suse.com/sles/11
sles11sp1 | SUSE Linux Enterprise Server 11 SP1 | 11.1 | http://suse.com/sles/11.1
sles11sp2 | SUSE Linux Enterprise Server 11 SP2 | 11.2 | http://suse.com/sles/11.2
sles11sp3 | SUSE Linux Enterprise Server 11 SP3 | 11.3 | http://suse.com/sles/11.3
sles11sp4 | SUSE Linux Enterprise Server 11 SP4 | 11.4 | http://suse.com/sles/11.4
sles12 | SUSE Linux Enterprise Server 12 | 12 | http://suse.com/sles/12
sles12sp1 | SUSE Linux Enterprise Server 12 SP1 | 12.1 | http://suse.com/sles/12.1
sles12sp2 | SUSE Linux Enterprise Server 12 SP2 | 12.2 | http://suse.com/sles/12.2
sles9 | SUSE Linux Enterprise Server 9 | 9 | http://suse.com/sles/9
solaris10 | Solaris 10 | 10 | http://sun.com/solaris/10
solaris11 | Oracle Solaris 11 | 11 | http://oracle.com/solaris/11
solaris9 | Solaris 9 | 9 | http://sun.com/solaris/9
ubuntu10.04 | Ubuntu 10.04 LTS | 10.04 | http://ubuntu.com/ubuntu/10.04
ubuntu10.10 | Ubuntu 10.10 | 10.10 | http://ubuntu.com/ubuntu/10.10
ubuntu11.04 | Ubuntu 11.04 | 11.04 | http://ubuntu.com/ubuntu/11.04
ubuntu11.10 | Ubuntu 11.10 | 11.10 | http://ubuntu.com/ubuntu/11.10
ubuntu12.04 | Ubuntu 12.04 LTS | 12.04 | http://ubuntu.com/ubuntu/12.04
ubuntu12.10 | Ubuntu 12.10 | 12.10 | http://ubuntu.com/ubuntu/12.10
ubuntu13.04 | Ubuntu 13.04 | 13.04 | http://ubuntu.com/ubuntu/13.04
ubuntu13.10 | Ubuntu 13.10 | 13.10 | http://ubuntu.com/ubuntu/13.10
ubuntu14.04 | Ubuntu 14.04 LTS | 14.04 | http://ubuntu.com/ubuntu/14.04
ubuntu14.10 | Ubuntu 14.10 | 14.10 | http://ubuntu.com/ubuntu/14.10
ubuntu15.04 | Ubuntu 15.04 | 15.04 | http://ubuntu.com/ubuntu/15.04
ubuntu15.10 | Ubuntu 15.10 | 15.10 | http://ubuntu.com/ubuntu/15.10
ubuntu16.04 | Ubuntu 16.04 | 16.04 | http://ubuntu.com/ubuntu/16.04
ubuntu16.10 | Ubuntu 16.10 | 16.10 | http://ubuntu.com/ubuntu/16.10
ubuntu17.04 | Ubuntu 17.04 | 17.04 | http://ubuntu.com/ubuntu/17.04
ubuntu17.10 | Ubuntu 17.10 | 17.10 | http://ubuntu.com/ubuntu/17.10
ubuntu4.10 | Ubuntu 4.10 | 4.10 | http://ubuntu.com/ubuntu/4.10
ubuntu5.04 | Ubuntu 5.04 | 5.04 | http://ubuntu.com/ubuntu/5.04
ubuntu5.10 | Ubuntu 5.10 | 5.10 | http://ubuntu.com/ubuntu/5.10
ubuntu6.06 | Ubuntu 6.06 LTS | 6.06 | http://ubuntu.com/ubuntu/6.06
ubuntu6.10 | Ubuntu 6.10 | 6.10 | http://ubuntu.com/ubuntu/6.10
ubuntu7.04 | Ubuntu 7.04 | 7.04 | http://ubuntu.com/ubuntu/7.04
ubuntu7.10 | Ubuntu 7.10 | 7.10 | http://ubuntu.com/ubuntu/7.10
ubuntu8.04 | Ubuntu 8.04 LTS | 8.04 | http://ubuntu.com/ubuntu/8.04
ubuntu8.10 | Ubuntu 8.10 | 8.10 | http://ubuntu.com/ubuntu/8.10
ubuntu9.04 | Ubuntu 9.04 | 9.04 | http://ubuntu.com/ubuntu/9.04
ubuntu9.10 | Ubuntu 9.10 | 9.10 | http://ubuntu.com/ubuntu/9.10
win1.0 | Microsoft Windows 1.0 | 1.0 | http://microsoft.com/win/1.0
win10 | Microsoft Windows 10 | 10.0 | http://microsoft.com/win/10
win2.0 | Microsoft Windows 2.0 | 2.0 | http://microsoft.com/win/2.0
win2.1 | Microsoft Windows 2.1 | 2.1 | http://microsoft.com/win/2.1
win2k | Microsoft Windows 2000 | 5.0 | http://microsoft.com/win/2k
win2k12 | Microsoft Windows Server 2012 | 6.3 | http://microsoft.com/win/2k12
win2k12r2 | Microsoft Windows Server 2012 R2 | 6.3 | http://microsoft.com/win/2k12r2
win2k3 | Microsoft Windows Server 2003 | 5.2 | http://microsoft.com/win/2k3
win2k3r2 | Microsoft Windows Server 2003 R2 | 5.2 | http://microsoft.com/win/2k3r2
win2k8 | Microsoft Windows Server 2008 | 6.0 | http://microsoft.com/win/2k8
win2k8r2 | Microsoft Windows Server 2008 R2 | 6.1 | http://microsoft.com/win/2k8r2
win3.1 | Microsoft Windows 3.1 | 3.1 | http://microsoft.com/win/3.1
win7 | Microsoft Windows 7 | 6.1 | http://microsoft.com/win/7
win8 | Microsoft Windows 8 | 6.2 | http://microsoft.com/win/8
win8.1 | Microsoft Windows 8.1 | 6.3 | http://microsoft.com/win/8.1
win95 | Microsoft Windows 95 | 4.0 | http://microsoft.com/win/95
win98 | Microsoft Windows 98 | 4.1 | http://microsoft.com/win/98
winme | Microsoft Windows Millennium Edition | 4.9 | http://microsoft.com/win/me
winnt3.1 | Microsoft Windows NT Server 3.1 | 3.1 | http://microsoft.com/winnt/3.1
winnt3.5 | Microsoft Windows NT Server 3.5 | 3.5 | http://microsoft.com/winnt/3.5
winnt3.51 | Microsoft Windows NT Server 3.51 | 3.51 | http://microsoft.com/winnt/3.51
winnt4.0 | Microsoft Windows NT Server 4.0 | 4.0 | http://microsoft.com/winnt/4.0
winvista | Microsoft Windows Vista | 6.0 | http://microsoft.com/win/vista
winxp | Microsoft Windows XP | 5.1 | http://microsoft.com/win/xp
9. Start / Stop listed KVM Virtual Machine
root@jeremiah:~# virsh list –all
Id Name State
—————————————————-
3 fedora-28 running
– debian9 shut off
To start debian9 linux virtual machine that is currently off
root@jeremiah:~# virsh start fedora-28
Domain fedora-28 started
root@jeremiah:/home/hipo# virsh start debian9
error: Failed to start domain debian9
error: Requested operation is not valid: network 'default' is not active
root@jeremiah:/home/hipo# virsh net-list –all
Name State Autostart Persistent
———————————————————-
br0 active yes yes
default inactive no yes
root@jeremiah:/home/hipo# virsh net-start default
Network default started
root@jeremiah:/home/hipo# virsh start debian9
Domain debian9 started
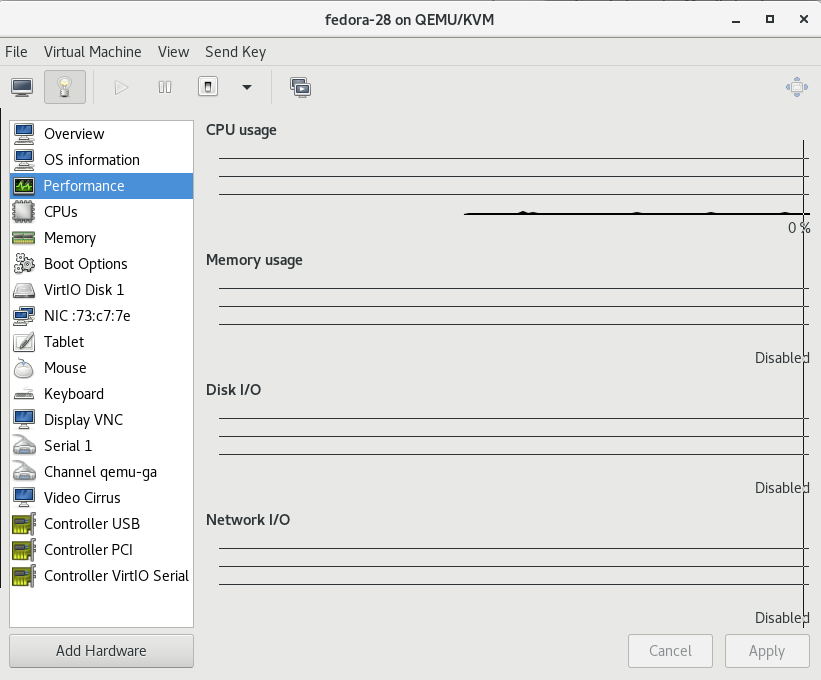
10. Attach to running VM with virsh or virt-manager
root@jeremiah:~# virsh list
Id Name State
—————————————————-
1 fedora-28 running
3 debian9 running
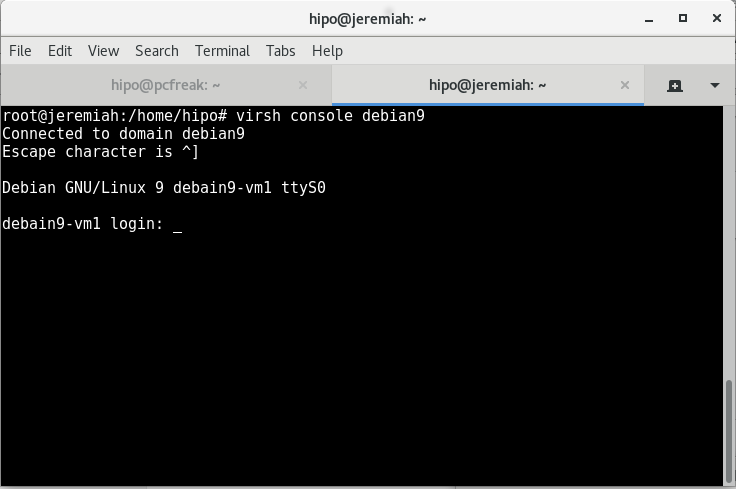
root@jeremiah:~# virsh connect debian9
Note that to make the login prompt appear you have to press enter once after the ^] connection string appears
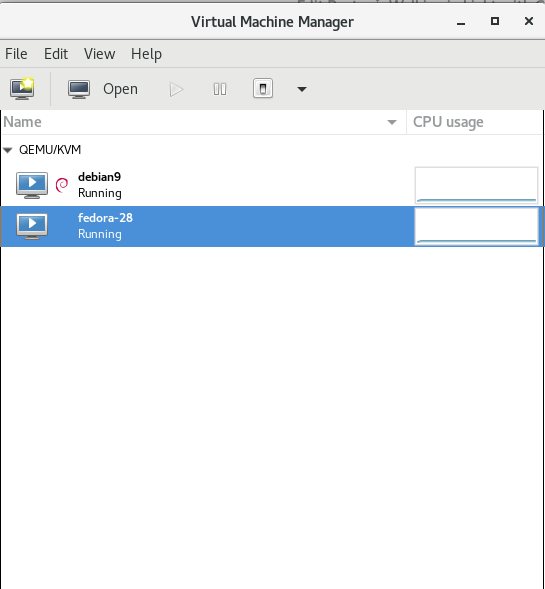
An alternative way is to use virt-manager GUI KVM desktop management interface and click over the Virtual Machine Guest name, in same fashion like in VirtualBox.

If you have KVM running on your Linux desktop PC / notebook you can also connect via VNC with virsh command.
root@jericho:~# virsh vncdisplay centos7
Another handy thing is to expose the Virtualized Guest OS with VNC in order to be able to connect and manage installation or further Linux configuration via VNC using an SSH Tunnel with port forwarding:
$ ssh hipo@www.pc-freak.net -L 5901:127.0.0.1:5901
11. Start / Shutdown / Suspend / Reboot (safe reboot) a VM guest machine domain
root@jericho:~# virsh shutdown debian9
root@jericho:~# virsh start fedora-28
root@jericho:~# virsh suspend debian9
root@jericho:~# virsh reboot fedora-28
12. Remove / Delete KVM Virtual Machines domain
root@jeremiah:~# virsh undefine fedora-28
root@jeremiah:~# virsh destroy fedora-28
Closing words
Using KVM to experiment with different OS distributions is really fun just like you can easily run a number of the major most popular Linux Distributions and a set of different versions. It takes few minutes to have a fully functional Linux to play with and it saves a lot of hassles when dealing with GNU / Linux and FreeBSD, doing so in Virtualbox for me prooved to be much more complicated (not to mention that often Virtualbox had an ugly bugs so even Importing an Appliance as a Guest VM with an official distro OS-es failed with weird errors.
One other very practical use of Kerkel-based Virtualization is if you want to run your servers using own Micro-Services architecture (e.g. run multiple Linux OS-es each running a separate Apache / Nginx / MySQL / PostGreSQL / Backup / Storage) etc. all of it running on a single dedicated server or a self-hosted bare-metal
There are plenty of Web Interfaces for Management KVM (proprietary and free software) that could even futher simplify the use and deploy / destory of KVM VMs.
All that makes possible running your own Linux or Web hosting provider a relatively easy task and seriously could cut business expenses and operational (maintenance) costs.
If you plan to run youw own hosting company, I can help you establish your infrastructure and advise you on the right technologies to use.