
If you're working as Linux sys-admin in a small or middle-sized company (80-300 people) whose personal and hosted infrastructure is quicly growing, you will soon face a requirement that all running Linux servers hosting applications requires unification in existing single / clustered Users Applications to be able to Login with same User / Password across all company Linux / UNIX servers.
Having single id / passwords across multiple servers is also handy for various routine sys-admin purposes as this simplifies daily maintanance tasks and deployment of "one view" server monitoring and bunch of software easily to be replicated on new server nodes.
This is where LDAP ( Lightweight Directory Access Protocol ) comes at help. LDAP authentication with use of PAM (Pluggable Authentication Module), allows to easily achieve a common centralized login mechanism across a Linux server "farm" using SSH or Xlogin (if X some kind of GUI environment) is to be used.
Configuring Linux servers to use a centralized LDAP server to store user / passwords and other user information is also very useful whenever you want to have a common login mechanism of a group of users across both Heterogenous network with Windows / Linux and UNIX servers. By keeping the users into a centralized LDAP server, users have access with same User / Pass to both Windows / Linux ,UNIX Sun OS / HP-UX / Unix / FreeBSD etc. Centralized LDAP for Production environment and a Testing one is a common thing to see in large IT infrastructure (hosting / support) companies such as IBM / HP / Google / Yahoo etc. .
LDAP credentials centralization is common in Telecommunication companies, many universities such as Berkley / MIT and in all kind of big business-es or anywhere where its needed to have in a common database replicated across servers hundreds of thousands of users.
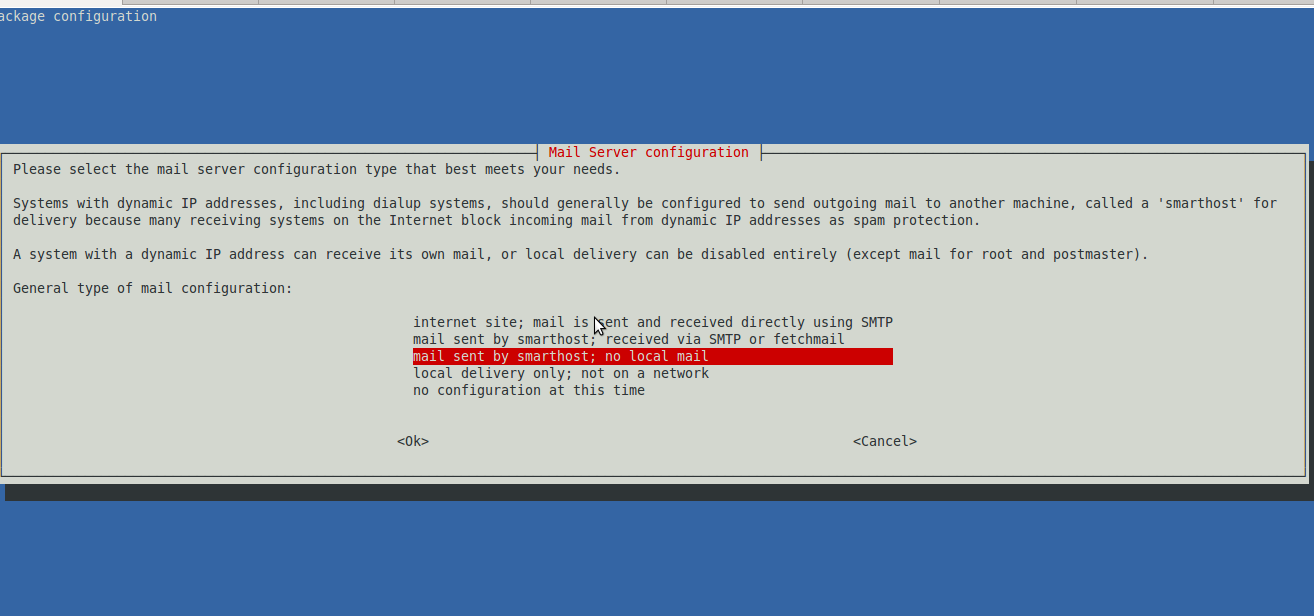
Here is how to Configure SSH LDAP Linux login authentication:
1. Install LDAP client and configuring it to use remote LDAP server on Debian / Ubuntu Linux
– On Debian Linux servers install the classical way to configure LDAP authentication is:
apt-get install –yes libpam-ldap libnss-ldap nscd ldap-utils
You will be asked a variety of configuration questions in the good old ncurses on LDAP server to be used:
- LDAP server Uniform Resource Identifier: ldap://LDAP-server-IP-Address
- Change the initial string from "ldapi:///" to "ldap://" before inputing your server's information
- Distinguished name of the search base:
- LDAP version to use: 3
- Make local root Database admin: Yes
- Does the LDAP database require login? No
- LDAP account for root:
- LDAP root account password: Your-LDAP-root-password
If you have inputted some wrong data to make the configuration interface pop-up again issue as root:
dpkg-reconfigure ldap-auth-config
Then to make aware the system LDAP database is to be used to through NSS (Name Services Switch) configured in /etc/nsswitch.conf
vim /etc/nsswitch.conf
To make /etc/passwd /etc/shadow and /etc/group not be queried from local system but to query LDAP defined server
passwd: ldap compat
group: ldap compat
shadow: ldap compat
Linux makes authentication to remote LDAP server through PAM (Pluggable Authentication Module) that provides authentication via series of modules which return Yes / No responce in Windows NT / XP something similar was called GINA in Windows 7 / 8 / 2012 a similar technology is used called Credential Provider.
LDAP authentication is done by using PAM, to make it possible:
vim /etc/pam.d/common-session
Place
session required pam_mkhomedir.so skel=/etc/skel umask=0022
This line makes PAM on login to create home directory for logged in user via LDAP and copy all files from /etc/skel/* to /home/username/*
To make new settings affective restart nscd service (handles passwd, group and host lookups caching previous credential results).
/etc/init.d/nscd restart
However this method of configuration is probably to be soon be obsoleted in future Debian releases the modern way to configure servers to authenticate to central LDAP server is with SSSD, i.e.
apt-get install sssd libnss-sss libpam-sss
apt-get remove nscd
vim /etc/sssd/sssd.conf
domains = LDAP
[…]
[domain/LDAP]
enumerate = true
id_provider = ldap
auth_provider = ldap
# ldap_schema can be set to "rfc2307", which stores group member names in the
# "memberuid" attribute, or to "rfc2307bis", which stores group member DNs in
# the "member" attribute. If you do not know this value, ask your LDAP
# administrator.
#ldap_schema = rfc2307
ldap_uri = ldap://server1.mydom.com/
ldap_search_base = dc=mydom,dc=intern
#ldap_tls_reqcert = never
ldap_tls_cacert = /etc/ldap/ssl/cacert.pem
2. Install LDAP client and configuring it to use remote LDAP server on CentOS / Fedora / RPM based Linux
yum -y install libpam-ldap nscd ldap-utils
On client machines, both /etc/ldap.conf and /etc/openldap/ldap.conf need to contain the proper server and search base information for the organization.
There is a quick way to configure LDAP use with authconfig
[root@www ~]# authconfig –enableldap
–enableldapauth
–ldapserver=dlp.server.world
–ldapbasedn="dc=server,dc=world"
–enablemkhomedir
–update
Starting nslcd: [ OK ]
[root@www ~]# exit
logout
CentOS Linux release 7.0.1406 (Core)
3.10.0-123.4.2.el7.x86_64 on an x86_64
www login:ldap-user # LDAP user
Password:# password
Creating directory '/home/rldap-user'.
[ldap-user@www ~]$ # logined normally
[ldap-user@www ~]$ passwd # change LDAP user password (LDAP server will be notified about change)
Changing password for user redhat.
Enter login(LDAP) password: # current password
New password: # new password
Retype new password:
LDAP password information changed for redhat
passwd: all authentication tokens updated successfully.
When using authconfig to configure LDAP server authentication will be managed by SSSD (System Security Services) Daemon for more check out man sssd.
To be working sssd will require you to have following list of RPM packages installed
sssd-client
sssd-common
sssd-common-pac
sssd-ldap
sssd-proxy
python-sssdconfig
authconfig
authconfig-gtk
SSSD configuration includingn the filled in LDAP server hostname generated by authconfig is stored in /etc/sssd/sssd.conf
To reload new SSSD settings:
systemctl restart sssd
Using sssd is the new way to enable LDAP Linux authentication and people who use it should not use the old already obsolete nslcd method
3. Enabling Apache web application to authenticate to LDAP server
If you further want LDAP authorization to also work on installed and functioning Apache webserver on the host you need to load mod_auth_ldap.so
in httpd.conf
vim /etc/httpd/conf/httpd.conf
There should be a record like:
LoadModule mm_auth_ldap_module modules/mod_auth_ldap.so
On Debian / Ubuntu Linux to enable LDAP auth in Apache2:
root@www:~# a2enmod ldap authnz_ldap
Enabling module ldap.
Considering dependency ldap for authnz_ldap:
Module ldap already enabled
Enabling module authnz_ldap.
To activate the new configuration, you need to run:
service apache2 restart
Finally to make Apache load new config:
On Redhat based distro:
/etc/init.d/httpd restart
On Debian
/etc/init.d/apache2 restart
If you want to use LDAP auth within PHP/ Perl applications you will also need to install php5-ldap, libnet-ldap-perl (debs)- on Debian / Ubuntu or php-ldap, perl-LDAP.noarch (rpm) on CentOS / Fedora.
To set LDAP credentials authentication from LDAP, in Virtualhost/s or .htaccess of certain directory use config like:
AuthName "Restricted"
AuthType Basic
AuthLDAPURL ldap://ldap.domain.com:389/ou=People,dc=domain,dc=com?uid
AuthLDAPBindDN "cn=Manager,dc=domain,dc=com"
AuthLDAPBindPassword "your_secret_secret_password_to_ldap_admin"
require valid-user
4. Debug Test LDAP server remote connection
Once LDAP auth is setup to debug / test users within server use ldapsearch (part of ldap-uitls):
ldapsearch -h <ldapserver>
-b dc=<your> ,dc=<domain> -x uid=<username>


 On Tuesday Zlati (A friend of mine introduced to me by Father Veliko), came to Arnhem. The plan was that he came on Tuesday here and afterwards in Wednesday morning the Trip to Amsterdam was going to happen. First we had settled that he will be in Arnhem in 12:00 o’clock. So Around 10:50 I walked down the way to the trainstation. I was on my way when Zlati ringed and told that he still, haven’t catched the train and he is not going to make it for 12:00, though he will be on Arnhem Central Station in 04:35 in the afternoon. I came back to home and on my way bought some apples as well as a oily sweet thing from the Turkish shop “Sultan” 🙂


A must have collection of WordPress plugins that enpowers your blog and improves SEO
Tuesday, April 5th, 2011Since I’m using wordpress as a blogging platform for about two years now and I’m constantly experimenting with valueable wordpress plugins.
I’ve decided to publish a compilation of wordpress plugins that empowers my blog
The plugins included in the compilation are quite various, some of the plugins aims at easy post sharing via the general social networks and main websites used by users today, others significantly helps in increasing the blog ranking in major search engines, there are some that adds like button to the blog.
These plugins also strenghthen the easy blog RSS file sharing, some post straight to twitter all your blog posts, generate tags automatically, puts a better features to the default wordpress commenting mechanism, prevent from spam comments, add features for easily adding Google adsense to the wordpress installation to help you advertise on your blog.
There are also plugins which delete duplicate posts (if you have such), puts better wordpress blog search bar, generates a sitemap to the blog, add an option to include php codes straight into your posts, adds wordpress an option to easily put mod rewrite rules straight from the wordpress interface, boost wordpress speed by adding static html generation cache, boost performance etc. etc.
Here is the complete list of wordpress plugins which I have currently installed on my wordpress blog:
ad-squares-widgetadd-to-any-subscribe
advertising-manager
ajax-comments
akismet
all-in-one-adsense-and-ypn
all-in-one-seo-pack
askapache-google-404
auto-tag
bm-custom-login
commentluv
comments-statistics
cyr2lat-slugs
delete-duplicate-posts
easy-adsenser
extended-search-plugin
facebook-share-new
favourite-bible-verse
feedburner-plugin
feedburner-widget
feedburner_feedsmith_plugin_2.3
feedlist
force-publish-schedule
google-analytics-for-wordpress
google-sitemap-generator
headspace2
my-link-order
php-code-widget
platinum-seo-pack
post-plugin-library
post-to-twitter
profile-pic
profile-pics
redirection
rss-atom-avatar
seo-automatic-links
seo-slugs
share-on-facebook
share-this
similar-posts
simple-tags
subscribe-to-comments-reloaded
subscribe-to-comments
subscribe2
text-control
tidy-up
tinymce-advanced
what-would-seth-godin-do
wordbook
wordpress-23-related-posts-plugin
wordpress-mobile-edition
wordpress-thread-comment
wp-codebox
wp-keiths-easy-rss
wp-likes
wp-o-matic
wp-postviews
wp-super-cache
wp-syntax
yourls-wordpress-to-twitter
I do have enabled most of the plugins, though some are disabled but still might be helpful somewhere in the close-future thus I still keep them installed.
I would skip the time to describe one by one what each of the above list of plugins will do for your wordpress, since the list is quite long.
However I defnitely think this is a list of plugins you might want to have installed in a newly established wordpress blog for sure.
Note that the versions of the plugins which are included in this must have wordpress plugins collection might not be the latest as the included ones are the ones I do have installed at the time of writting of this article.
Also be aware that some of the plugins might create some issues with newer versions of wordpress (your blog might beak up!), however most of the plugins should work out of the box by just enabling each one of them from the wordpress interface via the menus:
Settings -> Plugins -> InactiveTo straight install my bundled package of plugins you have to issue the commands:
linux:~# cd /var/www/blog/wp-content/pluginslinux:/var/www/blog/wp-content/plugins# wget https://www.pc-freak.net/files/a_must_have_wordpress_plugins_collection.tar.gz
linux:/var/www/blog/wp-content/plugins# tar -zxvf a_must_have_wordpress_plugins_collection.tar.gz
...
linux:/var/www/blog/wp-content/plugins# unzip *.zip
Now as they should be installed under the plugins directory go and enable the plugins.
Further on many of the plugins will require configuration from the menus:
Settingsor in the menu
Tools
After being setup up your new wordpress installation will look significantly better, you will notice a tons of useful features which you might have previously missing and desperately needed 😉
Most of the bundled package of wordpress plugins works fine with wordpress version 3.1, if you’re trying to install enable and configure the plugins on some other versions of wordpress, there might be problems!
If you experience problems by trying out my bunch of wordpress plugins please drop me a comment.
I hope you enjoyed this improvised article, if these bunch of plugins are useful to you please give me a thanks 🙂
Thanks!
Tags: adsense, advertising manager, aims, ajax, analytics, auto tag, bible, bible verse, blog, boost, Button, collection, commentluv, compilation, complete list, configure, custom login, cyr, drop, extended search, generation, google, google sitemap generator, html generation, Inactive, installation, interface, major search engines, mechanism, mod, option, package, php, platform, plugin, post, Search, search bar, search plugin, SEO, Settingsor, Slugs, social networks, squares, time, twitter, wget, widget, wordbook, Wordpress, wordpress blog, wordpress plugins, ypn
Posted in SEO, Web and CMS, Wordpress | 8 Comments »