Posts Tagged ‘configured’

Upgrade Debian Linux 9 to 10 Stretch to Buster and Disable graphical service load boot on Debian 10 Linux / Debian Buster is out

Tuesday, July 9th, 2019

howto-upgrade-debian-linux-debian-stretch-to-buster-debian-10-buster

I've just took a time to upgrade my Debian 9 Stretch Linux to Debian Buster on my old school Laptop (that turned 11 years old) Lenovo Thinkpad R61 . The upgrade went more or less without severe issues except few things.

The overall procedure followed is described n a few websites out there already and comes up to;


0. Set the proper repository location in /etc/apt/sources.list


Before update the sources.list used are:
 

deb [arch=amd64,i386] http://ftp.bg.debian.org/debian/ buster main contrib non-free
deb-src [arch=amd64,i386] http://ftp.bg.debian.org/debian/ buster main contrib non-free


deb [arch=amd64,i386] http://security.debian.org/ buster/updates main contrib non-free
deb-src [arch=amd64,i386] http://security.debian.org/ buster/updates main contrib non-free

deb [arch=amd64,i386] http://ftp.bg.debian.org/debian/ buster-updates main contrib non-free
deb-src [arch=amd64,i386] http://ftp.bg.debian.org/debian/ buster-updates main contrib non-free

deb http://ftp.debian.org/debian buster-backports main


For people that had stretch defined in /etc/apt/sources.list you should change them to buster or stable, easiest and quickest way to omit editting with vim / nano etc. is run as root or via sudo:
 

sed -i 's/stretch/buster/g' /etc/apt/sources.list
sed -i 's/stretch/buster/g' /etc/apt/sources.list.d/*.list

The minimum of config in sources.list after the modification should be
 

deb http://deb.debian.org/debian buster main
deb http://deb.debian.org/debian buster-updates main
deb http://security.debian.org/debian-security buster/updates main

Or if you want to always be with latest stable packages (which is my practice for notebooks):

deb http://deb.debian.org/debian stable main
deb http://deb.debian.org/debian stable-updates main
deb http://security.debian.org/debian-security stable/updates main


1. Getting list of hold packages if such exist and unholding them, e.g.


apt-mark showhold


Same could also be done via dpkg

dpkg –get-selections | grep hold


To unhold a package if such is found:

echo "package_name install"|sudo dpkg –set-selections

For those who don't know what hold package is this is usually package you want to keep at certain version all the time even though after running apt-get upgrade to get the latest package versions.
 

2. Use df -h and assure you have at least 5 – 10 GB free space on root directory / before proceed

df -h /

3. Update packages list to set new set repos as default

apt update


4. apt upgrade
 

apt upgrade

Here some 10 – 15 times you have to confirm what you want to do with configuration that has changed if you're unsure about the config (and it is not critical service) you're aware as such as Apache / MySQL / SMTP etc. it is best to install the latest maintainer version.

Hopefully here you will not get fatal errors that will interrupt it.

P.S. It is best to run apt-update either in VTTY (Virtual console session) with screen or tmux or via a physical tty (if this is not a remote server) as during the updates your GUI access to the gnome-terminal or konsole / xterm whatever console used might get cut. Thus it is best to do it with command:
 

screen apt upgrade


5. Run dist-upgrade to finalize the upgrade from Stertch to Buster


Once all is completed of the new installed packages, you will need to finally do, once again it is best to run via screen, if you don't have installed screen install it:


if [ $(which screen) ]; then echo 'Installed'; else apt-get install –yes screen ; fi

screen apt dist-upgrade


Here once again you should set whether old configuration to some e services has to stay or the new Debian maintainer package shipped one will overwrite the old and locally modified (due to some reason), here do wisely whatever you will otherwise some configured services might not boot as expected on next boot.


6. What if you get packages failed on update


If you get a certain package failed to configure after installed due to some reason, if it is a systemd service use:


journalctl -xe |head -n 50


or fully observer output of journalctl -xe and decide on yourself.

In most cases

dpkg-reconfigure failed-package-name


should do the trick or at least give you more hints on how to solve it.


Also if a package seems to be in inconsistent or broken state after upgrade  and simple dpkg-reconfigure doesn't help, a good command
that can help you is


dpkg-reconfigure -f package_name


or you can try to workaround a failed package setup with:
 

dpkg –configure -a

 
If dpkg-reconfigure doesn't help either as I experienced in prior of Debian from Debian 6 -> 7 an Debian 7 ->8 updates on some Computers, then a very useful thing to try is:
 

apt-get update –fix-missing 

apt-get install -f


At certain cases the only work around to be able to complete the package upgrade is to to remove the package with apt remove but due to config errors even that is not possible to work around this as final resort run:
 

dpkg –remove –force-remove-reinstreq


7. Clean up ununeeded packages


Some packages are left over due to package dependencies from Stretch and not needed in buster anymore to remove them.
 

apt autoremove


8. Reboot system once all upgrade is over


/sbin/reboot


9. Verify your just upgraded Debian is in a good state


root@noah:~# uname -a;
Linux noah 4.19.0-5-rt-amd64 #1 SMP PREEMPT RT Debian 4.19.37-5 (2019-06-19) x86_64 GNU/Linux


root@noah:~# cat /etc/issue.net
Debian GNU/Linux 10


root@noah:~# lsb_release -a
No LSB modules are available.
Distributor ID:    Debian
Description:    Debian GNU/Linux 10 (buster)
Release:    10
Codename:    buster


root@noah:~# hostnamectl
   Static hostname: noah
         Icon name: computer-laptop
           Chassis: laptop
        Machine ID: 4759d9c2f20265938692146351a07929
           Boot ID: 256eb64ffa5e413b8f959f7ef43d919f
  Operating System: Debian GNU/Linux 10 (buster)
            Kernel: Linux 4.19.0-5-rt-amd64
      Architecture: x86-64


10. Remove annoying picture short animation with debian logo looping


plymouth-debian-graphical-boot-services

By default Debian 10 boots up with annoying screen hiding all the status of loaded services state .e.g. you cannot see the services that shows in [ FAILED ] state and  which do show as [ OK ] to revert back the old behavior I'm used to for historical reasons and as it shows a lot of good Boot time debugging info, in previous Debian distributions this was possible  by setting the right configuration options in /etc/default/grub

which so far in my config was like so

GRUB_CMDLINE_LINUX_DEFAULT="quiet splash scsi_mod.use_blk_mq=y dm_mod.use_blk_mq=y zswap.enabled=1 text"


Note that zswap.enabled=1 passed option is because my notebook is pretty old machine from 2008 with 4GB of memory and zswap does accelerate performance when working with swap – especially helpful on Older PCs for more you can read more about zswap on ArchLinux wiki
After modifying this configuration to load the new config into grub the cmd is:
 

/usr/sbin/update-grub

 
As this was not working and tried number of reboots finally I found that annoying animated gif like picture shown up is caused by plymouth below is excerpts from Plymouth's manual page:


       "The plymouth sends commands to a running plymouthd. This is used during the boot process to control the display of the graphical boot splash."

Plymouth has a set of themes one can set:


# plymouth-set-default-theme -l
futureprototype
details
futureprototype
joy
lines
moonlight
softwaves
spacefun
text
tribar


I tried to change that theme to make the boot process as text boot as I'm used to historically with cmd:
 

update-alternatives –config text.plymouth

 
As after reboot I hoped the PC will start booting in text but this does not happened so the final fix to turn back to textmode service boot was to completely remove plymouth
 

apt-get remove –yes plymouth

Ansible Quick Start Cheatsheet for Linux admins and DevOps engineers

Wednesday, October 24th, 2018

ansible-quick-start-cheetsheet-ansible-logo

Ansible is widely used (Configuration management, deployment, and task execution system) nowadays for mass service depoyments on multiple servers and Clustered environments like, Kubernetes clusters (with multiple pods replicas) virtual swarms running XEN / IPKVM virtualization hosting multiple nodes etc. .

Ansible can be used to configure or deploy GNU / Linux tools and services such as Apache / Squid / Nginx / MySQL / PostgreSQL. etc. It is pretty much like Puppet (server / services lifecycle management) tool , except its less-complecated to start with makes it often a choose as a tool for mass deployment (devops) automation.

Ansible is used for multi-node deployments and remote-task execution on group of servers, the big pro of it it does all its stuff over simple SSH on the remote nodes (servers) and does not require extra services or listening daemons like with Puppet. It combined with Docker containerization is used very much for later deploying later on inside Cloud environments such as Amazon AWS / Google Cloud Platform / SAP HANA / OpenStack etc.

Ansible-Architechture-What-Is-Ansible-Edureka

0. Instaling ansible on Debian / Ubuntu Linux


Ansible is a python script and because of that depends heavily on python so to make it running, you will need to have a working python installed on local and remote servers.

Ansible is as easy to install as running the apt cmd:


# apt-get install –yes ansible
 

The following additional packages will be installed:
  ieee-data python-jinja2 python-kerberos python-markupsafe python-netaddr python-paramiko python-selinux python-xmltodict python-yaml
Suggested packages:
  sshpass python-jinja2-doc ipython python-netaddr-docs python-gssapi
Recommended packages:
  python-winrm
The following NEW packages will be installed:
  ansible ieee-data python-jinja2 python-kerberos python-markupsafe python-netaddr python-paramiko python-selinux python-xmltodict python-yaml
0 upgraded, 10 newly installed, 0 to remove and 1 not upgraded.
Need to get 3,413 kB of archives.
After this operation, 22.8 MB of additional disk space will be used.

apt-get install –yes sshpass


Installing Ansible on Fedora Linux is done with:


# dnf install ansible –yes sshpass


On CentOS to install:
 

# yum install ansible –yes sshpass

sshpass needs to be installed only if you plan to use ssh password prompt authentication with ansible.

Ansible is also installable via python-pip tool, if you need to install a specific version of ansible you have to use it instead, the package is available as an installable package on most linux distros.

Ansible has a lot of pros and cons and there are multiple articles already written on people for and against it in favour of Chef or Puppet As I recently started learning Ansible. The most important thing to know about Ansible is though many of the things can be done directly using a simple command line, the tool is planned for remote installing of server services using a specially prepared .yaml format configuration files. The power of Ansible comes of the use of Ansible Playbooks which are yaml scripts that tells ansible how to do its activities step by step on remote server. In this article, I'm giving a quick cheat sheet to start quickly with it.
 

1. Remote commands execution with Ansible
 

First thing to do to start with it is to add the desired hostnames ansible will operate with it can be done either globally (if you have a number of remote nodes) to deploy stuff periodically by using /etc/ansible/hosts or use a custom host script for each and every ansible custom scripts developed.

a. Ansible main config files

A common ansible /etc/ansible/hosts definition looks something like that:


# cat /etc/ansible/hosts
[mysqldb]
10.69.2.185
10.69.2.186
[master]
10.69.2.181
[slave]
10.69.2.187
[db-servers]
10.69.2.181
10.69.2.187
[squid]
10.69.2.184

Host to execute on can be also provided via a shell variable $ANSIBLE_HOSTS
b) is remote hosts reachable / execute commands on all remote host

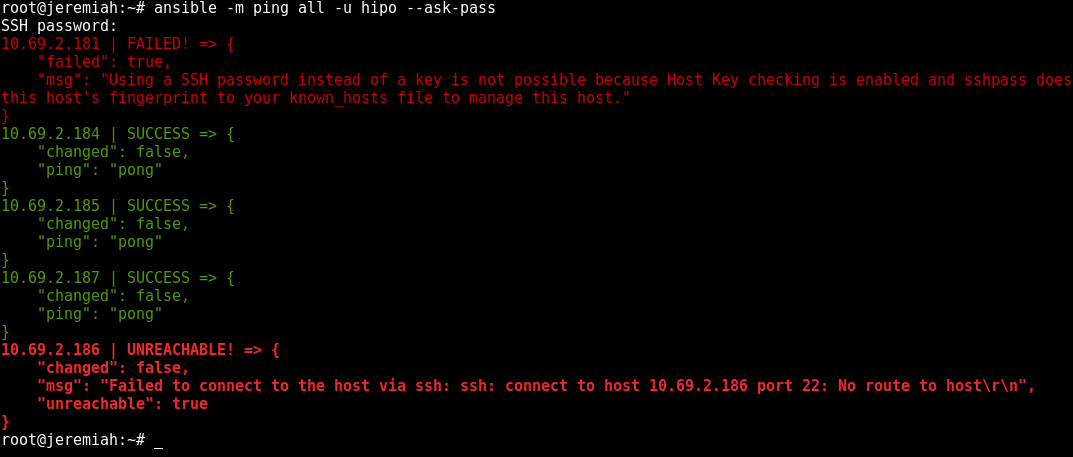
To test whether hour hosts are properly configure from /etc/ansible/hosts you can ping all defined hosts with:


ansible all -m ping


ansible-check-hosts-ping-command-screenshot

This makes ansible try to remote to remote hosts (if you have properly configured SSH public key authorization) the command should return success statuses on every host.


ansible all -a "ifconfig -a"


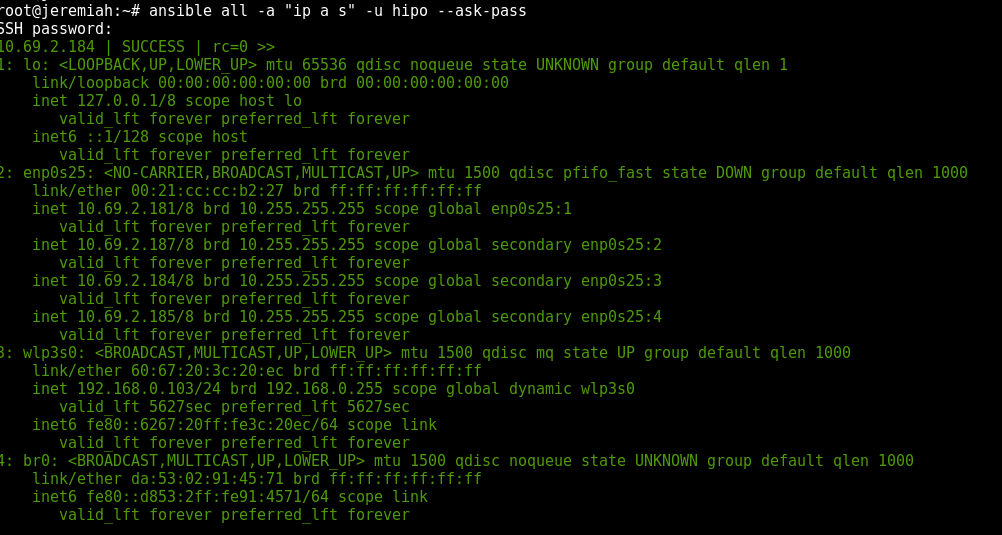
If you don't have SSH keys configured you can also authenticate with an argument (assuming) all hosts are configured with same password with:


ansible all –ask-pass -a "ip all show" -u hipo –ask-pass


ansible-show-ips-ip-a-command-screenshot-linux

If you have configured group of hosts via hosts file you can also run certain commands on just a certain host group, like so:


ansible <host-group> -a <command>

It is a good idea to always check /etc/ansible/ansible.cfg which is the system global (main red ansible config file).

c) List defined host groups
 

ansible localhost -m debug -a 'var=groups.keys()'
ansible localhost -m debug -a 'var=groups'

d) Searching remote server variables


# Search remote server variables
ansible localhost -m setup -a 'filter=*ipv4*'


ansible localhost -m setup -a 'filter=ansible_domain'


ansible all -m setup -a 'filter=ansible_domain'


# uninstall package on RPM based distros
ansible centos -s -m yum -a "name=telnet state=absent"
# uninstall package on APT distro
ansible localhost -s -m apt -a "name=telnet state=absent"


2. Debugging – Listing information about remote hosts (facts) and state of a host


# All facts for one host
ansible -m setup
  # Only ansible fact for one host
ansible
-m setup -a 'filter=ansible_eth*'
# Only facter facts but for all hosts
ansible all -m setup -a 'filter=facter_*'


To Save outputted information per-host in separate files in lets say ~/ansible/host_facts


ansible all -m setup –tree ~/ansible/host_facts


3. Playing with Playbooks deployment scripts


a) Syntax Check of a playbook yaml


ansible-playbook –syntax-check


b) Run General Infos about a playbook such as get what a playbook would do on remote hosts (tasks to run) and list-hosts defined for a playbook (like above pinging).


ansible-playbook –list-hosts
ansible-playbook
–list-tasks


To get the idea about what an yaml playbook looks like, here is example from official ansible docs, that deploys on remote defined hosts a simple Apache webserver.


– hosts: webservers
  vars:
    http_port: 80
    max_clients: 200
  remote_user: root
  tasks:
  – name: ensure apache is at the latest version
    yum:
      name: httpd
      state: latest
  – name: write the apache config file
    template:
      src: /srv/httpd.j2
      dest: /etc/httpd.conf
    notify:
    – restart apache
  – name: ensure apache is running
    service:
      name: httpd
      state: started
  handlers:
    – name: restart apache
      service:
        name: httpd
        state: restarted

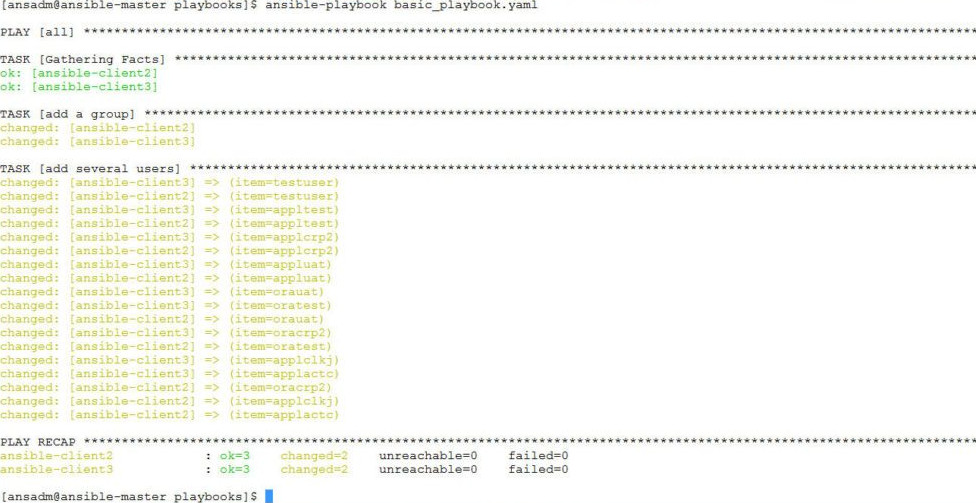
To give it a quick try save the file as webserver.yml and give it a run via ansible-playbook command
 

ansible-playbook -s playbooks/webserver.yml


The -s option instructs ansible to run play on remote server with super user (root) privileges.

The power of ansible is its modules, which are constantly growing over time a complete set of Ansible supported modules is in its official documenation.

Ansible-running-playbook-Commands-Task-script-Successful-output-1024x536

There is a lot of things to say about playbooks, just to give the brief they have there own language like a  templates, tasks, handlers, a playbook could have one or multiple plays inside (for instance instructions for deployment of one or more services).

The downsides of playbooks are they're so hard to write from scratch and edit, because yaml syntaxing is much more stricter than a normal oldschool sysadmin configuration file.
I've stucked with problems with modifying and writting .yaml files and I should say the community in #ansible in irc.freenode.net was very helpful to help me debug the obscure errors.

yamllint (The YAML Linter tool) comes handy at times, when facing yaml syntax errors, to use it install via apt:
 

# apt-get install –yes yamllint


a) Running ansible in "dry mode" just show what ansible might do but not change anything
 

ansible-playbook playbooks/PLAYBOOK_NAME.yml –check


b) Running playbook with different users and separate SSH keys


ansible-playbook playbooks/your_playbook.yml –user ansible-user
 
ansible -m ping hosts –private-key=~/.ssh/keys/custom_id_rsa -u centos


c) Running ansible playbook only for certain hostnames part of a bigger host group


ansible-playbook playbooks/PLAYBOOK_NAME.yml –limit "host1,host2,host3"


d) Run Ansible on remote hosts in parallel

To run in raw of 10 hosts in parallel
 

# Run 10 hosts parallel
ansible-playbook <File.yaml> -f 10            


e) Passing variables to .yaml scripts using commandline

Ansible has ability to pre-define variables from .yml playbooks. This variables later can be passed from shell cli, here is an example:

# Example of variable substitution pass from command line the var in varsubsts.yaml if present is defined / replaced ansible-playbook playbooks/varsubst.yaml –extra-vars "myhosts=localhost gather=yes pkg=telnet"


4. Ansible Galaxy (A Docker Hub) like large repository with playbook (script) files


Ansible Galaxy has about 10000 active users which are contributing ansible automation playbooks in fields such as Development / Networking / Cloud / Monitoring / Database / Web / Security etc.

To install from ansible galaxy use ansible-galaxy

# install from galaxy the geerlingguy mysql playbook
ansible-galaxy install geerlingguy.mysql


The available packages you can use as a template for your purpose are not so much as with Puppet as Ansible is younger and not corporate supported like Puppet, anyhow they are a lot and does cover most basic sysadmin needs for mass deployments, besides there are plenty of other unofficial yaml ansible scripts in various github repos.

Mail send from command line on Linux and *BSD servers – useful for scripting

Monday, September 10th, 2018

mail-send-email-from-command-line-on-linux-and-freebsd-operating-systems-logo

Historically Email sending has been very different from what most people use it in the Office, there was no heavy Email clients such as Outlook Express no MX Exchange, no e-mail client capabilities for Calendar and Meetings schedule as it is in most of the modern corporate offices that depend on products such as Office 365 (I would call it a connectedHell 365 days a year !).

There was no free webmail and pop3 / imap providers such as Mail.Yahoo.com, Gmail.com, Hotmail.com, Yandex.com, RediffMail, Mail.com the innumerous lists goes and on.
Nope back in the day emails were doing what they were originally supposed to like the post services in real life simply send and receive messages.

For those who remember that charming times, people used to be using BBS-es (which were basicly a shared set-up home system as a server) or some of the few University Internal Email student accounts or by crazy sysadmins who received their notification and warnings logs about daemon (services) messages via local DMZ-ed network email servers and it was common to read the email directly with mail (mailx) text command or custom written scripts … It was not uncommon also that mailx was used heavily to send notification messages on triggered events from logs. Oh life was simple and clear back then, and even though today the email could be used in a similar fashion by hard-core old school sysadmins and Dev Ops / simple shell scriptings tasks or report cron jobs such usage is already in the deep history.

The number of ways one could send email in text format directly from the GNU / Linux / *BSD server to another remote mail MTA node (assuming it had properly configured Relay server be it Exim or Postifix) were plenty.

In this article I will try to rewind back some of the UNIX history by pinpointing a few of the most common ways, one used to send quick emails directly from a remote server connection terminal or lets say a cheap VPS few cents server, through something like (SSH or Telnet) etc.
 

1. Using the mail command client (part of bsd-mailx on Debian).
 

In my previous article Linux: "bash mail command not found" error fix
I ended the article with a short explanation on how this is done but I will repeat myself one more time here for the sake of clearness of this article.

root@linux:~# echo "Your Sample Message Body" | mail -s "Whatever … Message Subject" remote_receiver@remote-server-email-address.com


The mail command will connect to local server TCP PORT 25 on local configured MTA and send via it. If the local MTA is misconfigured or it doesn't have a proper MX / PTR DNS records etc. or not configure as a relay SMTP remote mail will not get delivered. Sent Email should be properly delivered at remote recipient address.

How to send HTML formatted emails using mailx command on Linux console / terminal shell using remote server through SSH ?

Connect to remote SSH server (VPS), dedicated server, home Linux router etc. and run:


root@linux:~# mailx -a 'Content-Type: text/html'
      -s "This is advanced mailx indeed!" < email_content.html
      "first_email_to_send_to@gmail.com, mail_recipient_2@yahoo.com"


email_content.html should be properly formatted (at best w3c standard compliant) HTML.

Here is an example email_content.html (skeleton file)


    To: your_customer@gmail.com
    Subject: This is an HTML message
    From: marketing@your_company.com
    Content-Type: text/html; charset="utf8"

    <html>
    <body>
    <div style="
        background-color:
        #abcdef; width: 300px;
        height: 300px;
        ">
    </div>
Whatever text mixed with valid email HTML tags here.
    </body>
    </html>


Above command sends to two email addresses however if you have a text formatted list of recipients you can easily use that file with a bash shell script for loop and send to multiple addresses red from lets say email_addresses_list.txt .

To further advance the one liner you can also want to provide an email attachment, lets say the file email_archive.rar by using the -A email_archive.rar argument.


root@linux:~# mailx -a 'Content-Type: text/html'
      -s "This is advanced mailx indeed!" -A ~/email_archive.rar < email_content.html
      "first_email_to_send_to@gmail.com, mail_recipient_2@yahoo.com"


For those familiar with Dan Bernstein's Qmail MTA (which even though a bit obsolete is still a Security and Stability Beast across email servers) – mailx command had to be substituted with a custom qmail one in order to be capable to send via qmail MTA daemon.
 

2. Using sendmail command to send email
 

Do you remember that heavy hard to configure MTA monster sendmail ? It was and until this very day is the default Mail Transport Agent for Slackware Linux.

Here is how we were supposed to send mail with it:


[root@sendmail-host ~]# vim email_content_to_be_delivered.txt


Content of file should be something like:

Subject: This Email is sent from UNIX Terminal Email

Hi this Email was typed in a file and send via sendmail console email client
(part of the sendmail mail server)

It is really fun to go back in the pre-history of Mail Content creation 🙂


[root@sendmail-host ~]# sendmail -v user_name@remote-mail-domain.com  < /tmp/email_content_to_be_delivered.txt


-v argument provided, will make the communication between the mail server and your mail transfer agent visible.
 

3. Using ssmtp command to send mail
 

ssmtp MTA and its included shell command was used historically as it was pretty straight forward you just launch it on the command line type on one line all your email and subject and ship it (by pressing the CTRL + D key combination).

To give it a try you can do:


root@linux:~# apt-get install ssmtp
Reading package lists… Done
Building dependency tree       
Reading state information… Done
The following additional packages will be installed:
  libgnutls-openssl27
The following packages will be REMOVED:
  exim4-base exim4-config exim4-daemon-heavy
The following NEW packages will be installed:
  libgnutls-openssl27 ssmtp
0 upgraded, 2 newly installed, 3 to remove and 1 not upgraded.
Need to get 239 kB of archives.
After this operation, 3,697 kB disk space will be freed.
Do you want to continue? [Y/n] Y
Get:1 http://ftp.us.debian.org/debian stretch/main amd64 ssmtp amd64 2.64-8+b2 [54.2 kB]
Get:2 http://ftp.us.debian.org/debian stretch/main amd64 libgnutls-openssl27 amd64 3.5.8-5+deb9u3 [184 kB]
Fetched 239 kB in 2s (88.5 kB/s)         
Preconfiguring packages …
dpkg: exim4-daemon-heavy: dependency problems, but removing anyway as you requested:
 mailutils depends on default-mta | mail-transport-agent; however:
  Package default-mta is not installed.
  Package mail-transport-agent is not installed.
  Package exim4-daemon-heavy which provides mail-transport-agent is to be removed.


(Reading database … 169307 files and directories currently installed.)
Removing exim4-daemon-heavy (4.89-2+deb9u3) …
dpkg: exim4-config: dependency problems, but removing anyway as you requested:
 exim4-base depends on exim4-config (>= 4.82) | exim4-config-2; however:
  Package exim4-config is to be removed.
  Package exim4-config-2 is not installed.
  Package exim4-config which provides exim4-config-2 is to be removed.
 exim4-base depends on exim4-config (>= 4.82) | exim4-config-2; however:
  Package exim4-config is to be removed.
  Package exim4-config-2 is not installed.
  Package exim4-config which provides exim4-config-2 is to be removed.

Removing exim4-config (4.89-2+deb9u3) …
Selecting previously unselected package ssmtp.
(Reading database … 169247 files and directories currently installed.)
Preparing to unpack …/ssmtp_2.64-8+b2_amd64.deb …
Unpacking ssmtp (2.64-8+b2) …
(Reading database … 169268 files and directories currently installed.)
Removing exim4-base (4.89-2+deb9u3) …
Selecting previously unselected package libgnutls-openssl27:amd64.
(Reading database … 169195 files and directories currently installed.)
Preparing to unpack …/libgnutls-openssl27_3.5.8-5+deb9u3_amd64.deb …
Unpacking libgnutls-openssl27:amd64 (3.5.8-5+deb9u3) …
Processing triggers for libc-bin (2.24-11+deb9u3) …
Setting up libgnutls-openssl27:amd64 (3.5.8-5+deb9u3) …
Setting up ssmtp (2.64-8+b2) …
Processing triggers for man-db (2.7.6.1-2) …
Processing triggers for libc-bin (2.24-11+deb9u3) …


As you see from above output local default Debian Linux Exim is removed …

Lets send a simple test email …


hipo@linux:~# ssmtp user@remote-mail-server.com
Subject: Simply Test SSMTP Email
This Email was send just as a test using SSMTP obscure client
via SMTP server.
^d


What is notable about ssmtp is that even though so obsolete today it supports of STARTTLS (email communication encryption) that is done via its config file


/etc/ssmtp/ssmtp.conf


4. Send Email from terminal using Mutt client
 

Mutt was and still is one of the swiff army of most used console text email clients along with Alpine and Fetchmail to know more about it read here

Mutt supports reading / sending mail from multiple mailboxes and capable of reading IMAP and POP3 mail fetch protocols and was a serious step forward over mailx. Its syntax pretty much resembles mailx cmds.


root@linux:~# mutt -s "Test Email" user@example.com < /dev/null


Send email including attachment a 15 megabytes MySQL backup of Squirrel Webmail


root@linux:~# mutt  -s "This is last backup small sized database" -a /home/backups/backup_db.sql user@remote-mail-server.com < /dev/null


5. Using simple telnet to test and send email (verify existence of email on remote SMTP)
 

As a Mail Server SysAdmin this is one of my best ways to test whether I had a server properly configured and even sometimes for the sake of fun I used it as a hack to send my mail 🙂
telnet is and will always be a great tool for doing SMTP issues troubleshooting.
 

It is very useful to test whether a remote SMTP TCP port 25 is opened or a local / remote server firewall prevents connections to MTA.

Below is an example connect and send example using telnet to my local SMTP on www.pc-freak.net (QMail powered (R) 🙂 )
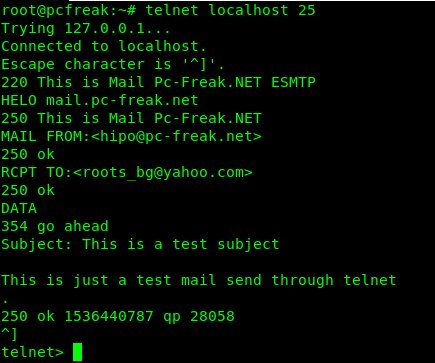
sending-email-using-telnet-command-howto-screenshot


root@pcfreak:~# telnet localhost 25
Trying 127.0.0.1…
Connected to localhost.
Escape character is '^]'.
220 This is Mail Pc-Freak.NET ESMTP
HELO mail.www.pc-freak.net
250 This is Mail Pc-Freak.NET
MAIL FROM:<hipo@www.pc-freak.net>
250 ok
RCPT TO:<roots_bg@yahoo.com>
250 ok
DATA
354 go ahead
Subject: This is a test subject


This is just a test mail send through telnet
.
250 ok 1536440787 qp 28058
^]
telnet>


Note that the returned messages are native to qmail, a postfix would return a slightly different content, here is another test example to remote SMTP running sendmail or postfix.


root@pcfreak:~# telnet mail.servername.com 25
Trying 127.0.0.1…
Connected to localhost.localdomain (127.0.0.1).
Escape character is '^]'.
220 mail.servername.com ESMTP Sendmail 8.13.8/8.13.8; Tue, 22 Oct 2013 05:05:59 -0400
HELO yahoo.com
250 mail.servername.com Hello mail.servername.com [127.0.0.1], pleased to meet you
mail from: systemexec@gmail.com
250 2.1.0 hipo@www.pc-freak.net… Sender ok
rcpt to: hip0d@yandex.ru
250 2.1.5 hip0d@yandex.ru… Recipient ok
data
354 Enter mail, end with "." on a line by itself
Hey
This is test email only


Thanks
.
250 2.0.0 r9M95xgc014513 Message accepted for delivery
quit
221 2.0.0 mail.servername.com closing connection
Connection closed by foreign host.


It is handy if you want to know whether remote MTA server has a certain Emailbox existing or not with telnet by simply trying to send to a certian email and checking the Email server returned output (note that the message returned depends on the remote MTA version and many qmails are configured to not give information on the initial SMTP handshake but returns instead a MAILER DAEMON failure error sent back to your sender address. Some MX servrers are still vulnerable to this attack yet, historically dreamhost.com. Below attack screenshot is made at the times before dreamhost.com fixed the brute force email issue.
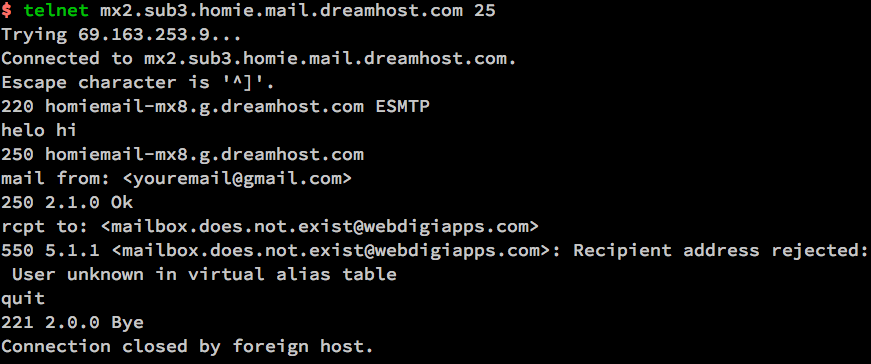
Terminal-Verify-existing-Email-with-telnet

6. Using simple netcat TCP/IP Swiss Army Knife to test and send email in console

netcat-logo-a-swiff-army-knife-of-the-hacker-and-security-expert-logo
Other tool besides telnet of testing remote / local SMTP is netcat tool (for reading and writting data across TCP and UDP connections).

The way to do it is analogous but since netcat is not present on most Linux OSes by default you need to install it through the package manager first be it apt or yum etc.

# apt-get –yes install netcat


First lets create a new file test_email_content.txt using bash's echo cmd.


# echo 'EHLO hostname
MAIL FROM: hip0d@yandex.ru
RCPT TO:   solutions@www.pc-freak.net
DATA
From: A tester <hip0d@yandex.ru>
To:   <solutions@www.pc-freak.net>
Date: date
Subject: A test message from test hostname


Delete me, please
.
QUIT
' >>test_email_content.txt


# netcat -C localhost 25 < test_email_content.txt


220 This is Mail Pc-Freak.NET ESMTP
250-This is Mail Pc-Freak.NET
250-STARTTLS
250-SIZE 80000000
250-PIPELINING
250 8BITMIME
250 ok
250 ok
354 go ahead
451 See http://pobox.com/~djb/docs/smtplf.html.

Because of its simplicity and the fact it has a bit more capabilities in reading / writing data over network it was no surprise it was among the favorite tools not only of crackers and penetration testers but also a precious debug tool for the avarage sysadmin. netcat's advantage over telnet is you can push-pull over the remote SMTP port (25) a non-interactive input.


7. Using openssl to connect and send email via encrypted channel


root@linux:~# openssl s_client -connect smtp.gmail.com:465 -crlf -ign_eof

    ===
               Certificate negotiation output from openssl command goes here
        ===

        220 smtp.gmail.com ESMTP j92sm925556edd.81 – gsmtp
            EHLO localhost
        250-smtp.gmail.com at your service, [78.139.22.28]
        250-SIZE 35882577
        250-8BITMIME
        250-AUTH LOGIN PLAIN XOAUTH2 PLAIN-CLIENTTOKEN OAUTHBEARER XOAUTH
        250-ENHANCEDSTATUSCODES
        250-PIPELINING
        250-CHUNKING
        250 SMTPUTF8
            AUTH PLAIN *passwordhash*
        235 2.7.0 Accepted
            MAIL FROM: <hipo@pcfreak.org>
        250 2.1.0 OK j92sm925556edd.81 – gsmtp
            rcpt to: <systemexec@gmail.com>
        250 2.1.5 OK j92sm925556edd.81 – gsmtp
            DATA
        354  Go ahead j92sm925556edd.81 – gsmtp
            Subject: This is openssl mailing

            Hello nice user
            .
        250 2.0.0 OK 1339757532 m46sm11546481eeh.9
            quit
        221 2.0.0 closing connection m46sm11546481eeh.9
        read:errno=0


8. Using CURL (URL transfer) tool to send SSL / TLS secured crypted channel emails via Gmail / Yahoo servers and MailGun Mail send API service


Using curl webpage downloading advanced tool for managing email send might be  a shocking news to many as it is idea is to just transfer data from a server.
curl is mostly used in conjunction with PHP website scripts for the reason it has a Native PHP implementation and many PHP based websites widely use it for download / upload of user data.
Interestingly besides support for HTTP and FTP it has support for POP3 and SMTP email protocols as well
If you don't have it installed on your server and you want to give it a try, install it first with apt:
 

root@linux:~# apt-get install curl


To learn more about curl capabilities make sure you check cURL –manual arg.
 

root@linux:~# curl –manual


a) Sending Emails via Gmail and other Mail Public services

Curl is capable to send emails from terminal using Gmail and Yahoo Mail services, if you want to give that a try.

gmail-settings-google-allow-less-secure-apps-sign-in-to-google-screenshot

Go to myaccount.google.com URL and login from the web interface choose Sign in And Security choose Allow less Secure Apps to be -> ON and turn on access for less secure apps in Gmail. Though I have not tested it myself so far with Yahoo! Mail, I suppose it should have a similar security settings somewhere.

Here is how to use curl to send email via Gmail.
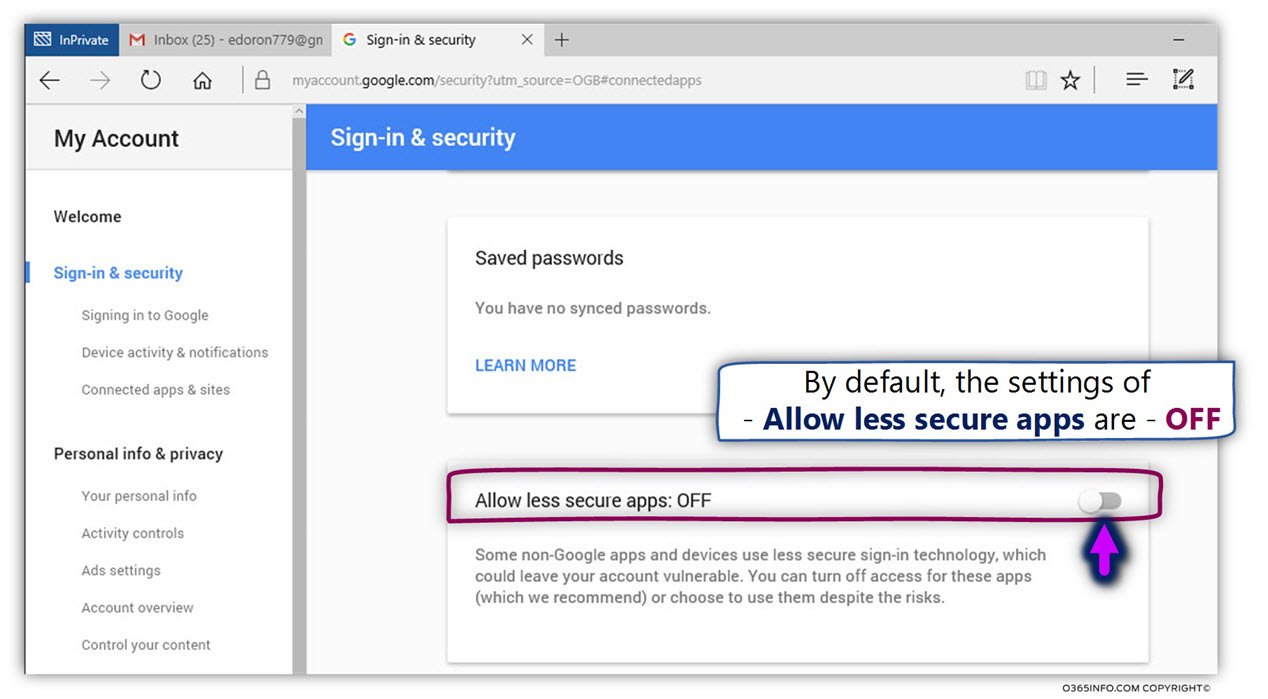
Gmail-password-Allow-less-secure-apps-ON-screenshot-howto-to-be-able-to-send-email-with-text-commands-with-encryption-and-outlook


root@linux:~# curl –url 'smtps://smtp.gmail.com:465' –ssl-reqd \
  –mail-from 'your_email@gmail.com' –mail-rcpt 'remote_recipient@mail.com' \
  –upload-file mail.txt –user 'your_email@gmail.com:your_accout_password'


b) Sending Emails using Mailgun.com (Transactional Email Service API for developers)

To use Mailgun to script sending automated emails go to Mailgun.com and create account and generate new API key.

Then use curl in a similar way like below example:


curl -sv –user 'api:key-7e55d003b…f79accd31a' \
    https://api.mailgun.net/v3/sandbox21a78f824…3eb160ebc79.mailgun.org/messages \
    -F from='Excited User <developer@yourcompany.com>' \
    -F to=sandbox21a78f824…3eb160ebc79.mailgun.org \
    -F to=user_acc@gmail.com \
    -F subject='Hello' \
    -F text='Testing Mailgun service!' \
   –form-string html='<h1>EDMdesigner Blog</h1><br /><cite>This tutorial helps me understand email sending from Linux console</cite>' \
    -F attachment=@logo_picture.jpg


The -F option that is heavy present in above command lets curl (Emulate a form filled in button in which user has pressed the submit button).
For more info of the options check out man curl.


9. Using swaks command to send emails from


root@linux:~# apt-cache show swaks|grep "Description" -B 10
Package: swaks
Version: 20170101.0-1
Installed-Size: 221
Maintainer: Andreas Metzler <ametzler@debian.org>
Architecture: all
Depends: perl
Recommends: libnet-dns-perl, libnet-ssleay-perl
Suggests: perl-doc, libauthen-sasl-perl, libauthen-ntlm-perl
Description-en: SMTP command-line test tool
 swaks (Swiss Army Knife SMTP) is a command-line tool written in Perl
 for testing SMTP setups; it supports STARTTLS and SMTP AUTH (PLAIN,
 LOGIN, CRAM-MD5, SPA, and DIGEST-MD5). swaks allows one to stop the
 SMTP dialog at any stage, e.g to check RCPT TO: without actually
 sending a mail.
 .
 If you are spending too much time iterating "telnet foo.example 25"
 swaks is for you.
Description-md5: f44c6c864f0f0cb3896aa932ce2bdaa8


root@linux:~# apt-get instal –yes swaks

root@linux:~# swaks –to mailbox@example.com -s smtp.gmail.com:587
      -tls -au <user-account> -ap <account-password>


The -tls argument (in order to use gmail encrypted TLS channel on port 587)

If you want to hide the password not to provide the password from command line so (in order not to log it to user history) add the -a options.

10. Using qmail-inject on Qmail mail servers to send simple emails

Create new file with content like:
 

root@qmail:~# vim email_file_content.text
To: user@mail-example.com
Subject: Test


This is a test message.
 

root@qmail:~# cat email_file_content.text | /var/qmail/bin/qmail-inject


qmail-inject is part of ordinary qmail installation so it is very simple it even doesn't return error codes it just ships what ever given as content to remote MTA.
If the linux host where you invoke it has a properly configured qmail installation the email will get immediately delivered. The advantage of qmail-inject over the other ones is it is really lightweight and will deliver the simple message more quickly than the the prior heavy tools but again it is more a Mail Delivery Agent (MDA) for quick debugging, if MTA is not working, than for daily email writting.

It is very useful to simply test whether email send works properly without sending any email content by (I used qmail-inject to test local email delivery works like so).
 

root@linux:~# echo 'To: mailbox_acc@mail-server.com' | /var/qmail/bin/qmail-inject


11. Debugging why Email send with text tool is not being send properly to remote recipient

If you use some of the above described methods and email is not delivered to remote recipient email addresses check /var/log/mail.log (for a general email log and postfix MTAs – the log is present on many of the Linux distributions) and /var/log/messages or /var/log/qmal (on Qmail installations) /var/log/exim4 (on servers running Exim as MTA).
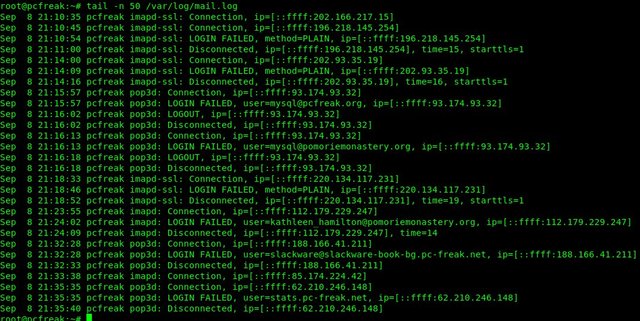
https://www.pc-freak.net/images/linux-email-log-debug-var-log-mail-output

 Closure

The ways to send email via Linux terminal are properly innumerous as there are plenty of scripted tools in various programming languages, I am sure in this article,  also missing a lot of pre-bundled installable distro packages. If you know other interesting ways / tools to send via terminal I would like to hear it.

Hope you enjoyed, happy mailing !

xorg on Toshiba Satellite L40 14B with Intel GM965 video hangs up after boot and the worst fix ever / How to reinstall Ubuntu by keeping the old personal data and programs

Wednesday, April 27th, 2011

black screen ubuntu troubles

I have updated Ubuntu version 9.04 (Jaunty) to 9.10 and followed the my previous post update ubuntu from 9.04 to Latest Ubuntu

I expected that a step by step upgrade from a release to release will work like a charm and though it does on many notebooks it doesn't on Toshiba Satellite L40

The update itself went fine, whether I used the update-manager -d and followed the above pointed tutorial, however after a system restart the PC failed to boot the X server properly, a completely blank screen with blinking cursor appeared and that was all.

I restarted the system into the 2.6.35-28-generic kernel rescue-mode recovery kernel in order to be able to enter into physical console.

Logically the first thing I did is to check /var/log/messages and /var/log/Xorg.0.log but I couldn't find nothing unusual or wrong there.

I suspected something might be wrong with /etc/X11/xorg.conf so I deleted it:

ubuntu:~# rm -f /etc/X11/xorg.conf

and attempted to re-create the xorg.conf X configuration with command:

ubuntu:~# dpkg-reconfigure xserver-xorg

This command was reported to be the usual way to reconfigure the X server settings from console, but in my case (for unknown reasons) it did nothing.

Next the command which was able to re-generate the xorg.conf file was:

ubuntu:~# X -configure

The command generates a xorg.conf sample file in /root/xorg.conf.* so I used the conf to put it in /etc/X11/xorg.conf X's default location and restarted in hope that this would fix the non-booting issue.

Very sadly again the black screen of death appeared on the notebook toshiba screen.
I further thought of completely wipe out the xorg.conf in hope that at least it might boot without the conf file but this worked out neither.

I attempted to run the Xserver with a xorg.conf configured to work with vesa as it's well known vesa X server driver is supposed to work on 99% of the video cards, as almost all of them nowdays are compatible with the vesa standard, but guess what in my case vesa worked not!

The only version of X I can boot in was the failsafe X screen mode which is available through the grub's boot menu recovery mode.

Further on I decided to try few xorg.conf which I found online and were reported to work fine with Intel GM965 internal video , and yes this was also unsucessful.

Some of my other futile attempts were: to re-install the xorg server with apt-get, reinstall the xserver-xorg-video-intel driver e.g.:

ubuntu:~# apt-get install --reinstall xserver-xorg xserver-xorg-video-intel

As nothing worked out I was completely pissed off and decided to take an alternative approach which will take a lot of time but at least will probably be succesful, I decided to completely re-install the Ubuntu from a CD after backing up the /home directory and making a list of available packages on the system, so I can further easily run a tiny bash one-liner script to install all the packages which were previously existing on the laptop before the re-install:

Here is how I did it:

First I archived the /home directory:

ubuntu:/# tar -czvf home.tar.gz home/
....

For 12GB of data with some few thousands of files archiving it took about 40 minutes.

The tar spit archive became like 9GB and I hence used sftp to upload it to a remote FTP server as I was missing a flash drive or an external HDD where I can place the just archived data.

Uploading with sftp can be achieved with a command similar to:

sftp user@yourhost.com
Password:
Connected to yourhost.com.
sftp> put home.tar.gz

As a next step to backup in a file the list of all current installed packages, before I can further proceed to boot-up with the Ubuntu Maverich 10.10 CD and prooceed with the fresh install I used command:

for i in $(dpkg -l| awk '{ print $2 }'); do
echo $i; done >> my_current_ubuntu_packages.txt

Once again I used sftp as in above example to upload my_current_update_packages.txt file to my FTP host.

After backing up all the stuff necessery, I restarted the system and booted from the CD-rom with Ubuntu.
The Ubuntu installation as usual is more than a piece of cake and even if you don't have a brain you can succeed with it, so I wouldn't comment on it 😉

Right after the installation I used the sftp client once again to fetch the home.tar.gz and my_current_ubuntu_packages.txt

I placed the home.tar.gz in /home/ and untarred it inside the fresh /home dir:

ubuntu:/home# tar -zxvf home.tar.gz

Eventually the old home directory was located in /home/home so thereon I used Midnight Commander ( the good old mc text file explorer and manager ) to restore the important user files to their respective places.

As a last step I used the my_current_ubuntu_packages.txt in combination with a tiny shell script to install all the listed packages inside the file with command:

ubuntu:~# for i in $(cat my_current_ubuntu_packagespackages.txt); do
apt-get install --yes $i; sleep 1;
done

You will have to stay in front of the computer and manually answer a ncurses interface questions concerning some packages configuration and to be honest this is really annoying and time consuming.

Summing up the overall time I spend with this stupid Toshiba Satellite L40 with the shitty Intel GM965 was 4 days, where each day I tried numerous ways to fix up the X and did my best to get through the blank screen xserver non-bootable issue, without a complete re-install of the old Ubuntu system.
This is a lesson for me that if I stumble such a shitty issues I will straight proceed to the re-install option and not loose my time with non-sense fixes which would never work.

Hope the article might be helpful to somebody else who experience some problems with Linux similar to mine.

After all at least the Ubuntu Maverick 10.10 is really good looking in general from a design perspective.
What really striked me was the placement of the close, minimize and maximize window buttons , it seems in newer Ubuntus the ubuntu guys decided to place the buttons on the left, here is a screenshot:

Left button positioning of navigation Buttons in Ubuntu 10.10

I believe the solution I explain, though very radical and slow is a solution that would always work and hence worthy 😉
Let me hear from you if the article was helpful.

How to set the preferred cipher suite on Apache 2.2.x and Apache 2.4.x Reverse Proxy

Thursday, May 4th, 2017

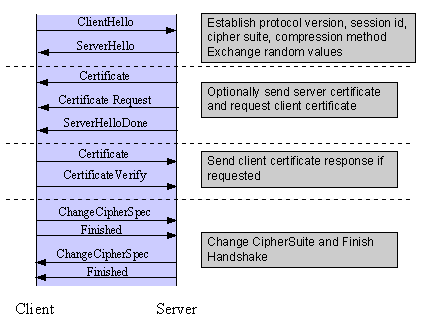
how-to-set-the-preferred-default-delivered-ssl-cipher-suite-apache-2.2-apache-2.4-how-ssl-handshake-works

1. Change default Apache (Reverse Proxy) SSL client cipher suite to end customer for Android Mobile applications to work

If you're a sys admin like me and you need  to support client environments with multiple Reverse Proxy Apache servers include old ones Apache version 2.2.x (with mod_ssl compiled in Apache or enabled as external module)
and for that reason a certain specific Apache Reverse Proxy certificate SSL encoding cipher default served suite change to be TLS_DHE_RSA_WITH_AES_128_CBC_SHA in order for the application to properly communicate with the server backend application then this article might help you.

There is an end user client application which is Live on a production servers some of which running on  backend WebSphere Application Servers (WAS) / SAP /  Tomcat servers and for security and logging purposes the traffic is being forwarded from the Apache Reverse Proxies (whose traffic is incoming from a roundup Load Balancers).

Here is a short background history of why cipher suite change is necessery?

The application worked fine and was used by a desktop PCs, however since recently there is an existent Android and Apple Store (iOS) mobile phone application and the Android Applications are unable to properly handle the default served Apache Reverse Proxy cipher suite and which forced the client to ask for change in the default SSL cipher suite to:

TLS_DHE_RSA_WITH_AES_128_CBC_SHA

By default, the way the client lists the cipher suites within its Client Hello will influence on Apache the selection of the cipher suite used between the client and server.

The current httpd.conf in Apache is configured so the ciphers for RP client cipher suite Hello transferred between Reverse Proxy -> Client are being provided in the following order:


1.    TLS_RSA_WITH_RC4_128_MD5
2.    TLS_RSA_WITH_RC4_128_SHA
3.    TLS_RSA_WITH_RC4_128_CBC_SHA
4.    TLS_DHE_RSA_WITH_AES_128_CBC_SHA


This has to be inverted so:

4. TLS_DHE_RSA_WITH_AES_128_CBC_SHA
becomes on the place of
1. TLS_RSA_WITH_RC4_128_MD5


A very good reading that helped me achieve the task as usual was Apache's official documentation about mod_ssl see here


So to fix the SSL/TLS cipher suite default served order use SSLCipherSuite and SSLHonorCipherOrder directives.


SSLCipherSuite directive is used to specify the cipher suites enabled on the server.
To dictate also  preferred cipher suite order directive and that's why you need SSLHonorCipherOrder directive (note that this is not available for older  Apache 2.x branch), the original bug for this directive can be seen within
 

For Example:


SSLHonorCipherOrder On
SSLCipherSuite RC4-SHA:AES128-SHA:AES256-SHA:DHE-RSA-AES128-SHA:DHE-RSA-AES256-SHA:DES-CBC3-SHA


So here is my fix for changing the Ciphersuite SSL Crypt order (notice the TLS_DHE_RSA_WITH_AES_128_CBC_SHA being given as first argument):


SSLHonorCipherOrder On
SSLCipherSuite TLS_DHE_RSA_WITH_AES_128_CBC_SHA:RC4-SHA:AES128-SHA:AES256-SHA:DHE-RSA-AES128-SHA:DHE-RSA-AES256-SHA:DES-CBC3-SHA

if you want also to enable TLSv1.2 certificate cipher support you can use also:
 

SSLProtocol -all +TLSv1.2

SSLHonorCipherOrder on


# Old Commented configuration from my httpd.conf – no RC4, 3DES allowed
#SSLCipherSuite "EECDH+ECDSA+AESGCM EECDH+aRSA+AESGCM EECDH+ECDSA+SHA384 EECDH+ECDSA+SHA256 EECDH+aRSA+SHA384 EECDH+aRSA+SHA256 EECDH+aRSA+RC4 EECDH EDH+aRSA 3DES-EDE-CBC-SHA RC4 !aNULL !eNULL !LOW !MD5 !EXP !PSK !SRP !DSS !RC4"


Because there was also requirement for a multiple of SSL cipher encryption (to support large range of both mobile and desktop computers and operating systems the final) cipher suite configuration in httpd.conf that worked for the client looked like so:
 

SSLCipherSuite ECDHE-RSA-AES128-GCM-SHA256:ECDHE-ECDSA-AES128-GCM-SHA256:ECDHE-RSA-AES256-GCM-SHA384:ECDHE-ECDSA-AES256-GCM-SHA384:DHE-DSS-AES128-GCM-SHA256:kEDH+AESGCM:ECDHE-RSA-AES128-SHA256:ECDHE-ECDSA-AES128-SHA256:ECDHE-RSA-AES128-SHA:ECDHE-ECDSA-AES128-SHA:ECDHE-RSA-AES256-SHA384:ECDHE-ECDSA-AES256-SHA384:ECDHE-RSA-AES256-SHA:ECDHE-ECDSA-AES256-SHA:DHE-DSS-AES128-SHA256:DHE-DSS-AES256-SHA:AES128-GCM-SHA256:AES256-GCM-SHA384:AES128-SHA:AES256-SHA:AES:CAMELLIA:DES-CBC3-SHA:!aNULL:!eNULL:!EXPORT:!DES:!RC4:!MD5:!PSK:!aECDH:!EDH-DSS-DES-CBC3-SHA:!EDH-RSA-DES-CBC3-SHA:!KRB5-DES-CBC3-SHA:!DHE-RSA-AES128-GCM-SHA256:!DHE-RSA-AES256-GCM-SHA384:!DHE-RSA-AES128-SHA256:!DHE-RSA-AES256-SHA:!DHE-RSA-AES128-SHA:!DHE-RSA-AES256-SHA256:!DHE-RSA-CAMELLIA128-SHA:!DHE-RSA-CAMELLIA256-SHA


Once this was done the customer requested HTTP cookie restriction to be added to the same virtual host.
There initial request was to:

2. Set HTTP cookie secure flag and HttpOnly on every cookie that is not being accessed from Internal website JavaScript code

To make Apache Reverse Proxy to behave that way here is the httpd.conf config added to httpd.conf
 

# vim httpd.conf


   #Header edit Set-Cookie ^(.*)$ $1;HttpOnly;Secure
   Header always edit Set-Cookie ^(.*)$ $1;HttpOnly;Secure

Finally an Apache restart was necessery

Auto insert password for a Trusted SSL Certificate / Automatically enter password for an SSL Certificate during Apache startup on Debian Lenny

Friday, March 26th, 2010

Protect-Your-Private-SSL_keys-Apache-howto
I've recently installed a Trusted certificate that I've previously protected with a pass-phrase to an Apache server running on top of Debian in order to have a better security.
Now everytime I restart Apache it's pretty annyoing and non-practical at the same time, to enter the Passphrase assigned to the SSL certificate.
It's also dangerous because if Apache crashes and tries to resurrect itself restartig it might not start-up again.
Another unpleasant possible scenario is if for example some of the php code developers tries to change something minor in some Virtualhost and afterwards restarts Apache for the new configurations to take place, again Apache won't bring up and a chaos would emerge.
So I decided to configurate my Apache that it auto fills in the passphrase each time it's being started or restarted.To do that I consulted some online resources and I end up redirected by a blog post to the mod_ssl ssl_reference web page

There is plenty of stuff on that document however in my case all I needed was one directive in /etc/apache2/mods-avalable/mods-available/ssl.conf :

SSLPassPhraseDialog exec:/etc/apache2/mods-available/passphrase

The above code must replace:

SSLPassPhraseDialog builtin

Now last step is to prepare the /etc/apache2/mods-available/passphrase .
Make sure the file has the following content:

#!/bin/sh
echo "yoursecretpassword"

Change above yoursecretpassword with your configured passphrase.
Also please make sure /etc/apache2/mods-availabe/passphrase has proper set permissions. In my case I've set the following permissions for the file:

debian:~# chown www-data:www-data /etc/apache2/mods-available/passphrase
debian:~# chmod 700 /etc/apache2/mods-available/passphrase

That should be it, Restart Apache and make sure Apache is properly loaded without anySSL passphrase prompts.
However you should have in mind that auto enabling passphrase loading on starting in Apache is much more insecure than typing in the password every time you restart Apache. Storing the passphrase in a file is quite insecure compared to if you type it every time Apache starts.
For instance if a hacker breaks into your server he might be able to steal your SSL certificate as well as the passphrase file.
And surely this is something you don't want. Anyways flexibility has a price and if you decide to go the way described, please note the risk first.


If you haven't already added a password to your private key during certficate generation time,

Of course you can add/remove a passphrase at a later time.

    add one (assuming it was an rsa key, else use dsa)

    openssl rsa -des3 -in your.key -out your.encrypted.key
    mv your.encrypted.key your.key

    the -des3 tells openssl to encrypt the key with DES3.

    remove it

    openssl rsa -in your.key -out your.open.key

    you will be asked for your passphrase one last time
    by omitting the -des3 you tell openssl to not encrypt the output.

    mv your.open.key your.key


Install and make Apache + PHP to work with PosgreSQL database server on Debian Linux and set up server Web Posgre interface Pgpadmin howto

Wednesday, June 15th, 2016

make-apache-php-work-with-postgresql-pgsql-and-install-postgresql-db-web-admin-interface

In previous article I've wrote on how to install postgresql on Debian Linux using the deb repository this was necessery to import some PostGres DBs, however this was not enough to run the posgresql php based website aimed as connection from Apache / PHP module to PostGre was failing after a bit of investigation and a check in phpinfo(); I've realized the module PHP module for postgres pgsql.so was missing, here is what I did in order to install it:
 

debian:~# apt-get install php5-pgsql phppgadmin libapache2-mod-auth-pgsql 

PHP sessions enable configuration

As it is common a common problem with PHP applications written to use PostGres is to loose sessions and by default PHP does not have configured sessions.save_path it is a very good practice to directly enable it in /etc/php5/apache2/php.ini open the file in text editor:
 

debian:~# vim /etc/php5/apache2/php.ini


Find the commented directive line:
 

;session.save_path = “/tmp”


and uncomment it, i.e.:
 

session.save_path = “/tmp”


Quit saving vim with the usual :wq!

The 3 modules provides pgsql.so for PHP and mod_auth_pgsql.so for Apache2, the 3rd packae phpgadmin provides a Web administration interface for installed PostgreSQL servers Databases, for those experienced with MySQL Database its the same as PHPMyAdmin.


 Here is quick configuration for use of PostgreAdmin interface:

By default PHPPGADMIN installation process configure the Apache2 server' /etc/phppgadmin/apache.conf  to use  /etc/apache2/conf.d/phppgadmin


Here is the default my server package instaleld  file content:


Alias /phppgadmin /usr/share/phppgadmin

<Directory /usr/share/phppgadmin>

DirectoryIndex index.php
AllowOverride None

order deny,allow
deny from all
allow from 127.0.0.0/255.0.0.0 ::1/128
# allow from all

<IfModule mod_php5.c>
  php_flag magic_quotes_gpc Off
  php_flag track_vars On
  #php_value include_path .
</IfModule>
<IfModule !mod_php5.c>
  <IfModule mod_actions.c>
    <IfModule mod_cgi.c>
      AddType application/x-httpd-php .php
      Action application/x-httpd-php /cgi-bin/php
    </IfModule>
    <IfModule mod_cgid.c>
      AddType application/x-httpd-php .php
      Action application/x-httpd-php /cgi-bin/php
    </IfModule>
  </IfModule>
</IfModule>

</Directory>

It is generally a good practice to change the default Alias location of phppgadmin, so edit the file and change it to something like:
 

Alias /phppostgresgadmin /usr/share/phppgadmin


  • Then phpPgAdmin is available at http://servername.com/phppostgresadmin (only from localhost, however in my case I wanted to be able to access it also from other hosts so allowed PostgresGadmin from every hosts, to do so, I've commented in above config


# allow from 127.0.0.0/255.0.0.0 ::1/128


and uncommented #allow from all line, e.g.:
 

allow from all


Also another thing here is in your VirtualHost whenever you plan to access the PHPPGADMIN is to include in config ( in my case this is the file /etc/apache2/sites-enabled/000-default before (</VirtualHost> end line) following Alias:
 

Alias /phpposgreadmin /usr/share/phppgadmin


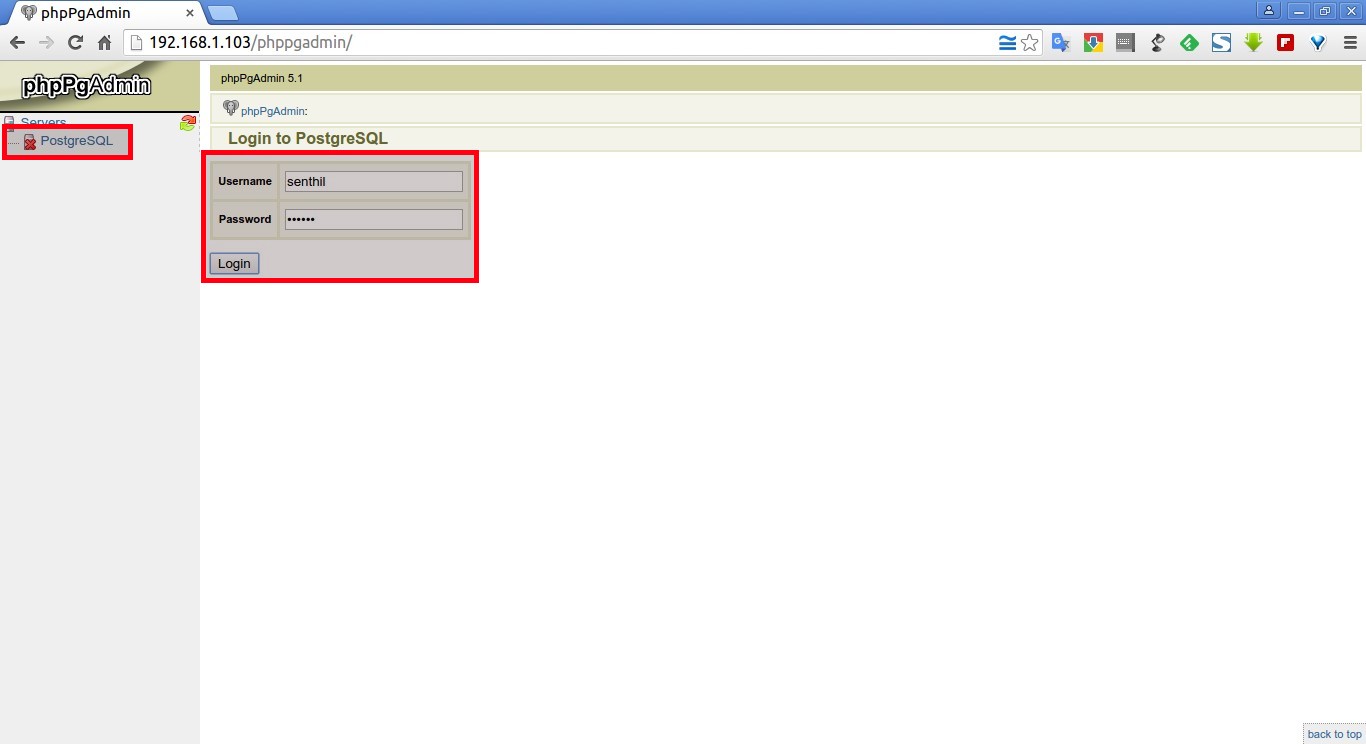
Then to access PostGreSQL PHP Admin interface in Firefox / Chrome open URL:


http://your-default-domain.com/phpposgreadmin

phpPgAdmin-postgresql-php-web-interface-debian-linux-screenshot


Configure access to a remote PostgreSQL Server

With PhpPgAdmin, you can manage many PostgreSQL servers locally (on the localhost) or on remote hosts.

First, you have to make sure that the distant PostgreSQL server can handle your request, that you can connect to it. You can do this by modifying the /etc/postgresql/9.5/main/filepg_hba.conf and adding a line like:

# PhpPgAdmin server access host all db_admin xx.xx.xx.xx 255.255.255.255 md5

Then, you need to add your distant PostgreSQL server into the config file for PhpPgAdmin. This file is  /etc/phppgadmin/config.inc.php the default postgresql port is 5432, however you might have configured it already to use some different port if you're not sure about the port number the postgresql is listening check it out:


debian:~# grep -i port /etc/postgresql/*/main/postgresql.conf
etc/postgresql/9.5/main/postgresql.conf:port = 5433                # (change requires restart)
/etc/postgresql/9.5/main/postgresql.conf:                    # supported by the operating system:
/etc/postgresql/9.5/main/postgresql.conf:# ERROR REPORTING AND LOGGING


To login to phppgadmin interface there is no root administrator user such as in PHP so you will need to priorly create some user and later use it for connection from Postgres Web interface.

To create from console new user in postgres:
 

debian:~# su – postgres
posgres@debian:~$ psql template1
posgres@debian:~$ psql -d template1 -U postgres


Welcome to psql 9.5, the PostgreSQL interactive terminal. Type: \copyright for distribution terms \h for help with SQL commands \? for help on internal slash commands \g or terminate with semicolon to execute query \q to quit template1=#

template1=# CREATE USER MyNewUser WITH PASSWORD 'myPassword';


To add a new database to postgres from shell:

template1=# CREATE DATABASE NewDatabase;
 

template1=# GRANT ALL PRIVILEGES ON DATABASE NewDatabase to MyNewUser;


template1=# q

Last command instructs it to quit if you want to get more info about possible commands do type instead of q ? for general help or for database / table commands only h
If you need to connect to NewDatabase just to test first it works in console before trying it from postgrepgadmin


posgres@debian:~$ psql -d NewDatabase -U MyNewUser


How to show country flag, web browser type and Operating System in WordPress Comments

Wednesday, February 15th, 2012

!!! IMPORTANT UPDATE COMMENT INFO DETECTOR IS NO LONGER SUPPORTED (IS OBSOLETE) AND THE COUNTRY FLAGS AND OPERATING SYSTEM WILL BE NOT SHOWING INSTEAD,

!!!! TO MAKE THE COUNTRY FLAGS AND OS WP FUNCTIONALITY WORK AGAIN YOU WILL NEED TO INSTALL WP-USERAGENT !!!

I've come across a nice WordPress plugin that displays country flag, operating system and web browser used in each of posted comments blog comments.
Its really nice plugin, since it adds some transperancy and colorfulness to each of blog comments 😉
here is a screenshot of my blog with Comments Info Detector "in action":

Example of Comments Info Detector in Action on wordpress blog comments

Comments Info Detector as of time of writting is at stable ver 1.0.5.
The plugin installation and configuration is very easy as with most other WP plugins. To install the plugin;

1. Download and unzip Comments Info Detector

linux:/var/www/blog:# cd wp-content/plugins
linux:/var/www/blog/wp-content/plugins:# wget http://downloads.wordpress.org/plugin/comment-info-detector.zip
...
linux:/var/www/blog/wp-content/plugins:# unzip comment-info-detector.zip
...

Just for the sake of preservation of history, I've made a mirror of comments-info-detector 1.0.5 wp plugin for download here
2. Activate Comment-Info-Detector

To enable the plugin Navigate to;
Plugins -> Inactive -> Comment Info Detector (Activate)

After having enabled the plugin as a last 3rd step it has to be configured.

3. Configure comment-info-detector wp plugin

By default the plugin is disabled. To change it to enabled (configure it) by navigating to:

Settings -> Comments Info Detector

Next a a page will appear with variout fields and web forms, where stuff can be changed. Here almost all of it should be left as it is the only change should be in the drop down menus near the end of the page:

Display Country Flags Automatically (Change No to Yes)
Display Web Browsers and OS Automatically (Change No to Yes

Comments Info Detector WordPress plugin configuration Screenshot

After the two menus are set to "Yes" and pressing on Save Changes the plugin is enabled it will immediately start showing information inside each comment the GeoIP country location flag of the person who commented as well as OS type and Web Browser 🙂

Increase tomcat MaxThreads values to resolve Tomcat timeout issues and sort

Friday, December 11th, 2015

Increase_Tomcat_MaxThreads_values_to_resolve_Tomcat_timeout-issues-and-sort

Thanks God, we have just completed (6 months) Migration few Tomcat and TomEE application servers for PG / PP and Scorpion instances from old environment to a new one for a customer.

Though the separate instances of the old environment are being migrated, the overall design of the Current Mode of Operations (CMO) as they use to call it in corporate World and the Future Mode of Operations (FMO) has differences.

The each of applications on old environment is configured to run in Tomcat failover cluster (2 tomcats on 2 separate machines with unique IP addresses are running) and Apache Reverse Proxy is being used with BalanceMember apache directive in order to drop requests to Tomcat cluster to Tomcat node1 and node2. On the new environment however by design the Tomcat cluster is removed and the application request has to be served by single Tomcat instance.

The migration completed fine and in the beginning in the first day (day 1) and day 2 since the environment went in Production and went through the so-called "GoLive", as called in Corporate World- which is a meathor for launching the application to be used as a production environment for customer, the customer reported TimeOut issues.

Some of the requests according to their report would took up to 4 minutes to serve, after a bit of investigation we found out, that though the environment was moved to one Tomcat the (number) amount of connections to application of end clients did not change, thus the timeouts were caused by default MaxThreads being reached and, we needed to to obviously raise that number. Here is the old Apache RP config where we had the 2 Tomcats between which the RP was load balancing:
 

BalancerMember ajp://10.10.10.5:11010 route=node1 connectiontimeout=10 ttl=60 retry=60
BalancerMember ajp://10.10.10.5:11010 route=node2 connectiontimeout=10 ttl=60 retry=60

ProxyPass / balancer://pool/ stickysession=JSESSIONID
ProxyPassReverse / balancer://pool/


As we needed a work around, we come to conclusion that we just need to increase Timeout on RP first so on Apache Reverse Proxy we placed following httpd.conf Virtualhost ProxyPass (directive) configs :


ProxyPass / ajp://10.10.10.5:11010/ keepalive=On timeout=30 connectiontimeout=30 retry=20
ProxyPassReverse / ajp://10.10.10.5:11010/

ProxyPass / ajp://10.10.10.5:11010/ keepalive=On timeout=30 connectiontimeout=30 retry=20
ProxyPassReverse / ajp://10.10.10.5:11010/


and following Apache Timeout directives options:


Timeout 300
KeepAlive On
MaxKeepAliveRequests 100
KeepAliveTimeout 15


Even though the developer tried to insist that the problem was in Reverse Proxy timeout config, they were wrong as I checked the RP logs and there was no "maximum connections reached" errors..

As you could guess what left to check was only Tomcat, after quick evaluation of server.xml, it turned out that the MaxThreads directive on old clustered Tomcats was omitted at all, meaning the default MaxThreads Tomcat value of 200 maximum connections were used, however this was not enough as the client was quering the application with about 350 connections / sec.

The solution was of course to raise the Maxthreads to 400 we were pretty lucky that we already had a good dedicated Linux machine where the application was hosted (16GB Ram, 2 CPUs x 2.67 Ghz), thus raising MaxThreads to 400 was not such a big deal.

Here is the final config we used to fix tomcat timeouts:
 

<Connector port="11010" address="10.10.10.80" protocol="AJP/1.3" redirectPort="8443" MaxThreads="400" connectionTimeout="300000" keepAliveTimeout="300000" debug="9" />


One note to make here is the debug="9" options to Connector directive was used to increase debug loglevel of Tomcat, and address="" is the local network IP on which Tomcat instance runs. As you see, we choose to use very high connectionTimeouts (because it is crucial, not to cut requests to applications due to timeouts) in case of application slowness.

We also suspected that there are some Oracle (ORA) database queries slowly served on the SQL backend, that might in future cause more app slowness, but this has to be checked seperately further in time as presently we were checking we did not have our Db person present.