Posts Tagged ‘drive’

How to find out which processes are causing a hard disk I/O overhead in GNU/Linux

Wednesday, September 28th, 2011

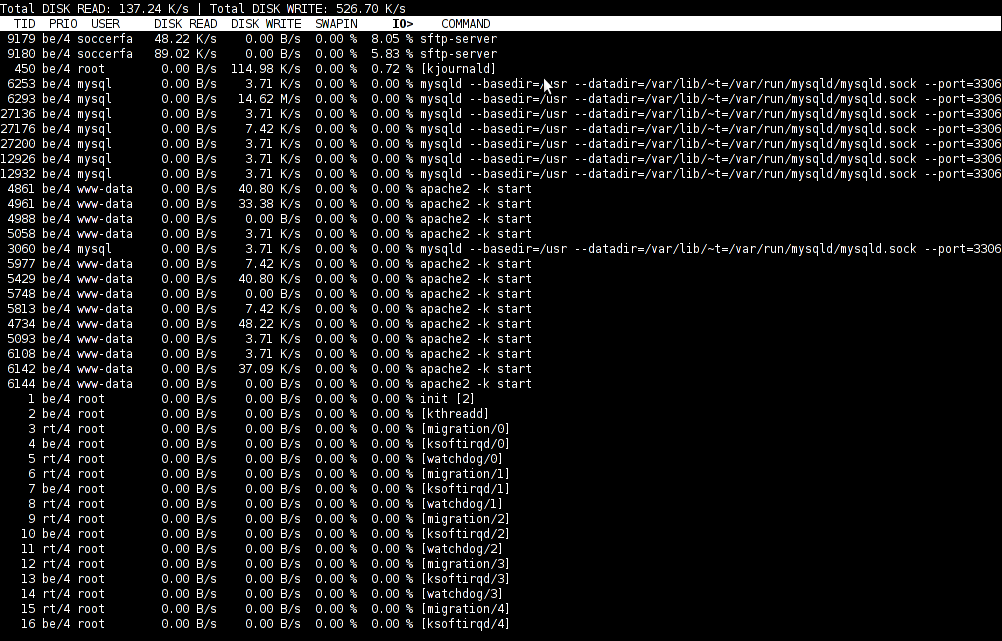
iotop monitor hard disk io bottlenecks linux
To find out which programs are causing the most read/write overhead on a Linux server one can use iotop

Here is the description of iotop – simple top-like I/O monitor, taken from its manpage.

iotop does precisely the same as the classic linux top but for hard disk IN/OUT operations.

To check the overhead caused by some daemon on the system or some random processes launching iotop without any arguments is enough;

debian:~# iotop

The main overview of iostat statistics, are the:

Total DISK READ: xx.xx MB/s | Total DISK WRITE: xx.xx K/s
If launching iotop, shows a huge numbers and the server is facing performance drop downs, its a symptom for hdd i/o overheads.
iotop is available for Debian and Ubuntu as a standard package part of the distros repositories. On RHEL based Linuxes unfortunately, its not available as RPM.

While talking about keeping an eye on hard disk utilization and disk i/o’s as bottleneck and a possible pitfall to cause a server performance down, it’s worthy to mention about another really great tool, which I use on every single server I administrate. For all those unfamiliar I’m talking about dstat

dstat is a – versatile tool for generating system resource statistics as the description on top of the manual states. dstat is great for people who want to have iostat, vmstat and ifstat in one single program.
dstat is nowdays available on most Linux distributions ready to be installed from the respective distro package manager. I’ve used it and I can confirm tt is installable via a deb/rpm package on Fedora, CentOS, Debian and Ubuntu linuces.

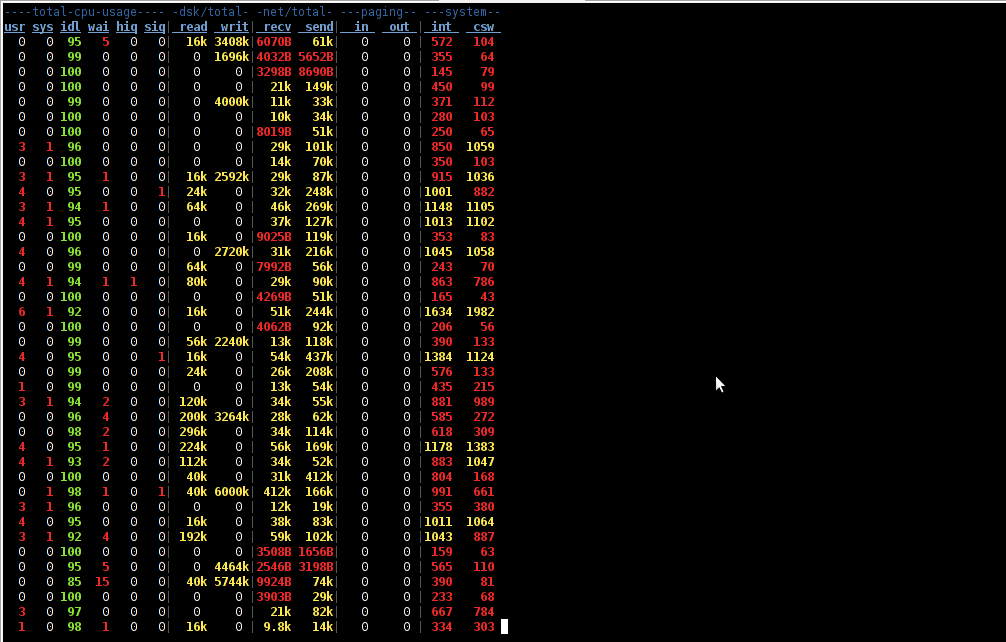
Here is how the tool in action looks like:

dstat Linux hdd load stats screenshot

The most interesting things from all the dstat cmd output are read, writ and recv, send , they give a good general overview on hard drive performance and if tracked can reveal if the hdd disk/writes are a bottleneck to create server performance issues.
Another handy tool in tracking hdd i/o problems is iostat its a tool however more suitable for the hard core admins as the tool statistics output is not easily readable.

In case if you need to periodically grasp data about disks read/write operations you will definitely want to look at collectl i/o benchmarking tool .Unfortunately collect is not included as a packaget for most linux distributions except in Fedora. Besides its capabilities to report on servers disk usage, collect is also capable to show brief stats on cpu, network.

Collectl looks really promosing and even seems to be in active development the latest tool release is from May 2011. It even supports NVidia’s GPU monitoring 😉 In short what collectl does is very similar to sysstat which by the way also has some possibilities to track disk reads in time.  collectl’s website praises the tool, much and says that in most machines the extra load the tool would add to a system to generate reports on cpu, disk and disk io is < 0.1%.  I couldn’t find any data online on how much sysstat (sar) extra loads a system. It will be interesting if some of someone concluded some testing and can tell which of the two puts less load on a system.

Monitoring Windows hosts with Nagios on Debian GNU/Linux

Tuesday, August 30th, 2011

Nagios logo install and configure nagios to monitor Windows hosts with on Debian GNU/Linux

In this article in short, I’ll explain how I configured Nagios on a Debian GNU/Linux release (Squeeze 6) to monitor a couple of Windows hosts running inside a local network. Now let’s start.

1. Install necessery nagios debian packages

apt-get install nagios-images nagios-nrpe-plugin nagios-nrpe-server nagios-plugins nagios-plugins-basic nagios-plugins-standard
nagios3 nagios3-cgi nagios3-common nagios3-core

2. Edit /etc/nagios-plugins/config/nt.cfg

In the File substitute:

define command { command_name check_nt command_line /usr/lib/nagios/plugins/check_nt -H '$HOSTADDRESS$' -v '$ARG1$' }

With:

define command {
command_name check_nt
command_line /usr/lib/nagios/plugins/check_nt -H '$HOSTADDRESS$' -p 12489 -v $ARG1$ $ARG2$
}

3. Modify nrpe.cfg to put in allowd hoss to connect to the Nagions nrpe server

vim /etc/nagios/nrpe.cfg

Lookup inside for nagios’s configuration directive:

allowed_hosts=127.0.0.1

In order to allow more hosts to report to the nagios nrpe daemon, change the value to let’s say:

allowed_hosts=127.0.0.1,192.168.1.4,192.168.1.5,192.168.1.6

This config allows the three IPs 192.168.1.4-6 to be able to report for nrpe.

For the changes to nrpe server to take effect, it has to be restrarted.

debian:~# /etc/init.d/nagios-nrpe-server restart

Further on some configurations needs to be properly done on the nrpe agent Windows hosts in this case 192.168.1.4,192.168.1.5,192.168.1.6

4. Install the nsclient++ on all Windows hosts which CPU, Disk, Temperature and services has to be monitored

Download the agent from http://sourceforge.net/projects/nscplus and launch the installer, click twice on it and follow the installation screens. Its necessery that during installation the agent has the NRPE protocol enabled. After the installation is complete one needs to modify the NSC.ini
By default many of nsclient++ tracking modules are not enabled in NSC.ini, thus its necessery that the following DLLs get activated in the conf:

FileLogger.dll
CheckSystem.dll
CheckDisk.dll
NSClientListener.dll
SysTray.dll
CheckEventLog.dll
CheckHelpers.dll

Another requirement is to instruct the nsclient++ angent to have access to the Linux installed nagios server again with adding it to the allowed_hosts config variable:

allowed_hosts=192.168.1.1

In my case the Nagios runs on Debian Lenny (Squeeze) 6 and possess the IP address of 192.168.1.1
To test the intalled windows nsclient++ agents are properly installed a simple telnet connection from the Linux host is enough:

5. Create necessery configuration for the nagios Linux server to include all the Windows hosts which will be monitored

There is a window.cfg template file located in /usr/share/doc/nagios3-common/examples/template-object/windows.cfg on Debian.

The file is a good start point for creating a conf file to be understand by nagios and used to periodically refresh information about the status of the Windows hosts.

Thus it’s a good idea to copy the file to nagios3 config directory:

debian:~# mkdir /etc/nagios3/objects
debian:~# cp -rpf /usr/share/doc/nagios3-common/examples/template-object/windows.cfg /etc/nagios3/objects/windows.cfg

A sample windows.cfg content, (which works for me fine) and monitor a couple of Windows nodes running MS-SQL service and IIS and makes sure the services are up and running are:

define host{
use windows-server ; Inherit default values from a template
host_name Windows1 ; The name we're giving to this host
alias Iready Server ; A longer name associated with the host
address 192.168.1.4 ; IP address of the host
}
define host{
use windows-server ; Inherit default values from a template
host_name Windows2 ; The name we're giving to this host
alias Iready Server ; A longer name associated with the host
address 192.168.1.4 ; IP address of the host
}
define hostgroup{
hostgroup_name windows-servers ; The name of the hostgroup
alias Windows Servers ; Long name of the group
}
define hostgroup{
hostgroup_name IIS
alias IIS Servers
members Windows1,Windows2
}
define hostgroup{
hostgroup_name MSSQL
alias MSSQL Servers
members Windows1,Windows2
}
define service{
use generic-service
host_name Windows1
service_description NSClient++ Version
check_command check_nt!CLIENTVERSION
}
define service{ use generic-service
host_name Windows1
service_description Uptime
check_command check_nt!UPTIME
}
define service{ use generic-service
host_name Windows1
service_description CPU Load
check_command check_nt!CPULOAD!-l 5,80,90
}
define service{
use generic-service
host_name Windows1
service_description Memory Usage
check_command check_nt!MEMUSE!-w 80 -c 90
define service{
use generic-service
host_name Windows1
service_description C: Drive Space
check_command check_nt!USEDDISKSPACE!-l c -w 80 -c 90
}
define service{
use generic-service
host_name Windows1
service_description W3SVC
check_command check_nt!SERVICESTATE!-d SHOWALL -l W3SVC
}
define service{
use generic-service
host_name Windows1
service_description Explorer
check_command check_nt!PROCSTATE!-d SHOWALL -l Explorer.exe
}
define service{
use generic-service
host_name Windows2
service_description NSClient++ Version
check_command check_nt!CLIENTVERSION
}
define service{ use generic-service
host_name Windows2
service_description Uptime
check_command check_nt!UPTIME
}
define service{ use generic-service
host_name Windows2
service_description CPU Load
check_command check_nt!CPULOAD!-l 5,80,90
}
define service{
use generic-service
host_name Windows2
service_description Memory Usage
check_command check_nt!MEMUSE!-w 80 -c 90
define service{
use generic-service
host_name Windows2
service_description C: Drive Space
check_command check_nt!USEDDISKSPACE!-l c -w 80 -c 90
}
define service{
use generic-service
host_name Windows2
service_description W3SVC
check_command check_nt!SERVICESTATE!-d SHOWALL -l W3SVC
}
define service{
use generic-service
host_name Windows2
service_description Explorer
check_command check_nt!PROCSTATE!-d SHOWALL -l Explorer.exe
}
define service{ use generic-service
host_name Windows1
service_description SQL port Check
check_command check_tcp!1433
}
define service{
use generic-service
host_name Windows2
service_description SQL port Check
check_command check_tcp!1433
}
The above config, can easily be extended for more hosts, or if necessery easily setup to track more services in nagios web frontend.
6. Test if connectivity to the nsclient++ agent port is available from the Linux server

debian:~# telnet 192.168.58.6 12489
Trying 192.168.58.6...
Connected to 192.168.58.6.
Escape character is '^]'.
asd
ERROR: Invalid password.

Another good idea is to launch on the Windows host the NSClient++ (system tray) , e.g.:

Start, All Programs, NSClient++, Start NSClient++ (system tray).

Test Nagios configuration from the Linux host running nagios and nrpe daemons to check if the check_nt, can succesfully authenticate and retrieve data generated from the nsclient++ on the Windows host:

debian:~# /usr/lib/nagios/plugins/check_nt -H 192.168.1.5 -p 12489 -v CPULOAD -w 80 -c 90 -l 5,80,90,10,80,90

If everything is okay and the remote Windows system 192.168.1.5 has properly configured and running NSClient++ the above command should return an output like:

CPU Load 1% (5 min average) 1% (10 min average) | '5 min avg Load'=1%;80;90;0;100 '10 min avg Load'=1%;80;90;0;100

In case of the command returns:

could not fetch information from server

instead this means that probably there is some kind of problem with authentication or handshake of the Linux host’s nagios check_nt to the Windows server’s running on 12489.

This is sometimes caused by misconfigured NSC.ini file, however in other occasions this error is caused by misconfigured Windows Firewall or because the NSClient++ is not running with Administrator user.

By the way important note to make about Windows 2008r2 is that if NSClient++ is running there it’s absolutely required to Login with Windows Administrator and run the NSClient++ /start , if it’s run through the Run As Adminsitrator with an admin privileged user the aforementioned error might appear, so be careful.
I’ve experienced this error myself and it took me about 40 minutes to find that I have to run it directly with Administrator user after logging as Administrator.

7. Create nagios web iface Apache configuration

nagios debian pachage is shipped with a config which is suitable to be set debian:~# cp -rpf /usr/share/doc/nagios3-common/examples/apache2.conf /etc/apache2/sites-avalable/nagios
debian:~# ln -sf /etc/apache2/sites-available/nagios /etc/apache2/sites-enabled/nagios

The /etc/apache2/sites-available/nagios can easily be configured to work on Virtualhost, to do so the above copied file need to be wrapped inside a VirtualHost directive. For that put in the beginning of the file;

<VirtualHost *:80>

and in the end of the file:

<VirtualHost *:80>

8. Restart nagios server and Apache for the new settings to take effect

debian:~# /etc/init.d/apache2 restart
...
debian:~# /etc/init.d/nagios3 restart

If some custom configuration about tracking the Debian Linux nagios host running services needs to be made, its also helpful for one to check in /etc/nagios3/conf.d

Well that’s mostly what I had to do to make the Nagios3 server to keep track of a small Windows network on Debian GNU/Linux Squeeze 6, hope this small article helps. Cheers 😉
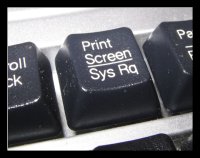
How to reboot remotely Linux server if reboot, shutdown and init commands are not working (/sbin/reboot: Input/output error) – Reboot Linux in emergency using MagicSysRQ kernel sysctl variable

Saturday, July 23rd, 2011

SysRQ an alternative way to restart unrestartable Linux server

I’ve been in a situation today, where one Linux server’s hard drive SCSI driver or the physical drive is starting to break off where in dmesg kernel log, I can see a lot of errors like:

[178071.998440] sd 0:0:0:0: [sda] Result: hostbyte=DID_BAD_TARGET driverbyte=DRIVER_OK,SUGGEST_OK
[178071.998440] end_request: I/O error, dev sda, sector 89615868

I tried a number of things to remount the hdd which was throwing out errors in read only mode, but almost all commands I typed on the server were either shown as missng or returning an error:
Input/output error

Just ot give you an idea what I mean, here is a paste from the shell:

linux-server:/# vim /etc/fstab
-bash: vim: command not found
linux-server:/# vi /etc/fstab
-bash: vi: command not found
linux-server:/# mcedit /etc/fstab
-bash: /usr/bin/mcedit: Input/output error
linux-server:/# fdisk -l
-bash: /sbin/fdisk: Input/output error

After I’ve tried all kind of things to try to diagnose the server and all seemed failing, I thought next a reboot might help as on server boot the filesystems will get checked with fsck and fsck might be able to fix (at least temporary) the mess.

I went on and tried to restart the system, and guess what? I got:

/sbin/reboot init Input/output error

I hoped that at least /sbin/shutdown or /sbin/init commands might work out and since I couldn’t use the reboot command I tried this two as well just to get once again:

linux-server:/# shutdown -r now
bash: /sbin/shutdown: Input/output error
linux-server:/# init 6
bash: /sbin/init: Input/output error

You see now the situation was not pinky, it seemed there was no way to reboot the system …
Moreover the server is located in remote Data Center and I the tech support there is conducting assigned task with the speed of a turtle.
The server had no remote reboot, web front end or anything and thefore I needed desperately a way to be able to restart the machine.

A bit of research on the issue has led me to other people who experienced the /sbin/reboot init Input/output error error mostly caused by servers with failing hard drives as well as due to HDD control driver bugs in the Linux kernel.

As I was looking for another alternative way to reboot my Linux machine in hope this would help. I came across a blog post Rebooting the Magic Wayhttp://www.linuxjournal.com/content/rebooting-magic-way

As it was suggested in Cory’s blog a nice alternative way to restart a Linux machine without using reboot, shutdown or init cmds is through a reboot with the Magic SysRQ key combination

The only condition for the Magic SysRQ key to work is to have enabled the SysRQ – CONFIG_MAGIC_SYSRQ in Kernel compile time.
As of today luckily SysRQ Magic key is compiled and enabled by default in almost all modern day Linux distributions in this numbers Debian, Fedora and their derivative distributions.

To use the sysrq kernel capabilities as a mean to restart the server, it’s necessery first to activate the sysrq through sysctl, like so:

linux-server:~# sysctl -w kernel.sysrq=1
kernel.sysrq = 1

I found enabling the kernel.sysrq = 1 permanently in the kernel is also quite a good idea, to achieve that I used:

echo 'kernel.sysrq = 1' >> /etc/sysctl.conf

Next it’s wise to use the sync command to sync any opened files on the server as well stopping as much of the server active running services (MySQL, Apache etc.).

linux-server:~# sync

Now to reboot the Linux server, I used the /proc Linux virtual filesystem by issuing:

linux-server:~# echo b > /proc/sysrq-trigger

Using the echo b > /proc/sysrq-trigger simulates a keyboard key press which does invoke the Magic SysRQ kernel capabilities and hence instructs the kernel to immediately reboot the system.
However one should be careful with using the sysrq-trigger because it’s not a complete substitute for /sbin/reboot or /sbin/shutdown -r commands.
One major difference between the standard way to reboot via /sbin/reboot is that reboot kills all the running processes on the Linux machine and attempts to unmount all filesystems, before it proceeds to sending the kernel reboot instruction.

Using echo b > /proc/sysrq-trigger, however neither tries to umount mounted filesystems nor tries to kill all processes and sync the filesystem, so on a heavy loaded (SQL data critical) server, its use might create enormous problems and lead to severe data loss!

SO BEWARE be sure you know what you’re doing before you proceed using /proc/sysrq-trigger as a way to reboot ;).

How to install Nvidia GeForce FX 5500 on Ubuntu 11.04

Tuesday, July 19th, 2011

Nvidia Tux GeForce GNU / Linux

Yesterday I was at a friend of mine who has recently installed Ubuntu 11.04 to his already oldish Desktop computer.

The system was 1.4Ghz (amd) with 512 RAM and some kind of Dell Trinitron 19 inch monitor
Even though he tried hard to make his NVIDIA GeForce FX 5500 ‘s drive to work properly with Ubuntu Natty Narwhal, he just has messed it even more.
As I always like helping people and I’m joyful for people who want to migrate to Linux, I took some time to make his NVIDIA GeForce work with this Ubuntu release.

First I tried to make it work by using some of the official NVIDIA Linux drivers located on nvidia.com following some online tutorial for Ubuntu claiming that it works but actually it didn’t, so finally after a bit of experimentation I found a way to make this video card work.
Here is how:

1. Install the following Ubuntu packages

root@ubuntu:~# apt-get install nouveau-firmware nvidia-173 nvidia-173-kernel-source
nvidia-cg-toolkit nvidia-common nvidia-current nvidia-glx-173 nvidia-settings
...

2. Load in the kernel and set to be auto loaded on boot nvidia’s driver kernel module nvidia-173

root@ubuntu:~# depmod -a;
root@ubutnu:~# modprobe nvidia-173
root@ubuntu:~# echo nvidia-173 >> /etc/modules

3. Stop temporary (Gnome dipsplay manager) gdm

root@ubuntu:~# service gdm stop
...

4. Use nvidia-xconfig to generate a working version of /etc/X11/xorg.conf for Nvidia

root@ubuntu:~# nvidia-xconfig
..

nvidia-xconfig will generate new /etc/X11/xorg.conf configuration corresponding to the Nvidia GeForce Fx 5500 and will move the old xorg.conf to xorg.conf.backup.

5. Start the gdm manager to be running again

root@ubuntu:~# service gdm start
...

Now the Xserver will start in a terrible mode of 640×480, probably because Ubuntu was unable to define correct VerticalSync and HorizontalSync for the 19 inch Dell Trinitron monitor or for some other weird reason, to fix this it’s quite easy though.
The fix to the NVIDIA GeForce 5500 running in 640×480 mode is done straigh via Gnome menus.

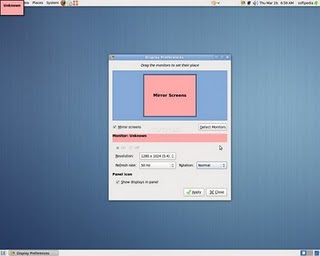
6. Use Gnome’s System -> Preferences -> Monitors to set raise up the Xserver resolution

Navigate to Gnome’s menus:

System -> Preferences -> Monitors

Gnome System Preferences Monitors Nvidia GeForce 5500 Ubuntu

Here you will have to select more appropriate resolution and a different refresh rate, which in my case was 1024×768 and further on to store the settings press the Apply button.

One oddity here was that according to the Monitor Preferences the refresh rate was running on 54 Hz which I don’t believe was the case as I guess it’s some kind of Gnome or Ubuntu bug. I changed the 54 Hz Refresh Rate to 50 Hz as using the 54 Hz refresh rate as the screen had a minor vibrations observable if one takes a thorough look on the screen.

Setting the NVIDIA GeForce 5500 driver to work with 50 Hz Refresh Rate in Gnome loooked like the Windows’s 85 Hz RR and looked quite nice so I left it this way.

Finally to test the newly installed driver 3D acceleration I used glxgears.

7. Install glxgears in order to be able to test that 3D acceleration on Nvidia works fine

root@ubuntu:~# apt-get install mesa-utils

After installing mesa-utils which nowdays contains glxgears executable one needs to execute the glxgears binary.

root@ubuntu:~# glxgears

Immediately after a window containing the glxgears should popup on the screen, like shown in below screenshot
Benchmark 3d Acceleration Linu glxgears

glxgears showed 3d acceleration works fine as the performance for 3d rendering shown was quite good and therefore 3D acceleration was running fine.

And that was it now the video works like and my friends, can enjoy the fun to have a generally virus Free OS 😉

Way to get around mdadm: /dev/md2 assembled from 1 drive – not enough to start the array.

Wednesday, July 13th, 2011

One server with a broken Raid array was having troubles with it’s software raid.
I tried to scan the raid array via a rescue cd like so:
server:~# mdadm --assemble --scan /dev/md1

just to be suprised by the message:
mdadm: /dev/md1 assembled from 2 drives – not enough to start the array.

In /proc/mdstat respectively the raid was showing inactive, e.g.:

server:~# cat /proc/mdstat
Personalities : [raid10] [raid1]
md1 : inactive sda2[0] sdc2[2] sdb2[1]
12024384 blocks

Respectively trying to activate the software Linux raid array with:
server:~# mdadm -A -s

Couldn’t be completed because of the same annoying error:
/dev/md1 assembled from 2 drives – not enough to start the array.

Thanksfully finally thanks to some Russian, who posted having same issues reported to be able to active his software RAID with mdadm’s –force option.

Thus enabling the problematic RAID 5 array was possible with:
server:~# mdadm -A -s --force

This solution of course is temporary and will have to further check what’s wrong with the array, however at least now I can chroot to the server’s / directory. 😉

How to install Ubuntu Linux on Acer ASPIRE 5736Z Notebook / Get around the black screen install CD issue

Friday, July 1st, 2011

My sister’s newly bought laptop is Acer Aspire 5736Z . By the default this notebook comes with some kind of Linux distribution Linpus .
Even though this Linpus (crafted Linux especially for Acer notebooks) looked really nice, it prooved to be a piece of shit linux distro.
Linplus was unable to even establish a simple Wireless WPA2 protected connection with my wireless router, not to mention that the physical Linux consoles (CTRL+ALT+F1) were disabled …

This LinPlus was so bad that I couldn’t even launch any type of terminal on it (I was stuck!) so I decided to kill it and make a decent latest Ubuntu 11.04 Install on it.

I was surprised to find out that trying to boot up the Ubuntu 11.04 installer led me to a black screen (black screen of death).

The v Aspire’s 5736Z monitor kept completely blank, where the hard drive was continuously reading (indicating that the Ubuntu installer has properly booted but it couldn’t light up the notebook screen).

A bit of investigation on any issues with this Acer notebook model has led me to a thread in fedora forums:
http://forums.fedoraforum.org/showthread.php?t=263794
On this forum the same kind of Linux install problem was described to also occur with ASPIREs 5736Z during a Fedora install.

I just tried the suggested fix and it works like a charm.

The fix goes like this:

1. Invoke the Ubuntu settings parameter Install pre install screen

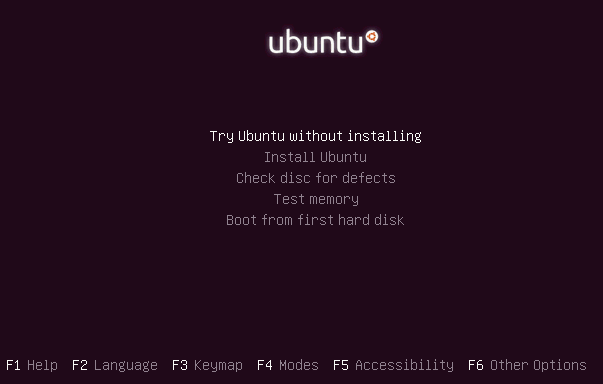
Just press any button while the Ubuntu installer CD is reading and after few secs the Install options screen should appear, like you see it in below’s screenshot:

Ubuntu Install boot options parameters screen

2. Select the nomodetest Boot CD Ubuntu option

You see in the above screenshot the F6 Other Options . I had toto press F6 and choose the nomodetest boot option to make the Ubuntu be able to further boot up.

After selecting the nomodetest option and pressing on the Install Ubuntu menu option the graphic installer launched succesfully 😉
Hope this small tip to be helpful to some Ubuntu or other Linux user who is trying to install Linux on his Acer Aspire 5736Z
Cheers 😉

How to list all files and directories in Windows XP drive and save it to a file

Friday, December 10th, 2010

Yesterday I had this thing, by accident because of some misconfiguration of the domain controller here in the university. I can read some files and folders which were belonging to students and teachers here in the university. We had some great fun with my good old friend David. In checking up some trashy stuff. It was rather interesting that one of the directory listings actually contained all the teachers computer usernames with it, therefore I needed a quick way to make all the files listing stored in a file in order to be able to later have this usernames listing stored in an MySQL or some other kind of database, after consulting few websites I came to the command to list all files and directories in the mapped sharing.

We first used the net use //workgroup/ J: to map the sharing in the workgroup and later we used the dir command as shown below to list all files and directories and store the data in a file.
So here is how you can also come with all your files and directories in your Windows drive stored in a file:

dir J: /s > c:somepathj_file.txt

Now if the files and directory is not too long you will have everything stored in j_file.txt in a couple of minutes time, however in our case the directory listing was huge so we had to wait for an hour and still the file was filling in 🙂

Playing Sega Mega Drive Games on Nokia 9300 / 9300i, Step by step howto install and play best sega mega drive games on Nokia 9300i on (picodrive)

Monday, November 30th, 2009

Ever thought about playing your favourite good old arcade games on Nokia 9300i?
I did ! It took me a while until I can play my favourite games from my youth,
however I was lucky to make it work.
1. In order to play the Sega games I have to use a Picodrive (a sega mega drive emulatorwho was originally written for Risc OS) and then was ported for our shiny mobile phones.The port that worked on my Nokia 9300i was picodrives80s90_0_5_latest_04-06-2006.sis
I have to admit it was a real pain in the ass to find the working version of Picodrive for the
Nokia 9300i mobile. So I hope you’ll be more happy than me simply following the picodrive
download location provided in the download link above.

2. After having the properly installed version of picodrive on your Nokia.
create a folder (preferably) on your memory card. Assure yourself the new created folder
is called pdgames.
3. Download some Sega Genesis roms from romnation.net orany other large Sega Genesis rom archive on the Internet.
4. Top 50 WORKING (recommended to playgames) for the picodrive emulator are as follows:
(N.B.! Originally the list of games was taken from allaboutsymbian’s website forums 1. Altered Beast2. California Games3. Cannon Fodder4. Columns5. Coolspot6. Dr Robotniks Mean Bean Machine7. Dragon's Fury8. Family Fortunes9. Fatal Fury10. FIFA 9711. Golf12. Greatest Heavyweights Boxing13. Green Dog14. Hard Drivin'15. Jungle Strike16. Lemmings17. Marble Madness18. Michael Jackson's Moonwalker19. Micky Mouse in Enchanted Castle20. Mortal Kombat21. Mutant League Football22. NBA Jam23. Outrun24. Paper Boy 225. Pit Fighter26. Revenge of Shinobi27. Road Rash28. Road Rash 229. Road Rash 330. Rocket Knight Adventures31. Simpsons, The - Krusty's Super Funhouse32. Sonic & Knuckles33. Sonic 134. Sonic 235. Sonic 336. Sonic 3d Blast37. Sonic Crackers38. Sonic Spinball39. Splatter House 240. Streets of Rage 141. Streets of Rage 242. Streets of Rage 343. Strider44. Super Monaco Grand Prix45. Taz Mania46. Tiny Toon Adventures47. Toejam and Earl48. Two Crude Dudes49. Virtua Fighter 2 vs Tekken 250. WWF Wrestlemania
Even though the list conatins plenty of wonderful sega games. Not all the games forementioned
were suitable for my personal liking.
Thus I’ve selected a custom list of games which I like more:
The roms I’ve installed on my Nokia 9300i, I’ve bundled in a small archive that can be downloaded
here, my picodrive_nokia9300i_favourite_roms_collection .
Well I was increadibly happy to be able to play this oldschool games on my phone! Hope you’ll experience the same wonderful joy!
Cheers 🙂