Posts Tagged ‘Linux’
Wednesday, February 15th, 2012 !!! IMPORTANT UPDATE COMMENT INFO DETECTOR IS NO LONGER SUPPORTED (IS OBSOLETE) AND THE COUNTRY FLAGS AND OPERATING SYSTEM WILL BE NOT SHOWING INSTEAD,
!!!! TO MAKE THE COUNTRY FLAGS AND OS WP FUNCTIONALITY WORK AGAIN YOU WILL NEED TO INSTALL WP-USERAGENT !!!
I've come across a nice WordPress plugin that displays country flag, operating system and web browser used in each of posted comments blog comments.
Its really nice plugin, since it adds some transperancy and colorfulness to each of blog comments 😉
here is a screenshot of my blog with Comments Info Detector "in action":

Comments Info Detector as of time of writting is at stable ver 1.0.5.
The plugin installation and configuration is very easy as with most other WP plugins. To install the plugin;
1. Download and unzip Comments Info Detector
linux:/var/www/blog:# cd wp-content/plugins

linux:/var/www/blog/wp-content/plugins:# wget http://downloads.wordpress.org/plugin/comment-info-detector.zip

...

linux:/var/www/blog/wp-content/plugins:# unzip comment-info-detector.zip

...
Just for the sake of preservation of history, I've made a mirror of comments-info-detector 1.0.5 wp plugin for download here
2. Activate Comment-Info-Detector
To enable the plugin Navigate to;
Plugins -> Inactive -> Comment Info Detector (Activate)
After having enabled the plugin as a last 3rd step it has to be configured.
3. Configure comment-info-detector wp plugin
By default the plugin is disabled. To change it to enabled (configure it) by navigating to:
Settings -> Comments Info Detector
Next a a page will appear with variout fields and web forms, where stuff can be changed. Here almost all of it should be left as it is the only change should be in the drop down menus near the end of the page:
Display Country Flags Automatically (Change No to Yes)

Display Web Browsers and OS Automatically  (Change No to Yes
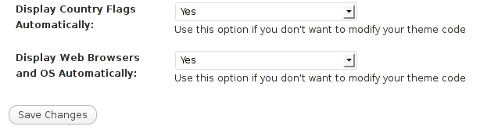
After the two menus are set to "Yes" and pressing on Save Changes the plugin is enabled it will immediately start showing information inside each comment the GeoIP country location flag of the person who commented as well as OS type and Web Browser 🙂
Tags: action, Auto, blog, Browsers, change, Comment, Comments, configured, country flag, country location, Detector, Display, downloads, Draft, drop, drop down menus, flag web, How to, Inactive, information, installation, Linux, location, mirror, operating system, os type, page, person, plugin, plugin installation, quot, sake, Save Changes, screenshot, show, Stable, time, transperancy, type, unzip, web browser type, web browsers, web forms, wget, Wordpress, Wordpress Comments, writting, www, zip linux
Posted in Web and CMS, Wordpress | 1 Comment »
Tuesday, May 8th, 2012 
I believe, the quickest way to take notes on Linux and BSD and later view the notes is to use the command line.
A very easy simple way to keep record of various short notes is just to use a simple text editor like (vim) and store each note in a separate file in lets say ~/notes/ directory.
Actually, I'm using this way to take notes and store sensitive info for various important information I need for further reference, since 5 years or so..
Opening a new text editor for each note and then doing cd ~/notes/; ls |grep -i 'string' is a bit time consuming.
Fortunately there is a quick two shell functions hack that shortens time for note taking. The following two bash functions has to be added in ~/.bashrc:
n() {

vim ~/notes/"$*".txt

}

nls() {

ls -c ~/notes/ | grep "$1"

}
Copy / Paste this two functions in the beginning or the end of ~/.bashrc in order to use them.
Also if ~/notes directory is not existing, yet create it:
hipo@noah:~$ mkdir notes
To make the two new input functions active across opened bash shells on console or terminal either re-login or reread the .bashrc by "sourcing it", e.g.
hipo@noah:~$ source ~/.bashrc
Afterwards, note taking becomes a piece of cake to store a new note with login credentials (user/password) for a new registration to a random named website, type something like:
hipo@noah:~$ n my_website_name-user-pass
This will open for editting ~/.notes/my_website_name-user-pass.txt, type the new desired note content and do save and exit from vim (press esc and type :x!.
Then to get a quick list of all previously stored notes use:
hipo@noah:~$ nls website

my_website_name-user-pass.txt
If you already have a directory containing subdirectories with various taken notes (like me), you will need to use an improved version nls written by Jason Ryan, the nls improved is like this:
nls () { tree -CR --noreport ~/notes | awk '{

if ((NR >) gsub(/.txt/,"")); if

(NF==1) print $1; else if (NF==2)

print $2; else if (NF==3)

printf " %s\n", $3}';

}
This two functions, were not my creation but was suggested in Linux Magazine issue 135 article entitled Command-line task managers and note-taking tools written by Dmitri Popov.
Hope this two functions, will be helpful to console geeks out there.
Tags: Auto, BSD, cake, consuming, copy paste, cr, Draft, file, freebsd, gnu linux, hack, hipo, important information, info, information, input functions, jason ryan, Linux, login, login credentials, mkdir, need, nls, noah, opening, password, piece, piece of cake, sensitive info, Shell, shell functions, shells, something, store, subdirectories, terminal, text, time, time consuming, Tip Quick Note, txtIf, type, use, vim, websitemy
Posted in Curious Facts, Linux, System Administration, vim editor | 2 Comments »
Wednesday, March 30th, 2016 
To find out the Linux install date, there is no one single solution according to the Linux distribution type and version, there are some common ways to get the Linux OS install age.
Perhaps the most popular way to get the OS installation date and time is to check out when the root filesystem ( / ) was created, this can be done with tune2fs command
server:~# tune2fs -l /dev/sda1 | grep 'Filesystem created:'
Filesystem created: Thu Sep 6 21:44:22 2012
server:~# ls -alct /|tail -1|awk '{print $6, $7, $8}'
sep 6 2012
root home directory is created at install time
server:~# ls -alct /root
…
root@server:~# ls -lAhF /etc/hostname
-rw-r–r– 1 root root 8 sep 6 2012 /etc/hostname
For Debian / Ubuntu and other deb based distributions the /var/log/installer directory is being created during OS install, so on Debian the best way to check the Linux OS creation date is with:
root@server:~# ls -ld /var/log/installer
drwxr-xr-x 3 root root 4096 sep 6 2012 /var/log/installer/
root@server:~# ls -ld /lost+found
drwx—— 2 root root 16384 sep 6 2012 /lost+found/
On Red Hat / Fedora / CentOS, redhat based Linuces , you can use:
rpm -qi basesystem | grep "Install Date"
basesystem is the package containing basic Linux binaries many of which should not change, however in some cases if there are some security updates package might change so it is also good to check the root filesystem creation time and compare whether these two match.
Tags: check, check archlinux install date, check fedora install date, check linux os installation date, check mint install date, check OS creation date linux, check rhel install date, check ubuntu install date, creation time, Debian, hostname, Linux, log, OS, package, root filesystem, root root, root server
Posted in Everyday Life, Linux, Linux and FreeBSD Desktop, Various | No Comments »
Friday, March 11th, 2016 
If you mistakenly chmod-ed all files within directory full of multiple other subdirectories and files and you want to revert back and set a certain file permissions (read, wite execute) privileges only to all directories:
find /path/to/base/dir -type d -exec chmod 755 {} +
If there are too many files or directories you need to change mod use
chmod 755 $(find /path/to/base/dir -type d) chmod 644 $(find /path/to/base/dir -type f)
Above willl run evaluate $() all files searched and print them and pass them to chmod so if you have too many files / directories to change it will drastically reduce execution time.
An alternative and perhaps a better way to do it for those who don't remember by heart the chmod permission (numbers), use something like:
chmod -R u+rwX,go+rX,go-w /path
Below is arguments meaning:
-R = recursively;
u+rwX = Users can read, write and execute;
go+rX = group and others can read and execute;
go-w = group and others can't write
If like piping, a less efficient but still working way to change all directory permissions only is with:
find /path/to/base/dir -type d -print0 | xargs -0 chmod 755
find /path/to/base/dir -type f -print0 | xargs -0 chmod 644
For those who wish to automate and often do change permissions of only files or only directories it might be also nice to look at (chmod_dir_files-recursive.sh) shell script
Tadadam 🙂
Tags: change, change permissions, chmod 755, directory, directory permissions, file permissions, How to, Linux, multiple, read, recursively, revert, subdirectories, time, use, working
Posted in Everyday Life, Linux, System Administration, Various | No Comments »
Sunday, September 20th, 2009 MAC stands for (Media Access Control) and stands for the computer physical address in LAN networks.
Ethernet MAC is a six byte number, usually expressed as a twelve digit hexadecimal number.
IPs are translated to Mac via a protocol called ARP (Address Resolution Protocol).
Let’s say Computer with IP 10.10.10.1 wants to send information to another system on the LAN with anIP of 10.10.10.2.
10.10.10.1 will first send broadcast to all stations on the LAN asking who has the address of 10.10.10.2.
Then the box possessing 10.10.10.2 will respond to 10.10.10.2 with it’s MAC address which would be temporary stored
in 10.10.10.2′s ARP’s table in order to make 10.10.10.1 recognize 10.10.10.2 later on.
Host 1 (10.10.10.1): Hello everyone on the LAN (FF:FF:FF:FF:FF:FF), who has the IP 10.10.10.2? My MAC is DE:AB:BE:EF:FF:FE so you can respond back to me.Host 2 (10.10.10.2): Hello DE:AB:BE:EF:FF:FE, I have IP 10.10.10.2 and my MAC address is 1C:43:B6:F8:9B:1E so you can send your IP packets to me.
There are a plenty of reasons that might force to wish for changing your mac. Though I’ll mention only one
1. To get across MAC filtering set on a router. Or in other words to bee able to access your internet withall your computers at home (don’t try them simultaneously!). For example recently a cousin of mine bought a secondnotebook for her daughter.
They desired to be able to access the internet with both the PCs. I contacted the ISPwith a request to add me a second MAC address, just to find that this wasn’t possible with this exact ISP.
Their computer ran dual boot install of a GNU/Linux system as well as Windows Vista, thus I needed to change their existing MACaddress in both Windows and Linux
Here is how I achieved that:
1. In Linux
Really simple:/sbin/ifconfig eth0 hw ether 00:00:00:00:00:00 (substitute here with your desired MAC)/sbin/ifconfig eth0 up
2. On BSD
/sbin/ifconfig xl0 link 00:00:00:AA:AA:AB (subst with MAC here), xl0 is your interface name/sbin/ifconfig xl0 up
3. In Windows XP
There are a couple of ways to go in Windows. The hardest way is to use regedit and to look and substitute some obscure values.
Another a bit easier way is to use either MacMakeUp , Smac or EtherChange
The classic way to change Mac in Windows XP is:
Go to Start->Settings->Control Panel and double click on Network and Dial-up Connectionsa) Right click on the NIC you want to change the MAC address and click on properties.b) Under “General†tab, click on the “Configure†buttonc) Click on “Advanced†tabd) Under “Property sectionâ€, you should see an item called “Network Address†or “Locally Administered Addressâ€, click on it.e) On the right side, under “Valueâ€, type in the New MAC address you want to assign to your NIC. Usually this value is entered without the “-†between the MAC address numbers.f) Goto command prompt and type in “ipconfig /all†or “net config rdr†to verify the changes are applied.
4. In Windows Vista
Go to Control Panel -> Network Connections -> Properties (on Connection using …) Configure -> Advanced -> Network Address (Then type your MAC Here)
All the credits for this post go to the article Changing Your MAC Address In Window XP/Vista, Linux And Mac OS X which explains what you read above even more thoroughly.
Most of the information here is originally found in the above article.END—–
Tags: ifconfig eth0, lan, Linux, MAC, Network Address, NIC, sbin, use, Windows Vista, XP
Posted in Computer Security, System Administration | No Comments »
Monday, February 22nd, 2016 
I'm forced to use Windows on my workbook and I found it really irritating, that I can't easily share files in a DropBox, Google Drive, MS OneDrive, Amazon Storage or other cloud-storage free remote service. etc.
I don't want to use DropBox like non self-hosted Data storage because I want to keep my data private and therefore the only and best option for me was to make possible share my Linux harddisk storage
dir remotely to the Windows notebook.
I didn't wanted to setup some complex environment such as Samba Share Server (which used to be often a common option to share file from Linux server to Windows), neither wanted to bother with installing FTP service and bother with FTP clients, or configuring some other complex stuff such as WebDav – which BTW is an accepted and heavily used solution across corporate clients to access read / write files on a remote Linux servers.
Hence, I made a quick research what else besides could be used to easily share files and data from Windows PC / notebook to a home brew or professional hosting Linux server.
It turned out, there are few of softwares that gives a similar possibility for a home lan small network Linux / Windows hybrid network users such, here is few of the many:
- SyncThing – Syncthing is an open-source file synchronization client/server application, written in Go, implementing its own, equally free Block Exchange Protocol. The source code's content-management repository is hosted on GitHub

- OwnCloud – ownCloud provides universal access to your files via the web, your computer or your mobile devices

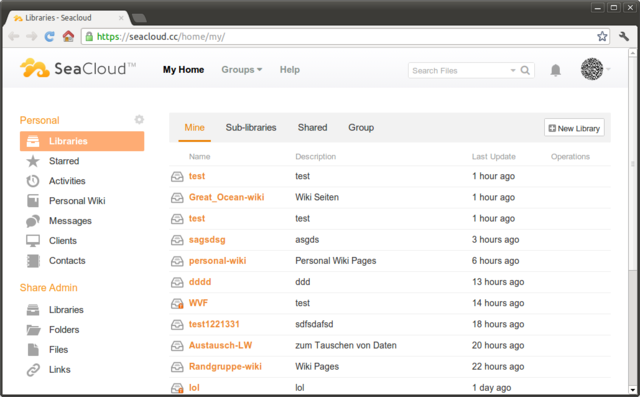
- Seafile – Seafile is a file hosting software system. Files are stored on a central server and can be synchronized with personal computers and mobile devices via the Seafile client. Files can also be accessed via the server's web interface
I've checked all of them and give a quick try of Syncthing which is really easy to start, just download the binary launch it and configure it under https://Localhost:8385 URL from a browser on the Linux server.
Syncthing seemed to be nice and easy to configure solution to be able to Sync files between Server A (Windows) and Server B(Linux) and guess many would enjoy it, if you want to give it a try you can follow this short install syncthing article.
However what I didsliked in both SyncThing and OwnCloud and Seafile and all of the other Sync file solutions was, they only supported synchronization via web and didn't seemed to have a Windows Explorer integration and did required
the server to run more services, posing another security hole in the system as such third party softwares are not easily to update and maintain.
Because of that finally after rethinking about some other ways to copy files to a locally mounted Sync directory from the Linux server, I've decided to give SSHFS a try. Mounting SSHFS between two Linux / UNIX hosts is
quite easy task with SSHFS tool
In Windows however the only way I know to transfer files to Linux via SSHFS was with WinSCP client and other SCP clients as well as the experimental:
As well as few others such as ExpandDrive, Netdrive, Dokan SSHFS (mirrored for download here)
I should say that I first decided to try copying few dozen of Gigabyte movies, text, books etc. using WinSCP direct connection, but after getting a couple of timeouts I was tired of WinSCP and decided to look for better way to copy to remote Linux SSHFS.
However the best solution I found after a bit of extensive turned to be:
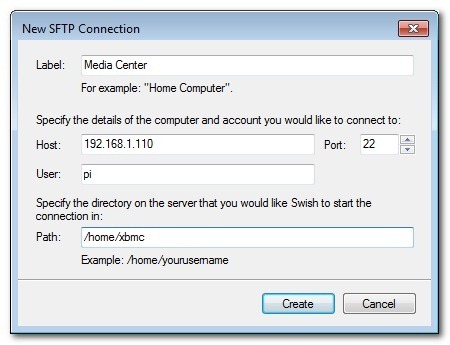
SWISH – Easy SFTP for Windows
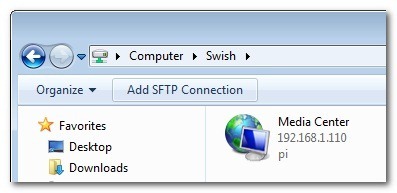
Swish is very straight forward to configure compared to all of them you download the .exe which as of time of writting is at version 0.8.0 install on the PC and right in My Computer you will get a New Device called Swish next to your local and remote drives C:/ D:/ , USBs etc.
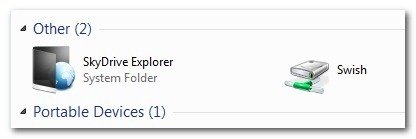
As you see in below screenshot two new non-standard buttons will Appear in Windows Explorer that lets you configure SWISH
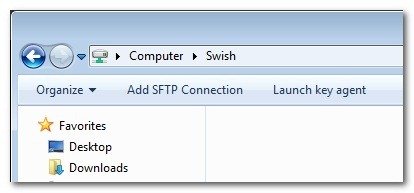
Next and final step before you have the SSHFS remote Linux filesystem visible on Windows Xp / 7 / 8 / 10 is to fill in remote Linux hostname address (or even better fill in IP to get rid of possible DNS issues), UserName (UserID) and Direcory to mount.
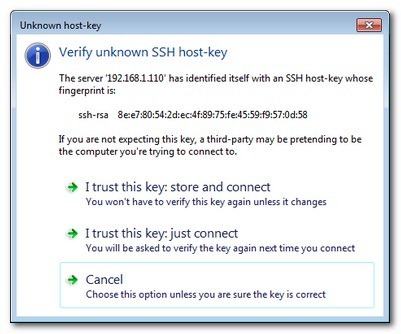
Then you will see the SSHFS moutned:
You will be asked to accept the SSH host-key as it used to be unknown so far
That's it now you will see straight into Windows Explorer the remote Linux SSHFS mounted:
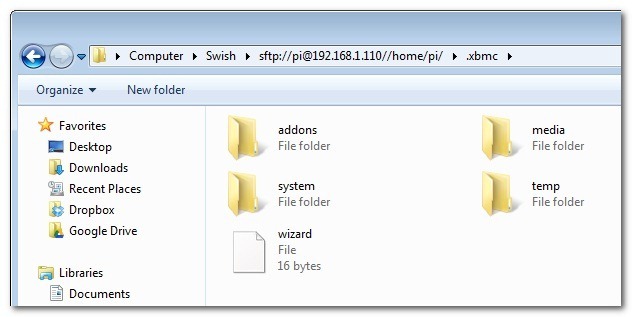
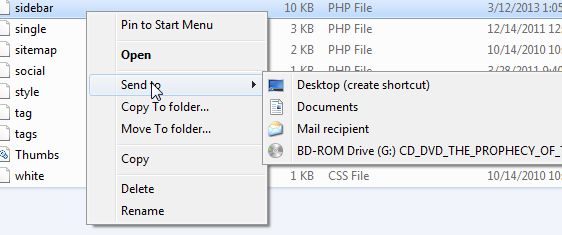
Once setupped a Swish connection to copy files directly to it you can use the Send to Embedded Windows dialog, as in below screenshot
The only 3 problem with SWISH are:
1. It doesn't support Save password, so on every Windows PC reboot when you want to connect to remote Linux SSHFS, you will have to retype remote login user pass.
Fron security stand point this is not such a bad thing, but it is a bit irritating to everytime type the password without an option to save permanently.
The good thing here is you can use Launch Key Agent as visible in above screenshot and set in Putty Key Agent your remote host SSH key so the passwordless login will work without any authentication at
all however, this might open a security hole if your Win PC gets infected by virus, which might delete something on remote mounted SSHFS filesystem so I personally prefer to retype password on every boot.
2. it is a bit slow so if you're planning to Transfer large amounts of Data as hundreds of megabytes, expect a very slow transfer rate, even in a Local 10Mbit Network to transfer 20 – 30 GB of data, it took me about 2-3 hours or so.
SWISH is not actively supported and it doesn't have new release since 20th of June 2013, but for the general work I need it is just perfect, as I don't tent to be Synchronizing Dozens of Gigabytes all the time between my notebook PC and the Linux server.
3. If you don't use the established mounted connection for a while or your computer goes to sleep mode after recovering your connection to remote Linux HDD if opened in Windows File Explorer will probably be dead and you will have to re-enable it.
For Mac OS X users who want to mount / attach remote directory from a Linux partitions should look in fugu – A Mac OS X SFTP, SCP and SSH Frontend
I'll be glad to hear from people on other good ways to achieve same results as with SWISH but have a better copy speed while using SSHFS.
Tags: bit, com, configure, connection, data, download, interface, Linux, linux windows, Samba Share Server, something, SSHFS, SWISH, transfer, web, web interface, Windows, windows explorer, www
Posted in Linux and FreeBSD Desktop, Networking, Remote System Administration, System Administration, Various, Windows | No Comments »
Wednesday, January 27th, 2016 
I've been working a bit on a client's automation, the task is to automate process of installations of Apaches / Tomcats / JBoss and Java servers, so me and colleagues don't waste too
much time in trivial things. To complete that I've created a small repository on a Apache with a WebDav server with major versions of each general branch of Application servers and Javas.
In order to access the remote URL where the .tar.gz binaries archives reside, I had to use a proxy serve as the client runs all his network in a DMZ and all Web Port 80 and 443 HTTPS traffic inside the client network
has to pass by the network proxy.
Thus to make the downloads possible via the shell script, writting I needed to set the script to use the HTTPS proxy server. I've been using proxy earlier and I was pretty aware of the http_proxy bash shell
variable thus I tried to use this one for the Secured HTTPS proxy, however the connection was failing and thanks to colleague Anatoliy I realized the whole problem is I'm trying to use http_proxy shell variable
which has to only be used for unencrypted Proxy servers and in this case the proxy server is over SSL encrypted HTTPS protocol so instead the right variable to use is:
https_proxy
The https_proxy var syntax, goes like this:
proxy_url='http-proxy-url.net:8080';
export https_proxy="$proxy_url"

Once the https_proxy variable is set UNIX's wget non interactive download tool starts using the proxy_url variable set proxy and the downloads in my script works.
Hence to make the different version application archives download work out, I've used wget like so:
wget –no-check-certificate –timeout=5 https://full-path-to-url.net/file.rar
For other BSD / HP-UX / SunOS UNIX Servers where shells are different from Bourne Again (Bash) Shell, the http_proxy and https_proxy variable might not be working.
In such cases if you have curl (command line tool) is available instead of wget to script downloads you can use something like:
curl -O -1 -k –proxy http-proxy-url.net:8080 https://full-path-to-url.net/file.rar
The http_proxy and https_proxy variables works perfect also on Mac OS X, default bash shell, so Mac users enjoy.
For some bash users in some kind of firewall hardened environments like in my case, its handy to permanently set a proxy to all shell activities via auto login Linux / *unix scripts .bashrc or .bash_profile that saves the inconvenience to always
set the proxy so lynx and links, elinks text console browsers does work also anytime you login to shell.
Well that's it, my script enjoys proxying traffic 🙂
Tags: client, command line tool, downloads, export, How to, HTTPS, Linux, net, network, proxy server, rar, shell script, use, wget
Posted in Curious Facts, Everyday Life, IBM AIX UNIX, Linux, Mac OS X, Remote System Administration, System Administration, Various | No Comments »
Wednesday, August 19th, 2015 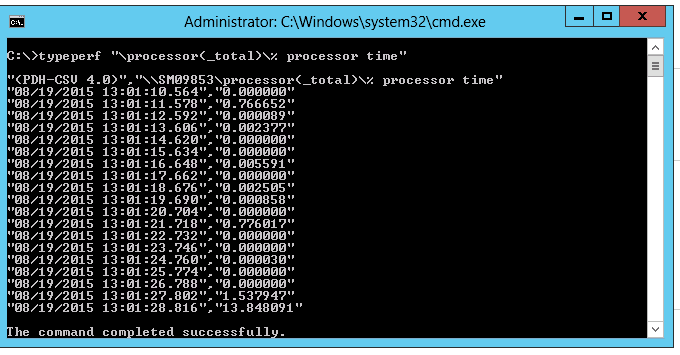
If you used to be a long years Linux / UNIX sysadmin and you suddenly have to also admistrate a bunch of Windows hosts via RDP (Remote Desktop Protocol) / Teamviewer etc. and you need to document The Load Avarage of a Windows XP / 7 / 8 servers but you're puzzled how to get an overall load avarage of Windows host via command in a UNIX way like with the good old uptime Linux / BSD command e.g.
ruth:$ uptime
11:43 up 713 days 22:44, 1 user, load average: 0.22, 0.17, 0.15
Then its time to you to get used to WMIC – WMIC extends WMI for operation from several command-line interfaces and through batch scripts. wmic is a wonderful command for Command addicted Linux guys and gives a lot of opportunities to query and conduct various sysadmin tasks from Windows command prompt.
To get an loadavarage with wmic use:
C:\>wmic cpu get loadpercentage
LoadPercentage
1
or
@for /f "skip=1" %p in ('wmic cpu get loadpercentage') do @echo %p%
1%
%
on Windows 7 / 8 and 10 as well Windows Server 2010 and Windows Server 2012 for more precise CPU loadavarage results, you can also use:
C:\> typeperf "\processor(_total)\% processor time"
"(PDH-CSV 4.0)","\\Win-Host\processor(_total)\% processor time"
"08/19/2015 12:52:53.343","0.002288"
"08/19/2015 12:52:54.357","0.000000"
"08/19/2015 12:52:55.371","0.000000"
"08/19/2015 12:52:56.385","0.000000"
"08/19/2015 12:52:57.399","0.000799"
"08/19/2015 12:52:58.413","0.000000"
"08/19/2015 12:52:59.427","0.000286"
"08/19/2015 12:53:00.441","0.000000"
"08/19/2015 12:53:01.455","0.000000"
"08/19/2015 12:53:02.469","0.008678"
"08/19/2015 12:53:03.483","0.000000"
"08/19/2015 12:53:04.497","0.002830"
"08/19/2015 12:53:05.511","0.000621"
"08/19/2015 12:53:06.525","0.768834"
"08/19/2015 12:53:07.539","0.000000"
"08/19/2015 12:53:08.553","1.538296"
Tags: Check Windows, cmd, command, CPU, echo, Linux, lot, sysadmin, time, windows server, WMIC
Posted in Everyday Life, Performance Tuning, Remote System Administration, System Administration, Various, Windows | No Comments »
Monday, April 27th, 2015 
In a Web application data migration project, I've come across a situation where I have to copy / transfer 500 Gigabytes of data from Linux server 1 (host A) to Linux server 2 (host B). However the two machines doesn't have direct access to each other (via port 22) for security reasons and hence I cannot use sshfs to mount remotely host dir via ssh and copy files like local ones.
As this is a data migration project its however necessery to migrate the data finding a way … Normal way companies do it is to copy the data to External Hard disk storage and send it via some Country Post services or some employee being send in Data center to attach the SAN to new server where data is being migrated However in my case this was not possible so I had to do it different.
I have access to both servers as they're situated in the same Corporate DMZ network and I can thus access both UNIX machines via SSH.
Thanksfully there is a small SSH protocol + TAR archiver and default UNIX pipe's capabilities hack that makes possible to transfer easy multiple (large) files and directories. The only requirement to use this nice trick is to have SSH client installed on the middle host from which you can access via SSH protocol Server1 (from where data is migrated) and Server2 (where data will be migrated).
If the hopping / jump server from which you're allowed to have access to Linux servers Server1 and Server2 is not Linux and you're missing the SSH client and don't have access on Win host to install anything on it just use portable mobaxterm (as it have Cygwin SSH client embedded )
Here is how:
jump-host:~$ ssh server1 "tar czf – /somedir/" | pv | ssh server2 "cd /somedir/; tar xf
As you can see from above command line example an SSH is made to server1 a tar is used to archive the directory / directories containing my hundred of gigabytes and then this is passed to another opened ssh session to server 2 via UNIX Pipe mechanism and then TAR archiver is used second time to unarchive previously passed archived content. pv command which is in the middle is not obligitory though it is a nice way to monitor status about data transfer like below:
500GB 0:00:01 [10,5MB/s] [===================================================>] 27%
P.S. If you don't have PV installed install it either with apt-get on Debian:
debian:~# apt-get install –yes pv
Or on CentOS / Fedora / RHEL etc.
[root@centos ~]# yum -y install pv
Below is a small chunk of PV manual to give you better idea of what it does:
NAME
pv – monitor the progress of data through a pipe
SYNOPSIS
pv [OPTION] [FILE]…
pv [-h|-V]
DESCRIPTION
pv allows a user to see the progress of data through a pipeline, by giving information such as time elapsed, percentage
completed (with progress bar), current throughput rate, total data transferred, and ETA.
To use it, insert it in a pipeline between two processes, with the appropriate options. Its standard input will be passed
through to its standard output and progress will be shown on standard error.
pv will copy each supplied FILE in turn to standard output (- means standard input), or if no FILEs are specified just
standard input is copied. This is the same behaviour as cat(1).
A simple example to watch how quickly a file is transferred using nc(1):
pv file | nc -w 1 somewhere.com 3000
A similar example, transferring a file from another process and passing the expected size to pv:
cat file | pv -s 12345 | nc -w 1 somewhere.com 3000
Note that with too big file transfers using PV will delay data transfer because everything will have to pass through another 2 pipes, however for file transfers up to few gigabytes its really nice to include it.
If you only need to transfer huge .tar.gz archive and you don't bother about traffic security (i.e. don't care whether transferred traffic is going through encrypted SSH tunnel and don't want to put an overhead to both systems for encrypting the data and you have some unfiltered ports between host 1 and host 2 you can run netcat on host 2 to listen for connections and forward .tar.gz content via netcat's port like so:
linux2:~$ nc -l -p 12345 > /path/destinationfile
linux2:~$ cat /path/sourcfile | nc desti.nation.ip.address 12345
Another way to transfer large data without having connection with server1 and server2 but having connection to a third host PC is to use rsync and good old SSH Tunneling, like so:
jump-host:~$ ssh -R 2200:Linux-server1:22 root@Linux-server2 "rsync -e 'ssh -p 2200' –stats –progress -vaz /directory/to/copy root@localhost:/copy/destination/dir"
Tags: command, copy, copy files, data, example, file, file transfers, ftp access, Linux, Linux Unix, localhost, progress, second time, ssh ftp, ssh session, standard, tar
Posted in Everyday Life, Linux, Various, Web and CMS | 2 Comments »
Tuesday, April 7th, 2015 
There are plenty of security schemes and strategies you can implement if you're a Shared Web Hosting company sysadmin however probably the most vital one is to install on Apache + PHP Webserver SuPHP module.
# apt-cache show suphp-common|grep -i descrip -A 4
Description: Common files for mod suphp Suphp consists of an Apache module (mod_suphp for either Apache 1.3.x or Apache 2.x) and a setuid root binary (suphp) that is called by the Apache module to change the uid of the process executing the PHP interpreter to the owner of the php script.
So what SuPHP actuall does is to run separate CPanel / Kloxo etc. Users with separate username and groupid permissions coinciding with the user present in /etc/passwd , /etc/shadow files existing users, thus in case if someone hacks some of the many customer sites he would be able to only write files and directories under the user with which the security breach occured.
On servers where SuPHP is not installed, all systemusers are using the same UserID / GuID to run PHP executable scripts under separate domains Virtualhost which are coinciding with Apache (on Debian / Ubuntu uid, gid – www-data) or on (CentOS / RHEL / Fedora etc. – user apache) so once one site is defaced exploited by a worm all or most server websites might end up infected with a Web Virus / Worm which will be trying to exploit even more sites of a type running silently in the background. This is very common scenarios as currently there are donezs of PHP / CSS / Javasripts / XSS vulnerability exploited on VPS and Shared hosting servers due to failure of a customer to update his own CMS scripts / Website (Joomla, Wordpress, Drupal etc.) and the lack of resource to regularly monitor all customer activities / websites.
Therefore installing SuPHP Apache module is essential one to install on new serverslarge hosting providers as it saves the admin a lot of headache from spreading malware across all hosted servers sites ..
Some VPS admins that are security freaks tend to also install SuPHP module together with many chrooted Apache / LiteSpeed / Nginx webservers each of which running in a separate Jailed environment.
Of course using SuPHP besides giving a improved security layer to the webserver has its downsides such as increased load for the server and making Apache PHP scripts being interpretted a little bit slower than with plain Apache + PHP but performance difference while running a site on top of SuPHP is often not so drastic so you can live it up ..
Installing SuPHP on a Debian / Ubuntu servers is a piece of cake, just run the as root superuser, usual:
# apt-get install libapache2-mod-suphp
Once installed only thing to make is to turn off default installed Apache PHP module (without SuPHP compiled support and restart Apache webserver):
# a2dismod php5 …
# /etc/init.d/apache2 restart
…
To test the SuPHP is properly working on the Apache Webserver go into some of many hosted server websites DocumentRoot
And create new file called test_suphp.php with below content:
# vim test_suphp.php
<?php
system('id');
?>
Then open in browser http://whatever-website/test_suphp.php assuming that system(); function is not disabled for security reasons in php.ini you should get an User ID, GroupID bigger than reserved system IDs on GNU / Linux e.g. ID > UID / GID 99
Its also a good idea to take a look into SuPHP configuration file /etc/suphp/suphp.conf and tailor options according to your liking
If different hosted client users home directories are into /home directory, set in suphp.conf
;Path all scripts have to be in
docroot=/home/
Also usually it is a good idea to set
umask=0022
Tags: apache webserver, customer, debian linux, file, good, home directory, hosting servers, how to install suphp apache better security, improve apache user security suphp, install suphp debian, level, Linux, piece of cake, plenty, read, root, running, scripts, security, security breach, server, servers, setup, Shared Web Hosting, sysadmin, website, Website Joomla
Posted in Computer Security, Linux, System Administration, Various, Web and CMS | No Comments »


How to show country flag, web browser type and Operating System in WordPress Comments
Wednesday, February 15th, 2012!!! IMPORTANT UPDATE COMMENT INFO DETECTOR IS NO LONGER SUPPORTED (IS OBSOLETE) AND THE COUNTRY FLAGS AND OPERATING SYSTEM WILL BE NOT SHOWING INSTEAD,
!!!! TO MAKE THE COUNTRY FLAGS AND OS WP FUNCTIONALITY WORK AGAIN YOU WILL NEED TO INSTALL WP-USERAGENT !!!
I've come across a nice WordPress plugin that displays country flag, operating system and web browser used in each of posted comments blog comments.
Its really nice plugin, since it adds some transperancy and colorfulness to each of blog comments 😉
here is a screenshot of my blog with Comments Info Detector "in action":
Comments Info Detector as of time of writting is at stable ver 1.0.5.
The plugin installation and configuration is very easy as with most other WP plugins. To install the plugin;
1. Download and unzip Comments Info Detector
linux:/var/www/blog:# cd wp-content/pluginslinux:/var/www/blog/wp-content/plugins:# wget http://downloads.wordpress.org/plugin/comment-info-detector.zip
...
linux:/var/www/blog/wp-content/plugins:# unzip comment-info-detector.zip
...
Just for the sake of preservation of history, I've made a mirror of comments-info-detector 1.0.5 wp plugin for download here
2. Activate Comment-Info-Detector
To enable the plugin Navigate to;
Plugins -> Inactive -> Comment Info Detector (Activate)After having enabled the plugin as a last 3rd step it has to be configured.
3. Configure comment-info-detector wp plugin
By default the plugin is disabled. To change it to enabled (configure it) by navigating to:
Settings -> Comments Info DetectorNext a a page will appear with variout fields and web forms, where stuff can be changed. Here almost all of it should be left as it is the only change should be in the drop down menus near the end of the page:
Display Country Flags Automatically (Change No to Yes)Display Web Browsers and OS Automatically (Change No to Yes
After the two menus are set to "Yes" and pressing on Save Changes the plugin is enabled it will immediately start showing information inside each comment the GeoIP country location flag of the person who commented as well as OS type and Web Browser 🙂
Tags: action, Auto, blog, Browsers, change, Comment, Comments, configured, country flag, country location, Detector, Display, downloads, Draft, drop, drop down menus, flag web, How to, Inactive, information, installation, Linux, location, mirror, operating system, os type, page, person, plugin, plugin installation, quot, sake, Save Changes, screenshot, show, Stable, time, transperancy, type, unzip, web browser type, web browsers, web forms, wget, Wordpress, Wordpress Comments, writting, www, zip linux
Posted in Web and CMS, Wordpress | 1 Comment »