Posts Tagged ‘package’

FreeBSD Jumbo Frames network configuration short how to

Wednesday, March 14th, 2012

FreeBSD Jumbo Frames Howto configure FreeBSD

Recently I wrote a post on how to enable Jumbo Frames on GNU / Linux , therefore I thought it will be useful to write how Jumbo Frames network boost can be achieved on FreeBSD too.

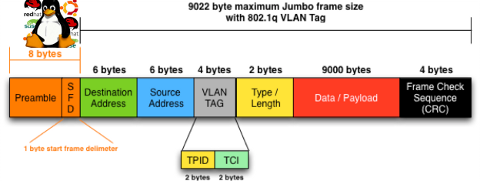
I will skip the details of what is Jumbo Frames, as in the previous article I have thoroughfully explained. Just in short to remind you what is Jumbo Frames and why you might need it? – it is a way to increase network MTU transfer frames from the MTU 1500 to MTU of 9000 bytes

It is interesting to mention that according to specifications, the maximum Jumbo Frames MTU possible for assignment are of MTU=16128
Just like on Linux to be able to take advantage of the bigger Jumbo Frames increase in network thoroughput, you need to have a gigabyt NIC card/s on the router / server.

1. Increasing MTU to 9000 to enable Jumbo Frames "manually"

Just like on Linux, the network tool to use is ifconfig. For those who don't know ifconfig on Linux is part of the net-tools package and rewritten from scratch especially for GNU / Linux OS, whether BSD's ifconfig is based on source code taken from 4.2BSD UNIX

As you know, network interface naming on FreeBSD is different, as there is no strict naming like on Linux (eth0, eth1, eth2), rather the interfaces are named after the name of the NIC card vendor for instance (Intel(R) PRO/1000 NIC is em0), RealTek is rl0 etc.

To set Jumbro Frames Maximum Transmission Units of 9000 on FreeBSD host with a Realtek and Intel gigabyt ethernet cards use: freebsd# /sbin/ifconfig em0 192.168.1.2 mtu 9000
freebsd# /sbin/ifconfig rl0 192.168.2.2 mtu 9000

!! Be very cautious here, as if you're connected to the system remotely over ssh you might loose connection to it because of broken routing.

To prevent routing loss problems, if you're executing the above two commands remotely, you better run them in GNU screen session:

freebsd# screen
freebsd# /sbin/ifconfig em0 192.168.1.2 mtu 9000; /sbin/ifconfig rl0 192.168.1.2 mtu 9000; \
/etc/rc.d/netif restart; /etc/rc.d/routed restart

2. Check MTU settings are set to 9000

If everything is fine the commands will return empty output, to check further the MTU is properly set to 9000 issue:

freebsd# /sbin/ifconfig -a|grep -i em0em0: flags=8843<UP,BROADCAST,RUNNING,SIMPLEX,MULTICAST> metric 0 mtu 9000freebsd# /sbin/ifconfig -a|grep -i rl0
rl0: flags=8843<UP,BROADCAST,RUNNING,SIMPLEX,MULTICAST> metric 0 mtu 9000

3. Reset routing for default gateway

If you have some kind of routing assigned for em0 and rl0, network interfaces they will be affected by the MTU change and the routing will be gone. To reset the routing to the previously properly assigned routing, you have to restart the BSD init script taking care for assigning routing on system boot time:

freebsd# /etc/rc.d/routing restart
default 192.168.1.1 done
add net default: gateway 192.168.1.1
Additional routing options: IP gateway=YES.

4. Change MTU settings for NIC card with route command

There is also a way to assign higher MTU without "breaking" the working routing, e.g. avoiding network downtime with bsd route command:

freebsd# grep -i defaultrouter /etc/rc.conf
defaultrouter="192.168.1.1"
freebsd# /sbin/route change 192.168.1.1 -mtu 9000
change host 192.168.1.1

5. Finding the new MTU NIC settings on the FreeBSD host

freebsd# /sbin/route -n get 192.168.1.1
route to: 192.168.1.1
destination: 192.168.1.1
interface: em0
flags: <UP,HOST,DONE,LLINFO,WASCLONED>
recvpipe sendpipe ssthresh rtt,msec rttvar hopcount mtu expire
0 0 0 0 0 0 9000 1009

6. Set Jumbo Frames to load automatically on system load

To make the increased MTU to 9000 for Jumbo Frames support permanent on a FreeBSD system the /etc/rc.conf file is used:

The variable for em0 and rl0 NICs are ifconfig_em0 and ifconfig_rl0.
The lines to place in /etc/rc.conf should be similar to:

ifconfig_em0="inet 192.168.1.1 netmask 255.255.255.0 media 1000baseTX mediaopt half-duplex mtu 9000"

Change in the above lines the gateway address 192.168.1.1 and the netmask 255.255.255.0 to yours corresponding gw and netmask.
Also in the above example you see the half-duplex ifconfig option is set insetad of full-duplex in order to prevent some duplex mismatches. A full-duplex could be used instead, if you're completely sure on the other side of the host is configured to support full-duplex connections. Otherwise if you try to set full-duplex with other side set to half-duplex or auto-duplex a duplex mismatch will occur. If this happens insetad of taking the advantage of the Increase Jumbo Frames MTU the network connection could become slower than originally with standard ethernet MTU of 1500. One other bad side if you end up with duplex-mismatch could be a high number of loss packets and degraded thoroughout …

7. Setting Jumbo Frames for interfaces assigning dynamic IP via DHCP

If you need to assign an MTU of 9000 for a gigabyt network interfaces, which are receiving its TCP/IP network configuration over DHCP server.
First, tell em0 and rl0 network interfaces to dynamically assign IP addresses via DHCP proto by adding in /etc/rc.conf:

ifconfig_em0="DHCP"
ifconfig_rl0="DHCP"

Secondly make two files /etc/start_if.em0 and /etc/start_if.rl0 and include in each file:

ifconfig em0 media 1000baseTX mediaopt full-duplex mtu 9000
ifconfig rl0 media 1000baseTX mediaopt full-duplex mtu 9000

Copy / paste in root console:

echo 'ifconfig em0 media 1000baseTX mediaopt full-duplex mtu 9000' >> /etc/start_if.em0
echo 'ifconfig rl0 media 1000baseTX mediaopt full-duplex mtu 9000' >> /etc/start_if.rl0

Finally, to load the new MTU for both interfaces, reload the IPs with the increased MTUs:

freebsd# /etc/rc.d/routing restart
default 192.168.1.1 done
add net default: gateway 192.168.1.1

8. Testing if Jumbo Frames is working correctly

To test if an MTU packs are transferred correctly through the network you can use ping or tcpdumpa.) Testing Jumbo Frames enabled packet transfers with tcpdump

freebsd# tcpdump -vvn | grep -i 'length 9000'

You should get output like:

16:40:07.432370 IP (tos 0x0, ttl 50, id 63903, offset 0, flags [DF], proto TCP (6), length 9000) 192.168.1.2.80 > 192.168.1.1.60213: . 85825:87285(1460) ack 668 win 14343
16:40:07.432588 IP (tos 0x0, ttl 50, id 63904, offset 0, flags [DF], proto TCP (6), length 9000) 192.168.1.2.80 > 192.168.1.1.60213: . 87285:88745(1460) ack 668 win 14343
16:40:07.433091 IP (tos 0x0, ttl 50, id 63905, offset 0, flags [DF], proto TCP (6), length 9000) 192.168.1.2.80 > 192.168.1.1.60213: . 23153:24613(1460) ack 668 win 14343
16:40:07.568388 IP (tos 0x0, ttl 50, id 63907, offset 0, flags [DF], proto TCP (6), length 9000) 192.168.1.2.80 > 192.168.1.1.60213: . 88745:90205(1460) ack 668 win 14343
16:40:07.568636 IP (tos 0x0, ttl 50, id 63908, offset 0, flags [DF], proto TCP (6), length 9000) 192.168.1.2.80 > 192.168.1.1.60213: . 90205:91665(1460) ack 668 win 14343
16:40:07.569012 IP (tos 0x0, ttl 50, id 63909, offset 0, flags [DF], proto TCP (6), length 9000) 192.168.1.2.80 > 192.168.1.1.60213: . 91665:93125(1460) ack 668 win 14343
16:40:07.569888 IP (tos 0x0, ttl 50, id 63910, offset 0, flags [DF], proto TCP (6), length 9000) 192.168.1.2.80 > 192.168.1.1.60213: . 93125:94585(1460) ack 668 win 14343

b.) Testing if Jumbo Frames are enabled with ping

Testing Jumbo Frames with ping command on Linux

linux:~# ping 192.168.1.1 -M do -s 8972
PING 192.168.1.1 (192.168.1.1) 8972(9000) bytes of data.
9000 bytes from 192.168.1.1: icmp_req=1 ttl=52 time=43.7 ms
9000 bytes from 192.168.1.1: icmp_req=2 ttl=52 time=43.3 ms
9000 bytes from 192.168.1.1: icmp_req=3 ttl=52 time=43.5 ms
9000 bytes from 192.168.1.1: icmp_req=4 ttl=52 time=44.6 ms
--- 192.168.0.1 ping statistics ---
4 packets transmitted, 4 received, 0% packet loss, time 3003ms
rtt min/avg/max/mdev = 2.397/2.841/4.066/0.708 ms

If you get insetad an an output like:

From 192.168.1.2 icmp_seq=1 Frag needed and DF set (mtu = 1500)

--- 192.168.1.1 ping statistics ---
0 packets transmitted, 0 received, +4 errors

This means a packets with maximum MTU of 1500 could be transmitted and hence something is not okay with the Jumbo Frames config.
Another helpful command in debugging MTU and showing which host in a hop queue support jumbo frames is Linux's traceroute

To debug a path between host and target, you can use:

linux:~# traceroute --mtu www.google.com
...

If you want to test the Jumbo Frames configuration from a Windows host use ms-windows ping command like so:

C:\>ping 192.168.1.2 -f -l 8972
Pinging 192.168.1.2 with 8972 bytes of data:
Reply from 192.168.1.2: bytes=8972 time=2ms TTL=255
Ping statistics for 192.168.1.2:
Packets: Sent = 4, Received = 4, Lost = 0 (0% loss),
Approximate round trip times in milli-seconds:
Minimum = 2ms, Maximum = 2ms, Average = 2ms

Here -l 8972 value is actually equal to 9000. 8972 = 9000 – 20 (20 byte IP header) – 8 (ICMP header)

Boost local network performance (Increase network thoroughput) by enabling Jumbo Frames on GNU / Linux

Saturday, March 10th, 2012

Jumbo Frames boost local network performance in GNU / Linux

So what is Jumbo Frames? and why, when and how it can increase the network thoroughput on Linux?

Jumbo Frames are Ethernet frames with more than 1500 bytes of payload. They can carry up to 9000 bytes of payload. Many Gigabit switches and network cards supports them.
Jumbo frames is a networking standard for many educational networks like AARNET. Unfortunately most commercial ISPs doesn't support them and therefore enabling Jumbo frames will rarely increase bandwidth thoroughput for information transfers over the internet.
Hopefully in the years to come with the constant increase of bandwidths and betterment of connectivity, jumbo frames package transfers will be supported by most ISPs as well.
Jumbo frames network support is just great for is small local – home networks and company / corporation office intranets.

Thus enabling Jumbo Frame is absolutely essential for "local" ethernet networks, where large file transfers occur frequently. Such networks are networks where, there is often a Video or Audio streaming with high quality like HD quality on servers running File Sharing services like Samba, local FTP sites,Webservers etc.

One other advantage of enabling jumbo frames is reduce of general server overhead and decrease in CPU load / (CPU usage), when transferring large or enormous sized files.Therefore having jumbo frames enabled on office network routers with GNU / Linux or any other *nix OS is vital.

Jumbo Frames traffic is supported in GNU / Linux kernel since version 2.6.17+ in earlier 2.4.x it was possible through external third party kernel patches.

1. Manually increase MTU to 9000 with ifconfig to enable Jumbo frames

debian:~# /sbin/ifconfig eth0 mtu 9000

The default MTU on most GNU / Linux (if not all) is 1500, to check the default set MTU with ifconfig:

linux:~# /sbin/ifconfig eth0|grep -i mtu
UP BROADCAST MULTICAST MTU:1500 Metric:1

To take advantage of Jumbo Frames, all that has to be done is increase the default Maximum Transmission Unit from 1500 to 9000

For those who don't know MTU is the largest physical packet size that can be transferred over the network. MTU is measured by default in bytes. If a information has to be transferred over the network which exceeds the lets say 1500 MTU (bytes), it will be chopped and transferred in few packs each of 1500 size.

MTUs differ on different netework topologies. Just for info here are the few main MTUs for main network types existing today:
 

  • 16 MBit/Sec Token Ring – default MTU (17914)
  • 4 Mbits/Sec Token Ring – default MTU (4464)
  • FDDI – default MTU (4352)
  • Ethernet – def MTU (1500)
  • IEEE 802.3/802.2 standard – def MTU (1492)
  • X.25 (dial up etc.) – def MTU (576)
  • Jumbo Frames – def max MTU (9000)

Setting the MTU packet frames to 9000 to enable Jumbo Frames is done with:

linux:~# /sbin/ifconfig eth0 mtu 9000

If the command returns nothing, this most likely means now the server can communicate on eth0 with MTUs of each 9000 and therefore the network thoroughput will be better. In other case, if the network card driver or card is not a gigabit one the cmd will return error:

SIOCSIFMTU: Invalid argument

2. Enabling Jumbo Frames on Debian / Ubuntu etc. "the Debian way"

a.) Jumbo Frames on ethernet interfaces with static IP address assigned Edit /etc/network/interfaces and you should have for each of the interfaces you would like to set the Jumbo Frames, records similar to:

Raising the MTU to 9000 if for one time can be done again manually with ifconfig

debian:~# /sbin/ifconfig eth0 mtu 9000

iface eth0 inet static
address 192.168.0.5
network 192.168.0.0
gateway 192.168.0.254
netmask 255.255.255.0
mtu 9000

For each of the interfaces (eth1, eth2 etc.), add a chunk similar to one above changing the changing the IPs, Gateway and Netmask.

If the server is with two gigabit cards (eth0, eth1) supporting Jumbo frames add to /etc/network/interfaces :

iface eth0 inet static
address 192.168.0.5
network 192.168.0.0
gateway 192.168.0.254
netmask 255.255.255.0
mtu 9000

iface eth1 inet static
address 192.168.0.6
network 192.168.0.0
gateway 192.168.0.254
netmask 255.255.255.0
mtu 9000

b.) Jumbo Frames on ethernet interfaces with dynamic IP obtained via DHCP

Again in /etc/network/interfaces put:

auto eth0
iface eth0 inet dhcp
post-up /sbin/ifconfig eth0 mtu 9000

3. Setting Jumbo Frames on Fedora / CentOS / RHEL "the Redhat way"

Enabling jumbo frames on all Gigabit lan interfaces (eth0, eth1, eth2 …) in Fedora / CentOS / RHEL is done through files:
 

  • /etc/sysconfig/network-script/ifcfg-eth0
  • /etc/sysconfig/network-script/ifcfg-eth1

etc. …
append in each one at the end of the respective config:

MTU=9000

[root@fedora ~]# echo 'MTU=9000' >> /etc/sysconfig/network-scripts/ifcfg-eth


a quick way to set Maximum Transmission Unit to 9000 for all network interfaces on on Redhat based distros is by executing the following loop:

[root@centos ~]# for i in $(echo /etc/sysconfig/network-scripts/ifcfg-eth*); do \echo 'MTU=9000' >> $i
done

P.S.: Be sure that all your interfaces are supporting MTU=9000, otherwise increase while the MTU setting is set will return SIOCSIFMTU: Invalid argument err.
The above loop is to be used only, in case you have a group of identical machines with Lan Cards supporting Gigabit networks and loaded kernel drivers supporting MTU up to 9000.

Some Intel and Realtek Gigabit cards supports only a maximum MTU of 7000, 7500 etc., so if you own a card like this check what is the max MTU the card supports and set it in the lan device configuration.
If increasing the MTU is done on remote server through SSH connection, be extremely cautious as restarting the network might leave your server inaccessible.

To check if each of the server interfaces are "Gigabit ready":

[root@centos ~]# /sbin/ethtool eth0|grep -i 1000BaseT
1000baseT/Half 1000baseT/Full

If you're 100% sure there will be no troubles with enabling MTU > 1500, initiate a network reload:

[root@centos ~]# /etc/init.d/network restart
...

4. Enable Jumbo Frames on Slackware Linux

To list the ethernet devices and check they are Gigabit ones issue:

bash-4.1# lspci | grep [Ee]ther
0c:00.0 Ethernet controller: D-Link System Inc Gigabit Ethernet Adapter (rev 11)
0c:01.0 Ethernet controller: D-Link System Inc Gigabit Ethernet Adapter (rev 11)

Setting up jumbo frames on Slackware Linux has two ways; the slackware way and the "universal" Linux way:

a.) the Slackware way

On Slackware Linux, all kind of network configurations are done in /etc/rc.d/rc.inet1.conf

Usual config for eth0 and eth1 interfaces looks like so:

# Config information for eth0:
IPADDR[0]="10.10.0.1"
NETMASK[0]="255.255.255.0"
USE_DHCP[0]=""
DHCP_HOSTNAME[1]=""
# Config information for eth1:
IPADDR[1]="10.1.1.1"
NETMASK[1]="255.255.255.0"
USE_DHCP[1]=""
DHCP_HOSTNAME[1]=""

To raise the MTU to 9000, the variables MTU[0]="9000" and MTU[1]="9000" has to be included after each interface config block, e.g.:

# Config information for eth0:
IPADDR[0]="172.16.1.1"
NETMASK[0]="255.255.255.0"
USE_DHCP[0]=""
DHCP_HOSTNAME[1]=""
MTU[0]="9000"
# Config information for eth1:
IPADDR[1]="10.1.1.1"
NETMASK[1]="255.255.255.0"
USE_DHCP[1]=""
DHCP_HOSTNAME[1]=""
MTU[1]="9000"

bash-4.1# /etc/rc.d/rc.inet1 restart
...

b.) The "Universal" Linux way

This way is working on most if not all Linux distributions.
Insert in /etc/rc.local:

/sbin/ifconfig eth0 mtu 9000 up
/sbin/ifconfig eth1 mtu 9000 up

5. Check if Jumbo Frames are properly enabled

There are at least two ways to display the MTU settings for eths.

a.) Using grepping the MTU from ifconfig

linux:~# /sbin/ifconfig eth0|grep -i mtu
UP BROADCAST MULTICAST MTU:9000 Metric:1
linux:~# /sbin/ifconfig eth1|grep -i mtu
UP BROADCAST MULTICAST MTU:9000 Metric:1

b.) Using ip command from iproute2 package to get MTU

linux:~# ip route get 192.168.2.134
local 192.168.2.134 dev lo src 192.168.2.134
cache mtu 9000 advmss 1460 hoplimit 64

linux:~# ip route show dev wlan0
192.168.2.0/24 proto kernel scope link src 192.168.2.134
default via 192.168.2.1

You see MTU is now set to 9000, so the two server lans, are now able to communicate with increased network thoroughput.
Enjoy the accelerated network transfers 😉


How to install GNOME server on Ubuntu 10.04.2 LTS Lucid

Wednesday, April 20th, 2011

After some upgrades of Ubuntu from 9.10 to Ubuntu 10.04.2, I faced problems during apt-get upgrade && apt-get dist-upgrade

I had to fix it up with apt-get upgrade -f , however the “fix” which was targetting a fix up to the apt-get dist-upgrade removed about 260 packages, among which were the grub boot loader , xorg-server and even gnome

As in order to fix the package mishap the apt-get update -f was my only possible solution I went by and confirmed that I would like to wipe out all the packages.

Logically afterwards it was required that I install my missing xorg-server and gnome in order to make the Ubuntu desktop work again.

Here is how:

ubuntu:~# apt-get update && apt-get xorg-server ubuntu-desktop

The ubuntu-desktop is a meta package which installs the GNOME environment.

How to add repository manually from command line in Ubuntu Linux

Sunday, January 8th, 2012

I'm on a way trying to install Free Mega Games Pack and I'm facing troubles in following the instructions to add a the latest development wine version described on http://www.winehq.org/download/ubuntu
The guys from WineHQ has to update the wine install instructions, since the instructions are targetting older versions of Ubuntu which are not compatible with newer Ubuntus which comes natively with Unity
In order to complete the step in adding the WineHQ Ubuntu PPA development repository my only way was to add it using command line.
Here is how:

root@ubuntu:~# apt-add-repository ppa:ubuntu-wine/ppa
You are about to add the following PPA to your system:
Latest official WineHQ releases
Welcome to the Wine Team PPA. Here you can get the latest available Wine betas for every supported version of Ubuntu. This PPA is managed by Scott Ritchie, and is a replacement for the WineHQ budgetdedicated.com repository used for Jaunty and earlier.
More info: https://launchpad.net/~ubuntu-wine/+archive/ppa
Press [ENTER] to continue or ctrl-c to cancel adding it
Executing: gpg --ignore-time-conflict --no-options --no-default-keyring --secret-keyring /tmp/tmp.bvo21sFWKG --trustdb-name /etc/apt/trustdb.gpg --keyring /etc/apt/trusted.gpg --primary-keyring /etc/apt/trusted.gpg --keyserver hkp://keyserver.ubuntu.com:80/ --recv 883E8688397576B6C509DF495A9A06AEF9CB8DB0
gpg: requesting key F9CB8DB0 from hkp server keyserver.ubuntu.com
gpg: key F9CB8DB0: public key "Launchpad PPA for Ubuntu Wine Team" imported
gpg: no ultimately trusted keys found
gpg: Total number processed: 1
gpg: imported: 1 (RSA: 1)

Similarly adding a PPA repository on Debian is also possible by using a little shell script add-apt-repository.sh . add-apt-repository.sh simulates what ubuntu's apt-add-repositry python script does.

It is educative to mention PPA stands for (Personal package Archive) and the difference between normal repository and PPA is mainly in the fact that PPA repositories makes a package distributed by the repository like the native Ubuntu packages issued by Canonical.
Once for example a new version of a file is placed in PPA deb package repository, the newer package will be automatically installed to the system using it.

How to add extra plugins, effects, brushes and functionality to GIMP on GNU / Linux

Tuesday, February 28th, 2012

How to add extra plugins, effects brushes and functionality to GIMP on Debian and Ubuntu Linux / GIMP logo head pictureThese days, I'm playing with The GIMP. I've been a GNU / Linux, FreeBSD user for already 11 years now but as I'm doing mostly system administration and I don't have much expertise in Panting or Computer Graphical Design, I've never put much time to learn more in the interesting area of graphical design. Hence until just recently, Just until now, I've never spend time with the GIMP (GNU Image Manipulation Program) and never realized how powerful this great program is. The more I learn about GIMP functionalities and how it works the more it makes me determined to learn some basic web design 🙂

The functionality which The GIMP offers in a basic install is quite rich, however by default on most Debian and Ubuntu installations many of the great plugins which easifies the way to edit pictures is missing.

Example for a very valuable functionality which is not present with standard gimp package installed on Debian and Ubuntu are:
 

Here I will mention here few words on:

  • GIMP FX-Foundry Collection

GIMP FX-Foundry is a thoroughful collection of GIMP scripts (addon plugins), that automates many of the operations which requires a professional web design skills and gives an easy intuitive interface through which very robust "high level" graphic design can be accomplished. This additional GIMP extensions helps to create very unique design in just few simple steps, as well as gives multiple tools for the sake of easy pro design creation. For anyone looking for quick edit of images with GIMP FX-Foundry is a must have GIMP plugins extension. The script pack is located on http://gimpfx-foundry.sourceforge.net/

To install FX-Foundry scripts collection on Debian / Ubuntu / Linux Mint and other based Linux distributions:

debian:~# apt-get install --yes gimp-plugin-registry
...

gimp-plugin-registry package name is based on GIMP Plugin registry's website
. Gimp plugin registry contains many helpful design goodies 🙂

Once installed you will notice GIMP with a new menu on the main menus bar reading FX-Foundry :

GIMP Screenshot GNU Linux Debian additional FX Foundry menu

GIMP FX Foundry extensionos package contains 124 scripts for additional graphics manipulation. The collection contains less scripts than the ones provided by gimp-plugin-registry. package has 156 scripts inside.

One of the most helpful GIMP addition from the package is the inclusion of Save for Web button under:

File -> Save for Web

GIMP Save for Web menu suitable for reduced size images for HTML image producing on Debian GNU / Linux screenshot

Another very helpful .deb package which adds up to GIMP's design possibilities is gimp-data-extras .

gimp-data-extras adds 111 new GIMP Fill in Patterns , which can be used through the Blend Tool to Fill selected areas with color gradients.

To install gimp-data-extras on Debian:

debian:~# apt-get install --yes gimp-data-extras
...

Generally once installed this package will add to GIMP – an extra set of brushes, palettes, and gradients for The GIMP as you can read in the package description.

I was also quite stunned to find out the good old GIMP is capable of basic Video editting!!

On Debian and Ubuntu there is a package called gimp-gap which once installed adds an extra Video menu.

GIMP Screenshot GNU Debian linux adding GIMP extra Video editting capabilities

I've not tested the GIMP video editting capabilities yet, however I intend to learn something about it immediately when I have some free time left. You see the enormous list of Video editting possibilities GIMP obtaines with gimp-gap which btw stands for (The GIMP Animation Package).

To install gimp-gap:

debian:~# apt-get install --yes gimp-gap

I've noticed also the following list of others useful GIMP additions (mainly helpful in Web, Brochure and Logo Graphic Design) to install them:

debian:~# apt-get --yes install gimp-gmic gimp-ufraw gtkam-gimp gimp-gluas \gimp-dimage-color gimp-dds gimp-dcraw gimp-cbmplugs flegita-gimp gimp-texturize \gimp-resynthesizer gimp-lensfun gimp-gutenprint gtkam-gimp mrwtoppm-gimp

Here is the package description of the packages above command will install:

  • gimp-cbmplugs – plugins for The GIMP to import/export Commodore 64 files
  • gimp-data-extras – An extra set of brushes, palettes, and gradients for The GIMP
  • gimp-dcraw – GIMP plug-in for loading RAW digital photos
  • gimp-dds – DDS (DirectDraw Surface) plugin for the gimp
  • gimp-dimage-color – GIMP plugin to convert Minolta DiMAGE pictures to sRGB colour space
  • gimp-gap – The GIMP Animation Package
  • gimp-gluas – Lua environment plug-in for GIMP
  • gimp-gmic – GIMP plugin for GREYC's Magic Image Converter
  • gimp-gutenprint – print plugin for the GIMP
  • gimp-lensfun – Gimp plugin to correct lens distortion using the lensfun library
  • gimp-normalmap – Normal map plugin for GIMP
  • gimp-plugin-registry – repository of optional extensions for GIMP
  • gimp-resynthesizer – Gimp plugin for texture synthesis
  • gimp-texturize – generates large textures from a small sample
  • gimp-ufraw – gimp importer for raw camera images
  • flegita-gimp – Gnome Gimp scan plugin.
  • gtkam-gimp – gtkam gimp plugin to open digital camera pictures
  • mrwtoppm-gimp – GIMP-plugin to support Minolta DiMAGE 5/7/7i RAW images

Now after installing all this plugins and seeing all GIMP's power, I'm starting to wonder why are still people ranting Adobe PhotoShop is feature rich.
That's all, enjoy the great new GIMP features. Happy picture editting 😉

Convert single PDF pages to multiple SVG files on Debian Linux with pdf2svg

Sunday, February 26th, 2012

In my last article, I've explained How to create PNG, JPG, GIF pictures from one single PDF document
Convertion of PDF to images is useful, however as PNG and JPEG graphic formats are raster graphics the image quality gets crappy if the picture is zoomed to lets say 300%.
This means convertion to PNG / GIF etc. is not a good practice especially if image quality is targetted.

I myself am not a quality freak but it was interesting to find out if it is possible to convert the PDF pages to SVG (Scalable Vector Graphics) graphics format.

Converting PDF to SVG is very easy as for GNU / Linux there is a command line tool called pdf2svg
pdf2svg's official page is here

The traditional source way compile and install is described on the homepage. For Debian users pdf2svg has already existing a deb package.

To install pdf2svg on Debian use:

debian:~# apt-get install --yes pdf2svg
...

Once installed usage of pdf2svg to convert PDF to multiple SVG files is analogous to imagemagick's convert .
To convert the 44 pages Projects.pdf to multiple SVG pages – (each PDF page to a separate SVG file) issue:

debian:~/project-pdf-to-images$ for i in $(seq 1 44); do \
pdf2svg Projects.pdf Projects-$i.SVG $i; \
done

This little loop tells each page number from the 44 PDF document to be stored in separate SVG vector graphics file:

debian:~/project-pdf-to-images$ ls -1 *.svg|wc -l
44

For BSD users and in particular FreeBSD ones png2svg has a bsd port in:

/usr/ports/graphics/pdf2svg

Installing on BSD is possible directly via the port and convertion of PDF to SVG on FreeBSD, should be working in the same manner. The only requirement is that bash shell is used for the above little bash loop, as by default FreeBSD runs the csh. 
On FreeBSD launch /usr/local/bin/bash, before following the Linux instructions if you're not already in bash.

Now the output SVG files are perfect for editting with Inkscape or Scribus and the picture quality is way superior to old rasterized (JPEG, PNG) images

Create PDF file from (png, jpg, gif ) images / pictures in Linux

Tuesday, September 14th, 2010

I’ve recently received a number of images in JPEG format as a feedback on a project plan that was constructed by a team I’m participating at the university where I study.

Somebody from my project group has scanned or taken snapshots of each of the hard copy paper feedback and has sent it to my mail.

I’ve received 13 images so I had to open them one by one to get each of the Project Plan to read the feedback on the page this was really unhandy, so I decided to give it a try on how to generate a common PDF file from all my picture files.

Thanksfully it happened to be very easy and trivial using the good old Image Magick

In order to complete the task of generating one PDF from a number of pictures all I did was.1. Switch to the directory where I have saved all my jpeg images

debian:~# cd /home/hipo/Desktop/my_images_directory/

2. Use the convert binary part of imagemagick package to generate the actual PDF file from the group of images

debian:~# convert *.jpg outputpdffile.pdf

If the images are numbered and contain many scanned pages of course you can always pass by all the images to the /usr/bin/convert binary, like for instance:

debian:~# convert 1.jpg 2.jpg 3.jpg 4.jpg 5.jpg outputpdffile.pdf
Even though in my case I had to convert to PDF from multiple JPEG (JPG) pictures, convertion with convert is not restricted to convert only from JPEG, but you can also convert to PDF by using other graphical file formats.

For instance to convert multiple PNG pictures to a single PDF file the command will be absolutely the same except you change the file extension of the graphic files e.g.:

debian:~# convert 1.PNG 2.PNG 3.PNG 4.PNG 5.PNG OUTPUT-PDF-FILE.PDF

I was quite happy eventually to know Linux is so flexible and such a trivial things are able to be completed in such an easy way.

How to make screenshots on Slackware Linux with XFCE graphical environment

Thursday, February 23rd, 2012

1. Install the slackware binary package xfce4-screenshooter.

For the latest Slackware Linux release which as of time of writting is 13.37 xfce4-screenshooter-1.7.9-i486-3sl.txz can be download from here

Install of xfce4-screenshooter-1.7.9-i486-3sl.txz is done with slackware's usual installpkg package manager command:

bash-4.1# /sbin/installpkg xfce4-screenshooter-1.7.9-i486-3sl.txz

By the way, I haven't used slackware for a long time so in the mean time since Slackware 13, the default slackware packages format .tgz is now substituted with the newer .txz (better compressed .txz). The old .tgz was simply a tar archive with DEFLATE gzip. The newer .txz packages bundled with newer slackware releases are using the LZMA2 (XZ) chain algorithm for compression. LZMA implies higher compression than even bzip2 and this is the reason why Patrick Volkerding – the one man army man behind Slackware decided to use it.
The reason Vollerding choose using .txz is slackware network distribution will load up less the networks and will take less time for downloading extra slackware packages via the internet. The .txz also reduces slackware main CD size so more packages can be contained in the same 700MB sized slack install CD.

Anyways now back to the installation of xfce-screenshooter.

Once installed to runit use the Xfce menus:

Xfce Menu -> Accesories -> Screenshot

Next you will see the xfce-screenshooter program to pop-up:

To take a snapshot of the screen use:

Entire Screen -> Save

XFCE screenshooter Slackware Linux take a screenshot dialog

XFCE screenshooter Slackware Linux action Save
 

What is the real development costs of Debian GNU / Linux – How much costs the development of a Free Software projects

Friday, February 17th, 2012

Free Software (FS) is free as in freedom as well as free as in price. Free and Open Source Software (FOSS) is developed by geek hobbyist which voluntarily put their time and effort in writting, testing and sharing with anyone for free million of lines of programming code. This doesn't mean however the price of free software costs is 0 (zero). Though the "end product" –  Free Software developed is FREE, "real" software costs as with any other product costs huge money.

I've recently read on Jeb's blog an estimation on how much is the cost of one of the major Free Software project efforts – Debian GNU / Linux
According to James E. Brombergerthe whole Debian project was estimated to be at the shocking price of $19 billion – $19 000, 000, 000 !!!

Here is how JEB got the $19 billions, a quote taken from his blog:

"By using David A Wheeler’s sloccount tool and average wage of a developer of US$72,533 (using median estimates from Salary.com and PayScale.com for 2011) I summed the individual results to find a total of 419,776,604 source lines of code for the ‘pristine’ upstream sources, in 31 programming languages — including 429 lines of Cobol and 1933 lines of Modula3!

In my analysis the projected cost of producing Debian Wheezy in February 2012 is US$19,070,177,727 (AU$17.7B, EUR€14.4B, GBP£12.11B), making each package’s upstream source code worth an average of US$1,112,547.56 (AU$837K) to produce. Impressively, this is all free (of cost).

James has done incredible job with this great research and he deserves applause.
However I believe the numbers proposed by his research are slightly different if we speak about realistic cost of Debian GNU / Linux.
The real costs of the working software ready to install on a user PC are way higher, as according to Jeb's research only the software cost based on code line count is considered.

Hence James software estimation calculates only the programming costs and miss many, many factors that constitute the software end cost.
Some of the many, many REAL COST / expenses for developing a huge Free Software project like Debian GNU / Linux to be considered are:
 

a) bandwidth costs for hosting free software (on the server side)b) bandwidth cost for developers or FS users downloading the software

a) Time spend to spread the word of the great added value of Debian and bundled software (Mouth by Mouth Marketing)

b) Time spend to advertise Debian and its free software components on blogs, social networks (identi.ca, facebook, twitter) etc.(Voluntary online Marketing, SEO etc.)

c) Time spend on generating ideas on future program versions and reporting them to Debian FS community

d) Time on evaluation and feedback on software

e) Time spend on managing free software repository (download) servers voluntarily (by system administrators)

f) Time spend by users on Bug Tracking & Bug Reporting

g) Time spend on research and self-actualization by software developer)

h) Time spend on software Quality Assurance

This are most of the multiple factors which should probably influence the cost of any non-free (proprietary software) project. No matter this costs apply for non-free software, it perfectly applies for free software as well.With all said if if we assume the non-programming costs are equal to the programming costs of $ 19 000 000 000 (suggested by Jeb). This means the real cost of Debian will presumably be at least $32 000 000 000. Putting $ 19 billion for all this long list of "additional" costs (besides pure source) factors is probably still very under-scored number.
 

  • the developers use of their own computers (hardware depreciation)
  • electricity bill of the volunteer (developer) working on the program or project
  • electricity bills for servers where free software is stored and available for download
  • volunteer developer IT skills and tech knowledge (KNOW HOW)
  • Internet, network, dial up bandwidth cost
  • personal time put in FS development (programming, design, creativity etc.)! here the sub costs are long:
  • Costs for Project Management Leaders / Project Coordination
  • The complexity of each of the projects constituting Debian

Very interesting figure from Jeb's research is the Programming Languages break down by source code figure.
Jamesresearch reveals on the 4 major programming languages used in the 17000+ software projects (part of Debian GNU / Linux):


  • ANSI C with 168,536,758 – (40% of all projects source code)
  • C++ at 83,187,329 – (20% of all projects source)
  • Java 34,698,990 – (lines of code 8% of sources)
  • Lisp – (7% of all projects source code)

  His research also provides a general idea on how much the source code of some of the major FOSS projects costs. Here is a copy of his figures
 

Individual Projects

Other highlights by project included:

Project Version Thousands
of SLOC
Projected cost
at US$72,533/developer/year
Samba 3.6.1 2,000 US$101 (AU$93M)
Apache 2.2.9 693 US$33.5M (AU$31M)
MySQL 5.5.17 1,200 US$64.2M (AU$59.7M)
Perl 5.14.2 669 US$32.3M (AU$30M)
PHP 5.3.9 693 US$33.5M (AU$31.1M)
Bind 9.7.3 319 US$14.8M (AU$13.8M)
Moodle 1.9.9 396 US$18.6M (AU$17.3M)
Dasher 4.11 109 US$4.8M (AU$4.4M)
DVSwitch 0.8.3.6 6 US$250K (AU$232K)


As you can imagine all the source evaluation results, are highly biased and are open for discussion, since evaluating a free software project/s is a hard not to say impossible task. The "open" model of development makes a project very hard to track, open source model implies too many unexpected variables missing from the equation for clear calculation on costs. What is sure however if turned in money it is very expensive to produce.  At present moment Debian Project is sponsored only through donations. The usual yearly budget 5 years ago for Debian  was only $80 000 dollars a year!! You can check Debian Project annual reports throughout the years here , for year 2012 Debian Project budget is as low as $ 222, 677 (US Dollars)! The output price of the software the project provides is enormous high if compared to the low project expenses!

For us the free software users, price is not a concern, Debian is absolutely free both  as in freedom and free as in beer 😉