Posts Tagged ‘package’
Tuesday, July 17th, 2012 
I use Debian Linux for my desktop for quite some time; Even though there are plenty of MP3 / CD players around in Debian, I’m used to the good old XMMS, hence I often prefer to use XMMS to play my music instead of newer players like RhythmBox or audacious.
Actually audacious is not bad substitute for XMMS and is by default part of Debian but to me it seems more buggy and tends to crash during playing some music formats more than xmms ….
As most people might know, XMMS is no longer supported in almost all modern Linux distributions, so anyone using Debian, Ubuntu or other deb derivative Linux would have to normally compile it from source.
Compiling from source is time consuming and I think often it doesn’t pay back the effort. Thanksfully, though not officially supported by Debian crew XMMS still can be installed using a deb xmms prebuilt package repository kindly provided by a hacker fellow knuta.
Using the pre-build deb packages, installing xmms on new Debian installs comes to:
debian:~# echo 'deb http://www.pvv.ntnu.no/~knuta/xmms/squeeze ./' >> /etc/apt/sources.list
debian:~# echo 'deb-src http://www.pvv.ntnu.no/~knuta/xmms/squeeze ./' >> /etc/apt/sources.list
debian:~# apt-get update && apt-get -y install xmms
There are also deb xmms built for Ubuntu, so Ubuntu users could install xmms using repositories:
deb http://www.pvv.ntnu.no/~knuta/xmms/karmic ./
deb-src http://www.pvv.ntnu.no/~knuta/xmms/karmic ./
That’s all now xmms is ready to use. Enjoy 🙂
Tags: amp, Auto, buggy, Compiling, consuming, Crew, deb, deb packages, Debian, Desktop, Draft, fellow, hacker, Installing, Linux, linux distributions, mp3 cd players, music, music formats, package, pvv, quite some time, repositories, repository, RhythmBox, squeeze, substitute, Thanksfully, time, time consuming, Ubuntu, update, way, XMMS, xmmsThere
Posted in System Administration | No Comments »
Tuesday, May 22nd, 2012 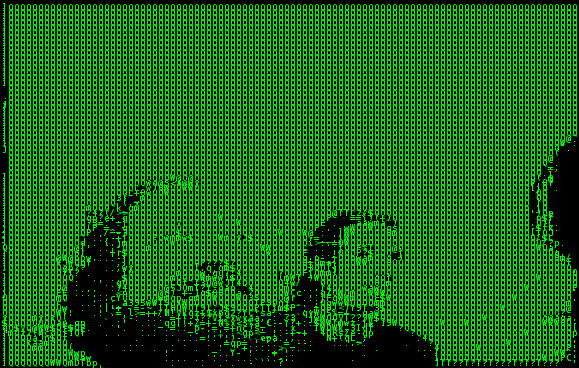
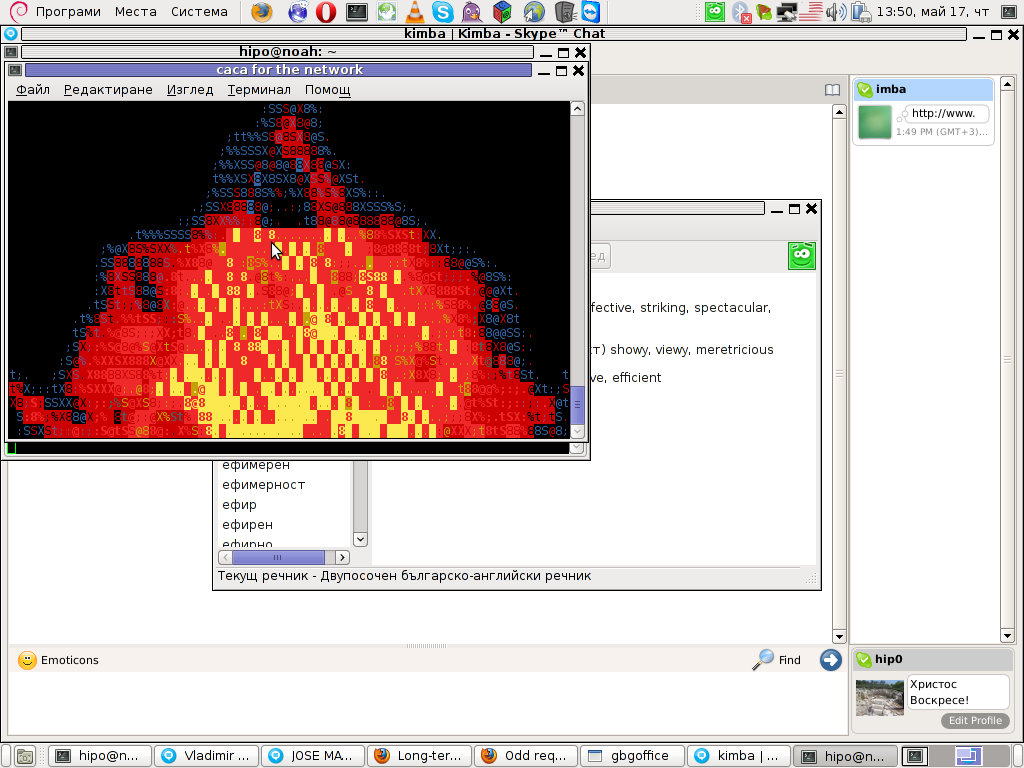
To continue with my lately ASCII centered articles I found hasciicam
hasciicam is a program to stream ASCII video over the network on Linux and probably can be easily made working on FreeBSDtoo.
The project concept is interesting in a matter of fun (play) point of view, however not too usable as we all know ASCII character looking faces doesn't look too pretty.
Below is the Debian (Squeeze) package description:
noah:~# apt-cache show hasciicam|grep -i description -A 7

Description: (h)ascii for the masses: live video as text

Hasciicam makes it possible to have live ASCII video on the web. It

captures video from a tv card and renders it into ascii, formatting the

output into an html page with a refresh tag or in a live ASCII window or

in a simple text file as well, giving the possibility to anybody that has a

bttv card, a Linux box and a cheap modem line to show a live ASCII video

feed that can be browsable without any need for plugin, java etc.

Homepage: http://ascii.dyne.org/
On hasciicam Project webpage is it is stated as a hardware you need to have:
"As hardware you need to have a webcam or a videocard supported by "video 4 linux", most of the gear you can buy around should work well."
To install and test it I run:
noah:~# apt-get --yes install hasciicam
Though it is stated on the project website supposed to work display video fine with most 'linux ready' webcams, it didn't with this very standard one.
Here is the exact WebCamera model as identified to the kernel:
noah:~# dmesg|grep -i camera

[ 1.433661] usb 2-2: Product: USB2.0 Camera

[ 10.107840] uvcvideo: Found UVC 1.00 device USB2.0 Camera (1e4e:0102)

[ 10.110660] input: USB2.0 Camera as /devices/pci0000:00/0000:00:1d.7/usb2/2-2/2-2:1.0/input/input11
By the way, I use the very same CAM daily on for Skype video calls as well as the Camera is working with no problems to save video or pictures inside Cheese
Here is the exact WebCamera model as identified to the kernel:
noah:~# dmesg|grep -i camera

[ 1.433661] usb 2-2: Product: USB2.0 Camera

[ 10.107840] uvcvideo: Found UVC 1.00 device USB2.0 Camera (1e4e:0102)

[ 10.110660] input: USB2.0 Camera as /devices/pci0000:00/0000:00:1d.7/usb2/2-2/2-2:1.0/input/input11
The just installed deb has one binary file only /usr/bin/hasciicam. To test it with the camera I issued:
noah:~# hasciicam -d /dev/video0

HasciiCam 1.0 - (h)ascii 4 the masses! - http://ascii.dyne.org

(c)2000-2006 Denis Roio < jaromil @ dyne.org >

watch out for the (h)ASCII ROOTS
Device detected is /dev/video0
USB2.0 Camera
1 channels detected
max size w[640] h[480] - min size w[48] h[32]
Video capabilities:
VID_TYPE_CAPTURE can capture to memory
!! error in ioctl VIDIOCGMBUF: : Invalid argument
Unfortunately as you see from the output, it failed to detect the web camera model.
The exact camera besides its kernel detection naminf is a cheap external USB 2.0 (fake brand / nonanem) "universal" Web PC Camera (SUPER .3mega pixel)
For those who have a further interest in building and installing hasciicam on other Linux platforms than Debian and Ubuntu or whoever wants to look in the code check check Project webpage is. For those who are less of programmers (like me) the project is written in C programming language and uses aa-lib in order to render the video to ASCII.
On the site you will notice two totally schizophrenic looking pictures of presumably the project head developer …
As I read in man hasciicam manual page it's said to be able to generate ascii plain text and html files as well as directly to write the output to console, which later probably can be streamed via the network.
Pitily as it didn't detect my camera I couldn't make some testing of its network capabilities.
A Streaming of ASCII couuld be done through pushing the .html output to a webserver and setting a php or javascript to loop through and refresh the browser over the uploaded files every sec or so.
Also I assume the ASCII video output saved in plain console could be streamed via netcat or some tiny scripted perl or bash script and directly observed via a telnet or ssh connection.
One playful way I can think of checking a stored video without the use of FTP is to login via ssh and do:
$ ssh someuser@somehost

$ watch -n 1 "cat video-ascii.html"
🙂
Well something disturbing about hasciicam from a (purely Christian point of view) is it was developed by some kind of non profit organization called RastaSoft on the project website, some of its authors has written JAH BLESS.
As I didn't succeeded seeing it working, I'll be interested to hear if someone who red this article and give it a try can report the web camera model used.
Tags: ascii character, Auto, card, description, dmesg, doesn, Draft, dyne, file, formatting, fun, fun play, gnu linux, HasciiCAM, html page, kernel, linux box, modem line, noah, package, package description, page, pci, plugin java, possibility, Product, project webpage, quot, refresh, show, squeeze, ssh, tag, text, tv card, video, video feed, video on the web, videocard
Posted in Entertainment, System Administration, Various | No Comments »
Saturday, May 19th, 2012 I'm a guy fascinated by ASCII art, since the very early days I saw a piece of this awesome digital art.
As time passed and computers went to be used mostly graphics resolution, ASCII art loose its huge popularity from the early DOS and BBS (internet primordial days).
However, this kind of art is still higly valued by true computer geeks.
In that manner of thoughts, lately I'm researching widely on ASCII art tools and ASCII art open source tools available for Linux.
Last time I check what is available for 'ASCII job' was before 5 years time. Recently I decided to review once again and see if there are new software for doing ascii manipulations on Linux and this is how this article got born.
My attention was caught by aewan (ASCII-art Editor Without A Name), while searching for ASCII keyword description packages with:
apt-cache search ascii
Aewan project official website is on sourceforge check it out here
Here is the complete description of the Debian package:
hipo@noah:~$ apt-cache show aewan|grep -i description -A 5

Description: ASCII-art Editor Without A Name

aewan is an ASCII art editor with support for multiple layers that can be

edited individually, colors, rectangular copy and paste, and intelligent

horizontal and vertical flipping (converts '\' to '/', etc). It produces

both stand-alone art files and an easy-to-parse format for integration

into your terminal applications.
I installed it to give it a try:
noah:~# apt-get --yes install aewan

Selecting previously deselected package aewan.

(Reading database ... 388522 files and directories currently installed.)

Unpacking aewan (from .../aewan_1.0.01-3_amd64.deb) ...

Processing triggers for man-db ...

Setting up aewan (1.0.01-3) ...
aewan package provides three executable binaries:
noah:~# dpkg -L aewan|grep -i /bin/ /usr/bin/aecat

/usr/bin/aewan

/usr/bin/aemakeflic
1. aewan binary is the ascii-art editor itself
2. aecat is utility to display an aewan documents (aewan format saved files)3. aemakeflic – tool to produce an animation from an aewan document
Next I ran it in plain console tty to check how it is like:
hipo@noah:~$ aewan
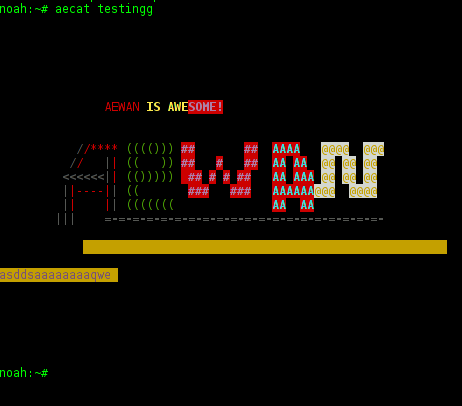
Below are screenshots to give you an idea how powerful aewan ASCII art editor is:
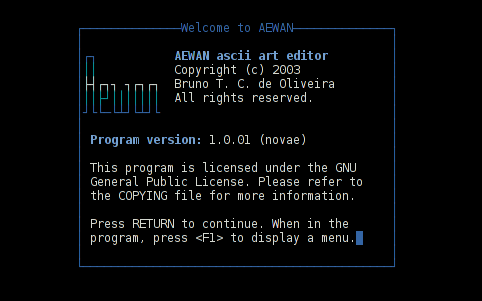
Aewan immediate entry screen after start up
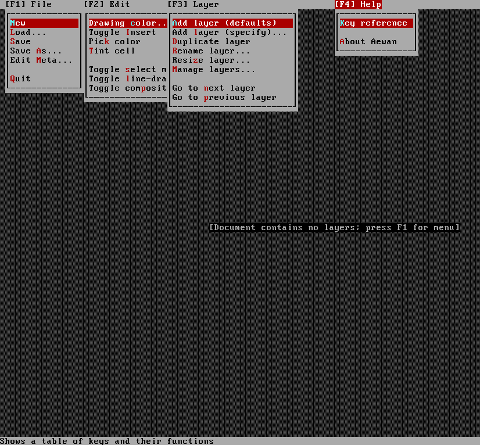
Aewan ASCII art editor – all of the supported tool functions
As you can see from the shot the editor is very feature rich. I was stunned to find out it even supports layers (in ASCII!!) (w0w!).
It even has a Layers Manager (like GIMP) 🙂
To create my first ASCII art I used the:
New
menu.
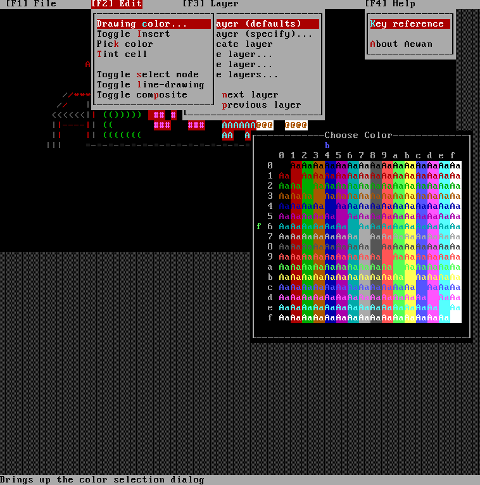
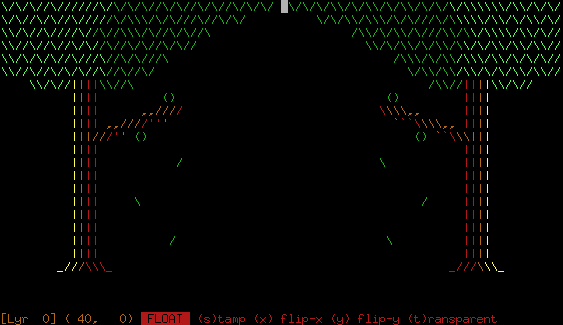
This however didn't immediately show the prompt, where I can type the ascii characters to draw my picture. In order to be able to draw inside the editor, its necessary to open at least one layer, through using the menu:
Add Layer (defaults)
then the interactive ASCII art editor appeared.
While an ASCII art is created with the editor you can select the color of the input characters by using Drawing Color menu seen in the above screenshot.
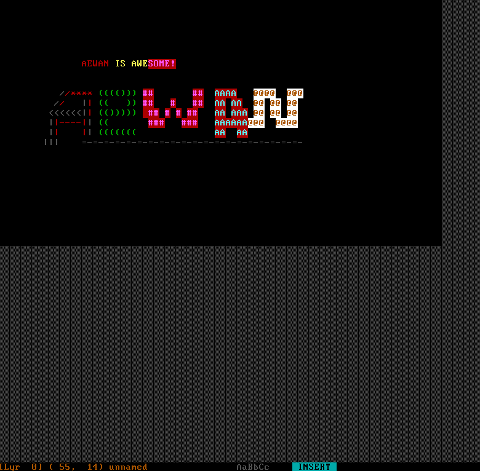
I've played few minutes and created a sample ascii art, just to test the color and editor "look & feel", my conclusions are the editor chars drawing is awesome.
All the commands available via menus are also accessible via a shortcut key combinations:
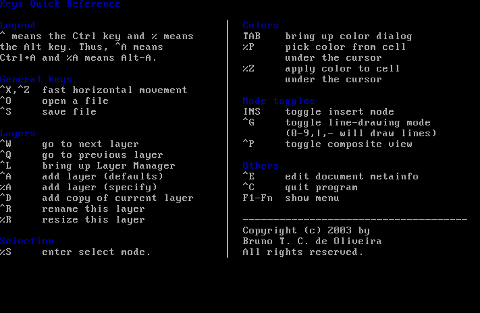
aewan controls are just great and definitely over-shadows every other text editor I used to draw an ASCII art so far.
Once saved the ASCII art, are by default saved in a plain gzipped ascii text. You can therefore simply zcat the the saves;
Don't expect zcat to show you the ascii as they're displayed in aewan, zcat-ing it will instead display just the stored meta data; the meta data is interpreted and displayed properly only with aecat command.
I've checked online for rpm builds too and such are available, so installing on Fedora, CentOS, SuSE etc. is up to downloading the right distro / hardware architecture rpm package and running:
# rpm -ivh aewan*.rpm
On the official website, there are also instructions to compile from source, Slackware users and users of other distros which doesn't have a package build should compile manually with the usual:
$ tar -zxf aewan-1.0.01.tar.gz

$ cd aewan-1.0.01

$ ./configure

$ make

$ su -c "make install"
For those inrested to make animations with aemakeflic you need to first save a multiple layers of pictures. The idea of creating ASCII art video is pretty much like the old school way to make animation "draw every scene" and movie it. Once all different scene layers of the ASCII art animation are prepared one could use aemakeflic to export all the ASCII layers as common video.
aemakeflic has the ability to export the ASCII animation in a runnable shell script to display the animation. The other way aemakeflic can be used is to produce a picture in kind of text format showing the video whether seen with less cmd.
Making ASCII animation takes a lot of time and effort. Since i'm too lazy and I lack the time I haven't tested this functionality. Anyways I've seen some ascii videos on telnet to remote hosts (some past time); therefore I guess they were made using aewan and later animated with aemakeflic.
I will close this post with a nice colorful ASCII art, made with aewan (picture is taken from the project page):
Tags: aecat, animation, ars, art, art editor, art files, art tools, ascii art, ascii keyword, Auto, BBS, bbs internet, computer geeks, converts, copy, copy and paste, deb, debian linux, debian package, description, documenti, dos days, dpkg, Draft, executable binaries, hipo, keyword description, manipulations, menu, nbsp, new software, noah, open source tools, package, piece, quot, reading database, related tools, revolution, rpm, Search, show, software, support, terminal, terminal applications, text, time, tool, true computer, zcat
Posted in Entertainment, Everyday Life, Various | No Comments »
Thursday, May 17th, 2012 
Probably, many don't know that it is possible to view normal graphical pictures (JPG, PNG, GIF, BMP) etc. in plain console tty.
Being able to view pictures in ASCII is something really nice especially for console geeks like me.
The images produced sometimes are a bit unreadable, if compared to the original graphics, but anyways most of the pictures looks pretty decent 🙂
Viewing in console / terminal images on GNU / Linux is possible thanks to a library called libcaca, caca labs libcaca project official website here.
Below is a shot description of libcaca:
hipo@noah:~$ apt-cache show libcaca0|grep 'Description' -A 4

Description: colour ASCII art library

libcaca is the Colour AsCii Art library. It provides high level functions

for colour text drawing, simple primitives for line, polygon and ellipse

drawing, as well as powerful image to text conversion routines.
In Debian, Ubuntu and other deb Linux distros viewing GUI images with no need for Xserver or any kind of window manager in plain ASCII is possible with cacaview.
cacaview is part of a package called caca-utils. caca-utils is providing few other great utilities for ASCII freaks 🙂 along with cacaview console ascii viewer prog.
The package> is available for Debian distributins since many years, so even on a very old Debians like Debian – (Potato, Woody, Sarge) the package is available in default free package repositories ready to install via apt
To install apt-get it as usual:
noah:~# apt-get --yes install caca-utils
Here is a list of the binaries the package provides:
hipo@noah:~$ dpkg -L caca-utils|grep -i /usr/bin/

/usr/bin/cacaserver

/usr/bin/cacaplay

/usr/bin/cacafire

/usr/bin/cacademo

/usr/bin/cacaview

/usr/bin/img2txt
1. cacaserver a tiny program allowing network streaming of applications written in caca
Belkow is a chop, from man cacaserver
cacaserver reads libcaca animation files in its standard input and
serves them as ANSI art on network port 51914. These animations can be
created by any libcaca program by setting the CACA_DRIVER environment
variable to raw and piping the program's standard output to cacaserver.
Clients can then connect to port 51914 using telnet or netcat to see
the output.
The example section of the manual points 1 example use of cacaserver to stream the console output from cacademo.
cacademo binary is a short presentation ASCII DEMO in the spirit of the old school assembly demos (demoscene) .
To run it to bind on port 51914 one has to type in bash shell:
hipo@noah:~$ CACA_DRIVER=raw cacademo | cacaserver

initialised network, listening on port 51914
Then to check out how the demo looks, open telnet connection to the cacaserver host; In my case the cacaserver is binded and streamed over IP 192.168.0.2:
hipo@debian:~$ telnet 192.168.0.2 51914
Immediately you got the demo shining; Below are two screenshots of the demo played after succesful telnet connection:
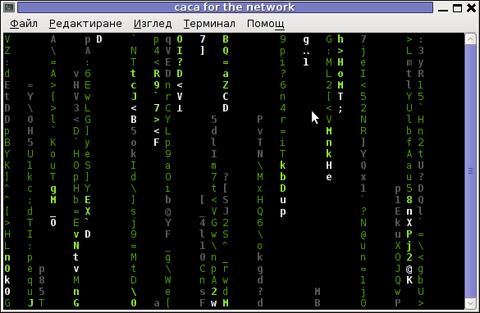
cacademo running over telnet network connection – Matrix
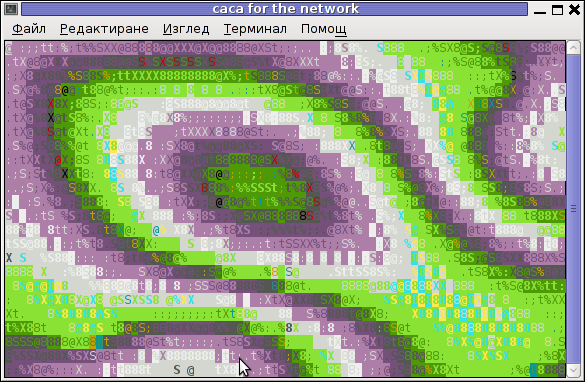
Blur spots cacademo shot of cacademo streamed via network
You see the demo looks quite awesome 🙂
2. Running cacafire to stream over network
Another possible example use of cacaserver is in conjunction with cacafire libcaca test application:
noah:~# CACA_DRIVER=raw cacafire | cacaserver

initialised network, listening on port 51914
cacafire is a short application written to render ASCII via libcaca and is just displaying a screen with ASCII (moving) burning fire.
It is quite spectacular if you, ask an unexpecting friend to connect to your host to 51914 🙂
Besides that bored sys admins, could run cacafire in console to hypnotize themselves watching dumb the burning fire screen for few hoursor just use it as a screensaver 😉
3. cacaview a program to display a graphic images in console using ASCII art
cacaview takes just one argument – the picture to be displayed.
Below is a screenshot of cacaview ran from my gnome-terminal displaying a ASCII text version of the MySQL server logo
hipo@noah:~$ cd /disk/pictures

hipo@noah:/disk/pictures$ cacaview mysql_logo.png
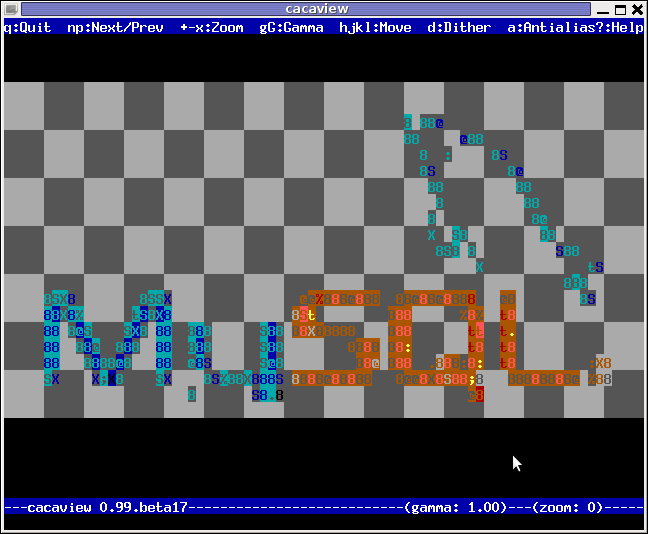
Whether cacaview is invoked in GUI, the libcaca X support is used, so the text image is visualized in new window with graphics, if however it is invoked in plain let's say tty1 libcaca displays the graphics pictures drawing it with only text characters.
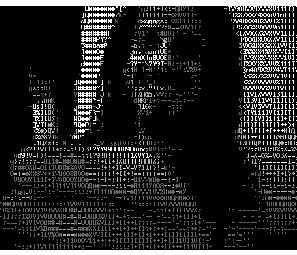
Here is also a screenshot, I've made while viewing a GIF website logo in ASCII in plain tty console:
hipo@noah:~$ cacaview /disk/pictures/logo.gif
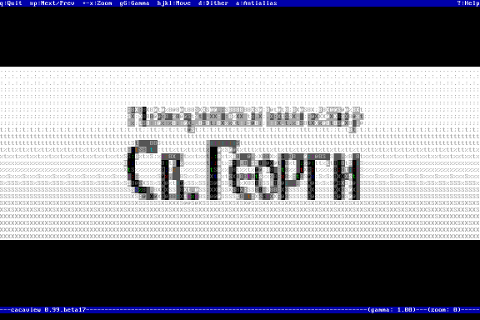
The logo is in cyrillic, so for latin speaking people some of the characters in the two words seen will be unreadable 🙂
cacaview even supports viewing, the next and previous picture in line, like in any modern graphics image viewer program.
To view a bunch of graphic pictures in ASCII with cacaview pass it *.*:
hipo@noah:~$ cacaview /disk/pictures/*.*
For simplicity the common unix * is also supported, so I find it quicker to do:
hipo@noah:~$ cacaview /disk/pictures/*
Showing pictures forward and backward (Previous / Next) picture is done with n and p kbd keys, whether;
 n - next;

p - previous
cacaview doesn't crash or stop but skip unknown file formats – if for instance encounters filenames which are not images; lets say you have *.rar archive files along with other pictures.
The complete list of keys cacaview supports are:
br />
KEYS
? show the help screen
n, p switch to next image, previous image
Left, Right, Up, Down or h, l, k, j
scroll the image around
+, – zoom in and out
z reset the zoom level to normal
f switch fullscreen mode (hide/show menu and status bars)
d toggle the dithering mode (no dithering, 4×4 ordered dithering, 8×8 ordered dithering and random dithering)
q exit the program
4. Converting graphics images to ASCII art like (plain text pictures)
The tool that does "the trick" is img2txt. img2txt has a bit more options while compared to the rest of the aforementioned tools.The following list of arguments are recognized:
- the size (font, height)
- brightness
- contrast
- gamma and dither
- format type of out the output pic
Anyways I found that the basic just in / out arguments passed are enough to produce pretty good results:
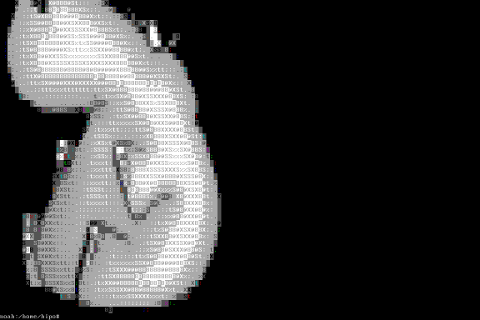
hipo@noah:~$ img2txt hipo_avatar.gif >hipo_avatar_pic.txt
The original hipo_avatar.gif file looks like so:

After above img2txt command is run and hipo_avatar_pic.txt to see the colorful output ASCII art img2txt produces, cat it:
hipo@noah:~$ cat hipo_avatar_pic.txt
The image result if screenshot looks quite beautiful and even, can be considered or used as an ART effect image (filter) 🙂
The picture colors are plain ANSI color, so in order to display properly the picture with colors on another computers or Operating System you will need at least basic support for ANSI colors.
Plenty of output file formats are supported by img2txt
Here is the complete list of supported output formats:
ansi : coloured ANSI
caca : internal libcaca format
utf8 : UTF8 with CR
utf8 : UTF8 with CRLF (MS Windows)
html : HTML with CSS and DIV support
html3 : Pure HTML3 with tables
irc : IRC with ctrl-k codes
bbfr : BBCode (French)
ps : Postscript
svg : Scalable Vector Graphics
tga : Targa Image
libcaca is available for FreeBSD too, but the caca-utils is not available as a port yet, though probably the deb or rpm packages can easily be ported to BSD.
Well that's all, Enjoy.
Tags: animation files, art, ascii art library, Auto, caca, colour, colour text, connection, conversion routines, demo, description, Disk, dpkg, Draft, ellipse, gnu linux, graphics utilities, gui images, hipo, host, JPG, level, level functions, libcaca, linux distros, nbsp, noah, original graphics, package, plain ascii, png, polygon, primitives, screen, screenshot, shot, shot description, show, something, support, terminal, text, text conversion, text mode, tiny program, xserver
Posted in Everyday Life, Linux, System Administration, Various | 1 Comment »
Friday, May 11th, 2012 
A friend of mine bring home a Seagate External Hard Disk Drive using USB 3 as a communication media. I needed to attach the hard disk to my FreeBSD router to transfer him some data, the External HDD is formatted to use NTFS as a main file partition and hence to make the file transfers I had to somehow mount the NTFS partition on the HDD.
FreeBSD and other BSDs, just like Linux does not have embedded NTFS file system mount support.
In order to add an external write support for the plugged hdd NTFS I looked in the ports tree:
freebsd# cd /usr/ports

freebsd# make search name='ntfs'

Port: fusefs-ntfs-2010.10.2

Path: /usr/ports/sysutils/fusefs-ntfs

Info: Mount NTFS partitions (read/write) and disk images

Maint: ports@FreeBSD.org

B-deps: fusefs-libs-2.7.4 libiconv-1.13.1_1 libtool-2.4 libublio-20070103 pkg-config-0.25_1

R-deps: fusefs-kmod-0.3.9.p1.20080208_7 fusefs-libs-2.7.4 libiconv-1.13.1_1 libublio-20070103 pkg-config-0.25_1

WWW: http://www.tuxera.com/community/
Port: ntfsprogs-2.0.0_1
Path: /usr/ports/sysutils/ntfsprogs
Info: Utilities and library to manipulate NTFS partitions
Maint: ports@FreeBSD.org
B-deps: fusefs-libs-2.7.4 libiconv-1.13.1_1 libublio-20070103 pkg-config-0.25_1
R-deps: libublio-20070103 pkg-config-0.25_1
WWW: http://www.linux-ntfs.org/
freebs# cd sysutils/fusefs-ntfs/
freebsd# ls
Makefile distinfo files/ pkg-descr pkg-plist
freebsd# cat pkg-descr
The ntfs-3g driver is an open source, freely available read/write NTFS
driver, which provides safe and fast handling of the Windows XP, Windows
Server 2003 and Windows 2000 filesystems. Almost the full POSIX filesystem
functionality is supported, the major exceptions are changing the file
ownerships and the access rights.
WWW: http://www.tuxera.com/community/
Using ntfs-3g I managed to succeed mounting the NTFS on my old PC running FreeBSD ver. 7_2
1. Installing fuserfs-ntfs support on BSD
Before I can use ntfs-3g, to mount the paritition, I had to install fuserfs-ntfs bsd port, with:
freebsd# cd /usr/ports/sysutils/fusefs-ntfs

freebsd# make install clean

.....
I was curious if ntfsprogs provides other utilities to do the ntfs mount but whilst trying to install it I realized it is already installed as a dependency package to fusefs-ntfs.
fusefs-ntfs package provides a number of utilities for creating, mounting, fixing and doing various manipulations with Microsoft NTFS filesystems.
Here is a list of all the executable utilities helpful in NTFS fs management:
freebsd# pkg_info -L fusefs-ntfs\* | grep -E "/bin/|/sbin|README"

/usr/local/bin/lowntfs-3g

/usr/local/bin/ntfs-3g

/usr/local/bin/ntfs-3g.probe

/usr/local/bin/ntfs-3g.secaudit

/usr/local/bin/ntfs-3g.usermap

/usr/local/bin/ntfscat

/usr/local/bin/ntfscluster

/usr/local/bin/ntfscmp

/usr/local/bin/ntfsfix

/usr/local/bin/ntfsinfo

/usr/local/bin/ntfsls

/usr/local/sbin/mkntfs

/usr/local/sbin/ntfsclone

/usr/local/sbin/ntfscp

/usr/local/sbin/ntfslabel

/usr/local/sbin/ntfsresize

/usr/local/sbin/ntfsundelete

/usr/local/share/doc/ntfs-3g/README

/usr/local/share/doc/ntfs-3g/README.FreeBSD
The README and README.FreeBSD are wonderful, reading for those who want to get more in depth knowledge on using the up-listed utilities.
One utility, worthy to mention, I have used in the past is ntfsfix. ntfsfix resolve issues with NTFS partitions which were not unmounted on system shutdown (electricity outage), system hang up etc.
2. Start fusefs (ntfs) and configure it to auto load on system boot
Once fuserfs-ntfs is installed, if its necessery ntfs fs mounts to be permanently supported on the BSD system add fusefs_enable="YES" to /etc/rc.conf – (the FreeBSD services auto load conf).
freebsd# echo 'fusefs_enable="YES"' >> /etc/rc.conf
One note to make here is that you need to have also dbus_enable="YES" and hald_enable="YES" in /etc/rc.conf, not having this two in rc.conf will prevent fusefs to start properly. Do a quick grep to make sure this two variables are enabled:
Afterwards fsusefs load up script should be run:
freebsd# /usr/local/etc/rc.d/fusefs start

Starting fusefs.
Another alternative way to load ntfs support on the BSD host is to directly load fuse.ko kernel module:
freebsd# /sbin/kldload fuse.ko
3. Mounting the NTFS partition
In my case, the Seagate hard drive was detected as da0, where the NTFS partition was detected as s1 (da0s1):
freebsd# dmesg|grep -i da0

da0 at umass-sim0 bus 0 target 0 lun 0

da0:  Fixed Direct Access SCSI-4 device

da0: 40.000MB/s transfers

da0: 953869MB (1953525164 512 byte sectors: 255H 63S/T 121601C)br />GEOM_LABEL: Label for provider da0s1 is ntfs/Expansion Drive.

GEOM_LABEL: Label for provider da0s1 is ntfs/Expansion Drive.
Therefore further to mount it one can use mount_ntfs (to quickly mount in read only mode) or ntfs-3g for (read / write mode):
If you need to just quickly mount a disk drive to copy some data and umount it with no need for writting to the NTFS partition do;
freebsd# /sbin/mount_ntfs /dev/ad0s1 /mnt/disk
Note that mount_ntfs command is a native BSD command and have nothing to do with ntfs-3g. Therefore using it to mount NTFS is not the same as mounting it via ntfs-3g cmd
freebsd# /usr/local/bin/ntfs-3g -o rw /dev/da0s1 /mnt/disk/
Something, I've noticed while using ntfs-3g is, it fails to properly exit even when the ntfs-3g shell execution is over:
freebsd# ps ax |grep -i ntfs|grep -v grep

18892 ?? Is 0:00.00 /usr/local/bin/ntfs-3g -o rw /dev/da0s1 /mnt/disk/
I dunno if this is some kind of ntfs-3g bug or feature specific to all versions of FreeBSD or it is something local to FBSD 7.2
Thought ntfs-3g, keeps appearing in process list, praise God as of time of writting NTFS support on FreeBSD prooved to be stable.
Read / Write disk operations to the NTFS I tested it with works great. Just about 5 years ago I still remember write mode was still experimental. Now it seems NTFS mounts can be used with no hassle even on production machines.
4. Auto mounting NTFS partition on FreeBSD system boot
There are two approaches towards 'the problem' I can think of.
The better way to auto mount on boot (in my view) is through /etc/fstab use
If /etc/fstab + ntfs-3g is to be used, you will however change the default /sbin/mount_ntfs command to point to /usr/local/bin/ntfs-3g, i.e.:
freebsd# mv /sbin/mount_ntfs /sbin/mount_ntfs.orig

freebsd# ln -s /usr/local/bin/ntfs-3g /sbin/mount_ntfs
Then to mount /dev/da0s1 via /etc/fstab add line:
/dev/ad0s1 /mnt/disk ntfs rw,late 0 0
To not bother with text editor run:
freebsd# echo '/dev/ad0s1 /mnt/disk ntfs rw,late 0 0' >> /etc/fstab
I've red in posts in freebsd forums, there is also a way to use ntfs-3g for mounting partitions, without substituting the original bsd /sbin/mount_ntfs, the exact commands suggested to be used with no need to prior mv /sbin/mount_ntfs to /sbin/mount_ntfs.orig and link it to ntfs is:
/dev/ad0s1 /disk ntfs rw,mountprog=/usr/local/bin/ntfs-3g,late 0 0
For any other NTFS partitions, for instance /dev/ad0s2, /dev/ad2s1 etc. simply change the parititon name and mount points.
The second alternative to adding the NTFS to auto mount is through /etc/rc.local. /etc/rc.local content will be executed very late in system boot. :
echo '/usr/local/bin/ntfs-3g -o rw /dev/da0s1' >> /etc/rc.local
One disadvanage of using /etc/rc.local for mounting the partition is the hanging ntfs-3g in proc list:
freebsd# ps ax |grep -i ntfs|grep -v grep

18892 ?? Is 0:00.00 /usr/local/bin/ntfs-3g -o rw /dev/da0s1 /mnt/disk/
Though, I haven't tested it yet. Using the same methodology should be perfectly working on PC-BSD, DragonFlyBSD, NetBSD and OpenBSD.
I will be glad if someone who runs any of the other BSDs can confirm, following this instructions works fine on these BSDs too.
Tags: Auto, BSDs, communication media, deps, Disk, disk images, Draft, drive, external hard disk, external hard disk drive, external hdd, file, file transfers, filesystem, filesystems, freebsd router, fuse, GEOM, hard disk drive, hdd, imagesMaint, kmod, libs, linux ntfs, Maint, NetBSD, ntfs partition, OpenBSD, ownerships, package, partition, Path, pkg, portsfreebsd, posix, quot, README, seagate external hard disk, Search, support, tree, Utilities, windows server, www linux, YES
Posted in Everyday Life, FreeBSD, System Administration | 1 Comment »
Wednesday, April 25th, 2012 Debian has a package language-env. I haven't used my Linux console for a long time. So I couldn't exactly remember how I used to be making the Linux console to support cyrillic language (CP1251, bg_BG.UTF-8) etc.
I've figured out for the language-env existence in Debian Book on hosted on OpenFMI – Bulgarian Faculty of Mathematics and Informatics website.
The package info with apt-cache show displays like that:
hipo@noah:~/Desktop$ apt-cache show language-env|grep -i -A 3 description

Description: simple configuration tool for native language environment

This tool adds basic settings for natural language environment such as

LANG variable, font specifications, input methods, and so on into

user's several dot-files such as .bashrc and .emacs.
What is really strange, is the package maintainer is not Bulgarian, Russian or Ukrainian but Japanese.
As you see the developer is weirdly not Bulgarian but Japanese Kenshi Muto. What is even more interesting is that it is another japanese that has actually written the script set-language-env contained within the package. Checking the script in the header one can see him, Tomohiro KUBOTA
Before I've found about the language-env existence, I knew I needed to have the respective locales installed on the system with:
# dpkg-reconfigure locales
So I run dpkg-reconfigure to check I have existing the locales for adding the Bulgarian language support.
Checking if the bulgarian locale is installed is also possible with /bin/ls:
# ls -al /usr/share/i18n/locales/*|grep -i bg

-rw-r--r-- 1 root root 8614 Feb 12 21:10 /usr/share/i18n/locales/bg_BG
The language-env contains a perl script called set-language-env which is doing the actual Debian Bulgarization / cyrillization. The set-language-env author is another Japanese and again not Slavonic person.
Actually set-language-env script is not doing the Bulgariazation but is a wrapper script that uses a number of "hacks" to make the console support cyrillic.
Further on to make the console support cyrillic, execute:
hipo@noah:~$ set-language-env
Setting up users' native language environment
by modifying their dot-files.
Type "set-language-env -h" for help.
1 : be (Bielaruskaja,Belarusian)
2 : bg (Bulgarian)
3 : ca (Catala,Catalan)
4 : da (Dansk,Danish)
5 : de (Deutsch,German)
6 : es (Espanol,Spanish)
7 : fr (Francais,French)
8 : ja (Nihongo,Japanese)
9 : ko (Hangul,Korean)
10 : lt (Lietuviu,Lithuanian)
11 : mk (Makedonski,Macedonian)
12 : pl (Polski,Polish)
13 : ru (Russkii,Russian)
14 : sr (Srpski,Serbian)
15 : th (Thai)
16 : tr (Turkce,Turkish)
17 : uk (Ukrajins'ka,Ukrainian)
Input number > 2
There are many questions in cyrillic list necessery to be answered to exactly define if you need cyrillic language support for GNOME, pine, mutt, console etcetera.
The script will create or append commands to a number of files on the system like ~/.bash_profile
The script uses the cyr command part of the Debian console-cyrillic package for the actual Bulgarian Linux localization.
As said it was supposed to also do a localization in the past of many Graphical environment programs, as well as include Bulgarian support for GNOME desktop environment. Since GNOME nowdays is already almost completely translated through its native language files, its preferrable that localization to be done on Linux install time by selecting a country language instead of later doing it with set-language-env. If you failed to set the GNOME language during Linux install, then using set-language-env will still work. I've tested it and even though a lot of time passed since set-language-env was heavily used for bulgarization still the GUI env bulgarization works.
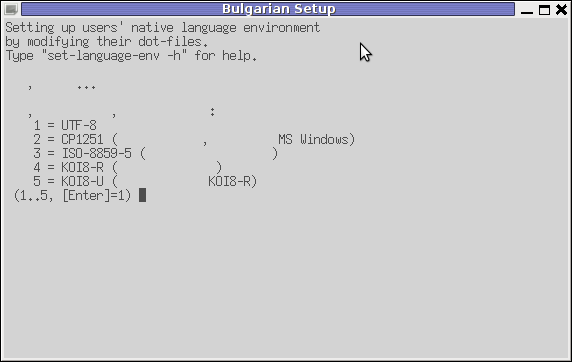
If set-language-env is run in gnome-terminal the result, the whole set of question dialogs will pop-up in new xterm and due to a bug, questions imposed will be unreadable as you can see in below screenshot:
If you want to remove the bulgarization, later at certain point, lets you don't want to have the cyrillic console or programs support use:
# set-language-env -r

Setting up users native language environment'
For anyone who wish to know more in depth, how set-language-env works check the README files in /usr/share/doc/language-env/ one readme written by the author of the Bulgarian localization part of the package Anton Zinoviev is /usr/share/doc/language-env/README.be-bg-mk-sr-uk
Tags: Auto, bashrc, bulgarian language, configuration tool, consol, debian gnu, description, description description, Desktop, dot files, Draft, existence, Faculty, font, font specifications, Gnome, hipo, info, Informatics, input methods, language support, localization, muto, native language, natural language environment, noah, OpenFMI, package, package maintainer, perl script, quot, root, root root, Russian, russian language, set language, show, show displays, support, time, Tomohiro, tool, UTF, utf 8, wrapper script
Posted in System Administration | 4 Comments »
Friday, April 13th, 2012 1. Dump all installed server packages from Debian Linux server1
First it is necessery to dump a list of all installed packages on the server from which the intalled deb packages 'selection' will be replicated.
debian-server1:~# dpkg --get-selections \* > packages.txt
The format of the produced packages.txt file will have only two columns, in column1 there will be the package (name) installed and in column 2, the status of the package e.g.: install or deinstall
Note that you can only use the –get-selections as root superuser, trying to run it with non-privileged user I got:
hipo@server1:~$ dpkg --set-selections > packages.txt

dpkg: operation requires read/write access to dpkg status area
2. Copy packages.txt file containing the installed deb packages from server1 to server2
There is many way to copy the packages.txt package description file, one can use ftp, sftp, scp, rsync … lftp or even copy it via wget if placed in some Apache directory on server1.
A quick and convenient way to copy the file from Debian server1 to server2 is with scp as it can also be used easily for an automated script to do the packages.txt file copying (if for instance you have to implement package cloning on multiple Debian Linux servers).
 root@debian-server1:~# scp ./packages.txt hipo@server-hostname2:~/packages.txt

The authenticity of host '83.170.97.153 (83.170.97.153)' can't be established. RSA key fingerprint is 38:da:2a:79:ad:38:5b:64:9e:8b:b4:81:09:cd:94:d4. Are you sure you want to continue connecting (yes/no)? yes Warning: Permanently added '83.170.97.153' (RSA) to the list of known hosts. hipo@83.170.97.153's password:

packages.txt
As this is the first time I make connection to server2 from server1, I'm prompted to accept the host RSA unique fingerprint.
3. Install the copied selection from server1 on server2 with apt-get or dselect
debian-server2:/home/hipo# apt-get update

...

debian-server2:/home/hipo# apt-get upgrade

Reading package lists... Done

Building dependency tree

Reading state information... Done

debian-server2:/home/hipo# dpkg --set-selections < packages.txt

debian-server2:/home/hipo# apt-get -u dselect-upgrade --yes
The first apt-get update command assures the server will have the latest version of the packages currently installed, this will save you from running an outdated versions of the installed packages on debian-server2
Bear in mind that using apt-get sometimes, might create dependency issues. This is depending on the exact package names, being replicated in between the servers
Therefore it is better to use another approach with bash for loop to "replicate" installed packages between two servers, like so:
debian-server2:/home/hipo# for i in $(cat packages.txt |awk '{ print $1 }'); do aptitude install $i; done
If you want to automate the questioning about aptitude operations pass on the -y
debian-server2:/home/hipo# for i in $(cat packages.txt |awk '{ print $1 }'); do aptitude -y install $i; done
Be cautious if the -y is passed as sometimes some packages might be removed from the server to resolve dependency issues, if you need this packages you will have to again install them manually.
4. Mirroring package selection from server1 to server2 using one liner
A quick one liner, that does replicate a set of preselected packages from server1 to server2 is also possible with either a combination of apt, ssh, awk and dpkg or with ssh + dpkg + dselect :
a) One-liner code with apt-get unifying the installed packages between 2 or more servers
debian-server2:~# apt-get --yes install `ssh root@debian-server1 "dpkg -l | grep -E ^ii" | awk '{print $2}'`

...
If it is necessery to install on more than just debian-server2, copy paste the above code to all servers you want to have identical installed packages as with debian-server1 or use a shor for loop to run the commands for each and every host of multiple servers group.
In some cases it might be better to use dselect instead as in some situations using apt-get might not correctly solve the package dependencies, if encountering problems with dependencies better run:
debian-server2:/home/hipo# ssh root@debian-server1 'dpkg --get-selections' | dpkg --set-selections && dselect install
As you can see using this second dselect installed "package" mirroring is also way easier to read and understand than the prior "cryptic" method with apt-get, hence I personally think using dselect method is a better.
Well that's basically it. If you need to synchronize also configurations, either an rsync/scp shell script, should be used with all defined server1 config files or in case if a cloning of packages between identical server machines is necessery dd or some other tool like Norton Ghost could be used.
Hope this helps, someone.
Tags: apache, aptitude, authenticity, b4, clone, cloning, copying, deb packages, debian linux, deinstall, dependency, description, dpkg, dump, file, fingerprint, hosts, instance, lftp, Linux, linux servers, Mirroring, necessery, operation, package, package description, Permanently, privileged user, quot, root, rsync, scp, server packages, server1, server2, sftp, ssh, wget
Posted in Linux, System Administration | No Comments »
Saturday, March 31st, 2012 I'm currently learning some basic graphic design – reading GIMP's documentation etc. While reading http://docs.gimp.org, I saw a reference to Gthumb and GQView picture viewing apps, so I thought of installing them on my Debian LinuxGQView has a lot of santimental value to me as it reminds me of the the old times when I used gqview as a default picture viewing program on a old machine running Debian Woody Linux with Window Maker as desktop environment.
I wanted to see how GQView looks nowdays so installed it:
noah:~# apt-get --yes install gqview
And onwards launch it:
hipo@noah:~/Desktop$ gqview

This is a compatibility alias for Geeqie!

Please use /usr/bin/geeqie instead!

Creating Geeqie dir:/home/hipo/.config/geeqie

Creating Geeqie dir:/home/hipo/.local/share/geeqie/collections

Creating Geeqie dir:/home/hipo/.cache/geeqie/thumbnails

Creating Geeqie dir:/home/hipo/.local/share/geeqie/metadata

What poped up instead of gqview is Geeqie – a picture viewer nowdays available on a default Slackware Linux install.
Fedora, CentOS users will have to build geekie from its source, as of time of writting there is no available rpm package.
It was new to me Gqview is no longer developed, its dev is forked (because its head developer is not reachable any more). Hence QGView continues to live on nowdays under the hood of Geekie
As you can see from the prior screenshot Geeqie has very similar interface to GQView. Going through the interface, I've found it has much more features than GQView. You see one of the many new nice features is the support for drawing Image Histograms.
There are few type of Histograms to display in Geekiq, available by navigating to:
View -> Image Overlay
Even if you're not familiar with Image histograms, probably you have seen them appear on a digital camera while browsing in menus. Its likely you didn't know what you saw a digital camera display is a histogram.
Anyways being not familiar with histograms is perfectly fine as for most of us (regular) users image historograms doesn't make much sense.
BTW Histograms are very useful for pro Photographers. Photographers can use them as an aid to show the distribution of picture "tones" captured, and whether image detail has been lost to blown-out highlights or blacked-out shadows.
Interesting fact concerning "reading" and understanding Histograms is on a Histogram for a very dark image the majority of data points are on the left side and center of the graph, whether histogram for a very bright image with few dark areas and/or shadows will have most of its data points located on the right side and center of the graph.
With this said in mind, you can see, the above Geeqie picture visibile histogram obviously has most of its data concentrated on the right and the center so this means the histogram belongs to a bright pic. Well, Actually you can see this without a histogram too 😉
Though Image Histograms might seem pretty useles they're very much needed in Professional Graphic Manipulation. For instance for correction of image color gamma or manually adjusting the brightness for each picture pixel brightness.
So Enough with histograms, I will switch now to a short review of Gthumb
Since I haven't used/seen Gthumb "for ages", I was also curious how the program looks nowdays. I did not needed to install gthumb, as I had it installed already on my notebook. I assume gthumb package was installed as some package dependency or I did it install some very long time ago and I forgot.
For people who didn't have it install do:
noah:~# apt-get --yes install gthumb

...
This installs a Gthumb version 2.12.2. The current latest stable Gthumb release is way ahead from the existing deb stable package, the latest available version on sourceforge is 2.7.4
Ubuntu gthumb latest packages would probably be newer than my debian installed one, so Ubuntu users can have the joy to use a newer version of gthumb…
gthumb is also installable for Fedora and CentOS users by default from default assigned package repos:
To install on RPM based Linux distro:
[root@centos:~ ]# yum -y install gthumb

...
Once installed, I ran it via a gnome run application shortcut ALT+F2 and typed:
gthumb
If you're more of a gui user than me you can run it also through GNOME menus:
Applications -> Graphics -> Gthumb Image Viewer
You see gthumb appears, quite similar in "look&feel" to Geeqie.
I went through the program options just for the sake to compare with Geeqie. Based on the fact Geeqie seems to have more functionality it is probably superior and better choice for people looking for professional image vieweing / editting.However there are some other aspects I've noticed, where it lacks behind Gthumb.
Gthumb has few great functionality which unfortunately as of time of writting are missing or hardly achievable in Geeqie
1. Bookmarking pictures.
This allows for your favourite pictures to be bookmarked in the same way as bookmarks work in a browser, really neat feature.
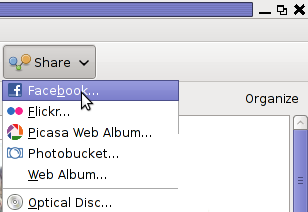
2. Share functionality
Share button is located on the rightest upper corner and makes sharing with major web storage places easy.
Through the Share button, you can export (share) your pictures directly in Picasa, Facebook,Flickr and Photobucket.

Through this share button it is also possible to "share your photos on a CD or DVD", – burn them on a CD/DVD directly from gthumb. This is doable via:
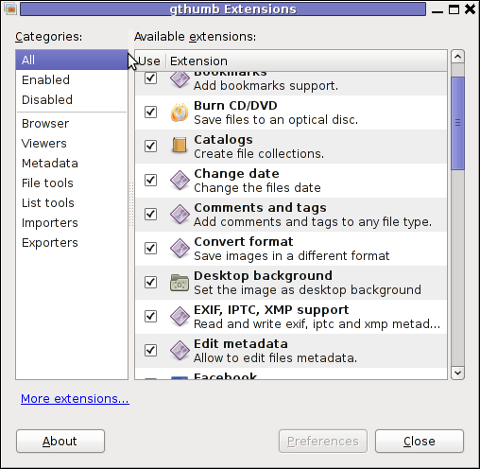
One other Gthumb advantagle is its extensibility. It has a powerful plugin system. Many of the features it has are already there thanks to its enabled extensions.
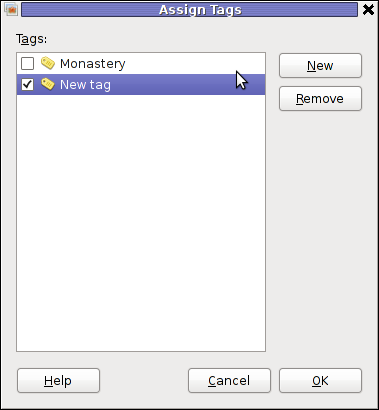
3. Photo Tagging
Nowdays tagging, photos has become so popular with the boom of facebook tagging. Gthumb has a relatively easy to use image tagging integrated.
tagging a picture is done by simply going through the picture and selecting it with the (rightest located mouse button).
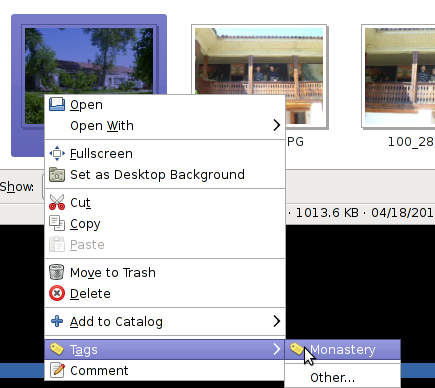
There is a list of few already predefined tags, which can be used to tag images.Assigning more tags is done via menu:
Tags -> Other
4. Organizing pictures
Through the Organize button located right below the Share button, one can easily organize his picture collections, based on few criterias.
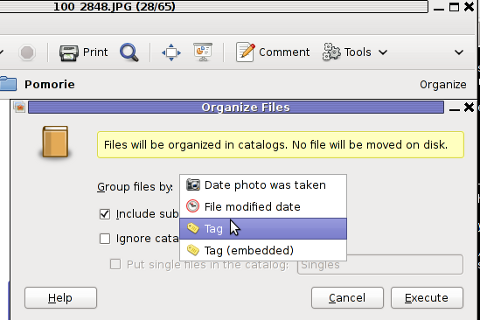
The organize easy feature is not so important for not people, who are not in depth in photographing but for professional photographers this is an absolute necessity. For people who are image freaks and store tens of thousands of pictures organizing pictures for easy later retrieval is really nice.
To sum it, up Geeqie and Gthumb are richer in functionality if compared to GNOME's default pic viewer (eye of the gnome) – eog.
Geeqie, as the name suggests is more for geek oriented and has a lot of great options which can serve well for advanced computer users. For an ordinary desktop user however it will probably be not easy to "digest". Gthumb on the other hand is ideal for anyone who prefers gui convenience. Gthumb is a good option for anyone looking for some similar to Picasa free software program that is feature rich and easy to use.For people who has to review a dozens of pictures daily, associating one of the two as a default picture viewer will probably be useful.
Tags: alias, alternative, Auto, center, CentOS, config, debian woody, default, design reading, Desktop, desktop environment, digital camera, Draft, fedora, geekie, GIMP, GNU, gnu linux, gqview, graphic design, head developer, hipo, histogram, histograms, image overlay, LinuxGQView, machine, meta package, metadata, noah, package, Photographers, picture, poped, quot, reading, rpm, screenshot, time, Ubuntu, value, window, woody linux, writting
Posted in Gnome, Linux and FreeBSD Desktop, News | No Comments »
Saturday, March 17th, 2012 Default XFce picture viewer on Slackware Linux is GIMP (GNU Image Manipulation Program). Though GIMP is great for picture editting, it is rather strange why Patrick Volkerding compiled XFCE to use GIMP as a default picture viewer? The downsides of GIMP being default picture viewing program for Slackware's XFCE are the same like Xubuntu's XFCE risterroro, you can't switch easily pictures back and forward with some keyboard keys (left, right arrow keys, backspace or space etc.). Besides that another disadvantage of using GIMP are;
a) picture opening time in GIMP loading is significantly higher if compared to a simple picture viewer program like Gnome's default, eye of the gnome – eog.
b) GIMP is more CPU intensive and puts high load on each picture opening
A default Slackware install comes with two good picture viewing programs substitute for GIMP:
- Gwenview
-
- Geeqie
-
Both of the programs support picture changing, so if you open a picture you can switch to the other ones in the same directory as the first opened one.
I personally liked more Gwenview because it has more intutive picture switching controls. With it you can switch with keyboard keys space and backspace
To change GIMP's default PNG, JPEG opening I had with mouse right button over a pic and in properties change, Open With: program.
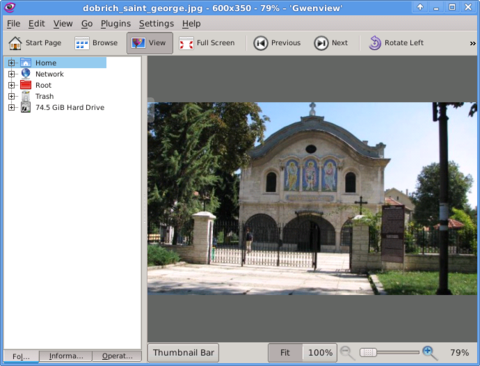
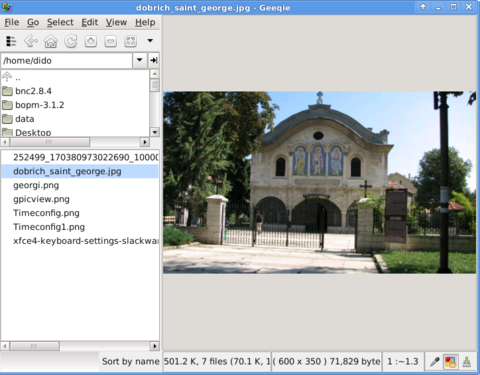
If you're curious about the picture on on all screenshots, this is Church – Saint George (situated in the city center of Dobrich, Bulgaria).
St. Georgi / St. George Church is built in 1842 and is the oldest Orthodox Church in Dobrich.
In the Crimean War (1853-1856) the church was burned down and was restored to its present form in 1864.
gpicview is another cool picture viewing program, I like. Unfortunately on Slackware, there is no prebuild package and the only option is either to convert it with alien from deb package or to download source and compile as usual with ./configure && make && make install .
Downloading and compiling from source went just fine on Slackware Linux 13.37gpicview has more modern looking interface, than gwenview and geeqie. and is great for people who want to be in pace with desktop fashion 🙂
Tags: arrow, arrow keys, Auto, backspace, Button, center, change, city, configure, crimean war 1853, deb package, Desktop, desktop environment, dobrich bulgaria, download, Draft, eye, georgi, GIMP, Gnome, gnu image manipulation, gnu image manipulation program, image manipulation program, keyboard keys, manipulation, nbsp, Open, opening time, option, orthodox church, other ones, package, picture editting, png, program, Risterroro, st george church, substitute, time, XFCE, Xubuntu
Posted in Linux and FreeBSD Desktop, System Administration | No Comments »
Friday, March 16th, 2012 
Are you a Debian System Administrator and you recently run apt-get upgrade && apt-get upgrade finding out there are plenty of new packagesfor upgrade? Do you need only a pre-selected number of packages to upgrade with apt?
I run apt-get update && apt-get upgrade on one of our company Debian servers, just to see there are a number of packages to be upgraded among which there was some I didn't wanted to upgrade. Here is a little paste output from apt-get upgrade:
debian:~# apt-get update && apt-get upgrade

Hit http://security.debian.org squeeze/updates Release.gpg

...

Hit http://security.debian.org squeeze/updates/main amd64 Packages

Fetched 128 kB in 0s (441 kB/s)

Reading package lists... Done

Reading package lists... Done

Building dependency tree

Reading state information... Done

The following packages will be upgraded:

at imagemagick libdbd-pg-perl libfreetype6 libmagickcore3 libmagickcore3-extra libmagickwand3 libmysqlclient16 mysql-client

mysql-client-5.1 mysql-common mysql-server mysql-server-5.1 mysql-server-core-5.1

Do you want to continue [Y/n]

14 upgraded, 0 newly installed, 0 to remove and 0 not upgraded.
From first sight it seems logical to issue apt-get upgrade packagename to upgrade only single package with its package dependencies, instead of the whole group the above packs. However doing:
apt-get upgrade imagemagick will still try to upgrade all the packages instead of just imagemagick and its dependency package deb libmagickcore3
debian:~# apt-get upgrade imagemagick

Reading package lists... Done

Building dependency tree

Reading state information... Done

The following packages will be upgraded:

at imagemagick libdbd-pg-perl libfreetype6 libmagickcore3 libmagickcore3-extra libmagickwand3 libmysqlclient16 mysql-client

mysql-client-5.1 mysql-common mysql-server mysql-server-5.1 mysql-server-core-5.1

14 upgraded, 0 newly installed, 0 to remove and 0 not upgraded.

Do you want to continue [Y/n]
Doing all package,upgrade is not a good idea in my case, since upgrading mysql-server will require a MySQL server restart (something which we cannot afford to do right now) on this production server.
MySQL server restart during upgrade is never a good idea especially on productive busy (heavy loaded) SQL servers.
A restart of the MySQL server serving thousands of requests per second could lead often to crashed tables and hence temporary server downtime etc.
Still it is a good idea to upgrade the rest of packages with their newer versions. For exmpl. to upgrade; imagemagick, at , libfreetype6 and so on.
In order to upgrade only this 3 ones and their respective package dependencies, issue:
debian:~# apt-get --yes install imagemagick at libfreetype6
Repeat the apt-get install command with passing all the single package name you want to be upgraded and voila you're done :).
Be sure the apt-get install packagename upgrade doesn't require also upgrade of myssql-server, mysql-client, mysql-common or mysql-server-core-5.1 or any of the package name you want to preserve from upgrading.
Tags: administrator, amp, Auto, building, deb, debian system, dependencies, dependency, dependency tree, doesn, DoneBuilding, Draft, Fetched, information, libfreetype, libmysqlclient, Linux, mysql server, number, package, packagesfor, pg, production, reading package, Repeat, second, server mysql, servers, something, SQL, squeeze, state information, system administrator, tree, Ubuntu, ubuntu linux, upgradeHit, voila
Posted in Linux, System Administration | No Comments »


