Posts Tagged ‘www’

Create SVN (Subversion) web statistics on Debian Lenny Linux with mpy-svn-stats and svnstats.sh

Monday, July 5th, 2010

I’ve recently desired to have a visualized statistics on how many commits, imports, people who commit into subversion’s repositories,graphs showing up the most active comitters, commits into the all subversion repositories grouped by month, week etc.
This kind of valuable information can give you insight, on a projects code life cycle. It can also help you to find out who takes most active participation into a certain project code development etc. and therefore could play a vital role in finding out about the work efficiency within your IT company or IT department.

There are plenty of softwares that can generate you some shiny statistics on how often and by whom are commits into your repositories as well as general statistics concerning your repositories accessibility.

Some of the projects suggested by most Linux users online, who had to resolve the same task e.g. (find some decent software to generate them good statistics on the svn use.) are:

1. statsvn

Here is a description on what statsvn is directly taken from its website:

StatSVN retrieves information from a Subversion repository and generates various tables and charts describing the project development, e.g.

StatSVN looks really promising, however what I find personally repulsive about it is that it depends on a Sun Java virtual machine
I have a bad taste for third party software that depends on java and therefore the software uses an XML dump generated from svn log –xml -v path/to/repos > svn-logfile.xml after which it’s necessary to pass the generated svn-logfile.xml file to statsvn, for instance:

statsvn [options] svn-logfile.xml path/to/repos

though a debian of statsvn is available and packaged for Debian in /usr/share/doc/statsvn/README.Debian we read:

Notes to Debian users:

* the jtreemap-based report has been disabled as jtreemap is currently
not packaged for Debian, and Debian cannot ship the applet without
its sources (not included in statsvn’s sources).

— Vincent Fourmond <fourmond@debian.org>, Tue, 4 Mar 2008 21:14:14 +0100

What I understood from statsvn documentation is that jtreemap is absolutely necessary in order to have a running statsvn, regardless if you have or you don’t have a java vm installed.

To take a general idea on what kind of Repo Roadmap does svnstat generates with jtreemap check out the following link

Since jtreemap is not available prepackaged for Debian I decided not to use svnstats though it looked quite superb.

Some further research on the kind of softwares available online able to generate me some statistics from cvs or subversion source repositories led me to,

2. svnplot

svnplot stroke me with it’s perfect looking many graphics generated on the Lines of Code commited, contribution of different authors to the repository, File count, avarage commit file sizes, common activity, author commit activity etc. etc.

I think tt’s worthy to check out some example statistics about a sample repository statistics generated by svnplot to get a better idea what to expect if you choose to install it on your server.

Even though svnplot looked also promising It wasn’t actually my choice because I think it’s not really mature enough as a software, the second reason which hold me back from installing it on my debian server was that I find it too much as a work in progress still.

Since neither svnstast nor svnplot didn’t well match my expectation and lacked a debian package I finally choose:

3. mpy svn stats as a solution to generate and graph information about svn usage

There are few reasons I finally took svn-mpy-stats to be the solution of choice.

1. It is available as a package in Debian Linux and easily installable via apt-get
2. It is written in Python and therefore doesn’t require a java virtual machine or some extra cosmetics to make it work3. It’s really simple and straight forward to configure and already tested and reported that it works well in Debian GNU/Linux

So here is the few simple steps I took to install mpy-svn-stats on Debian Lenny (in Debian Sid / Squeeze I suppose the procedure would be analogous.

– Install mpy-svn-stats via apt-get or aptitude

debian-server:~# apt-get install mpy-svn-stats

Run it for your svn repository with a command like:

debian-server:~# mkdir /var/www/svnstats
/usr/bin/mpy-svn-stats -o /var/www/svnstats/ file:///var/svn-repos/repository_name

In the above command substitute /var/www/svnstats/ and /var/svn-repos/repository_name with a directory of choice where you like to generate the html statistics for the svn usage as well as the full path and name of your repository.

Of course it’s a good idea to make mpy-svn-stats run periodically with for instance crontab or at or any other unix task cheduler available for your Linux system.

So far so good. You have probably already noticed that it’s rather inconvenient because you have to execute mpy-svn-stats command to each of your svn repositories individually.
This is absolute madness if your company is creating new svn source repository projects often, like let’s say everyday, because you will have to generate statistics for each of the repositories either manually or add new repositories manually to a script which will be later invoked by a crontab rule.

To get around this constrain, I’ve come up with a tiny shell script svnstats.sh which takes care for everything on it’s own.

It automatically will loop in your main subversion repositories directory through all the sub-repositories and generate individual html statistics in a separate automatically created directory by the script.

So to make your life easier and automate the process of generating stats with mpy-svn-stats consider downloading svnstats.sh and installing it as a separate rule like so:

debian-server:~# crontab -u root -e

Include therein the following:

# generate svn statistics everyday in 05:20 a.m.20 5 * * * /usr/sbin/svnstats.sh >/dev/null >>&1

Now everyday at 05:20 your mpy-svn-stats will generate a nice graphs and statistics for your subversion repository usage in /var/www/svstats, if you consider generating the data into a different location consider editting the head of mpy-svn-stats svnstats.sh script and change according to your likings.

Now let’s create an Alias in Apache to enable the (mpy-svn-stats generated by svnstats.sh) to be visualized via web:

– Edit VirtualHost configuration file of choice and put there, something like:

Alias /svnstats/ /var/www/svnstats/

Lastly it might be a good idea to use htaccess to protect your url with a password, afterwards you can enjoy your mpy svn statistics.

Generating Static Source Code Auditing reports with Spike PHP Security Audit Tool

Saturday, April 24th, 2010

I’m conducting a PHP Audit on a server in relation to that one of the audit criterias I follow is a
Static PHP Source Code Auditing of the php files source code located physically on the Linux server.
Auditing a tons of source code manually is a kind of impossible task, therefore I needed a quick way to at least
partly automate or fully automate the PHP applications source code.
A quick search in Google pointed me to a php application tool – Spike Security Audit .
This small application PHP written app is quite handy. It is able to either check a certain php source code file for WARNINGS or ERRORS or do a complete security source code analysis of a bunch of PHP files in a directory including all the other php source files in subdirectories.

After executed the PHP Security Audit Tool generates a nice source code analysis report in html that can easily be later observed with some Browser.

The use of the tool is pretty straight forward, all you have to do is download it from Spikeforge – the project’s official webpage and unzip it e.g.


debian-server:~# wget http://developer.spikesource.com/frs/download.php/136/spike_phpSecAudit_0.27.zip
debian-server:~# unzip spike_phpSecAudit_0.27.zip

Then you have to invoke the run.php with the php cli, that you need to have installed first.
If you don’t have the php cli yet please install it with the command:


debian-server:~# apt-get install php5-cli

Now you have to execute the run.php script bundled with the spike php security audit program source code.


debian-server:~# php run.php

Please specify a source directory/file using –src option.

Usage run.php options

Options:
–src Root of the source directory tree or a file.
–exclude [Optional] A directory or file that needs to be excluded.
–format [Optional] Output format (html/text). Defaults to ‘html’.
–outdir [Optional] Report Directory. Defaults to ‘./style-report’.
–help Display this usage information.

As you can see the spike php security audit has only few command line options and they’re quite easily understandable.
However in my case I had to audit a couple of directories which contained source code.
I also wanted the generated reports to be cyclic, on let’s say per daily basis cause I wanted to have the PHP applicaiton analysis generated on a daily basis.
In that reason I decided to write a small shell script that would aid the usage of php spike audit, I’ve called the script code-analysis.sh

The usage of the Automation source code analysis script for PHP Spike Audit can be downloaded here
The script has a few configuration options that you might need to modify before you can put it to execute on a crontab.

This are:


# Specify your domain name on which php spike audit reports will be accessed
domain_name='yourdomainname.com';
# put here the location where phpspike run.php execute is located
spike_phpsec=/usr/local/spike_phpSecAudit_0.27/run.php;
# specify here which will be the directory where the php source code analysis reports will be stored by php spike
log_dir=/root/code-analysis/;
# in that part you have to specify the physical location of the php cli it's located by default in /usr/bin/php on Debian GNU Linux.
php_bin=/usr/bin/php;
# the directory below should be set to a directory where the reports that will be visible from the webserver will be stored
www_dir=/var/www/code-analysis;

# in the variables

directory[1]=’/home/source-code1/’; ..
directory[2]=”; ..

# you should configure the directories containing php source code to be audited by the php spike audit tool.

After you have prepared the code-analysis.sh script with your custom likings, you can now put it to be executed periodically
using crontab or some other unix system scheduler of choice.

To do that edit your root crontab.

crontab -u root -e

and put in it.

# code analysis results
05 3 * * * /usr/local/bin/code-analysis.sh >/dev/null 2>&1

Now hopefully you can edit your /etc/apache2/apache2.conf or your httpd.conf depending on your linux or unix architecture and make a Alias like:


Alias /code-analysis "/var/www/code-analysis"

Now your php source code analysis from the php spike audit tool will be generated daily.
You will be able to access them via web using http://yourdomain.com/code-analysis/

That way, you can review your php source code written or changed in your php applications on daily basis and you can a way easily track your coding mistakes, as well as track for possible security issues in your code.

For the sake of security I’ve also decided to protect the /code-analysis Apache directory with a password using the following .htaccess file:


AuthUserFile /var/www/code-analysis/.htpasswd
AuthGroupFile /dev/null
AuthName "Login to access PHP Source Code Analysis"
AuthType Basic

< Limit GET >
require valid-user
< /Limit >

If you decide to protect yours as well you have to also generate the .htpasswd file using the following command:


debian-server:~# htpasswd -c /var/www/code-analysis/.htpasswd admin

You will be asked for a password. The code-analysis.sh script will also take care to generate an html file for you including links to reports to all the php source code audited directories reports.

Now accessing http://yourdomain.com/code-analysis/ will give you shiny look to the php source applications generated reports .

Howto install GeoTrust RapidSSL certificate on Debian Lenny / Squeeze / Wheezy Linux

Thursday, March 25th, 2010

I faced the task of generating official Validated SSL Certificates by in mydaily duties as a System Administrator at cadiaholding.com . Though generating self-signedSSL certificate is comparatively easy task. It was a pain in the ass setting Apache version 2.2.9-10+lenny6to correctly serve pages through https:// protocol over openssl version 0.9.8g-15+lenny6.I’ll try to go through the whole process of Generating the certificate in order to help some other Debianusers out there to face less setbacks in such a simple task as installing a Trusted SSL Certificate issued(bought) by RapidSSL. Even though this article will mostly deal with SSL certificate issued by RapidSSL,it should be not a problem to apply this methodogy with Verisign or some of the other Geotrust issuedSecure Socket Layer certificates.

In generating the Validated certficate I used enom which is a domain name,ssl certificates, email and hosting company whole-saler.
Fron emon’s website after logging in and using the web interface, there are two major things required to fill inin order to issue your Trusted SSL certificate.

1. Fill in in a form a CSR file, this is usually generated on the Linux server using the openssl.
To issue the CSR file required by Enom use the following commands:

a. First we generate an DES3 RSA encrypted key which we will use next to generate the opeensl CSR file required by ENOM.
debian:~# /usr/bin/openssl genrsa -des3 -out www.domain.com.key 2048
Enter pass phrase for www.domain.com.key:

You’ll be required to fill in a pass-phrase that will be later be required to fill in before Apache servers starts or restarts,so make sure you fill something you either remember or you keep the password stored in a file.
You have to change also the www.domain.com.key in accordance with your domain name.
Now as we already have a proper generated DES3 RSA key afterwards it’s necessery to generate the CSR file with the openssl command line frontend.
So here is how:

debian:~# /usr/bin/openssl req -new -key /home/hipo/www.domain.com.key -out /home/hipo/www.domain.com.csr

Again in the above example change all the paths and file names as you wish.
It’s necessery that the end user fill in a number of questions related to the Certificate Signing Request.
Herein I’ll list what kind of prompts will emerge after executing the above command:

Enter pass phrase for /home/hipo/www.domain.com.key:
You are about to be asked to enter information that will be incorporated
into your certificate request.
What you are about to enter is what is called a Distinguished Name or a DN.
There are quite a few fields but you can leave some blank
For some fields there will be a default value,
If you enter '.', the field will be left blank.
-----
Country Name (2 letter code) [AU]:
State or Province Name (full name) [Some-State]:
Locality Name (eg, city) []:
Organization Name (eg, company) [Internet Widgits Pty Ltd]:
Organizational Unit Name (eg, section) []:
Common Name (eg, YOUR name) []:
Email Address []:
Please enter the following 'extra' attributes
to be sent with your certificate request
A challenge password []:
An optional company name []:

Note that you’ll hav eto fill in the pass phrase previously entered during the generation of the www.domain.com.key file.
In case if you’d like to read more thoroughly on the subject of howto create a Certificate Signing Request or (CSR) as we called it on multiple times, you can read About Certificate Signing Request (CSR) Generation Instructions – Apache SSL more in depth here

2. Hopefully following the above instructions you’ll now have a file named www.domain.csrJust open the www.domain.scr and copy paste it’s content to the ENOM website CSR * webform.

3. Further on select your Webserver type on Enom’s website:In our case we have to select Apache + ApacheSSL

4. What follows next is filling in your company contact information This is also required for proper certificate generation, you have to think twice before you fill in this data, take a note this can’t be changed later on without issuing a brand SSL new certificate.

Apart from the 3 major above requirements to fill in Enom there are some few more radio buttons to use to make some selections according to your personal preferences, however I won’t take time to dig in that and I’ll leave this to you.
After all the above is fulfilled you’ll have to submit your certificate details and choose an email address to which you will receive in a minute a RapidSSL Certificate Request Confirmation

Following a link from the email, will show you some basic information about the certificate about to be generated. That’s your final chance to cancel the issued Trusted Certificated.
If you’re absolutely sure the information about to enter the certificate is correct then you’ll have to follow a link and approve the certificate.

You’ll be informed that you’ll receive your certificate either through Certifier website (e.g. Enom’s website) or via another email.
I thought it’s more probable I receive it via email but anyways I was wrong. More thank 4 hours has passed since the certificate was issued and is available via Enom’s interface but I haven’t received nothing on my mail.
Therefore my friendly advice is to check about your brand new shiny Trusted Certificate on Emom’s website. I had mine ready in about 10 minutes after the CSR was issued.

Assuming that you’ve succesfully obtained the SSL Trusted certificate from RapidSSL what follows is setting up the certificate.
Initially I tried using documentation from RapidSSL website called Installing your SSL Certificate / Web Server Certificate / Secure Server Certificate from RapidSSL.com
I tried to configure one of my Virtualhost as shown in their example inserting in my /etc/apache/sites-available/www.domain.com file, few directives within the VirtualHost something like the shown below

SSLEngine on
# domain.com.crt cointains the Trusted SSL certificate generated and obtained by you from RapidSSL
SSLCertificateFile /etc/apache2/ssl/www.domain.com.crt
# www.domain.com.key contains the file used to generate the CSR file as described earlier in this post
SSLCertificateKeyFile /etc/apache2/ssl/www.domain.com.key

It is also possible insetad of using the SSLCertificateFile and SSLCertificateKeyFile directvies directives in Apache config to use:


Another alternative is to use

SSLCertificateFile /etc/ssl/certs/your-domain-name.crt
SSLCertificateKeyFile /etc/ssl/certs/your-domain-name.key
SSLCACertificateFile /etc/ssl/certs/gd_bundle.crt

The key file is the one generated earlier on the server and handed to the SSL regisrar, the files:

your-domain-name.crt and gd_bundle.crt files are provided by RapidSSL or from whatever SSL registrater the SSL was purchased.

After trying the above configuration and restarting apache with:

/etc/init.d/apache2 restart

Apache failed to start, it might be helpful to somebody out there the error I had in my apache error.log:
The error.log red the following:

[warn] RSA server certificate is a CA certificate (BasicConstraints: CA == TRUE !?)

After some 30 minutes or an hour of Googling on the error I came to the conclusion that the error is caused, becauseApache is supposed to work with .PEM files instead of the classical .CRT and .KEY files asnormally approached in most of the other Unix operating systems.

It took me a bit more of reading on the internet to find out that actually the .pem files so widely adopted in Debian simply contain both the www.domain.com.key file and the www.domain.com.crt key simply pasted one after another, this I also observed from the default Apache self-signed certificate that I believe comes with debian /etc/apache2/ssl/apache.pem .
So I copied both the content of my www.domain.com.key and www.domain.com.crt and store it in one file:
/etc/apache2/ssl/www.domain.com.pem

Also the following configuration:
SSLEngine on
SSLCertificateFile /etc/apache2/ssl/www.domain.com.pem

had to go in your
/etc/apache2/sites-enabled/www.domain.com

Last thing that’s left is to restart your Apache;

/etc/init.d/apache2 restart

Apache will prompt you for your certificate password entered by you during the www.domain.com.key generation. Type your password and with a bit of luck and hopefully with God’s help you’ll be having a Trusted Certificate on your webserver.

Last step is to check if the certificate is okay accessing your domain https://www.domain.com.

Well this is the end of the article, hope you enjoy.If you do please leave your comments, any corrections are also welcomed 🙂

Adding RSS Feed to WordPress in conjunction with FeedBurner / WordPress add-to-any-subscribe plugin

Saturday, May 15th, 2010

adding_rss_feed_to_wordpress-in-conjunction-with-Google-Feedburner-add-to-any-subscribe-plugin
I received a comment today from one of my blog readers. That he likes my blog content but he looks for a way to subscribe to my blog.
Though I had a subscription button configured in my wordpress template of choice. The button is located on place in the template that is absolutely unnoticable (at the bottom of the page). This is by the way I believe a default behaviour in case if the default wordpress plugin is used.
Thus I decided to set a clear RSS Subscription button on my blog.
Though at a first glimpse the task looked quite trivial it happened to be a way more complex!
I’ve tried a number of things before I can succeed in adding an RSS button.
The most simple though not really flexible way was through:

WordPress’s Widgets (Using the RSS Widget) .
rss default feed widget

This approach however has one major inconvenience.
Using the default wordpress RSS Widget you cannot configure the Widget to keep displaying 0 items of the feed.
In other words you cannot configure from the the sliding menu reading:
How many items would you like to display? 0 in order to prevent completely showing up of any of the feed on the page.
If you leave it with one. The RSS icon of RSS widget would point directly to your blog instead to the RSS feed configured.
So in practice configuring it especially in my case rendered completely useless.
The appearing link from the default RSS widget for some weird reason doesn’t includes a link to where my feed is located https://www.pc-freak.net/blog/feed/
In the meantime I looked online to look for something that will facilitate me in completing the simple task to add an RSS Subscribe Feed to my Blog.
I asked for help in freenode’s irc network #wordpress channel. And a guy from there suggested that I go with wp-o-matic wordpress plugin
Anyways It took me a few minutes to realize this plugin is suitabile if you want to show other blogs feed to your blog instead of adding a RSS feed link to your own blog, this wasn’t my goal so I skipped next in looking for something to help me on.
In the meantime I found the interesting feedburner google feed service that is able to help in creating, publishing and distributing RSS & Atom feeds.
I recommend you check it if you still haven’t. It takes only a few clicks to register in order to use feedburner as a feed service.
Once you are set-up with Feedburner, you can activate all the cool functions, such as allowing your readers to subscribe via email, and also the Feedburner Flares.
Another nice thing about using feedburner is that it formats your fed content in a really pretty layout. By the way since the 2004 feedburner is owned by Google. So in a certain terms using feedburner instead of the default wordpress blog feed will probably attract more google visitors to your blog and is generally good for your blog placement in search engines.
For more of the advantages check feedburner’s google service website .
However there is one major disadvantage in using the feedburner’s feed service. Using the service rob you out of control of your feed, since all the feeds will be properly generated and formatted from feedburner.
The newly created service for feedburner by me is located on www.feeds.feedburner.com/WalkingInLightWithChrist-FaithComputingDiary
Now to be able to use the newly installed feedburner service with my blog I had to test a couple of plugins before I came to the ones that really worked.
I played with feedburner_feedsmith_plugin , feedburner-widget , feedlist.2.61 , wp-keiths-easy-rss , rss-atom-avatar but I couldn’t make any of them work properly with feedburner. Some of the up mentioned plugins were a real hell to configure so I completely abandondoned them seeing their inflexibility. Others were completely abondonede for more than 2 years from now, etc. etc. Fundamentally none of them worked for me.
I finally was able to bring up the feedburner service on my worpdress using The FD Feedburner plugin

All necessery to enable the plugin after you download into wordpress’s wp-content/plugins directory is to configure the plugin from:
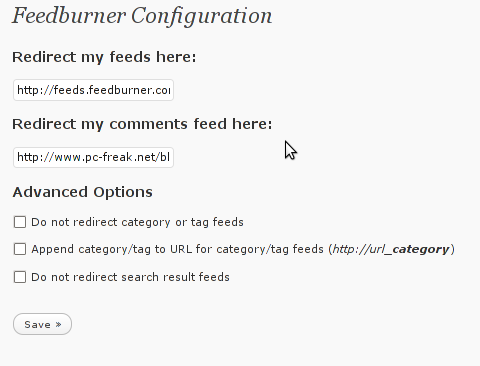
Plugins -> FeedBurner Configuration Here is the screenshot on the FD Feedburner plugin configuration screen:

FD Feedburner plugin

As you can see in the screenshot the plugin is really simple to configure. All you need to provide it with is the url provided to you by feedburner right after you register your blog for the service.

Now as you will have your http://www.yourwebsite.com/blog/feed/ be redirected to the feedburner’s website generated feed for your website by the FD FeedBurner WordPress Plugin all left to be done is to provide a link on your blog to your blog feed.

To accomplish this you will have to download the add-to-any-subscribe wordpress plugin.
Again installation of add-to-any-subscribe is a piece of cake, to install follow The install instructions here

Now hopefully your feedburner feed will be able to be distrubuted to your visitors via the AddtoAny subscription button on your blog.

WordPress Plugins to monitor and debug WP enabled plugins – Find Errors / Warnings and Remove WP problematic plugins slowing down your Website (blog) database

Thursday, February 19th, 2015

plugins-to-monitor-debug-wordpress-enabled-plugins-how-to-track-find-errors-and-warnings-and-remove-problematic-wp-extensions-that-slow-down-your-website

Recent days, I'm spending a lot of time again trying to optimize my wordpress blog. Optimizing WP for better efficiency is becoming harder and harder task day by day as the website file content data is growing along with SQL databases. Moreover situation gets even worse because the number of plugins enabled on my blog is incrementally growing with time because, there is more and more goodies I'd like to add.
Optimizing WordPress to run for Speed on a server is a whole a lot of art and its a small universe in itself, because as of time of writting this post the count (number) of WordPress available PLUGINS is 36,197 ! 

1. Manually Tracking WordPress  Plugins causing Slow SQL Queries (MySQL bottleneck) issues directly using console / SSH

Because of its open source development and its nice modular design wordpress has turned into a standard for building small, middle sized and large websites (some WordPress based blogs and sites have from 50 000 to 100 000 unique pages!). My blog is still a small WordPress site with only 1676 posts, so I still haven't reached the high volume traffic optimization requirements but still even though I have a relatively good server hardware  8GB RAM / (2×2.70 Ghz Intel CPU) / 500 GB (7400 RPM HDD) at times I see Apache Webservers is unable to properly serve coming requests because of MySQL database (LEFT JOIN) requests being slow to serve (taking up to few seconds to complete) and creating a MySQL table lock, putting all the rest SQL queries to stay in a long unserved queues line, I've realized about this performance issue by using a a mysql cli (command) client and few commands and console command (tool) called mytop (also known as mtop). MyTop refreshes every 3 seconds, so the slow query will immediately stay on screen to view moer info about it press "f" and type the  in query ID.
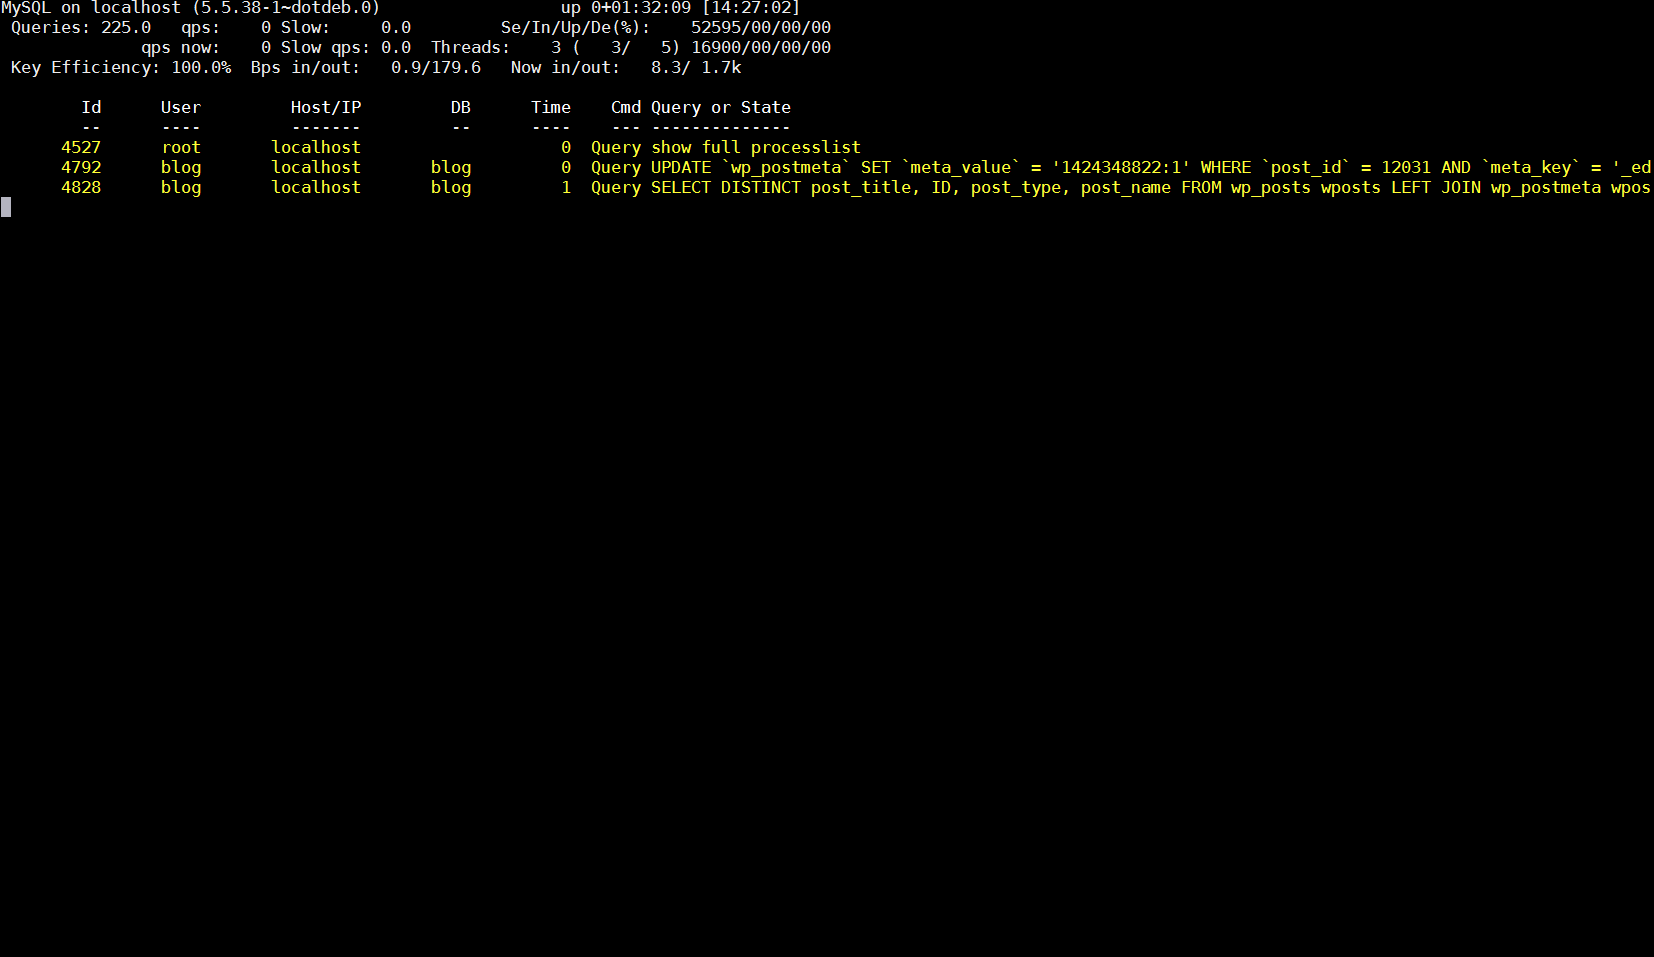
mysql-top-running-on-gnu-linux-server-tracking-sql-queries-in-console-screenshot.png

mysql-top-running-on-gnu-linux-server-tracking-sql-queries-in-console-screenshot2

Finally it is very useful to run  for a while MySQL server logging to /var/log/mysql/slow-query.log:
Slow query is enabled (on my Debian 7 Wheezy host) by adding to /etc/mysql/my.cnf
after conf section


vim /etc/mysql/my.cnf
#
# * Logging and Replication
#
# Both location gets rotated by the cronjob.
# Be aware that this log type is a performance killer.
# As of 5.1 you can enable the log at runtime!
#general_log_file        = /var/log/mysql/mysql.log
#general_log             = 1
#
# Error logging goes to syslog due to /etc/mysql/conf.d/mysqld_safe_syslog.cnf.
#
# Here you can see queries with especially long duration


Paste:


slow_query_log = 1
slow_query_log_file = /var/log/mysql/slow-query.log
long_query_time = 2
log-queries-not-using-indexes


And then to make new mysql configuration load restarted mysql server:


debian-server:~# /etc/init.d/mysql restart
Stopping MySQL database server: mysqld.
Starting MySQL database server: mysqld ..
Checking for tables which need an upgrade, are corrupt or were
not closed cleanly..


Leaving mysql-slow.log to be enabled for 30 minutes to an 1 hrs is a good time to track most problematic slow queries and based on this queries, I took parts of  SQL UPDATE / SELECT / INSERT etc. Db queries which was problematic and grepped throughout /var/www/blog/wp-content/plugin files in order to determine which WordPress Plugin is triggering the slow query, causing blog to hang when too many clients try to see it in browser.

My main problematic SQL query having long execution time  (about 2 to 3 seconds!!!) most commonly occuring in slow-query.log was:


SELECT DISTINCT post_title, ID, post_type, post_name FROM wp_posts wposts LEFT JOIN wp_postmeta wpostmeta ON wposts.ID = wpostmeta.post_id LEFT JOIN wp_term_relationships ON (wposts.ID = wp_term_relationships.object_id) LEFT JOIN wp_term_taxonomy ON (wp_term_relationships.term_taxonomy_id = wp_term_taxonomy.term_taxonomy_id) WHERE (post_type='page' OR (wp_term_taxonomy.taxonomy = 'category' AND wp_term_taxonomy.term_id IN(11))) AND post_status = 'publish' AND LENGTH(post_title)>=5 ORDER BY LENGTH(post_title) ASC LIMIT 500

Because above query uses SQL Column names and Tables which are not hard coded in PHP code, to find out which plugins is most probably to launch this complex LEFT JOIN query, I used a quick bash one-liner:


# cd /var/www/blog/wp-content/plugins


# for i in $(grep -rli 'SELECT DISTINCT' *); do grep -rli 'LEFT JOIN' $i; done 
./seo-automatic-links/seo-links.php
./wp-postviews/wp-postviews.php
./yet-another-related-posts-plugin/classes/YARPP_Cache_Tables.php


I wanted to put less load on CPU during grep so looked for string only in .PHP extensioned files with:


 # for i in $(find . -iname '*.php' -exec grep -rli 'SELECT DISTINCT' '{}' \;); do grep -rli 'LEFT JOIN' $i; done
./seo-automatic-links/seo-links.php
./wp-postviews/wp-postviews.php
./yet-another-related-posts-plugin/classes/YARPP_Cache_Tables.php


As you can see the complex query is being called from PHP file belonging to one of 3 plugins

  • SEO Automatic Links – this is SEO Smart Links WP plugin (Does internal bliog interlinking in order to boast SEA)
  • WP PostViews – WordPress Post Views plugin (Which allows me to show how many times an article was read in WP Widget menu)
  • Yet Another Related Posts – Which is WP plugin I installed / enabled to show Related posts down on each blog post


2. Basic way to optimize MySQL slow queries (EXPLAIN / SHOW CREATE TABLE)

Now as I have a basic clue on plugins locking my Database, I disabled them one by one while keeping enabled mysql slow query log and viewing queries in mytop and I figure out that actually all of the plugins were causing a short time overheat (lock) on server Database because of LEFT JOINs. Though I really like what this plugins are doing, as they boast SEO and attract prefer to disable them for now and have my blog all the time responsible light fast instead of having a little bit better Search Engine Optimization (Ranking) and loosing many of my visitors because they're annoyed to wait until my articles open

Before disabling I tried to optimize the queries using MySQL EXPLAIN command + SHOW CREATE TABLE (2 commands often used to debug slow SQL queries and find out whether a Column needs to have added INDEX-ing to boast MySQL query).

Just in case if you decide to give them a try here is example on how they're used to debug problematic SQL query:
 

  1. mysql> explain SELECT DISTINCT post_title, ID, post_type, post_name
  2.     -> FROM wp_posts wposts LEFT JOIN wp_postmeta wpostmeta
  3.     -> ON wposts.ID = wpostmeta.post_id LEFT JOIN wp_term_relationships
  4.     -> ON (wposts.ID = wp_term_relationships.object_id) LEFT JOIN wp_term_taxonomy
  5.     -> ON (wp_term_relationships.term_taxonomy_id = wp_term_taxonomy.term_taxonomy_id)
  6.     -> WHERE (post_type='page'
  7.     -> OR (wp_term_taxonomy.taxonomy = 'category'
  8.     -> AND wp_term_taxonomy.term_id IN(11,15,17)))
  9.     -> AND post_status = 'publish'
  10.     -> AND LENGTH(post_title)>=5
  11.     -> ORDER BY LENGTH(post_title) ASC
  12.     -> LIMIT 500;
  13. +—-+————-+———————–+——–+——————+———+———+———————————————+——+———————————————-+
  14. | id | select_type | table                 | type   | possible_keys    | key     | key_len | ref                                         | rows | Extra                                        |
  15. +—-+————-+———————–+——–+——————+———+———+———————————————+——+———————————————-+
  16. |  1 | SIMPLE      | wposts                | ALL    | type_status_date | NULL    | NULL    | NULL                                        | 1715 | Using where; Using temporary; Using filesort |
  17. |  1 | SIMPLE      | wpostmeta             | ref    | post_id          | post_id | 8       | blog.wposts.ID                              |   11 | Using index; Distinct                        |
  18. |  1 | SIMPLE      | wp_term_relationships | ref    | PRIMARY          | PRIMARY | 8       | blog.wposts.ID                              |   19 | Using index; Distinct                        |
  19. |  1 | SIMPLE      | wp_term_taxonomy      | eq_ref | PRIMARY          | PRIMARY | 8       | blog.wp_term_relationships.term_taxonomy_id |    1 | Using where; Distinct                        |
  20. +—-+————-+———————–+——–+——————+———+———+———————————————+——+———————————————-+
  21. 4 rows in set (0.02 sec)
  22.  
  23. mysql>
  24.  


  1. mysql> show create table wp_posts;
  2. +———-+————————–+
  3. | Table    | Create Table                                                                                                                                                                                                                                                                                                                                                                                                                                 |
  4. +———-+————————–+
  5. | wp_posts | CREATE TABLE `wp_posts` (
  6.   `ID` bigint(20) unsigned NOT NULL AUTO_INCREMENT,
  7.   `post_author` bigint(20) unsigned NOT NULL DEFAULT '0',
  8.   `post_date` datetime NOT NULL DEFAULT '0000-00-00 00:00:00',
  9.   `post_date_gmt` datetime NOT NULL DEFAULT '0000-00-00 00:00:00',
  10.   `post_content` longtext NOT NULL,
  11.   `post_title` text NOT NULL,
  12.   `post_excerpt` text NOT NULL,
  13.   `post_status` varchar(20) NOT NULL DEFAULT 'publish',
  14.   `comment_status` varchar(20) NOT NULL DEFAULT 'open',
  15.   `ping_status` varchar(20) NOT NULL DEFAULT 'open',
  16.   `post_password` varchar(20) NOT NULL DEFAULT '',
  17.   `post_name` varchar(200) NOT NULL DEFAULT '',
  18.   `to_ping` text NOT NULL,
  19.   `pinged` text NOT NULL,
  20.   `post_modified` datetime NOT NULL DEFAULT '0000-00-00 00:00:00',
  21.   `post_modified_gmt` datetime NOT NULL DEFAULT '0000-00-00 00:00:00',
  22.   `post_content_filtered` longtext NOT NULL,
  23.   `post_parent` bigint(20) unsigned NOT NULL DEFAULT '0',
  24.   `guid` varchar(255) NOT NULL DEFAULT '',
  25.   `menu_order` int(11) NOT NULL DEFAULT '0',
  26.   `post_type` varchar(20) NOT NULL DEFAULT 'post',
  27.   `post_mime_type` varchar(100) NOT NULL DEFAULT '',
  28.   `comment_count` bigint(20) NOT NULL DEFAULT '0',
  29.   PRIMARY KEY (`ID`),
  30.   KEY `post_name` (`post_name`),
  31.   KEY `type_status_date` (`post_type`,`post_status`,`post_date`,`ID`),
  32.   KEY `post_parent` (`post_parent`),
  33.   KEY `post_author` (`post_author`),
  34.   FULLTEXT KEY `post_related` (`post_title`,`post_content`)
  35. ) ENGINE=MyISAM AUTO_INCREMENT=12033 DEFAULT CHARSET=utf8 |
  36. +———-+———————-+
  37. 1 row in set (0.00 sec)
  38.  
  39. mysql>
  40.  


By the way above output is a paste from the the new PasteBin Open Source (Stikked powered) service I started on www.pc-freak.net – paste.www.pc-freak.net (p.www.pc-freak.net) 🙂

Before I took final decision to disable slow WP plugins, I've experimented a bit trying to add INDEX to Table Column (wposts) in hope that this would speed up SQL queries with:


mysql> ALTER TABLE TABLE_NAME ADD INDEX (wposts);


But this didn't improve query speed even on the contrary it make execution time worse.

3. Tracking WordPress Plugin PHP Code Execution time and Plugins causing Slow SQL Queries (MySQL bottleneck) issues through WP itself

Well fine, I'm running my own hosted Blog and WordPress sites, but for people who have wordpress sites on shared hosting, there is usually no SSH (Terminal) Access to server, those people will be happy to hear there are 2 Free easy installable WordPress plugins which can be used to Debug Slow WordPress Plugins SQL Queries as well as plugin to Track which plugin takes most time to execute, this are:


a) P3 Plugin Performance Profiler  

runs a scan over your site to determine what resources your plugins are using, and when, during a standard page request. P3 PPP Can even create reports in a beatiful Excel like Pie chart sheet.
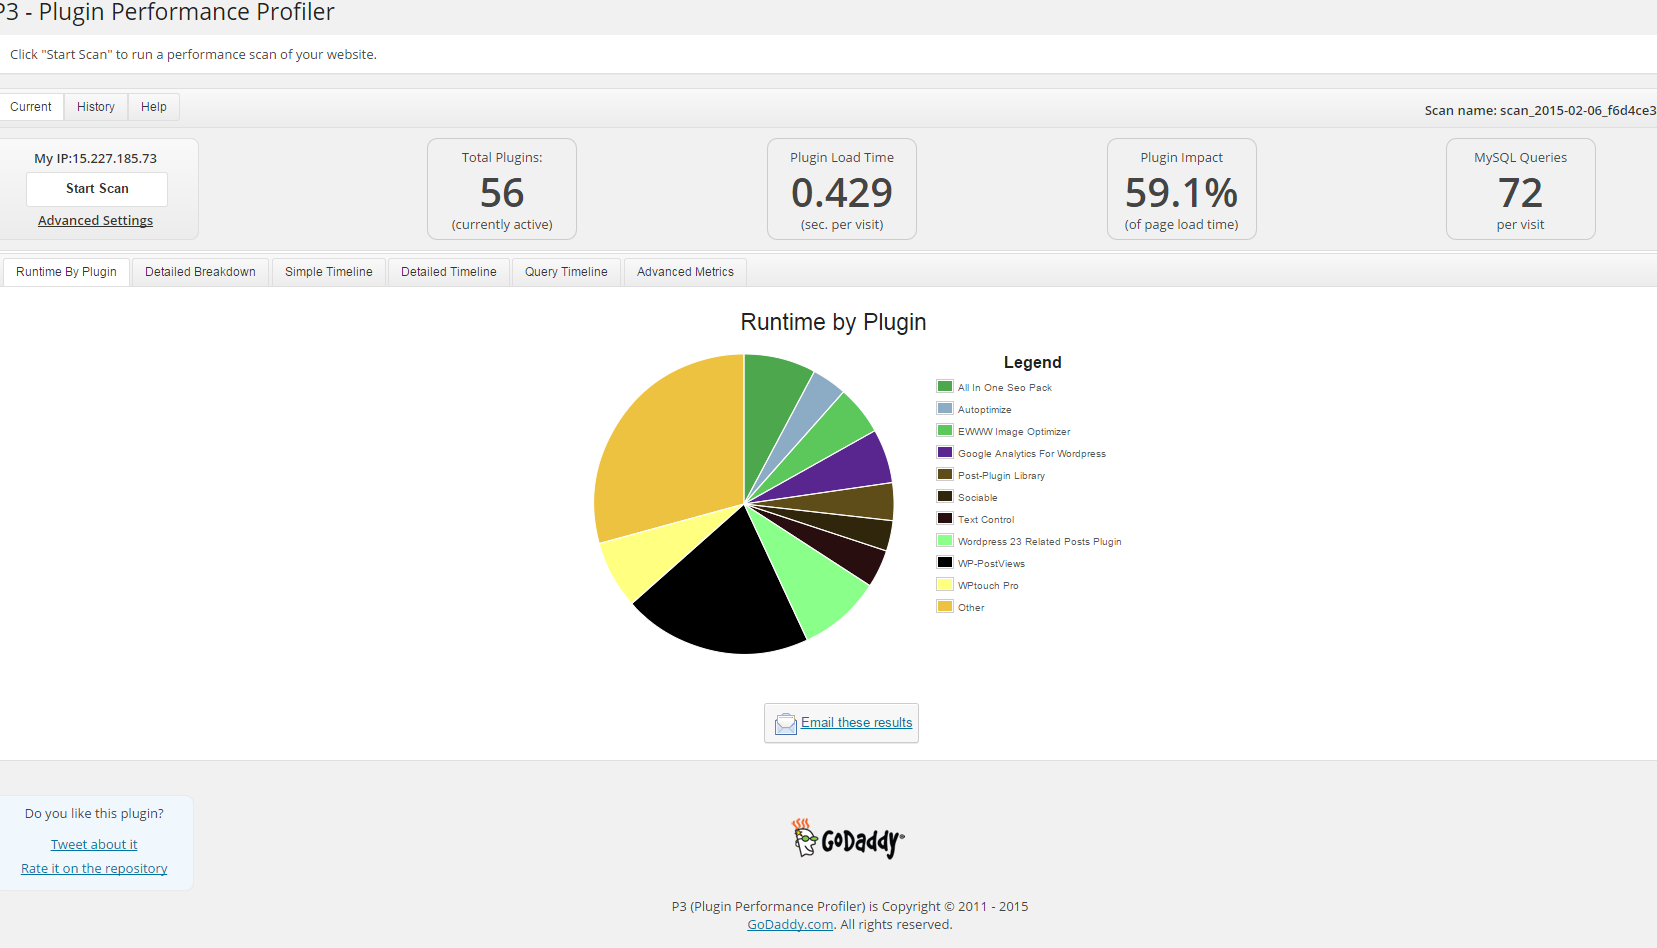
p3-plugin-performance-profiler-godaddy-screenshot-debian-gnu-linux-wordpress-website

Another useful thing to see with P3 PPP is Detailed Timeline it shows when the plugins are being loaded during new page request so you can see if there is a certain sequence in time when a plugin slows down the website.
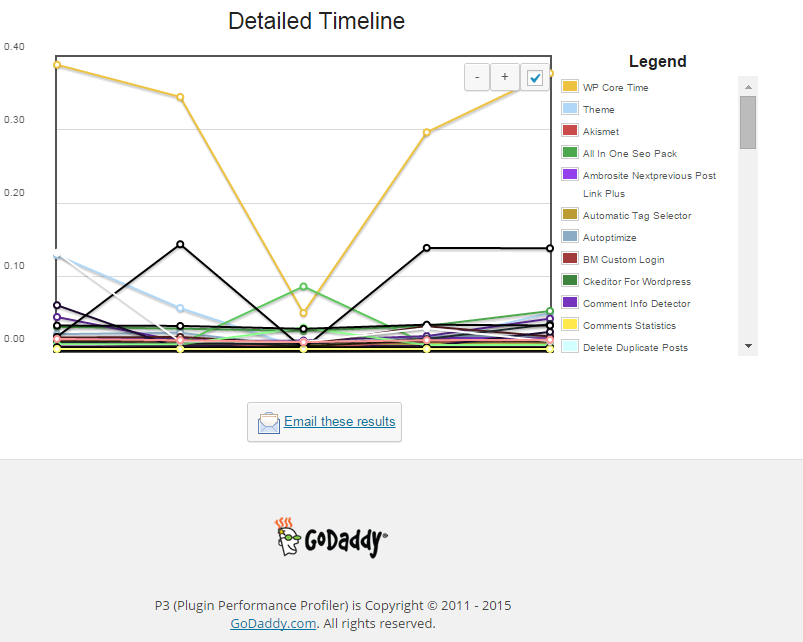
detailed_timeline-wordpress-p3-performance-plugin-on-website-screenshot

The pictures says it all as P3 PPP is Godaddy's work, congrats to GoDaddy, they've done great job.


b) WordPress memory Viewer WP plugins

Is useful to check how much memory each of WordPress plugin is taking on user (visitor) request.
Memory Viewer is allows you to view WordPress’ memory utilization at several hooks during WordPress’ execution. It also shows a summary of MySQL Queries that have ran as well as CPU time.
To use it download it to plugins/ folder as usual enable it from:

Installed Plugins -> (Inactive) -> Memory Viewer (Enable)

To see statistics from Memory Viewer open any post from your blog website and scroll down to the bottom you will notice the statistics, showing up there, like on below screenshot.
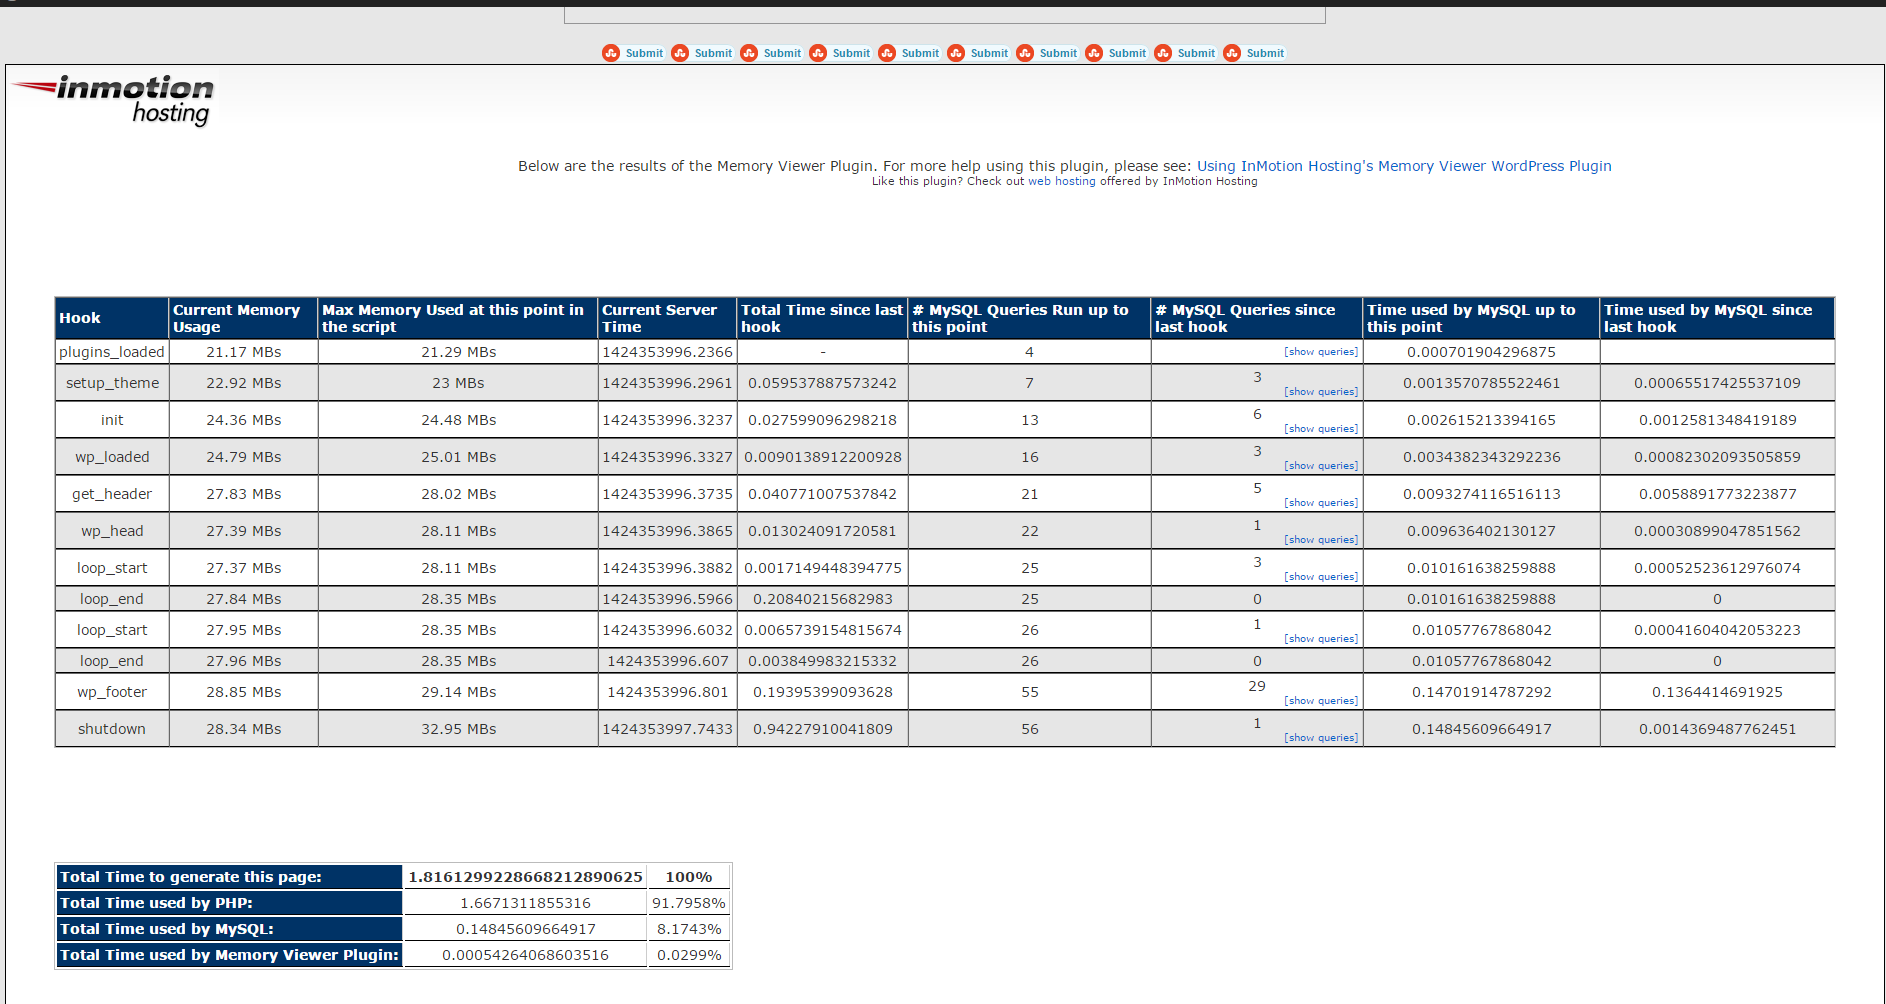
wordpress-memory-viewer-plugin-debian-gnu-linux-hosted-website-show-which-plugin-component-eats-most-memory-in-wordprses-blog
 

Though WP Memory Viewer is said to work only up to WP version 3.2.1, I've tested it and it works fine on my latest stable WordPress 4.1 based blog.

c) WordPress Query Monitor
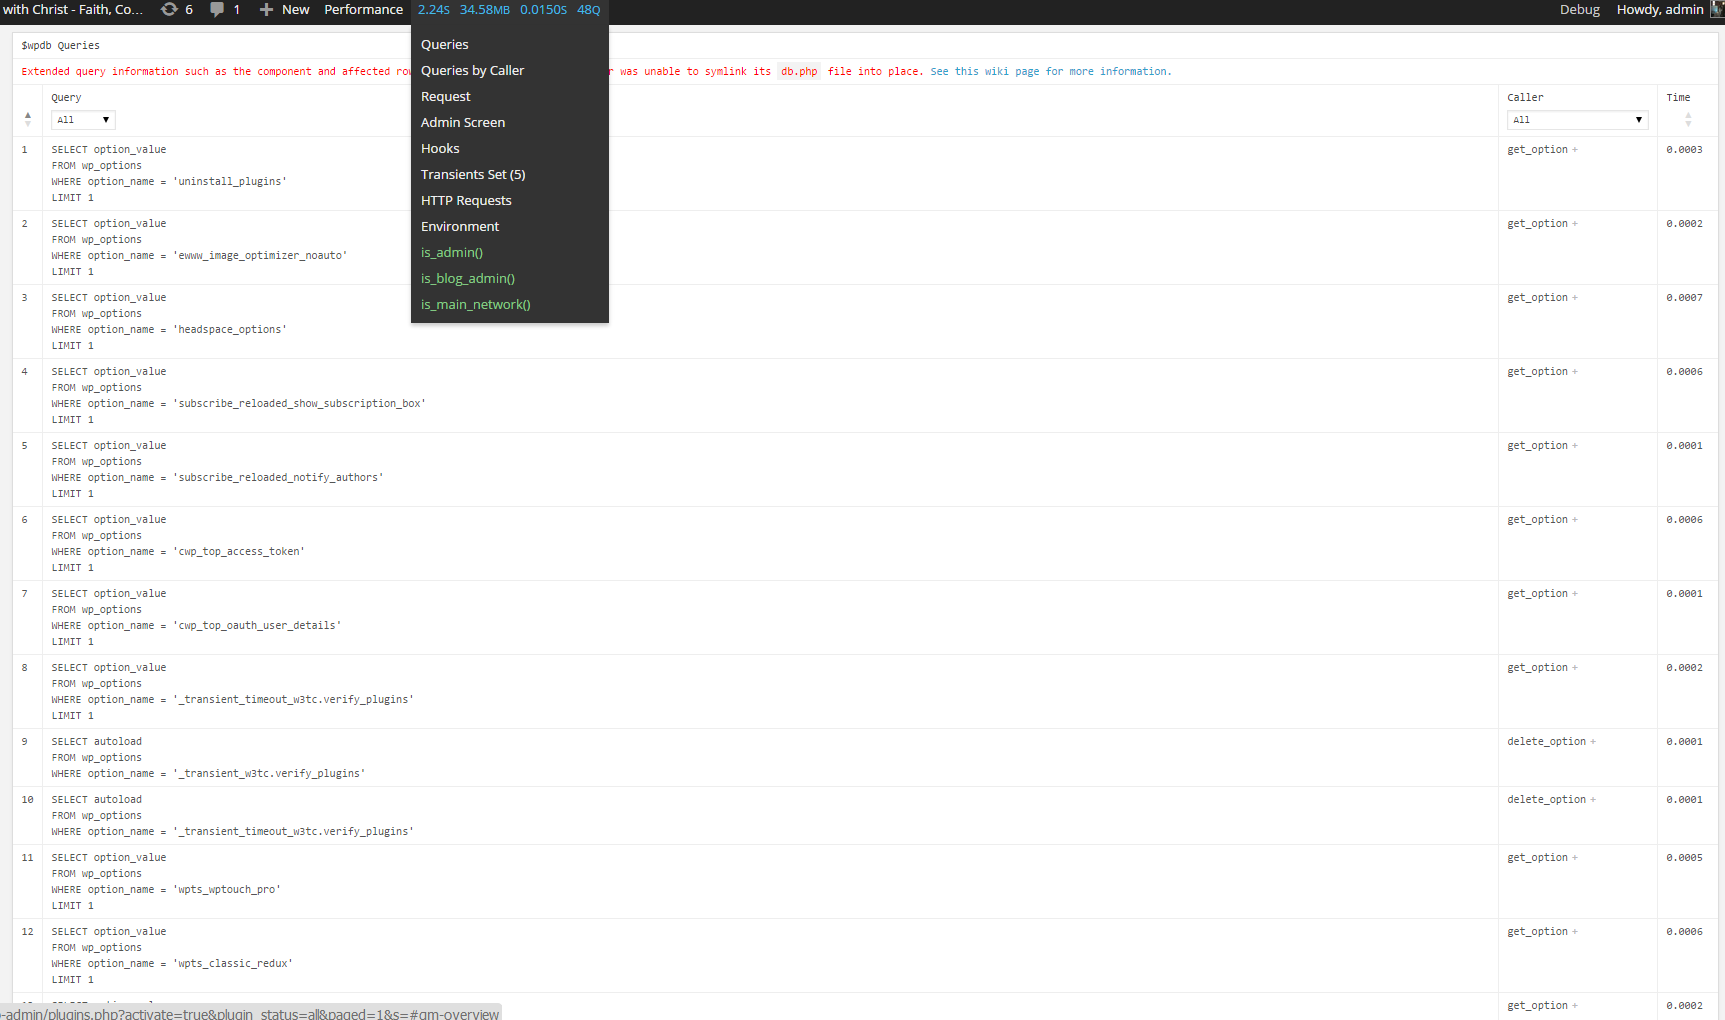
wordpress-query-monitor-plugin-to-monitor-track-and-optimize-problems-with-sql-caused-by-wp-plugins.png
 

Query Monitor is a debugging plugin for anyone developing with WordPress but also very helpful for anyone who want to track issues with plugins who use the database unefficient.
It has some advanced features not available in other debugging plugins, including automatic AJAX debugging and the ability to narrow down things by plugin or theme.
You can view plenty of precious statistics on how enabled plugins query the database server, here is a short overview on its Database Queries capabilities:

  • Shows all database queries performed on the current page
  • Shows affected rows and time for all queries
  • Show notifications for slow queries and queries with errors
  • Filter queries by query type (SELECT, UPDATE, DELETE, etc)
  • Filter queries by component (WordPress core, Plugin X, Plugin Y, theme)
  • Filter queries by calling function
  • View aggregate query information grouped by component, calling function, and type
  • Super advanced: Supports multiple instances of wpdb on one page
  • Once enabled from Plugins you will see it appear as a new menu on bottom Admin raw.

An important note to make here is latest Query Monitor extension fails when loaded on current latest Wordpress 4.1, to use it you will have to download and useolder Query Monitor plugin version 2.6.8 you can download it from here

d) Debug Bar

If you want you want a Memory Viewer like plugin for more complex used components memory debugging, reporting if (WP_DEBUG is set in wp-config.php) also check out Debug Bar .
For me Debug Bar was very useful because it show me depreciated functions some plugins used, so I substituted the obsoleted function with new one.
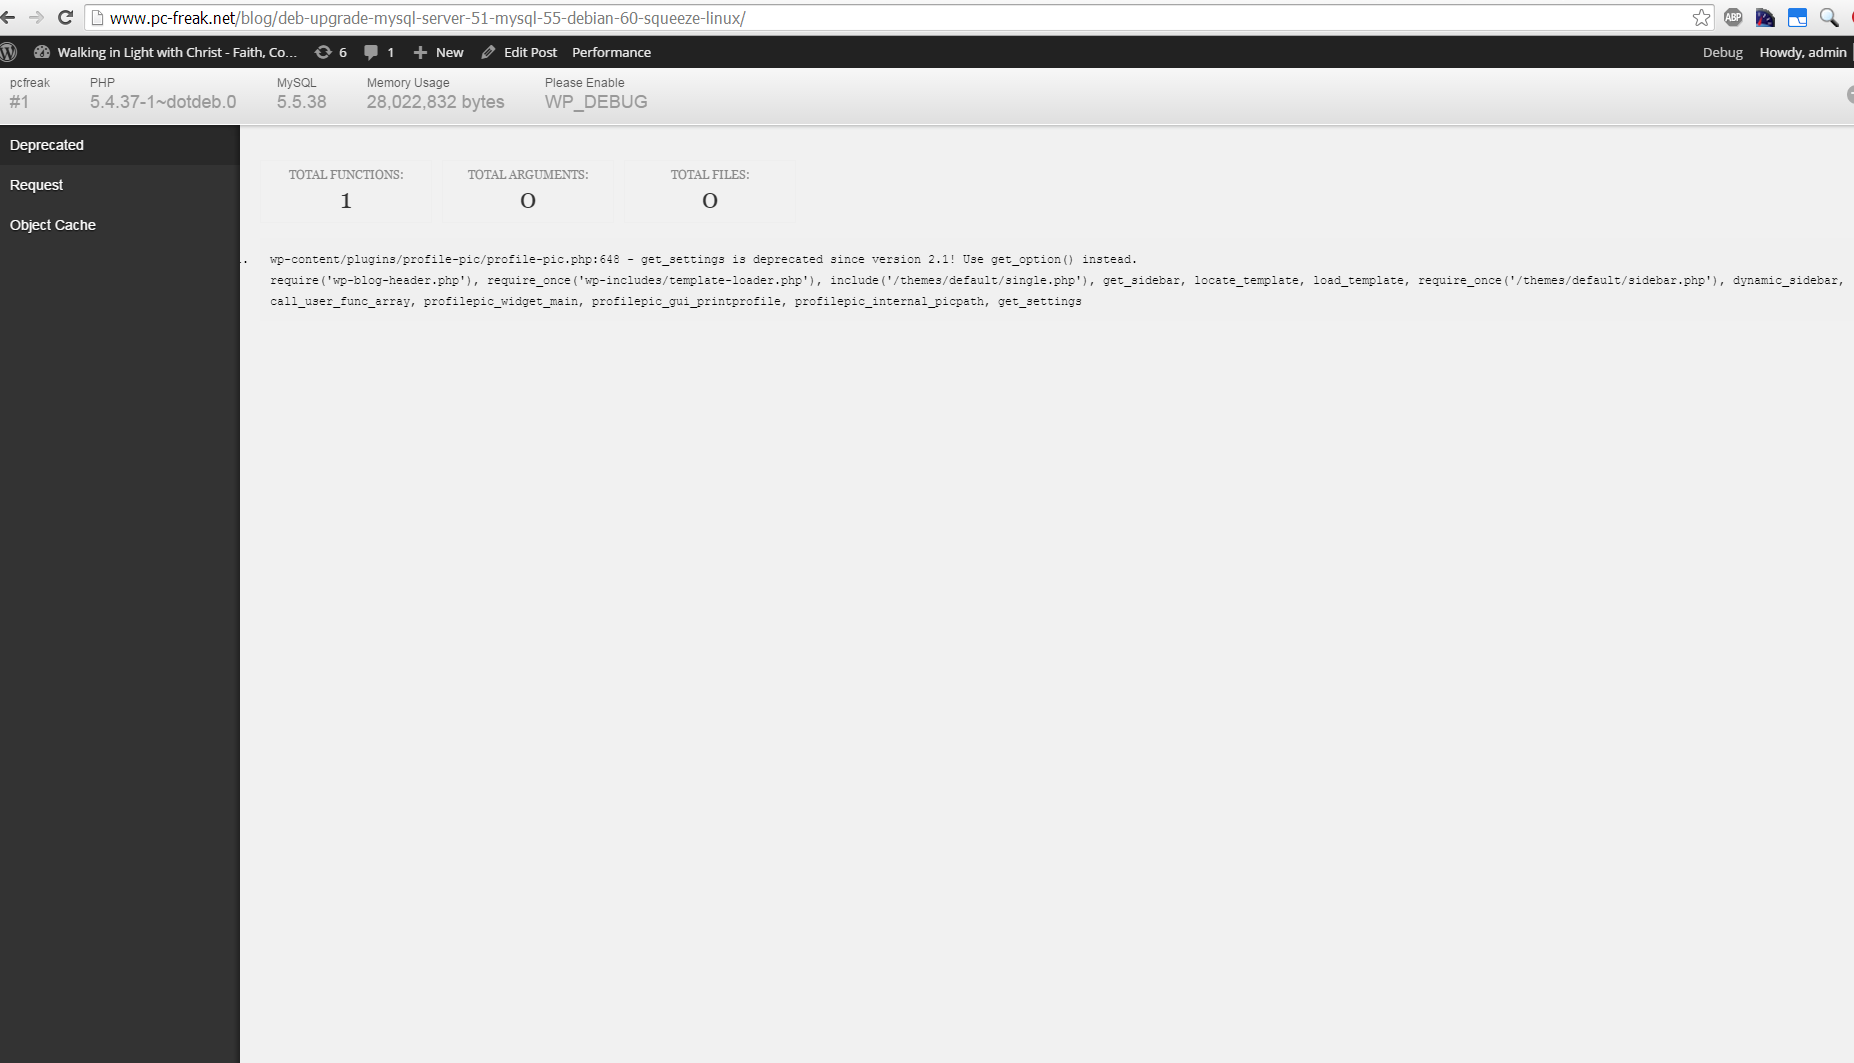
 

debug-bar-debug-wordpress-plugins-memory-use-screenshot-website


4. Server Hardware hungry (slow) WordPress plugins that you better not use

While spending time to Google for some fixes to WP slow query plugins – I've stumbled upon this post giving a good list with WordPress Plugins better off not to use because they will slow down your site
This is a publicly well known list of WP plugins every WordPress based site adminstrator should avoid, but until today I didn't know so my assumption is you don't know either ..

Below plugins are extremely database intensive mentioned in article that we should better (in all cases!) avoid:

  • Dynamic Related Posts
  • SEO Auto Links & Related Posts
  • Yet Another Related Posts Plugin
  • Similar Posts
  • Contextual Related Posts
  • Broken Link Checker — Overwhelms even our robust caching layer with an inordinate amount of HTTP requests.
  • MyReviewPlugin — Slams the database with a fairly significant amount of writes.
  • LinkMan — Much like the MyReviewPlugin above, LinkMan utilizes an unscalable amount of database writes.
  • Fuzzy SEO Booster — Causes MySQL issues as a site becomes more popular.
  • WP PostViews — Inefficiently writes to the database on every page load. To track traffic in a more scalable manner, both the stats module in Automattic’s Jetpack plugin and Google Analytics work wonderfully.
  • Tweet Blender — Does not play nicely with our caching layer and can cause increased server load.


A good Complete list of known WordPress slow plugins that will hammer down your wordpress performance is here

There are few alternatives to this plugins and when I have some free time I will download and test their alternatives but for now I plan the plugins to stay disabled.
 

For the absolute WP Performance Optimization Freaks, its good to check out the native way to Debug a wordpress installation through using few embedded
variables


define('WP_DEBUG', true);
define('WP_DEBUG', false);
define('WP_DEBUG_LOG', true);
define('WP_DEBUG_DISPLAY', false);
define('SAVEQUERIES', true);


An article describing how you can use native WP debug variables is here


Happy Optimizing  ! 🙂

mod_rewrite redirect rule 80 to 443 on Apache webserver

Wednesday, April 2nd, 2014

A classic sysadmin scenario is to configure new Apache webserver with requirement to have an SSL ceriticate installed and working on port 443 and all requests coming on port 80 to be redirected to https://.
On Apache this is done with simple mod_rewrite rule:

RewriteEngine On
RewriteCond %{HTTPS} off
RewriteRule (.*) https://%{HTTP_HOST}%{REQUEST_URI}

Before applying the rule don't forget to have Apache mod_rewrite enabled usually it is not enabled on default most Linux distributions by default.
On shared hostings if you don't have access to directly modify Apache configuration but have .htaccess enabled you can add above rules also to .htaccess

Add this to respective VirtualHost configuration and restart Apache and that's it. If after configuring it for some reason it is not working debug mod_rewrite issues by enabling mod_rewrite's rewrite.log

Other useful Apache mod_rewrite redirect rule is redirect a single landing page from HTTP to HTTP

RewriteEngine On
RewriteRule ^apache-redirect-http-to-https.html$ https://www.site-url.com/apache-redirect-http-to-https.html [R=301,L]

!Note! that in case where performance is a key requirement for a website it might be better to use the standard way to redirect HTTP to HTTPS protocol in Apache through:

ServerName www.site-url.com Redirect / https://www.site-url.com/

To learn more on mod_rewrite redirecting  check out this official documentation on Apache's official site.

Make Viber calls with no smartphone from Mobile to PC and from PC to Mobile – Bluestacks install android mobile apps on PC

Thursday, April 24th, 2014

Viber-for-smartphones-connect-freely-through-internet-voip-on-your-mobile

Since I've bought ZTE smat phone and I have Android on it, decided to install   Viber – iOS, Android and Desktop PC – Free Calls, Text and Picture sharing through the internet app. Viber is used by a lot of my people including many friends already so I installed it as well to be possible to speak for free with close friends …

Why Viber?


What makes this nifty app so great is its capability to make free calls over mobile phones through the Internet Viber.
Viber saves you a lot of money as calls are handled only through the Internet (you need Wifi on your mobile or Mobile 3G Internet access on phone) and you don't need to pay to your mobile operator 0.10 – 0.15 euro / cents per minute. Besides being Free another advantage of Viber is conversations sound quality which is much better than a regular phone call

Viber doesn't need a special registration, but as (login) identificator uses your mobile phone number – you just need to have a working Mobile operator phone num. Once registered under a number even if you change your mobile sim card to other operator (for example moving from country to country) still the Viber account will continue work. Another good reason to use Viber is it makes possible price free calls between different countries (for example if you travel a lot and you want to regularly speak with your wife) – in my case right now I'm in Bulgaria and my wife is in Belarus, so to save money and keep talking daily we use Viber daily.

What Devices and Operating System Viber Supports and what is Viber advantages / disadvantages ?


Another reason why Viber is so great is its multi-platform support it works on iPhone, Blackberry, Windows Phone, Nokia (Symbian), Windows, Mac OS and even (Korean own OS-ed) Bada devices. Some might argue that Viber is inferior to Skype and interms of Voice and Video quality its better because of its enhanced HD voice enhanced codecs, besides that Viber's video is still in Beta. However Viber has one big advantage it makes easy possible to reach people using just their Mobile Phone numbers where in Skype it takes time and effort to register in Skype install application on your Mobile keep yourself logged in in Skype and have all contacts previously added, all this happens automatically in Viber in time of installation of Viber App on your mobile.
 

Which Is Cheaper Viber or Skype?

Skype_VS_Viber-VOIP-Prices-which-is-cheaper-skype-or-viber


Once installed Viber could integrate itself with rest of your Mobile OS Call Manager and in time of call a friend number you have the opportunity to make it free Viber call. Viber are also selling Viber Credits so if you want to use your Viber Voice Over IP you can call external mobile operator numbers on a very very cheap price. Viber Calls to landline or mobile phones could be up to 400% cheaper than Skype! Whether you own a Smartphone it will be nice to give Viber a try.

Viber – How to make Phone calls between Desktop PC and Smarphone Mobile


One not so standard Viber use is to make Viber calls with no smartphone (at hand) from PC to another Viber equipped Mobile and vice versa.
I needed to make Viber calls from my ZTE Android running mobile to my wife's MacBook Air PC because her mobile is an old Nokia running obscure Symbian version which is not supporting Viber + she doesn't have an Internet access tariff switched on her mobile.

Here is what I had to do to make Phone calls between my Mobile Viber App and my wife's MacbookAir Notebook PC:
 

  • Install BlueStacks Web App Player


    BlueStacks_emulate-google-appstore-on-Windows-and-Mac-OS-android-emulator_Logo
    BlueStacks App Player is a software designed to enable Android applications to run on Windows PC, Apple Macintosh Computers and Windows tablets. BlueStacks is something like (VMware, Qemu) Virtual Machine which allows you to install and run any Android App on your Desktop PC.
    Its curious that app was created by Rosen Sharma in 2008 an ex CTO (Chief Technology Officer) of McAfee
     

  •  A mobile phone with a working SIM card (Nokia 6310 or any old mobile no need to be a smartphone
     
  • Desktop PC with Windows 7, 8 or PC with Mac OS


Install Bluestacks

BlueStacks is needed in order to emulate a smartphone on your PC, therefore once setupped Bluestacks. Launch it and  inside its necessary to login with your Gmail (Google Account) in order to allow access to Google Play Appstore on your PC.
viber with no mobile phone bluestacks
 

Installing and Verifying Viber

This is the most crucial and tricky part in order to make Viber working on any device you need to receive a special Viber verification code, you need to fill in this code to confirm Viber installation on PC. Here I assume you have BlueStacks running with Viber Application installed.

viber-running-under-bluestacks-on-windows-7-8-screenshot

First will be prompted to Agree with Terms and Conditions and provide Mobile Phone number for verification. Tell the Viber app that you have a smartphone with Viber already when prompted. After receving Viber Verification Code you need to fill in this code into BlueStacks Window (inside Viber should be running), go further to next step and you should be done with Desktop PC Viber number registration.

N.B. ! One brackets to open here is you need to have a working Mobile Phone number where you will receive the verification code as SMS, otherwise you cannot get the verification. On your filled in mobile phone number you will get the verification code as SMS.

Making Viber Calls to (Windows Mac) PC without Smartphone

There is no more further need for BlueStacks so you can uninstall it, however I preferred to keep it as its useful to be able to install Android Applications straight on your Desktop PC. To start using Viber on Desktop, just launch Viber application (not through BlueStacks) but the direct install.

Use Viber dial pad to dial your desired remote Smartphone number with Viber equipped.
Enjoy the free Internet calls ! 🙂
 

Fiddler – Windows web debugging proxy for any browser – Linux web debugging applications

Thursday, May 29th, 2014

fiddler-web-proxy-debugging-http-https-traffic-in-windows-browser
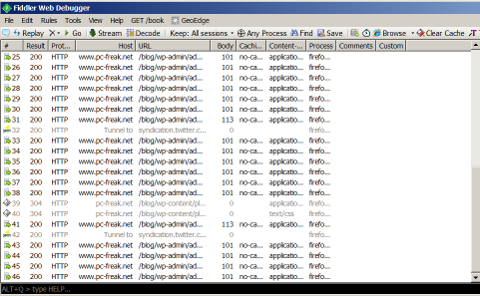
Earlier I've blogged about helpful web developer or a web hosting system administrator Web Browser plugins . Among the list of useful plugins for debugging sent / received web content on your desktop (HTTPWatchm, HTTPFox, Yslow etc.), I've found another one called Fiddler.

Telerik's Fiddler is a Browser plugin  and a Windows Desktop application to monitor HTTP and HTTPS outbound web traffic and report and provide you with various information useful for:

fiddler-web-debugger-for-browser-and-desktop-for-windows-keep-trac-and-optimize-web-traffic-to-web-servers

  • Performance Testing
  • HTTP / HTTPS
  • Traffic recording
  • Security Testing
  • Web Session Manipulation
  • Encode Decode web traffic
  • Convert strings from / to Base64, Hex, DeflatedSAML etc.
  • Log all URL requests originating from all opened browsers on your Desktop
  • Decrypt / encrypt HTTPS traffic using man in the middle techniques
  • Show tuning details for accessed web pages
     

Fiddler is available to install and use as a desktop application (requires .NET 2) or install as a browser plugin. Perhaps the coolest  Fiddler feature from my perspective is its decrypt / encrypt in Base64 and Hex available from TextWizard menu. The tool is relatively easy to use for those who have experience in web debugging, for novice here is a video explaining tool's basics.

Fiddler doesn't have a Linux build yet but it is possible to run it also on Linux using Mono Framework and a few hacks.

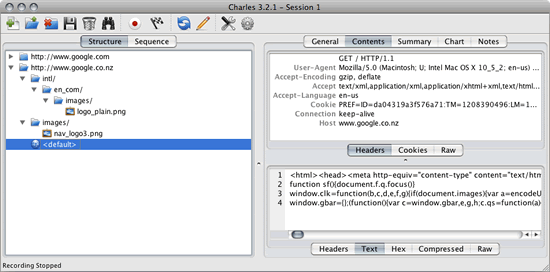
charles-proxy-web-debugging-tool-for-linux-fiddler-alternative
A good native Linux / UNIX alternatives to Fiddler are Nettool, Charles Proxy, Paros Proxy and Web Scarab.

Bulgarian misery net sponsor of European welfare – Statistics on European Union country installments

Tuesday, June 10th, 2014

european-union-fed-by-people-misery-bulgarian-misery-sponsor-of-european-welfare

Budget of European Union for 2011 is 142 billion Euro. Main source of budget income are installments from country members. Installments paid to EU consist about 1 of countries GDP – and approximately this is the amount of money paid  per EU country member.

For Bulgaria installment is about 426 million euro. The bigger GDP is the bigger the amount of money the respective country pains to the overall European Union budget. Even though payments of member countries is only 1% of GDP, this is the source for about 70% of income of EU.

Other source of money for European Union community comes from VAT taxes, and countries customs taxes (over import / export goods) collected on external border of EU community. In national budgets. Member countries give out 75% of their quotes over the custom incomes, collected in external borders of EU. In national counry budget only 25% of money made from customs control imports and imports influx. In Bulgaria's case we can be talk about the import crossing borders of Macedonia, Serbia and Turkey. Import from VAT taxes in 2011 are 3 370 billion leva and from customs 131 million leva. What percantage of this money went to European Union knows only experts.
For last year the Brussels money for Bulgaria are only 1.33 billion Euro (just to compare Poland received 16 736 billion euro). What is even more sad is that money coming from European union for so called funds influx into the pockets of well known oligarchs.

As it looks even though the glorifications with which Bulgarian government gave to the acquisition of this 1.33 billions eur-obrussel gifts during last year our coutnry still remains net sponsor of European budget. Here are not included the country econonic losses of the membership in EU, for example the closure of reactors of our Nuclear Power Plant in Kozloduy. In mean time about 1% of budget of EU community comes from installments from EU employees, unspent money from EU country members as well as receipts from fines from firms and companies for breachment of laws for protectition of competition and normative acts.
Primary supplier in European Union budget is Germany.
 

  • In 2011, Germany paid to EU 27 954 billion euro. This is about 19.7 of all the Union incomes.
  • Second to Germany by paid country member fee to EU is France with 23.273 billion euros, about 16.4% of all EU income.
  • Third is Italy with 18 447 billion euros or 13% of all EU budget.

As prior mentioned in 2011 direct installment of Bulgaria is 0.426 billion euro (without VAT quotes and incomes from taxation). Less installments paid Esthonia, Lithuania, Malta, Cyprus, Luxemburg (!!!) and Slovenia. Even though all this countries has less teritoriy and less population all this countries are much richer and has a higher GDP per capita!
 

  • Hungary (10 million people)'s installment is 1.135 billions and Romania's installment (Romania – 21.7 million people) was 1.419 billion euro.

Finally – lets take a look of EU country installments per capita of some of member countries.

  • Last year the avarage european give for Brussels burocracy 0.78 euro a day!

Question is how it is possible for everyone to pay 0.78 euro for European Adminsitration? – if there is high unemployment in Bulgaria and a lot of people doesn't receive even 0.78 a day?

European Union returned money in terms of funds does not create fabrics or industry and therefore doesn't create employment – doesn't reduce unemployment ?


Does really Bulgaria and we Bulgarians advantage of the European Union?

Avarage Bulgarian paid 0.16 euro per day – the lowest individual installment in union
 

  • average Latvian, Romanian and Lithuanian,  paid (0.17, 0, 18, 0.24 euro cents a day).


    The most paid citizens of the excessively rich principality

  • Luxemburg1.52 euro a day per person, followed by Danes, Belgians, Swedes, Dutch, Irish, French and Austrians (ranging from 1.47 euro to 0.98 euro).

As some of European Union citizens might not known,few million of Euro of this money is spend on a move of European deputies from Brussels to Strasburg every month (money given for travel costs of EU deputies and physical move of resources from Brussels to Strasburg). The exact sum spend per year for this unmeaningful move (in order to fulfil European community old legislation varies from 150 to 200 million a year!)

yum add proxy on CentOS, RHEL, Fedora Linux howto

Thursday, June 5th, 2014

yum-via-proxy-yum-package-management-mascot
Whether you had to install a CentOS server in a DMZ-ed network with paranoic system firewall rules or simply you want to use your own created RPM local repository to run RPM installs and CentOS system updates via monitored Proxy you will have to configure yum to use a proxy.

There is a standard way to do it by adding a proxy directive to /etc/yum.conf as explained in CentOS official documetnation.
However for some reason:

proxy=http://your-proxy-url.com:8080
proxy_username=yum-user
proxy_password=qwerty

proxy vars adding to /etc/yum.conf [main] section is not working on CentOS 6.5?
However there is a dirty patch by using the OS environment standard variable http_proxy
To make yum work via proxy in gnome-terminal run first:

export http_proxy=http://your-proxy-server.com:8080

or if proxy is protected by username / password run instead:

export username='yum-user'
export password='qwerty'
export http_proxy="http://$username:$password@your-proxy-server:8080/

Afterwards yum will work via the proxy, i.e.:

yum update && yum upgrade

To make http_proxy exported system wide check my previous post – Set Proxy System-Wide

Hope this helps someone.