Posts Tagged ‘application’

Shutdown tomcat server node in case of memory depletion – Avoiding Tomcat Out of memory

Friday, June 6th, 2014

fix-avoid-tomcat-out-of-memory-logo

Out Of Memory Errors, or OOMEs, are one of the most common problems faced by Apache Tomcat users. Tomcat cluster behind Apache unreachable (causing customer downtimes). OOME errors occur on production servers that are experiencing an unusually high spike of traffic.

Out of memory errors are usually a problem of application and not of Tomcat server. OMEs have become such a persistent topic of discussion in the Apache Tomcat community cause its so difficult to trace to their root cause. Usually 'incorrect' web app code causing Tomcat to run out of memory is usually technically correct.

Most common reasons for Out of Memory errors in application code are:
 

  •     the heap size being too small
  •     running out of file descriptors
  •     more open threads than the host OS allows
  •     code with high amounts of recursion
  •     code that loads a very large file into memory
  •     code that retaining references to objects or classloaders
  •     a large number of web apps and a small PermGen


The following java option -XX:OnOutOfMemoryError= could be added to any of tomcat java application servers in setenv.sh in  JAVA_OPTS= variable in case of regular Out of Memory errors occur making an application unstable.

-XX:OnOutOfMemoryError=<path_to_tomcat_shutdown_script.sh>

Where < path_to tomcat_shutdown_script.sh > is shutdown script(which performs kill <tomcat_pid> if normal shutdown fails) for the tomcat instance.

With this setup if any tomcat instance run out of memory it will be shutdown (shutdown script invoked) – as result the Apache proxy infront of Tomcats should not pass any further requests to this instance and application will visualize / work properly for end customers.

Usually a tomcat_shutdown_script.sh to invoke in case of OOM would initiate a Tomcat server restart something like:

for i in `ps -ef |grep tomcat |grep /my_path_to_my_instance | awk '{print $2}'`
do
kill -9 "$i"
#path and script to start tomcat
done

To prevent blank pages returned to customer because of shutdown_script.sh starting stopping Tomcat you can set in Reverse Apache Proxy something like:
 

<Proxy balancer://mycluster>
   BalancerMember ajp://10.16.166.48:11010/ route=delivery1 timeout=30 retry=1
   BalancerMember ajp://10.16.166.70:11010/ route=delivery2 timeout=30 retry=1
</Proxy>

Where in above example I assume, there are only two tomcat nodes, for more just add respective ones.

Note that if the deployed application along all servers is having some code making it crash all tomcat nodes can get shutdown all time and you can get in a client havoc 🙂

What is Vertical scaling and Horizontal scaling – Vertical and Horizontal hardware / services scaling

Friday, June 13th, 2014

horizontal-vs-vertical-scaling-vertical-and-horizontal-scaling-explained-diagram

If you're coming from a small or middle-sized company to a corporations like HP or IBM probably you will not a clear defined idea on the 2 types (2 dimensions) of system Scaling (Horizontal and Vertical scaling). I know from my pesronal experience that in small companies – all needed is to guarantee a model for as less probels as possible without too much of defining things and with much less planning. Other thing is being a sysadmin in middle-sized companies, often doesn't give you opportunity to discuss issues to solve with other admins but you have to deal as "one man (machine) for all" and thus often to solve office server and services tasks you do some custom solution.
hence for novice system administrators probably it will be probably unclear what is the difference between Horizontal and Vertical Scaling?

horizontal-vertical-scaling-scale-up-and-scale-out-server-infrastructure-diagram


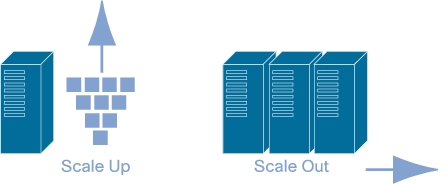
Vertical Scaling (scale vertically or scale up) :- adding more resources(CPU/RAM/DISK) to your server (database or application server is still remains one).
Vertical Scaling is much more used in small and middle-sized companies and in applications and products of middle-range. Very common example for Virtual Scaling nowdays is to buy an expensive hardware and use it as a Virtual Machine hypervisor (VMWare ESX). Where a database is involved using Vertical Scaling without use of multiple virtual machines might be not the best solution, as even though hardware might suffice (creation of database locks might impose problems). Reasons to scale vertically include increasing IOPS (Input / Ouput Operations), increasing CPU/RAM capacity, and increasing disk capacity.
Because Vertical Scaling usually means upgrade of server hardware – whenever an improved performance is targeted, even though if Virtualization is used, the risk for downtimes with it is much higher than whenever horizontal scaling.

Horizontal Scaling (scale horizontally or scale out):- adding more processing units (phyiscal machine) to your server (infrastructure be it application web/server or database).
Horizontal scaling, means increasing  the number of nodes in the cluster, reduces the responsibilities of each member node by spreading the keyspace wider and providing additional end-points for client connections. The capacity of each individual node does not change, but its load is decreased (because load is distributed between separate server nodes). Reasons to scale horizontally include increasing I/O concurrency, reducing the load on existing nodes, and increasing disk capacity.
Horizontal Scaling has been historically much more used for high level of computing and for application and services. The Internet and particular web services gave a boom of Horizontal Scaling use, most companies nowadays that provide well known web services like Google (Gmail, Youtube), Yahoo, Facebook, Ebay, Amazon etc. are using heavily horizontal scaling. Horizontal Scaling is a must use technology – whenever a high availability of (server) services are required.

Fix MySQL connection error – Host ” is blocked because of many connection errors; unblock with ‘mysqladmin flush-hosts’

Wednesday, July 2nd, 2014

fix-mysql-too-many-connection-errors-explained

If you get a MySQL error like:

Host '' is blocked because of many connection errors; unblock with 'mysqladmin flush-hosts'

This most likely means your PHP / Java whatever programming language application connecting to MySQL is failing to authenticate with the application created (existing) or that the application is trying too many connections to MySQL in a rate where MySQL server can't serve all the requests.

Some common errors for Too many Connection errors are:
 

  • Networking Problem
  • Server itself could be down
  • Authentication Problems
  • Maximum Connection Errors allowed.

The value of the max_connection_errors system variable determines how many successive interrupted connection requests are permitted to myqsl server.
 

Well anyways if you get the:

Host '' is blocked because of many connection errors; unblock with 'mysqladmin flush-hosts'

You can consider this a sure sign application connections to MySQLis logging a lot of error connections, for some reason.
This error could also appear on very busy websites where high amount of separete connections are used – I've seen the error occur on PHP websites whether mysql_pconnect(); is selected in favour of the prooved working mysql_connect();

The first thing to do before changing / increasing default set of max connection errors is to check how many max connection errors are set within MySQL?

For that connect with MySQL CLI and issue:
 

mysql> SHOW VARIABLES LIKE '%error%';


+——————–+————————————————————-+
| Variable_name      | Value                                                           |
+——————–+————————————————————-+
| error_count        | 0                                                                     |
| log_error          | /var/log/mysql//mysqld.log                                |
| max_connect_errors | 10000                                                      |
| max_error_count    | 64                                                               |
| slave_skip_errors  | OFF                                                             |
+——————–+————————————————————-+


A very useful mysql cli command in debugging max connection errors reached problem is

mysql> SHOW PROCESSLIST;


To solve the error, try to tune in /etc/my.cnf, /etc/mysql/my.cnf or wherever my.cnf is located:

[mysqld]
max_connect_errors
variable

and

wait_timeout var. Some reasonable variable size would be:

max_connect_errors = 100000
wait_timeout = 60

If such (anyways) high values is still not high enough you can raise mysql config connection timeout


to

max_connect_errors = 100000000

Also if you want to try raise max_connect_errors var without making it permanenty (i.e. remember var setting after MySQL service restart), set it from MySQL cli with:

SET GLOBAL max_connect_errors


If you want to keep the set default max_connection_errors and fix it temporary, you can try to follow the error

Host '' is blocked because of many connection errors; unblock with 'mysqladmin flush-hosts'

suggestion and issue in root console:

mysqladmin flush-hosts

Same could also be done from MySQL Cli with cmd:
 

FLUSH HOSTS;

Make MySQL existing users to have access from any or particular host after SQL migration

Tuesday, July 1st, 2014

make_mysql_existing_users_have-access-from-any-or-particular-host-after-SQL-migration
Recently I've done a migration of MySQL server from host A (running and configured to serve requests on (localhost – 127.0.0.1) to host B (server2.host.com)
There are already existing users in mysql which are allowed to only access the database server from localhost as until now the applciation was sending SQL queries straight on localhost. Now the architecture has to change to use the MySQL Database remotely.

Hence I've migrated the MySQL server by dumping all the existing the databases on MySQL host A  with:

mysqldump -u root -p --all-databases > alldbs_dump.sql


And then importing the databases on host B with

mysql -u root -p < alldbs_dump.sql

Though this migrated the data from Host A to Host B, still the application on Host A was failing to succesfully use its data from database on Host B, because of inability to properly authenticate. It couldn't authenticate because MySQL on Host B's users are not configured to have access from IP address of Host A, but only allowed the application users to be able to connect on localhost..

I've used following SQL CLI query to check Hosts allowed to connect to MySQL (in this case localhost):

# mysql -u root -p
mysql> use mysql;
mysql> select * from user where user like '%eameiotest%' and Host='localhost';


To fix that I logged on MySQL server on Host B with mysql cli and issued for each of the users the application was using:

UPDATE mysql.user SET Host='%' WHERE Host='localhost' AND User='eameiotest';
 

UPDATE mysql.user SET Host='%' WHERE Host='localhost' AND User='eameiotest2';
 

UPDATE mysql.user SET Host='%' WHERE Host='localhost' AND User='eameiotest3';


On execution, If you get errors like:
 

ERROR 1062 (23000): Duplicate entry '%-eameiotest' for key 'PRIMARY'


Don't think that there is no solution, as I've read some threads online claiming the only way to get around this issue is to dump mysql database and re-import it, this is not necessery. There is a work around to this MySQL bug.

To work-around the error, you will first have to set the user allowed access host to empty – ' ' :


UPDATE mysql.user SET Host='' WHERE Host='localhost' AND User='eameiotest';
 

UPDATE mysql.user SET Host='' WHERE Host='localhost' AND User='eameiotest2';
 

UPDATE mysql.user SET Host='' WHERE Host='localhost' AND User='eameiotest3';


And re-issue again commands:
 

UPDATE mysql.user SET Host='%' WHERE Host='localhost' AND User='eameiotest';
 

UPDATE mysql.user SET Host='%' WHERE Host='localhost' AND User='eameiotest2';
 

UPDATE mysql.user SET Host='%' WHERE Host='localhost' AND User='eameiotest3';


You might want to also issue:
 

GRANT ALL PRIVILEGES ON yourdatabase-name.* TO 'eameiotest1'@'server-host';

GRANT ALL PRIVILEGES ON yourdatabase-name.* TO 'eameiotest2'@'server-host';

GRANT ALL PRIVILEGES ON yourdatabase-name.* TO 'eameiotest3'@'server-host';
 

This should have solve the app connection issues, Cheers 🙂


Run native Internet Explorer 6 on latest Debian / Ubuntu Linux with IEs4Linux

Thursday, July 24th, 2014

Install-internet-explorer-on-debian-linux-IEs4Linux_logo.svg
If you're a GNU / Linux Desktop user like me and you have to administrate hybrid server environments running mixture of MS Windows with Microsoft IIS webserver running active server pages (.ASP) developed application or UNIX / GNU Linux servers web applications using Mono as a server-side language, often you need to have browser which properly supports  Internet Explorer Trident web (layout) renderer (also famous as MSHTML).

Having Internet Explorer on your Linux is very useful for web developers who want to test how their website works under IE.

Of course you can always install Windows in Virtualbox VM and do your testing in the Virtual Machine but this takes time to install and also puts a useless load to a PC ….

IES4 Linux is a Linux free (open source) shell script that lets you run Internet Explorer on your Linux desktop.

ies4linux scripts collection uses emulation with WINE (Wine is Not Emulator) emulator to run the native  Windows Internet Explorer thus before use it you have to install Wine.

There are plenty of tutorials online about ies4Linux, problem is as it is not updated and developed most tutorials doesn't work on Debian Wheezy / Ubuntu and rest of deb based linux distros.
This is why I decided to write just another ies4linux tutorial that actually works!

On Debian / Ubuntu / Mint Linux install via apt-get:

apt-get –yes install wine

Then with a non-root user download ies4linux-latest.tar.gz. Just in case ies4linux-latest.tar.gz disappears in future I've created also a ies4linux-latest.tar.gz mirror for download here

and unarchive tar archive:

wget http://www.tatanka.com.br/ies4linux/downloads/ies4linux-latest.tar.gz
tar -zxvf ies4linux-latest.tar.gz
cd ies4linux-*
./ies4linux

You will get:
 

IEs4Linux 2 is developed to be used with recent Wine versions (0.9.x). It seems that you are using an old version. It's recommended that you update your wine to the latest version (Go to: winehq.com).

You need to install cabextract first!
Download it here: http://www.kyz.uklinux.net/cabextract.php

To fulfill this requirement you will need to also cabetract package which is luckily part of Debian:
 

apt-get install –yes cabextract

On wine version 1.0 and onwards winprefixcreate has been changed to winecfg binary.
To prevent missing wineprefixcreate, errors during ies4linux installer run  its necessery to symlink as a workaround:
 

ln -sv /usr/bin/winecfg /usr/bin/wineprefixcreate


To continue with Internet Explorer ies4Linux installater run again:

./ies4linux
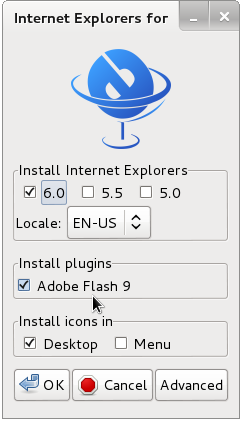
images/internet-explorer-for-linux-debian-gnu-linux-screenshot

/images/internet-explorer-4-linux-installer-debian-gnu-linu-screenshot

You will get the installer GUI window with selection option which Internet Explorer version you want. Choose between IE 5.0, IE 5.5 and IE 6. It is also possible to install IE 7 which is still considered beta version and is less tested and unstable, will probably lead to crashes. If you want to install also IE 7 check it as an option from Advanced menu.
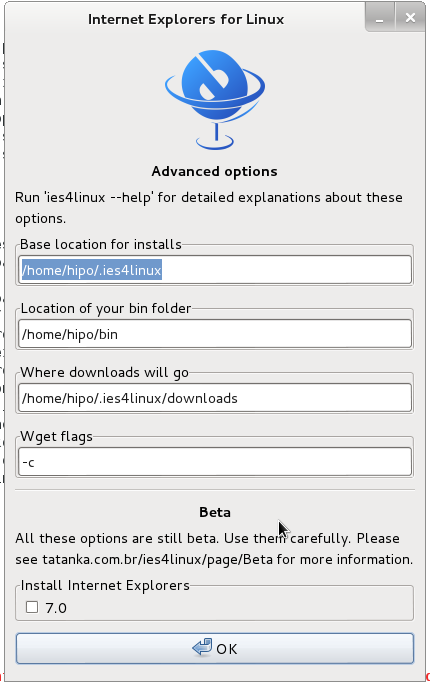
/images/ies4linux-internet-explorer-installer-debian-gnu-linux-screenshot

If you get permission errors after running ies4Linux gui installer to solve that chown recursively directory to the user with which you will be running it:
 

chown -R hipo:hipo ies4linux-2.99.0.1


Internet Explorer for Linux downloader, will connect Microsoft.com website and download DCOM, MCF and various IE required .CAB files.

If you get some ies4linux GUI installer unexpected crashes you can try to download all required IE binaries, surrounding files and flash player using no-gui installer with cmd:
 

./ies4linux –no-gui –install-corefonts

IEs4Linux 2 is developed to be used with recent Wine versions (0.9.x). It seems that you are using an old version. It's recommended that you update your wine to the latest version (Go to: winehq.com).

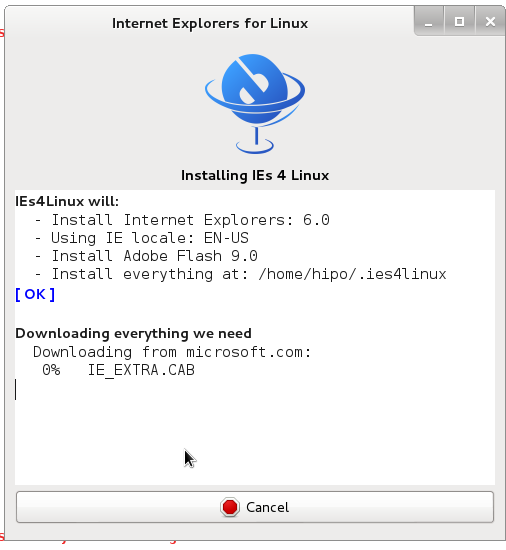
IEs4Linux will:
  – Install Internet Explorers: 6.0
  – Using IE locale: EN-US
  – Install Adobe Flash 9.0
  – Install MS Core Fonts
  – Install everything at: /home/hipo/.ies4linux
[ OK ]

Downloading everything we need
  Downloading from microsoft.com:
   DCOM98.EXE
   mfc42.cab
   249973USA8.exe
   ADVAUTH.CAB
   CRLUPD.CAB
   HHUPD.CAB
   IEDOM.CAB
   IE_EXTRA.CAB
   IE_S1.CAB
   IE_S2.CAB
   IE_S5.CAB
   IE_S4.CAB
   IE_S3.CAB
   IE_S6.CAB
   SETUPW95.CAB
   FONTCORE.CAB
   FONTSUP.CAB
   VGX.CAB
   SCR56EN.CAB

  Downloading from macromedia.com:
   100% swflash.cab

  Downloading from sourceforge.net
   0%   webdin32.exe[ OK ]bdin32.exe

Installing IE 6
  Initializing
  Creating Wine Prefix
Your wine does not have wineprefixcreate installed. Maybe you are running an old Wine version. Try to update it to the latest version.

To fix the error:

Your wine does not have wineprefixcreate installed. Maybe you are running an old Wine version. Try to update it to the latest version.

vim lib/functiions.sh

Go to line 36 (Type :36 in vim)

Line:

wine –version 2>&1 | grep -q "0.9." || warning $MSG_WARNING_OLDWINE

Has to be changed to:

wine –version 2>&1 | egrep -q "0.9.|-1." || warning $MSG_WARNING_OLDWINE


Also you need to substitute wineprefixcreate to wineboot (if you haven't already symlinked wineprefixcreate to winecfg – as pointed earlier in article.

To do so make following substitution in lib/install.sh and in lib/functions.sh

cp -rpf lib/install.sh lib/install.sh.bak; cat lib/install.sh |sed -e 's#wineprefixcreate#wineboot#g' > lib/install_new.sh; mv lib/install_new.sh lib/install.sh

cp -rpf lib/install.sh lib/functions.sh.bak; cat lib/functions.sh |sed -e 's#wineprefixcreate#wineboot#g' > lib/functions_new.sh; mv lib/functions_new.sh lib/functions.sh


Also it is necessery to change default corefonts download url which points to sourceforge but is failing. I've made mirror of corefonts files here
 

cp -rpf lib/install.sh lib/install.sh.bak; cat lib/install.sh |sed -e 's#http://internap.dl.sourceforge.net/sourceforge/corefonts/#www.pc-freak.net/files/corefonts/#g' > lib/install_new.sh; mv lib/install_new.sh lib/install.sh

Re-run the ies4linux console installer:
 

 ./ies4linux –no-gui –install-corefonts

….
Es4Linux installations finished!

On installation success you should get output like this
Hopefully you will see no errors like in my case, if you get the corefonts download error again re-run the installer and it should succesully download the files.

To then run ies4linux:

~/bin/ie6
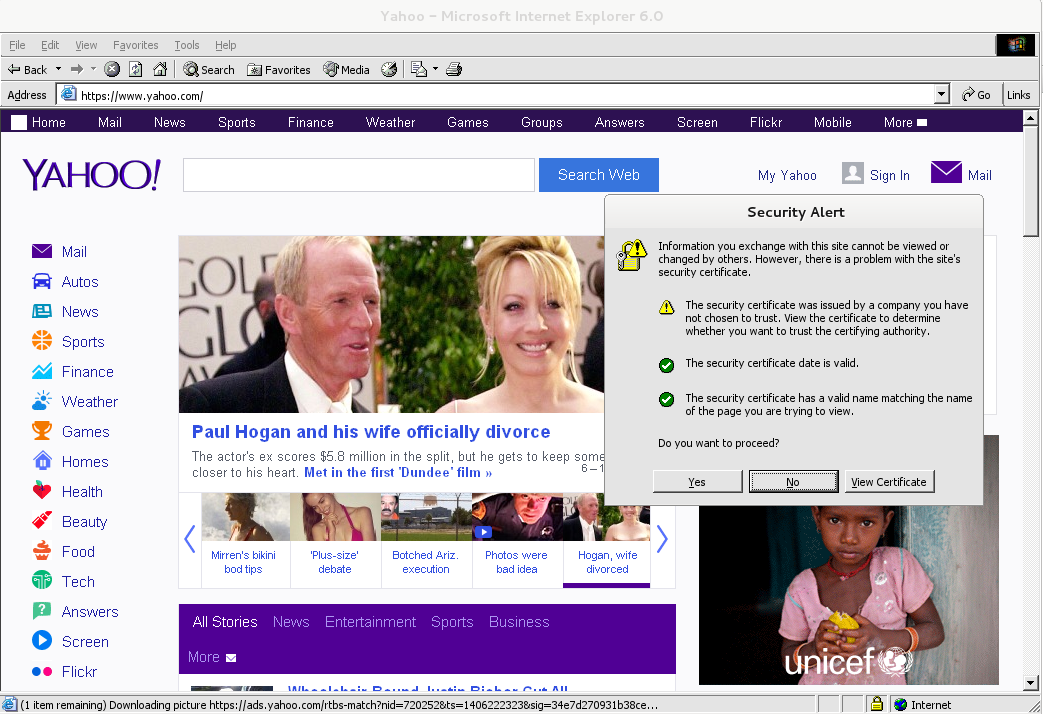

internet-explorer-ies4linx-running-on-debian-gnu-linux-screenshot
Though Ies 4 Linux is good for basic testing it is not psosible to use the browser for normal browsing because its a bit buggy and slow.

By default Internet Explorer 6 behavior is to prompt security alert on various actions, though this might be useful for debugging it is really annoying so I personally disabled those by decreasing from:

Tools -> Internet Options -> Security -> (Security Level)
I've decreased it from Medium to Medium-Low

ies4Linux was not developed since 2008 and as of time of writting ies4linux official project website seems abandoned.


 

xkill for Windows – Kill hanged programs with one click like in UNIX

Thursday, September 18th, 2014

Windows Xkill by Solo Dev logo kill easily hanged, crashed windows programs - Linux xkill for Windows alternative

I’ve used Linux as I’ve used it over the last 10 years and thus I’m so used to xkill that I consider it as a normal tool every modern operating system should have.

Since I’m forced to work on a Windows platform over the last 1 year, every now and then I have crashing / hanged apps Window which sometimes is hard to kill using Task Manager or command line tools like tasklist, taskkill or pstools – Windows Sysinternal tools cause you don’t know the exact process name of the Windows crashed application.

Thanksfully a good hearted guy SuprVillain made Windows Xkill program. Windows Xkill is portable app, so you don’t need to install it but simply download and run it.

windows-7-system-tray-xkill-screenshot-xkill-for-windows

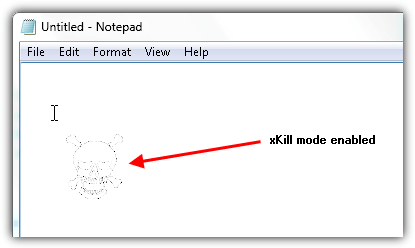
Win-Xkill runs in system tray and has “kill mode” of operation, when Kill mode it is running Windowns Xkill operates exactly like UNIX’s xkill. The mouse pointer turns into Skull and Cross Bones, you point at a Window app you wanted to kill and it gets terminated.
Windows Xkill kill mode enabled killing a windows notepad app
Win Xkill kill mode, can be invoked using also a key press Control+Alt+Backspace as well as there is an option to leave xkill running in the background background, but disabling the tiny skull icon in systray from its interface.
Enjoy 🙂

How to split / rar in parts large data archive files on Linux and Windows – Transfer big files across servers located in DMZ rescticted areas

Friday, November 28th, 2014

how-to-split-rar-in-parts-large-data-archive-files-on-Linux-and-Windows-Transfer-big-files-across-servers-in-firewalled-restricted-areas

I was working on a Application Migration Project whose goal was to Install a business application called Asset Guardian and then move current company Data from the old server to the new AppServer.
F
or that purpose the company vendor Asset Guardian shipped to a Public access FTP, a huge (12GB) ZIP archive file which had to be transferred into a well secured DMZ-ed corporation network with various implemented Traffic Shaping Network policies, a resctrictive firewall allowing access to Internal Network only and to Few (Restrictive configured) Proxy Server IPs on port 80 and 8080.

One of the proxy servers allowed access to the Internet and I set this one and tried downloading the Huge Archive file  with the Windows 2012 server default browser Internet Explorer 10, though the download started it kept slow between ~ 300 – 500KB sec and when reached 3.4GB download failed. I tried resuming the download but as the remote Public FTP server where files resides doesn't support FTP RESUME function.
I thought it might be that Internet Explorer is badly managing the download so, I go forward and installed Portable Firefox (mirrored version 33.1.1 is here). Re-running download with firefox also failed, so the next logical step was for me to try downloading with Windows version of Wget (Wget) and with Portable Free Download Manager 3.9.14.1481 (mirrored here) using both of them was unable to complete download (probably due to firewall or Proxy screwing the proxy inspected traffic) thus I had to look for another way to copy the enormous archive into the company network.

To get around the issue I tried to download the file from FTP to another Server running Apache and tried re-downloading the big file archive (Asset-Guardian-data.zip) from Apache Webserver via HTTP protocol, this download method didn't work neither using plain HTTP protocol for download when downloaded file reached (3.4GB), thus I realized this is due to restrictive Proxy servers (dropping file downloads) bigger than  3.4GBs).

Then to be able to transfer the huge 12GB file, it seems the only left option was to to chop the big file on smaller file chunks and transfer them one by one.
In my case I had the Asset-Guardian-Files.zip transferred already to the Apache (Webserver) host which is running Linux so basicly the task was to Transfer Big archive file between the SuSE Linux Enterprise Server (SLES) 11 and Windows 2012 Server.

Quickesy way to do that is by using UNIX split command, i.e.:

split -b 1024m Asset-Guardian-Files.zip


The outputted files each 1GB are with naming (xaa, xab, xac, xad, xae, xaf, gaf etc.) in same folder where split command is run:

To later merge the files on the Windows 2012 server (copy) command is used:

copy /b file1 + file2 + file3 + file4 filetogether


In my case the command to issue on Win 2012 server was:

copy /b xaa + xab + xac + xae + xae + xaf + xaf + xag xah xai xaj xak Asset-Guardian-files.zip


This method to chop and transfer the file is most simple one and it doesn't require the two servers to have WinRAR or Console RAR / unrar installed.

If instead of Copy Huge File from Linux -> Windows host you need to copy too big file (lets say 100GB) between 2 Windows servers (Windows server host A and Windows server Host B – both situated in different firewall corporate networks) you will need to download to Win Host A and use Windows UNIX split equivalent tool called sfk (The Swiss File Knife) , sfk has port also for Mac OS so in case of need for need for migrating huge archive file from Mac OS X host it will serve as Linux's split – I've made SFK (current version) mirror here.

Another way to cut the 12GB file in parts and transfer to destination host via HTTP was to use rar (on the Linux host), then download the file on Win 2012 server and use Winrar Portable Free to extract the multiple files:

To make archive separate in parts set out to certain size out of a huge file with rar on Linux use:

cd /var/www
rar -a -v1000000k Asset_Guardian_Files.splitted.rar /var/www/Asset_Guardian_Files.zip

10000000Kbs = 10000000/1024 = 976MBs, hence rar produced parts will be sized to 976MB rar parts.

To find out archives check for *splitted*.rar in your /var/www

ls -al /var/www/*splitted*.rar
-rw-r–r– 1 root root 1048576 ное 28 18:34 Asset-Guardian-Files.splitted.part1.rar
-rw-r–r– 1 root root 1048576 ное 28 18:34 Asset-Guardian-Files.splitted.part2.rar
-rw-r–r– 1 root root 1048576 ное 28 18:34 Asset-Guardian-Files.splitted.part3.rar
-rw-r–r– 1 root root 1048576 ное 28 18:34 Asset-Guaridna-Filse.splitted.part4.rar


Then to download the files M$ Win 2012 server IE (http://my-linux-host.com/Asset-Guardian-Files.splitted.part1.rar, http://my-linux-host.com/Asset-Guardian-Files.splitted.part2.rar. etc.)

Thanks God, Problem Solved 🙂

Windows XP / 7, Minimize any program to system tray free software – RBTray, Trayconizer and Windows HideIT

Monday, January 5th, 2015

rbtray-screenshot1-on-ms-windows-minimize-any-application-systray-winblows
As Linux admin, I'm already aware of AllTray *NIX application able to send any application to GNOME / KDE tray.
But what If you have a program on Windows XP / 7 / 8,  that doesn't have a minimize to tray functionality and you want to send it to tray?
I.e. what if you want to send programs like Notepad (that doesn't by default go to win systray) to Windows  tray in order to prevent them mess up with other Open Windows minimized windows?

After a quick research on the topic I found these 3 – RBtray, Trayconizer, HideIt, Below is a very quick review on each

.

1. Minimize any Windows program to tray with RBTray

rbtray_windows-7-screenshot-minimize-any-application-to-tray-minimize-notepad
If you want to stick to open source (GPL) software a tiny free software proggie that does the trick is RBTray current latest RBtray is 4.3 release is download mirror is here.

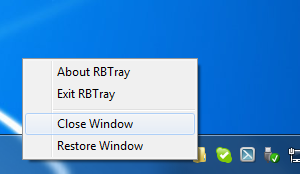
To use RBTray you don't need to do anything, once program is unarchived from archive, once launched there will be no system application that it is running, but you can go to any minimized program (not in tray) and by clicking with right mouse button on minimize button you will the app minimize to tray.

Here is how RBTray works (taken from archive README file):

Installing:
Extract the 32-bit or 64-bit binaries (depending on your OS) to a
 folder, e.g.
C:Program FilesRBTray.  Double click RBTray.exe to start it.  If you want it
to automatically start after you reboot, create a shortcut to RBTray.exe in
your Start menu's Startup group.

Using:
Right click on any program's minimize button to minimize it to the tray.  To
restore, single-click the program's icon in the tray.

Exiting:
Right click on any tray icon created by RBTray and click Exit RBTray in the
popup menu.  Or run RBTray.exe with the –exit parameter.


2. Miminize any app to system tray with Trayconizer

trayconizer_screenshot-microsoft-windows-minimize-notepad
Trayconizer is the other tray minizer tool you might want to check out, Windows tray minize application a download mirror of Trayconizer is here. As of time of writing this post (current) latest Trayconizer version is 1.1.1.

Trayconizer allows you to minimize virtually any application to the system tray rather than having it take up valuable space in your taskbar. The screen shot to the left shows Trayconizer minimizing Notepad to the system tray. Trayconizer is definitely the tool of choice of system administrators who need to keep minimized windows program to system tray each time on boot as it can be easily run from command line.

Using Trayconizer is simple. To start Trayconizer on Notepad, you would execute: C:PathToTrayconizer.exe C:WindowsNotepad.exe.

You can create a shortcut in your Startup group to execute Trayconizer on a program that you use frequently but want to keep tucked out of the way in the system tray when you're not using it. There is even an option for starting the application initially in the minimized state.

Trayconizer will automatically shut itself down when you close the program you are Trayconizing. Additionally, multiple Trayconized programs are handled by a single instance of Trayconizer to avoid wasting system resources.

Trayconizer requires no DLL's beyond the base Win32 API libraries and will not store any entries in your registry.

3. Minimize any program to Windows systray with Windows HideIT

windows-hideit-minimize-to-tray-screenshot-send-any-running-windows-program-to-systray

Another good tool useful in hiding (minimizing) Windows programs which are lacking the minimize option embedded built-in is Windows HideIT.

Hideit official download website is here, note that with Hideit, Its pretty confusing to find where to download in (so to download look in the right upper corner for a download button) HideIT Download Mirror is here.

Hideit should be able to minimize any Application to sysytem tray, while Rbtray fails ith some. Both RBtray and Windows
HIdeIT will popup with a blue down-arrow on Tray icon once launched and you can show / hide minimized applications from there.

All RbTray, Trayconizer and HideIt tray minimizers should work on virtually all NT 4.0 Windows XP / 2000 / Vista / 7 / 8 though I haven't tested on all of 'em yet. If you happen to find it working on  Win NT 4.0 / 8 etc., please drop a comment.

Windows equivalent of Linux which, whereis command – Windows WHERE command

Friday, June 6th, 2014

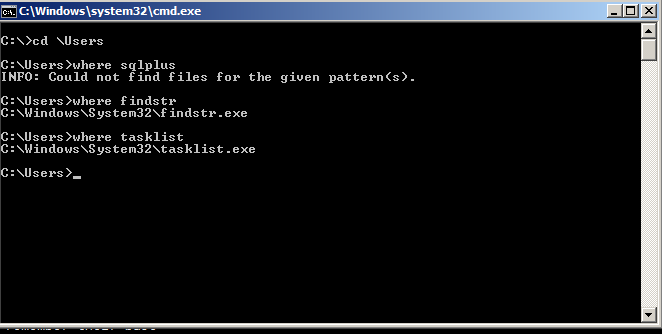
windows-find-commands-full-location-where-which-linux-commands-equivalent-in-windows-where-screenshot
In Linux there are the which and whereis commands showing you location of binaries included in $PATH # which lsof /usr/bin/lsof

# whereis lsof
lsof: /usr/bin/lsof /usr/share/man/man8/lsof.8.gz

so question arises what is which / whereis command Linux commands Windows equivalent?

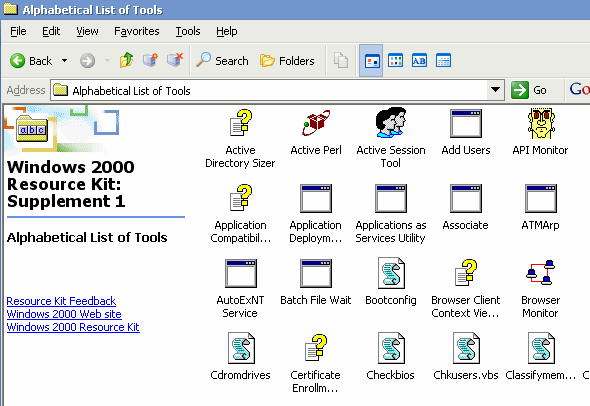
In older Windows Home / Server editions – e.g. – Windows XP, 2000, 2003 – there is no standard installed tool to show you location of windows %PATH% defined executables. However it is possible to add the WHERE command binary by installing Resource Kit tools for administrative tasks.

windows-resource-kit-tools-install-where-linux-command-equivalent-in-windows


In Windows Vista / 7 / 8 (and presumably in future Windows releases), WHERE command is (will be) available by default

C:\Users\Georgi>WHERE SQLPLUS
D:\webdienste\application\oracle\11.2.0\client_1\BIN\sqlplus.exe

Cheers! 🙂

Preserve Session IDs of Tomcat cluster behind Apache reverse proxy / Sticky sessions with mod_proxy and Tomcat

Wednesday, February 26th, 2014

apache_and_tomcat_merged_logo_prevent_sticky_sessions
Having a combination of Apache webservice Reverse Proxy to redirect invisibly traffic to a number of Tomcat server positioned in a DMZ is a classic task in big companies Corporate world.
Hence if you work for company like IBM or HP sooner or later you will need to configure Apache Webserver cluster with few running Jakarta Tomcat Application servers behind. Scenario with necessity to access a java based application via Tomcat which requires logging (authentication) relaying on establishing and keeping a session ID is probably one of the most common ones and if you do it for first time you will probably end up with Session ID issues.  Session ID issues are hard to capture at first as on first glimpse application will seem to be working but users will have to re-login all the time even though the programmers might have coded for a session to expiry in 30 minutes or so.

… I mean not having configured Session ID prevention to Tomcats will cause random authentication session expiries and users using the Tomcat app will be unable to normally access below application with authenticated credentials. The solution to these is known under term "Sticky sessions"
To configure Sticky sessions you need to already have configured Apache/s with following minimum configuration:

  • enabled mod_proxy, proxy_balancer_module, proxy_http_module and or mod_proxy_ajp (in Apache config)

  LoadModule proxy_module modules/mod_proxy.so
LoadModule proxy_balancer_module modules/mod_proxy_balancer.so
LoadModule proxy_http_module modules/mod_proxy_http.so

  • And configured and tested Tomcats running an Application reachable via AJP protocol

Below example assumes there is Reverse Proxy Load Balancer Apache which has to forward all traffic to 2 tomcats. The config can easily be extended for as many as necessary by adding more BalancerMembers.

In Apache webserver (apache2.conf / httpd.conf) you need to have JSESSIONID configured. These JSESSIONID is going to be appended to each client request from Reverse Proxy to each of Tomcat servers with value opened once on authentication to first Tomcat node to each of the other ones.

<Proxy balancer://mycluster>
BalancerMember ajp://10.16.166.53:11010/ route=delivery1
BalancerMember ajp://10.16.166.66:11010/ route=delivery2
</Proxy>

ProxyRequests Off
ProxyPass / balancer://mycluster/ stickysession=JSESSIONID
ProxyPassReverse / balancer://mycluster/

The two variables route=delivery1 and route=delivery2 are routed to hosts identificators that also has to be present in Tomcat server configurations
In Tomcat App server First Node (server.xml)

<Engine name="Catalina" defaultHost="localhost" jvmRoute="delivery1">

In Tomcat App server Second Node (server.xml)

<Engine name="Catalina" defaultHost="localhost" jvmRoute="delivery2">

Once Sticky Sessions are configured it is useful to be able to track they work fine this is possible through logging each of established JESSSIONIDs, to do so add in httpd.conf

LogFormat "%h %l %u %t \"%r\" %>s %b \"%{Referer}i\" \"%{User-Agent}i\"\"%{JSESSIONID}C\"" combined

After modifications restart Apache and Tomcat to load new configs. In Apache access.log the proof should be the proof that sessions are preserved via JSESSIONID, there should be logs like:
 

127.0.0.1 - - [18/Sep/2013:10:02:02 +0800] "POST /examples/servlets/servlet/RequestParamExample HTTP/1.1" 200 662 "http://localhost/examples/servlets/servlet/RequestParamExample" "Mozilla/5.0 (X11; Linux x86_64; rv:17.0) Gecko/20130807 Firefox/17.0""B80557A1D9B48EC1D73CF8C7482B7D46.server2"

127.0.0.1 - - [18/Sep/2013:10:02:06 +0800] "GET /examples/servlets/servlet/RequestInfoExample HTTP/1.1" 200 693 "http://localhost/examples/servlets/" "Mozilla/5.0 (X11; Linux x86_64; rv:17.0) Gecko/20130807 Firefox/17.0""B80557A1D9B48EC1D73CF8C7482B7D46.server2"

That should solve problems with mysterious session expiries 🙂