Posts Tagged ‘connection’

Speeding up Apache through apache2-mpm-worker and php5-cgi on Debian / How to improve Apache performance and decrease server memory consumption

Friday, March 18th, 2011

speeding up apache through apache2-mpm-worker and php5-cgi on Debian Linux / how to improve apache performance and decrease server responce time
By default most Apache running Linux servers on the Internet are configured to use with the mpm prefork apache module
Historically prefork apache module is the predecessor of the worker module therefore it's believed to be a way more tested and reliable, if you need a critical reliable webserver configuration.

However from my experience by so far with the Apache MPM Worker I can boldly say that many of the rumors concerning the unreliabity of apache2-mpm-worker are just myths.

The old way Apache handles connections e.g. the mod prefork is the well known way that high amount of the daemons on Linux and BSD are still realying on.
When prefork is a used by Apache, every new TCP/IP connection arriving at your Linux server on the Apache configured port let's say on port 80 is being served by Apache in a way that the Apache process (mother process) parent does fork a new Apache parent copy in order to serve the new request.
Thus by using the prefork Apache needs to fork new process (if it doesn't have already an empty forked one waiting for connections) and serve the HTTP request of the new client, after the request of the client is completed the newly forked Apache usually dies (even though it again depends on the way the Apache server is configured via the Apache configuration – apache2.conf / httpd.conf etc.).

Now you can imagine how slow and memory consuming it is that all the time the parent Apache process spawns new processes, kills old ones etc. in order to fulfill the client requests.

Now just to compare the Apace mpm prefork does not use the old forking way, but relies on a few Apache processes which handles all the requests without constantly being destroyed and recreated like with the prefork module.
This saves operations and system resources, threaded programming has already been proven to be more efficient way to handle tasks and is heavily adopted in GUI programming for instance in Microsoft Windows, Mac OS X, Linux Gnome, KDE etc.

There is plenty of information and statistical data which compares Apache running with prefork and respectively worker modules online.
As the goal of this article is not to went in depths with this kind of information I would not say more on it but let you explore online a bit more about them in case if you're interested.

The purpose of this article is to explain in short how to substitute the Apache2-MPM-Prefork and how your server performance could benefit out of the use of Apache2-MPM-Worker.
On Debian the default Apache process serving module in Apache 1.3x,Apache 2.0x and 2.2x is prefork thus the installation of apache2-mpm-worker is not "a standard way" to install Apache

Deciding to swith from the default Debian apache-mpm-prefork to apache-mpm-worker is quite a serious and responsible decision and in some cases might cause troubles, if you have decided to follow my article be sure to consider all the possible negative consequences of switching to the apache worker !

Now after having said a bunch of info which might be not necessary with the experienced system admin I'll continue on with the steps to install the apache2-mpm-worker.

1. Install the apache2-mpm-worker

debian:~# apt-get install apache2-mpm-worker php5-cgi
Reading state information... Done
The following packages were automatically installed and are no longer required:
The following packages will be REMOVED apache2-mpm-prefork libapache2-mod-php5
The following NEW packages will be installed apache2-mpm-worker
0 upgraded, 1 newly installed, 2 to remove and 46 not upgraded.
Need to get 0B/259kB of archives.After this operation, 6193kB disk space will be freed.

As you can notice in below's text confirmation which will appear you will have to remove the apache2-mpm-prefork and the apache2-mpm-worker modules before you can proceed to install the apache2-mpm-prefork.

You might ask yourself if I remove my installed libphp how would I be able to use my Apache with my PHP based websites? And why does the apt package manager requires the libapache2-mod-php5 to get removed.
The explanation is simple apache2-mpm-worker is not thread safe, in other words scripts which does use the php fork(); function would not work correctly with the Apache worker module and will probably be leading to PHP and Apache crashes.
Therefore in order to install the apache mod worker it's necessary that no libapache2-mod-php5 is existent on the system.
In order to have a PHP installed on the server again you will have to use the php5-cgi deb package, this is the reason in the above apt-get command I'm also requesting apt to install the php5-cgi package next to apache2-mpm-worker.

2. Enable the cgi and cgid apache modules

debian:~# a2enmod cgi
debian:~# a2enmod cgid

3. Activate the mod_actions apache modules

debian:~# cd /etc/apache2/mods-enabled
debian:~# ln -sf ../mods-available/actions.load
debian:~# ln -sf ../mods-available/actions.conf

4. Add configuration options in order to enable mod worker to use the newly installed php5-cgi

Edit /etc/apache2/mods-available/actions.conf vim, mcedit or nano (e.g. your editor of choice and add inside:

&ltIfModule mod_actions.c>
Action application/x-httpd-php /cgi-bin/php5
</IfModule>

After completing all the above instructions, you might also need to edit your /etc/apache2/apache2.conf to tune up, how your Apache mpm worker will serve client requests.
Configuring the <IfModule mpm_worker_module> in apache2.conf is necessary to optimize your newly installed mpm_worker module for performance.

5. Configure the mod_worker_module in apache2.conf One example configuration for the mod worker is:

<IfModule mpm_worker_module>
StartServers 2
MaxClients 150
MinSpareThreads 25
MaxSpareThreads 75
ThreadsPerChild 25
MaxRequestsPerChild 0
</IfModule>

Consider the fact that this configuration is just a sample and it's in no means configured for serving Apache requests for high load Apache servers and you need to further play with the values to have a good results on your server.

6. Check that all is fine with your Apache configurations and no syntax errors are encountered

debian:~# /usr/sbin/apache2ctl -t
Syntax OK

If you get something different from Syntax OK track the error and fix it before you're ready to restart the Apache server.

7. Now restart the Apache server

debian:~# /etc/init.d/apache2 restart

All should run fine and hopefully your PHP scripts should be interpreted just fine through the php5-cgi instead of the libapache2-mod-php5.
Using the /usr/bin/php5-cgi will increase with some percentage your server CPU load but on other hand will drasticly decrease the Webserver memory consumption.
That's quite logical because the libapache2-mod-hp5 is loaded once during apache server whether a new instance of /usr/bin/php5-cgi is invoked during each of Apache requests via the mod worker.

There is one serious security flow coming with php5-cgi, DoS against a server processing scripts through php5-cgi is much easier to be achieved.
An example for a denial attack which could affect a website running with mod worker and php5-cgi, could be simulated from a simple user with a web browser which holds up the f5 or ctrl + r browser page refresh buttons.
In that case whenever php5-cgi is used the CPU load would rise drastic, one possible solution to this denial of service issues is by installing and using libapache2-mod-evasive like so:

8. Install libapache2-mod-evasive

debian:~# apt-get install libapache2-mod-evasive
The Apache mod evasive module is a nice apache module to minimize HTTP DoS and brute force attacks.
Now with mod worker through the php5-cgi, your apache should start serving requests more efficiently than before.
For some performance reasons some might even want to try out the fastcgi with the worker to boost the Apache performance but as I have never tried that I can't say how reliable a a mod worker with a fastcgi would be.

N.B. ! If you have some specific php configurations within /etc/php5/apache2/php.ini you will have to set them also in /etc/php5/cgi/php.ini before you proceed with the above instructions to install Apache otherwise your PHP scripts might not work as expected.

Mod worker is also capable to work with the standard mod php5 Apache module, but if you decide to go this route you will have to recompile your PHP lib manually from source as in Debian this option is not possible with the default php library.
This installation worked fine on Debian Lenny but suppose the same installation should work fine on Debian Squeeze as well as Debian testing/unstable.
Feedback on the afore-described mod worker installation is very welcome!


Fix temporary DNS problems on Windows – ipconfig /flushdns

Monday, March 17th, 2014

fix temporary dns issues ipconfig /fush
My internet connection is coming router over a strange Belarusian ADSL modem "Промсвязь". This device serves as ADSL modem and a Wireless Router.
promsviaz_belarusian_adsl_and_wifi_modem

Periodically I'm experiencing issues with DNS, where there is internet but DNS resolving stops woring even though in ipconfig /all I can see DNS settings are proper:

C:\Users\hipo> ipconfig /all

...
Wireless LAN adapter Wireless Network Connection:

   Connection-specific DNS Suffix  . :
   Description . . . . . . . . . . . : Intel(R) Centrino(R) Ultimate-N 6300 AGN
   Physical Address. . . . . . . . . : 3C-A9-F4-4C-E7-98
   DHCP Enabled. . . . . . . . . . . : Yes
   Autoconfiguration Enabled . . . . : Yes
   Link-local IPv6 Address . . . . . : fe80::5d2f:97b8:9e1a:2b13%63(Preferred)
   IPv4 Address. . . . . . . . . . . : 192.168.100.2(Preferred)
   Subnet Mask . . . . . . . . . . . : 255.255.255.0
   Lease Obtained. . . . . . . . . . : March 17, 2014 16:57:40 PM
   Lease Expires . . . . . . . . . . : March 18, 2014 16:57:40 PM
   Default Gateway . . . . . . . . . : 192.168.100.1
   DHCP Server . . . . . . . . . . . : 192.168.100.1
   DHCPv6 IAID . . . . . . . . . . . : 1094494708
   DHCPv6 Client DUID. . . . . . . . : 00-01-00-01-19-CB-1A-5D-A4-5D-36-5A-EB-84

   DNS Servers . . . . . . . . . . . : 8.8.8.8
                                       192.168.100.1
                                       8.8.4.4

   NetBIOS over Tcpip. . . . . . . . : Enabled


The fix to situation is to Restart Promsvijazy and restart my Notebook. As this fix takes a lot of time I found another "work around". Make Windows Flush its DNS servers (forget old DNS servers and re-assign them again)

C:\Users\hipo> ipconfig /flushdns

Windows IP Configuration Successfully flushed the DNS Resolver Cache.


Other useful commands to make connection re-initiate completely are:

ipconfig /renew

Renews all Adapter settings (Lan, Wiki, PPP etc.) – re-assign IPs / re-initiate connections and

ipconfig /release

Releases any established connection

Create local network between virtual machines in Virtualbox VM – Add local LAN between Linux Virtual Machines

Wednesday, June 11th, 2014

add-virtualbox-virtual-machines-inside-local-network-create-internal-LAN-local-net-linux-windows

I want to do test MySQL Cluster following MySQL Cluster Install Guide for that purpose, I've installed 2 version of CentOS 6.5 inside Virtualbox and I wanted to make the 2 Linux hosts reachable inside a local LAN network, I consulted some colleagues who adviced me to configure two Linux hosts to use Bridget Adapter Virtualbox networking (Network configuration in Virtualbox is done on a Virtual Machine basis from):
 

Devices -> Network Settings

(Attached to: Bridged Adapter)

Note!: that by default Cable Connected (tick) is not selected so when imposing changes on Network – tick should be set)
After Specifying Attached to be Bridged Adapter to make CentOS linux refresh network settings run in gnome-terminal:

[root@centos ~]# dhclient eth0

However CentOS failed to grab itself DHCP IP address.
Thus I tried to assign manually IP addresses with ifconfig, hoping that at least this would work, e.g.:

on CentOS VM 1:

/sbin/ifconfig eth0 192.168.10.1 netmask 255.255.255.0

on CentOS VM 2:

/sbin/ifconfig eth1 192.168.10.2 netmask 255.255.255.0

To test whether there is connection between the 2 VM hosts tried ping-ing 192.168.10.2 (from 192.168.10.1) and tested with telnet if I can access remotely SSH (protocol), from CentOS VM2 1 to CentOS VM2 and vice versa, i.e.:

[root@centos ~]# telnet 192.168.10.2 22


Trying 192.168.10.2…
telnet: connect to address 192.168.10.2: No route to host

Then after checking other options and already knowing by using VBox NAT network option I had access to the internet, I tried to attach a standard local IP addresses to both Linux-es as Virtual interfaces (e.g eth0:1), .e.g:

On Linux VM 1:

/sbin/ifconfig eth0:0 192.168.10.1 netmask 255.255.255.0

On Linux VM 2:

/sbin/ifconfig eth1:0 192.168.10.2 netmask 255.255.255.0

Then to test again used telnet

[root@centos ~]# telnet 192.168.10.2 22

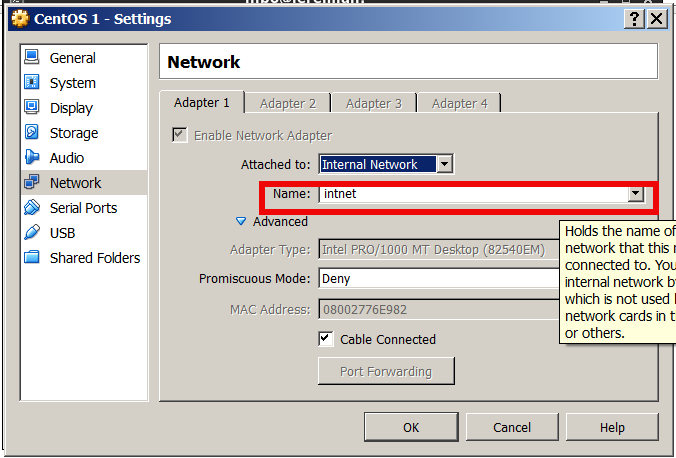
Then I found Virtualbox has a special Internal Networking support

to choose in Attached to drop down menu. According to Internal Networking Virtualbox instructions to put two Virtual Machine hosts inside an Internal network they should be both set in Internal network with identical name.
P. S. It is explicitly stated that using Internal Network will enable access between Guest Virtual Machines OS, but hosts will not have access to the Internet (which in my case doesn't really mattered as I needed the two Linux VMs just as a testbed)

virtualbox-create-internal-local-network-between-guest-host-Linux-Windows1

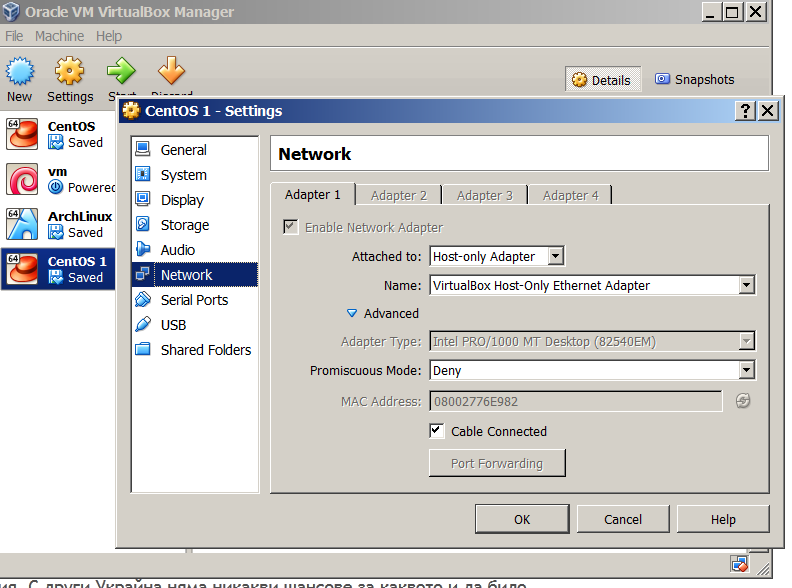
I tried this option but it doesn't work for me for some reason, after some time of research online on how to create local LAN network between 2 Virtual Machines luckily I decided to test all available Virtualbox Networking choices and noticed Host-only adapter.

Selecting Host-only Adapter and using terminal to re-fetch IP address over dhcp:

virtualbox-connect-in-local-lan-network-linux-and-windows-servers-hosts-only-adapter

On CentOS VM1

dhclient eht0

On CentOS VM2

dhclient eth1

assigned me two adjoining IPs – (192.168.56.101 and 192.168.56.102).

Connection between the 2 IPs 192.168.56.101 and 192.168.56.102 on TCP and UDP and ICMP protocol works, now all left is to install MySQL cluster on both nodes.


Fix MySQL connection error – Host ” is blocked because of many connection errors; unblock with ‘mysqladmin flush-hosts’

Wednesday, July 2nd, 2014

fix-mysql-too-many-connection-errors-explained

If you get a MySQL error like:

Host '' is blocked because of many connection errors; unblock with 'mysqladmin flush-hosts'

This most likely means your PHP / Java whatever programming language application connecting to MySQL is failing to authenticate with the application created (existing) or that the application is trying too many connections to MySQL in a rate where MySQL server can't serve all the requests.

Some common errors for Too many Connection errors are:
 

  • Networking Problem
  • Server itself could be down
  • Authentication Problems
  • Maximum Connection Errors allowed.

The value of the max_connection_errors system variable determines how many successive interrupted connection requests are permitted to myqsl server.
 

Well anyways if you get the:

Host '' is blocked because of many connection errors; unblock with 'mysqladmin flush-hosts'

You can consider this a sure sign application connections to MySQLis logging a lot of error connections, for some reason.
This error could also appear on very busy websites where high amount of separete connections are used – I've seen the error occur on PHP websites whether mysql_pconnect(); is selected in favour of the prooved working mysql_connect();

The first thing to do before changing / increasing default set of max connection errors is to check how many max connection errors are set within MySQL?

For that connect with MySQL CLI and issue:
 

mysql> SHOW VARIABLES LIKE '%error%';


+——————–+————————————————————-+
| Variable_name      | Value                                                           |
+——————–+————————————————————-+
| error_count        | 0                                                                     |
| log_error          | /var/log/mysql//mysqld.log                                |
| max_connect_errors | 10000                                                      |
| max_error_count    | 64                                                               |
| slave_skip_errors  | OFF                                                             |
+——————–+————————————————————-+


A very useful mysql cli command in debugging max connection errors reached problem is

mysql> SHOW PROCESSLIST;


To solve the error, try to tune in /etc/my.cnf, /etc/mysql/my.cnf or wherever my.cnf is located:

[mysqld]
max_connect_errors
variable

and

wait_timeout var. Some reasonable variable size would be:

max_connect_errors = 100000
wait_timeout = 60

If such (anyways) high values is still not high enough you can raise mysql config connection timeout


to

max_connect_errors = 100000000

Also if you want to try raise max_connect_errors var without making it permanenty (i.e. remember var setting after MySQL service restart), set it from MySQL cli with:

SET GLOBAL max_connect_errors


If you want to keep the set default max_connection_errors and fix it temporary, you can try to follow the error

Host '' is blocked because of many connection errors; unblock with 'mysqladmin flush-hosts'

suggestion and issue in root console:

mysqladmin flush-hosts

Same could also be done from MySQL Cli with cmd:
 

FLUSH HOSTS;

Nokia Communicator 9300i connection via Bluetooth on Debian GNU/Linux Unstable

Saturday, October 24th, 2009

I wanted to connect my Nokia Communicator 9300i device via bluetooth on Linux on
my Thinkpad running Debian GNU/Linux unstable. By default my bluetooth is disabled
because I usually do not use the bluetooth.
To make the bluetooth back running I had to issue the command:
# echo "enable" > /proc/acpi/ibm/bluetooth
Next the bluetooth-wizard came to play:
# /usr/bin/bluetooth-wizard and then I had to follow the intuitive dialogs,a 4 digit code was generated by my Linux system the whole system was required to be provided
on the Nokia Communicator.
The only left thing is to use gnome’s bluetooth-applet “Blowse Files” feature.
Here is a screenshot showing up the bluetooth-applet in case if you wonder how the app looks like
Bluetooth Applet
In case if bluetooth-applet is not appearing as an applet in your gnome panel. You might need to:
# /usr/bin/gnome-control-center
– Search for the Bluetooth menu:
Make sure the “Show Bluetooth icon”‘s tick is presented
Last thing to note is that I tried using the bluez-gnome debian package
as a mean to communicate with the Phone unsuccesfully. As far as I could understand
from a couple of posts I’ve red online the Nokia communicator requires the obex
protocol to communicate data. This is not supported by bluez-gnome.
I’ve also red a couple of interesting posts which explained how to usep3nfs to mount your telephone via the unix nfs protocol
There is an old article explaining how to do the mount via p3nfs in Ubuntu which
can be red here

Substitute for the Gnome bluetooth / Or how to properly manage your bluetooth (obex) connections in Gnome

Saturday, June 5th, 2010

I connect my Nokia 9300i mobile phone over bluetooth every now and then. In that connection, everyoften I do experience problems with properly connecting the device to my notebook running Debian Squeeze/Sid Unstable on it’s Desktop.
Until recently it really annoyed me that I had to loose time restring the Linux system sometimes when an access to the mobiledevice was failing, without any good trackable error message.
The connection error I have experienced quite often when I was trying to browse my Nokia 9300i cellphone using the bluetooth protocolon Linux was:
“the name org.openobex.client was not provided”
You can read about a similar error to the one encountered by me when using bluetooth on my Debian Linux in debian bugs mailing list on osdir
The way I solved the issues with connecting over bluetooth on Linux until recently was by rebooting the whole Linux system (dumb)!.
Some other things I try to get arround the bluetooth connection errors was by trying to re-enable my bluetooth notebook embedded device on my Lenovo Thinkpad with command:

root@noah:~# echo disable > /proc/acpi/ibm/bluetooth
root@noah:~# echo enable > /proc/acpi/ibm/bluetooth

I alsy tried to physically remove the bluetooth module, rfcomm and a few other modules which were preventing the removal with rmmod of the bluetooth module.
However this solution did’t help either .. To solve the issues I tried few other stuff one of which was installing libobexftp0 and obexftp since my Nokia 9300i uses the obex protocol to communicate with the computer through bluetooth

I have to note that so far I have used the embedded general gnome application Gnome Bluetooth by using the bluetooth-applet .

Well all my worries came to end finally by simply using another piece of bluetooth communication software callde blueman
Since I have installed that handy software bluetooth is working perfectly fine everytime with my mobile. I warmly recommend to everybody out there to switch to the blueman which is a substitute for the old crappy gnome-bluetooth pack
check out the up-mentioned provided website.
It’s probably also worthy to say that the blueman app is written in python.
Well I’m pretty happy now whilst using blueman, hopefully you’ll enjoy it too as well as solve your bluetooth issues ! 🙂

How to create ssh tunnels / ssh tunneling on Linux and FreeBSD with openssh

Saturday, November 26th, 2011

ssh-tunnels-port-forwarding-windows-linux-bypassing-firewall-diagram
SSH tunneling
allows to send and receive traffic using a dedicated port. Using an ssh traffic can have many reasons one most common usage reason is to protect the traffic from a host to a remote server or to access port numbers which are by other means blocked by firewall, e.g.: (get around firewall filtering)
SSH tunneling works only with TCP traffic. The way to make ssh tunnel is with cmds:

host:/root# ssh -L localhost:deshost:destport username@remote-server.net
host:/root# ssh -R restport:desthost:localport username@remote-server.net
host:/root# ssh -X username@remote-server.net

This command will make ssh to bind a port on localhost of the host host:/root# machine to the host desthost:destport (destination host : destinationport). Important to say deshost is the host destination visible from the remote-server.net therefore if the connection is originating from remote-server.net this means desthost will be localhost.
Mutiple ssh tunnels to multiple ports using the above example commands is possible. Here is one example of ssh tunneling
Let’s say its necessery to access an FTP port (21) and an http port (80), listening on remote-server.net In that case desthost will be localhost , we can use locally the port (8080) insetad of 80, so it will be no necessery to make the ssh tunnel with root (admin privileges). After the ssh session gets opened both services will be accessible on the local ports.

host:/home/user$ ssh -L 21:localhost:21 -L 8080:localhost:80 user@remote-server.net

That’s all enjoy 😉

How to fix “ERROR 1577 (HY000) at line 1: Cannot proceed because system tables used by Event Scheduler were found damaged at server start”

Saturday, May 12th, 2012

After migrating databases data from FreeBSD MySQL 5.0.83 server to a Debian Squeeze Linux MySQL version 5.1.61, below is a mysql –version issued on both the FreeBSD and the Debian servers

freebsd# mysql --version
mysql Ver 14.12 Distrib 5.0.83, for portbld-freebsd7.2 (i386) using 5.2

debian:~# mysql --version
mysql Ver 14.14 Distrib 5.1.61, for debian-linux-gnu (i486) using readline 6.1

The data SQL dump from the FreeBSD server was dumped with following command arguments:

freebsd# mysqldump --opt --allow-keywords --add-drop-table --all-databases -u root -p > complete_db_dump.sql

Then I used sftp to transfer complete_db_dump.sql dump to the a brand new installed latest Debian Squeeze 6.0.2. The Debian server was installed using a "clean Debian install" without graphical environment with CD downloaded from debian.org's site.

On the Debian machine I imported the dump with command:

debian:~# mysq -u root -p < complete_db_dump.sql

Right After the dump was imported I re-started SQL server which was previously installed with:

debian:~# apt-get install mysql-server
The error I got after restarting the mysql server:

debian:~# #/etc/init.d/mysql restart

was:

ERROR 1577 (HY000) at line 1: Cannot proceed because system tables used by Event Scheduler were found damaged at server start
ERROR 1547 (HY000) at line 1: Column count of mysql.proc is wrong. Expected 20, found 16. The table is probably corrupted

This error cost me a lot of nerves and searching in google to solve. It took me like half an hour of serious googling ,until I finally found the FIX!!!:

debian:~# mysql_upgrade -u root -h localhost -p --verbose --force
Enter password:
Looking for 'mysql' as: mysql
Looking for 'mysqlcheck' as: mysqlcheck
Running 'mysqlcheck' with connection arguments: '--port=3306' '--socket=/var/run/mysqld/mysqld.sock' '--host=localhost'
bible.holy_bible OK
bible.holybible OK
bible.quotes_meta OK

Afterwards finally I had to restart the mysql server once again in order to finally get rid of the shitty:

ERROR 1547 (HY000) at line 1: Column count of mysql.proc is wrong. Expected 20, found 16. The table is probably corrupted error!

debian:~# /etc/init.d/mysql restart
Stopping MySQL database server: mysqld.
Starting MySQL database server: mysqld.
Checking for corrupt, not cleanly closed and upgrade needing tables..

This solved the insane Column count of mysql.proc is wrong. Expected 20, found 16 once and for all!

Before I came with this fix I tried all kind of forum suggested fixes like:

debian:~# mysql_upgrade -u root -p
Looking for 'mysql' as: mysql
Looking for 'mysqlcheck' as: mysqlcheck
This installation of MySQL is already upgraded to 5.1.61, use --force if you still need to run mysql_upgrade

debian:~# mysql_upgrade -p
Looking for 'mysql' as: mysql
Looking for 'mysqlcheck' as: mysqlcheck
This installation of MySQL is already upgraded to 5.1.61, use --force if you still need to run mysql_upgrade

And few more, none of them worked the only one that worked was:

debian:~# #mysql_upgrade -u root -h localhost -p --verbose --force

I have to say big thanks to Mats Lindth wonderful blog post which provided me with the solution.

It seems, since Oracle bought the Community edition of MySQL thinks with this database server are getting more and more messy and backwards incompatible day by day.
Lately, I'm experiencing too much hassles with MySQL version incompitabilities. Maybe I should think for migrating permanently to Postgre …

By the way the ERROR 1547 (HY000) at line 1: Column count of mysql.proc is wrong. is most probably caused of some kind of password hashing incompitability between the password hashing between the BSD and Debian SQL versions, as mysql -u root -p < dump.sql, does override default stored user passwords in the mysql database tables… Such password, hashing issues were common in prior MySQL 4 to MySQL 5 migrations I've done, however since MySQL 5+ is already storing its password strings encrypted with md5 encryption I wonder why on earth this mess happens ….
 

Fixing 127.0.0.1 – – “OPTIONS * HTTP/1.0” 200 136 “-” “Apache (internal dummy connection)” / ::1 – – [-.. :- .. +0200] “OPTIONS * HTTP/1.0” 200 Apache access.log junk records

Saturday, December 1st, 2012

If you're on Debian Linux and you played with mpm_prefork_module MinSpareServers and MaxSpareServers directives, it is very likely your access.log apache log ends up with a plenty of junk messages like:

127.0.0.1 – – [25/Nov/2012:06:27:21 +0200] "OPTIONS * HTTP/1.0" 200 136 "-" "Apache (internal dummy connection)"

It was quite unexplainable to me what is causing all this errors. I've seen plenty of posts on the Internet discussing on that but most are somehow outdated and suggested solutions to the weird logged  internal dummy connection messages did not work well for me.

I would not care so much about the message, only if it was not creating a lot of bulk records in my logs which when later are compressed just take up useless disk space and besides that it makes following the Apache log with:

# tail -f  /var/log/apache2/access.log

hardly readable.

  • One of the many solutions and posts suggested a solution with mod_rewrite rules. It claims adding the rules to .htaccess or to apache config files (vhost confs whether multiple vhosts domains):

RewriteCond %{HTTP_USER_AGENT} ^.*internal\ dummy\ connection.*$ [NC]
RewriteRule .* – [F,L]

The full article you read the whole here.
I've tested this rules, and thought I might be doing something wrong this proved unworking for me. Besides that even if it worked I would not imply such fix, as it will be creating a useless extra load on each incoming Apache connection.


As a second solution as I found on stackoverflow's website is to add in apache / vhost configs:

<Limit OPTIONS Order allow,deny Deny from all </Limit> I tested this as well but it does not work either. I've seen a bunch of other posts and none seemed to be working, until I finally came across Linux Guru's blog which was discussing a similar issue suggesting a fix. The post is discussing on Apache access.log being filled with messages like: ::1 - - [13/Mar/2008:09:05:13 +0200] "OPTIONS * HTTP/1.0" 200 Which are almost the same except, the 127.0.0.1 is the IPv6's equivalent ::1. The blog provided solution is to use: SetEnvIf Remote_Addr "::1" dontlog CustomLog /var/log/apache2/access.log combined env=!dontlog What this makes is to completely clear up all occurances of ::1 in /var/log/apache2/access.log. Once it uses Apache Internal directive SetEnvIf Remote_Addr "::1" dontlog to "bind" ::1 to dontlog variable and then after the usual Log location definition – e.g. – CustomLog /var/log/apache2/access.log combined it instructs the environment not to log dontlog variable matches, i.e. env=!dontlog

Following he same logic to get rid of the so annoying:

127.0.0.1 – – [25/Nov/2012:06:27:21 +0200] "OPTIONS * HTTP/1.0" 200 136 "-" "Apache (internal dummy connection)"

I used as a solution adding:

SetEnvIf Remote_Addr "127.0.0.1" dontlog
CustomLog /var/log/apache2/access.log combined env=!dontlog

to /etc/apache2/sites-available/000-default (the default virtualhost), with the CustomLog directive, for more domains and more CustomLog VirtualHost definitions it might be necessary to add it to all Vhosts too.

This solution to Request of the Server to itself is also found on Apache's wiki  check what httpd wiki here.

As I've read further it appeared the same Internal Dummy Connection error is experienced on CentOS Linux too and the SetEnvIf method works there too well you can read post here.

Another possible solution though this didn't work for me is to just play with the settings of MinSpareServers and MaxSpareServers in apache2.conf (or httpd.conf on RedHats and BSD).

There is plenty of things written on the problem and it is really confusing to read about it, as most of the people writing about it were looking for the quick fix and thus just dropped few lines on what worked for them without much details on exact OS en Apache version.

The reason why:
127.0.0.1 – – [25/Nov/2012:06:27:21 +0200] "OPTIONS * HTTP/1.0" 200 136 "-" "Apache (internal dummy connection)" appear in log is due to the fact in Apache 2.x series Apache developers change the the Parent Apache controlling process to send periodic requests to its waiting idling childs, just to make the childs are still alive, this is done somehow in the very inefficient method IMHO by sending those dummy connection requests.

Maybe better and more thoroughful explanation on What is the Dummy Internal Connection and what causes it is on another Bulgarian Fellow Valery Dachev you can read his explan.

On a couple of occasions, I've experienced a very high server loads like load avarage of 180etc. , I have some suspicion that this super high loads are caused somehow by the Internal Dummy Connection thing too, though I'm not sure if my assumptions are correct. It could be I have messed up something with MaxSpareServers / MinSpareServers too, or just the hardware on the host is unable to process a sudden traffic peaks. I've red online other people who complain of similar overloads and complaininng about the Internal Dummy Connection too. But as long as my little research go, I couldn't find noone knowing anything on that. If some of the readers of this post has an idea on that please drop a comment !

Well that's it hope my little blog post sheds some more light on the topic, and lets hope in future Apache versions developers will come with less resource hungry method to do internal dummy checks for exmpl. by sending a SIGUSR signal.