One of the WordPress websites hosted on our dedicated server produces all the time a wp-cron.php 404 error messages like:
xxx.xxx.xxx.xxx - - [15/Apr/2010:06:32:12 -0600] "POST /wp-cron.php?doing_wp_cron HTTP/1.0
I did not know until recently, whatwp-cron.php does, so I checked in google and red a bit. Many of the places, I've red are aa bit unclear and doesn't give good exlanation on what exactly wp-cron.php does. I wrote this post in hope it will shed some more light on wp-config.php and how this major 404 issue is solved..
So
what is wp-cron.php doing?
- wp-cron.php is acting like a cron scheduler for WordPress.
- wp-cron.php is a wp file that controls routine actions for particular WordPress install.
- Updates the data in SQL database on every, request, every day or every hour etc. – (depending on how it's set up.).
- wp-cron.php executes automatically by default after EVERY PAGE LOAD!
- Checks all pending comments for spam with Akismet (if akismet or anti-spam plugin alike is installed)
- Sends all scheduled emails (e.g. sent a commentor email when someone comments on his comment functionality, sent newsletter subscribed persons emails etc.)
- Post online scheduled articles for a day and time of particular day
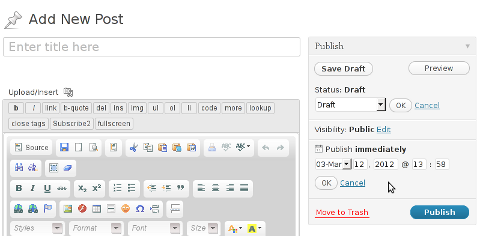
Suppose you're writting a new post and you want to take advantage of WordPress functionality to schedule a post to appear Online at specific time:

The Publish Immediately, field execution is being issued on the scheduled time thanks to the wp-cron.php periodic invocation.
Another example for wp-cron.php operation is in handling flushing of WP old HTML Caches generated by some wordpress caching plugin like W3 Total Cache
wp-cron.php takes care for dozens of other stuff silently in the background. That's why many wordpress plugins are depending heavily on wp-cron.php proper periodic execution. Therefore if something is wrong with wp-config.php, this makes wordpress based blog or website partially working or not working at all.
Our company wp-cron.php errors case
In our case the:
212.235.185.131 – – [15/Apr/2010:06:32:12 -0600] "POST /wp-cron.php?doing_wp_cron HTTP/1.0" 404
is occuring in Apache access.log (after each unique vistor request to wordpress!.), this is cause wp-cron.php is invoked on each new site visitor site request.
This puts a "vain load" on the Apache Server, attempting constatly to invoke the script … always returning not found 404 err.
As a consequence, the WP website experiences "weird" problems all the time. An illustration of a problem caused by the impoper wp-cron.php execution is when we are adding new plugins to WP.
Lets say a new wordpress extension is download, installed and enabled in order to add new useful functioanlity to the site.
Most of the time this new plugin would be malfunctioning if for example it is prepared to add some kind of new html form or change something on some or all the wordpress HTML generated pages.
This troubles are result of wp-config.php's inability to update settings in wp SQL database, after each new user request to our site.
So the newly added plugin website functionality is not showing up at all, until WP cache directory is manually deleted with rm -rf /var/www/blog/wp-content/cache/…
I don't know how thi whole wp-config.php mess occured, however my guess is whoever installed this wordpress has messed something in the install procedure.
Anyways, as I researched thoroughfully, I red many people complaining of having experienced same wp-config.php 404 errs. As I red, most of the people troubles were caused by their shared hosting prohibiting the wp-cron.php execution.
It appears many shared hostings providers choose, to disable the wordpress default wp-cron.php execution. The reason is probably the script puts heavy load on shared hosting servers and makes troubles with server overloads.
Anyhow, since our company server is adedicated server I can tell for sure in our case wordpress had no restrictions for how and when wp-cron.php is invoked.
I've seen also some posts online claiming, the wp-cron.php issues are caused of improper localhost records in /etc/hosts, after a thorough examination I did not found any hosts problems:
hipo@debian:~$ grep -i 127.0.0.1 /etc/hosts

127.0.0.1 localhost.localdomain localhost
You see from below paste, our server, /etc/hosts has perfectly correct 127.0.0.1 records.
Changing default way wp-cron.php is executed
As I've learned it is generally a good idea for WordPress based websites which contain tens of thousands of visitors, to alter the default way wp-cron.php is handled. Doing so will achieve some efficiency and improve server hardware utilization.
Invoking the script, after each visitor request can put a heavy "useless" burden on the server CPU. In most wordpress based websites, the script did not need to make frequent changes in the DB, as new comments in posts did not happen often. In most wordpress installs out there, big changes in the wordpress are not common.
Therefore, a good frequency to exec wp-cron.php, for wordpress blogs getting only a couple of user comments per hour is, half an hour cron routine.
To disable automatic invocation of wp-cron.php, after each visitor request open /var/www/blog/wp-config.php and nearby the line 30 or 40, put:
define('DISABLE_WP_CRON', true);
An important note to make here is that it makes sense the position in wp-config.php, where define('DISABLE_WP_CRON', true); is placed. If for instance you put it at the end of file or near the end of the file, this setting will not take affect.
With that said be sure to put the variable define, somewhere along the file initial defines or it will not work.
Next, with Apache non-root privileged user lets say www-data, httpd, www depending on the Linux distribution or BSD Unix type add a php CLI line to invoke wp-cron.php every half an hour:
linux:~# crontab -u www-data -e
0,30 * * * * cd /var/www/blog; /usr/bin/php /var/www/blog/wp-cron.php 2>&1 >/dev/null
To assure, the php CLI (Command Language Interface) interpreter is capable of properly interpreting the wp-cron.php, check wp-cron.php for syntax errors with cmd:
linux:~# php -l /var/www/blog/wp-cron.php

No syntax errors detected in /var/www/blog/wp-cron.php
That's all, 404 wp-cron.php error messages will not appear anymore in access.log! 🙂
Just for those who can find the root of the /wp-cron.php?doing_wp_cron HTTP/1.0" 404 and fix the issue in some other way (I'll be glad to know how?), there is also another external way to invoke wp-cron.php with a request directly to the webserver with short cron invocation via wget or lynx text browser.
– Here is how to call wp-cron.php every half an hour with lynxPut inside any non-privileged user, something like:
01,30 * * * * /usr/bin/lynx -dump "http://www.your-domain-url.com/wp-cron.php?doing_wp_cron" 2>&1 >/dev/null
– Call wp-cron.php every 30 mins with wget:
01,30 * * * * /usr/bin/wget -q "http://www.your-domain-url.com/wp-cron.php?doing_wp_cron"
Invoke the wp-cron.php less frequently, saves the server from processing the wp-cron.php thousands of useless times.
Altering the way wp-cron.php works should be seen immediately as the reduced server load should drop a bit.
Consider you might need to play with the script exec frequency until you get, best fit cron timing. For my company case there are only up to 3 new article posted a week, hence too high frequence of wp-cron.php invocations is useless.
With blog where new posts occur once a day a script schedule frequency of 6 up to 12 hours should be ok.


How to resolve (fix) WordPress wp-cron.php errors like “POST /wp-cron.php?doing_wp_cron HTTP/1.0″ 404” / What is wp-cron.php and what it does
Monday, March 12th, 2012One of the WordPress websites hosted on our dedicated server produces all the time a wp-cron.php 404 error messages like:
xxx.xxx.xxx.xxx - - [15/Apr/2010:06:32:12 -0600] "POST /wp-cron.php?doing_wp_cron HTTP/1.0
I did not know until recently, whatwp-cron.php does, so I checked in google and red a bit. Many of the places, I've red are aa bit unclear and doesn't give good exlanation on what exactly wp-cron.php does. I wrote this post in hope it will shed some more light on wp-config.php and how this major 404 issue is solved..
So
what is wp-cron.php doing?
Suppose you're writting a new post and you want to take advantage of WordPress functionality to schedule a post to appear Online at specific time:
The Publish Immediately, field execution is being issued on the scheduled time thanks to the wp-cron.php periodic invocation.
Another example for wp-cron.php operation is in handling flushing of WP old HTML Caches generated by some wordpress caching plugin like W3 Total Cache
wp-cron.php takes care for dozens of other stuff silently in the background. That's why many wordpress plugins are depending heavily on wp-cron.php proper periodic execution. Therefore if something is wrong with wp-config.php, this makes wordpress based blog or website partially working or not working at all.
Our company wp-cron.php errors case
In our case the:
212.235.185.131 – – [15/Apr/2010:06:32:12 -0600] "POST /wp-cron.php?doing_wp_cron HTTP/1.0" 404
is occuring in Apache access.log (after each unique vistor request to wordpress!.), this is cause wp-cron.php is invoked on each new site visitor site request.
This puts a "vain load" on the Apache Server, attempting constatly to invoke the script … always returning not found 404 err.
As a consequence, the WP website experiences "weird" problems all the time. An illustration of a problem caused by the impoper wp-cron.php execution is when we are adding new plugins to WP.
Lets say a new wordpress extension is download, installed and enabled in order to add new useful functioanlity to the site.
Most of the time this new plugin would be malfunctioning if for example it is prepared to add some kind of new html form or change something on some or all the wordpress HTML generated pages.WP cache directory is manually deleted with rm -rf /var/www/blog/wp-content/cache/…
This troubles are result of wp-config.php's inability to update settings in wp SQL database, after each new user request to our site.
So the newly added plugin website functionality is not showing up at all, until
I don't know how thi whole wp-config.php mess occured, however my guess is whoever installed this wordpress has messed something in the install procedure.
Anyways, as I researched thoroughfully, I red many people complaining of having experienced same wp-config.php 404 errs. As I red, most of the people troubles were caused by their shared hosting prohibiting the wp-cron.php execution.
It appears many shared hostings providers choose, to disable the wordpress default wp-cron.php execution. The reason is probably the script puts heavy load on shared hosting servers and makes troubles with server overloads.
Anyhow, since our company server is adedicated server I can tell for sure in our case wordpress had no restrictions for how and when wp-cron.php is invoked.
I've seen also some posts online claiming, the wp-cron.php issues are caused of improper localhost records in /etc/hosts, after a thorough examination I did not found any hosts problems:
hipo@debian:~$ grep -i 127.0.0.1 /etc/hosts
127.0.0.1 localhost.localdomain localhost
You see from below paste, our server, /etc/hosts has perfectly correct 127.0.0.1 records.
Changing default way wp-cron.php is executed
As I've learned it is generally a good idea for WordPress based websites which contain tens of thousands of visitors, to alter the default way wp-cron.php is handled. Doing so will achieve some efficiency and improve server hardware utilization.
Invoking the script, after each visitor request can put a heavy "useless" burden on the server CPU. In most wordpress based websites, the script did not need to make frequent changes in the DB, as new comments in posts did not happen often. In most wordpress installs out there, big changes in the wordpress are not common.
Therefore, a good frequency to exec wp-cron.php, for wordpress blogs getting only a couple of user comments per hour is, half an hour cron routine.
To disable automatic invocation of wp-cron.php, after each visitor request open /var/www/blog/wp-config.php and nearby the line 30 or 40, put:
define('DISABLE_WP_CRON', true);
An important note to make here is that it makes sense the position in wp-config.php, where define('DISABLE_WP_CRON', true); is placed. If for instance you put it at the end of file or near the end of the file, this setting will not take affect.
With that said be sure to put the variable define, somewhere along the file initial defines or it will not work.
Next, with Apache non-root privileged user lets say www-data, httpd, www depending on the Linux distribution or BSD Unix type add a php CLI line to invoke wp-cron.php every half an hour:
linux:~# crontab -u www-data -e
0,30 * * * * cd /var/www/blog; /usr/bin/php /var/www/blog/wp-cron.php 2>&1 >/dev/null
To assure, the php CLI (Command Language Interface) interpreter is capable of properly interpreting the wp-cron.php, check wp-cron.php for syntax errors with cmd:
linux:~# php -l /var/www/blog/wp-cron.php
No syntax errors detected in /var/www/blog/wp-cron.php
That's all, 404 wp-cron.php error messages will not appear anymore in access.log! 🙂
Just for those who can find the root of the /wp-cron.php?doing_wp_cron HTTP/1.0" 404 and fix the issue in some other way (I'll be glad to know how?), there is also another external way to invoke wp-cron.php with a request directly to the webserver with short cron invocation via wget or lynx text browser.
– Here is how to call wp-cron.php every half an hour with lynxPut inside any non-privileged user, something like:
01,30 * * * * /usr/bin/lynx -dump "http://www.your-domain-url.com/wp-cron.php?doing_wp_cron" 2>&1 >/dev/null
– Call wp-cron.php every 30 mins with wget:
01,30 * * * * /usr/bin/wget -q "http://www.your-domain-url.com/wp-cron.php?doing_wp_cron"
Invoke the wp-cron.php less frequently, saves the server from processing the wp-cron.php thousands of useless times.
Altering the way wp-cron.php works should be seen immediately as the reduced server load should drop a bit.
Consider you might need to play with the script exec frequency until you get, best fit cron timing. For my company case there are only up to 3 new article posted a week, hence too high frequence of wp-cron.php invocations is useless.
With blog where new posts occur once a day a script schedule frequency of 6 up to 12 hours should be ok.
Tags: akismet, Auto, caches, checks, commentor, cr, cron, daySuppose, dedicated server, doesn, dozens, Draft, email, error messages, execution, exlanation, file, google, HTML, HTTP, invocation, localhost, nbsp, newsletter, operation, periodic execution, php, plugin, quot, request, scheduler, someone, something, spam, SQL, time, time thanks, Wordpress, wordpress plugins, wp
Posted in System Administration, Web and CMS, Wordpress | 3 Comments »