I have a Godaddy account for already 4 years or so and with time I tend to login and use Godaddy to set DNS records or buy a new domain way more often if compared to the old days.
By default GoDaddy creates numeric accounts names (Customer Number as they call it), example:
Being in necessity to often login to godady it started getting more and more annoying with every single day as it is pretty hard for me to memorize the not so intuitive 1424915, therefore everytime I had to login to Godaddy, I had to check in my notes again and again what is my Username
This costs me a lot of time, so finally in a quick chat with a friend today, he mentioned about having the same issue and explained he just recently changed his (Customer Number) numeric Username to a easy to remember login text string.
I know that changing the Username from an ID to a word in GoDaddy is possible for a long time and I even did it before for one Godaddy Account owned by a company. However just until today, I did not changed my GoDaddy Account number to intuitive text phrase for the simple reason I did not have time to check, how changing the account username and password in Godaddy could be done
Anyways today this friends small chat, triggered me to take few seconds and check in Godaddy's website navigation on how changing the ugly number ID to a shiny username was possible. This is how this little article got born 🙂
So enough jibberish, here is how I changed my Customer Number username to a desired easy to memorize:
1. Login to Godaddy with your Customer Number
2. Navigate to My Account -> Update Security Settings
My Account -> Update Security Settings
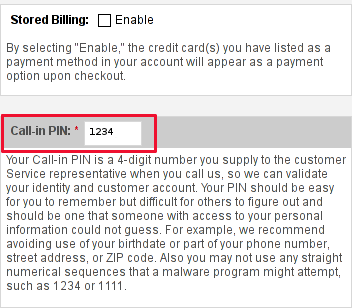
Fill in properly all the input (red start) fields seen on the screenshot and click Save Changes . Once you see a message settings are Saved. It is generally a good idea to open some different kind of browser and try logging in with the new set username and password.
Update Security Settings is also the place for people who would like to change Godaddy account password. Be 100% sure to check the new username/password pair in another browser (without logging out with the one you just use) or you will end up unable to login to your godaddy account !!! Its also a good idea in any case to, have written down somewhere on paper Godaddy's Call-in-PIN, this is just a precaution to assure yourself that you will be able to restore your account username/password in case if lost.
If you haven't used the Call In PIN, I hope you will never need to. Anyways just as a matter of info this PIN can help you in some cases where you have to identify yourself as the owner of your Godaddy account (Something like the Debit / Credit cards CVV code [positioned on the card back] ). I've only used the Call in PIN in few occasions by Godaddy's tech support, where I contacted them directly by email to ask some specific questions on how to do stuff inside my account. I know this article, will be boring for some of my readers, so if this is the case please accept my humble apologies … anyways it will help me orient myself in the future if I forgot how I did it and hopefully will be useful to someone else.
I've faced some issues with crappy sound in some of the games I'm playing on my Debian . Also I ometimes, have issues with sound while watching movies with VLC or Totem... Sound issues with Skype are also seldomly occuring during skype calls etc. etc.
Recently I've realized many of this crappy sound issues origins from PulseAudio – the sound server GNOME desktop env uses to manage all sound just before passing it through ALSA.
I've found on the internet many suggested ways on how to workaround these issues. Many of the things suggested as workarounds, however was outdated and referred to old versions of GNOME / Pulseaudio and therefore was unusable on my Debian 6 Squeeze….
What I found most helpful is fixes and workarounds for pulseaudio list compiled by people in the Fedora community on fedorasolved.org's website – http://fedorasolved.org/Members/fenris02/pulseaudio-fixes-and-workarounds
Some of the fixes and work arounds suggeted on the above link, I have already applied, others was not applicable for Debian.
Anyways the things which I found most important and I believe many people who runs Debian need to implement from the list to solve pulseaudio crappy sound issues is concluded in the below 5 steps.
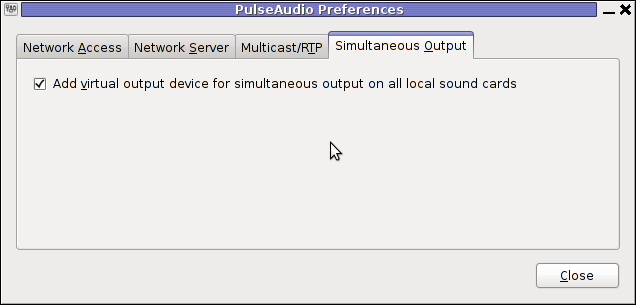
4. Enable Simultaneous Output in PulseAudio preferences
Navigate to the GNOME menus:
System -> PulseAudio Preferences
Choose the "Simultaneous Output" tab and select:
Add virtual output device for simultaneous output on all local sound cards
5. Log Off Gnome and restart PulseAudio
To load the new changed settings in /etc/pulse/daemon.conf restart of pulseaudio server is required, right after a Logoff from the current opened gnome session;
To do so LogOff with the trivial:
System -> Log Out
Login as root in console;
Press CTRL+ALT+F1, login with root and issue:
debian:~# /etc/init.d/pulseaudio restart

...
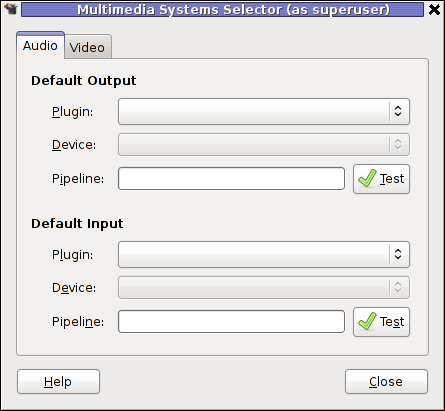
N.B.; In some cases it might be necessery to do some adjustments are made in gstreamer properties , to change settings there launch:
Tampering with gstreamer-properties used to fix for me some problems with ALSA and PulseAudio in the past, so it might be worthy to check it out and experiment a bit with it as well.
debian:~$ gstreamer-properties
Now many of the crappy sound games or applications should start working just fine. Enjoy 😉
Accidently I've removed the Gnome Volume Control while trying to remove an applet nearby from the GNOME main menu panel. Unfortunately in GNOME 2, I couldn't find a way to to return back (restore) Gnome Volume Control to the main panel. After a bit of pondering, I've managed to find a way.
Here is how I managed to restore it back:
1. Navigate to:
System > Preference > Startup Applications
2. Click on Add, then add and type the following:
 Name: Volume control

Command: gnome-volume-control-applet

Comment: Launch volume control applet
Adding the gnome-volume-control-applet will launch it every time a new gnome session (with the same user) is initiated. On next gnome login you will see the icon to appear again in the notification area. Cheers 😉
Every now and then my gnome keyboard layout switcher hangs. When my keyboard switcher hangs I can't switch between my two defined languages English and my native Bulgarian
The hang up of the language switcher is makes switching between my two defined languages impossible until I logoff and login again or kill the current GNOME session with CTRL+ALT+BACKSPACE.
Sometimes logging off again is not necessery so I have to logoff and login to GNOME few times until finally the gnome keyboard layout switcher reacts to an issued change language via Alt+Shift or by clicking on it.
Unfortunately the gnome keyboard layout switcher is not available as a process so there is no way to simply kill -HUP the process responsible for it.
Just until today I couldn't find a way how to restart the gnome keyboard layout switcher when it hangs.
Now today I finally found a way to restart it without restarting the whole gnome session or killing completely the Xorg server.
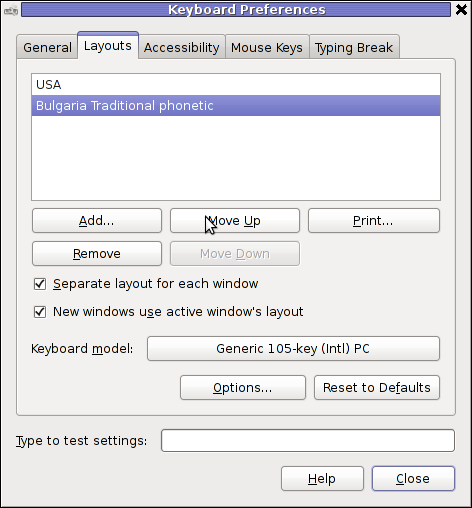
To "fix" up the keyboard switcher when its not responding, I had to issue in gnome-terminal or via ALT+F2:
hipo@noah:~$ gnome-keyboard-properties
As you can see in the screenshot below, one has to press the Move Up button to switch the default order of languages. Once this is done the keyboard layout switcher starts working again. Once working I just used the move up once again to revert back my default language order as it used to be.
I'm not sure what exactly is causing the GNOME 2 keyboard layout switcher to hang (when it does), my guess is it is due to some kind of version incompitability between gnome versions or configurations specific to my computer. In the past I was running Debian Testing/Unstable and then downgraded back to Debian stable, probably this is the reason of the language switcher hangs.
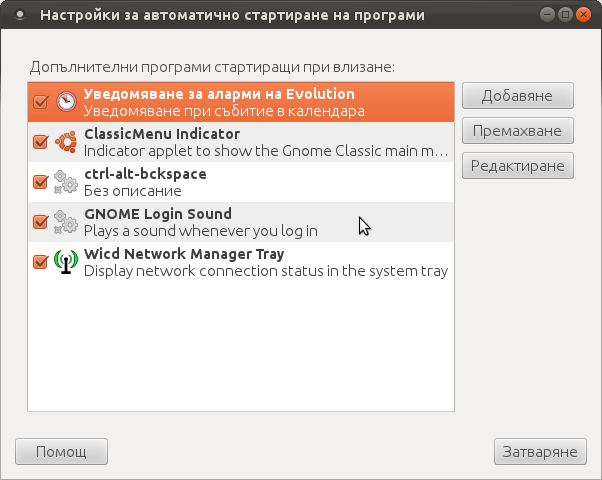
I needed to enable automatic passwordless login in my Debian GNU/Linux … GNOME and GDM desktop environments developed a lot through the last few years, achieving these simple task was doable only through gdm manual configurations. Nowdays creatiion of user to login without any password is easy via easy to use GUI program.
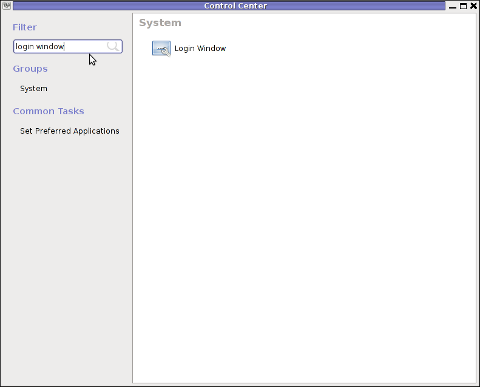
In this article I'll explain, few ways to enable automatic login in GNOMEThe quickest way is to navigate in GNOMEs gnome-control-center -> Login Window submenu
To do so launch gnome-control-center – press (ALT+F2) keys and type in gnome-control-center, or launch via command line in gnome-terminal or xterm:
hipo@debian:~$ gnome-control-center
While inside the control center find en launch the Login Window as in the screenshot below:
Login Window configuration can be also done directly by launching gdmsetup from command line e.g.:
hipo@debian:~$ /usr/sbin/gdmsetup

...
gdmsetup will further pop up a window asking to type in the root password to allow you to customize, how gdm will deal with user logins.
For who might not know gnome well architecture, gdmsetup is part of the gdm (Gnome Display Manager) package and is the default login program used to login the end user in most of the modern Linux based distributions as well as BSDs. gdm logins the users on many of the free software OS desktop environments like GNOME, LXDE, XFCE… Just to name a few of the many Linuces counting on GDM to handle the user logins: Ubuntu, Xubuntu, Fedora, Debian, Linux Mint, OpenSUSE etc.
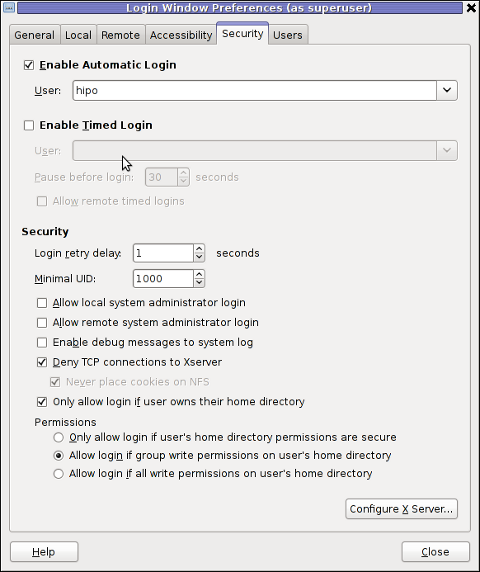
Once the Login Windows Prefences appears go to the Security tab.
As you can see in the screenshot, what you can do with gdmsetup it is pretty self-explanatory:
The two options of interests for user authorization without pass are:
a. Enable Automatic Login
To enable:- put a tick on Enable Automatic Login
– from user dropdown menu, choose the user which has to be configured
b. Enable Timed Login
Enable Automatic Login lets the user login without any user password input, immediately after the configured username is typed in (if gdm is with type username prompt). In case where the usernames are represented by Avatars, (like its in most user friendly Linux distributions), once clicked avatar the user is logged in.
When Enable Timed Login is ticked and a username is choosen or typed, instead of immediately logging the user on click or username input, the user logging is delayed with a number of set seconds .
Enabling the Automatic and / or Timed Login is doable also using few simple configurations directives in /etc/gdm/custom.conf. In many distros /etc/gdm/custom.conf will be not existing and hence the file has to be created. To enable delayed autologin without password for a user using gdm config:
Create the file with a text editor ( vim, joe, nano )whatever your favourity and place inside:
Where hipo is my desired username that will autolog, and as you see the LoginDelay is 0 (e.g. no gdm login delay) I attempted to also allow autologin for several users with some cinfigurations like:
In gdm3, the location of GDM config files should be /etc/gdm3/ directory, anyways the configurations directives should be working just like in gdm2 After any configuration changes to gdm.conf or custom.conf to load the new settings in gdm a gdm daemon restart is necessery with cmd:
root@debian:~# /etc/init.d/gdm restart

...
Note that, weirdly not using the gdm init script and trying to kill -HUP $(pidof gdm) / killall -9 gdm will not make gdm to load its new configurations. So always restart via /etc/init.d/gdm restart after gdm conf change.
Another alternative method to achieve login without a password input is by creating a passwordless user account on the system. This method is not recommended though, especially for machines with real IP addresses visible from the Internet (with lets say enabled) SSHD access. Using a passwordless system account can expose the system to a severe security risk!!! Anyways, for systems not running telnet/sshd or any other system remote access service creating a user without an empty password might be not such a bad idea.
To make a user auto login without any password input /etc/shadow file (storing all user account information) needs an edit.
This is an example user entry taken from /etc/shadow:
test:$6$OPdvXArZ$ktujC6bBh9JNaCz8E9v61yNeWcJHqQiuNk8eBzevcwcIl8KFvQzJ6aBCvVpIs0Lf5MAbHjjqftUeN9crWUfxs.:15275:0:99999:7:::Now to make the test user login directly without any pass input, one can just remove his encrypted password string. After the change the user line in /etc/shadow, should be:
test::15275:0:99999:7:::
If the user is created just from scratch e.g. (a new user) that needs to login passwordless in GDM, create it without password:
root@debian:~# adduser -d newusername
To sum it up the good thing about the remove password hash method to auto login a user is that it will allow user or users login across all Display Managers (not only GDM specific). The bad side is it is very insecure and therefore in most times a really bad practice.
I guess the described ways to login without password in Gdm on FreeBSD should similar, unfortunately right now I have not access to BSD running desktop to test it. If someone has tested it and can confirm it works it will be great to drop a comment.
Point in your browser to http://yoursite.com/joomla/administrator/ or to url wherever your admin panel is located
2. Go to Menu Manager
Menus -> Menu Manager 3. Click the new button located on the right top side of the joomla admin panel
Next the Select Menu Item Type dialog will appear:
There you will need to select the External Link option
Now fill in your desired url that you desire your Menu link to point to and choose among the few possible options on how do you want the new external website to appear after clicked on the menus link. And that's it now you will have it. Easy 🙂
‘ve used the RSForms to build some custom Joomla Contact forms. The RSForms was recommended to me by a friend and actually it’s a pretty cool and quick way to create forms. I’ve installed it and played a bit with it to create a custom forms for one of the website I had to bring up just recently.
After the contact form was ready however there was a problem with sending emails. It took me quite a while to find out how to solve the problemwith contact not able to mail whatever is filled in.
First time I tried the RSForms after filling in the details and pressing the submit button,I got the error message;
Could not instantiate mail function.
I should say that, I’m running a QMAIL email server on the server where I have the Joomla & RSForms installed and configured.
I’ve came up with a solution to this issue after some research in Google
In order to solve that you will have to login to your Joomla administrator and Navigate to:
Site -> Global Configuration -> Server
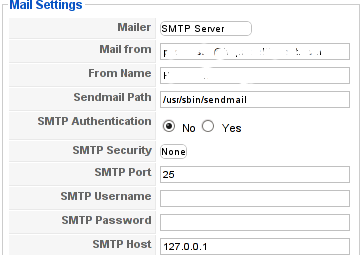
Whenever it opens up you should be seing the Mail Settings on the bottom right corner;
From there you will have to change the Mailer from PHP Mail Function to SMTP Server
To give you a better idea check out the screenshot of the Mail Settings below:
Changing this simple setting resolved the Could not instantiate mail function for me.
Right after I tested the RSForms to send my filled in form content but this time the PHPMAILER_RECIPIENTS_FAILED message was there;
This error was caused actually by a mistake I made in the configuration of the Custom RSForm I have prepared;
In Components -> RSForm!Pro -> Manage forms whenever I was preparing my form I’ve made a mistake in the User Emails customized field in my custom prepared form in the To: field I had a wrong variable set (a different value was set from the E-mail caption I’ve set on).
Solving this solved the issue. Even though the PHPMAILER_RECIPIENTS_FAILED was gone now, next I was unpleasently surprised by another error message which prevented the Contact form to properly send the input data:
Now I had to fight with the error;
PHPMAILER_FROM_FAILED
It took me a while and a lot of forums reading before I figure it out again my custom prepared RSForm had an issue;
The problem was in the Admin Emails customization of the form in the From: fill in box I had mistakenly typed in proper email, setting a proper email there solved the issue;
I’ve red online many suggested solutions to the issue which dealt with changes in the the file joomla/components/com_contact/controller.php around line 112, 162 etc.
I should say that before I found and solved the actual problem I’ve tried modifing this file also but with zero success.
Sometimes Linux is so complicated, it really pisses me of, why is not life easier? 😐
2. Install the Google Analytics Tracking Module; Login as joomla admin and navigate to;
Extensions -> Install
Place the analytics_tracking15.zip url to the Install URL: field. Again as of time of writting you need to place https://www.pc-freak.net/files/analytics_tracking15.zip;
3. Open the Module Manager
Extensions -> Module Manager
4. Click over Google Analytics Tracking Module On the right pane you will notice in the Module Parameters the Analytics_uacct_code field. In the uacct_code field you need to paste your UA obtained from your created google-analytics account. This code is usually something like UA-2101595-10 Now place your code their and press the save green button located near the right top of the screen. You should see the text in blue Item Saved which would indicate your UA code is stored already in the Google Analytics Tracking Module, now press the Cancel button located again on the right top. As a last step before the Google analytics is set-up on the Joomla you need to enable the plugin to do you need to press over the tick left sided from the text reading Google Analytics Tracking Module in theModule Manager 5. Click over the Enabled button in Module Manager; Google Analytics Tracking Module -> Enabled
Cheers! Now, your Joomla website visitors count will start logging to Google Analytics.
I've recently decided to add Comment as OpenID functionality to my wordpress blog. The reasons to do that is that I myself have today created an OpenID account. Already million of people have OpenID account without even knowing. Most major search engines and social websites like Google, Yahoo, Live Journal, Hyves, Blogger, Flicker, MySpace automatically creates an OpenID account for newly registered users. It is up to the user to check with each of the aforementioned providers what is the URL of their OpenID account.
Even though OpenID popularity is steadly rising, I'm sure there are still plenty of users who did not heard, used or noticed OpenID yet.
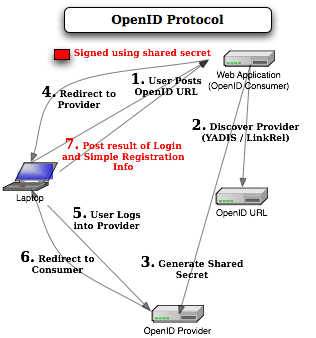
So What the heck is OpenID? For all those who still haven't heard about it, OpenID is a universal web site login system With just one "unified" OpenID account the user can login to multiple websites with no need to create multiple accounts across each and every different website on the internet. The only requirement for the user to be able to use OpenID is that the website in question to have (support) for OpenID credential and the user to have existing OpenID account.
Therefore using one single OpenID you can sign in as a certain user to multiple websites on the internet with no need for annoying registration process to each and every new website you encounter. Another benefit OpenID gives to the user is that you don't have to memorize or keep notes of a tens or thousands of different login accounts across the many different websites on the net. Using OpenID also saves the user from troubles with forgotten password or username as just one OpenID login is used to login you everywhere.
For WordPress blogging platform the Russian Igor Korolev, has written a wordpress plugin – comments-to-wordpress . This plugin adds support for OpenID authentication in WordPress comments.
Here is how to OpenID to WordPress:
1. Download the comments-with-wordpress plugin and unzipAs of writting of this article latest comments-to-wordpress plugin is ver. 1.4. Download the plugin to blog path directory lets say, /var/www/blog/wp-content/plugins/ and unzip:
Next the plugin has to be Enabled, just like any other wordpress plugin via admin menus:
Plugins -> Inactive -> Comments with OpenID (enable)
Once the plugin is enaabled it is necessery to add some code with a text editor in file /var/www/blog/wp-content/themes/default/comments.php
Small noet to make here: If you're not using the default WordPress theme (like I do), you will have to edit the /themes/your-theme-name/comments.php instead.
Save the comments.php file and you Identification for new comments with OpenID will appear in your wordpress Comments form.
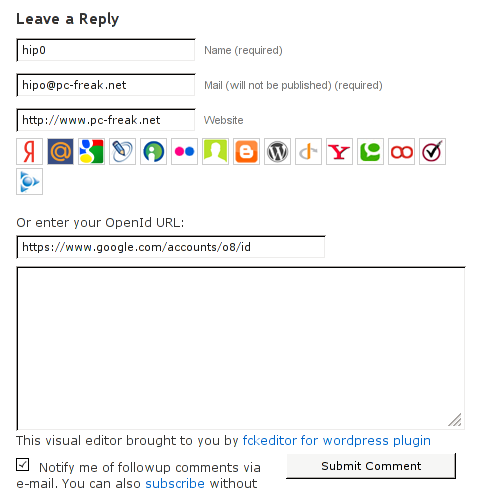
The OpenID plugin will add a number of service OpenIDs to choose between like you can see in my blog's plugin section or the screenshot below:
The URL https://www.google.com/accounts/o8/id is just a sample and showed because I clicked on the Google icon. If you have a Google profile you can check the exact ID and use it as URL there. Simply if your browser is logged in Gmail and you have Google profile. OpenID should work. As you can see the plugin supports a number of services which already support OpenID auth, the list of services can be easily extended by adding minor changes in …/plugins/comments-with-openid/comments-with-openid.php
There is also another wordpress plugin with the openid name – http://wordpress.org/extend/plugins/openid/
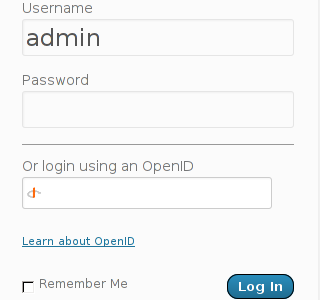
Downloading and enabling the other openid plugin also adds support for OpenID login in your http://your-url.com/wp-admin/ login page.
Installing the OpenID plugin is needed especially if you're a blogger blogging on 5 or 10 different topic oriented blogs, once downloading and installing the OpenID plugin will allow you to login across the blog ring without loosing time or bothering to remember different passwords across all the blogs. Here is a screenshot of the /wp-admin wordpress login page with the OpenID wp plugin enabled:
As of time of writting according to http://openid.net/get-an-openid/what-is-openid/'s website there are over 50000 major websites on the net already accepting OpenID login. Of course as every technlogy OpenID is not perfect and along with its convenience in some cases it could impose security hole. OpenID opponents claim under some circumstances OpenID is prone to forgery, XSS (cross site scripting) and XSFR attacks. Everyone who is about to use OpenID should be also aware of the great security risk it impose if one OpenID account gets stolen through sniffing, this could mean multiple websites can be accesses with the one single OpenID by the malicious user and a lot of confidential data owned by the user can be revealed or deleted … With this said I think OpenID is not a recommended login technology for Windows users, as windows is famous for being vulnerable to so many Viruses and Spyware/Malware etc.. With non-free software OSes like MS Windows, the user never cannot for sure if the system is infected, hence using OpenID to transfer credentials over the internet or store an OpenID SSL/(TLS) certificate to identify in websites is TOO DANGEROUS! Hope this article was helpful. Cya
My sister, experience some programs running with wine (Windows Emulator) to crash on her Ubuntu 11.10. As she is quite new with Linux, she has no idea about the existence of CTRL ALT BACKSPACE key combination to restart a hanged GNOME, KDE by directly killing the Xorg server.
I felt obliged to explain her it is better to use CTRL ALT BACKSPACE X kill switch instead of restarting the whole Linux kernel (which basiclly is working) and that it is just the display keeping blacnk.
Pressing the would kill Xorg and therefore all applicatins previously running on top of it will die. In Ubuntu Xorg is configured to run via gdm, so once killed it will automatically reload the GDM (Gnome Display Manager).
I was about to explain her that its better she use CTRL+ALT+BACKSPACE instead of restarting the whole system but suddenly I realized this is not working.
In UBUNTU 11.10 and I guess in all UBUNTU's after 9.04 CTRL ALT BACKSPACE is substituted with the key switch combination ALT PRINTSCREEN K, I've explained her about that.
This change is actually a change implied by most Linux distributions nowdas and is some kind of change in Xorg newer versions… To enable back the CTRL + ALT + BACKSPACE , I've issued cmd:
An alternative way to set setxkbmap -option terminate:ctrl_alt_bksp to run on Ubuntu user login is by setting it as a startup application using;
stanimira@ubuntu:~$ gnome-session-properties
Press the Add button and type in the box to appear; Name: setxkbmap
Command: setxkbmap -option terminate:ctrl_alt_bksp
Comment: setxkbmap
Reverting the Xserver kill switch back to the classical Ctrl+Alt+Backspace should also be running fine on older Ubuntu Linuces – 11.04, 10.10, 10.04 etc.


How to restore accidently removed Gnome volume control in GNOME in GNU / Linux
Sunday, January 22nd, 2012Accidently I've removed the Gnome Volume Control while trying to remove an applet nearby from the GNOME main menu panel. Unfortunately in GNOME 2, I couldn't find a way to to return back (restore) Gnome Volume Control to the main panel. After a bit of pondering, I've managed to find a way.
Here is how I managed to restore it back:
1. Navigate to:
System > Preference > Startup Applications
2. Click on Add, then add and type the following:Name: Volume control
Command: gnome-volume-control-applet
Comment: Launch volume control applet
Adding the gnome-volume-control-applet will launch it every time a new gnome session (with the same user) is initiated. On next gnome login you will see the icon to appear again in the notification area. Cheers 😉
Tags: applet, area, Auto, Cheers, Click, command, Comment, control, Draft, Gnome, gnu linux, icon, launch, Linux, login, menu, menu panel, Navigate, notification, notification area, panel, preference, startup, startup applications, system, time, type, volume control, way
Posted in FreeBSD, Gnome, Linux, Linux and FreeBSD Desktop | No Comments »