Posts Tagged ‘text’

AEWAN – a nice advanced GNU / Linux console ASCII art text editor

Saturday, May 19th, 2012

I'm a guy fascinated by ASCII art, since the very early days I saw a piece of this awesome digital art.

As time passed and computers went to be used mostly  graphics resolution, ASCII art loose its huge popularity from the early DOS and BBS (internet primordial days).

However, this kind  of art is still higly valued by true computer geeks.
In that manner of thoughts, lately I'm researching widely on ASCII art tools and ASCII art open source tools available for Linux.
Last time I check what is available for 'ASCII job' was before 5 years time. Recently I decided to review once again and see if there are new software for doing ascii manipulations on Linux and this is how this article got born.

My attention was caught by aewan (ASCII-art Editor Without A Name), while searching for ASCII keyword description packages with:

apt-cache search ascii

Aewan project official website is on sourceforge check it out here

Here is the complete description of the Debian package:

hipo@noah:~$ apt-cache show aewan|grep -i description -A 5
Description: ASCII-art Editor Without A Name
aewan is an ASCII art editor with support for multiple layers that can be
edited individually, colors, rectangular copy and paste, and intelligent
horizontal and vertical flipping (converts '\' to '/', etc). It produces
both stand-alone art files and an easy-to-parse format for integration
into your terminal applications.

I installed it to give it a try:

noah:~# apt-get --yes install aewan
Selecting previously deselected package aewan.
(Reading database ... 388522 files and directories currently installed.)
Unpacking aewan (from .../aewan_1.0.01-3_amd64.deb) ...
Processing triggers for man-db ...
Setting up aewan (1.0.01-3) ...

aewan package provides three executable binaries:

noah:~# dpkg -L aewan|grep -i /bin/ /usr/bin/aecat
/usr/bin/aewan
/usr/bin/aemakeflic

1. aewan binary is the ascii-art editor itself

2. aecat is utility to display an aewan documents (aewan format saved files)3. aemakeflictool to produce an animation from an aewan document

Next I ran it in plain console tty  to check how it is like:

hipo@noah:~$ aewan

Below are screenshots to give you an idea how powerful aewan ASCII art editor is:

AEWAN ASCII art editor entry information screen Debian GNU / Linux shot

Aewan immediate entry screen after start up

Aewan ASCII art editor Linux showing the major functionality of aewan on Debian GNU / Linux Squeeze

Aewan ASCII art editor – all of the supported tool functions

As you can see from the shot the editor is very feature rich. I was stunned to find out it even supports layers (in ASCII!!) (w0w!). 
It even has a Layers Manager (like GIMP) 🙂

To create my first ASCII art I used the:

New

menu.

This however didn't immediately show the prompt, where I can type  the ascii characters to draw my picture. In order to be able to draw inside the editor, its necessary to open at least one layer, through using the menu:

Add Layer (defaults)

then the interactive ASCII art editor appeared.

While an ASCII art is created with the editor you can select the color of the input characters by using Drawing Color menu seen in the above screenshot.

aewan drawing color choose color Linux shot

I've played few minutes and created a sample ascii art, just to test the color and editor "look & feel", my conclusions are the editor chars drawing is awesome.

Aewan ascii art produced on my Debian GNU / Linux host

All the commands available via menus are also accessible via a shortcut key combinations:

Aewan Linux Ascii art editor quick key shortcut commands

aewan controls are just great and definitely over-shadows every other text editor I used to draw an ASCII art so far.
Once saved the ASCII art, are by default saved in a plain gzipped ascii text. You can therefore simply zcat the the saves;
Don't expect zcat to show you the ascii as they're displayed in aewan, zcat-ing it will instead  display just the stored meta data; the meta data is interpreted and displayed properly only with aecat command.

aewan aecat displaying properly previously saved ascii art picture

I've checked online for rpm builds too and such are available, so installing on Fedora, CentOS, SuSE etc. is up to downloading the right distro / hardware architecture rpm package and running:

# rpm -ivh aewan*.rpm

On the official website, there are also instructions to compile from source, Slackware users and users of other distros which doesn't have a package build should compile manually with the usual:

$ tar -zxf aewan-1.0.01.tar.gz
$ cd aewan-1.0.01
$ ./configure
$ make
$ su -c "make install"

For those inrested to make animations with aemakeflic you need to first save a multiple layers of pictures. The idea of creating ASCII art video is pretty much like the old school way to make animation "draw every scene" and movie it. Once all different scene layers of the ASCII art animation are prepared one could use  aemakeflic to export all the ASCII layers as common video.

aemakeflic has the ability to export the ASCII animation in a runnable shell script to display the animation. The other way aemakeflic can be used is to produce a picture in kind of text format showing the video whether seen with  less cmd.
Making ASCII animation takes a lot of time and effort. Since i'm too lazy and I lack the time I haven't tested this functionality. Anyways I've seen some ascii videos on telnet  to remote hosts (some past time); therefore I guess they were made using aewan and later animated with aemakeflic.

I will close this post with a nice colorful ASCII art, made with aewan (picture is taken from the project page):

Aewan Flipping Selection Screenshot
 

Trip To Amsterdam (TTA)

Tuesday, March 3rd, 2009

Saint Nicolas Roman Catholic Church near Amsterdam trainstation pictureOn Tuesday Zlati (A friend of mine introduced to me by Father Veliko), came to Arnhem. The plan was that he came on Tuesday here and afterwards in Wednesday morning the Trip to Amsterdam was going to happen. First we had settled that he will be in Arnhem in 12:00 o’clock. So Around 10:50 I walked down the way to the trainstation. I was on my way when Zlati ringed and told that he still, haven’t catched the train and he is not going to make it for 12:00, though he will be on Arnhem Central Station in 04:35 in the afternoon. I came back to home and on my way bought some apples as well as a oily sweet thing from the Turkish shop “Sultan” 🙂

Around 3 I took my way to the city center again, on my way I had toleave Sali’s laptop in his home. I had taken his laptop to re-install Windows and setup his Windows in Bulgarian as well as configure it to be able to watch Bulgarian TV channels online.
In order to achieve that I used a proxy donated to me by Amridikon. Thanks Amri!

To make Windows Vista Home Premium to Bulgarian I had to use a small proggie “Vista Change Language 1.0”. I had to burn the program to a CD and boot into it and then use the downloaded language pack to change the vista text language to Bulgarian. I did so all went well, unfortunately after an upgrade the text in the menus did screw up. So I have to boot again in the Vista Change Language 1.0 boot CD and revert it back to Bulgarian.
Then I had to disable Windows Vista updates in order to prevent the same language mess up to occur again. This was a little out of the topic, but I decided it’s nice to have it on paper.

So back to where I was with my TTA .. I took Zlati from the train station,we went to Sali and he treated us with some kind of traditional turkish soup meal. The soup was quite nice btw. He was extremely happy that he could watch Bulgarian TV’s online through the bg.gledai.tv website. I was glad to that God helped me and blessed me in succeeding in all the things I mentioned above. Afterwards we went with Zlati and Koko to Albertheijn picked up a beer and a couple of other things. Then I and Zlati went to my place where we used my notebook to research about places of Interest, we would like to attend in Amsterdam. We went to bed around 2 o’clock at night.

At the morning we went to the train station. I suggested that we go a little earlier because I thought, well it might be better to be earlier in the city for to have more time to walk and take a look at its significant things in it. We were on the train station 8:10 and had the intention to take the first train at 8:29, however God had other plans for that.It seemed that we have to wait and buy a ticket for after 9:00, otherwise Zlati couldn’t use his train card for my discount.He was quite irritated by the fact that I suggested that we went to the train station so early since he was quite sleepy in the morning because we went to bed so late.

Anyways I got a coffee from the trainstation waiting-room coffee machine.And, eh the coffee there is expensive, be careful if you travel in the Netherlands by train.

The coffee costed 1.50 per cappuchino, huh … We catched a train in 9:29 and we were in the capital of Amsterdam in 10:40.
I was so excited! Yes the trip worthed the price of 16.30 EUR (with the 40% discount). Amsterdam is a really nice city, especially considering it’s architecture. And I saw such a big shops and so many things to choose from … The whole city is full of canals and boats are traveling through it.
We went to music store, wow there was so much music in it.
We entered a lot of Catholic Churches in one of the Catholic Churches there was an orthodox icon of St. Nickolas! So I made the sign of the cross and prayed the Saint to pray God for me the sinner.
With our arrival right after we went out of the central station I saw a bookstore,so I proposed Zlati to enter. It seemed that was a protestant Christian bookstore. Even though a protestant one the people there at least were believing in our Lord and Saviour Jesus Christ.

I had a small chat with one of the guys asking if they have Orthodox Bible, It seemed they haven’t so I started telling him about the advantages of being Orthodox Christian. I explained him how I became orthodox after God gave me the faith and transformed my life.
The bookstore had a free/coffee and tea.So each me and Zlati took a cappuchino. It was so nice God gave me a hot drink in the Early morning in Amsterdam.
A lot of people are insane in that place, I saw a lot of pod smokers on the street.

On a lot of places the air had that typical pod stell. We saw a lot of Museums, we tried to use a citymap although in a lot of cases  un-succesful. We saw so many Churches, Madam Tusad’s museum,as well as Anne Frank museum, the tulip museum.
There was also sex, museums we saw on our way and even this freaks had gay museum. We saw some road building in progress where a couple of people were building a road on top of pillars, right above the water! 🙂 The city is full of old buildings most of which originating from 16th century. The Architecture is really amazing. The parks and everything and the terraces had that typical European style which I’ve seen in movies showing people from the 18thor 19th century drinking coffees on the balconies. We took a lot of pictures. Unfortunately I still haven’t taken the pictures from Zlati. We entered into a shop which was selling buddhist, hindu and indian statues and souvenirs to warm a bit as the weather outside was coldy.
There we had a nice chat with the storekeeper, about religion and about my Orthodox faith in Our Lord Jesus! He mentioned that near around there is an Syrian Orthodox Church. So went to seek for it. After some rambling we found it but unfortunately it was already closed the time was quite late over 18:00, so it was quite normal to be closed.The style of the Church didn’t really much differentiated from the rest of the Catholic Churches.

Earlier we went into a Church, whether they had that modern exposition, again we went their to warm ourselves (it was such a cold day).

The Church inside was nice but the pictures,they was selling on the expo was really terrible, a lot of sado-mazo and perverted motives in the pictures …

I was saddened to see that they have de-sacrated a holy place like that. Well it’s true that the Roman catholics stepped aside from the orthodox faith some time ago but still they are believing Christians and therefore there temples are holy to some degree too … therefore such an abomination really shouldn’t happen.

The good thing was that in the Church they even had made toilets inside the church we could use 🙂
The Church wall paintings were displaying the way our Lord Jesus has walked on it’s way to final execution by the jews, carrying his cross on the way to Golgotha.

Around 18:30 we went to the street where the so famous prostites and drug addicts street was the “RED LIGHTS” – so famous all around the world ….

I couldn’t believed my eyes, prostites staying behind windows half naked waiting for a customer to hire them for sex …I have heard about that place but I really couldn’t imagine it could legally exist in the center of a metropolitan city like Amsterdam.

We walked in that “wicked” part of the city for around hour.
There were all kind of junkies people who looked really criminal, the prostitutes on the windows. Sex shops, sex video rooms, you name it .. all the disgusting stuff you could imagine. After this walk we went to the train station around 8:00 and took the train back to Arnhem. The whole day went quite flawless,God has heard our prayer to keep us from evil and give us safe journey.The whole trip was really relaxing for me! Praise the Lord for his great mercy towards me the sinner for giving my eyes to see all this things!

Converting JPEG Images to ASCII Art text (picture) in Microsoft Windows (2000 / XP / Vista / 7)

Friday, May 18th, 2012

A friend of mine, just mentioned about a program ASCIIPic – capable of converting graphic images in JPEG to plain text ASCII in Microsoft Windows OSes.
Yesterday I blogged about caca-utils (img2txt) – console tool to convert picture graphics to plain text ASCII , so knowing of the Windows freeware ASCIIPic existence catched my attention and I decided to give it a try to get idea what is situation with Images to ASCII text convertion in Windows? 🙂.

1. Generating ASCII from JPEG images with ASCII Pic

As I don't have a Microsoft Windows OS at hand, I downloaded it and run it on my Debian notebook with WINE (Wine Is Not an Emulator) MS-Windows emulator.

For my surprise the program run succesfuly its GUI interface and worked pretty smooth even emulated on Linux.

ASCII Pic 2.0 JPG PNG GIF to ASCII text MS Windows Convertor screenshot

As of time of writting, the latest version of the freeware program available is 2.0. You see in above screenshot the program is pretty intutive to use. You select an Input file, an Output file and you're ready to Process the image to TXT.
One small note to make here is the program couldn't recognize as Input files images in PNG or GIF formats, it seems the only image formats the program recognizes as input are JPEG and BMP.

ASCII Pic Windows image to ASCII program picture shot

The converted images to ASCII results are quite unsatisfactory, I tried converting few pictures originally in size 1024×768 but the produced ASCII was messy huge (the program didn't automatically set height / width dimensions to 60×80 and therefore, when I revied the produced pictures, they were very ugly and hardly readable. It could be the same image looks better if reviewed in MS-Windows Notepad but I seriously doubt that …

I thought some improvement to the produced ASCII image might be possible from the app options so I played around with the Zoom, Negation, Brightness and Monochrome options, none of them had a drastic change on the output. Using any of the program options didn't make the output TXT "image" to look closer riginal JPEGs..

ASCII Pic 2.0 Windows picture to ASCII Program options screenshot

ASCII Pic official website contains a number of other tiny tools, like WinKill and RemoteShut, however most of the tools are already too obslete and useless just like ASCII Pic

If I have to compare ASCIIPic produced ASCII Images to libcaca's Linux img2txt, asciipic's ASCII images are a piece of crap.

2. jp2a command line tool image to ASCII generator

As of time of writting a good alternative program I found for Windows is jp2a
jp2a is a free GPL-ed software available for all major operating system architectures Linux, BSD, Mac OS X, Windows.
jp2a is a command line tool and lacks any GUI interface but if compared to ASCII Pic the output ASCII image is awesome.

jp2a Windows binary can be downloaded from here , also I've made a mirror of windows jp2a bin in case if it disappears here

3. ASCII Generator 2 (asc2gen) – Windows GUI Images to ASCII generator

ASC 2 Gen is actually the best I can find program to convert images to ascii in Win as of time of writting.
Just like img2txt it generates pretty decent looking text images.

ASC2Gen failed to run emulated on my Linux host with wine version 1.0.1, hence to test it I used a a Windows host via teamviewer.

Below are few screenshots illustrating most of the options ASCII2GEN provides:

asc2gen Microsoft Windows image to ascii generator inverted penguins screenshot

asc2gen penguins in inverted color set (black color text background)

ASC2Gen backhead penguins ascii picture screenshot

ASC2GEN flipped backhed generated image to ASCII

ascii2gen generate images to ascii in colors Microsoft Windows shot

Picture to ASCII text converted with ASCII colors

Dithering Windows image to ascii text generated picture ASCII

ascii2gen dithering level option shot

asc2gen jpeg, png, gif to plain text ascii brightness contrast screenshot pic

asc2gen contrast / brigthness atune shot

ascii2gen penguins converted images to plain text inverted with capital letters for picture

asc2gen save as options shot

Something else nice is it supports a lot of image file formats as input including (BMP and GIF) images.
I've also made a mirror of asc2gen v. 2.0.0 here

While researching online, I found plenty of other Image to ASCII geneartors, however as I didn't tested them I can't say if they are  better ones.
Anyways I will be happy to hear if anyone knows other good ASCII generator alternative progs for Winblows?

Viewing JPEG,GIF and PNG in ASCII with cacaview on GNU / Linux – Review on caca-utils text mode graphics utilities

Thursday, May 17th, 2012

Stitch 80x45 libcaca mascot cacaview viewing JPG, PNG, GIF images as ASCII on Linux libcaca

Probably, many don't know that it is possible to view normal graphical pictures (JPG, PNG, GIF, BMP) etc. in plain console tty.

Being able to view pictures in ASCII is something really nice especially for console geeks like me.
The images produced sometimes are a bit unreadable, if compared to the original graphics, but anyways most of the pictures looks pretty decent 🙂

Viewing in console / terminal images on GNU / Linux is possible thanks to a library called libcaca, caca labs libcaca project official website here.
Below is a shot description of libcaca:
hipo@noah:~$ apt-cache show libcaca0|grep 'Description' -A 4
Description: colour ASCII art library
libcaca is the Colour AsCii Art library. It provides high level functions
for colour text drawing, simple primitives for line, polygon and ellipse
drawing, as well as powerful image to text conversion routines.

In Debian, Ubuntu and other deb Linux distros viewing GUI images with no need for Xserver or any kind of window manager in plain ASCII is possible with cacaview.

cacaview is part of a package called caca-utils. caca-utils is providing few other great utilities for ASCII freaks 🙂 along with cacaview console ascii viewer prog.
The package> is available for Debian distributins since many years, so even on a very old Debians like Debian – (Potato, Woody, Sarge) the package is available in default free package repositories ready to install via apt

To install apt-get it as usual:

noah:~# apt-get --yes install caca-utils

Here is a list of the binaries the package provides:

hipo@noah:~$ dpkg -L caca-utils|grep -i /usr/bin/
/usr/bin/cacaserver
/usr/bin/cacaplay
/usr/bin/cacafire
/usr/bin/cacademo
/usr/bin/cacaview
/usr/bin/img2txt

1. cacaserver a tiny program allowing network streaming of applications written in caca

Belkow is a chop, from man cacaserver
 

cacaserver reads libcaca animation files in its standard input and
serves them as ANSI art on network port 51914. These animations can be
created by any libcaca program by setting the CACA_DRIVER environment
variable to raw and piping the program's standard output to cacaserver.

Clients can then connect to port 51914 using telnet or netcat to see
the output.

The example section of the manual points 1 example use of cacaserver to stream the console output from cacademo.
cacademo binary is a short presentation ASCII DEMO in the spirit of the old school assembly demos (demoscene) .
To run it to bind on port 51914 one has to type in bash shell:
hipo@noah:~$ CACA_DRIVER=raw cacademo | cacaserver
initialised network, listening on port 51914

Then to check out how the demo looks, open telnet connection to the cacaserver host; In my case the cacaserver is binded and streamed over IP 192.168.0.2:

hipo@debian:~$ telnet 192.168.0.2 51914

Immediately you got the demo shining; Below are two screenshots of the demo played after succesful telnet connection:

Cacaserver - caca for the network screenshot Matrix cacademo

cacademo running over telnet network connection – Matrix

cacaserver running on Debian GNU / Linux drug addict like spots streamed via telnet

Blur spots cacademo shot of cacademo streamed via network

You see the demo looks quite awesome 🙂

2. Running cacafire to stream over network

Another possible example use of cacaserver is in conjunction with cacafire libcaca test application:

noah:~# CACA_DRIVER=raw cacafire | cacaserver
initialised network, listening on port 51914
cacafire is a short application written to render ASCII via libcaca and is just displaying a screen with ASCII (moving) burning fire.
It is quite spectacular if you, ask an unexpecting friend to connect to your host to 51914 🙂

Cacafire Screenshot Debian GNU / Linux cacaserver streaming ASCII demo via network port 51914

Besides that bored sys admins, could run cacafire in console to hypnotize themselves watching dumb the burning fire screen for few hoursor just use it as a screensaver 😉

3. cacaview a program to display a graphic images in console using ASCII art

cacaview takes just one argument – the picture to be displayed.

Below is a screenshot of cacaview ran from my gnome-terminal displaying a ASCII text version of the MySQL server logo

hipo@noah:~$ cd /disk/pictures
hipo@noah:/disk/pictures$ cacaview mysql_logo.png


cacaview displaying MySQL database logo in ASCII using caca for X

Whether cacaview is invoked in GUI, the libcaca X support is used, so the text image is visualized in new window with graphics, if however it is invoked in plain let's say tty1 libcaca displays the graphics pictures drawing it with only text characters.

Here is also a screenshot, I've made while viewing a GIF website logo in ASCII in plain tty console:

hipo@noah:~$ cacaview /disk/pictures/logo.gif

cacaview plain tty console screenshot of a website logo graphics pictures 17-05-2012

The logo is in cyrillic, so for latin speaking people some of the characters in the two words seen will be unreadable 🙂

cacaview even supports viewing, the next and previous picture in line, like in any modern graphics image viewer program.
To view a bunch of graphic pictures in ASCII with cacaview pass it *.*:

hipo@noah:~$ cacaview /disk/pictures/*.*

For simplicity the common unix * is also supported, so I find it quicker to do:

hipo@noah:~$ cacaview /disk/pictures/*

Showing pictures forward and backward (Previous / Next) picture is done with n and p kbd keys, whether;
n - next;
p - previous

cacaview doesn't crash or stop but skip unknown file formats – if for instance encounters filenames which are not images; lets say you have *.rar archive files along with other pictures.

The complete list of keys cacaview supports are:
br />

KEYS
? show the help screen

n, p switch to next image, previous image

Left, Right, Up, Down or h, l, k, j
scroll the image around

+, – zoom in and out

z reset the zoom level to normal

f switch fullscreen mode (hide/show menu and status bars)

d toggle the dithering mode (no dithering, 4×4 ordered dithering, 8×8 ordered dithering and random dithering)

q exit the program

4. Converting graphics images to ASCII art like (plain text pictures)

The tool that does "the trick" is img2txt. img2txt has a bit more options while compared to the rest of the aforementioned tools.The following list of arguments are recognized:

  • the size (font, height)
  • brightness
  • contrast
  • gamma and dither
  • format type of out the output pic

Anyways I found that the basic just in / out arguments passed are enough to produce pretty good results:

hipo@noah:~$ img2txt hipo_avatar.gif >hipo_avatar_pic.txt

The original hipo_avatar.gif file looks like so:

hipo avatar gif picture before img2txt convertion to text

After above img2txt command is run and hipo_avatar_pic.txt to see the colorful output ASCII art img2txt produces, cat it:

hipo@noah:~$ cat hipo_avatar_pic.txt

The image result if screenshot looks quite beautiful and even, can be considered or used as an ART effect image (filter) 🙂

Console Screenshot hipo avatar pic ASCII img2txt output picture

The picture colors are plain ANSI color, so in order to display properly the picture with colors on another computers or Operating System you will need at least basic support for ANSI colors.

Plenty of output file formats are supported by img2txt

Here is the complete list of supported output formats:
 

ansi : coloured ANSI
caca : internal libcaca format
utf8 : UTF8 with CR
utf8 : UTF8 with CRLF (MS Windows)
html : HTML with CSS and DIV support
html3 : Pure HTML3 with tables
irc : IRC with ctrl-k codes
bbfr : BBCode (French)
ps : Postscript
svg : Scalable Vector Graphics
tga : Targa Image

libcaca is available for FreeBSD too, but the caca-utils is not available as a port yet, though probably the deb or rpm packages can easily be ported to BSD.

Well that's all, Enjoy.

How to make screenshot in /dev/tty console on GNU / Linux – Taking picture JPEG / PNG snapshot of text console in systems without graphical environment

Monday, April 30th, 2012

I'm used to making picture screenshots in GNOME desktop environment. As I've said in my prior posts, I'm starting to return to my old habits of using console ttys for regular daily jobs in order to increase my work efficiency. In that manner of thoughts sometimes I need to take a screenshot of what I'm seeing in my physical (TTY consoles) to be able to later reuse this. I did some experimenting and this is how this article got born.

In this post, I will shortly explain how a picture of a command running in console or terminal in GNU / Linux can be made

Before proceeding to the core of the article, I will say few words on ttys as I believe they might be helpful someone.
The abbreviation of tty comes after TeleTYpewritter phrase and is dating back somewhere near the 1960s. The TTY was invented to help people with impaired eyesight or hearing to use a telephone like typing interface.

In Unix / Linux / BSD ttys are the physical consoles, where one logs in (typing in his user/password). There are physical ttys and virtual vtys in today *nixes. Today ttys, are used everywhere in a modern Unixes or Unix like operating system with or without graphical environments.
Various Linux distributions have different number of physical consoles (TTYs) (terminals connected to standard output) and this depends mostly on the distro major contributors, developers or surrounding OS community philosophy.
Most modern Linux distributions have at least 5 to 7 physical ttys. Some Linux distributions like Debian for instance as of time of writting this, had 7 active by default physical consoles.
Adding 3 more ttys in Debian / Ubuntu Linux is done by adding the following lines in /etc/inittab:
 

7:23:respawn:/sbin/getty 38400 tty7
8:23:respawn:/sbin/getty 38400 tty8
9:23:respawn:/sbin/getty 38400 tty9

On some Linux distributions like Fedora version 9 and newer ones, new ttys can no longer be added via /etc/inittab,as the RedHat guys changed it for some weird reason, but I guess this is too broad issue to discuss ….

In graphical environments ttys are called methaphorically "virtual". For instance in gnome-terminal or while connecting to a remote SSH server, a common tty naming would be /dev/pts/8 etc.

tty command in Linux and BSDs can be used to learn which tty, one is operating in.

Here is output from my tty command, issued on 3rd TTY (ALT+F3) on my notebook:
 

noah:~# tty
/dev/tty3

A tty cmd output from mlterm GUI terminal is like so:
 

hipo@noah:~$ tty/dev/pts/9

Now as mentioned few basic things on ttys I will proceed further to explain how I managed to:

a) Take screenshot of a plain text tty screen into .txt file format
b) take a (picture) JPG / PNG screenshot of my Linux TTY consoles content

1. Take screenshot of plain text tty screen into a plain (ASCII) .txt file:

To take a screenshot of tty1, tty2 and tty3 text consoles in a txt plain text format, cat + a standard UNIX redirect is all necessery:
 

noah:~# cat /dev/vcs1 > /home/hipo/tty1_text_screenshot.txt
noah:~# cat /dev/vcs2 > /home/hipo/tty2_text_screenshot.txt
noah:~# cat /dev/vcs3 > /home/hipo/tty3_text_screenshot.txt

This will dump the text content of the console into the respective files, if however you try to dump an ncurses library like text interactive interfaces you will end up with a bunch of unreadable mess.
In order to read the produced text 'shots' onwards less command can be used …
 

noah:~# less /home/hipo/tty1_text_screenshot.txt
noah:~# less /home/hipo/tty2_text_screenshot.txt
noah:~# less /home/hipo/tty3_text_screenshot.txt

2. Take picture JPG / PNG snapshot of Linux TTY console content

To take a screenshot of my notebook tty consoles I had to first install a "third party program" snapscreenshot . There is no deb / rpm package available as of time of writting this post for the 4 major desktop linux distributions Ubuntu, Debian, Fedora and Slackware.
Hence to install snapscreenshot,I had to manually download the latest program tar ball source and compile e.g.:
 

noah:~# cd /usr/local/src
noah:/usr/local/src# wget -q http://bisqwit.iki.fi/src/arch/snapscreenshot-1.0.14.3.tar.bz2
noah:/usr/local/src# tar -jxvvvf snapscreenshot-1.0.14.3.tar.bz2

noah:/usr/local/src# cd snapscreenshot-1.0.14.3
noah:/usr/local/src/snapscreenshot-1.0.14# ./configure && make && make install
Configuring…
Fine. Done. make.
make: Nothing to be done for `all'.
if [ ! "/usr/local/bin" = "" ]; then mkdir –parents /usr/local/bin 2>/dev/null; mkdir /usr/local/bin 2>/dev/null; \
for s in snapscreenshot ""; do if [ ! "$s" = "" ]; then \
install -c -s -o bin -g bin -m 755 "$s" /usr/local/bin/"$s";fi;\
done; \
fi; \
if [ ! "/usr/local/man" = "" ]; then mkdir –parents /usr/local/man 2>/dev/null; mkdir /usr/local/man 2>/dev/null; \
for s in snapscreenshot.1 ""; do if [ ! "$s" = "" ]; then \
install -m 644 "$s" /usr/local/man/man"`echo "$s"|sed 's/.*\.//'`"/"$s";fi;\
done; \
fi

By default snapscreenshot command is made to take screenshot in a tga image format, this format is readable by most picture viewing programs available today, however it is not too common and not so standartized for the web as the JPEG and PNG.
Therefore to make the text console tty snapshot taken in PNG or JPEG one needs to use ImageMagick's convert tool. The convert example is also shown in snapscreenshot manual page Example section.

To take a .png image format screenshot of lets say Midnight Commander interactive console file manager running in console tty1, I used the command:
 

noah:/home/hipo# snapscreenshot -c1 -x1 > ~/console-screenshot.tga && convert ~/console-screenshot.tga console-screenshot.png

Linux text console tty mc screenshot with snapscreenshot terminal / console snapshotting program

Note that you need to have read/write permissions to the /dev/vcs* otherwise the snapscreenshot will be unable to read the tty and produce an error:
 

hipo@noah:~/Desktop$ snapscreenshot -c2 -x1 > snap.tga && convert snap.tga snap.pngGeometry will be: 1x2Reading font…/dev/console: Permission denied

To take simultaneous picture screenshot of everything contained in all text consoles, ranging from tty1 to tty5, issue:
 

noah:/home/hipo# snapscreenshot -c5 -x1 > ~/console-screenshot.tga && convert ~/console-screenshot.tga console-screenshot.png

Here is a resized 480×320 pixels version of the original screenshot the command produces:

All text Consoles tty1 to tty5 merged screenshot png image with snapscreenshot taken on Debian GNU / Linux

Storing a picture shot of the text (console) screen in JPEG (JPG) format is done analogously just the convert command output extension has to be changed to jpeg i.e.:
 

noah:/home/hipo# snapscreenshot -c5 -x1 > ~/console-screenshot.tga && convert ~/console-screenshot.tga console-screenshot.jpeg

I've also written a tiny wrapper shell script, to facilitate myself picture picture taking as I didn't like to type each time I want to take a screenshot of a tty the above long line.

Here is the wrapper script I wrote:
 

#!/bin/sh
### Config
# .tga produced file name
output_f_name='console-screenshot.tga';
# gets current date
cur_date=$(date +%d_%m_%Y|sed -e 's/^ *//');
# png output f name
png_f_name="console-screenshot-$cur_date.png";
### END Config
snapscreenshot -c$arg1 -x1 > $output_f_name && convert $output_f_name $png_f_name;
echo "Output png screenshot from tty1 console produced in";
echo "$PWD/$png_f_name";
/bin/rm -f $output_f_name;

You can also download my console-screenshot.sh snapscreenshot wrapper script here

The script is quite simplistic to use, it takes just one argument which is the number of the tty you would like to screenshot.
To use my script download it in /usr/local/bin and set it executable flag:
 

noah:~# cd /usr/local/bin
noah:/usr/local/bin# wget -q https://www.pc-freak.net/~bshscr/console-screenshot.sh
noah:/usr/local/bin# chmod +x console-screenshot.sh

Onwards to use the script to snapshot console terminal (tty1) type:
 

noan:~# console-screenshot.sh

I've made also mirror of latest version of snapscreenshot-1.0.14.3.tar.bz2 here just in case this nice little program disappears from the net in future times.


How to add visitor/visitors counter in Joomla based website using the VINAORA joomla plugin

Wednesday, December 29th, 2010

One of the websites based on Joomla, that I’m managing, had to have the option to show a Visitors Counter on the page bottom.

I did some research online to check for some Joomla plugins that are capable of aiming my Joomla installation with the Visitor Counter feature.

There are a couple of plugins available out there that are able to provide a Joomla installation with a Web Counter, however I’ll just mention the few which I have tested myself.
The ones I’ve tested myself are;

1. VCNT
2. Count your Visitors
3. Cool Hits Counter
and finally the one that I really liked the most:

4. VINAORA

All the prior 3 aforementioned VCNT, Count your Visitors and Cool Hits Counter, are actually working right after installation. I haven’t had the time to test them thoroughfully but from a first look they appear to be counting the visitors.

The Count your visitors – joomla plugin’s download main page was in German with no option to revert to English, so that wasn’t nice.

Though the plugin seems to work fine after just downloaded and installed and configured from

Extensions -> Module Manager

The configuration options for Count your visitors are quite obscure but if you’re a looking for a really simple way to count your Joomla based website visitors it might be a good choice. The plugin is based on the initial Joomla module called Statistics.

By the way I’ve read some reports online that actually Joomla 1.5 also includes some kind of minimal integrated web counter embedded in itself throughout the Joomla Statistics module .
However I personally couldn’t really follow the methods describe to take advantage of the Joomla install integrated Statistics module, however if somebody has already succeeded in using the Statistics default joomla module I’ll be glad, if he shares with me.

I’ve found the VCNT visitor statistics plugin a handy one, but this module had this major problem that the VCNT 1.5 text which was appearing as a heading before the statistics was hard to wipe out of my web page, so eventually I got pissed of and thought and tested the Cool Hits Counter.

The Cool Hits Counter is actually a simplistic module which presents a counter about visitors on the web site in numeric digit numbers.
These module uses the integrated Joomla 1.5 module mod_stats the only difference is the support for numeric digit numbers.

As I’ve said none of the above modules wasn’t flexible enough and therefore wasn’t what I was looking for, thus I decided to use my installed VINAORA Joomla web(users) counter plugin.

The VINAORA is actually quite straight foward to configure, right after installation to start with the configuration I had to navigate to:

Extension -> Module Manager -> Vinaora Visitors Counter -> Module Parameters

Since I wanted just a simple counter without any external statistics I personally prefered using Vinaora’s counter with the optionsDisplay Mode: Simple as well as the Zero-Statistics turned on to (Yes)

Some of the other options I found to be best matching my desires for the Visitors Counter was:

Show Title: No and Position: Left

Now I had this shiny visitors statistics in my Joomla installation but there was the annoying Link in my Visitors Counter appearing on the page, thus in order to remove the default link Visitors Counter which was pointing to the VINAORA’s web page, I had to edit the file:
modules/mod_vvisit_counter/tmpl/default.php located in my Joomla Document Root directory.

First I’ve edited the code on line 21 where I’ve removed out the Vinaora string since I didn’t wanted any reference to Vinaora to occur in my Joomla HTML code.

In line 162 in the code:

$html .= ….

By removing it I’ve completed scraped out the annoying references to VINAORA and their link to http://vinaora.com website and thus made the Visitors counter a look a bit more professional.

Now the counter is working with a graphical numeric digits and everything is just fine with my Web counter Joomla counter thanks to VINAORA 🙂
 

Editting binary files in console and GUI on FreeBSD and Linux

Thursday, April 26th, 2012

I’ve recently wanted to edit one binary file because there was compiled in the binary a text string with a word I didn’t liked and therefore I wanted to delete. I know I can dig in the source of the proggie with grep and directly substitute my “unwatned text” there but I wanted to experiment, and see what kind of hex binary text editors are for Free OSes.
All those who lived the DOS OS computer era should certainly remember the DOS hex editors was very enjoyable. It was not rare case, where in this good old days, one could simply use the hex editor to “hack” the game and add extra player lives or modify some vital game parameter like put himself first in the top scores list. I even remember some DOS programs and games was possible to be cracked with a text editor … Well it was times, now back to current situation as a Free Software user for the last 12 years it was interesting to see what is the DOS hexeditor like alternatives for FreeBSD and Linux and hence in this article I will present my findings:

A quick search in FreeBSD ports tree and Debian installable packages list, I’ve found a number of programs allowing one to edit in console and GUI binary files.

Here is a list of the hex editors I will in short review in this article:

  • hexedit
  • dhex
  • chexedit
  • hte
  • hexer
  • hexcurse
  • ghex
  • shed
  • okteta
  • bless
  • lfhex

1. hexedit on Linux and BSD – basic hex editor

I’ve used hexedit already on Linux so I’ve used it some long time ago.

My previou experience in using hexedit is not too pinky, I found it difficult to use on Redhat and Debian Linux back in the day. hexedit is definitely not a choice of people who are not “initiated” with hex editting.
Anyways if you want to give it a try you can install it on FreeBSD with:

freebsd# cd /usr/ports/editors/hexedit
freebsd# make install clean

On Debian the hexedit, install package is named the same so installation is with apt:

debian:~# apt-get –yes install hexedit

hexedit screenshot Debian Linux Squeeze

2. Hex editting with chexedit

I’ve installed chexedit the usual way from ports:

freebsd# cd /usr/ports/editors/chexedit
freebsd# make install clean

chexedit is using the ncurses text console library, so the interface is very similar to midnight commander (mc) as you see from below’s screenshot:

Chexeditor FreeBSD 7.2 OS Screenshot

Editting the binary compiled in string was an easy task with chexedit as most of the commands are clearly visible, anyways changing a certain text string contained within the binary file with some other is not easy with chexedit as you need to know the corresponding binary binary value representing each text string character.
I’m not a low level programmer, so I don’t know the binary values of each keyboard character and hence my competence came to the point where I can substitute the text string I wanted with some unreadable characters by simply filling all my text string with AA AA AA AA values…

chexedit on Debian is packaged under a deb ncurses-hexedit. Hence to install it on Deb run:

debian:~# apt-get –yes install ncurses-hexedit

Further on the binary to run chexedit on binary contained within ncurses-hexedit is:

debian:~# hexeeditor

3. Hex Editting on BSD and Linux with hte

Just after trying out chexedit, I’ve found about the existence of one even more sophisticated hexeditor console program available across both FreeBSD and Linux.
The program is called hte (sounds to me a bit like the Indian word for Elephant “Hatti” :))

hte is installable on Debian with cmd:

debian:~# apt-get install ht

On FreeBSD the port name is identical, so to install it I execed:

freebsd# cd /usr/ports/editors/hte
freebsd# make install clean

hte is started on Debian Linux (and presumably other Linux distros) with:

$ hte

On FreeBSD you need to run it with ht command:

freebsd# ht

You see how hte looks like in below screenshot:

ht has the look & feel like midnight commander and I found it easier to use than chexedit and hexeditor
4. hexer VI like interface for Linux

As I was looking through the available packages ready to install, I’ve tried hexer

debian:~# apt-get install –yes hexer

hexer does follow the same standard commands like VIM, e.g. i for insert, a for append etc.

Hexer Debian Linux vim like binary editor screenshot

It was interesting to find out hexer was written by a Bulgarian fellow Petar Penchev 🙂
(Proud to be Bulgarian)

http://people.freebsd.org/~roam/ – Petar Penchev has his own page on FreeBSD.org

As a vim user I really liked the idea, the only thing I didn’t liked is there is no easy way to just substitute a string within the binary with another string.

5. hexcurse another ncurses library based hex editor

On Deb install and run via:

debian:~# apt-get –yes install hexcurse
debian:~# hexcurse /usr/bin/mc

Hexcurse Debian Linux text binary editor screenshot

hexcurse is also available on FreeBSD to install it use cmd:

freebsd# cd /usr/ports/editors/hexcurse
freebsd# make install clean
….

To access the editor functions press CTRL+the first letter of the word in the bottom menu, CTRL+H, CTRL+S etc.
Something I disliked about it is the program search is always in hex, so I cannot look for a text string within the binaries with it.

6. ghex – Editting binary files in graphical environment

If you’re running a graphical environment, take a look at ghex. ghex is a gnome (graphical hex) editor.Installing ghex on Debian is with:

debian:~# apt-get –yes install ghex
….

To run ghex from terminal type:

debian:~# ghex2

GHex2 GNOME hex binary editor screenshot

To install ghex on FreeBSD (and I assume other BSDs), install via port:

freebsd# cd /usr/ports/editors/ghex
freebsd# make install clean

Gnome hex editor have plenty of tools, useful for developers to debug binary files.

Some nice tools one can find are under the the menus:

Windows -> Character Table

This will show a complete list of each keyboard sent character in ASCII, Hex, Decimal, Octal and Binary

Screenshot ghex Character table Debian Linux

Another useful embedded tool in ghex is:

Windows -> Type Convertion Dialog

Ghex type convertion dialog screenshot

Note that if you want to use the Type Convertion Dialog tool to find the representing binary values of a text string you will have to type in the letters one by one and save the output within a text file and later you can go and use the same editor to edit the text string within the binary file you like.

I’m not a programmer but surely for programmers or people who want to learn some binary counting, this 2 ghex edmebbed tools are surely valuable.

To conclude even though there are plenty of softwares for hex editting in Linux and BSD, none of them is not so easy to use as the old DOS hexdedit tool, maybe it will be a nice idea if someone actually rewrites the DOS tool and they package it for various free operating systems, I’m sure many people will find it helpful to have a 1:1 equivalent to the DOS tool.

7. Shed pico like interfaced hex editor

For people, who use pico / nano as a default text editor in Linux shed will probably be the editor of choice as it follows the command shortcuts of picoOn Deb based distros to install it run:

debian:~# apt-get install –yes shed

shed pico like hex binary editor Linux

Shed has no BSD port as of time of writting.8. Okteta a KDE GUI hex editor

For KDE users, I found a program called okteta. It is available for Deb based Linuxes as deb to install it:

debian:~# apt-get –yes install okteta

Screenshot Okteta Debian GNU / Linux Squeeze

As of time of writting this article there is no okteta port for BSDs.
Okteta has plenty of functions and even has more of a functions than ghexedit. Something distinctive for it is it supports opening multiple files in tabs.

9. lfhex a large file text editor

lfhex is said to be a large (binary) file text editor, I have not tested it myself but just run it to see how it looks like. I don’t have a need to edit large binary files too, but I guess there are people with such requirements too 🙂

lfhex - Linux The Large file hex editor

To install lfhex on Debian:

debian:~# apt-get install –yes lfhex

lfhex has also a FreeBSD port installable via:

freebsd# cd /usr/ports/editors/lfhex
freebsd# make install clean

10. Bless a GUI tool for editting large hex (binary) files

Here is the description directly taken from the BSD port /usr/ports/editors/bless

Bless is a binary (hex) editor, a program that enables you to edit files asa sequence of bytes. It is written in C# and uses the Gtk# bindings for theGTK+ toolkit.

To install and use ot on deb based Linuxes:

debian:~# apt-get install –yes bless
….

On BSD installation is again from port:

freebsd# cd /usr/ports/editors/bless
freebsd# make install clean
….

Something that makes bless, maybe more desirable choice for GUI users than ghex is its availability of tabs. Opening multiple binaries in tabs will be useful only to few heavy debuggers.

Bless GUI hex editor Debian Linux tabs opened screenshot

11. Ghextris – an ultra hard hacker tetris game 🙂

For absolute, hacker / (geeks), there is a tetris game called ghextris. The game is the hardest tetris game I ever played in my life. It requires more than regular IQ and a lot of practice if you want to become really good in this game.

To enjoy it:

debian:~# apt-get –yes install ghextris

Ultra hrad hardcore hackers game ghextris screenshot

Unfortunately there is no native port of ghextris for BSD (yet). Anyhow, it can be probably run using the Linux emulation or even compiled from source.
Well that’s all I found for hexedit-ing, I’ll be happy to hear if someone can give me some feedback on his favourite editor.

Tiny PHP script to dump your browser set HTTP headers (useful in debugging)

Friday, March 30th, 2012

While browsing I stumbled upon a nice blog article

Dumping HTTP headers

The arcitle, points at few ways to DUMP the HTTP headers obtained from user browser.
As I'm not proficient with Ruby, Java and AOL Server what catched my attention is a tiny php for loop, which loops through all the HTTP_* browser set variables and prints them out. Here is the PHP script code:

<?php<br />
foreach($_SERVER as $h=>$v)<br />
if(ereg('HTTP_(.+)',$h,$hp))<br />
echo "<li>$h = $v</li>\n";<br />
header('Content-type: text/html');<br />
?>

The script is pretty easy to use, just place it in a directory on a WebServer capable of executing php and save it under a name like:
show_HTTP_headers.php

If you don't want to bother copy pasting above code, you can also download the dump_HTTP_headers.php script here , rename the dump_HTTP_headers.php.txt to dump_HTTP_headers.php and you're ready to go.

Follow to the respective url to exec the script. I've installed the script on my webserver, so if you are curious of the output the script will be returning check your own browser HTTP set values by clicking here.
PHP will produce output like the one in the screenshot you see below, the shot is taken from my Opera browser:

Screenshot show HTTP headers.php script Opera Debian Linux

Another sample of the text output the script produce whilst invoked in my Epiphany GNOME browser is:

HTTP_HOST = www.pc-freak.net
HTTP_USER_AGENT = Mozilla/5.0 (X11; U; Linux x86_64; en-us) AppleWebKit/531.2+ (KHTML, like Gecko) Version/5.0 Safari/531.2+ Debian/squeeze (2.30.6-1) Epiphany/2.30.6
HTTP_ACCEPT = application/xml,application/xhtml+xml,text/html;q=0.9,text/plain;q=0.8,image/png,*/*;q=0.5
HTTP_ACCEPT_ENCODING = gzip
HTTP_ACCEPT_LANGUAGE = en-us, en;q=0.90
HTTP_COOKIE = __qca=P0-2141911651-1294433424320;
__utma_a2a=8614995036.1305562814.1274005888.1319809825.1320152237.2021;wooMeta=MzMxJjMyOCY1NTcmODU1MDMmMTMwODQyNDA1MDUyNCYxMzI4MjcwNjk0ODc0JiYxMDAmJjImJiYm; 3ec0a0ded7adebfeauth=22770a75911b9fb92360ec8b9cf586c9;
__unam=56cea60-12ed86f16c4-3ee02a99-3019;
__utma=238407297.1677217909.1260789806.1333014220.1333023753.1606;
__utmb=238407297.1.10.1333023754; __utmc=238407297;
__utmz=238407297.1332444980.1586.413.utmcsr=www.pc-freak.net|utmccn=(referral)|utmcmd=referral|utmcct=/blog/

You see the script returns, plenty of useful information for debugging purposes:
HTTP_HOST – Virtual Host Webserver name
HTTP_USER_AGENT – The browser exact type useragent returnedHTTP_ACCEPT – the type of MIME applications accepted by the WebServerHTTP_ACCEPT_LANGUAGE – The language types the browser has support for
HTTP_ACCEPT_ENCODING – This PHP variable is usually set to gzip or deflate by the browser if the browser has support for webserver returned content gzipping.
If HTTP_ACCEPT_ENCODING is there, then this means remote webserver is configured to return its HTML and static files in gzipped form.
HTTP_COOKIE – Information about browser cookies, this info can be used for XSS attacks etc. 🙂
HTTP_COOKIE also contains the referrar which in the above case is:
__utmz=238407297.1332444980.1586.413.utmcsr=www.pc-freak.net|utmccn=(referral)
The Cookie information HTTP var also contains information of the exact link referrar:
|utmcmd=referral|utmcct=/blog/

For the sake of comparison show_HTTP_headers.php script output from elinks text browser is like so:

* HTTP_HOST = www.pc-freak.net
* HTTP_USER_AGENT = Links (2.3pre1; Linux 2.6.32-5-amd64 x86_64; 143x42)
* HTTP_ACCEPT = */*
* HTTP_ACCEPT_ENCODING = gzip,deflate * HTTP_ACCEPT_CHARSET = us-ascii, ISO-8859-1, ISO-8859-2, ISO-8859-3, ISO-8859-4, ISO-8859-5, ISO-8859-6, ISO-8859-7, ISO-8859-8, ISO-8859-9, ISO-8859-10, ISO-8859-13, ISO-8859-14, ISO-8859-15, ISO-8859-16, windows-1250, windows-1251, windows-1252, windows-1256,
windows-1257, cp437, cp737, cp850, cp852, cp866, x-cp866-u, x-mac, x-mac-ce, x-kam-cs, koi8-r, koi8-u, koi8-ru, TCVN-5712, VISCII,utf-8 * HTTP_ACCEPT_LANGUAGE = en,*;q=0.1
* HTTP_CONNECTION = keep-alive
One good reason, why it is good to give this script a run is cause it can help you reveal problems with HTTP headers impoperly set cookies, language encoding problems, security holes etc. Also the script is a good example, for starters in learning PHP programming.


How to digital watermark to a picture – Protect pic with copyright image or text with composite, convert and Phatch on GNU / Linux

Friday, March 23rd, 2012

Watermarking is a technique to identify a physical or non-physical object with its owner (creator). First watermarks in history originates from very ancient times.

There are two basic types of Watermark types:

I. Physical Watermarks (classical)

II. Digital Watermarks

Historically Classical Watermarks, were mostly important. As we tend to use more and more visible and we switch to use of more invisible stuff, nowdays the importance and use of digital watermarks is steadily raising.

You have most likely already seen pictures from websites which contain a copyright holder message stamp or website logo on it.
As you could imagine the picture watermark is placed in order to prevent pictures from being re-used in another internet space ,without the picture copyright holder explicit permission…

Watermarks have entered most if not all areas of our life, but we often don't recognize they're there / rarely think about them.
Few of the many "physical watermarks" we use daily are:
 

  • paper money watermark (to protect against anti money forgery)
  • bank debit / credit cards stamps near the card chip
  • postcards paper stamps

There are too many different kind of "physical watermarks" and since this is not the accent of this article, I will continue straight to explaiin a bit on Digital (picture) watermarks and how to watermark images with ImageMagick image editting command line suit.

Just like with physical watermarks, there are different kinds of digital watermarks. There are:
 

  • Picture (Images) digital watermarks
  • – Steganography

  • Video watermarks
  • Audio stream digital watermarks
  • Visual digital watermarks
  • – Visible area of text or picture over another text picture or video

  • Invisible digital watermarks
  • – digital information (files) metadata with watermark content etc.

The topic of watermarking is quite wide, so I will stop here and focus on the main idea of this article – to show how to place digital watermark on graphic image or collection of pictures.

The most straightway non-interactive way to do picture watermarking is with ImageMagick's composite command line tool. This little handy tool is capable of creating watermarks in single and multiple pictures.

If you prefer to have a simple text as a watermark, then you should use imagick's convert cmd.

1. Putting a watermark of picture in the right bottom corner

$ composite -gravity southeast -dissolve 100 \
watermark_picture.png image-to-watermark.png \
output-watermarked-image.png

Snoopy Writting pc freak watermark picture text watermark on the right bottom corner with composite

2. Placing watermark to picture in the bottom right corner

$ composite -gravity northeast -dissolve 80 \
watermark_picture.png image-to-watermark.png \
output-watermarked-image.png

Snoopy Writting pc freak picture text watermark on the right bottom corner with composite

3. Watermarking picture in the bottom left corner

$ composite -gravity southwest -dissolve 90 \
watermark_picture.png image-to-watermark.png \
output-watermarked-image.png

Snoopy writting watermarking picture on the bottom left corner imagemagick (composite)

4. Watermarking picture in the top left corner

$ composite -gravity northwest -dissolve 100 \
watermark_picture.png image-to-watermark.jpg \
output-watermarked-image.jpg

As you see from above example, composite even accept mixing up input / output between PNG and JPEG pictures 🙂

Output Watermarked Image picture on top left corner with pc-freak logo image Imagick composite

5. Put a watermark in the image center

$ composite -gravity center -dissolve 100 \
watermark_picture.png image-to-watermark.png \
output-watermarked-image.png

position watermark on the picture middle (center) composite output picture

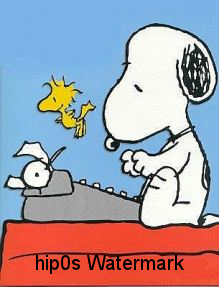
6. Sealing image with custom text / Text Watermarking a picture

a) Writting text watermark to an image centered in "footer"

$ convert image-to-watermark.png -pointsize 20 \
-draw "gravity south fill black text 0,12 \
'hip0s Watermark'" output-watermarked-image.jpg

This will place a watermark in position 0,12, meaning the text will be added in the bottom center of the watermarked image.

Watermarking a picture sealing with custom text image imagick composite pic

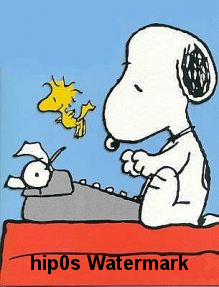
-pointsize 20 defines the text font size. hip0s Watermark is the actual text that will be stamped.

b) Writting image watermark with font type customization (Arial Tahoma etc.):

To list all available fonts ready to be used by convert, type:

$ convert -list font
$ convert -list font |grep -i arial
Font: Arial-Black-Regular
family: Arial Black
glyphs: /usr/share/fonts/truetype/msttcorefonts/Arial_Black.ttf
Font: Arial-Bold
family: Arial
glyphs: /usr/share/fonts/truetype/msttcorefonts/Arial_Bold.ttf
Font: Arial-Bold-Italic
family: Arial
glyphs: /usr/share/fonts/truetype/msttcorefonts/arialbi.ttf
Font: Arial-Italic
family: Arial
glyphs: /usr/share/fonts/truetype/msttcorefonts/ariali.ttf
Font: Arial-Regular
family: Arial
glyphs: /usr/share/fonts/truetype/msttcorefonts/Arial.ttf

$ convert -list type
Bilevel
ColorSeparation
ColorSeparationMatte
Grayscale
GrayscaleMatte
Optimize
Palette
PaletteBilevelMatte
PaletteMatte
TrueColorMatte
TrueColor

On my system, I have 392 of fonts installed, to check the number of installed fonts ready for use by convert I used:

$ convert -list font|grep -i 'font:'|wc -l
392

To only check exact fonts names usable in convert:

$ convert -list font|grep -i 'font:'

To use the red marked Arial-Regular for font of the text picture timestamp issue;

$ convert watermark_picture.jpg -font Arial-Regular \
-pointsize 20 -draw "gravity south fill black text 0,12 'hip0s Watermark'" \
output-watermarked-image.jpg

Watermark and with Arial-Regular font image magick convert screenshot dog type writter

c) Using external font with convert to place image text watermark

Lets say you would like to use an external font (arhangai.ttf) not listed in convert -font list usable fonts:

$ convert image-to-watermark.png -pointsize 20 \
-font /usr/share/fonts/truetype/arhangai/arhangai.ttf \
-draw "gravity south fill black text 0,12 \
'hip0s Watermark'" output-watermarked-image_7.png

Talking about fonts, if you would like to add some external, nice free-fonts (ttf) files to your current logged in user, exec:

hipo@noah:~$ cd ~/fonts
hipo@noah:/fonts$ for i in \
$(lynx -dump http://www.webpagepublicity.com/free-fonts.html|grep -i .ttf|grep -i http|awk '{ print $2 }'); \
do wget -r -l2 -nd -Nc $i;
done

This will add 85 new nice looking fonts. Putting fonts in .fonts/ directory, are red while fonts are looked up by applications installed on respective the server or desktop GNU / Linux systems. Any font put there is ready to be used across all ImageMagick command line tools, as well as will be added across the list of possible fonts to use in GIMP and the rest of gui editors installed on the system.

According to the (watermark) texts font size passed to convert on some pictures the text written will exceed the picture dimensions and only partially some of the text intended as watermark will be visible.
If you encounter the exceed picture text problem, take few minutes and play with fonts sizes until you have a good font size to fit the approximate dimensions of the (expected minimum / maximum – horizontal and vertical) stamped picture dimensions.

For the sake of clarity, here is a list with arguments used in above, composite and convert examples.
 

  • composite — The ImageMagick command that combines two images.
  • -dissolve 80 — The number after the option determines the brightness of the watermark.  100 is full strength.
  • -gravity southeast — Determines the placement of watermark.
    Possible options are; north, west, south, east, northwest, northeast, southeast, southwest, center
  • watermark_picture.png — The watermark image is the first argument.
  • image-to-watermark.jpg — The second argument is the original image to be watermarked.
  • output-watermarked-image.jpg — The third argument is the new composite image to be created.
    N. B. !  If you don't specify a new file, be careful, the original file will be overwritten.

As ImageMagick is cross platform graphic editting suit – it runs on both *nix (Linux,BSD) and Windows. I have tested it on Linux, only but on FreeBSD and other BSDs it should work without any problem.
The composite and convert above examples should be easily rewritten to run on achieve watarmarking on MS Windows too.

7. Watermarking multiple pictures in a directory

To watermark multiple pictures within a directory use, a short bash loop in combination with either convert or composite could be used:

$ cd your-directory/
$ for i in *; do
convert $i -pointsize 20 -draw "gravity south fill black text 0,12 'hip0s Watermark'" output-watermarked-image.jpg
done

convert and composite also support wildcards like '*.JPG, *.PNG', but I'm not sure if this syntax can be used for mass picture marking?

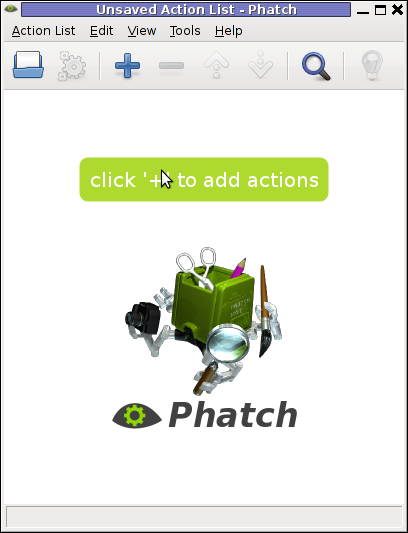
8. Adding watermark and doing other various advanced Image Edit, Convert and Compose stuff with Phatch GUI program

Another program that is capable to put watermarks on pictures and besides that doing a number of routine graphic manipulation operations achievable with expert Image manipulation programs like GIMP / Inkscape is PHATCH = PHOTO & BATCH

Phatch is swiss army knife for doing web design or or graphics design on Linux.

Phatch is really great and easy to use program. Tt makes putting basic designer effects on pictures with no requirement for any design skills.
With Phatch you can become a designer for a day literally 😉

If you haven't used it yet, make sure you try it!
Below, are two screenshots of Phatch running on my Debian G* / Linux

Phatch Linux Debian Squeeze Screenshot

Phatch Linux Debian Squeeze Screenshot Watermark effect

Phatch is installable via apt on Debian and Ubuntu Linux. It has also a phatch-cli tools, which are a possible substitute to ImageMagick's composite / convert tools.

On deb based distros install Phatch with:

noah:~# apt-get --yes install phatch phatch-cli

In Phatch it is also possible, to create a combination of filters to be later applied to an image file or a group of image files all in a directory. The program capabilities are really outstanding, it is pure joy to work with it.

Using Phatch GUI interface is hard to comprehend in the beginning, I needed few minutes until I can get the idea how to use it. Anyhow once you know the basics, its very easy to use onwards.

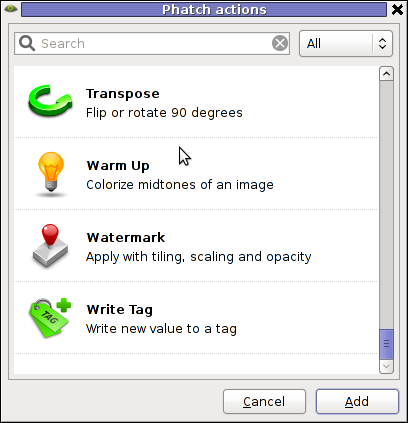
Phatch currently can perform the following actions:
 

  • Auto Contrast – Maximize image contrast
  • Border – Crop or add border to all sides
  • Brightness – Adjust brightness from black to white
  • Canvas – Crop the image or enlarge canvas without resizing the image
  • Colorize – Colorize grayscale image
  • Common – Copies the most common pixel value
  • Contrast – Adjust from grey to black & white
  • Convert Mode – Convert the color mode of an image (grayscale, RGB, RGBA or CMYK)
  • Effect – Blur, Sharpen, Emboss, Smooth, ..
  • Equalize – Equalize the image histogram
  • Fit – Downsize and crop image with fixed ratio
  • Grayscale – Fade all colours to gray
  • Invert – Invert the colors of the image (negative)
  • Maximum – Copies the maximum pixel value
  • Median – Copies the median pixel value
  • Minimum – Copies the minimum pixel value
  • Offset – Offset by distance and wrap around
  • Posterize – Reduce the number of bits of colour channel
  • Rank – Copies the rank'th pixel value
  • Rotate – Rotate with random angle
  • Round – Round or crossed corners with variable radius and corners
  • Saturation – Adjust saturation from grayscale to high
  • Save – Save an image with variable compression in different types
  • Scale – Scale an image with different resample filters.
  • Shadow – Drop a blurred shadow under a photo with variable position, blur and color
  • Solarize – Invert all pixel values above threshold
  • Text – Write text at a given position
  • Transpose – Flip or rotate an image by 90 degrees
  • Watermark – Apply a watermark image with variable placement (offset, scaling, tiling) and opacity

Most of the function / effects Phatch in the up list works fine as I tested them to get to know the program.
The only effect that didn't worked for me is Blender effect.
Trying to apply the Blending effect I got error:

Can not apply action Blender:
'dict' object has no attribute 'rfind'

dict object has not attribiture rfind error screenshot my linux

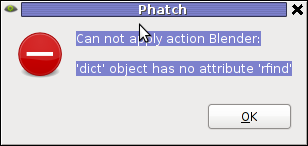
Its really a pity blender filter don't work. I've seen on Phatch's website some pictures showing the blender effect in action and it looks really awesome.

In attempt to work around the err, I tried downloading Phatch's latest release and running it with python interpreter but it didn't work out …
I tried also to install some packages to the system that somehow seemed to be related to blenderversatile 3D modeller/renderer program but this worked neither.
I suspect Phatch blender effect is not working on Ubuntu too as I've red complains in some Ubuntu forums.
If someone succeeding making blend effect work please let me know how?

Interesting feature of Phatch is the program support for applying its predefined filters using a cli interface.
The syntax for phatch cli, should be something like:

phatch -console action_list.phatch

Where action_list.phatch is a Phatch predefined filter. Anyways I didn't manage to figure out how to use the program CLI. I'll be glad to hear if someone succeeded in using the program console, if so please share with me how?

9. Adding Watermark to pictures with GIMP

To add a watermark text or picture in GIMP, there are plenty of ways but is more time consuming by both Phatch or convert, composite..
There is a script in gimp plugin registry site – watermark.scm which adds watermarking capability to GIMP

On my system this script was installed with the deb package gimp-data-extras. To apply the plugin on a pic, I used GIMP menus:

Filters -> Eg -> Copyright Placer

GIMP Copyright Holder plugin Watermark Screenshot

If someone knows about better or quicker ways to do watermarking, please share 🙂
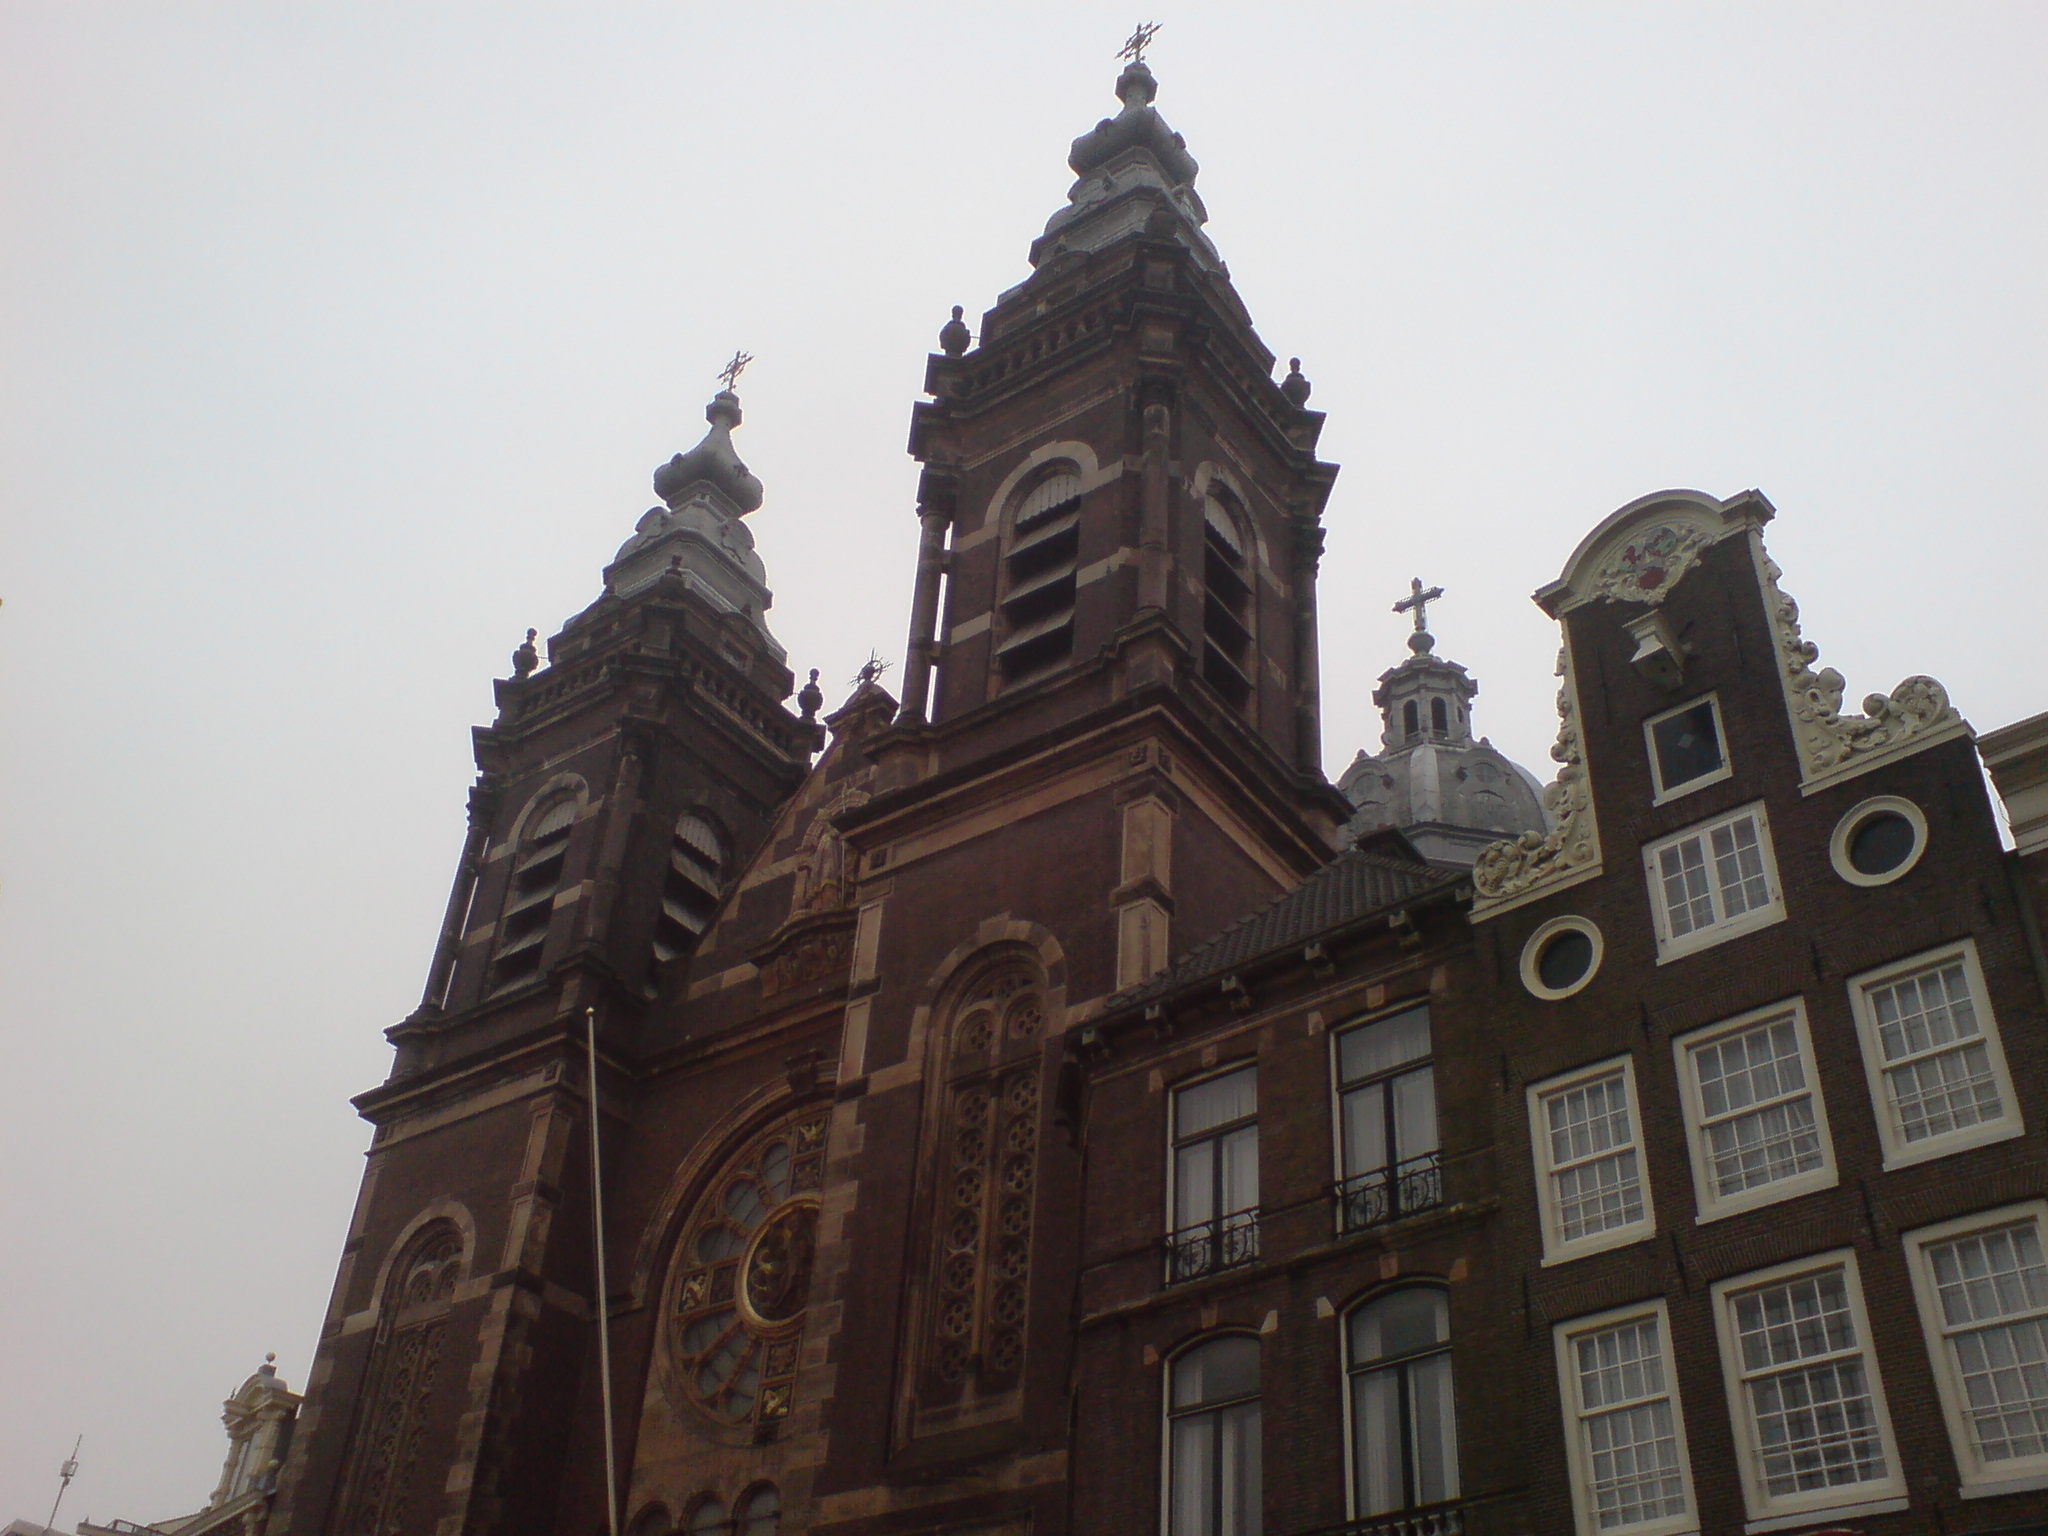