Posts Tagged ‘case’

ipw3945 on kernel 2.6.30

Friday, September 4th, 2009

I’ve loosed big time trying to compile ipw3945 on my debian amd64 system running kernel 2.6.30, unfortunately at the endI couldn’t make ipw3945 run correctly. However I’ll try to explain just in case if somebody out there succeeds in running the ipw3945 driver on kernel 2.6.30. First I needed to compile the ieee80211-1.2.18 subsystem correctly. That gave me a hard time cause the damned thing won’t compile on my kernel version. I’ve googled about the solution and had to combine a couple of solutions before I succeed compiling.Here is what was required
1. First in ieee80211.module.c change proc_net for init_net.proc_net.
2. Next change in ieee80211_crypt_wep.c and ieee80211_crypt_tkip.c .page for .page_link
3. Next download ieee80211_wx.c-2.6.27.patch.txt
4. Patch ieee80211-1.2.18 e.g. in my case: # cd /usr/src/ieee80211-1.2.18; patch -p0 < ieee80211_wx.c-2.6.27.patch.txt
5. Overwrite the file ieee80211_crypt_tkip.c in /usr/src/ieee80211-1.2.18 with the following ieee80211_crypt_tkip.c file.
6. Now with God’s help you might try: # make && make install

Now let’s proceed to the compilation of the ipw3945 driver itself.

I’ve used the the ipw3945-1.2.2 driver from the Intel Pro/Wireless 3945ABG Driver Website .In kernels newer than 2.6.22 on 64 bit architectures in order to make the driver compile, you have to apply the fix-for-64-bits-2.6.22-onwards.patch patch.
Now enter the ipw3945-1.2.2 source directory and execute patch -p0 < fix-for-64-bits-2.6.22-onwards.patch ,hopefully it should patch correctly.I had to also use the ipw3945-1.2.2.patch patch.
Again patch it with: # patch -p0 < ipw3945-1.2.2.patch.

Next in order to compile it I had to execute: # make IEEE80211_INC=/usr/src/ieee80211-1.2.18 IEEE80211_IGNORE_DUPLICATE=y && make install.Next I have downloaded the ipw3945d-1.7.22 . Untarred the archive file
# tar -zxvf ipw3945d-1.7.22.tgz and last but not least:
# cp -rpf x86_64/ipw3945d /etc/init.d/The ipw3945 loaded correctly with modprobe ipw3945, however the wireless device wasn’t detected … Even though the failure to make the ipw3945 driver running what I did gave me hope that eventually if I invest some more time and efforts attempting to make it work I could eventually succeed and enjoy the benefits of a better wireless networks signal strengths. Until that happens I’ll hold up to the newer iwl3945 to use my wireless.END—–

How to deb upgrade PHP 5.3.3-7 / MySQL Server 5.1 to PHP 5.4.37 MySQL 5.5 Server on Debian 6.0 / 7.0 Squeeze / Wheezy GNU / Linux

Thursday, February 12th, 2015

how-to-deb-upgrade-mysql-server-5.1-to-mysql-5.5-php-5.3-to-php-5.4-5.5-upgrade-howto-on-old-stable-debian-squeeze-wheezy

I've been still running Debian Squeeze 6.0 GNU / Linux on few of the Linux / Apache / MySQL servers I'm administrating and those servers are running few Wordperss / Joomla websites which lately face severe MySQL performance issues. I tried to optimize using various mysql performance optimization scripts such as mysql-tuner.pl, Tuning-primer.sh and Percona Toolkit – a collection of advanced command-line tools for system administrators and tech / support staff to perform a variety of MySQL and system tasks that are too difficult or complex to perform manually. Though with above tools and some my.cnf tunizations I managed to achieve positive performance improvement results with above optimizations, still I didn't like how MyQSL served queries and since the SQL server is already about 5 years old (running version 5.1) and the PHP on sever is still at 5.3 branch, I was advised by my dear colleague Anatoliy to try version update as a mean to improve SQLserver performance. I took seriously the suggestion to try upgrade as a mean to resolve performance issues in this article I will explain in short what I had to do to make MySQL upgrade a success

Of course to try keep deb installed software versions as fresh as possible possible deb packagse, I'm already using Debian Back Ports (for those who hear it a first time Debian Backports is a special repository for Stable versioned Debian Desktop and Servers  – supporting stable releases of Debian Linux) which allows you to keep install packages versions less outdated (than default installable software which usually are way behind latest stable package versions with 2-5 years).

If you happen to administer Stable Debian servers and you never used BackPorts I warmly recommend it as it often includes security patches of packages part of Debian stable releases that reached End Of Support (EOS) and already too old even for security updates to be issued by respective Debian Long Term Suport (LTS) repositories.

If you're like me and still in situation to manage remotely Debian 6.0 Squeeze and its the first time you hear about BackPorts and Debian LTShttps://wiki.debian.org/LTS/ to start using those two add to your /etc/apt/sources.list below 3 lines

Open with vim editor and press shift+G to go to last line of file and then press I to enter INSERT mode, once you're done to save, press (ESC) then press : and type x! in short key combination for exit and save setting in vim is 
 

Esc + :x! 


debian-server:~# vim /etc/apt/sources.list
deb http://http.debian.net/debian squeeze-lts main contrib non-free
deb-src http://http.debian.net/debian squeeze-lts main contrib non-free
deb http://http.debian.net/debian-backports squeeze-backports main

If you haven't been added a security updates line in /etc/apt/sources.list make sure you add also:


deb http://security.debian.org/ squeeze/updates main contrib non-free
deb-src http://security.debian.org/ squeeze/updates main contrib non-free


Then to apply latest security updates and packages from LTS / Backports repository run the usual:


debian-server:~# apt-get update && apt-get –yes upgrade
….

If you need to search a package or install something from just added backports repository use:


debian-server:~# apt-cache -t squeeze-backports search "mysql-server"
auth2db – Powerful and eye-candy IDS logger, log viewer and alert generator
torrentflux – web based, feature-rich BitTorrent download manager
cacti – Frontend to rrdtool for monitoring systems and services
mysql-server-5.1 – MySQL database server binaries and system database setup
mysql-server-core-5.1 – MySQL database server binaries
mysql-server – MySQL database server (metapackage depending on the latest version)


To install specific packages only with all their dependencies from Backports while keeping rest of packages from Debian Stable:


debian-server:~# apt-get install -t squeeze-backports "package_name"

In same way you can also search or install specific packages from LTS repo:


debian-server:~# apt-get search -t squeeze-lts "package_name"

debian-server:~# apt-get install -t squeeze-lts "package_name"

Latest mysql available from Debian BackPorts and LTS is still quite old 5.1.73-1+deb6u1 therefore I made an extensive research online on how can I easily update MySQL 5.1 to MySQL 5.5 / 5.6 on Debian Stable Linux.
 

Luckily there were already DotDeb deb repositories for Debian LAMP (Linux / Apache  / MySQL / PHP / Nginx ) running servers prepared in order to keep the essential Webserver services up2date even long after distro official support is over. I learned about existence of this repo thanks to a Ryan Tate's post who updates his LAMP stack on TurnKey Linux which by the way is based on slightly modified official stable Debian Linux releases packages

To start using DotDeb repos add in /etc/apt/sources.list (depending whereh you're on Squeeze or Wheeze Debian):


deb http://packages.dotdeb.org squeeze all
deb-src http://packages.dotdeb.org squeeze all

or for Debian Wheezy add repos:


deb http://packages.dotdeb.org wheezy all
deb-src http://packages.dotdeb.org wheezy all


I was updating my DebianLatest MySQL / PHP / Apache release to Latest ones on (6.0.4) Squeeze so added above squeeze repos:

Before refreshing list of package repositories, to authenticate repos issue:


debian-server:~# wget -q http://www.dotdeb.org/dotdeb.gpg
debian-server:~# apt-key add dotdeb.gpg

Once again to update my packages from newly added DodDeb repository


debian-server:~# apt-get update

Before running the SQL upgrade to insure myself, I dumped all databases with:


debian-server:~# mysqldump -u root -p -A > /root/dump.sql

Finally I was brave enough to run apt-get dist-upgrade to update with latest LAMP packages


debian-server:~# apt-get dist-upgrade
Reading package lists… Done
Building dependency tree
Reading state information… Done
Calculating upgrade… Done
The following packages will be REMOVED:
  mysql-client-5.1 mysql-server mysql-server-5.1
The following NEW packages will be installed:
  libaio1 libmysqlclient18 mysql-client-5.5 mysql-client-core-5.5 python-chardet python-debian
The following packages will be upgraded:
  curl krb5-multidev libapache2-mod-php5 libc-bin libc-dev-bin libc6 libc6-dev libc6-i386 libcurl3 libcurl3-gnutls libcurl4-openssl-dev libevent-1.4-2
  libgssapi-krb5-2 libgssrpc4 libjasper1 libk5crypto3 libkadm5clnt-mit7 libkadm5srv-mit7 libkdb5-4 libkrb5-3 libkrb5-dev libkrb53 libkrb5support0 libmysqlclient-dev
  libxml2 libxml2-dev locales mysql-client mysql-common ntp ntpdate php-pear php5 php5-cgi php5-cli php5-common php5-curl php5-dev php5-gd php5-imagick php5-mcrypt
  php5-mysql php5-odbc php5-recode php5-sybase php5-xmlrpc php5-xsl python-reportbug reportbug unzip

50 upgraded, 6 newly installed, 3 to remove and 0 not upgraded.
Need to get 51.7 MB of archives.
After this operation, 1,926 kB of additional disk space will be used.
Do you want to continue [Y/n]? Y

As you see from above output above command updates Apache webservers / PHP and PHP related modules, however it doesn't update MySQL installed version, to update also MySQL server 5.1 to MySQL server 5.5


debian-server:~#  apt-get install –yes mysql-server mysql-server-5.5

You will be prompted with the usual Debian ncurses text blue interface to set a root password to mysql server, just set it the same as it used to be on old upgraded MySQL 5.1 server.

Well now see whether mysql has properly restarted with ps auxwwf


debian-server:~#  ps axuwwf|grep -i sql
root     22971  0.0  0.0 112360   884 pts/11   S+   15:50   0:00  |                   \_ grep -i sql
root     19436  0.0  0.0 115464  1556 pts/1    S    12:53   0:00 /bin/sh /usr/bin/mysqld_safe
mysql    19837  4.0  2.3 728192 194552 pts/1   Sl   12:53   7:12  \_ /usr/sbin/mysqld –basedir=/usr –datadir=/var/lib/mysql –plugin-dir=/usr/lib/mysql/plugin –user=mysql –pid-file=/var/run/mysqld/mysqld.pid –socket=/var/run/mysqld/mysqld.sock –port=3306
root     19838  0.0  0.0 110112   700 pts/1    S    12:53   0:00  \_ logger -t mysqld -p daemon.error

In my case it was running, however if it fails to run try to debug what is going wrong on initialization by manually executing init script /etc/init.d/mysql stop; /etc/init.d/mysql start and look for errors. You can also manually try to run mysqld_safe from console if it is not running run:


debian-server:~# /usr/bin/mysqld_safe &

This should give you a good hint on why it is failing to run
 

One more thing left is to check whether php modules load correctly to do so issue:


debian-server:~# php -v
Failed loading /usr/lib/php5/20090626/xcache.so:  /usr/lib/php5/20090626/xcache.so: cannot open shared object file: No such file or directory

Failed loading /usr/lib/php5/20090626/xdebug.so:  /usr/lib/php5/20090626/xdebug.so: cannot open shared object file: No such file or directory


You will likely get an exception (error) like above.
To solve the error, reinstall xcache and xcache-debug debs


debian-server:~# apt-get purge php5-xcache php5-xdebug

Now PHP + MySQL + Apache environment should be running much smootly.
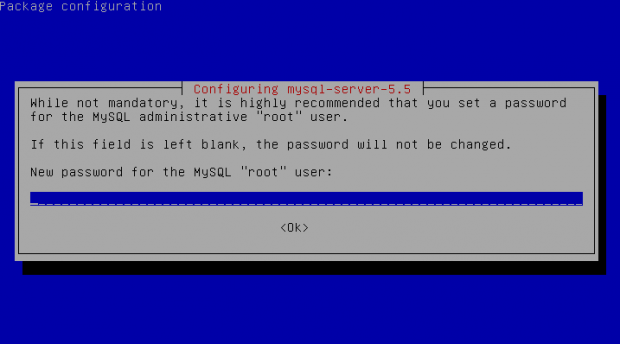
debian-squeeze-wheeze-update-install-mysql-sevver5.55-620x344-howto

Upgrading the MySQL server / PHP library to MySQL server 5.6 / PHP 5.5 on Wheeze Linux is done in very much analogous ways all you have to do is change the repositories with above wheeze 7.0 ones and to follow the process as described in this article. I haven't tested update on Wheezy yet, so if you happen to try my article with wheezy reports and got a positive upgrade result please drop a comment.

mod_rewrite redirect rule 80 to 443 on Apache webserver

Wednesday, April 2nd, 2014

A classic sysadmin scenario is to configure new Apache webserver with requirement to have an SSL ceriticate installed and working on port 443 and all requests coming on port 80 to be redirected to https://.
On Apache this is done with simple mod_rewrite rule:

RewriteEngine On
RewriteCond %{HTTPS} off
RewriteRule (.*) https://%{HTTP_HOST}%{REQUEST_URI}

Before applying the rule don't forget to have Apache mod_rewrite enabled usually it is not enabled on default most Linux distributions by default.
On shared hostings if you don't have access to directly modify Apache configuration but have .htaccess enabled you can add above rules also to .htaccess

Add this to respective VirtualHost configuration and restart Apache and that's it. If after configuring it for some reason it is not working debug mod_rewrite issues by enabling mod_rewrite's rewrite.log

Other useful Apache mod_rewrite redirect rule is redirect a single landing page from HTTP to HTTP

RewriteEngine On
RewriteRule ^apache-redirect-http-to-https.html$ https://www.site-url.com/apache-redirect-http-to-https.html [R=301,L]

!Note! that in case where performance is a key requirement for a website it might be better to use the standard way to redirect HTTP to HTTPS protocol in Apache through:

ServerName www.site-url.com Redirect / https://www.site-url.com/

To learn more on mod_rewrite redirecting  check out this official documentation on Apache's official site.

How to promptly interrupt Windows shutdown in case of shutdown, restart mistake

Thursday, April 17th, 2014

windows-shutting-down-by-mistake-interrupt-howto-shot
Its really annoying, when some Anti-Virus software or application updates itself and requires a Windows restart. It is even more annoying when you have 50 windows opened and suddenly they start closing one by one. In such cases it is precious to know there is way to Cancel Windows Shutdown using command line:

Just press Windows (button) + R: type in;


shutdown /a

and press enter.

That's it a quick cmd prompt will flash through the screen and Windows will stop shutdowning 🙂 Enjoy

Restart hung Mac OS application – How to kill programs in Mac OS – alternative of Windows CTRL + ALT + DEL

Friday, May 23rd, 2014

mac-kill-hung-application-killing-freezed-application-on-mac-osx
If you happen to have the rare case of having a hung MAC OS X application and you're coming from a Linux / Windows background you will be certainly wonderhing how to kill Mac OS X hung application.
In Mac OS the 3 golden buttons to kill crashed application are:


COMMAND + OPTION + ESCAPE

Command + Option + Escape

while pressed simultaneously is the Mac Computer equivalent of Windows CTRL + ALT + DEL

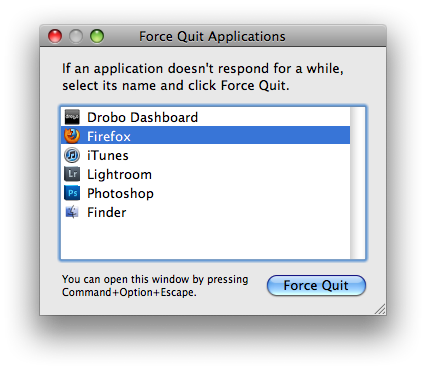
mac-os-force-kill-hung-application-force-program-exit-mac-OSX

Holding together COMMAND  + OPTION + ESCAPE on MAC OS brings up the Force Quit Window showing and letting you choose between the list of open applications. To close freezed MAC application, choose it and Press the Force Quit Button this will kill immediately that application.  

To directly end application without invoking the choose Force Quit Window menu, to force a hanging app quit right click on its icon in Dock (CTRL + Click) and choose "Force Quit” from context menu.

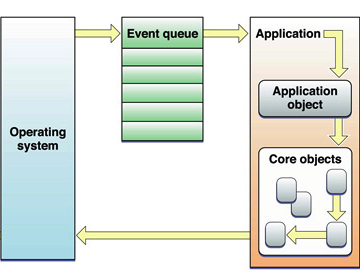
A little bit more on why applications hung in MAC OS. Each application in MAC OS has its event queue. Event queue is created on initial application launch, event queue is buffer that accepts input from system (could be user input from kbd or mouse, messages passed from other programs etc.). Program is hanging when system detects queued events are not being used.

macOSX-EventQueue-reason-for-application-hung-in-macs
Other reasons for Mac OS hanging program is whether you're attaching detaching new hardware peripherals (i.e. problems caused by improper mount / unmounts), same hang issues are often observed on BSD and Linux. Sometimes just re-connecting (mouse, external hdd etc.) resolves it.
Program hungs due to buggy software are much rarer in Macs just like in IPhones and Ipads due to fact mac applications are very well tested until published in appstore.

Issues with program hungs in Mac sometimes happen after "sleep mode" during "system wake" function – closing, opening macbook. If a crashed program is of critical importance and you don't want to "Force Quit" with COMMAND + OPTION + ESC. Try send PC to sleep mode for a minute or 2 by pressing together OPTION + COMMAND + EJECT.

An alternative approach to solve hanging app issue is to Force-quit Finder and Dock to try that, launch Terminal

And type there:

# killall Dock

Other useful to know Mac OS keyboard combination is COMMAND + OPTION + POWERHold together Command and Option and after a while press Power – This is a shortcut to instruct your Mac PC to reboot.

Migrate VMWare Linux Virtual Machine to Virtualbox – Convert VMware .VMX to .OVF (Open Virtual Format)

Monday, June 2nd, 2014

migrate_vmware-virtual-machine-toto-virtualbox-vmx-to-ovf-migration

VMWare Virtual Machines are usually stored in OVA Format  which is bundle of OVF(Open Virtualization Format) and in multiple *.VMDK files.
Though other Virtual Machines are supposed to also support these "open virtualization format", different VM vendors implement and support it differently, therefore though in theory VirtualBox and QEMU are said to support OVA Format. Attempts to import such usually will fail. In this little article I will explain how VMWare stored (exported) VirtualMachine machine can be succesfully imported to VirtualBox.
 

1. Locate where is Virtualbox .vmx files from Window search or via dir command

I'm a console guy, so I prefer looking for VMWare's .vmx from command line:
 

C:\Users\GGEORGI7> cd c:\ C:\> dir /s *.vmx


Volume in drive C is PC COE
Volume Serial Number is XXXX-XXXX

Directory of C:\Users\ggeorgi7\Documents\Virtual Machines\Debian 7

06/02/14 11:06 AM 2,687 Debian 7.vmx
05/28/14 15:44 PM 370 Debian 7.vmxf
2 File(s) 3,057 bytes


2. Switch to wherever the VMWare virtualmachine .vmx file is located


C:\> cd \Users\ggeorgi7\Documents\Virtual Machines\Debian 7
 

N.B. !Make sure the VMWare Virtualmachine is Shutdown (if it is Suspended converted file will not be properly implemented inside VirtualBox!). Whether the migrated virtualhost is suspended, launch VMWare, restore its state and Shut it down properly before starting migration with ovftool.
 

3. Remove Vmware-tools, Reset Display settings and Input D (before exporting to OVF) in VMWare

a) Remove vmware-tools

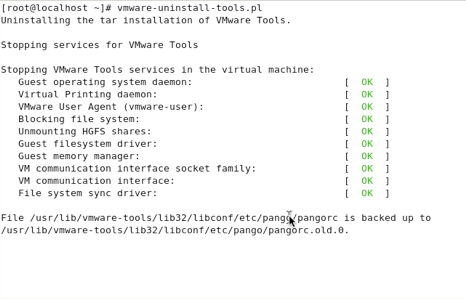
Vmware-tools kernel modules and stuff compiled specific for VMWare are no longer needed and might pose issues, thus it is always a good idea if previously installed in VMWare to wipe them out with cmd:

vmware-uninstall-tools.pl

uninstall-vmware-tools-linux-screenshot-migrating-vmware-to-virtualbox
b) Reset Display Device and Input Devices

Inside VMWare virtual machine Linux host, before shutting it down run:

mv /etc/X11/xorg.conf /etc/X11/xorg.conf.vmware

c) Remove Incomptable devices

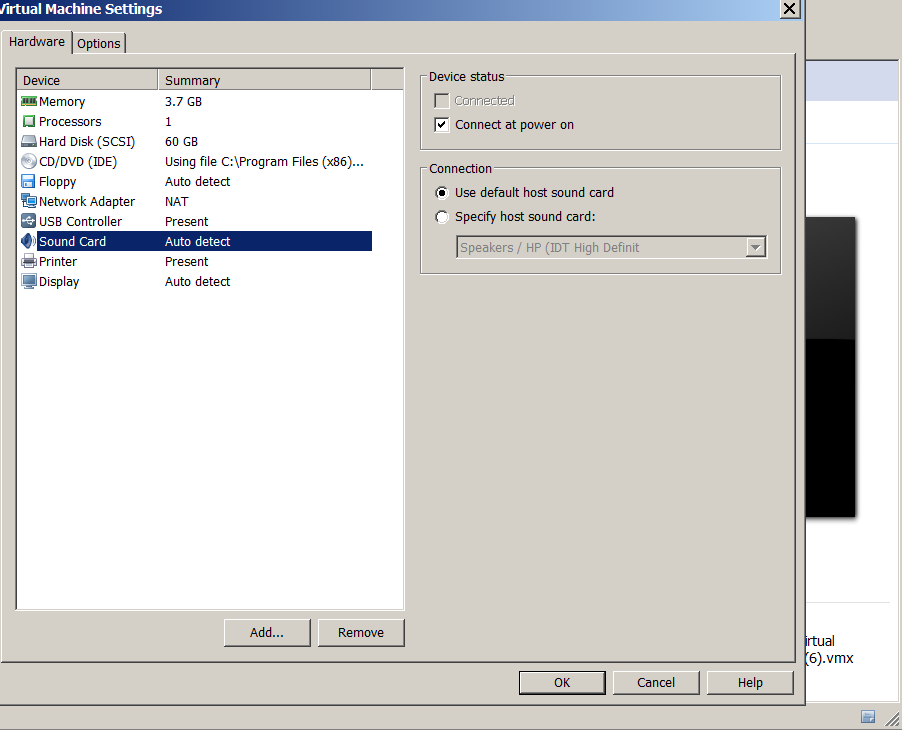
To prevent issues with sound – its necessary to remove VMWare device created for soundcard, in order to let VirtualBox create its soundcard device on 1st boot after migration. To do so click on Virtual Machine and from context menu click Settings then in  Hardware tab select Sound Card and Remove:
 

Settings -> Hardware -> Sound Card (Click Remove)

vmware-migration-remove-soundcard-to-make-work-sound-work-in-virtualbox


4. Make a Clone (Backup) of Virtual Machine

Its always a good idea to create backup of VMWare VM to be migrated just in case something goes wrong during migration, so you have a way to step back to the already working one. Once files are copied it might be a good idea to use use some archiver like PeaZip or 7-Zip to save some disk space.
 

mkdir SomeFolder
copy Path_To_Virtual_Machine Folder_for_Backup_Virtual_Machine


In my case this was


mkdir \Temp\VMWare-machine-backup
C:\>copy "C:\Users\ggeorgi7\Documents\Virtual Machines\Debian 7"\ c:\Temp\VM
ware-machine-backup

Restoring later VMWare VirtualMachines in case of some failure is done by simply copying backuped files to VMWare Working Directory folder

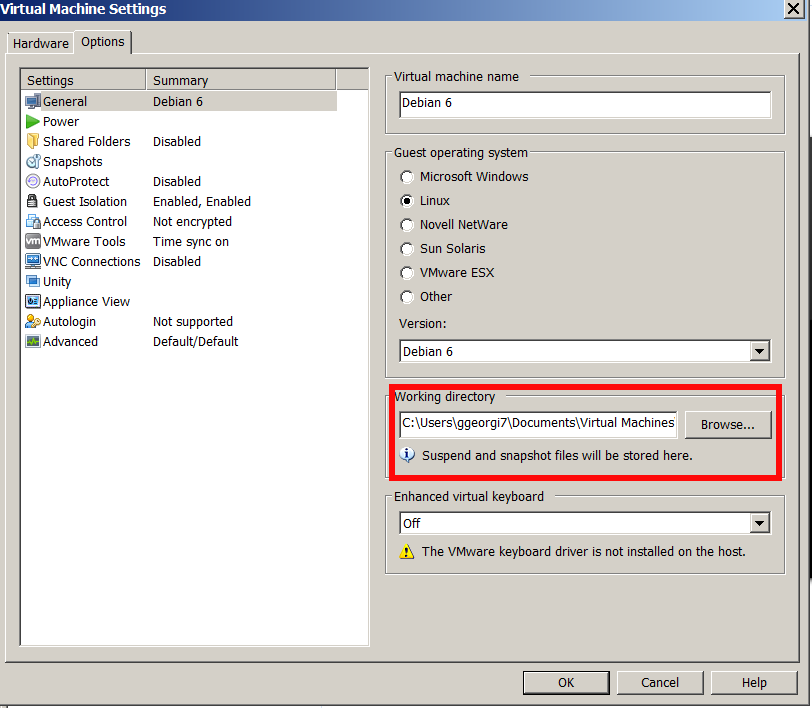
In case if Wondering

Where is stored VMWare Virtual Machines?


Check in:
 

VM -> Settings -> Options


vmware-working-directory-folder-where-are-stored-vmware-virtualmachines

5. Use VMWare ovftool.exe to convert .VMX to Open Virtualization Format (.OVF)


Though export from .VMX to .OVF it can be also done from VMWare GUI from:
 

File -> Export to OVF

Anyways I think it is better to do it via OVFTool console tool:

The most common location for  VMWare Workstation is:
 

C:\Program Files (x86)\Vmware\Vmware Workstation\OVFTool


For VMware Player it is:

C:\Program Files (x86)\Vmware\Vmware Player\OVFTool

Very important thing to mention here is you have to be cautious, Never to run together VMWare and VirtualBox.
!! Before proceeding to next OVTool .vmx to .ovf migration Shutdown the VirtualMachine and as a best practice close VMware completely.

cd Location-directory-ofOVFTool
ovftool.exe Path-folder-to_VMVM_file.vmx Path-folder_to_VM_exportVM_file_export.ovf

C:\> cd "\Program Files (x86)\VMware\VMware Workstation"\OVFTool
C:\Program Files (x86)\VMware\VMware Workstation\OVFTool>ovftool.exe "\Users\ggeorgi7\Documents\Virtual Machines\Debian 7\Debian 7.vmx" C:\Users\ggeorg i7\vmware-debian-export.ovf


vmware-ovftool-convert-vmware-linux-virtual-machine-to-virtualbox


Convertion will take about 30 minutes on a normal computer hardware lets say (Dual Core PC 2Ghz with 4 Gb of RAM).
If you get a “failed to open disk” error during convertion, its likely that the virtual machine is still running or wasn’t shut down properly – boot the virtual machine and perform a shut down.

6. Launch VirtualBox, Install Guest Additions to enable Copy / Paste and USB support in Virtual Machine

After the process completes, you can boot the virtual machine. If you haven't earlier uninstalled vmware-tools  uninstall VMware Tools, and install VirtualBox’s Guest Additions (in order to allow Copy / Paste between VirtualBox and guess OS).
 

7. Launch VirtualBox and Import exported .OVF

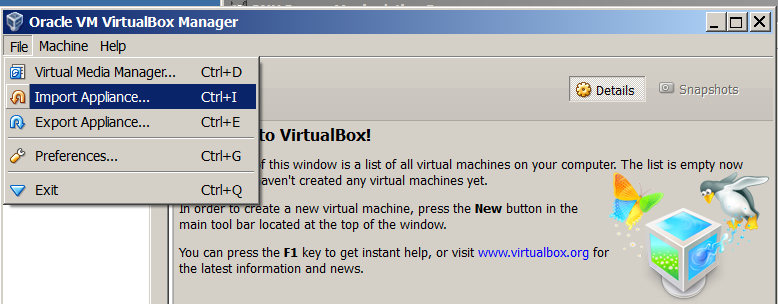
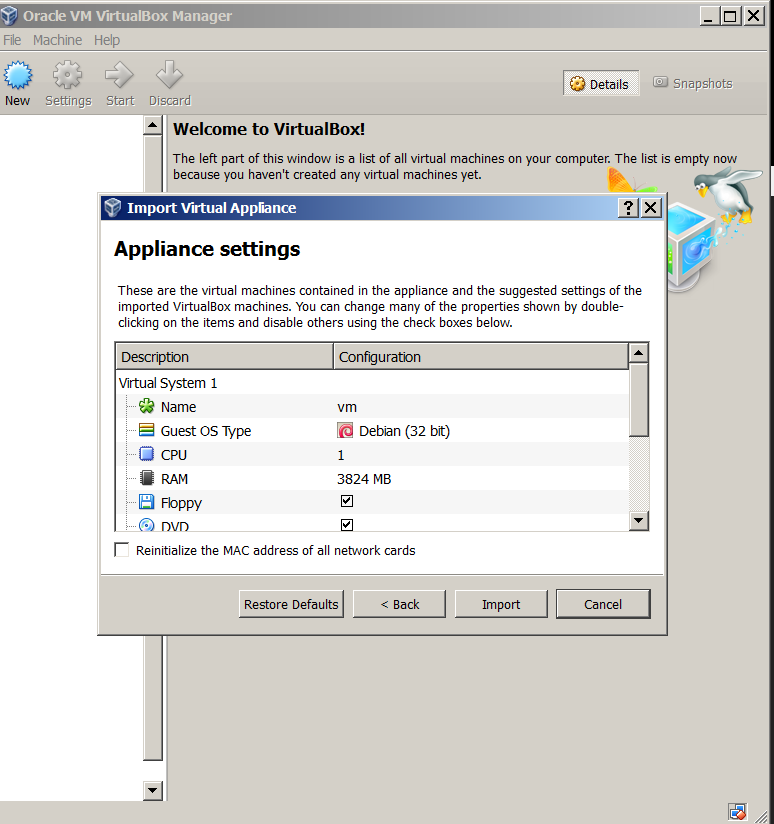
Once Virtual Machine is exported, to import it into VirtualBox, launch VirtualBox and choose:
 

File -> Import Appliance


virtualbox-import-vmware-old-virtual-machine-to-new-linux import vmware appliance

virtualbox-import-vmware-previously-installed-virtual-machine-linux import appliance virtualbox
 

Creating multi-part zip archives in Linux with 7zip command to transfer large zip files data in parts

Monday, December 1st, 2014

creating-multi-part-zip-archives-in-Linux-debian-ubuntu-fedora-centos-rhel-with-7z-command-to-transfer-large-files-data-in-parts
Recently, I've blogged on how to move large files from source to destination server in parts on a slow / restricted networks or whenever the media is limtied in size. This is not a common scenario but it happens so if you're admin sooner or later you will need that. I give example with UNIX's split and unrar. However strip's file naming can get you insane (in case if you don't want to use cstrip command – split a file into sections determined by context lines instead) plus normal split Linux / *nix command doesn't support compression and encryption. On the other side on many Company internal Networks with Windows server hosts running – Winblows (2003, 2008, 1012) for security purposes it might be that WinRar is not installed, thus you might need to transfer the file parted between the GNU / Linux server and Windows server in standard OS supported by Windows ZIP format. Assuming that you have root (admin) access to the Linux host you can then archive your file in parts using ZIP encryption algorithm with 7zip.

1. Installing 7zip on CentOS / Fedora / RHEL and other Redhat based Linuces

If the Linux server is running:
Fedora / CentOS  / RHEL and you don't have 7zip installed yet install it with:

yum -y install p7zip

According to distros version  it might be the name could be a bit different if p7zip is different to find the one you need search with:

yum search p7zip

and install whatever you need
 

2. Installing 7zip on Debian / Ubuntu and other Debian based servers

apt-get install –yes p7zip-full

Depending on Deb based distro just like with fedora if p7zip-full pack is not installable, check 7zip's package distro version:

apt-cache search p7zip


3. Archiving ZIP file in multiple (sized) parts on GNU / Linux

7z a -v512m Large-file-separated-in-multi-parts.zip Large-Many-Gigabytes-File.SQL

This would output multiple files:

Large-file-separated-in-multi-parts.zip.001, Large-file-separated-in-multi-parts.zip.002, Large-file-separated-in-multi-parts.zip.003, Large-file-separated-in-multi-parts.004 etc.

If you want to add security to the transferred file to protect newly created ZIP archive with password use following command:

7z a -v512m Large-file-separated-in-multi-parts.zip Large-Many-Gigabytes-File.SQL


7-Zip [64] 9.20  Copyright (c) 1999-2010 Igor Pavlov  2010-11-18
p7zip Version 9.20 (locale=bg_BG.UTF-8,Utf16=on,HugeFiles=on,2 CPUs)
Scanning

Creating archive Large-file-separated-in-multi-parts.zip


Enter password (will not be echoed) :

Once you have transferred all the many parts via (SSH/ FTPS or not preferrably HTTP / HTTPS / FTP) place them in the same folder and use Windows standard ZIP to unarchive.

If the archived 7zip files are to be unarchived on another Linux host (in case if multi part zip transfer is between Linux -> Linux hosts) to unarchive, parted files:

7z x Large-file-separated-in-multi-parts.zip.*

Curious: Old ladies from Plovdiv, Bulgaria are knitting mobile and computer equipment hand made cases

Monday, November 11th, 2013

new business idea manual hand crafted knitted mobile device cases

While reading one of my daily tech news websites today I stimbled on very unusual news and a business idea, worthy to re-blog 😉 The idea of the new Innovative business is just genious and simple as that – knitted digital equipment cases. There are plenty of old ladies in Bulgaria who are used to knitting sweaters, hats and all kind of hand made winter clothes. Knitting was among the must have skills for ladies in Bulgaria until some years time even my grandmother when a bit younger used to knit in most of her free time. Thus most of grandmothers in Bulgaria still when get old and have a lot of free time, kill their time with the craft they learned as young. For the young European people who probably never heard of it knitting is unique kind of manufacture for producing winter clothes from yarn.

yarn in different colors the base material for knitting

Knitting was a top ladies craft before the boom of industrial manufacture before 19th century industrial revolution, nowadays its almost a forgotten craft. Now some genious people in Bulgaria decided to give work to this old ladies and pay them for knitting computer and mobile equipment cases (cases for Tablets, Smartphones, Notebooks etc.) Knitting of mobile equipment cases opens new work places and introduces new way for old people to earn some extra income, such extra income is absolutely necessary in Bulgaria nowdays as most old ladies receive ridiculous pension of 120 to 150 EUR per month (money insufficient to pay expensive winter heating bills and so expensive food that is nowdays in Bulgaria).

lady knitting a sweater or some kind of clothe

The company who invented this new business and introduced it for the masses is Snug Essentials and is started by enthusiastic young people who had grandmothers practicing the old craft. The innovative product is distributed via Etsy Global Platform for distributing hand crafted goods as well as in   Facebook, Twitter and Ebay. As of time of writting the companyis extremely small 6 old grandmas work on producing the knitted cases for digital equipment but the tendency is this to rise soon, as there are plenty of people who love the hand made cases.
The price of a case is also not too high, it costs only around 10$ per knitted case. Here are few nice knitted cases produced by grandmas 🙂

notebook laptop in knitted hand made case

Your girlfriend will love it if you gift her one of these 🙂

knitted notebook case original business idea


Use rsync to copy from files from destination host to source host (rsync reverse copy) / few words on rsync

Monday, January 9th, 2012

I've recently had to set up a backup system to synchronize backup archive files between two remote servers and as I do usually with this situation I just set up a crontab job to periodically execute rsync to copy data from source server to the destination server . Copying SRC to DEST is the default behaviour rsync uses, however in this case I had to copy from the destination server to the source server host (in other words sync files the reversely.

The usual way to copy with rsync via SSH (from SRC to DEST) is using a cmd line like:

debian:~$ /usr/bin/rsync -avz -e ssh backup-user@xxx.xxx.xxx.xxx:/home/backup-user/my-directory .

Where the xxx.xxx.xxx.xxx is my remote server IP with which files are synched.
According to rsync manual, the proposed docs SYNOPSIS is in the format;
Local: rsync [OPTION…] SRC… [DEST

Obviusly the default way to use rsync is to copy source to destination which I used until now, but in this case I had to the other way around and copy files from a destination host to the source server. It was logical that swapping the SRC and DEST would complete my required task. Anyways I consulted with some rsync gurus in irc.freenode.net , just to make sure it is proper to just swap the SRC, DEST arguments.
I was told this is possible, so I swapped args;

debian:~$ /usr/bin/rsync -avz -e ssh . backup-user@xxx.xxx.xxx.xxx:/home/backup-user/my-directory
...

Surprisingly this worked 😉 Anyways I was adviced by by a good guy nick named scheel , that putting -e ssh to command line is generally unnecessery except if there is no some uncommon used SSH port over which the data is transferred. An example case in which -e 'ssh is necessery would be if transferring via lets say SSH port 1234;

rsync -avz -e 'ssh -p1234' /source user@host:/dest

In all other cases omitting '-e ssh' is better as '-e ssh' is rsync default. Therefore my final swapped line I put in cron to copy from a destinatio to source host with rsync looked like so:

05 03 2 * * /usr/bin/ionice -c 3 /usr/bin/rsync -avz my-directory backup-user@xxx.xxx.xxx.xxx:/home/backup-user/ >/dev/null 2>&1
 

How to configure pine (alpine) console client to work with vpopmail pop3 and imap protocol

Monday, June 13th, 2011

I needed to check my mail via ssh connection, as my installed squirrelmail is curently broken and I’m away from my own personal computer.

I did some online research on how this can be achieved and thanksfully I finallyfound a way to check my pop3 and imap mailbox with a console client called alpine , better known in unix community under the name pine .

I installed pine on my Debian with apt:


debian:~# apt-get install alpine

Here is my pine configuration file .pinerc used to fetch my mail with pine:

a .pinerc conf file to check my pop3 mail

To use that file I placed it in my home directory ~/ , e.g.:


debian:~# wget https://www.pc-freak.net/files/.pinerc
...

To attune the pop3 server configuration in the sample .pinerc above one needs to change the value of:


inbox-path=

For example to configure pine to fetch mail from the pop3 server mail.www.pc-freak.net and store it locally in my home directory within a file called INBOX
I have configured the inbox-path .pinerc variable to look like so:


inbox-path={mail.www.pc-freak.net/pop3/user=hipo@www.pc-freak.net}INBOX

In above configuration’s inbox-path variable configuration the /pop3/ specifies I want to fetch my mail via the pop3 protocol , if one wants to use imap this has to be substituted with /imap/

The value user=hipo@www.pc-freak.net specifies my vpopmail created user which in my case is obviously hipo@www.pc-freak.net

The other variables which are good to be changed in .pinerc config are:


personal-name=

This variable has to be set to the name of the Email Sender which will be set, if pine is used to send email.

I also changed the user-domain variable as it’s used to set the domain name from which the pine client will send the emails from:

As my domain is www.pc-freak.net I’ve set the domain name variable to be:


user-domain=www.pc-freak.net

Now after launching pine it prompted me for my email password, putting in the pass did fetch all my new unread mails via pop3 protocol.

The only annoying thing was that each time I quit pine and start it up again, I’m now asked to enter the email password.

This behaviour is really shitty, but thanksfully one can easily workaround that by letting pine be constantly running detached in gni screen session.