I have noticed that many blogs nowdays offer an email subscription box to simplify the subscription procedure for the blog readers.
My blog was lacking this feature so I took the time to find out how can I add an e-mail subscription box field on my blog. My research has shown me that the easiest way to add the subscription box is by using Google’s Feedburner RSS service . I’ve been using Google FeedBurner for quite some time and I’ve already 27 subscriptions with it. Earlier when I added a FeedBurner subsciption to my blog I’ve blogged about it, so if you’re not acquainted on how to add FeedBurner service to your blog, you might want to read my previous article Adding RSS Feed to WordPress in conjunction with FeedBurner / WordPress add-to-any-subscribe plugin
In this article I will explain in short step by step, how to add the subscrpition email box to your wordpress I assume, that the reader has already enabled and configured registration with Feedburner, if you still haven’t just skip few lines above and check my previous article. I would hereby skip the explanation of why feedburner as an RSS is so advantageous for every blog owner and readers and skip further to the email subscription procedure step by step instructions: Step 1: Login to your FeedBurner Account
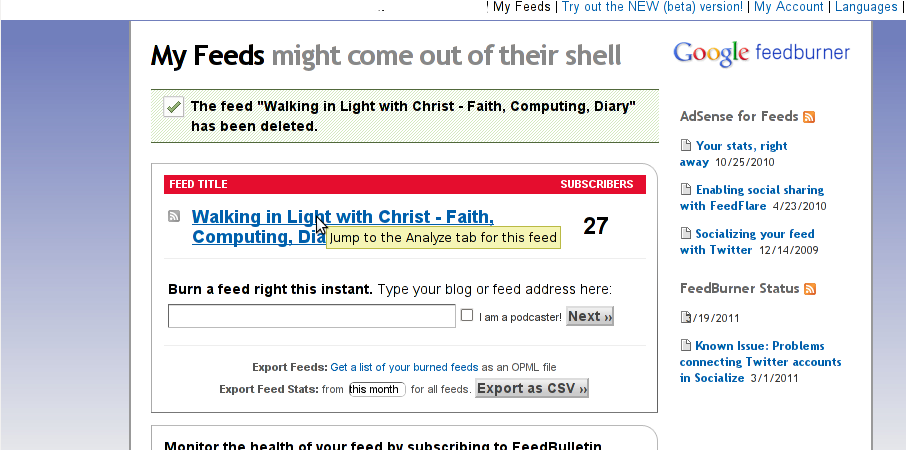
In my case my feedburner account url is accessed via the URL http://feeds.feedburner.com/WalkingInLightWithChrist-FaithComputingDiary
I have been properly logged in to my feedburner, so to view statistics of my current feeds subscription and to configure various variables of feedburner I had to access the URL address: http://feedburner.google.com/fb/a/myfeeds, a very quick shortcut to my feedburner account settings is also avaialable by simply accessing the URL: http://feedburner.com
Step 2: Click on the link that saysMy Feeds
If you have configured feeds for your feedburner you will get the list of feedburner feeds, (one could have multiple feeds, let’s say if you have a couple of blogs or sites and you use one feedburner account to podcast your feeds for each of the separated blogs or sites.
Step 3: Click over the feed you want to have the feedburner email subscription box
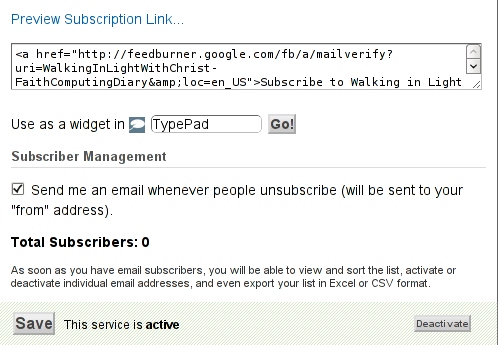
Below you see the screenshot of my configured feedburner feed:
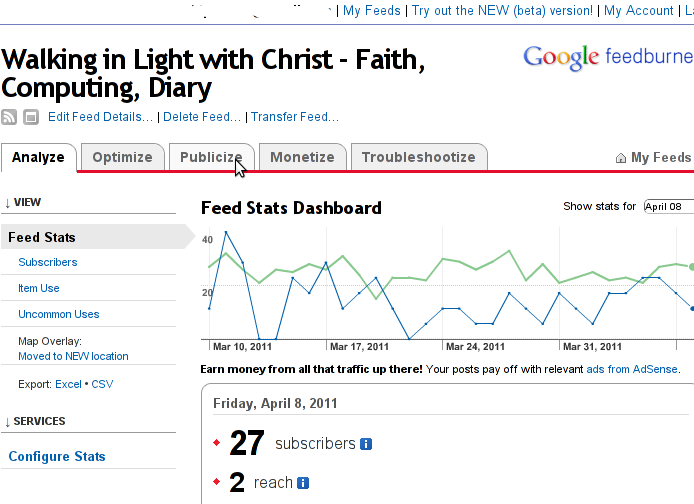
Right after clicking on your configured feed in my case Walking in Light With Christ – Faith, Computing, Diary you will see the screen:
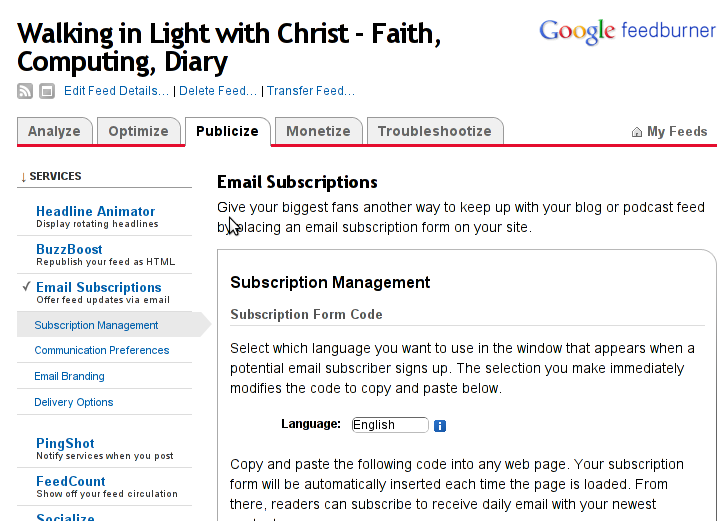
Step 4: Click on Publicize menu
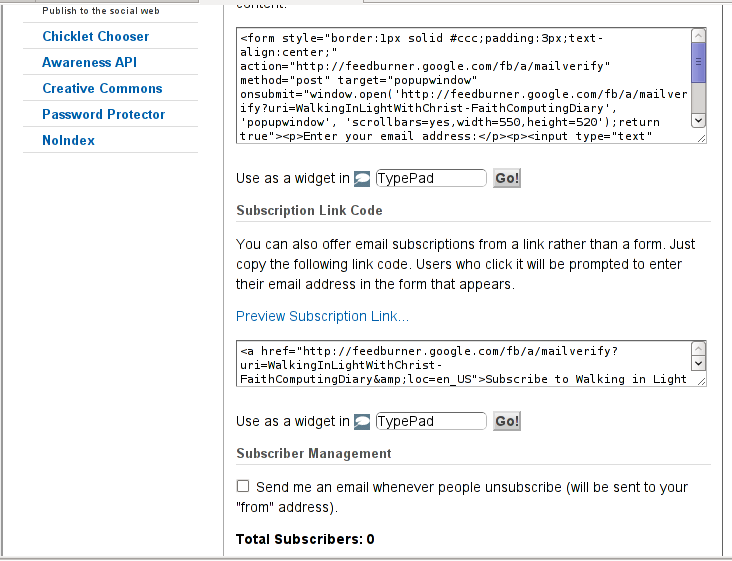
You will see the following two screens while scrolling with your browser:
You see in the second screenshot above there is a textbox with a html form code, to set the feedburner subscription to appear on your blog you need to copy/paste this code and put it on your blog.
After copy/pasting the code, don’t forget to scroll down in your browser and save the email subscription generated form settings, (NB! if you don’t save it it want be working even if you install it on your blog). Here is the Save button screenshot:
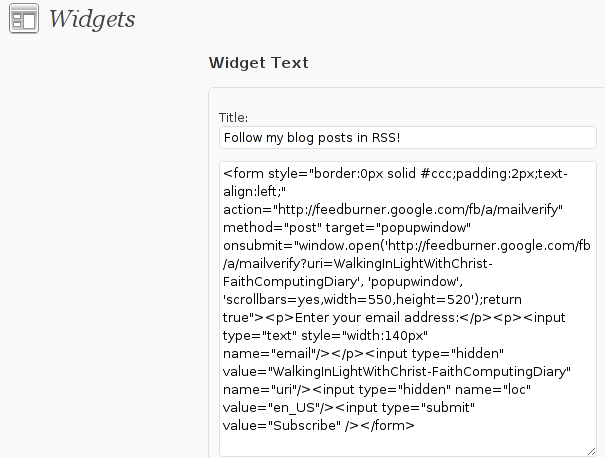
Step 5: Setting up feedburner email textbox to wordpress
In order to set up the just copied html and css form code you need to login to your wordpress blog admin and go to:
Appearance -> Widgets
Scroll over the Available Widgets list, find the Text Widget and press the Add button to include the Text Widget to your blog sidebar.
Further on the same Widgets page, go to the Sidebar menu find the just added Text Widget and click over the Edit link:
Here is my screenshot of the edit screen of the Text Widget:
Step 6. Add the feedburner email subscription box to single posts blog views
This step is not a requirement, but I found it for myself to be vital, as it might rise some more subscribers to my blog, if my blog readers finds individual indexed pages in Google.
This step is also highly dependant on the wordpress theme you use, I use the old wordpress default theme and it’s default behaviour is not to show up the wordpress sidebar, whether an individual wordpress post is clicked over, therefore to enable my feedburner subscription box for individual posts I also need to place the form code obtained from Feedburner.com’s to my templates single.php
If you’re using some kind of theme that doesn’t have the non-sidebar single post behaviour you might skip forward this step, otherwise just continue on reading.
To include the feedburner email form subscription to my single posts I edited blog/wp-content/themes/default/single.php
In the single.php file find the code:
<?php comments_template(); ?>
Immediately after the above code place your feedburner form code, like you see in below screenshot:
Step 7: Modify your form code css and javascript to make your feedburner more accustomed for your needs
Again this step is voluntary and is not necessery I’ve disliked the default way the form is formatted so I played a bit with few of it’s values to customize it to my likings, the things which I have changed a bit in the provided feedburner form code was:
Remove the Delivered by Feedburner text from the form
>To do so in the issued feedburner form code below when you copy the code paste it to some text editor and remove from the code the text:<p>Delivered by <a href=”http://feedburner.google.com” target=”_blank”>FeedBurner</a></p>
– Change the subsciption box width and height:
style=”width:140px”Changed that to:style=”width:120px”also I’ve changed:’scrollbars=yes,width=550,height=520’to:’scrollbars=yes,width=450,height=420’Another point of interest for adjustmnets in the feedburner for are in the form code:
Remove feedburner subscription form default bordering
form style=”border:1px solid #ccc;padding:3px;text-align:center;”I’ve changed that to:form style=”border:0px solid #ccc;padding:2px;text-align:center;”By changing the css values border:1px to border:0px I have instructed the subscription box to show up without borders.
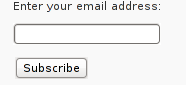
That’s all now refresh in your browser and check if the feedburner email subscription form is showing up properly to your wordpress. To completely ensure yourself it works correctly try to subscribe yourself to the form and during your next blog post you should receive an email notifying you about the newly written article.
You can see, my blog feedburner subscription form on the blog right sidebar or on the below picture:
My WordPress blog had an odd problem, all on the blog, worked just fine except the Widgets add new widget drag and drop functionality. As there was new version of wordpress available I tried updating but this fixed the missing drag and drop widget functionality neither, so finally after a bit of googling and experimentation to follow suggested fixes like using the enable Accessiblity Mode button on top Widgets.Thus the common suggested fix that worked for most of the people who stumbled upon this annoying wordpress bug was to simply nagivate to:
Appearance -> Widgets -> Screen Options -> Enable Accessibility Mode
As for me pressing over the Screen Options was impossible (nothing happened when I pressed over it), finally I’ve found a hack 😉
The hack is quite simple, all I had to do is just pass a variable ?widgets-access=on to the widget.php php script Therefore the fix to the problem was as follows http://blog.mysite.com/wp-admin/widgets.php?widgets-access=on
By the default wordpress does not have support for changing the exact font, therefore copying and pasting a text made in Open Office or MS Word often places in the Post or Page wp edit fonts different from the default one set for articles. Hence some articles after being published on a wordpress blog show up with improper font and the only way to fix that is to change the font first in Open Office and then copy back to wordpress instead of simply being able to change the font from within the wordpress article.
To get around this problem, there is a nice plugin fckeditor-for-wordpress-plugin which aids wordpress with an awesome Word like edit functionalities. , downhload location for FCKEdit for WordPress is here
Here is a screenshot of the extra nice functionality the FCKEditor for wordpress providces.
Installing the plugin is like installing any other wordpress plugin and comes easily to:
debian:/~# cd /var/www/blog/wp-content/plugins

debian:/plugins# wget http://downloads.wordpress.org/plugin/fckeditor-for-wordpress-plugin.3.3.1.zip

...

debian:/plugins# unzip fckeditor-for-wordpress-plugin.3.3.1.zip

...

debian:/plugins# cd fckeditor-for-wordpress-plugin/
And further enabling the plugin from:
Plugins -> Inactive -> (Dean's FCKEditor For WordPress) Enable
fckeditor for wordpress will replace the default wordpress editor TinyMCE straight after being enabled. I’ve done also a mirror of the current version as of time of writting of this article, one can download the fckeditor for wordpress mirrored here Now really file editting inside wordpress admin panel is way easier and convenient 😉 Cheers
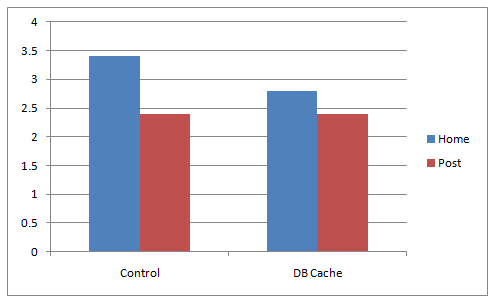
A combination of two wordpress caching plugins (Hyper Cache and Db Cachesignificantly improves the access times of a wordpress based blogs and websites.
Installing the two websites has drastically improved my blog opening times, so in my view having the two plugins on every wordpress install out there is a must! 🙂 The plugins installation is straight forward, here is how I installed them.
1. Installing Hyper Cache on WordPress
To install Hyper Cache all I had to do is download and enable the plugin, the plugin doesn’t require any configuration. I always love it when I don’t have to bother with reading configuration options and pondering for some 20 minutes on the plugin features, so in that perspective Hyper Cache in my view is a good alternative to WordPress Super Cache
Besides that WordPress Super Cache was having issues when enabled on few wordpress based websites I manage these days. For comparison Hyper Cache worked just great on all wordpress install I tried the plugin so far.
To install all I had to do is download the plugin unzip and enable it:
a. Download and unzip it
debian:/var/www/blog# wget http://downloads.wordpress.org/plugin/hyper-cache.zip

...

debian:/var/www/blog# cd wp-content/plugins

debian:/var/www/blog/wp-content/plugins# unzip hyper-cache.zip
b. Enable Hyper Cache plugin
To enable the plugin follow to standard plugin location;
Plugins -> Inactive -> Hyper Cache (Enable)
To enable the plugin follow to standard plugin location;
What Db Cache, does it does caching of last queries made to MySQL for specified time, so if the query has to be refetched again from wordpress’s php frontend the queries results are fetched straight for the memory. This decreases the load towards the MySQL server and increases the webpages loading time.
As the plugin page suggests it’s way faster than other html caching-plugins like WP-Cache or WP Super Cache
However, I think its still slower than using a combination of WP Super Cache’s alternativeHyper Cache and Db Cache . Combining this two could rise the webpage opening times according to some statisticonline at best cases up to 830% !! 😉 Let me proceed with how I did the install of Db Cache .
c. Make sure the permissions for Db Cache are correct
On Debian to enable Db Cache, the permissions should be changed for Apache to have a read/write permissions to plugin directory, on Debian to fix the permissions I used the commands:
On other GNU/Linux distributions the above commands (user and group) www-data:www-data, should be set to whatever user/group Apache is running with, on Slackware this would be nobody:nobody, on CentOS and RHEL it would be apache:apache.
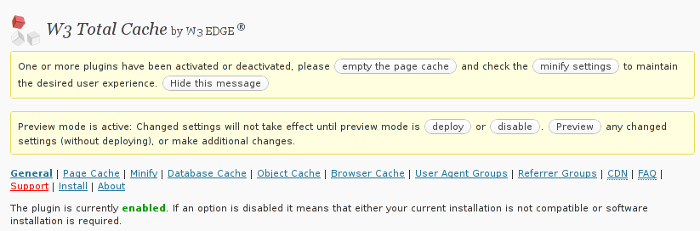
In my recent question of looking for best ways to optimize my wordpress blog, as well as other wordpress based websites, I’m managing I’ve come across a great plugin called W3 Total Cache or W3TC as it’s widely known among wordpress geeks.
The full caching wordpress solution in face of W3TC is already actively deployed among many major wordpress powered websites, to name a few: stevesouders.com, mattcutts.com, mashable.com
I gave a try W3 Total Cache and was amazed about the rich caching functionality it provides. Having the W3TC plugin installed adds a whole menu on the left wordpress admin panel reading Performance , clicking on it shows a menu with thorough choices on numerous things which deal with the running of wordpress on the server. Here is a screenshot on the menus W3 Total Cache provides:
The plugin has support for html caching, sql caching, CDN, CSS and Javascript compress & minify etc. To test the plugin adequately I disabled HyperCache and Db Cache . My observations is that with W3TC wordpress renders php and the overall user experience and download times in wordpress are better. Therefore I’ll probably use only W3 Total Cache as a cacher for wordpress installs. Besides that I had some issues on some wordpress based websites with the Db Cache SQL caching. On these websites after enabling Db Cache, suddenly page edditing of the created existing pages started returning empty pages. This could be due to the fact that these wordpress based websites was customly tailered and many code was wiped out, however it could also be a Db Cache bug. So to conclude W3TC is the perfect solution for wordpress caching 😉
WP-Minify – does combine all JS and CSS script into one consolidated compressed script or style as well removes any duplicate script resources and hence could have positive impact on performance
HeadJS Loader – does strips out all your old javascript declarations and puts them into one head.js file so that they are loaded in parallel in the head of the pages and through that prevents the blocking of load up until all JS is a loaded so commonly seen these days on the net for more info on how HeadJS works check out http://headjs.com
Script Gzip – merges and compresses the CSS and JS links on page, the plugin does not have caching functionality. The plugin doesn’t have much configuration options which I find as a good thing
To find out what works best for you its a best practice if the website speed load time is tested after loading each of the plugins and with all of them enabled and configured, finally for best results just leave only the plugins or a combination of them which gives the lowest page responce times.
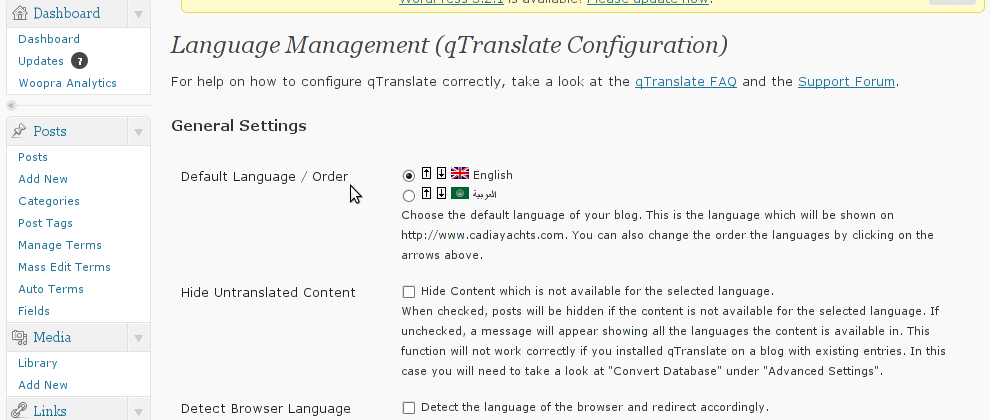
Lately, I have to deal with some wordpress based installs in big part of my working time. One of the wordpress sites needed to have added a multi language support.
My first research in Google pointed me to WPML Multilingual CMSThe WordPress Multilingual Plugin WPML Multilingual CMS looks nice and easy to use but unfortunately its paid, the company couldn’t afford to pay for the plugin so I looked forward online for a free alternative and stumbled upon QTranslate
QTranslate is free and very easy to install. Its installed the wordpress classic way and the installation went smoothly, e.g.:
After activating the plugin, there is a Settings button from which qTranslate‘s various plugin parameteres can be tuned.
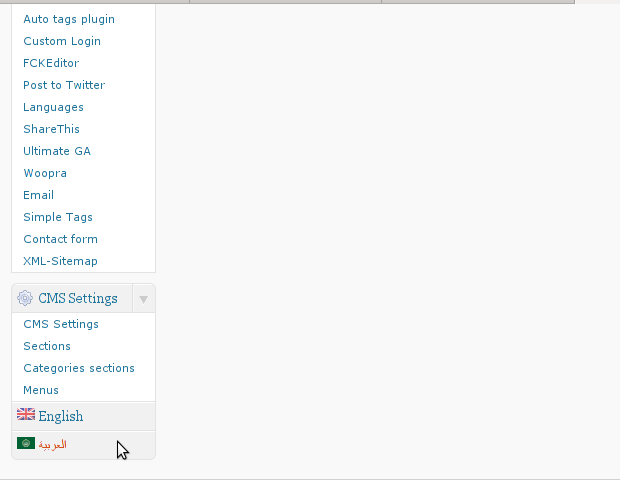
In my case my site had to support both English and Arabic, so from the settings I added support for Arabic translation to the wordpress install.
Adding Arabic is done in the following way:
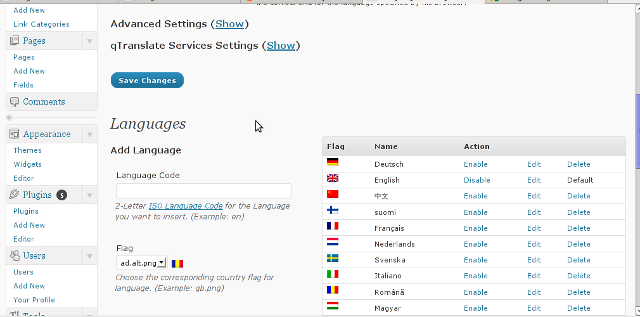
a. From the Language Management (qTranslate Configuration) from the Languages menu and the Languages (Add Languages) I had to choose a language code (in my case a language code of ar – for Arabic). Next I had to choose the Arabic flag from the follow up flag list.
In next text box Name , again I had to fill Arabic, for Locale en_US.UTF-8 The following Date Format and Time Format text boxes are optional so I left them blank. To complete the process of adding the Arabic as a new language wordpress should support I pressed the Add Language button and the Arabic got added as a second language.
Afterwards the Arabic was added as second language, on the bottom of the left wordpress menu pane a button allowing a switch between English, Arabic appeared (see below screenshot):
Finally to make Arabic appear as a second language of choice on the website I added it as a Widget in the Widgets menu from the AWidgets menu:
Appearance -> Widgets
In widgets I added qTranslate Language Chooser to the Sidebar without putting any kind of Title for qtranslate widget . I found it most helpful to choose the Text and Image as an option on how to display the Language switching in the wp.
Since some time, I don’t know exactly where, after some updates of my WordPress running on a small server with FreeBSD 7.2. I’ve started getting a lot of Apache crashes. Often the wordpress scripts stopped working completely and I got only empty pages when trying to process the wordpress blog in a browser.
After a bunch of reading online, I’ve figured out that the cause might be PHP APC stands for Alternative PHP Cache .
I was not sure if the PHP running on the server had an APC configured at all so I used a phpinfo(); script to figure out if I had it loaded. I saw the APC among the loaded to show off in the list of loaded php modules, so this further led me to the idea the APC could be really causing the unexpected troubles.
Thus first I decided to disable the APC on a Virtualhost level for the domain where the crashing wordpress was hosted, to do I placed in the VirtualHost section in the Apache configuration /usr/local/etc/apache2/httpd.conf the following config directive:
php_flag apc.cache_by_default Off
These get me rid of the multiple errors:
PHP Warning: require_once() [function.require-once]: Unable to allocate memory for pool. in /usr/local/www/data-dist/blog/wp-content/plugins/tweet-old-post/top-admin.php on line 6
which constantly were re-occuring in php_error.log:
Further after evaluating all the websites hosted on the server and making sure none of which was really depending on APC , I’ve disabled the APC completely for PHP. To do so I issued:
echo 'apc.enabled = 0' >> /usr/local/etc/php.ini
Similarly on GNU/Linux to disable globally APC from PHP only the correct location to php.ini should be provided on Debian this is /etc/php5/apache2/php.ini .
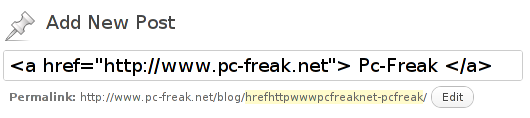
I needed to link a new created WordPress Post to external web page address. So when one clicks over the created post he opens an external website.
I’ve googled around to see how this can be achieved and found ordpress external links plugin I gave a go of the plugin, but pitily I couldn’t make it work. I decided to try some other methods and after some time I tried another approach. I used the HTML >a href=””< My Post Title </a> as a title and it appeared this simple method prooved working 😉
Here is a small screenshot, from wordpress Add New Post dialog
By the way the information online I’ve found on how this the external link creation for a Page or a Post is made was quite obscure and messy. i wonder why there is no clear explanation on the direct a href link creation, especially since WordPress is a de-facto standard for a blogging platform and nowdays powers up so many websites engines around the world.
I've recently decided to add Comment as OpenID functionality to my wordpress blog. The reasons to do that is that I myself have today created an OpenID account. Already million of people have OpenID account without even knowing. Most major search engines and social websites like Google, Yahoo, Live Journal, Hyves, Blogger, Flicker, MySpace automatically creates an OpenID account for newly registered users. It is up to the user to check with each of the aforementioned providers what is the URL of their OpenID account.
Even though OpenID popularity is steadly rising, I'm sure there are still plenty of users who did not heard, used or noticed OpenID yet.
So What the heck is OpenID? For all those who still haven't heard about it, OpenID is a universal web site login system With just one "unified" OpenID account the user can login to multiple websites with no need to create multiple accounts across each and every different website on the internet. The only requirement for the user to be able to use OpenID is that the website in question to have (support) for OpenID credential and the user to have existing OpenID account.
Therefore using one single OpenID you can sign in as a certain user to multiple websites on the internet with no need for annoying registration process to each and every new website you encounter. Another benefit OpenID gives to the user is that you don't have to memorize or keep notes of a tens or thousands of different login accounts across the many different websites on the net. Using OpenID also saves the user from troubles with forgotten password or username as just one OpenID login is used to login you everywhere.
For WordPress blogging platform the Russian Igor Korolev, has written a wordpress plugin – comments-to-wordpress . This plugin adds support for OpenID authentication in WordPress comments.
Here is how to OpenID to WordPress:
1. Download the comments-with-wordpress plugin and unzipAs of writting of this article latest comments-to-wordpress plugin is ver. 1.4. Download the plugin to blog path directory lets say, /var/www/blog/wp-content/plugins/ and unzip:
Next the plugin has to be Enabled, just like any other wordpress plugin via admin menus:
Plugins -> Inactive -> Comments with OpenID (enable)
Once the plugin is enaabled it is necessery to add some code with a text editor in file /var/www/blog/wp-content/themes/default/comments.php
Small noet to make here: If you're not using the default WordPress theme (like I do), you will have to edit the /themes/your-theme-name/comments.php instead.
Save the comments.php file and you Identification for new comments with OpenID will appear in your wordpress Comments form.
The OpenID plugin will add a number of service OpenIDs to choose between like you can see in my blog's plugin section or the screenshot below:
The URL https://www.google.com/accounts/o8/id is just a sample and showed because I clicked on the Google icon. If you have a Google profile you can check the exact ID and use it as URL there. Simply if your browser is logged in Gmail and you have Google profile. OpenID should work. As you can see the plugin supports a number of services which already support OpenID auth, the list of services can be easily extended by adding minor changes in …/plugins/comments-with-openid/comments-with-openid.php
There is also another wordpress plugin with the openid name – http://wordpress.org/extend/plugins/openid/
Downloading and enabling the other openid plugin also adds support for OpenID login in your http://your-url.com/wp-admin/ login page.
Installing the OpenID plugin is needed especially if you're a blogger blogging on 5 or 10 different topic oriented blogs, once downloading and installing the OpenID plugin will allow you to login across the blog ring without loosing time or bothering to remember different passwords across all the blogs. Here is a screenshot of the /wp-admin wordpress login page with the OpenID wp plugin enabled:
As of time of writting according to http://openid.net/get-an-openid/what-is-openid/'s website there are over 50000 major websites on the net already accepting OpenID login. Of course as every technlogy OpenID is not perfect and along with its convenience in some cases it could impose security hole. OpenID opponents claim under some circumstances OpenID is prone to forgery, XSS (cross site scripting) and XSFR attacks. Everyone who is about to use OpenID should be also aware of the great security risk it impose if one OpenID account gets stolen through sniffing, this could mean multiple websites can be accesses with the one single OpenID by the malicious user and a lot of confidential data owned by the user can be revealed or deleted … With this said I think OpenID is not a recommended login technology for Windows users, as windows is famous for being vulnerable to so many Viruses and Spyware/Malware etc.. With non-free software OSes like MS Windows, the user never cannot for sure if the system is infected, hence using OpenID to transfer credentials over the internet or store an OpenID SSL/(TLS) certificate to identify in websites is TOO DANGEROUS! Hope this article was helpful. Cya


How to add OpenID functionality to WordPress Comments / What is OpenID?
Tuesday, February 14th, 2012I've recently decided to add Comment as OpenID functionality to my wordpress blog. The reasons to do that is that I myself have today created an OpenID account. Already million of people have OpenID account without even knowing. Most major search engines and social websites like Google, Yahoo, Live Journal, Hyves, Blogger, Flicker, MySpace automatically creates an OpenID account for newly registered users.
It is up to the user to check with each of the aforementioned providers what is the URL of their OpenID account.
Even though OpenID popularity is steadly rising, I'm sure there are still plenty of users who did not heard, used or noticed OpenID yet.
So What the heck is OpenID?
For all those who still haven't heard about it, OpenID is a universal web site login system With just one "unified" OpenID account the user can login to multiple websites with no need to create multiple accounts across each and every different website on the internet.
The only requirement for the user to be able to use OpenID is that the website in question to have (support) for OpenID credential and the user to have existing OpenID account.
Therefore using one single OpenID you can sign in as a certain user to multiple websites on the internet with no need for annoying registration process to each and every new website you encounter. Another benefit OpenID gives to the user is that you don't have to memorize or keep notes of a tens or thousands of different login accounts across the many different websites on the net.
Using OpenID also saves the user from troubles with forgotten password or username as just one OpenID login is used to login you everywhere.
For WordPress blogging platform the Russian Igor Korolev, has written a wordpress plugin – comments-to-wordpress . This plugin adds support for OpenID authentication in WordPress comments.
Here is how to OpenID to WordPress:
1. Download the comments-with-wordpress plugin and unzipAs of writting of this article latest comments-to-wordpress plugin is ver. 1.4.
Download the plugin to blog path directory lets say, /var/www/blog/wp-content/plugins/ and unzip:
# cd /var/www/blog/wp-content/plugins

# wget http://downloads.wordpress.org/plugin/comments-with-openid.zip

...

# unzip comments-with-openid.zip

...
I've also done a mirror for download of comments-with-openid 1.4 here
2. Enable Comments with OpenID wp plugin
Next the plugin has to be Enabled, just like any other wordpress plugin via admin menus:
Plugins -> Inactive -> Comments with OpenID (enable)
Once the plugin is enaabled it is necessery to add some code with a text editor in file /var/www/blog/wp-content/themes/default/comments.php
Small noet to make here: If you're not using the default WordPress theme (like I do), you will have to edit the /themes/your-theme-name/comments.php instead.
Inside the file look for the form input fields:
<p> <input type="text" name="author" ....

...

<p> <input type="text" name="email" id="email" ....

...

<p> <input type="text" name="url" id="url" ....

...
Before the html tags code:
Paste the following code:
<?php comments_with_openid(); ?>
Save the comments.php file and you Identification for new comments with OpenID will appear in your wordpress Comments form.
The OpenID plugin will add a number of service OpenIDs to choose between like you can see in my blog's plugin section or the screenshot below:
The URL https://www.google.com/accounts/o8/id is just a sample and showed because I clicked on the Google icon. If you have a Google profile you can check the exact ID and use it as URL there. Simply if your browser is logged in Gmail and you have Google profile. OpenID should work. As you can see the plugin supports a number of services which already support OpenID auth, the list of services can be easily extended by adding minor changes in …/plugins/comments-with-openid/comments-with-openid.php
There is also another wordpress plugin with the openid name – http://wordpress.org/extend/plugins/openid/
Downloading and enabling the other openid plugin also adds support for OpenID login in your http://your-url.com/wp-admin/ login page.
Installing the OpenID plugin is needed especially if you're a blogger blogging on 5 or 10 different topic oriented blogs, once downloading and installing the OpenID plugin will allow you to login across the blog ring without loosing time or bothering to remember different passwords across all the blogs. Here is a screenshot of the /wp-admin wordpress login page with the OpenID wp plugin enabled:
As of time of writting according to http://openid.net/get-an-openid/what-is-openid/'s website there are over 50000 major websites on the net already accepting OpenID login.
Of course as every technlogy OpenID is not perfect and along with its convenience in some cases it could impose security hole. OpenID opponents claim under some circumstances OpenID is prone to forgery, XSS (cross site scripting) and XSFR attacks. Everyone who is about to use OpenID should be also aware of the great security risk it impose if one OpenID account gets stolen through sniffing, this could mean multiple websites can be accesses with the one single OpenID by the malicious user and a lot of confidential data owned by the user can be revealed or deleted …
With this said I think OpenID is not a recommended login technology for Windows users, as windows is famous for being vulnerable to so many Viruses and Spyware/Malware etc..
With non-free software OSes like MS Windows, the user never cannot for sure if the system is infected, hence using OpenID to transfer credentials over the internet or store an OpenID SSL/(TLS) certificate to identify in websites is TOO DANGEROUS!
Hope this article was helpful. Cya
Tags: authentication, Auto, benefit, code, Comment, Draft, file, functionality, google, hyves, igor korolev, Journal, login, login accounts, major search engines, need, openid, password, php, platform, plugin, popularity, quot, Russian, Search, support, tens, text, type, universal web, url, username, wget, what the heck, Wordpress, writting, Yahoo
Posted in System Administration, Web and CMS, Wordpress | 2 Comments »