Posts Tagged ‘working’

Installing Virtualbox Guest Additions Vboxadditions on CentOS 7, Fedora 19 / 20 and RHEL 6.5 / 5.10 on Windows host

Thursday, July 17th, 2014

Virtualbox_guest_additions-on-centos-7-howto-virtualbox-logo
If you decided to use Redhat based Linux distribution inside Virtualbox Virtual Machine on Windows 7 / 8, first thing to do right after installing the Linux guest OS is to install Virtualbox Guest Additions. Earlier I've blogged How to enable virtualbox VM Windows XP fullscreen mode on Virtualbox running on Ubuntu now I need it vice versa a Linux OS living inside Virtual Machine running on top of Windows 7 Enterprise. need to enable Full-screen mode. Another reason why Vboxadditions should be installed right after Linux install is complete is for performance reasons and better integration between host OS and guest OS. Virtualbox Guest Additions enables mouse's copy / paste functions to work between Win and Virtualized Linux as well as enables arbitrary screen resolutions (resizing VM guest window) etc. On Windows versions of Virtualbox to install Vbox Guest Additions it is no longer necessery to download and mount a separate vbox-guest-additions ISO file, this is handled by Virtualbox itself.

The steps described here for installation of VirtualBox Guest Additions are tested and prooved as working on current latest CentOS 6.5, however they should be working (with or without minor modifications) in rest of RPM based Linux distributions

Fedora 20, 19, 18, 17, 16, 15, 14, 13, 12, CentOS 6.5, 6.4, 6.3, 6.2, 6.1, 6.0, 5.10 and Redhat Enterprise Linux (RHEL) 6.5, 6.4, 6.3, 6.2, 6.1, 6, 5.10 VirtualBox version installed on Windows 7 host is 4.3.14 build.


Devices -> Drag'n'Drop (Bidirectional)

Devices -> Share Clipboard (Bidirectional)


1. Installing VirtualBox GuestAdditions on CentOS 7, Redhat, Fedora

a) become superuser

su root
[root@centos~:]#

b) Mount Virtualbox provided Guest additions into virtual cdrom /dev/cdrom

From VirtualBox click on
 

Devices -> Install Guest Additions

centos7-install-guest-additions-cd-screenshot-microsoft-windows-virtualbox

mkdir /media/VirtualBoxGuestAdditions
mount -r /dev/cdrom /media/VirtualBoxGuestAdditions

c) Update to the latest Linux kernel with yum

yum -y update kernel*

Then to boot up into the updated kernel – restart the system

shutdown -r now


d) Install Kernel headers bzip dkms bzip2

yum install -y gcc kernel-devel kernel-headers dkms make bzip2 perl

If you're installing VirtualBox Guest Additions on CentOS 6 or RHEL 5, you will have to install also below 2 rpms:
 

## CentOS 6 and Red Hat (RHEL) 5 ##
rpm -Uvh http://dl.fedoraproject.org/pub/epel/6/i386/epel-release-6-8.noarch.rpm
 
## CentOS 5 and Red Hat (RHEL) 5 ##
rpm -Uvh http://dl.fedoraproject.org/pub/epel/5/i386/epel-release-5-4.noarch.rpm


e) export KERN_DIR to just installed kernel source


For CentOS 7 export following KERN_DIR


## Current running kernel on Fedora, CentOS 7 and Red Hat (RHEL) 7 ##
KERN_DIR=/usr/src/kernels/`uname -r`
export KERN_DIR

For older CentOS and RHEL 5 export
## Current running kernel on CentOS 5 and Red Hat (RHEL) 5 ##

KERN_DIR=/usr/src/kernels/`uname -r`-`uname -m`
export KERN_DIR

f) Download VBoxAdditions 4.3.14 iso from Virtualbox website

I've made mirror of VBoxGuestAdditions_4.3.14.iso for download here:
 

mkdir /usr/share/virtualbox
cd /usr/share/virtualbox

wget http://dlc.sun.com.edgesuite.net/virtualbox/4.3.14/VBoxGuestAdditions_4.3.14.iso

g) Mount the iso
 

mount -t iso9660 VBoxGuestAdditions_4.3.14.iso /media/VirtualBoxGuestAdditions/


h) Compile and Install Virtualbox GuestAdditions kernel modules
For both 32-bit and 64-bit systems run one and the same shell script:

cd /media/VirtualBoxGuestAdditions
./VBoxLinuxAdditions.run

Verifying archive integrity… All good.
Uncompressing VirtualBox 4.3.14_RC1 Guest Additions for Linux…………
VirtualBox Guest Additions installer
Removing installed version 4.3.14_RC1 of VirtualBox Guest Additions…
Copying additional installer modules …
Installing additional modules …
Removing existing VirtualBox non-DKMS kernel modules       [  OK  ]
Building the VirtualBox Guest Additions kernel modules
Building the main Guest Additions module                   [  OK  ]
Building the shared folder support module                  [  OK  ]
Building the OpenGL support module                         [  OK  ]
Doing non-kernel setup of the Guest Additions              [  OK  ]
You should restart your guest to make sure the new modules are actually used

Installing the Window System drivers
Installing X.Org Server 1.15 modules                       [  OK  ]
Setting up the Window System to use the Guest Additions    [  OK  ]
You may need to restart the hal service and the Window System (or just restart
the guest system) to enable the Guest Additions.

Installing graphics libraries and desktop services componen[  OK  ]

l) Restart the CentOS Virtual Machine
 

reboot

Now get a beer and celebrate the full-screen / USB / Webcamera enabled support ! 🙂

This article is possible thanks to earlier article called Virtualbox guest additions on Fedora CentOS and Redhat.

http://www.if-not-true-then-false.com/2010/install-virtualbox-guest-additions-on-fedora-centos-red-hat-rhel/


How to disable WordPress Visual Editor to solve problems Editor / Post problems after upgrade to WordPress 4.0

Monday, October 27th, 2014

wordpress-visual-editor-not-showing-problem-and-its-easy-fix-solution
Recently, I've upgraded to latest as of time of writting WordPress 4.0. The upgrade went fine however after upgrade even though I've upgraded also the CKEdit for WordPressVisual Editor stopped working. To solve the issue, my logical guess was to try to disable CKEditor:

(Plugins -> Ckeditor for WordPress (Deactivate)

However even after disabling, default WP Visual Editor continued to be not showing properly – e.g. the Publish / Save Draft / Preview buttons pane as well as the usual format text menu buttons (set text to Italic, Bold, Underline Text,  Create New Paragraph etc.) was completely missing and it was impossible to write anything in the text edit box like you see in below screenshot:

wordpress_visual_editor_missing_buttons_no-publish-button-wordpress_screenshot

I've red a lot on the internet about the issue and it seem a lot of people end up with the WordPress broken Visual Editor issue after upgrading to WP 3.9 and to WordPress 4.0. A lot of people did came to a fix, by simply disabling all WP plugins and enabling them one by one, however as I have about 50 WordPress plugins enabled in my WP blog disabling every plugins and re-enabling was too time consuming as I had to first write down all the plugins enabled and then re-enable them one by one by hand (after re-installing the wordpress version) testing after each whether the editor works or not ..
Therefore I skipped that fix and looked for another one. Other suggestions was to:

Edit wp-includes/css/editor.min.css and include at the end of file:
 

.mce-stack-layout{margin-top:20px}.wp-editor-container textarea.wp-editor-area{margin-top:67px;}


I've tried that one but for me this didn't work out ..

There were some people reporting certain plugins causing the visual editor issues such reported were:

  • NextScripts: Social Networks Auto-Poster
  • Google Sitemaps – Append UTW Tags
  • Google XML Sitemaps
  • TinyMCE Advanced (some suggested replacing TinyMCE and related scripts)
  • JS & CSS Script Optimizer … etc.
     

There were some suggestions also that the issues with Editor could be caused by the Used Blog Theme. It is true I'm using very Old WordPress theme, however as I like it so much I didn't wanted to change that one ..

Others suggested as a fix adding to site's wp-config.php:

define('CONCATENATE_SCRIPTS', false);

Unfortunately this doesn't work either.

Finally I've found the fix myself, the solution is as simple as disabling WordPress Visual Editor:

To disable WP Visual Editor:

1. Go to Upper screen right corner, after logged in to wp-admin (A drop down menu) with Edit My Profile will appear::

wordpress_edit_my_profile_screenshot
2. From Profile screen to appear select Disable the visual editor when writing scroll down to the bottom of page and click on Update Profile button to save new settings:

disable_the_visual_editor_when_writing

That's all now the Post / Edit of an Article will work again with text buttons only.

How to split / rar in parts large data archive files on Linux and Windows – Transfer big files across servers located in DMZ rescticted areas

Friday, November 28th, 2014

how-to-split-rar-in-parts-large-data-archive-files-on-Linux-and-Windows-Transfer-big-files-across-servers-in-firewalled-restricted-areas

I was working on a Application Migration Project whose goal was to Install a business application called Asset Guardian and then move current company Data from the old server to the new AppServer.
F
or that purpose the company vendor Asset Guardian shipped to a Public access FTP, a huge (12GB) ZIP archive file which had to be transferred into a well secured DMZ-ed corporation network with various implemented Traffic Shaping Network policies, a resctrictive firewall allowing access to Internal Network only and to Few (Restrictive configured) Proxy Server IPs on port 80 and 8080.

One of the proxy servers allowed access to the Internet and I set this one and tried downloading the Huge Archive file  with the Windows 2012 server default browser Internet Explorer 10, though the download started it kept slow between ~ 300 – 500KB sec and when reached 3.4GB download failed. I tried resuming the download but as the remote Public FTP server where files resides doesn't support FTP RESUME function.
I thought it might be that Internet Explorer is badly managing the download so, I go forward and installed Portable Firefox (mirrored version 33.1.1 is here). Re-running download with firefox also failed, so the next logical step was for me to try downloading with Windows version of Wget (Wget) and with Portable Free Download Manager 3.9.14.1481 (mirrored here) using both of them was unable to complete download (probably due to firewall or Proxy screwing the proxy inspected traffic) thus I had to look for another way to copy the enormous archive into the company network.

To get around the issue I tried to download the file from FTP to another Server running Apache and tried re-downloading the big file archive (Asset-Guardian-data.zip) from Apache Webserver via HTTP protocol, this download method didn't work neither using plain HTTP protocol for download when downloaded file reached (3.4GB), thus I realized this is due to restrictive Proxy servers (dropping file downloads) bigger than  3.4GBs).

Then to be able to transfer the huge 12GB file, it seems the only left option was to to chop the big file on smaller file chunks and transfer them one by one.
In my case I had the Asset-Guardian-Files.zip transferred already to the Apache (Webserver) host which is running Linux so basicly the task was to Transfer Big archive file between the SuSE Linux Enterprise Server (SLES) 11 and Windows 2012 Server.

Quickesy way to do that is by using UNIX split command, i.e.:

split -b 1024m Asset-Guardian-Files.zip


The outputted files each 1GB are with naming (xaa, xab, xac, xad, xae, xaf, gaf etc.) in same folder where split command is run:

To later merge the files on the Windows 2012 server (copy) command is used:

copy /b file1 + file2 + file3 + file4 filetogether


In my case the command to issue on Win 2012 server was:

copy /b xaa + xab + xac + xae + xae + xaf + xaf + xag xah xai xaj xak Asset-Guardian-files.zip


This method to chop and transfer the file is most simple one and it doesn't require the two servers to have WinRAR or Console RAR / unrar installed.

If instead of Copy Huge File from Linux -> Windows host you need to copy too big file (lets say 100GB) between 2 Windows servers (Windows server host A and Windows server Host B – both situated in different firewall corporate networks) you will need to download to Win Host A and use Windows UNIX split equivalent tool called sfk (The Swiss File Knife) , sfk has port also for Mac OS so in case of need for need for migrating huge archive file from Mac OS X host it will serve as Linux's split – I've made SFK (current version) mirror here.

Another way to cut the 12GB file in parts and transfer to destination host via HTTP was to use rar (on the Linux host), then download the file on Win 2012 server and use Winrar Portable Free to extract the multiple files:

To make archive separate in parts set out to certain size out of a huge file with rar on Linux use:

cd /var/www
rar -a -v1000000k Asset_Guardian_Files.splitted.rar /var/www/Asset_Guardian_Files.zip

10000000Kbs = 10000000/1024 = 976MBs, hence rar produced parts will be sized to 976MB rar parts.

To find out archives check for *splitted*.rar in your /var/www

ls -al /var/www/*splitted*.rar
-rw-r–r– 1 root root 1048576 ное 28 18:34 Asset-Guardian-Files.splitted.part1.rar
-rw-r–r– 1 root root 1048576 ное 28 18:34 Asset-Guardian-Files.splitted.part2.rar
-rw-r–r– 1 root root 1048576 ное 28 18:34 Asset-Guardian-Files.splitted.part3.rar
-rw-r–r– 1 root root 1048576 ное 28 18:34 Asset-Guaridna-Filse.splitted.part4.rar


Then to download the files M$ Win 2012 server IE (http://my-linux-host.com/Asset-Guardian-Files.splitted.part1.rar, http://my-linux-host.com/Asset-Guardian-Files.splitted.part2.rar. etc.)

Thanks God, Problem Solved 🙂

Linux Bond network interfaces to merge multiple interfaces ISPs traffic – Combine many interfaces NIC into one on Debian / Ubuntu / CentOS / Fedora / RHEL Linux

Tuesday, December 16th, 2014

how-to-create-bond-linux-agregated-network-interfaces-for-increased-network-thoroughput-debian-ubuntu-centos-fedora-rhel
Bonding Network Traffic
 (link aggregation) or NIC teaming is used to increase connection thoroughput and as a way to provide redundancy for a services / applications in case of some of the network connection (eth interfaces) fail. Networking Bonding is mostly used in large computer network providers (ISPs), infrastructures, university labs or big  computer network accessible infrastructures or even by enthusiatst to run home-server assuring its >= ~99% connectivity to the internet by bonding few Internet Providers links into single Bonded Network interface. One of most common use of Link Aggreegation nowadays is of course in Cloud environments.  

 Boding Network Traffic is a must know and (daily use) skill for the sys-admin of both Small Company Office network environment up to the large Professional Distributed Computing networks, as novice GNU /  Linux sys-admins would probably have never heard it and sooner or later they will have to, I've created this article as a quick and dirty guide on configuring Linux bonding across most common used Linux distributions.

It is assumed that the server where you need network boding to be configured has at least 2 or more PCI Gigabyte NICs with hardware driver for Linux supporting Jumbo Frames and some relatively fresh up2date Debian Linux >=6.0.*, Ubuntu 10+ distro, CentOS 6.4, RHEL 5.1, SuSE etc.
 

1. Bond Network ethernet interfaces on Debian / Ubutnu and Deb based distributions

To make network bonding possible on Debian and derivatives you need to install support for it through ifenslave package (command).

apt-cache show ifenslave-2.6|grep -i descript -A 8
Description: Attach and detach slave interfaces to a bonding device
 This is a tool to attach and detach slave network interfaces to a bonding
 device. A bonding device will act like a normal Ethernet network device to
 the kernel, but will send out the packets via the slave devices using a simple
 round-robin scheduler. This allows for simple load-balancing, identical to
 "channel bonding" or "trunking" techniques used in switches.
 .
 The kernel must have support for bonding devices for ifenslave to be useful.
 This package supports 2.6.x kernels and the most recent 2.4.x kernels.


apt-get –yes install ifenslave-2.6


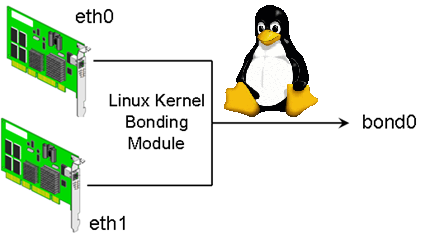
Bonding interface works by creating a "Virtual" network interface on a Linux kernel level, it sends and receives packages via special
slave devices using simple round-robin scheduler. This makes possible a very simple network load balancing also known as "channel bonding" and "trunking"
supported by all Intelligent network switches

Below is a text diagram showing tiny Linux office network router configured to bond ISPs interfaces for increased thoroughput:


Internet
 |                  204.58.3.10 (eth0)
ISP Router/Firewall 10.10.10.254 (eth1)
   
                              | -----+------ Server 1 (Debian FTP file server w/ eth0 & eth1) 10.10.10.1
      +------------------+ --- |
      | Gigabit Ethernet       |------+------ Server 2 (MySQL) 10.10.10.2
      | with Jumbo Frame       |
      +------------------+     |------+------ Server 3 (Apache Webserver) 10.10.10.3
                               |
                               |------+-----  Server 4 (Squid Proxy / Qmail SMTP / DHCP) 10.10.10.4
                               |
                               |------+-----  Server 5 (Nginx CDN static content Webserver) 10.10.10.5
                               |
                               |------+-----  WINDOWS Desktop PCs / Printers & Scanners, Other network devices 


Next to configure just installed ifenslave Bonding  
 

vim /etc/modprobe.d/bonding.conf

alias bond0 bonding
  options bonding mode=0 arp_interval=100 arp_ip_target=10.10.10.254, 10.10.10.2, 10.10.10.3, 10.10.10.4, 10.10.10.5


Where:

  1. mode=0 : Set the bonding policies to balance-rr (round robin). This is default mode, provides load balancing and fault tolerance.
  2. arp_interval=100 : Set the ARP link monitoring frequency to 100 milliseconds. Without option you will get various warning when start bond0 via /etc/network/interfaces
  3. arp_ip_target=10.10.10.254, 10.10.10.2, … : Use the 10.10.10.254 (router ip) and 10.10.10.2-5 IP addresses to use as ARP monitoring peers when arp_interval is > 0. This is used determine the health of the link to the targets. Multiple IP addresses must be separated by a comma. At least one IP address must be given (usually I set it to router IP) for ARP monitoring to function. The maximum number of targets that can be specified is 16.

Next to make bonding work its necessery to load the bonding kernel module:

modprobe -v bonding mode=0 arp_interval=100 arp_ip_target=10.10.10.254, 10.10.10.2, 10.10.10.3, 10.10.10.4, 10.10.10.5


Loading the bonding module should spit some good output in /var/log/messages (check it out with tail -f /var/log/messages)

Now to make bonding active it is necessery to reload networking (this is extremely risky if you don't have some way of Console Web Java / VPN Access such as IPKVM / ILO / IDRAC), so reloading the network be absolutely sure to either do it through a cronjob which will automatically do the network restart with new settings and revert back to old configuration whether network is inaccessible or assure physical access to the server console if the server is at your disposal.

Whatever the case make sure you backup:

 cp /etc/network/interfaces /etc/network/interfaces.bak

vim /etc/network/interfaces

############ WARNING ####################
# You do not need an "iface eth0" nor an "iface eth1" stanza.
# Setup IP address / netmask / gateway as per your requirements.
#######################################
auto lo
iface lo inet loopback
 
# The primary network interface
auto bond0
iface bond0 inet static
    address 10.10.10.1
    netmask 255.255.255.0
    network 192.168.1.0
    gateway 10.10.10.254
    slaves eth0 eth1
    # jumbo frame support
    mtu 9000
    # Load balancing and fault tolerance
    bond-mode balance-rr
    bond-miimon 100
    bond-downdelay 200
    bond-updelay 200
    dns-nameservers 10.10.10.254
    dns-search nixcraft.net.in


As you can see from config there are some bond specific configuration variables that can be tuned, they can have positive / negative impact in some cases on network thoroughput. As you can see bonding interfaces has slaves (this are all other ethXX) interfaces. Bonded traffic will be available via one single interface, such configuration is great for webhosting providers with multiple hosted sites as usually hosting thousand websites on the same server or one single big news site requires a lot of bandwidth and of course requires a redundancy of data (guarantee it is up if possible 7/24h.

Here is what of configs stand for

 
  • mtu 9000 : Set MTU size to 9000. This is related to Jumbo Frames.
  • bond-mode balance-rr : Set bounding mode profiles to "Load balancing and fault tolerance". See below for more information.
  • bond-miimon 100 : Set the MII link monitoring frequency to 100 milliseconds. This determines how often the link state of each slave is inspected for link failures.
  • bond-downdelay 200 : Set the time, t0 200 milliseconds, to wait before disabling a slave after a link failure has been detected. This option is only valid for the bond-miimon.
  • bond-updelay 200 : Set the time, to 200 milliseconds, to wait before enabling a slave after a link recovery has been detected. This option is only valid for the bond-miimon.
  • dns-nameservers 192.168.1.254 : Use 192.168.1.254 as dns server.
  • dns-search nixcraft.net.in : Use nixcraft.net.in as default host-name lookup (optional).

To get the best network thorougput you might want to play with different bounding policies. To learn more and get the list of all bounding policies check out Linux ethernet Bounding driver howto

To make the new bounding active restart network:
 

/etc/init.d/networking stop
sleep 5;
/etc/init.d/networking start


2. Fedora / CentOS RHEL Linux network Bond 

Configuring eth0, eth1, eth2 into single bond0 NIC network virtual device is with few easy steps:

a) Create following bond0 configuration file:
 

vim /etc/sysconfig/network-scripts/ifcfg-bond0


DEVICE=bond0
IPADDR=10.10.10.20
NETWORK=10.10.10.0
NETMASK=255.255.255.0
GATEWAY=10.10.10.1
USERCTL=no
BOOTPROTO=none
ONBOOT=yes


b) Modify ifcfg-eth0 and ifcfg-eth0 files /etc/sysconfig/network-scripts/

– Edit ifcfg-eth0

vim /etc/sysconfig/network-scripts/ifcfg-eth0

DEVICE=eth0
USERCTL=no
ONBOOT=yes
MASTER=bond0
SLAVE=yes
BOOTPROTO=none

– Edit ifcfg-eth1

vim /etc/sysconfig/network-scripts/ifcfg-eth1

DEVICE=eth0
USERCTL=no
ONBOOT=yes
MASTER=bond0
SLAVE=yes
BOOTPROTO=none


c) Load bond driver through modprobe.conf

vim /etc/modprobe.conf

alias bond0 bonding
options bond0 mode=balance-alb miimon=100


Manually load the bonding kernel driver to make it affective without server reboot:
 

modprobe bonding

d) Restart networking to load just configured bonding 
 

service network restart


3. Testing Bond Success / Fail status

Periodically if you have to administrate a bonded interface Linux server it is useful to check Bonds Link Status:

cat /proc/net/bonding/bond0
 

Ethernet Channel Bonding Driver: v3.5.0 (November 4, 2008)

Bonding Mode: fault-tolerance (active-backup)
Primary Slave: None
Currently Active Slave: eth0
MII Status: up
MII Polling Interval (ms): 100
Up Delay (ms): 0
Down Delay (ms): 0

Slave Interface: eth0
MII Status: up
Link Failure Count: 0
Permanent HW addr: 00:1e:0b:d6:6c:8f

Slave Interface: eth1
MII Status: up
Link Failure Count: 0
Permanent HW addr: 00:1e:0b:d6:6c:8c

To check out which interfaces are bonded you can either use (on older Linux kernels)
 

/sbin/ifconfig -a


If ifconfig is not returning IP addresses / interfaces of teamed up eths, to check NICs / IPs:

/bin/ip a show
1: lo: <LOOPBACK,UP,LOWER_UP> mtu 16436 qdisc noqueue state UNKNOWN
    link/loopback 00:00:00:00:00:00 brd 00:00:00:00:00:00
    inet 127.0.0.1/8 brd 127.255.255.255 scope host lo
    inet 127.0.0.2/8 brd 127.255.255.255 scope host secondary lo
    inet6 ::1/128 scope host
       valid_lft forever preferred_lft forever
2: eth0: <BROADCAST,MULTICAST,SLAVE,UP,LOWER_UP> mtu 1500 qdisc mq master bond0 state UP qlen 1000
    link/ether 00:1e:0b:d6:6c:8c brd ff:ff:ff:ff:ff:ff
3: eth1: <BROADCAST,MULTICAST,SLAVE,UP,LOWER_UP> mtu 1500 qdisc mq master bond0 state UP qlen 1000
    link/ether 00:1e:0b:d6:6c:8c brd ff:ff:ff:ff:ff:ff
7: bond0: <BROADCAST,MULTICAST,MASTER,UP,LOWER_UP> mtu 1500 qdisc noqueue state UP
    link/ether 00:1e:0b:d6:6c:8c brd ff:ff:ff:ff:ff:ff
    inet 10.239.15.173/27 brd 10.239.15.191 scope global bond0
    inet 10.239.15.181/27 brd 10.239.15.191 scope global secondary bond0:7156web
    inet6 fe80::21e:bff:fed6:6c8c/64 scope link
       valid_lft forever preferred_lft forever


In case of Bonding interface failure you will get output like:

Ethernet Channel Bonding Driver: v3.5.0 (November 4, 2008)
Bonding Mode: load balancing (round-robin)
MII Status: up
MII Polling Interval (ms): 100
Up Delay (ms): 200
Down Delay (ms): 200
Slave Interface: eth0
MII Status: up
Link Failure Count: 0
Permanent HW addr: 00:xx:yy:zz:tt:31
Slave Interface: eth1
MII Status: down
Link Failure Count: 1
Permanent HW addr: 00:xx:yy:zz:tt:30

Failure to start / stop bonding is also logged in /var/log/messages so its a good idea to check there too once launched:
 

tail -f /var/log/messages
Dec  15 07:18:15 nas01 kernel: [ 6271.468218] e1000e: eth1 NIC Link is Down
Dec 15 07:18:15 nas01 kernel: [ 6271.548027] bonding: bond0: link status down for interface eth1, disabling it in 200 ms.
Dec  15 07:18:15 nas01 kernel: [ 6271.748018] bonding: bond0: link status definitely down for interface eth1, disabling it

On bond failure you will get smthing like:

Dec  15 04:19:15 micah01 kernel: [ 6271.468218] e1000e: eth1 NIC Link is Down
Dec  15 04:19:15 micah01 kernel: [ 6271.548027] bonding: bond0: link status down for interface eth1, disabling it in 200 ms.
Dec  15 04:19:15 micah01 kernel: [ 6271.748018] bonding: bond0: link status definitely down for interface eth1, disabling it


4. Adding removing interfaces to the bond interactively
 

You can set the mode through sysfs virtual filesystem with:

echo active-backup > /sys/class/net/bond0/bonding/mode

If you want to try adding an ethernet interface to the bond, type:

echo +ethN > /sys/class/net/bond0/bonding/slaves

To remove an interface type:

echo -ethN > /sys/class/net/bond0/bonding/slaves


In case if you're wondering how many bonding devices you can have, well the "sky is the limit" you can have, it is only limited by the number of NIC cards Linux kernel / distro support and ofcourse how many physical NIC slots are on your server.

To monitor (in real time) adding  / removal of new ifaces to the bond use:
 

watch -n 1 ‘cat /proc/net.bonding/bond0′


Windows XP / 7, Minimize any program to system tray free software – RBTray, Trayconizer and Windows HideIT

Monday, January 5th, 2015

rbtray-screenshot1-on-ms-windows-minimize-any-application-systray-winblows
As Linux admin, I'm already aware of AllTray *NIX application able to send any application to GNOME / KDE tray.
But what If you have a program on Windows XP / 7 / 8,  that doesn't have a minimize to tray functionality and you want to send it to tray?
I.e. what if you want to send programs like Notepad (that doesn't by default go to win systray) to Windows  tray in order to prevent them mess up with other Open Windows minimized windows?

After a quick research on the topic I found these 3 – RBtray, Trayconizer, HideIt, Below is a very quick review on each

.

1. Minimize any Windows program to tray with RBTray

rbtray_windows-7-screenshot-minimize-any-application-to-tray-minimize-notepad
If you want to stick to open source (GPL) software a tiny free software proggie that does the trick is RBTray current latest RBtray is 4.3 release is download mirror is here.

To use RBTray you don't need to do anything, once program is unarchived from archive, once launched there will be no system application that it is running, but you can go to any minimized program (not in tray) and by clicking with right mouse button on minimize button you will the app minimize to tray.

Here is how RBTray works (taken from archive README file):

Installing:
Extract the 32-bit or 64-bit binaries (depending on your OS) to a
 folder, e.g.
C:Program FilesRBTray.  Double click RBTray.exe to start it.  If you want it
to automatically start after you reboot, create a shortcut to RBTray.exe in
your Start menu's Startup group.

Using:
Right click on any program's minimize button to minimize it to the tray.  To
restore, single-click the program's icon in the tray.

Exiting:
Right click on any tray icon created by RBTray and click Exit RBTray in the
popup menu.  Or run RBTray.exe with the –exit parameter.


2. Miminize any app to system tray with Trayconizer

trayconizer_screenshot-microsoft-windows-minimize-notepad
Trayconizer is the other tray minizer tool you might want to check out, Windows tray minize application a download mirror of Trayconizer is here. As of time of writing this post (current) latest Trayconizer version is 1.1.1.

Trayconizer allows you to minimize virtually any application to the system tray rather than having it take up valuable space in your taskbar. The screen shot to the left shows Trayconizer minimizing Notepad to the system tray. Trayconizer is definitely the tool of choice of system administrators who need to keep minimized windows program to system tray each time on boot as it can be easily run from command line.

Using Trayconizer is simple. To start Trayconizer on Notepad, you would execute: C:PathToTrayconizer.exe C:WindowsNotepad.exe.

You can create a shortcut in your Startup group to execute Trayconizer on a program that you use frequently but want to keep tucked out of the way in the system tray when you're not using it. There is even an option for starting the application initially in the minimized state.

Trayconizer will automatically shut itself down when you close the program you are Trayconizing. Additionally, multiple Trayconized programs are handled by a single instance of Trayconizer to avoid wasting system resources.

Trayconizer requires no DLL's beyond the base Win32 API libraries and will not store any entries in your registry.

3. Minimize any program to Windows systray with Windows HideIT

windows-hideit-minimize-to-tray-screenshot-send-any-running-windows-program-to-systray

Another good tool useful in hiding (minimizing) Windows programs which are lacking the minimize option embedded built-in is Windows HideIT.

Hideit official download website is here, note that with Hideit, Its pretty confusing to find where to download in (so to download look in the right upper corner for a download button) HideIT Download Mirror is here.

Hideit should be able to minimize any Application to sysytem tray, while Rbtray fails ith some. Both RBtray and Windows
HIdeIT will popup with a blue down-arrow on Tray icon once launched and you can show / hide minimized applications from there.

All RbTray, Trayconizer and HideIt tray minimizers should work on virtually all NT 4.0 Windows XP / 2000 / Vista / 7 / 8 though I haven't tested on all of 'em yet. If you happen to find it working on  Win NT 4.0 / 8 etc., please drop a comment.

Turn your Windows PC / notebook to Wireless Router with My Wifi Router 3.0 and TP-Link TL-WN722N

Wednesday, January 7th, 2015

my-wifi-router-3.0-turn-regular-windows-notebook-to-wifi-router

I've been to home of my wife's parents and for this Christmas, they have received second hand Acer Aspire notebook as a Christmas gift. So far they were using internet using their Windows XP PC which is getting internet here in Belarus via UTP network cable using ByFly ZTE ADSL router modem. As ADSL modem lacked wifh WI-FI Antenna (support) and there was already the Acer notebook which had to access the internet preferrably via Wireless connection, the option was to get a WI-FI router and connect it to the ADSL modem but as this would cost (20 EUR at minimum) and there was alreay Wireless (Receiver) adapter TP-LINK TL-WN722N unused, I decided to try make the TP-LINK Receiver and Windows XP PC to act as a small Home Made Wireless  (software) router.

Until I succeeded I've tried multiple softwares which all failed to turn the Windows PC to Wi-Fi Hotspot.
Here is list of few of the softwares I tried that didn't worked for some reason:

1. Wifi HotSpot Creator

WiFi-HotSpot-Creator-screenshot

Turn your PC into a Wi-Fi Router for Free!

Instantly share your internet connection with your friends and peers over Wi-Fi. Turns your PC into a Wi-Fi Router! And its Free! Wifi HotSpot Creator is said to be able to convert any Mac OS X and Windows PC to hotspot here is Wifi HotSpot Creator download website
Wifi HotSpot Creator is said to work with Windows Vista / XP / 7 / 8, however as I said it doesn't work for me on Windows XP.
 

2. Virtual Wifi router

Here is

With Virtual WiFi Router you can create a WiFi hotspot for WiFi Reverse Tethering on Windows 7 and for wifi supported mobiles and other wifi enabled computer to create a network and to share internet. Virtual Wifi Router in a minute converts your PC into a WiFi hot spot for free.

To make the program working it depends on .NET 4.5. Though the program looked like a superb it unfortunately was crashing on Windows XP. Below are few screenshots from program working on Windows 7.

virtual-wifi-router-screenshot

virtual-wifi-router-connected-device-screenshot-windows
3. My Wifi Router 3.0

Finally I've come across My Wifi Router 3.0 which is just another program that makes necessery Windows configuration to TP-Link TL-WN722N Wireless receiver Adapter to turn it into a homemade Wi-Fi router.
my-wifi-router-on-windows-xp-desktop-pc-noteboko-creenshot

By default Amiss_papp Wifi is configured, this can be changed, however in my case when I tried changing it there were some issues, so finally I've had to re-install My Wifi Router to make it working again.
Once configured My Wifi Router there is the green button (Activate / Deactivate Free Wifi) as seen from screenshot.

As you can see My Wifi Router also allows to Share Videos over WiFi. Once I've tested the program and confirmed it as working, I had to configure it to automatically start on Windows PC boot.

This is done from Settings (located on backward triangle button, next to minimize function).
I had to set check in to  Auto Start and Software Conflict Detection.

make-windows-pc-with-wireless-wifi-router-my-wifi-router-settings-screenshot

Once connected to the TP-Link TL-WN722N (USB) Wi-Fi (High Gain) Receiver adapter in Windows Tray a new indicator will popup that a device has been connected. I've tested My Wifi Router and it seem to be working fine with 3 remote connected Wi-Fi devices (1 Notebook and 2 Nokia Lumia mobile phones). The speed of internet was fast and if I didn't know the connection is done in a software way via such an improvised Windows XP Wi-Fi network router I would think it is just a regular Wi-Fi network router.

One more thing I had to do to make the internet working I had to share the the LAN Network (ethernet card) Interface's internet from
 

Control Panel -> Networking -> Local Area Connection (Properties) -> Advanced

https://www.pc-freak.net/images/windows-xp-internet-connection-sharing-how-to-networking-screenshot-make-network-address-translation-windows-xp.jpg

A downside of My Wifi Router is I couldn't find a way to save password while connection to the newly created WiFi router with it, so each time I had to login I had to manually type in the password (default my wifi router password is 123567890). Re-typing password on each login is annoying but if you have to do it once per day in the morning when you turn on your notebook it is not such a big deal.

Once connected to My Wifi Router in Connection Management in Friends (tab) you will see a list with connected devices.

my-wifi-router-on-windows-xp-with-htc-and-ipad-iphone-connected
As visible from above screenshot default IPs which will be assigned to new connected clients to My Wifi Router will be in local network IP range 192.168.23.2 – 192.168.23.254.

Now all left is to Enjoy  your new Software Wi-Fi router 🙂

How to disable IPv6 on Debian / Ubuntu / CentOS and RHEL Linux

Friday, December 9th, 2011

I have few servers, which have automatically enabled IPv6 protocols (IPv6 gets automatically enabled on Debian), as well as on most latest Linux distribituions nowdays.

Disabling IPv6 network protocol on Linux if not used has 2 reasons:

1. Security (It’s well known security practice to disable anything not used on a server)
Besides that IPv6 has been known for few criticil security vulnerabilities, which has historically affected the Linux kernel.
2. Performance (Sometimes disabling IPv6 could have positive impact on IPv4 especially on heavy traffic network servers).
I’ve red people claiming disabling IPv6 improves the DNS performance, however since this is not rumors and did not check it personally I cannot positively confirm this.

Disabling IPv6 on all GNU / Linuces can be achieved by changing the kernel sysctl settings net.ipv6.conf.all.disable_ipv6 by default net.ipv6.conf.all.disable_ipv6 equals 1 which means IPv6 is enabled, hence to disable IPv6 I issued:

server:~# sysctl net.ipv6.conf.all.disable_ipv6=0

To set it permanently on system boot I put the setting also in /etc/sysctl.conf :

server:~# echo 'net.ipv6.conf.all.disable = 1 >> /etc/sysctl.conf

The aforedescribed methods should be working on most Linux kernels version > 2.6.27 in that number it should work 100% on recent versions of Fedora, CentOS, Debian and Ubuntu.

To disable IPv6 protocol on Debian Lenny its necessery to blackist the ipv6 module in /etc/modprobe.d/blacklist by issuing:

echo 'blacklist ipv6' >> /etc/modprobe.d/blacklist

On Fedora / CentOS there is a another universal “Redhat” way disable IPv6.

On them disabling IPv6 is done by editting /etc/sysconfig/network and adding:

NETWORKING_IPV6=no
IPV6INIT=no

I would be happy to hear how people achieved disabling the IPv6, since on earlier and (various by distro) Linuxes the way to disable the IPv6 is probably different.
 

Alto to stop Iptables IPV6 on CentOS / Fedora and RHEL issue:

# service ip6tables stop

# service ip6tables off

Preserve Session IDs of Tomcat cluster behind Apache reverse proxy / Sticky sessions with mod_proxy and Tomcat

Wednesday, February 26th, 2014

apache_and_tomcat_merged_logo_prevent_sticky_sessions
Having a combination of Apache webservice Reverse Proxy to redirect invisibly traffic to a number of Tomcat server positioned in a DMZ is a classic task in big companies Corporate world.
Hence if you work for company like IBM or HP sooner or later you will need to configure Apache Webserver cluster with few running Jakarta Tomcat Application servers behind. Scenario with necessity to access a java based application via Tomcat which requires logging (authentication) relaying on establishing and keeping a session ID is probably one of the most common ones and if you do it for first time you will probably end up with Session ID issues.  Session ID issues are hard to capture at first as on first glimpse application will seem to be working but users will have to re-login all the time even though the programmers might have coded for a session to expiry in 30 minutes or so.

… I mean not having configured Session ID prevention to Tomcats will cause random authentication session expiries and users using the Tomcat app will be unable to normally access below application with authenticated credentials. The solution to these is known under term "Sticky sessions"
To configure Sticky sessions you need to already have configured Apache/s with following minimum configuration:

  • enabled mod_proxy, proxy_balancer_module, proxy_http_module and or mod_proxy_ajp (in Apache config)

  LoadModule proxy_module modules/mod_proxy.so
LoadModule proxy_balancer_module modules/mod_proxy_balancer.so
LoadModule proxy_http_module modules/mod_proxy_http.so

  • And configured and tested Tomcats running an Application reachable via AJP protocol

Below example assumes there is Reverse Proxy Load Balancer Apache which has to forward all traffic to 2 tomcats. The config can easily be extended for as many as necessary by adding more BalancerMembers.

In Apache webserver (apache2.conf / httpd.conf) you need to have JSESSIONID configured. These JSESSIONID is going to be appended to each client request from Reverse Proxy to each of Tomcat servers with value opened once on authentication to first Tomcat node to each of the other ones.

<Proxy balancer://mycluster>
BalancerMember ajp://10.16.166.53:11010/ route=delivery1
BalancerMember ajp://10.16.166.66:11010/ route=delivery2
</Proxy>

ProxyRequests Off
ProxyPass / balancer://mycluster/ stickysession=JSESSIONID
ProxyPassReverse / balancer://mycluster/

The two variables route=delivery1 and route=delivery2 are routed to hosts identificators that also has to be present in Tomcat server configurations
In Tomcat App server First Node (server.xml)

<Engine name="Catalina" defaultHost="localhost" jvmRoute="delivery1">

In Tomcat App server Second Node (server.xml)

<Engine name="Catalina" defaultHost="localhost" jvmRoute="delivery2">

Once Sticky Sessions are configured it is useful to be able to track they work fine this is possible through logging each of established JESSSIONIDs, to do so add in httpd.conf

LogFormat "%h %l %u %t \"%r\" %>s %b \"%{Referer}i\" \"%{User-Agent}i\"\"%{JSESSIONID}C\"" combined

After modifications restart Apache and Tomcat to load new configs. In Apache access.log the proof should be the proof that sessions are preserved via JSESSIONID, there should be logs like:
 

127.0.0.1 - - [18/Sep/2013:10:02:02 +0800] "POST /examples/servlets/servlet/RequestParamExample HTTP/1.1" 200 662 "http://localhost/examples/servlets/servlet/RequestParamExample" "Mozilla/5.0 (X11; Linux x86_64; rv:17.0) Gecko/20130807 Firefox/17.0""B80557A1D9B48EC1D73CF8C7482B7D46.server2"

127.0.0.1 - - [18/Sep/2013:10:02:06 +0800] "GET /examples/servlets/servlet/RequestInfoExample HTTP/1.1" 200 693 "http://localhost/examples/servlets/" "Mozilla/5.0 (X11; Linux x86_64; rv:17.0) Gecko/20130807 Firefox/17.0""B80557A1D9B48EC1D73CF8C7482B7D46.server2"

That should solve problems with mysterious session expiries 🙂

Mysql: How to disable single database without dropping or renaming it

Wednesday, January 22nd, 2014

mysql rename forbid disable database howto logo, how to disable single database without dropping it
A colleague of mine working on MySQL database asked me How it is possible to disable a MySQL database. He is in situation where the client has 2 databases and application and is not sure which of the two databases the application uses. Therefore the client asked one of the database is disabled and wait for few hours and see if something will break / stop working and in that way determine which of the two database is used by application.

My first guess was to backup both databases and drop one of them, then if it is the wrong one to restore from the SQL dump backup, however this wasn't acceptable solution. So second I though of RENAME of database to another one and then reverting the name, however as it is written in MySQL documentation RENAME database function was removed from MySQL (found to be dangerous) since version 5.1.23 onwards. Anyhow there is a quick hack to rename mysql database using a for loop shell script one below:

mysql -e "CREATE DATABASE \`new_database\`;"
for table in `mysql -B -N -e "SHOW TABLES;" old_database`
do
  mysql -e "RENAME TABLE \`old_database\`.\`$table\` to \`new_database\`.\`$table\`"
  done
  mysql -e "DROP DATABASE \`old_database\`;"

Other possible solution was to change permissions of Application used username, however this was also complicated from mysql cli, hence I thought of installing and using PHPMyAdmin to make modify of db user permissions easier but on this server there wasn't Apache installed and MySQL is behind a firewall and only accessible via java tomcat host.

Finally after some pondering what can be done I came with solution to request to disable mysql database using chmod in /var/lib/mysql/data/, i.e.:

sql-server:~# chmod 0 /var/lib/mysql/databasename

Where databasename is the same as the database is named listable via mysql cli.

After doing it that way with no need to restart MySQL server database stopped to appear in show databases; and client confirmed that disabled database is no longer needed so we proceeded dropping it.

Hope this little article will help someone out there. Cheers :

How to fix problem with Skype No Video on MacBook Air with Mac OS X 10.8.6 / Mac OS X Repair OS file permissions with Disk Utility

Monday, December 9th, 2013

mac os x utilities disk utility reset Mac OSX file permissions to default
My girlfriend Svetlana has MacBook Air and just recently her skype Video calls stopped working once again after Mac OS X offered her to apply some update. Her notebook as of time of writting this post is running Mac OS X version 10.8.6. About 1 month and a halfago she was facing same Skype No VIdeo on Mac BookAri issues for how I fixed her No Video Skype issues back then check here. Initially I thought again the problem will be identical and to test if Web Camera hardware is detected on a hardware level by OS, I tried to check if it is displaying videoi FaceTime application. Last time there was no Video in Skype on her Mac Book Air  I remember clearly camera was detected on OS level and displaying well in Facetime, however this time even in facetime I couldn't see a capture of myself … As obviously problem was not in Skype Mac OS previous time fix of substituting AppleCamera.plugin with older version would not fix it. After some evaluation on problem and reading large number of posts on Apple support forums, I've came to the conclusion that it is possible the whole issues are faced by improper permissions applied by latest applied Mac OS update. In such cases people were recommending to Repair Mac OS Standard OS Files Permissions using an OS embedded tool called Disk Utility.
Disk Utility is an application that's built into OS X that can perform lots of useful and even scary actions.Sysadmins and advanced users seem to find frequent need of this handy tool but those newer to the Mac OS it is better to only use it after reading the docs and well realizing what exactly doing.

To Find / Open Disk Utility on Mac OS;

Launch Applications folder -> Utilities (folder), click the name of your startup disk, and select Repair Disk Permissions.

mac-oSX-applications-utilitilities-diskutility


Mac OS X 10.8.6 Disk Utility Repair Disk Permissions screenshot
As I can understand from other ports reverting Mac OS File permissions to their default can solve a number of strange issues with Mac OS.
After repairing Mac OS X basis OS file permissions and testing in FaceTime and Skype, Camera god detected and Video was working fine 🙂
Hope this little article helps someone to fix same issues, if so please drop a thank you comment 😉