Archive for the ‘Wordpress’ Category
Wednesday, December 5th, 2012 I regularly embed Youtube videos in my blog posts just like most bloggers do. With the grow of video materials, embedding a video along with your shorty study is very handy. Whoever has embedded videos in WordPress knows it is as simple as copy pasting the embed code provided by youtube's Share button (located little below the video Window).
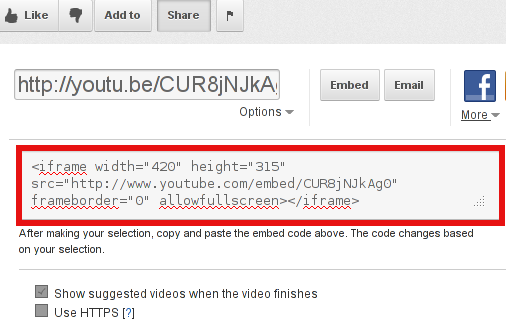
Often the video provided by youtube is varying in sizing making the embedded video on my blog (and probably on others) override a content placed on the right as BlogRoll links, Recent Posts, Twitter of Facebook (Follow / Share) buttons etc.
As with every piece of nice free software, wordpress is quickly developing becoming better and better, every next day; One of the recent developments WordPress developers did is adding it a capability for limiting an Embedded Media Settings size. Doing so makes wordpress to automatically tailor the size of embedded videos, so you don't have every time when embedding a new video to bother changing inside the generated youtube embed code, but wordpress does this auto for you while pressing the Post Publish button.
Enabling automatic video size tailoring in WordPress is done like so:
1. Login to Wordress with admin user (http://www.wordpress-site.com/wp-admin or whatever WP admin URL is)
2. On the left menu you will see the Settings menu, use sub-menu Media, i.e.
Settings -> Media
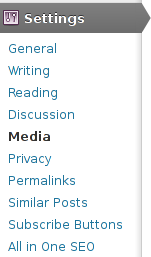
Like you see on below screenshot, besides being able to automatically adjust Embedded codes (videos objects) wordpress is capable of automatically pass article images options to set every inserted image to certain pre-defined size.

Setting a Custom Image size along with Custom Embed desired size is very handy and saves a lot of time. So far everytime when I write a new post on my blog and included a picture in it, I loose time to adjust the picture to 480×315 pixels (a good picture sizing looking good on screen resolutions from 1024 and higher).
Thus in future this little trick will save me up to few minutes whether I write an article with plenty of pictures or videos 😉
The process of embedding becomes even more easier if you are using already some Advanced functionality WordPress Article editor like FCKEDITOR for wordpress plugin
If you have fckeditor, you can straight embed the automatically shrinked to your set size by using FCKEDITOR's flash button instead of loosing each time when copying the embed code by pressing below the youtube video Share and Embed buttons.
Actually just about an year ago, the default wordpress editor TinyMCE used to have native support for Embedding youtube videos through a button called Insert / Edit Embedded Media, but due to copyright protections it was removed from wordpress. There is also one other wp plugin called Embedded Video Plugin but as long as I tested this one in the past it never used to work for me (though nowadays it might be working fine with embedding youtube videos)

Well that's all folks. Hope my little post helps someone 🙂
Tags: automating, embedded, inserted, tailoring, Videos, youtube
Posted in Everyday Life, System Administration, Web and CMS, Wordpress | 1 Comment »
Monday, July 9th, 2012 
2 of the wordpress installations, I take care for had been reported an annoying bug today by some colleagues.
The bug consisted in double trailing slash at the end of the domain url e.g.;
http://our-company-domainname.com//
As a result in the urls everywhere there was the double trailing slash appearing i.e.::
http://our-company-domainname.com//countact-us/

http://our-company-domainname.com//languages/
etc.
The bug was reported to happen in the multiolingual version of the wordpress based sites, as the Qtranslate plugin is used on this installations to achieve multiple languages it seemed at first logical that the double slash domain and url wordpress issues are caused for some reason by qTranslate.
Therefore, I initially looked for the cause of the problem, within the wordpress admin settings for qTranslate plugin. After not finding any clue pointing the bug to be related to qTranslate, I've then checked the settings for each individual wordpress Page and Post (There in posts usually one can manually set the exact url pointing to each post and page).
The double slash appeared also in each Post and Page and it wasn't possible to edit the complete URL address to remove the double trailin slashes. My next assumption was the cause for the double slash appearing on each site link is because of something wrong with the sites .htaccess, therefore I checked in the wp main sites directory .htaccess
Strangely .htacces seemed OKAY and there was any rule that somehow might lead to double slashes in URL. WP-sites .htaccess looked like so:
server:/home/wp-site1/www# cat .htaccess
RewriteEngine On
RewriteBase /
# Rewrite rules for new content and scripts folder
RewriteRule ^jscripts/(.*)$ wp-includes/js/$1
RewriteRule ^gallery/(.*)$ wp-content/uploads/$1
RewriteRule ^modules/(.*)$ wp-content/plugins/$1
RewriteRule ^gui/(.*)/(.*)$ wp-content/themes/$1/$2 [L]
# Disable direct acceees to wp files if referer is not valid
#RewriteCond %{THE_REQUEST} .wp-*
#RewriteCond %{REQUEST_URI} .wp-*
#RewriteCond %{REQUEST_URI} !.*media-upload.php.*
#RewriteCond %{HTTP_REFERER} !.*cadia.*
#RewriteRule . /error404 [L]
# Standard WordPress rewrite
RewriteCond %{REQUEST_FILENAME} !-f
RewriteCond %{REQUEST_FILENAME} !-d
RewriteRule . /index.php [L]
Onwards, I thought a possible way to fix bug by adding mod_rewrite rules in .htaccess which would do a redirect all requests to http://www.our-company-domainname.com//contact-us/ to http://www.our-company-domainname.com//contact-us/ etc. like so:
RewriteRule ^/(.*)$ /$1
This for unknown reasons to me didn't worked either, finally thanks God I remembered to check the variables in wp-config.php (some month ago or so I added there some variables in order to improve the wordpress websites opening times).
I've figured out I did a mistake in one of the variables by adding an ending slash to the URL. The variable added was:
define('WP_HOME','http://our-company-domainname.com/');
whether instead it should be without the ending trailing slash like so:
define('WP_HOME','http://our-company-domainname.com');
By removing the ending trailing slash:
define('WP_HOME','http://our-company-domainname.com/');
to:
define('WP_HOME','http://our-company-domainname.com');
fixed the issue.
Cheers 😉
Tags: annoying bug, assumption, Auto, care, cause, clue, colleagues, content themes, Draft, exact url, FILENAME, folderRewriteRule, GUI, HTTP, index, languages, mod, nbsp, Onwards, page, php, plugin, reason, referer, rewrite, RewriteCond, RewriteEngine, RewriteRule, scripts, slashes, something, standard, Strangely, url address, URLs, Wordpress, wp, WP-sites, www cat
Posted in System Administration, Wordpress | No Comments »
Friday, April 6th, 2012 I'm running WordPress for already 3 years or so now. Since some very long time. The first wordpress install, I can hardly remember but it something like wordpress 2.5 or wordpress 2.4
Since quite a long time my wordpress blog is powered by a number of plugins, which I regularly update, whenever new plugins pops up …
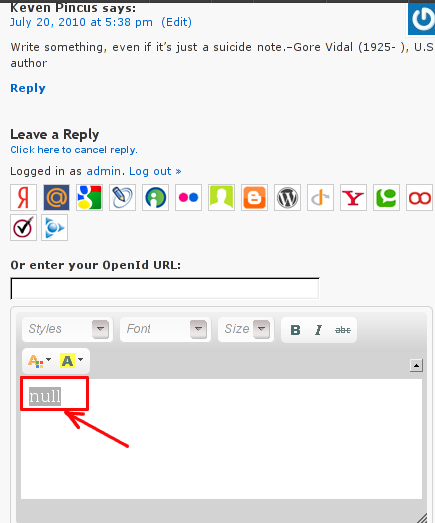
I haven't noticed most of the time problems during major WordPress platform updates or the update of the installed extensions. However, today while I tried to reply back to one of my blog comments, I've been shocked that, I couldn't.
Pointing at the the Comment Reply box and typing inside was impossible and a null message was stayed filled in the form:
To catch what was causing this weird misbehaving with the reply comments functionality, I grepped through my /var/www/blog/wp-content/plugins/* for the movecfm(null,0,1,null):
# cd /var/www/blog/wp-content/plugins

# grep -rli 'movecfm(null,0,1,null)' */*.php

wordpress-thread-comment/wp-thread-comment.php
I've taken the string movecfm(null,0,1,null) from the browser page source in in my Firefox by pressing – Ctrl+U).
Once I knew of the problem, I first tried commenting the occurances of the null fields in wp-thread-comment.php, but as there, were other troubles in commenting this and I was lazy to read the whole code, checked online if some other fellows experienced the same shitty null void javascript error and already someone pointed at a solution. In the few minutes search I was unable to find anyone who reported for this bug, but what I found is some user threads on wordpress.org mentioning since WordPress 2.7+ the wordpress-threaded-comments is obsolete and the functionality provided by the plugin is already provided by default in newer WPinstalls.
Hence in order to enable the threaded comments WordPress (embedded) reply functionality from within the wp-admin panel used:
Settings -> Discussions -> Enable Threaded (nested) comments (Tick)
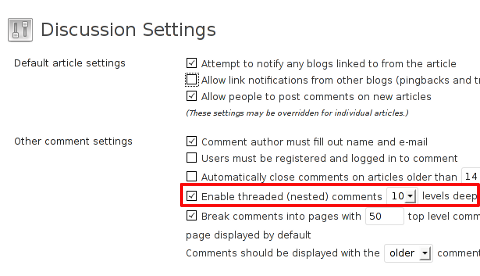
You see there is also an option to define how many nested comments subcomments, can be placed per comment, the default was 5, but I thought 5 is a bit low so increased it to 10 comments reply possible per comment.
Finally, to prevent the default threaded comments to interfere with the WordPress Threaded Comments plugin, disabled the plugin through menus:
Plugins -> Active -> WordPress Thread Comments (Deactivate)
This solved the weird javascript null "bug" caused by wordpress-threaded-comments once and for all.
Hopefully onwards, my blog readers will not have issues with threaded Reply Comments.
Tags: admin panel, Auto, code, Comment, Ctrl, Draft, fellows, few minutes, Firefox, form, grep, long time, misbehaving, movecfm, null fields, null message, number, occurances, option, page, page source, php, phpI, platform, plugin, Plugins, quot, reply comments, rli, someone, something, thread, threads, tick, time, time problems, Wordpress, wordpress blog, wp
Posted in Web and CMS, Wordpress | 1 Comment »
Tuesday, April 3rd, 2012 One of the companies, where I'm doing a part time job, as an IT Consultant, System Administrator and Web developer, a e-marketing specialist and business consultant (the list goes on ;)) … planned to integrate a Newsletter support in their WordPress based websites.
As this fits my "job description" ,I took the task and implemented a simple but functional Newsletter support to their 4 WP based sites. In this article I will in short describe, my experience with placing the Newsletter subscription.:
Earlier I've done something similar as, I've added a subscipriotion (form) box to WordPress to use Google Feedburner RSS . What I needed this time, however was a bit different. The company required the newsletter to be a separate one and don't relay on Google Feedburner (RSS) to deal with the subscriptions .
It took me a while until I came with a working version of a Newsletter and I actually tested all in all 4 newsletter wordpress plugins before, I had a well working one. Here in short, In this article I will shortly take a look at the 4 WP newsletter plugins:
1. A wordpress plugin called simply Newsletter
As of time of writting this is the most popular wordpress plugin, when I looked through:
- http://wordpress.org/extend/plugins/
Wordpress Newsletter plugin can be obtained via http://wordpress.org/extend/plugins/newsletter/
Its really Advanced, probably the best free newsletter for WP available as of time of writting. The plugin supports email subscriber user confirmation (double opt-in), as well as can be accustomized to work with single opt-in.
For all those who don't know Double Opt-In is the technical term for a once requested user email (single opt-in), for subscription which is later confirmed by following an email box sent link pointing to confirmation URL.
Double Opt-In is almost a standard and "must" as otherwise, many spam bots will fill in randomly email addresses and your subscribers list will be mostly containing spammer email addresses.
1. Install WordPress Newsletter Plugin To install Newsletter plugin;
a) download and put into wp-content/plugins/ and unzip
server:~# cd /var/www/blog/wp-content/plugins

server:/var/www/blog/wp-content/plugins# wget -q http://downloads.wordpress.org/plugin/newsletter.zip

server:/var/www/blog/wp-content/plugins# unzip newsletter.zip
b) Enable in Plugins:
Plugins -> Newsletter (Activate)
c) Configure Newsletter
A new menu will appear in the left WP control panel, like you see in below screenshot:
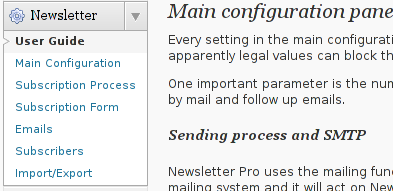
Newsletter plugin is very configurable but it takes a bit of longer time until it is confingured to work well. So be patient with it.
d) Make Newsletter field appear on a wordpress home page.
In order to enable just configure Newsletter plugin (text and subscription form) to appear on the wordpress pages, you need to add the plugin as a widget. To do so go to:
Appearance -> Widgets
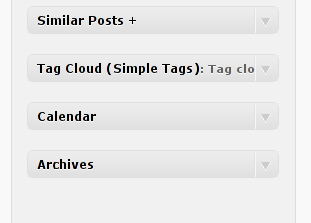
Drag and drop the Newsletter plugin widget to the widget right pane. Put it on the exact place you would like it to appear.
Once the widget is placed, you will see it appear to the respective location on WP pages, you should have something like:

If while you enable the plugin and put the Newsletter widget doesn't appear on WordPress, this is probably due to some Cache left from some enabled WP caching pugin like W3 Total Cache
In any case if Newsletter form subscription, is not appearing on your pages, delete the cache/ directory:
# rm -rf /var/www/wordpress-site/wp-content/cache/
I've experienced, this caching problems and it was quite a riddle, until I found out that the Newsletter plugin is not appearing on the WP pages because of the old cache. I've checked bacicly everything (error.log , apache php_error.log) etc.. Therein, there was no error or anything, so after a long 1 hour or so poundering I figured out this kind of caching done by W3 Cache.
My guess is, the same newsletter "not working" issue is probably observable also on WP installs with other caching plugins like WP Hyper Cache or WP Db Cache
2. ALO EasyMail Newsletter WordPress plugin
I don't know, why but this plugin didn't work properly on the wordpress install, I've tested it. Its true the wordpress version where I give it a try was not running, the latest stable wordpress so I assume this might be the reason for the empty pages returned when I enabled the plugin.
According to wordpress's plugin – http://wordpress.org/extend/plugins/alo-easymail/, the plugin is marked as Works, however in my case it didn't.
3. Adding WordPress Newsletter through Email newsletter
This plugin was a real piece of cake, compared to all of the rest, tested this one was the easiest one to install and configure on WordPress.
Just like with Newsletter and ALO EasyMail Newsletter once the user is subscribed, from the admin there is possibility to sent crafted messages to all subscribers.
The plugin is a great, choice for anyone who is looking for quick install of Newsletter on WordPress without extra "config" complications.
Below is a quote describing email newsletter, taken from the plugin author webpage;
Advantage of this plugin
- Simple no coding required.
- Easy installation .
- Using this plug-in we can send email to all registered folks.
- Using this plug-in we can send email to all comment posted folks.
- Email subscribe box for front end
- Check box option available to select/unselect emails from the send mail list.
- Integrated the email newsletter plugin & simple contact form plugin
– Enabling the plugin is done via admin menus:
Plugins -> Inactive -> Email Newsletter (enable)
Afterwards, the plugin requires a quick configuration from wp-admin:
Email Newsletter -> Subscriber form setting
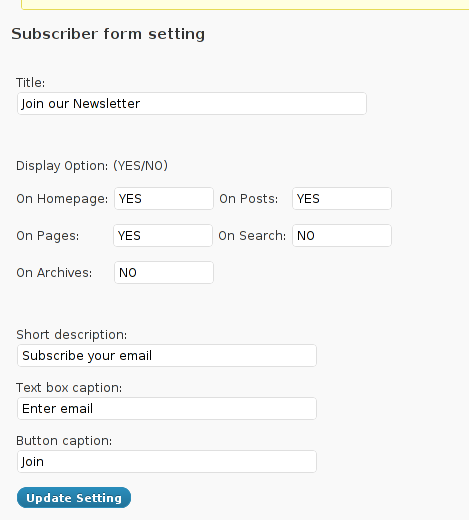
You see in the screenshot, the config where to place the plugin is trivial.
To make Email Newsletter appear on the pages, you will have to add the Email Newsletter widget from:
Appearance -> Widgets
The widget looks like the one in below screenshot:
Drag and drop the widget to the widgets pane. Onwards on the wordpress pages, should appear an email subsciption box:

Though Email Newsletter is great, it has one serious drawback, as it doesn't support Double Opt-In. Therefore people subscribing through it are not mailed with a request to confirm their email subscription request.
As a result, its very likely many spam-bots submit fake emails in the newsletter subscribe form and in 1 year time your newsletter email list might get full with tens of thousands unexistent emails. If you end up with this bad scenario, once newsletter emails are sent to (regular) exitent subscribers, many of the bulk emails in the list will never reach their senders, but will just fill-up the mail server queue and take up server resources for nothing for one week or so (depending on the email configuration keep undelivered mail setting).
Anyways, since the basis of this plugin works fine, I'm sure if the author modifies it to include a simple Captcha instead of double-opt functionality, the plugin can become top plugin.
Tags: administrator, ALO, Auto, bit, blog, business consultant, Cache, confirmation, confirmation url, description, download, Draft, e mail, email addresses, Feedburner, form, free newsletter, google, Install, job, job description, mail newsletter, marketing, newsletter, newsletter subscription, newsletter support, NewsletterAs, Opt, part time job, plugin, Plugins, quot, relay, something, spammer, specialist, subscriber, subscribers, subscriptions, support, system administrator, time, web developer, Wordpress, wp newsletter, writting
Posted in System Administration, Web and CMS, Wordpress | 3 Comments »
Monday, March 12th, 2012 
One of the WordPress websites hosted on our dedicated server produces all the time a wp-cron.php 404 error messages like:
xxx.xxx.xxx.xxx - - [15/Apr/2010:06:32:12 -0600] "POST /wp-cron.php?doing_wp_cron HTTP/1.0
I did not know until recently, whatwp-cron.php does, so I checked in google and red a bit. Many of the places, I've red are aa bit unclear and doesn't give good exlanation on what exactly wp-cron.php does. I wrote this post in hope it will shed some more light on wp-config.php and how this major 404 issue is solved..
So
what is wp-cron.php doing?
- wp-cron.php is acting like a cron scheduler for WordPress.
- wp-cron.php is a wp file that controls routine actions for particular WordPress install.
- Updates the data in SQL database on every, request, every day or every hour etc. – (depending on how it's set up.).
- wp-cron.php executes automatically by default after EVERY PAGE LOAD!
- Checks all pending comments for spam with Akismet (if akismet or anti-spam plugin alike is installed)
- Sends all scheduled emails (e.g. sent a commentor email when someone comments on his comment functionality, sent newsletter subscribed persons emails etc.)
- Post online scheduled articles for a day and time of particular day
Suppose you're writting a new post and you want to take advantage of WordPress functionality to schedule a post to appear Online at specific time:
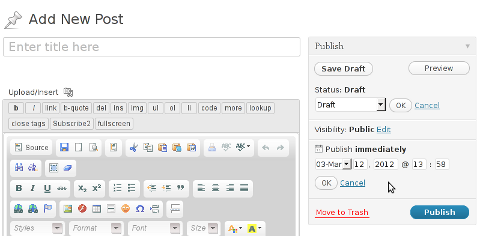
The Publish Immediately, field execution is being issued on the scheduled time thanks to the wp-cron.php periodic invocation.
Another example for wp-cron.php operation is in handling flushing of WP old HTML Caches generated by some wordpress caching plugin like W3 Total Cache
wp-cron.php takes care for dozens of other stuff silently in the background. That's why many wordpress plugins are depending heavily on wp-cron.php proper periodic execution. Therefore if something is wrong with wp-config.php, this makes wordpress based blog or website partially working or not working at all.
Our company wp-cron.php errors case
In our case the:
212.235.185.131 – – [15/Apr/2010:06:32:12 -0600] "POST /wp-cron.php?doing_wp_cron HTTP/1.0" 404
is occuring in Apache access.log (after each unique vistor request to wordpress!.), this is cause wp-cron.php is invoked on each new site visitor site request.
This puts a "vain load" on the Apache Server, attempting constatly to invoke the script … always returning not found 404 err.
As a consequence, the WP website experiences "weird" problems all the time. An illustration of a problem caused by the impoper wp-cron.php execution is when we are adding new plugins to WP.
Lets say a new wordpress extension is download, installed and enabled in order to add new useful functioanlity to the site.
Most of the time this new plugin would be malfunctioning if for example it is prepared to add some kind of new html form or change something on some or all the wordpress HTML generated pages.
This troubles are result of wp-config.php's inability to update settings in wp SQL database, after each new user request to our site.
So the newly added plugin website functionality is not showing up at all, until WP cache directory is manually deleted with rm -rf /var/www/blog/wp-content/cache/…
I don't know how thi whole wp-config.php mess occured, however my guess is whoever installed this wordpress has messed something in the install procedure.
Anyways, as I researched thoroughfully, I red many people complaining of having experienced same wp-config.php 404 errs. As I red, most of the people troubles were caused by their shared hosting prohibiting the wp-cron.php execution.
It appears many shared hostings providers choose, to disable the wordpress default wp-cron.php execution. The reason is probably the script puts heavy load on shared hosting servers and makes troubles with server overloads.
Anyhow, since our company server is adedicated server I can tell for sure in our case wordpress had no restrictions for how and when wp-cron.php is invoked.
I've seen also some posts online claiming, the wp-cron.php issues are caused of improper localhost records in /etc/hosts, after a thorough examination I did not found any hosts problems:
hipo@debian:~$ grep -i 127.0.0.1 /etc/hosts

127.0.0.1 localhost.localdomain localhost
You see from below paste, our server, /etc/hosts has perfectly correct 127.0.0.1 records.
Changing default way wp-cron.php is executed
As I've learned it is generally a good idea for WordPress based websites which contain tens of thousands of visitors, to alter the default way wp-cron.php is handled. Doing so will achieve some efficiency and improve server hardware utilization.
Invoking the script, after each visitor request can put a heavy "useless" burden on the server CPU. In most wordpress based websites, the script did not need to make frequent changes in the DB, as new comments in posts did not happen often. In most wordpress installs out there, big changes in the wordpress are not common.
Therefore, a good frequency to exec wp-cron.php, for wordpress blogs getting only a couple of user comments per hour is, half an hour cron routine.
To disable automatic invocation of wp-cron.php, after each visitor request open /var/www/blog/wp-config.php and nearby the line 30 or 40, put:
define('DISABLE_WP_CRON', true);
An important note to make here is that it makes sense the position in wp-config.php, where define('DISABLE_WP_CRON', true); is placed. If for instance you put it at the end of file or near the end of the file, this setting will not take affect.
With that said be sure to put the variable define, somewhere along the file initial defines or it will not work.
Next, with Apache non-root privileged user lets say www-data, httpd, www depending on the Linux distribution or BSD Unix type add a php CLI line to invoke wp-cron.php every half an hour:
linux:~# crontab -u www-data -e
0,30 * * * * cd /var/www/blog; /usr/bin/php /var/www/blog/wp-cron.php 2>&1 >/dev/null
To assure, the php CLI (Command Language Interface) interpreter is capable of properly interpreting the wp-cron.php, check wp-cron.php for syntax errors with cmd:
linux:~# php -l /var/www/blog/wp-cron.php

No syntax errors detected in /var/www/blog/wp-cron.php
That's all, 404 wp-cron.php error messages will not appear anymore in access.log! 🙂
Just for those who can find the root of the /wp-cron.php?doing_wp_cron HTTP/1.0" 404 and fix the issue in some other way (I'll be glad to know how?), there is also another external way to invoke wp-cron.php with a request directly to the webserver with short cron invocation via wget or lynx text browser.
– Here is how to call wp-cron.php every half an hour with lynxPut inside any non-privileged user, something like:
01,30 * * * * /usr/bin/lynx -dump "http://www.your-domain-url.com/wp-cron.php?doing_wp_cron" 2>&1 >/dev/null
– Call wp-cron.php every 30 mins with wget:
01,30 * * * * /usr/bin/wget -q "http://www.your-domain-url.com/wp-cron.php?doing_wp_cron"
Invoke the wp-cron.php less frequently, saves the server from processing the wp-cron.php thousands of useless times.
Altering the way wp-cron.php works should be seen immediately as the reduced server load should drop a bit.
Consider you might need to play with the script exec frequency until you get, best fit cron timing. For my company case there are only up to 3 new article posted a week, hence too high frequence of wp-cron.php invocations is useless.
With blog where new posts occur once a day a script schedule frequency of 6 up to 12 hours should be ok.
Tags: akismet, Auto, caches, checks, commentor, cr, cron, daySuppose, dedicated server, doesn, dozens, Draft, email, error messages, execution, exlanation, file, google, HTML, HTTP, invocation, localhost, nbsp, newsletter, operation, periodic execution, php, plugin, quot, request, scheduler, someone, something, spam, SQL, time, time thanks, Wordpress, wordpress plugins, wp
Posted in System Administration, Web and CMS, Wordpress | 3 Comments »
Monday, March 21st, 2011 I’m trying to install subscribe-to-comments wordpress plugin in order to make my users to easily set a tick and receive new emails if somebody replies to their comments in my blog. Pitily downloading and trying to install the subscribe-to-comments wordpress plugin was failing after it’s activation with an error message:
PHP Fatal error: Cannot redeclare show_subscription_checkbox() (previously declared in /var/www/blog/wp-content/plugins/subscribe-to-comments/subscribe-to-comments.php:12) in /var/www/blog/wp-content/plugins/subscribe-to-comments.php on line 58"
I did my best to edit the subscribe-to-comments.php to fix up the fatal error but it was no go, so after a bunch of research I’ve found out somebody created a new version of the plugin under the name subscribe-to-comments-reloaded .
I’ve proceeded and gave a try to subscribe-to-comments-reloaded as a substitute to the old broken subscribe-to-comments .
Enabling the subscribe-to-commets-reloaded worked out of the box and the plugin now works perfectly fine and even better is enabling all the functionaity of the subscribe-to-comments
Cheers 🙂
Tags: activation, blog, bunch, Cheers, ERROR, error message, fatal error, fine, functionaity, line, name, order, php, plugin, quot, redeclare, show, Solving "Cannot redeclare show_subscription_checkbox() (previously declared in .. wp-content/plugins/subscribe-to-comments/subscribe-to-comments.php", Subscription, substitute, tick, var, version, www
Posted in Various, Web and CMS, Wordpress | 3 Comments »
Saturday, May 28th, 2011 If you’re installing some PHP based CMS/blog like (Joomla or WordPress) or some kind of template and suddenly you stumble on a error:
Deprecated: Function split() is deprecated in /usr/local/www/websitedomain/templates/youbizz/html/modules.php on line 78
In order to fix that the file which spits the error message, in my case modules.php needs to be modified and the split php function has to be substituted with explode on every occuring place.
I experienced this error on FreeBSD 7_2 with php version 5.3.5 installed from ports.
This simple fix works fine.
Tags: blog, cms, Deprecated, ERROR, error message, file, fine, fix, freebsd, function, kind, line, order, php 5, place, ports, template, usr, version, websitedomain, Wordpress, www, youbizz
Posted in FreeBSD, Joomla, System Administration, Wordpress | 4 Comments »
Tuesday, April 5th, 2011 For a number of time I’ve been planning to change my blog comments placement. Until this very day however I’ve kept the default wordpress theme’s Comments button placement.
I realize the default Comments button placement is a bit hard to see and not that much intuitive for the user that enters my blog for a first time.
My first guess was that there might be somewhere a wordpress plugin which will allow me to adjust my comments button placement.
After some research online and a realization that probably there is no such plugin existing yet. I’ve forced myself to tune it up myself.
It was clear to me that in order to change the it will be necessery to edit the WordPress templates files. I’m not a designer and when I hear about templates I usually get scared, however I took the time to take a look at the default wordpress template and find out actually that template modifications is actually rather easier than I thought.
My previous idea was that in order to edit templates you have to be some kind of CSS and HTML guru (which I’m not). Nevertheless it seems that in order to play and adjust in a good way the templates you don’t need ot be a pro.
Even an uneducated fool like myself can easily do almost everything he thinks of throughout few lines of code in the wp templates.
To get back to the major topic thanks God after a bit of review and reading of wordpress.org documentation and some user forums. I’ve figured out that in order to change my Comments placement you need to modify the file:
- blog/wp-content/themes/default/index.php
In index.php find the line starting with:
You will notice within this opened paragraph the php code:
<?php the_tags('Tags: ', ', ', '

'); ?> Posted in <?php the_category(', ') ?>

| <?php edit_post_link('Edit', '', ' | '); ?>

<?php comments_popup_link('No Comments »', '1 Comment »', '% Comments »'); ?>
This is the actual default theme php code that makes the wordpress Comments or No Comments that maes the comments appear on the blog.
Now I’ve decided to let this be as it is but add one more Comment button to wordpress on a different location that is more appealing to my blog visitors
After quick evaluation I’ve determined that probably the best location that the Comments button should have is right after the end of the post text
If you think my idea for button placement is appropriate, to set this location for the Comments button, you will have to find the follwoing code in index.php:
<div class="entry">

<?php the_content('Read the rest of this entry »'); ?>

</div>
Right after the end of this code place the following code:
<?php comments_popup_link('No Comments »', '1 Comment »', '% Comments »'); ?>

</div>
Tags: amp, Auto, blog, Button, button placement, code lt, Comment, content themes, CSS, default theme, Draft, everything, file, fool, god, guess, guru, HTML, idea, index, kind, line, link, location, lt, nbsp, necessery, online, order, org, paragraph, php, php code, place, placement, plugin, quot, reading, realization, right, template, text, textIf, time, topic, way, Wordpress, wordpress plugin, wordpress templates
Posted in Various, Web and CMS, Wordpress | 1 Comment »
Thursday, April 7th, 2011 I’ve recently realized that the Easy Adsenser plugin which I used to place google adsense advertisements on my blog, is probably stealing some portion of my clicks.
There were some fraud reports on wordpress.org by people who have found out the author of Easy Adsenser rips clicks, by showing sometimes his own ad code even if the plugin is configured to not grant any clicks as a donation to the plugin author.
I don’t know how true this story is and I don’t have the time to observe the whole plugin code to say for sure if the rumors about clicks stealing are true.
However as I’m paying my internet access (that guarantees) by blog to stay online with some adsense advertisements and the adsense revenues are either equal to my internet tax or a bit higher (depending on the month), it’s quite unpleasent to hear someone is stealing from the ads clicks which still generate very low revenue.
Thus I took the time to read some blog posts online which gave me some hints on how can I directly place the google adsense advertisement code into the theme template files
My goal was to place one google adsense ad to appear right after the title of each article and one to appear as a vertical bar in the end of my sidebar.
In this article in short I’ll explain how I achieved this banner placement via the default wordpress template which obviously I use on my blog.
Let’s start:
1. Add adsense to the index page of the blog
Edit your blog/wp-content/themes/default/index.php file
Therein find the code:
<div id="content" class="narrowcolumn" role="main">
and right after this line put the following php code:
<?php

$postnum = 1;

$showadsense1 = 1;

?>
This code is necessery to assure the adsense code only appears on the first blog post from the blog index page
2. Find the code:
<small><?php the_time('F jS, Y') ?> <!-- by
Immediately after the code place the php code:
<?php if ($postnum == $showadsense1) {

echo '<div class="adsense" style="float:right;margin:12px;">;paste here your adsense code ...</div>';

} ?>
<?php $postnum++; ?>
Now with this changes, 1 adsense advertisements should start appearing right after your first and only on your blog post, next step is to place manually one more vertical adsense banner.
2. Place adsense vertical bannre in wordpress blog sidebar
Login with admin user to wordpress and navigate to:
Appearance -> Widgets
Among the available widgets you will notice the widget called Text click over: Add to add this widget to the list of widgets to appear on your blog sidebar.
Afterwards look up over the Sidebar list of widgets find the newly added Text widget and click over Edit to modify it’s content.
Further on put a Title for the widget or choose to leave the title field as blank if you don’t want a name to appear.
On the next textbox just paste your adsense code and you’re done. A simple refresh of your wordpress blog index page should show you a vertical banner with your adsense code.
! Note that if you have recently issued the adsense code it will take about 10-20 minutes until the banner starts showing up.
Until now wordpress is configured to show adsense adverts on the blog main page, as a next step we need to place the same adsense adverts to appear whether a single blog post is reviewed (opened).
Place an adsense advertisements to single posts opened
For that purpose it’s necessery to edit the file single.php it’s again located in blog/wp-content/themes/default
Once again you will first need to find the code:
if (have_posts())
Put the code after the end of the line on a new line:
<?php

// below code is for adsense

$postnum = 1;

$showadsense1 = 1;

?>
Next lookup in the file for the code:
<h2><?php the_title(); ?></h2>
On a new line after it place:
<?php if ($postnum == $showadsense1) { echo '<div class="adsense" style="float:right;margin:12px;"><script type="text/javascript"> place here your adsense code </div>';

} ?>
<?php $postnum++; ?>
That’s all now the adsense advertisements will be also showing on the single blog posts reviews found via some search engine (google, yahoo etc.).
Hope this article will be helpful to somebody, if so drop me a thanks line in comments 😉
Tags: adsense, advertisement, advertisements, banner placement, blog, class, code, code lt, content themes, div id, file, filesMy, fraud, fraud reports, goal, google, google adsense, index, index page, internet access, internet tax, js, margin, necessery, page, page posts, php, place, plugin, plugin code, quot, right, role, sidebar, someone, start 1, story, template, time, unpleasent, vertical bar, wordpress blog
Posted in SEO, System Administration, Web and CMS, Wordpress | 2 Comments »
Saturday, April 9th, 2011 I have noticed that many blogs nowdays offer an email subscription box to simplify the subscription procedure for the blog readers.
My blog was lacking this feature so I took the time to find out how can I add an e-mail subscription box field on my blog.
My research has shown me that the easiest way to add the subscription box is by using Google’s Feedburner RSS service .
I’ve been using Google FeedBurner for quite some time and I’ve already 27 subscriptions with it.
Earlier when I added a FeedBurner subsciption to my blog I’ve blogged about it, so if you’re not acquainted on how to add FeedBurner service to your blog, you might want to read my previous article Adding RSS Feed to WordPress in conjunction with FeedBurner / WordPress add-to-any-subscribe plugin
In this article I will explain in short step by step, how to add the subscrpition email box to your wordpress I assume, that the reader has already enabled and configured registration with Feedburner, if you still haven’t just skip few lines above and check my previous article.
I would hereby skip the explanation of why feedburner as an RSS is so advantageous for every blog owner and readers and skip further to the email subscription procedure step by step instructions:
Step 1: Login to your FeedBurner Account
In my case my feedburner account url is accessed via the URL http://feeds.feedburner.com/WalkingInLightWithChrist-FaithComputingDiary
I have been properly logged in to my feedburner, so to view statistics of my current feeds subscription and to configure various variables of feedburner I had to access the URL address: http://feedburner.google.com/fb/a/myfeeds, a very quick shortcut to my feedburner account settings is also avaialable by simply accessing the URL: http://feedburner.com
Step 2: Click on the link that says My Feeds
If you have configured feeds for your feedburner you will get the list of feedburner feeds, (one could have multiple feeds, let’s say if you have a couple of blogs or sites and you use one feedburner account to podcast your feeds for each of the separated blogs or sites.
Step 3: Click over the feed you want to have the feedburner email subscription box
Below you see the screenshot of my configured feedburner feed:
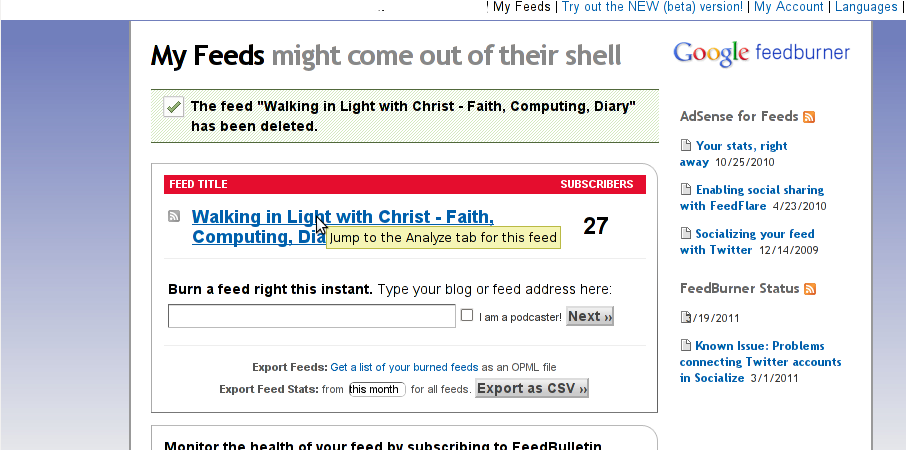
Right after clicking on your configured feed in my case Walking in Light With Christ – Faith, Computing, Diary you will see the screen:
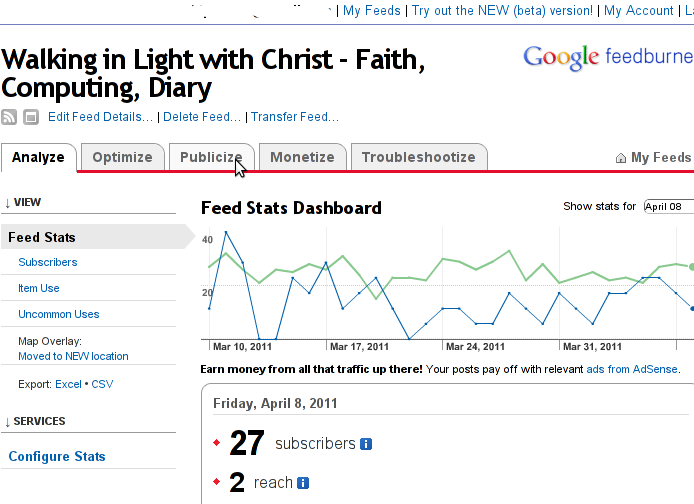
Step 4: Click on Publicize menu
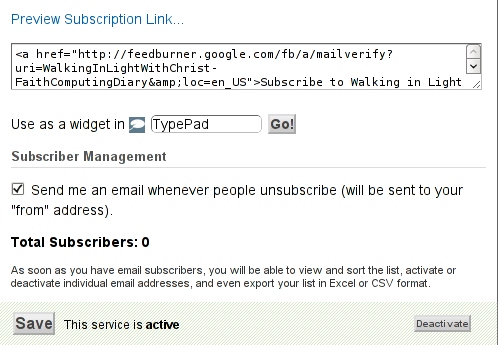
You will see the following two screens while scrolling with your browser:
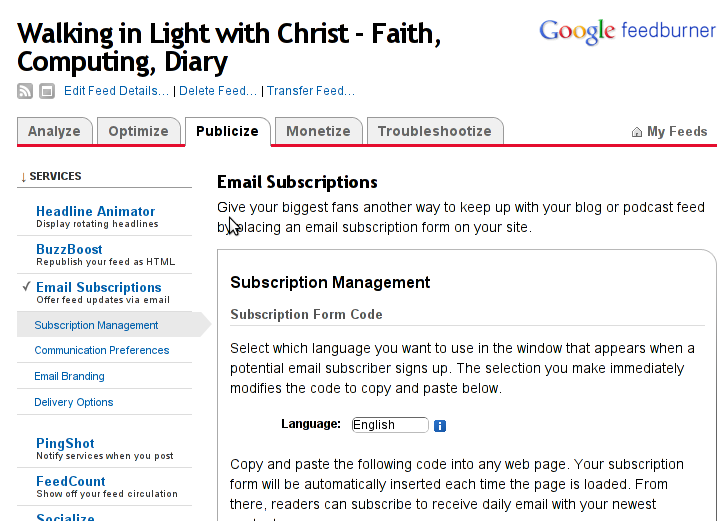
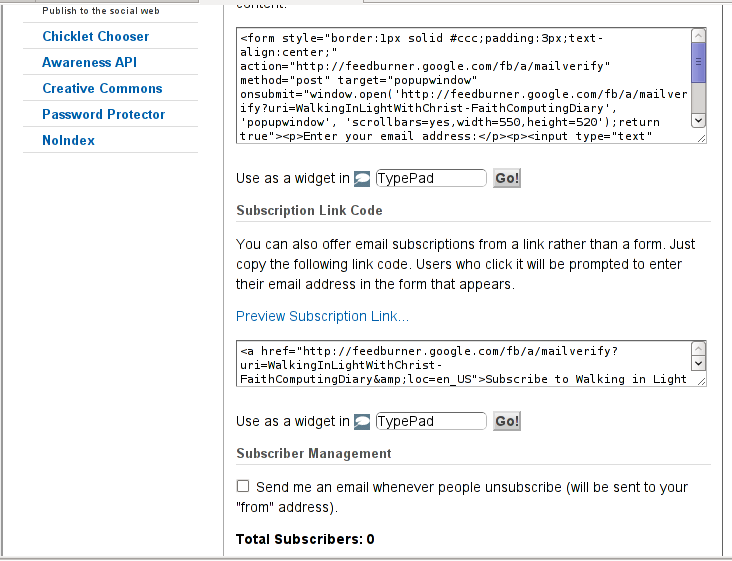
You see in the second screenshot above there is a textbox with a html form code, to set the feedburner subscription to appear on your blog you need to copy/paste this code and put it on your blog.
After copy/pasting the code, don’t forget to scroll down in your browser and save the email subscription generated form settings, (NB! if you don’t save it it want be working even if you install it on your blog).
Here is the Save button screenshot:
Step 5: Setting up feedburner email textbox to wordpress
In order to set up the just copied html and css form code you need to login to your wordpress blog admin and go to:
Appearance -> Widgets
Scroll over the Available Widgets list, find the Text Widget and press the Add button to include the Text Widget to your blog sidebar.
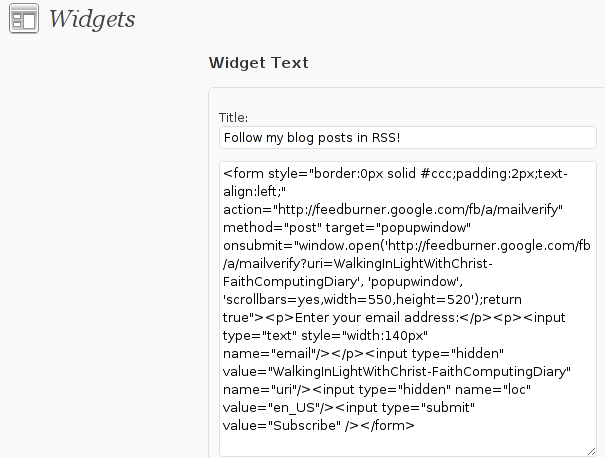
Further on the same Widgets page, go to the Sidebar menu find the just added Text Widget and click over the Edit link:

Here is my screenshot of the edit screen of the Text Widget:
Step 6. Add the feedburner email subscription box to single posts blog views
This step is not a requirement, but I found it for myself to be vital, as it might rise some more subscribers to my blog, if my blog readers finds individual indexed pages in Google.
This step is also highly dependant on the wordpress theme you use, I use the old wordpress default theme and it’s default behaviour is not to show up the wordpress sidebar, whether an individual wordpress post is clicked over, therefore to enable my feedburner subscription box for individual posts I also need to place the form code obtained from Feedburner.com’s to my templates single.php
If you’re using some kind of theme that doesn’t have the non-sidebar single post behaviour you might skip forward this step, otherwise just continue on reading.
To include the feedburner email form subscription to my single posts I edited blog/wp-content/themes/default/single.php
In the single.php file find the code:
<?php comments_template(); ?>
Immediately after the above code place your feedburner form code, like you see in below screenshot:

Step 7: Modify your form code css and javascript to make your feedburner more accustomed for your needs
Again this step is voluntary and is not necessery I’ve disliked the default way the form is formatted so I played a bit with few of it’s values to customize it to my likings, the things which I have changed a bit in the provided feedburner form code was:
- Remove the Delivered by Feedburner text from the form
-
>To do so in the issued feedburner form code below when you copy the code paste it to some text editor and remove from the code the text:<p>Delivered by <a href=”http://feedburner.google.com” target=”_blank”>FeedBurner</a></p>
- – Change the subsciption box width and height:
-
style=”width:140px”Changed that to:style=”width:120px”also I’ve changed:’scrollbars=yes,width=550,height=520’to:’scrollbars=yes,width=450,height=420’Another point of interest for adjustmnets in the feedburner for are in the form code:
- Remove feedburner subscription form default bordering
-
form style=”border:1px solid #ccc;padding:3px;text-align:center;”I’ve changed that to:form style=”border:0px solid #ccc;padding:2px;text-align:center;”By changing the css values border:1px to border:0px I have instructed the subscription box to show up without borders.
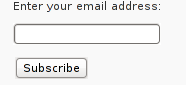
That’s all now refresh in your browser and check if the feedburner email subscription form is showing up properly to your wordpress.
To completely ensure yourself it works correctly try to subscribe yourself to the form and during your next blog post you should receive an email notifying you about the newly written article.
You can see, my blog feedburner subscription form on the blog right sidebar or on the below picture:
Hope that article will help somebody out there.
Tags: account settings, blogs, Button, Click, code, configure, conjunction, e mail, explanation, feature, Feed, Feedburner, form, google, mail subscription, menu, php, plugin, podcast, quite some time, screen, screenshot, scroll, sidebar, statistics, step 1, step 2, subsciption, subscription procedure, subscriptions, subscrpition, time, url, url address, variables, Wordpress
Posted in Various, Web and CMS, Wordpress | 7 Comments »


Fix Null error in WordPress comment reply with wordpress-threaded-comments plugin enabled
Friday, April 6th, 2012I'm running WordPress for already 3 years or so now. Since some very long time. The first wordpress install, I can hardly remember but it something like wordpress 2.5 or wordpress 2.4
Since quite a long time my wordpress blog is powered by a number of plugins, which I regularly update, whenever new plugins pops up …
I haven't noticed most of the time problems during major WordPress platform updates or the update of the installed extensions. However, today while I tried to reply back to one of my blog comments, I've been shocked that, I couldn't.
Pointing at the the Comment Reply box and typing inside was impossible and a null message was stayed filled in the form:
To catch what was causing this weird misbehaving with the reply comments functionality, I grepped through my /var/www/blog/wp-content/plugins/* for the movecfm(null,0,1,null):
# cd /var/www/blog/wp-content/plugins
# grep -rli 'movecfm(null,0,1,null)' */*.php
wordpress-thread-comment/wp-thread-comment.php
I've taken the string movecfm(null,0,1,null) from the browser page source in in my Firefox by pressing – Ctrl+U).
Once I knew of the problem, I first tried commenting the occurances of the null fields in wp-thread-comment.php, but as there, were other troubles in commenting this and I was lazy to read the whole code, checked online if some other fellows experienced the same shitty null void javascript error and already someone pointed at a solution. In the few minutes search I was unable to find anyone who reported for this bug, but what I found is some user threads on wordpress.org mentioning since WordPress 2.7+ the wordpress-threaded-comments is obsolete and the functionality provided by the plugin is already provided by default in newer WPinstalls.
Hence in order to enable the threaded comments WordPress (embedded) reply functionality from within the wp-admin panel used:
Settings -> Discussions -> Enable Threaded (nested) comments (Tick)
You see there is also an option to define how many nested comments subcomments, can be placed per comment, the default was 5, but I thought 5 is a bit low so increased it to 10 comments reply possible per comment.
Finally, to prevent the default threaded comments to interfere with the WordPress Threaded Comments plugin, disabled the plugin through menus:
Plugins -> Active -> WordPress Thread Comments (Deactivate)This solved the weird javascript null "bug" caused by wordpress-threaded-comments once and for all.
Hopefully onwards, my blog readers will not have issues with threaded Reply Comments.
Tags: admin panel, Auto, code, Comment, Ctrl, Draft, fellows, few minutes, Firefox, form, grep, long time, misbehaving, movecfm, null fields, null message, number, occurances, option, page, page source, php, phpI, platform, plugin, Plugins, quot, reply comments, rli, someone, something, thread, threads, tick, time, time problems, Wordpress, wordpress blog, wp
Posted in Web and CMS, Wordpress | 1 Comment »