Posts Tagged ‘apache2’
Wednesday, July 16th, 2014 
On most if not all modern GNU / Linux distributions, Apache webserver comes preinstalled with mod_speling.
What mod_speling does is it tries to find and serve files and directories for non-existing (404 return code) urls with a similar name to passed URL. Other thing mod_speling does is it serves files case-insensitive, even though the UNIX / Linux filesystems are built to understand files case-sensitive.
mod_speling is a very useful module especially when files are being pushed (synchronized) to Apache visible from web document folder from operating systems like Windows whose filesystem doesn't store files case sensitive.
Let me give you a small example on M$ Windows a create file NewFile.html, NEWFILE.HTML, NeWfIlE.Html etc. are one and the same file newfile.html and not 3 different files like it is usually on UNIX / Linux filesystems.
If you happen to migrate old static Websites from Microsoft Internet Information Services (IIS) to UNIX / Linux based hosting. Often Html coders which create websites on Windows platform doesn't respect in website hyperlinks case-sensitive, because anyways Windows FS is case-insetive, thus moving the website to Linux host with Apache the website/s will end up with many 404 error pages, whose fixing for big static websites will be a real pain in the ass.
Also there might be need for mod_speling module enabled, for PHP / Python / Perl websites developed on MS Windows platform and tested on Windows host and then officially to be deployed on Linux.
Note that mod_speling name as a funny thing as actually the module is also converting mis-pelled / mis-typed Apache URLs:
If for example, someone tried to link to your website from a forum mistyping the URL address with mod_speling the mistyped URL could still be handled to open the real existing URL:
Lets say you have URL:
http://your-domain.com/files/what-Ever-fle.php
and the actual URL is:
http://your-domain.com/files/what-Ever-file.php
mod_speling will make Apache scan in /files/ for any files with similar name to what-Ever-fle.php and will open any similar matched file name, preventing you from the normal 404 error and therefore often serving exactly what it has to. Of course such a behavior could be unwanted in same cases for CMSes, which depend on 404 error code for proper operating, so be very sure when configuring mod_speling that this is exactly what you need.
mod_speling can be also useful sometimes for Search Engine Optimization – SEO, as it will show less 404 pages to Crawler search engine bots.
1. Enable mod_speling module on Debian GNU / Linux and Ubuntu
Enabling mod_speling in Apache in Debian / Ubuntu etc. debian based Linuxes is done with either creating symlink from /etc/apache2/mods-available/speling.load to /etc/apache2/mods-enabled/speling.load :
ln -sf /etc/apache2/mods-available/speling.load /etc/apache2/mods-enabled/speling.load
Or by using a2enmod – Debian apache module enabling script:
a2ensite sitename
To enable mod_speling mis-speling resolve feature config directive is:
CheckSpelling on
To disable case sensitivity – as I said earlier helpful for migrations from Microsoft Windows hosts to Linux, use directive:
CheckCaseOnly on
To enable both use:
<IfModule mod_speling.c>
CheckCaseOnly on
CheckSpelling on
</IfModule>
Enabling mod_speling case-insensitivity and fixing mistypes in URL could be done from .htaccess, for any <Directory> (vhost) with enabled .htaccess with
AllowOverride All
To enable it for default set host in new Apache install place it in /etc/apache2/apache2.conf and /etc/apache2/sites-enabled/000-default
Then as usual to make the configuration changes take affect, restart Apache:
/etc/init.d/apache2 restart
2. Enablig mod_speling on CentOS, RHEL and Fedora Linux
Most of RPM based Linux distributions have already mod_speling by default in Apache, so there will be no need to explicitly enable the module within HTTPD.
To check whether mod_speling is already enabled in httpd issue:
/usr/sbin/httpd -M |grep -i mod_speling
If you don't get no output from command this means the module is not enabled. This is the case with CentOS Linux 6.5 for example …
To enable mod_speling on Apache level add in /etc/httpd/conf/httpd.conf
LoadModule speling_module modules/mod_speling.so
and restart webserver
/etc/init.d/httpd restart
If you get instead
/usr/sbin/httpd -M |grep -i mod_speling
speling_module (shared)
Then it is already loaded in HTTPD to enable the module for default domain add to /etc/httpd/conf/httpd.conf – within (<Directory "/var/www/html">),
<IfModule mod_speling.c>
CheckCaseOnly on
CheckSpelling on
</IfModule>
Or if you want to make it active for specific directories within /var/www/html/whatever-dir use either new <Directory ..> directive within Apache config, or enable .htaccess processing with AllowOverride All and place them in .htaccess . For complete mod_speling reference check on Apache's official website
Tags: apache2, config, Debian Ubuntu, doesn, filesystem, fix, httpd, Make Apache, NEWFILE, Often Html, operating systems, pain in the ass, php, script, url, website, Windows
Posted in PHP, Web and CMS | No Comments »
Thursday, November 13th, 2014 
In Linux there are plenty of tools to measure input / ouput – read / write server bottlenecks. Just to mention a few such are, the native part of all Linux distributions IOSTAT – which is a great tool to measure hard disk bottlenecks. However as iostat requires certain sysadmin skills for novice sys-admins, there is also ofcourse more interactive tools such as DSTAT or even better GLANCE which monitors not only disk writes but memory use, CPU load and Network use.
This tools can help you measure which processes are writting most (a lot) to hard disk drive but there is another quick and efficient way to track disk i/o by directly using the Linux kernel this is done via kernel parameter :
/proc/sys/vm/block_dump
To enable block_dump kernel logging:
echo 1 > /proc/sys/vm/block_dump
To later track in real time output from kernel interactively on which running process calling the kernel is writing to server hard drive
tail -f /var/log/syslog
The output looks like so:
Nov 13 12:25:51 pcfreak kernel: [1075037.701056] kjournald(297): WRITE block 482293496 on sda1
Nov 13 12:25:51 pcfreak kernel: [1075037.701059] kjournald(297): WRITE block 482293504 on sda1
Nov 13 12:25:51 pcfreak kernel: [1075037.701062] kjournald(297): WRITE block 482293512 on sda1
Nov 13 12:25:51 pcfreak kernel: [1075037.701066] kjournald(297): WRITE block 482293520 on sda1
Nov 13 12:25:51 pcfreak kernel: [1075037.701069] kjournald(297): WRITE block 482293528 on sda1
Nov 13 12:25:51 pcfreak kernel: [1075037.701072] kjournald(297): WRITE block 482293536 on sda1
Nov 13 12:25:51 pcfreak kernel: [1075037.702824] kjournald(297): WRITE block 482293544 on sda1
Nov 13 12:25:52 pcfreak kernel: [1075039.219288] apache2(3377): dirtied inode 3571740 (_index.html.old) on sda1
Nov 13 12:25:52 pcfreak kernel: [1075039.436133] mysqld(22945): dirtied inode 21546676 (#sql_c0a_0.MYI) on sda1
Nov 13 12:25:52 pcfreak kernel: [1075039.436826] mysqld(22945): dirtied inode 21546677 (#sql_c0a_0.MYD) on sda1
Nov 13 12:25:53 pcfreak kernel: [1075039.662832] mysqld(22945): dirtied inode 21546676 (#sql_c0a_0.MYI) on sda1
Nov 13 12:25:53 pcfreak kernel: [1075039.663297] mysqld(22945): dirtied inode 21546677 (#sql_c0a_0.MYD) on sda1
Nov 13 12:25:53 pcfreak kernel: [1075039.817120] apache2(3377): dirtied inode 3571754 (_index.html) on sda1
Nov 13 12:25:53 pcfreak kernel: [1075039.819968] apache2(3377): dirtied inode 3571740 (_index.html_gzip) on sda1
Nov 13 12:25:53 pcfreak kernel: [1075039.820016] apache2(3377): dirtied inode 3571730 (?) on sda1
Nov 13 12:25:53 pcfreak kernel: [1075040.491378] mysqld(22931): dirtied inode 21546676 (#sql_c0a_0.MYI) on sda1
Nov 13 12:25:53 pcfreak kernel: [1075040.492309] mysqld(22931): dirtied inode 21546677 (#sql_c0a_0.MYD) on sda1
Nov 13 12:25:54 pcfreak kernel: [1075041.551513] apache2(3377): dirtied inode 1474706 (_index.html_gzip.old) on sda1
Nov 13 12:25:54 pcfreak kernel: [1075041.551566] apache2(3377): dirtied inode 1474712 (_index.html.old) on sda1
Nov 13 12:25:55 pcfreak kernel: [1075041.769036] mysqld(22941): dirtied inode 21546676 (#sql_c0a_0.MYI) on sda1
Nov 13 12:25:55 pcfreak kernel: [1075041.769804] mysqld(22941): dirtied inode 21546677 (#sql_c0a_0.MYD) on sda1
Nov 13 12:25:55 pcfreak kernel: [1075041.985857] apache2(3282): dirtied inode 4063282 (data_9d97a7f62d54bc5fd791fba3245ba591-SMF-modSettings.php) on sda1
Nov 13 12:25:55 pcfreak kernel: [1075041.987460] apache2(3282): dirtied inode 29010186 (data_9d97a7f62d54bc5fd791fba3245ba591-SMF-permissions–1.php) on sda1
Nov 13 12:25:55 pcfreak kernel: [1075041.988357] flush-8:0(289): WRITE block 51350632 on sda1
Using the kernel method to see which processes are stoning your server is great way especially for servers without connectivity to the Internet where you have no possibility to install sysstat package (contaning iostat), dstat or glance.
Thanks to Marto's blog for this nice hack.
Tags: apache2, echo 1, hard disk drive, How to, kernel, kernel parameter, make, MYD, MYI, mysqld, pcfreak, WRITE
Posted in System Administration, Various, Web and CMS | No Comments »
Wednesday, September 7th, 2011 
One good module that helps in mitigating, very basic Denial of Service attacks against Apache 1.3.x 2.0.x and 2.2.x webserver is mod_evasive
I’ve noticed however many Apache administrators out there does forget to install it on new Apache installations or even some of them haven’t heard about of it.
Therefore I wrote this small article to create some more awareness of the existence of the anti DoS module and hopefully thorugh it help some of my readers to strengthen their server security.
Here is a description on what exactly mod-evasive module does:
debian:~# apt-cache show libapache2-mod-evasive | grep -i description -A 7
Description: evasive module to minimize HTTP DoS or brute force attacks
mod_evasive is an evasive maneuvers module for Apache to provide some
protection in the event of an HTTP DoS or DDoS attack or brute force attack.
.
It is also designed to be a detection tool, and can be easily configured to
talk to ipchains, firewalls, routers, and etcetera.
.
This module only works on Apache 2.x servers
How does mod-evasive anti DoS module works?
Detection is performed by creating an internal dynamic hash table of IP Addresses and URIs, and denying any single IP address which matches the criterias:
- Requesting the same page more than number of times per second
- Making more than N (number) of concurrent requests on the same child per second
- Making requests to Apache during the IP is temporarily blacklisted (in a blocking list – IP blacklist is removed after a time period))
These anti DDoS and DoS attack protection decreases the possibility that Apache gets DoSed by ana amateur DoS attack, however it still opens doors for attacks who has a large bot-nets of zoombie hosts (let’s say 10000) which will simultaneously request a page from the Apache server. The result in a scenario with a infected botnet running a DoS tool in most of the cases will be a quick exhaustion of system resources available (bandwidth, server memory and processor consumption).
Thus mod-evasive just grants a DoS and DDoS security only on a basic, level where someone tries to DoS a webserver with only possessing access to few hosts.
mod-evasive however in many cases mesaure to protect against DoS and does a great job if combined with Apache mod-security module discussed in one of my previous blog posts – Tightening PHP Security on Debian with Apache 2.2 with ModSecurity2
1. Install mod-evasive
Installing mod-evasive on Debian Lenny, Squeeze and even Wheezy is done in identical way straight using apt-get:
deiban:~# apt-get install libapache2-mod-evasive

...
2. Enable mod-evasive in Apache
debian:~# ln -sf /etc/apache2/mods-available/mod-evasive.load /etc/apache2/mods-enabled/mod-evasive.load
3. Configure the way mod-evasive deals with potential DoS attacks
Open /etc/apache2/apache2.conf, go down to the end of the file and paste inside, below three mod-evasive configuration directives:
<IfModule mod_evasive20.c>

DOSHashTableSize 3097DOS

PageCount 30

DOSSiteCount 40

DOSPageInterval 2

DOSSiteInterval 1

DOSBlockingPeriod 120

#DOSEmailNotify hipo@mymailserver.com

</IfModule>
In case of the above configuration criterias are matched, mod-evasive instructs Apache to return a 403 (Forbidden by default) error page which will conserve bandwidth and system resources in case of DoS attack attempt, especially if the DoS attack targets multiple requests to let’s say a large downloadable file or a PHP,Perl,Python script which does a lot of computation and thus consumes large portion of server CPU time.
The meaning of the above three mod-evasive config vars are as follows:
DOSHashTableSize 3097 – Increasing the DoSHashTableSize will increase performance of mod-evasive but will consume more server memory, on a busy webserver this value however should be increased
DOSPageCount 30 – Add IP in evasive temporary blacklist if a request for any IP that hits the same page 30 consequential times.
DOSSiteCount 40 – Add IP to be be blacklisted if 40 requests are made to a one and the same URL location in 1 second time
DOSBlockingPeriod 120 – Instructs the time in seconds for which an IP will get blacklisted (e.g. will get returned the 403 foribden page), this settings instructs mod-evasive to block every intruder which matches DOSPageCount 30 or DOSSiteCount 40 for 2 minutes time.
DOSPageInterval 2 – Interval of 2 seconds for which DOSPageCount can be reached.
DOSSiteInterval 1 – Interval of 1 second in which if DOSSiteCount of 40 is matched the matched IP will be blacklisted for configured period of time.
mod-evasive also supports IP whitelisting with its option DOSWhitelist , handy in cases if for example, you should allow access to a single webpage from office env consisting of hundred computers behind a NAT.
Another handy configuration option is the module capability to notify, if a DoS is originating from a number of IP addresses using the option DOSEmailNotify
Using the DOSSystemCommand in relation with iptables, could be configured to filter out any IP addresses which are found to be matching the configured mod-evasive rules.
The module also supports custom logging, if you want to keep track on IPs which are found to be trying a DoS attack against the server place in above shown configuration DOSLogDir “/var/log/apache2/evasive” and create the /var/log/apache2/evasive directory, with:
debian:~# mkdir /var/log/apache2/evasive
I decided not to log mod-evasive DoS IP matches as this will just add some extra load on the server, however in debugging some mistakenly blacklisted IPs logging is sure a must.
4. Restart Apache to load up mod-evasive
debian:~# /etc/init.d/apache2 restart

...
Finally a very good reading which sheds more light on how exactly mod-evasive works and some extra module configuration options are located in the documentation bundled with the deb package to read it, issue:
debian:~# zless /usr/share/doc/libapache2-mod-evasive/README.gz
Tags: ana amateur, anti, apache 2, apache server, apache2, awareness, bandwidth server, botnet, brute force attack, concurrent requests, configured, criterias, DDoS, debian linux, Denial, denial of service, denial of service attacks, description, dos attack, dos tool, DOSHashTableSize, evasive maneuvers, event, exhaustion, existence, file, grep, hash, hash table, HTTP, IfModule, Installing, libapache, mod, number, option, page, period of time, protection, Secure Apache, server security, Service, show, small article, system resources, time, tool, uris, webpage
Posted in Computer Security, Linux, System Administration, Web and CMS | 1 Comment »
Monday, June 3rd, 2013 
There is plenty of software for monitoring how server performs and whether servers are correctly up and running. There is probably no Debian Linux admin who didn't already worked or at least tried Nagios and Mointor to monitor and notify whether server is unreachable or how server services operate. Nagios and Munin are play well together to prevent possible upcoming problems with Web / Db / E-mail services or get notify whether they are completely inaccessible. One similar "next-generation" and less known software is Icanga.
The reason, why to use Icinga instead of Nagios is more features a list of what does Icinga supports more than Nagios is on its site here
I recently heard of it and decided to try it myself. To try Icanga I followed Icanga's install tutorial on Wiki.Icanga.Org here
In Debian Wheezy, Icinga is already part of official repositories so installing it like in Squeeze and Lenny does not require use of external Debian BackPorts repositories.
1. Install Icinga pre-requirement packages
debian:# apt-get --yes install php5 php5-cli php-pear php5-xmlrpc php5-xsl php5-gd php5-ldap php5-mysql
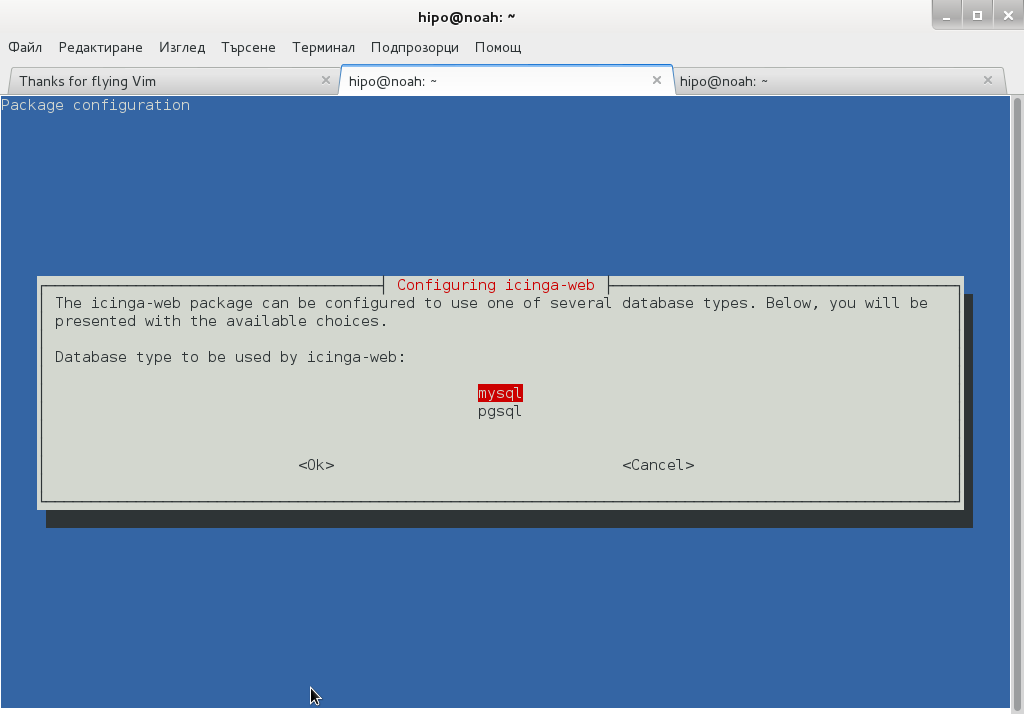
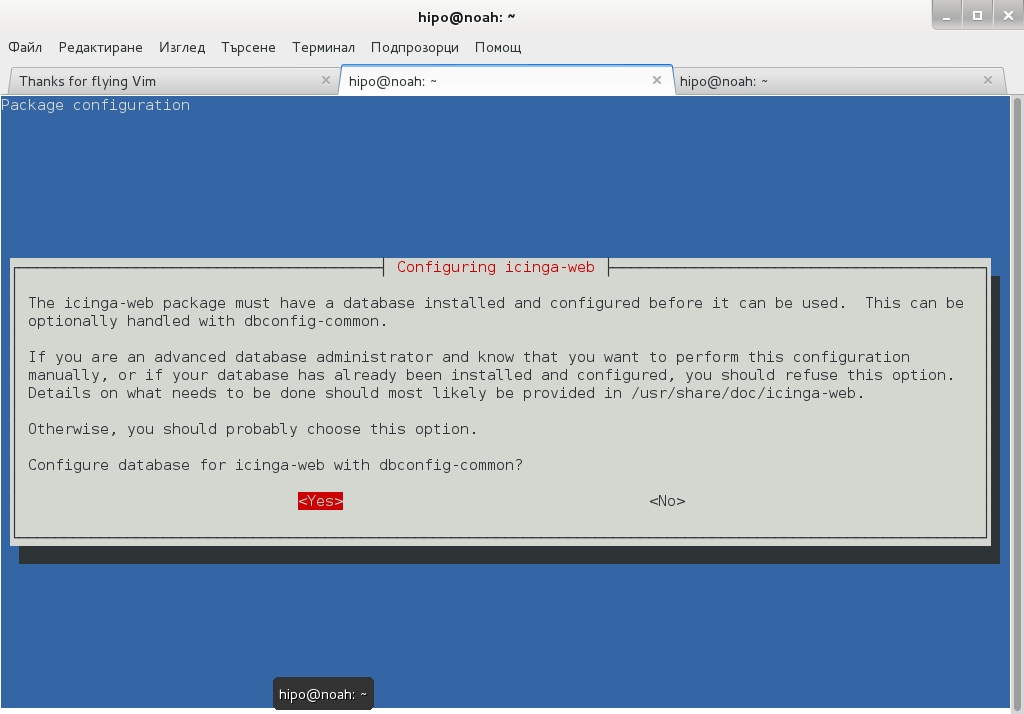
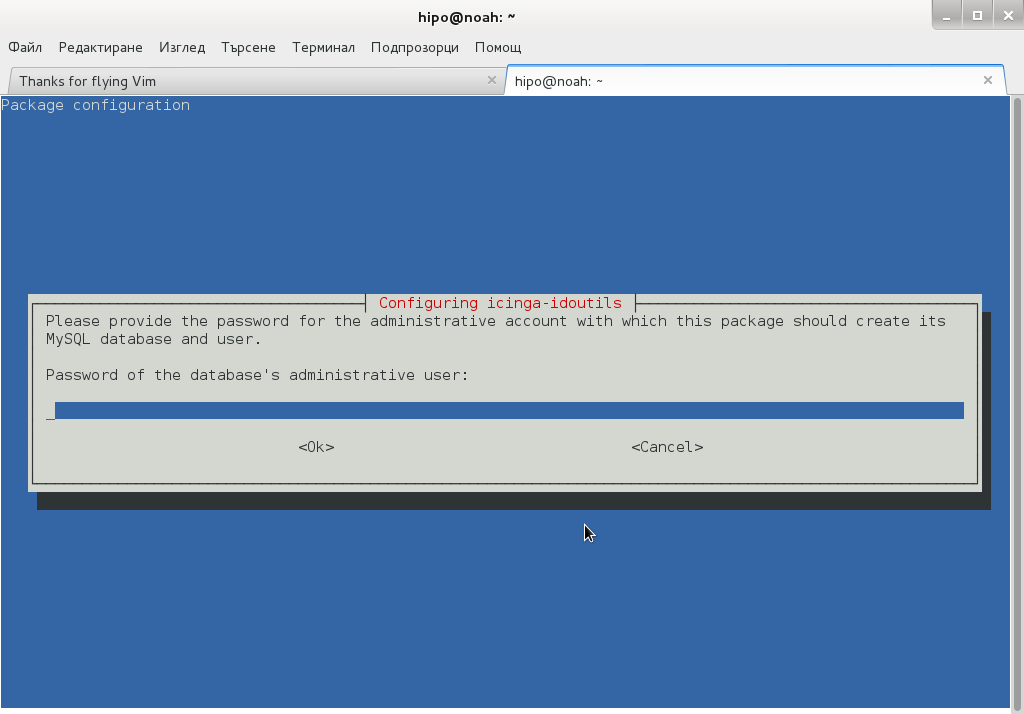
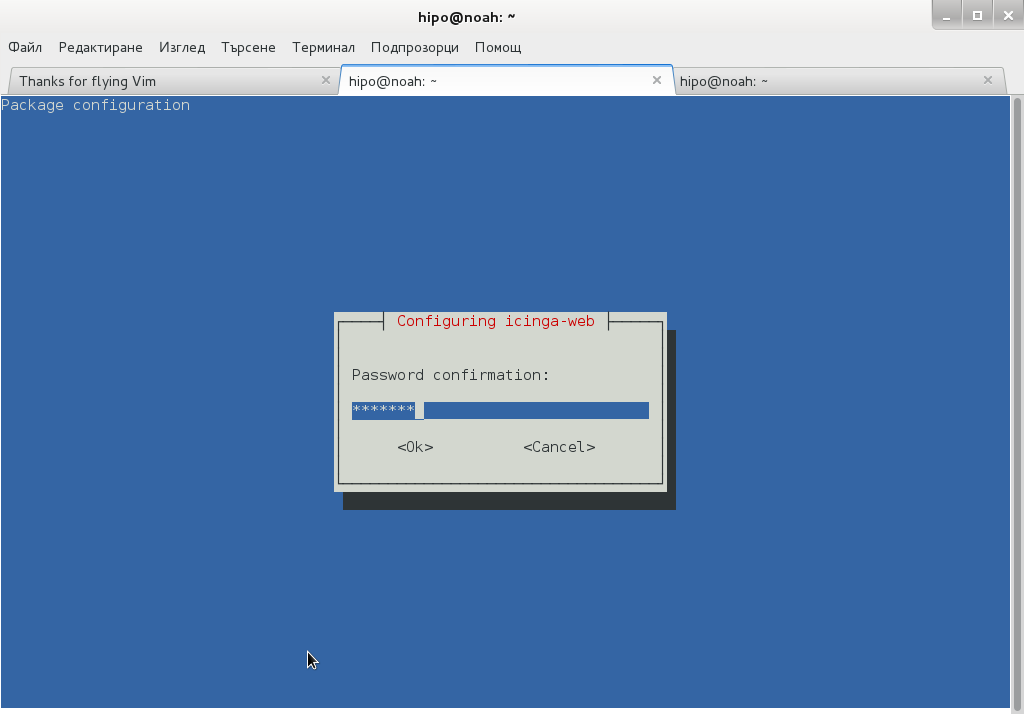
2. Install Icanga-web package
debian:~# apt-get --yes install icinga-web
Here you will be prompted a number of times to answer few dialog questions important for security, as well as fill in MySQL server root user / password as well as SQL password that will icinga_web mySQL user use.
….
Setting up icinga-idoutils (1.7.1-6) …
dbconfig-common: writing config to /etc/dbconfig-common/icinga-idoutils.conf
granting access to database icinga for icinga-idoutils@localhost: success.
verifying access for icinga-idoutils@localhost: success.
creating database icinga: success.
verifying database icinga exists: success.
populating database via sql… done.
dbconfig-common: flushing administrative password
Setting up icinga-web (1.7.1+dfsg2-6) …
dbconfig-common: writing config to /etc/dbconfig-common/icinga-web.conf
Creating config file /etc/dbconfig-common/icinga-web.conf with new version
granting access to database icinga_web for icinga_web@localhost: success.
verifying access for icinga_web@localhost: success.
creating database icinga_web: success.
verifying database icinga_web exists: success.
populating database via sql… done.
dbconfig-common: flushing administrative password
Creating config file /etc/icinga-web/conf.d/database-web.xml with new version
database config successful: /etc/icinga-web/conf.d/database-web.xml
Creating config file /etc/icinga-web/conf.d/database-ido.xml with new version
database config successful: /etc/icinga-web/conf.d/database-ido.xml
enabling config for webserver apache2…
Enabling module rewrite.
To activate the new configuration, you need to run:
service apache2 restart
`/etc/apache2/conf.d/icinga-web.conf' -> `../../icinga-web/apache2.conf'
[ ok ] Reloading web server config: apache2 not running.
root password updates successfully!
Basedir: /usr Cachedir: /var/cache/icinga-web
Cache already purged!
3. Enable Apache mod_rewrite
debian:~# a2enmod rewrite
debian:~# /etc/init.d/apache2 restart
4. Icinga documentation files
Some key hints on Enabling some more nice Icinga features are mentioned in Icinga README files, check out, all docs files included with Icinga separate packs are into:
debian:~# ls -ld *icinga*/

drwxr-xr-x 3 root root 4096 Jun  3 10:48 icinga-common/

drwxr-xr-x 3 root root 4096 Jun  3 10:48 icinga-core/

drwxr-xr-x 3 root root 4096 Jun  3 10:48 icinga-idoutils/

drwxr-xr-x 2 root root 4096 Jun  3 10:48 icinga-web/
debian:~# less /usr/share/doc/icinga-web/README.Debian
debian:~# less /usr/share/doc/icinga-idoutils/README.Debian
5. Configuring Icinga
Icinga configurations are separated in two directories:
debian:~# ls -ld *icinga*
drwxr-xr-x 4 root root 4096 Jun 3 10:50 icinga
drwxr-xr-x 3 root root 4096 Jun 3 11:07 icinga-web
>
etc/icinga/ – (contains configurations files for on exact icinga backend server behavior)
/etc/icinga-web – (contains all kind of Icinga Apache configurations)
Main configuration worthy to look in after install is /etc/icinga/icinga.cfg.
6. Accessing newly installed Icinga via web
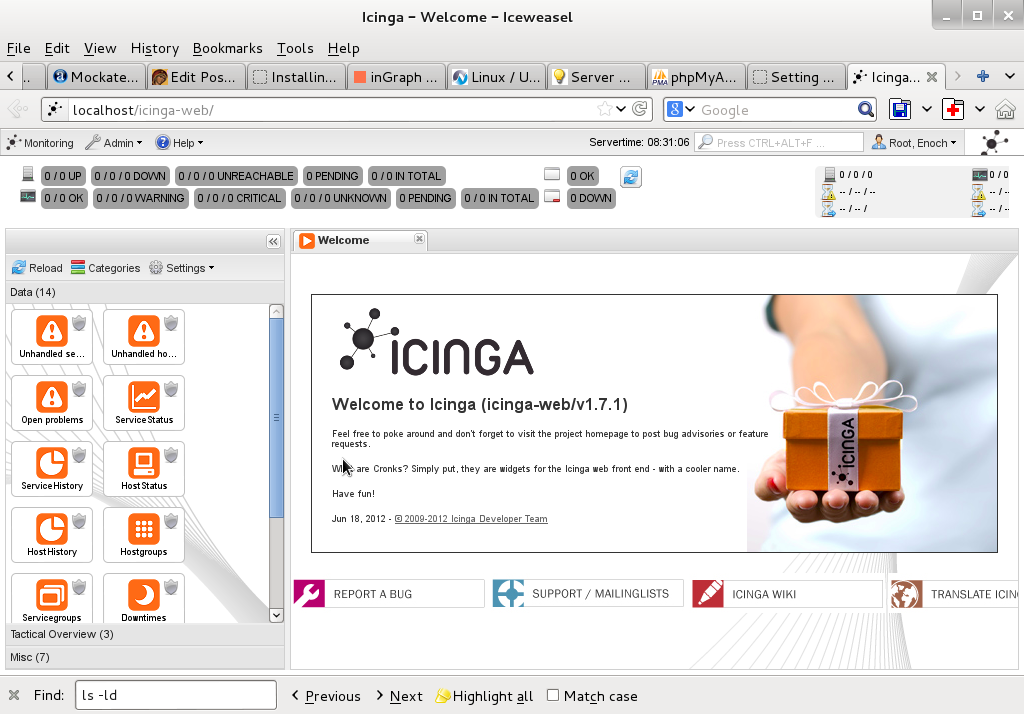
To access just installed Icinga, open in browser URL – htp://localhost/icinga-web
7. Monitoring host services with Icinga (NRPE)
As fork of Nagios. Icinga has similar modular architecture and uses number of external plugins to Monitor external host services list of existing plugins is on Icinga's wiki here.
Just like Nagios Icinga supports NRPE protocol (Nagios Remote Plugin Executor). To setup NRPE, nrpe plugin from nagios is used (nagios-nrpe-server).
To install NRPE on any of the nodes to be tracked;
debian: ~# apt-get install –yes nagios-nrpe-server
…
Then to configure NRPE edit /etc/nagios/nrpe_local.cfg
Once NRPE is supported in Icinga, you can install on Windows or Linux hosts NRPE clients like in Nagios to report on server processes state and easily monitor if server disk space / load or service is in critical state.
Tags: apache, apache2, debian linux, Debian Linux Installing, e mail services, Icanga Nagios, known software, Linux, Monitoring, new software, NRPE, php pear, repo, repositories, repository, root password, root root, server root, server services, servers, squeeze, version, web package, xml
Posted in Everyday Life, Linux, Monitoring, System Administration, Various | 1 Comment »
Saturday, March 19th, 2011 
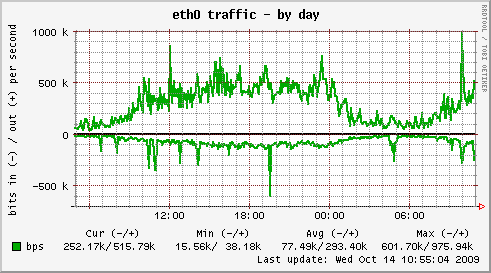
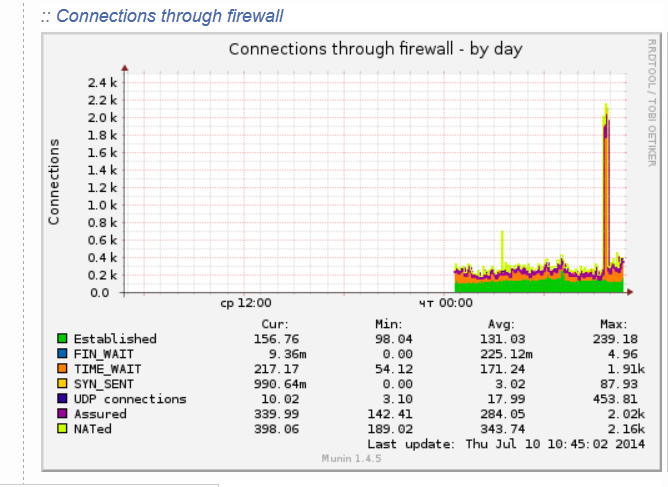
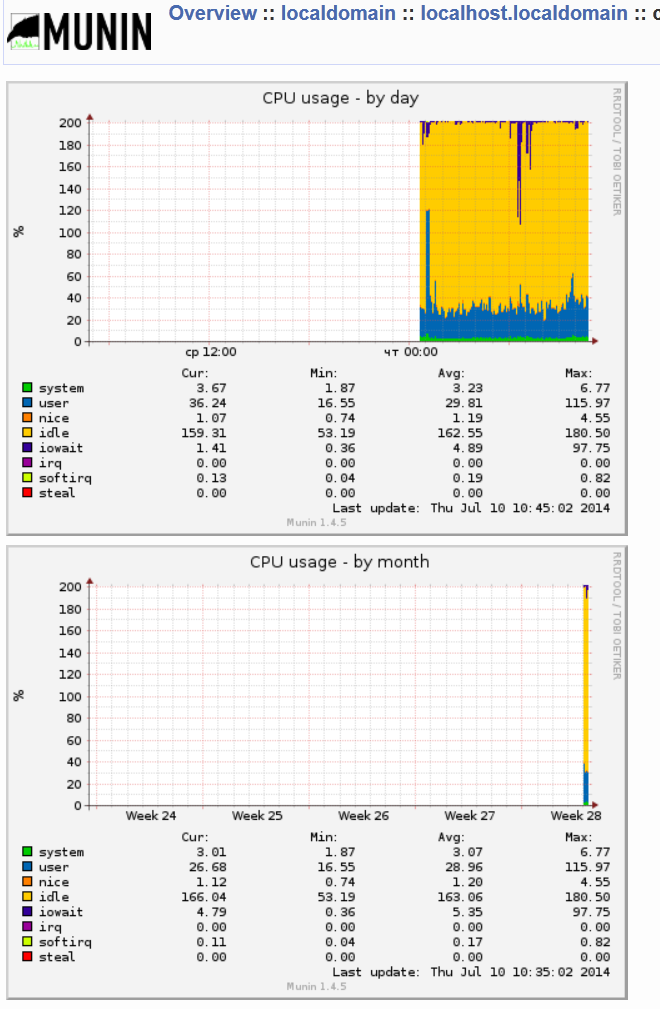
Munin is great software for surveillance software for your MySQL, Apache, Qmail, Postfix and many other of the classical daemon services which most of the Linux, BSD servers online are running on.
1. Munin on Debian Linux is really easy to be installed and comes to executing:
debian:~# apt-get install munin munin-node munin-plugins-extra
2. Link /var/www/munin/ to some VirtualHost or ServerHost
For instance if your munin is to be placed on the domain www.pc-freak.net.net which has the DocumentRoot of /var/www
debian:~# cd /var/www

debian:/var/www# ln -sf /var/www/munin munin
3. Add some extra MySQL related plugins
To check whole list of pmunin plugins you can enable check in /etc/munin/plugins directory
Lets say our Munin will be providing statistics mainly for MySQL, enable this bunch of plugins:
cd /etc/munin/plugins

ln -s /usr/share/munin/plugins/mysql_ mysql_

ln -s /usr/share/munin/plugins/mysql_bytes mysql_bytes

ln -s /usr/share/munin/plugins/mysql_innodb mysql_innodb

ln -s /usr/share/munin/plugins/mysql_isam_space_ mysql_isam_space_

ln -s /usr/share/munin/plugins/mysql_queries mysql_queries

ln -s /usr/share/munin/plugins/mysql_slowqueries mysql_slowqueries

ln -s /usr/share/munin/plugins/mysql_threads mysql_threads
Though above command would enable mysql monitoring it will be not working out of the box. You will find in munin logs error like:
Missing dependency Cache::Cache at /usr/share/munin/plugins/mysql_ line 716."
To fix this install libcache-perl and libcache-cache-perl
apt-get install --yes libcache-perl libcache-cache-perl
Then regenerate munin plugin configuration issue cmd:
munin-node-configure --suggest --shell | sh
and restart Munin-node server
service munin-node restart
Munin Node should be able login to the MySQL server using the Debian System Maintenance user however if you should need to create a custom user you can add the following configuration to:
/etc/munin/plugin-conf.d/munin-node
[mysql*]
user root
env.mysqluser muninmonitor
env.mysqlpassword Your-Secret-Password
4. Edit Munin config
Make sure you have at least the following variables enabled in /etc/munin/munin.conf
dbdir /var/lib/munin
htmldir /var/cache/munin/www
logdir /var/log/munin
rundir /var/run/munin
tmpldir /etc/munin/templates
includedir /etc/munin/munin-conf.d
[localhost.localdomain]
address 127.0.0.1
use_node_name yes
5. Add Munin Alias or Virtualhost
To make Munin Accessible from Webserver you need to at least add an alias create a file
/etc/apache2/conf.d/munin with following content:
vim /etc/apache2/conf.d/munin
Alias /munin /var/cache/munin/www
<Directory /var/cache/munin/www>
Order allow,deny
#Allow from localhost 127.0.0.0/8 ::1
Allow from all
Options None
php_value engine off
<IfModule mod_expires.c>
ExpiresActive On
ExpiresDefault M310
</IfModule>
</Directory>
If you want to access Munin from Apache subdomain create it lets say you want to access it via stats.www.pc-freak.net, use following config file:
vi /etc/apache2/sites-enabled/stats.www.pc-freak.net
<VirtualHost *>
ServerAdmin hipo@www.pc-freak.net
ServerName stats.www.pc-freak.net
DocumentRoot /var/cache/munin/www
<Directory />
Options FollowSymLinks
#AllowOverride All
php_value engine off
</Directory>
LogLevel debug
CustomLog /var/log/apache2/munin/access.log combined
ErrorLog /var/log/apache2/munin/error.log
ServerSignature On
<Directory /var/cache/munin/www>
Order allow,deny
#Allow from localhost 127.0.0.0/8 ::1
Allow from all
Options FollowSymlinks
#AllowOverride All
php_value engine off
</Directory>
</VirtualHost>
6. Restart Apache;
debian:~# /etc/init.d/apache2 restart
Now to access the newly installed munin point your favorite browser to (either the subdirectory configured for access or the Virtualhost subdomain):
https://www.pc-freak.net/munin/
or
http://munin.www.pc-freak.net
7. Protecting Munin with a password
As it could be a security leak to expose statistics regarding your server (Disk I/O, Memory, Load Avarage, Apache, MySQL Postfix) operations it is good security practice to protect munin with a password.
I've earlied blogged on how to protect your server munin web-statistics wtih an htaccess password (read it here)
Happy Monitoring
Tags: apache performance, apache2, bsd servers, configuration issue, CustomLog, documentroot, domain pc, freak, great software, Linux, munin, net, node, password, postfix, Qmail, restart apache, security practice, share, surveillance software, Tracking graphically MySQL and Apache performance in web with Munin on Debian, Virtualhost, web, www
Posted in Monitoring, MySQL, System Administration, Web and CMS | 1 Comment »
Friday, October 5th, 2012 Debian GNU / Linux's Apache default behavior is to report Apache server name, version and Linux distribution version and codename.
This is shown as a minor security leak in many Security Scanner (audit) software like Nessus. It reveals a vital information which could help malicious attacker later to use exploit if the version number in question is vulnerable.
The quickest way to check, either Apache versioning and distro info is disabled is with telnet:
hipo@noah:~/Desktop$ telnet www.pc-freak.net 80
Trying 83.228.93.76…
Connected to www.pc-freak.net.
Escape character is '^]'.
HEAD / HTTP/1.0
Connection closed by foreign host.
hipo@noah:~/Desktop$ telnet www.pc-freak.net 80
Trying 83.228.93.76…
Connected to www.pc-freak.net.
Escape character is '^]'.
HEAD / HTTP/1.0
HTTP/1.1 200 OK
Date: Fri, 05 Oct 2012 10:48:36 GMT
Server: Apache/2.2.16 (Debian)
X-Powered-By: PHP/5.3.3-7+squeeze14
Vary: Accept-Encoding
Connection: close
Content-Type: text/html
Disabling this Distro version codename and version number reporting on Debian is done by changing in file /etc/apache2/conf.d/security directives:
ServerTokens OS

ServerSignature On
to
ServerSignature Off

ServerTokens ProductOnly
Here important note to make is if you try adding:
ServerSignature Off and ServerTokens Prod straight in Debian general config /etc/apache2/apache2.conf, but did not change the settings set for the vars through /etc/apache2/conf.d/security; settings from /etc/apache2/conf.d/security will overwrite ServerSignature / ServerTokens settings set in /etc/apache2/apache2.conf
I tried this myself (forgotting about /etc/apache2/conf.d/security) and adding both variables straight in apache2.conf. After Apache restart Apache version number and type of distribution continued be returned by the WebServer.
I thought something specific changed in Debian Squeeze – Apache/2.2.16 so this two variables are probably not working so I did a quick research online seing other people complaining also unable to disable Apache ver and Linux distro version and looking for a reason why. Well anyways if you happen to also ponder, why ServerSignature Off and ServerTokens ProductOnly does not take effect keep in mind it is due to overwritten settings via /etc/apache2/conf.d/security, changing the values there and restarting Apache and you're done 🙂
To make sure 100% Apache is no longer returning exact version number and host installed distro type, use telnet again:
hipo@noah:~/Desktop$ telnet www.pc-freak.net 80
Trying 83.228.93.76…
Connected to www.pc-freak.net.
Escape character is '^]'.
HEAD / HTTP/1.0
Connection closed by foreign host.
Tags: apache2, character, config, Desktop, hipo, host, How to, net, number, version
Posted in System Administration, Web and CMS | 1 Comment »
Wednesday, February 26th, 2014 
Having a combination of Apache webservice Reverse Proxy to redirect invisibly traffic to a number of Tomcat server positioned in a DMZ is a classic task in big companies Corporate world.
Hence if you work for company like IBM or HP sooner or later you will need to configure Apache Webserver cluster with few running Jakarta Tomcat Application servers behind. Scenario with necessity to access a java based application via Tomcat which requires logging (authentication) relaying on establishing and keeping a session ID is probably one of the most common ones and if you do it for first time you will probably end up with Session ID issues. Session ID issues are hard to capture at first as on first glimpse application will seem to be working but users will have to re-login all the time even though the programmers might have coded for a session to expiry in 30 minutes or so.
… I mean not having configured Session ID prevention to Tomcats will cause random authentication session expiries and users using the Tomcat app will be unable to normally access below application with authenticated credentials. The solution to these is known under term "Sticky sessions"
To configure Sticky sessions you need to already have configured Apache/s with following minimum configuration:
- enabled mod_proxy, proxy_balancer_module, proxy_http_module and or mod_proxy_ajp (in Apache config)
LoadModule proxy_module modules/mod_proxy.so
LoadModule proxy_balancer_module modules/mod_proxy_balancer.so
LoadModule proxy_http_module modules/mod_proxy_http.so
- And configured and tested Tomcats running an Application reachable via AJP protocol
Below example assumes there is Reverse Proxy Load Balancer Apache which has to forward all traffic to 2 tomcats. The config can easily be extended for as many as necessary by adding more BalancerMembers.
In Apache webserver (apache2.conf / httpd.conf) you need to have JSESSIONID configured. These JSESSIONID is going to be appended to each client request from Reverse Proxy to each of Tomcat servers with value opened once on authentication to first Tomcat node to each of the other ones.
 <Proxy balancer://mycluster>

BalancerMember ajp://10.16.166.53:11010/ route=delivery1

BalancerMember ajp://10.16.166.66:11010/ route=delivery2

</Proxy>
 ProxyRequests Off

ProxyPass / balancer://mycluster/ stickysession=JSESSIONID

ProxyPassReverse / balancer://mycluster/
The two variables route=delivery1 and route=delivery2 are routed to hosts identificators that also has to be present in Tomcat server configurations
In Tomcat App server First Node (server.xml)
<Engine name="Catalina" defaultHost="localhost" jvmRoute="delivery1">
In Tomcat App server Second Node (server.xml)
<Engine name="Catalina" defaultHost="localhost" jvmRoute="delivery2">
Once Sticky Sessions are configured it is useful to be able to track they work fine this is possible through logging each of established JESSSIONIDs, to do so add in httpd.conf
LogFormat "%h %l %u %t \"%r\" %>s %b \"%{Referer}i\" \"%{User-Agent}i\"\"%{JSESSIONID}C\"" combined
After modifications restart Apache and Tomcat to load new configs. In Apache access.log the proof should be the proof that sessions are preserved via JSESSIONID, there should be logs like:
127.0.0.1 - - [18/Sep/2013:10:02:02 +0800] "POST /examples/servlets/servlet/RequestParamExample HTTP/1.1" 200 662 "http://localhost/examples/servlets/servlet/RequestParamExample" "Mozilla/5.0 (X11; Linux x86_64; rv:17.0) Gecko/20130807 Firefox/17.0""B80557A1D9B48EC1D73CF8C7482B7D46.server2"
127.0.0.1 - - [18/Sep/2013:10:02:06 +0800] "GET /examples/servlets/servlet/RequestInfoExample HTTP/1.1" 200 693 "http://localhost/examples/servlets/" "Mozilla/5.0 (X11; Linux x86_64; rv:17.0) Gecko/20130807 Firefox/17.0""B80557A1D9B48EC1D73CF8C7482B7D46.server2"
That should solve problems with mysterious session expiries 🙂
Tags: AJP, apache webserver, apache2, application, authentication, combination, conf, configured, DMZ, Engine, First Node, hp, httpd, ID, Jakarta Tomcat Application, JESSIONID, JSESSIONID, localhost, need, number, proof, proxy, request, Reverse Proxy, Reverse Proxy Load Balancer Apache, run, Second Node, server, session, working, xml
Posted in Linux, System Administration, Various | 2 Comments »
Monday, October 28th, 2013 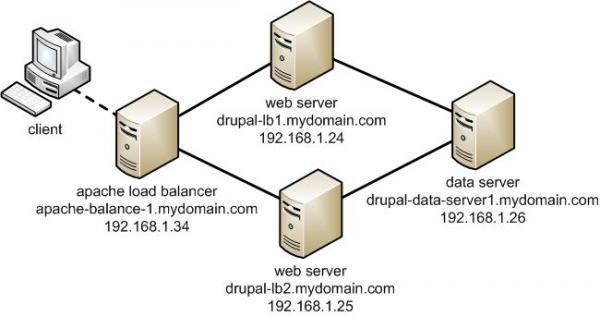
Any admin somehow involved in sphere of UNIX Webhosting knows Apache pretty well. I've personally used Apache for about 10 years now and until now I always used it as a single installation on a Linux. Always so far whenever the requirements for more client connections raised up, web hosting companies I worked for did a migration of Website / websites on a newer better (quicker) server hardware configuration. Everyone knows keeping a site on a single Apache server poses great RISK if the machine hangs up for a reason or gets DoSed this makes websites unavailable until reboot and poses unwanted downtime. Though I know pretty well the concept of load balancing until today I never had configured Apache to serve as Load balancer between two or more identical machines set-upped to interpret PHP / Perl scripts. Amazingly load balancing users web traffic happened to be much easier than I supposed. All necessary is a single Apache configured with mod_proxy_balancer which acts as proxy and ships HTTP requests between two Apache servers. Logically its very important that the entry traffic host with Apache mod_proxy_balancer has to be configured to only run only mod_proxy_balancer otherwise it will be eating unnecessary server memory as with each unnecessary loaded Apache module usage of memory resources raise up.
The scenario of my load balancer and 2 webserver hosts behind it goes like this:
a. Apache with load balancer with external IP address – i.e. (83.228.93.76) with DNS record for ex. www.mybalanced-webserver.com
b. Normally configured Apache to run PHP scripts with internal IP address through NAT – (Network address translation) (on 10.10.10.1) – known under host JEREMIAH
c. Second identical Apache to above host running on 10.10.10.1 with IP 10.10.10.2. with internal host ISSIAH.
N.B.! All 3 hosts are running latest Debian GNU / Linux 7.2 Wheezy
After having this in mind, I proceeded with installing the on 83.228.93.76 apache and removing all unnecessary modules.
!!! Important note is if you use some already existent Apache configured to run PHP or any other unnecessary stuff – make sure you remove this otherwise expect severe performance issues !!!
1. Install Apache webserver
loadbalancer:~# apt-get install --yes apache2
2. Enable mod proxy proxy_balancer and proxy_http
On Debian Linux modules are enabled with a2enmod command;
 loadbalancer:~# a2enmod proxy

loadbalancer:~# a2enmod proxy_balancer

loadbalancer:~# a2enmod proxy_http
Actually what a2enmod command does is to make symbolic links from /etc/apache2/mods-available/{proxy,proxy_balancer,proxy_http} to /etc/apache2/mods-available/{proxy,proxy_balancer,proxy_http}
3. Configure Apache mod proxy to load balance traffic between JEREMIAH and ISSAIAH webservers
loadbalancer:~# vim /etc/apache2/conf.d/proxy_balancer
/etc/apache2/conf.d/proxy-balancer
Paste inside:
<Proxy balancer://mycluster> BalancerMember http://10.0.0.1 BalancerMember http://10.0.0.4 </Proxy> ProxyPass / balancer://mycluster – See more at: http://www.elastichosts.com/support/tutorials/add-a-front-end-apache-cloud-load-balancer/#sthash.29iPnZpz.dpuf
<Proxy balancer://mycluster>
BalancerMember http://10.10.10.1
BalancerMember http://10.10.10.2
</Proxy>
ProxyPass / balancer://mycluster
<Proxy balancer://mycluster> BalancerMember http://10.0.0.1 BalancerMember http://10.0.0.4 </Proxy> ProxyPass / balancer://mycluster – See more at: http://www.elastichosts.com/support/tutorials/add-a-front-end-apache-cloud-load-balancer/#sthash.29iPnZpz.dpuf
<Proxy balancer://mycluster> BalancerMember http://10.0.0.1 BalancerMember http://10.0.0.4 </Proxy> ProxyPass / balancer://mycluster – See more at: http://www.elastichosts.com/support/tutorials/add-a-front-end-apache-cloud-load-balancer/#sthash.29iPnZpz.dpuf
<Proxy balancer://mycluster> BalancerMember http://10.0.0.1 BalancerMember http://10.0.0.4 </Proxy> ProxyPass / balancer://mycluster – See more at: http://www.elastichosts.com/support/tutorials/add-a-front-end-apache-cloud-load-balancer/#sthash.29iPnZpz.dpuf
<Proxy balancer://mycluster> BalancerMember http://10.0.0.1 BalancerMember http://10.0.0.4 </Proxy> ProxyPass / balancer://mycluster – See more at: http://www.elastichosts.com/support/tutorials/add-a-front-end-apache-cloud-load-balancer/#sthash.29iPnZpz.dpuf
4. Configure Apache Proxy to access traffic from all hosts (by default it is configured to Deny from all)
<Proxy balancer://mycluster> BalancerMember http://10.0.0.1 BalancerMember http://10.0.0.4 </Proxy> ProxyPass / balancer://mycluster – See more at: http://www.elastichosts.com/support/tutorials/add-a-front-end-apache-cloud-load-balancer/#sthash.29iPnZpz.dpuf
loadbalancer:~# vim /etc/apache2/mods-enabled/proxy.conf
Change there Deny from all to Allow from all
Deny from all
/etc/apache2/mods-enabled/proxy.conf
5. Restart Apache
loadbalancer:~# /etc/init.d/apache2 restart
Once again I have to say that above configuration is actually a basic Apache cluster so hosts behind load balancer Apache there should be machines configured to interpret scripts identically. If one Apache server of the cluster dies, the other Apache + PHP host will continue serve and deliver webserver content so no interruption will happen. This is not a round robin type of load balancer. Above configuration will distribute Webserver load requested in ratio 3/4 3 parts will be served by First server and 4th parth will be delivered by 2nd Apache.
Well, that's all load balancer is configured! Now to test it open in browser www.mybalanacer-webserver.com or try to access it by IP in my case: 83.228.93.76
a2enmod proxy
Tags: Apache Proxy, apache server, apache2, com, command, conf, configured, hosts, How to, JEREMIAH, load balancer, load balancing, proxy, running, traffic, webserver, www
Posted in Linux, System Administration, Web and CMS | 1 Comment »
Friday, January 31st, 2014 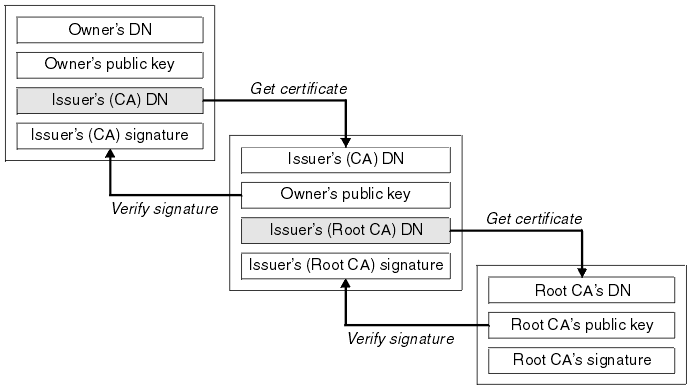
If you work in a big company with large network infrastructure who has to deal with SSL Certificates you will sooner or later will have to learn about existence of SSL Certificate Chains.
Its worthy thus to know what is SSL Certificate Chains and how such a chain is configured in Apache?
Personal SSL certificates (certificates issued to an individual or a company) can be used by clients to uniquely identify themselves when they are involved in starting an SSL connection.
SSL Certificate file contains X.509 certificate, which, in turn, contains a public key used for encryption.
Each personal certificate has zero or more certificate chains of certification authority certificates that extend back to the root certification authority.
Certificate R (Root Certification Authority)
|
| represents issuer of
V
Certificate I1 (Intermediate Certification Authority)
|
| represents issuer of
V
Certificate I2 (A subsidiary Intermediate Certification Authority)
|
| represents issuer of
V
Certificate I3 (A further subsidiary Intermediate Certification Authority)
|
| represents issuer of
V
Certificate P (A personal certificate that is used to identify its owner
on an SSL handshake)
Certificate chains are used to verify the authenticity of each certificate in that chain, including the personal certificate. Each certificate in the chain is validated using its 'parent' certificate, which in turn is validated using the next certificate up the chain, and so on, from the personal certificate up to the root certification authority certificate.
Now after explaining thoroughfully what is SSL Certificate Chain, here is how to configure a SSL Certificate in Apache Webserver.
Open apache2.conf or httpd.conf (depending on GNU / Linux distribution) and add to it;
   SSLEngine On

   SSLCertificateFile conf/cert/webserver-host.crt

   SSLCertificateKeyFile conf/cert/webserver-host.key

   SSLCertificateChainFile conf/cert/internet-v4.crt

   # SSLCertificateChainFile conf/cert/intranet-v3.crt

   SSLOptions +StdEnvVars +OptRenegotiate +ExportCertData
SSLCertificateChainFile conf/cert/chain-cert.crt
loads a chain of separate Personal SSL certificates each signing each other on different levels, chain is leading to top ROOT CA (Certificate Authority).
Tags: apache, apache2, cert, certificate, Certificate Chain, com, company, conf, configured, deal, existence, httpd, individual, installation, key, parent, root, signing, SSL, webserver, www
Posted in Linux, System Administration, Web and CMS | 1 Comment »
Wednesday, July 18th, 2012 
At security critical hosts running Apache + PHP based sites it is recommended functions like:
system();

exec();shell_exec();.....
to be disabled. The reason is to mainly harden against script kiddies who might exploit your site/s and upload some shitty SK tool like PHP WebShell, PHP Shell and the probably thousands of “hacker” variations that exist nowdays.
In latest Debian stable Squeeze, suhosin – advanced protection module for php5 is being installed and enabled in Apache (by default).
Simply disabling a number of functions using suhosin, could prevent multiple of future headaches and hours of pondering on who 0wn3d your server ….
Disabling the basic PHP system(); and other similar functions which allows shell spawn is not always possible, since some websites or CMS platforms depends on them for proper runnig, anyways whether it is possible disabling ’em is a must.
There are two ways to disable system(); functions; One is through using /etc/php5/apache2/conf.d/suhosin.ini and 2nd by adding a list of functions that has to be disabled directly in Website Virtualhost file or in apache2.conf (/etc/apache2/apache2.conf;
For people hosting multiple virtualhost websites on the same server using the custom domain Virtualhost method is probably better, since on a global scale the functions could be enabled if some of the websites hosted on the server requires exec(); to work OK. In any case using /etc/php5/apache2/conf.d/suhosin.ini to disable system(); functions in PHP is less messy …
1. Disabling PHP system(); fuctions through /etc/apache2/apache2.conf and custom site Vhosts
Place somewhere (I prefer near the end of config);;;
php_admin_flag safe_mode on

php_admin_value disable_functions "system, exec, shell_exec, passthru , ini_alter, dl, pfsockopen, openlog, syslog, readlink, symlink, link, leak, fsockopen, popen, escapeshellcmd, apache_child_terminate apache_get_modules, apache_get_version, apache_getenv, apache_note,apache_setenv,virtual"
Disabling it for custom virtualhost is done by simply adding above Apache directvies (before the closing tag in /etc/apache2/sites-enabled/custom-vhost.com
2. Disabling PHP system();, exec(); shell spawn with suhosin.ini
In /etc/php5/apache2/conf.d/suhosin.ini add;;
suhosin.executor.func.blacklist =system, exec, shell_exec, passthru, ini_alter, dl,

pfsockopen, openlog, syslog, readlink, symlink, link, leak, fsockopen, popen,

escapeshellcmd, apache_child_terminate apache_get_modules, apache_get_version,

apache_getenv, apache_note,apache_setenv,virtual
To do it directly via shell issue;;;
server: conf.d/# cd /etc/php5/apache2/conf.d/

server: conf.d# echo 'suhosin.executor.func.blacklist =system, exec, shell_exec, passthru, ini_alter, dl,' >> suhosin.ini

server: conf.d# echo 'pfsockopen, openlog, syslog, readlink, symlink, link, leak, fsockopen, popen,' >> suhosin.ini

server: conf.d# echo escapeshellcmd, apache_child_terminate apache_get_modules, apache_get_version,' >> suhosin.ini

server: conf.d# echo 'apache_getenv, apache_note,apache_setenv,virtual' >> suhosin.ini
Then to re-load the memory loaded Apache libphp library an Apache restart is necessary;
server: conf.d# /etc/init.d/apache2 restart

Restarting web server: apache2 ... waiting .

server: conf.d#
Tadam, this should be quite a good security against annoying automated script attacks. Cheers 😉
Tags: apache security, apache2, Auto, custom, custom domain, debian gnu, Draft, escapeshellcmd, exec, func, global scale, GNU, gnu linux, harden, headaches, ini, Linux, number, passthru, php admin, php5, popen, protection, reason, runnig, safe mode, script, script kiddies, Shell, squeeze, suhosin, symlink, syslog, system, system functions, tool, two ways, VhostsPlace, Virtualhost, WebShell
Posted in Computer Security, System Administration, Web and CMS | 3 Comments »


