Posts Tagged ‘Button’
Tuesday, December 7th, 2010 I’m using a template youbizz just recently for a website. The website is already configured to use Joomla as a CMS.
This is a website related to the university so joomla was the perfect choice for a quick and easy to configure Content Management System
The youbizz template really makes difference and make the website layout look & feel quite a business looking.
However I needed a way to make my general configured menu buttons on the website to have a dropdown sub-menus in it
I even didn’t know if Joomla is supporting this, but by a chance I’ve made a submenu to the website Home buttom menu and thus I learned it how I can make submenus.
It actually appears creating the submenus to a menu in Joomla is a piece of cake, all you have to do in joomla administrator is go to to:
Menus -> Main Menu
From there you can configure as website buttons and link them to the ones already prepared in Article Manager
Just in case if you don’t know to add a buttons to a new joomla installation it’s necessary from admin to first go to:
Content -> Article Manager
Next press the New button (a green button with an image of a plus sign)
Thereon put a Title , Alias and in the input box put on everything you want this button pressed to show up in ur website.
Completing that simply press the Apply button and it should be done.
Next step to make the article appear in Menus -> Main Menu is to go this section and respectively from there use the green button with the plus sign to add up a new element to the main menu.
Right after you will have the Menu Item: [ New ] to appear it looks like in the pic below:
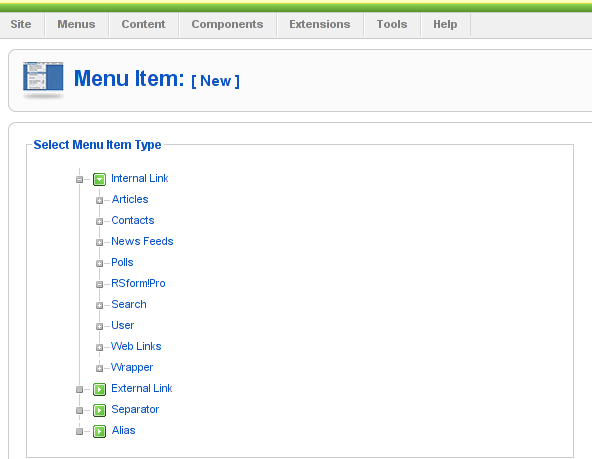
From the list of items to select you need to select the Article menu element. A submenu will appear in your browser to the Articles reading:
Article Layout

Article Submission Layout

etc.
From this menu you will have to select the Article Layout
The next screen to appear will look like the pic below:

Here in article layout few things needs to be adjusted, again you will need to place the Title and the Alias, further after from the Parameters (Basic) located on the right you will have to select an article to link the new menu you’re just creating in Joomla’s new menu.
This is achieved via pressing the Select button located nearby the Select Article
Here it’s important to note the existence of Parent Item scrolldown field. This field will have all the created menu buttons in Main Menu . In case if this is the first one to create in main menu then it could be also empty.
The Parent Item field is really an important field and through it the menu’s submenus are created in Joomla.
For instance let’s say you want the current creating article to be listing as a sub-benu button to another already existing category, instead of listing as a separate button to the Joomla’s main menu navigation.
Well it’s pretty easy just choose from the Parent Item the name of an already existing menu button in Joomla main menu to be the parent of the sub-menu button you want to have.
That’s it now you will have the sub-menu button to appear as a drop down button (if of course your template supports dropdown menus).
There are few more options to choose in between which I found to be quite self explanatory, so I want explain them
But I hope I was able to explain at least the basics how menu subbuttons can be created in Joomla 1.5I find it a bit harder to explain in a bit plain way, but anyways if some of my dear readers is not understanding how to achieve the sub-menus I’m more than willing to help out further via the comments.
Tags: alias, article layout, article manager, article menu, article submission, buttom, Button, cake, chance, cms, configure, content management system, difference, dropdown menus, element, everything, green button, home, How to Add sub-menus to Joomla main navigation buttons (Making dropdown menus) in Joomla, Image, input box, installation, Item, menu, menu buttons, menu element, menus, navigation buttons, new button, new element, parent, perfect choice, piece, piece of cake, Plus, submenu, template, Thereon, website buttons, website layout, youbizz
Posted in Everyday Life, Joomla, Linux, Programming, System Administration | No Comments »
Monday, December 20th, 2010 A joomla installation I’m managing needed to have created a sitemap.xml
From a SEO perspective sitemap.xml and sitemap.xml.gz are absolutely necessary for a website to bewell indexed in google.
After some investigation I’ve found out a perfect program that makes generation of sitemap.xml in joomla a piece of cake.
All necessary to be done for the sitemap.xml to be created comes to download and install of JCrawler
What makes JCrawler even better is that it’s open source program.
To install Jcrawler go in the joomla administrator panel:
Extensiosn -> Install/Uninstall
You will see the Install from URL on the bottom, there place the link to the com_jcrawler.zip installation archive, for instance you can place the link of the downloaded copy of com_jcrawler.zip I’ve mirrored on www.pc-freak.net ,by placing it on https://www.pc-freak.net/files/com_jcrawler.zip
The installation will be done in a few seconds and you will hopefully be greated with a Installation Success message.
Last thing to do in order to have the sitemap.xml in your joomla based website generated is to navigate to:
Components -> JCrawler
There a screen will appear where you can customize certain things related to the sitemap.xml generation, I myself used the default options and continued straight to the Start button.
Further on a screen will appear asking you to Submit the newly generated sitemap to; Google, MSN, Ask.com, Moreover and Yahoo , so press the Submit button.
That’s all now your joomla website will be equipped with sitemap.xml, enjoy!
Tags: bewell, Button, com, customize, default options, download, downloaded copy, Extensiosn, freak, google, gz, How to build website sitemap (sitemap.xml) in Joomla, Install, installation, installation archive, installation success, investigation, JCrawler, link, MSN, open source program, order, panel, perspective, piece of cake, Press, Start, start button, success message, Uninstall, xml, Yahoo, zip installation
Posted in Joomla, Linux, SEO, Various | 7 Comments »
Tuesday, March 15th, 2011 Just in case if you are looking for a quick way to set Google Analytics on newly installed Joomla powered site, here is how:
1. Download the Google Analytics Tracking Module
The module is available from Joomla Extensions on joomla.org
At the current time of writting you need to download the analytics_tracking15,zip file
2. Install the Google Analytics Tracking Module;
Login as joomla admin and navigate to;
Extensions -> Install
Place the analytics_tracking15.zip url to the Install URL: field.
Again as of time of writting you need to place https://www.pc-freak.net/files/analytics_tracking15.zip;
3. Open the Module Manager
Extensions -> Module Manager
4. Click over Google Analytics Tracking Module
On the right pane you will notice in the Module Parameters the Analytics_uacct_code field. In the uacct_code field you need to paste your UA obtained from your created google-analytics account.
This code is usually something like UA-2101595-10
Now place your code their and press the save green button located near the right top of the screen. You should see the text in blue Item Saved which would indicate your UA code is stored already in the Google Analytics Tracking Module, now press the Cancel button located again on the right top.
As a last step before the Google analytics is set-up on the Joomla you need to enable the plugin to do you need to press over the tick left sided from the text reading Google Analytics Tracking Module in the Module Manager
5. Click over the Enabled button in Module Manager;
Google Analytics Tracking Module -> Enabled
Cheers! Now, your Joomla website visitors count will start logging to Google Analytics.
Tags: analytics, Button, Cancel, cancel button, Cheers, Click, current time, Enabled, file, freak, google, google analytics, green button, How to easy place Google Analytics to track website visitors on Joomla, Install, Item, login, Module, module parameters, Open, org, Parameters, plugin, Press, reading, something, text reading, tick, time, ua, uacct, way, website visitors, writting, zip file
Posted in Joomla, Linux, SEO, System Administration, Various, Web and CMS | 1 Comment »
Tuesday, May 31st, 2011 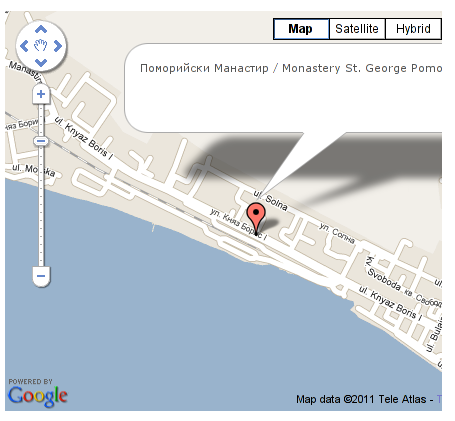
It’s a wise idea that every website has a address location map on it’s website, for that reason Google maps is just great.
To install Google maps capability to joomla one can use a plugin called Google Maps .
You can straighly download Joomla’s Googlemap plugin from here
Afterwards use Extension Manager to install the plugin e.g. follow:
Extensions -> Install/Uninstall (Choose File)
and click on Upload File & Install button.
To further enable and configure the Joomla Googlemap plugin you will have to go to the location:
Extensions -> Plugin Manager
Therein you will have to find and enable the Google Maps plugin which is to be found in the column named Plugin Manager
On my Joomla installation the plugin was located in the second page with modules, so if you don’t find the module on the listing with modules on the first page, make sure you scroll to the bottom of the page and click on Next button.
Therein in the list you will most likely notice Google Maps use the Enable button to enable it.
Next step is to configure the plugin, to do so press on the plugin name Google Maps
All configuration necessery here is to place Googlemaps API Key in the respective field (you will see it among config options).
Issuing a new Google Maps api key takes just few seconds, if you already have a gmail account just go to http://code.google.com/apis/maps/signup.html and take few seconds to issue the key.
You will get the key right on your gmail account after being issued (to repeat myself issuing takes few seconds so no worrier here).
Once having the key place it in the Googlemaps API Key field and configuring Address (which is one of the list of many options the plugin provides) you will be done with configuration.
To display a google map the location you just configured go to the Article Manager , select the article where you want the google mapslocation picture of your address to appear and type in the Article something like:
{mosmap|text='Exact street address location'|zoom='15'|zoomType='Large'|zoomNew='0'}
After you saved the article a very nice Google map showing you the location’s streets will appear on your web page in the article link where placed.
You can further conifgure a number of things related to the google maps just embedded into joomla, one thing you might want to play with is the zoom level.You see in below’s code is equal to 15, e.g. zoom=’15’
Set it to another one if you want to regulate your googlemaps zoom level.
For more thoroughful options take a look at the extensive plugin documentation and play with the many settings
Tags: address location, amp, article manager, Button, capability, config, config options, download, Extension, Gmail, gmail account, google, google map, google maps, Googlemap, Googlemaps, Install, installation, key, key field, level, location, ManagerTherein, Maps, necessery, page, plugin, plugin name, reason, street, type, upload, wise idea, worrier
Posted in Joomla, Various, Web and CMS | 2 Comments »
Thursday, June 2nd, 2011 he Joomla CMS default behaviour is that Page titles of the Joomla Articles created are always set to the page Title assigned to each of the articles.
This is not very good behaviour in terms of SEO, as the page title of each link on the main page is different and there is no continuous repeating pattern in all of the joomla pages.
Everyone that has even basic idea of SEO knows that page titles are very important weight factor to make indexing inside Search Engines succesful.
There is a well know SEO rule which is the more reoccuring pattern one has in his page titles, more is stressed on the keywords contained in the title.
As I said for some weird reason Joomla has no common page Title for all my the created Article pages linked via the Main Menu*
Thus in order to improve this bad default Joomla SEO behaviour one has to change the default auto assigned titles for created pages, manually.
Two things are necessery to change each of the joomla already existing TITLES.
1. Go to each of the pages (.e.g. Home etc.) and change the Parameters System Page Title settings
After logging in with administrator in Joomla, navigate to
Menus -> Main Menu*
Further on choose a menu item from all your existing items, let’s say Home and click on it.
On the left side below the Save, Apply, Close and Help buttons you will notice the menus:
Parameters (Basic), Parameters (Component), Parameters (System)
When clicked on Parameters (System) a submenu will appear:
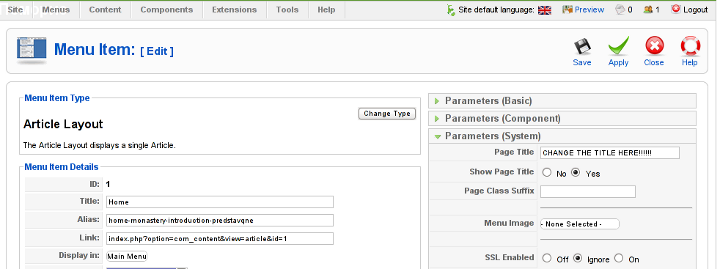
Above is a screenshot of the up-described Parameters (System) [Page Title] location
You need to change where it reads on the screenshot CHANGE THE TITLE HERE !!!!!! 😉
After entering your own desired page title go and save the article via the Apply or Save button (also visible in the screenshot).
Now as the custom Page Title is set, next step is to enable the custom Page Title for the respective Article in Article Manager
2. Enable custom Page Title for created pages in Joomla
Go to the Article Manager by following the menus:
Content -> Article Manager
Select the Article of which you want to change the Page Title to some custom text and click over it.
As the article opens for edit in an html editor, navigate to Parameters (Advanced) tab and therein change the Show Title from default setting value:
Use Global
to
Yes
Once again use the Save or Apply button to confirm the new settings and open your website in a new tab, try to browse and check the title of the articles parameters just edited. It should show up in the Title (page heading) the custom input Title.
Now repeat the same procedure for all pages (Articles), existing in Joomla to attune the Page Titles to some Google friendly strings and enjoy the better Search engine indexing which should likely follow.
Tags: article manager, Auto, Button, cms, Component, component parameters, custom, default behaviour, Draft, everyone, Global, good behaviour, home, indexing, location, menu, menus, necessery, page, page titles, Parameters, reason, screenshot, Search, search engines, SEO, show, submenu, tab, text, value, weird reason
Posted in Joomla, Various, Web and CMS | No Comments »
Tuesday, April 5th, 2011 For a number of time I’ve been planning to change my blog comments placement. Until this very day however I’ve kept the default wordpress theme’s Comments button placement.
I realize the default Comments button placement is a bit hard to see and not that much intuitive for the user that enters my blog for a first time.
My first guess was that there might be somewhere a wordpress plugin which will allow me to adjust my comments button placement.
After some research online and a realization that probably there is no such plugin existing yet. I’ve forced myself to tune it up myself.
It was clear to me that in order to change the it will be necessery to edit the WordPress templates files. I’m not a designer and when I hear about templates I usually get scared, however I took the time to take a look at the default wordpress template and find out actually that template modifications is actually rather easier than I thought.
My previous idea was that in order to edit templates you have to be some kind of CSS and HTML guru (which I’m not). Nevertheless it seems that in order to play and adjust in a good way the templates you don’t need ot be a pro.
Even an uneducated fool like myself can easily do almost everything he thinks of throughout few lines of code in the wp templates.
To get back to the major topic thanks God after a bit of review and reading of wordpress.org documentation and some user forums. I’ve figured out that in order to change my Comments placement you need to modify the file:
- blog/wp-content/themes/default/index.php
In index.php find the line starting with:
You will notice within this opened paragraph the php code:
<?php the_tags('Tags: ', ', ', '

'); ?> Posted in <?php the_category(', ') ?>

| <?php edit_post_link('Edit', '', ' | '); ?>

<?php comments_popup_link('No Comments »', '1 Comment »', '% Comments »'); ?>
This is the actual default theme php code that makes the wordpress Comments or No Comments that maes the comments appear on the blog.
Now I’ve decided to let this be as it is but add one more Comment button to wordpress on a different location that is more appealing to my blog visitors
After quick evaluation I’ve determined that probably the best location that the Comments button should have is right after the end of the post text
If you think my idea for button placement is appropriate, to set this location for the Comments button, you will have to find the follwoing code in index.php:
<div class="entry">

<?php the_content('Read the rest of this entry »'); ?>

</div>
Right after the end of this code place the following code:
<?php comments_popup_link('No Comments »', '1 Comment »', '% Comments »'); ?>

</div>
Tags: amp, Auto, blog, Button, button placement, code lt, Comment, content themes, CSS, default theme, Draft, everything, file, fool, god, guess, guru, HTML, idea, index, kind, line, link, location, lt, nbsp, necessery, online, order, org, paragraph, php, php code, place, placement, plugin, quot, reading, realization, right, template, text, textIf, time, topic, way, Wordpress, wordpress plugin, wordpress templates
Posted in Various, Web and CMS, Wordpress | 1 Comment »
Saturday, April 9th, 2011 I have noticed that many blogs nowdays offer an email subscription box to simplify the subscription procedure for the blog readers.
My blog was lacking this feature so I took the time to find out how can I add an e-mail subscription box field on my blog.
My research has shown me that the easiest way to add the subscription box is by using Google’s Feedburner RSS service .
I’ve been using Google FeedBurner for quite some time and I’ve already 27 subscriptions with it.
Earlier when I added a FeedBurner subsciption to my blog I’ve blogged about it, so if you’re not acquainted on how to add FeedBurner service to your blog, you might want to read my previous article Adding RSS Feed to WordPress in conjunction with FeedBurner / WordPress add-to-any-subscribe plugin
In this article I will explain in short step by step, how to add the subscrpition email box to your wordpress I assume, that the reader has already enabled and configured registration with Feedburner, if you still haven’t just skip few lines above and check my previous article.
I would hereby skip the explanation of why feedburner as an RSS is so advantageous for every blog owner and readers and skip further to the email subscription procedure step by step instructions:
Step 1: Login to your FeedBurner Account
In my case my feedburner account url is accessed via the URL http://feeds.feedburner.com/WalkingInLightWithChrist-FaithComputingDiary
I have been properly logged in to my feedburner, so to view statistics of my current feeds subscription and to configure various variables of feedburner I had to access the URL address: http://feedburner.google.com/fb/a/myfeeds, a very quick shortcut to my feedburner account settings is also avaialable by simply accessing the URL: http://feedburner.com
Step 2: Click on the link that says My Feeds
If you have configured feeds for your feedburner you will get the list of feedburner feeds, (one could have multiple feeds, let’s say if you have a couple of blogs or sites and you use one feedburner account to podcast your feeds for each of the separated blogs or sites.
Step 3: Click over the feed you want to have the feedburner email subscription box
Below you see the screenshot of my configured feedburner feed:
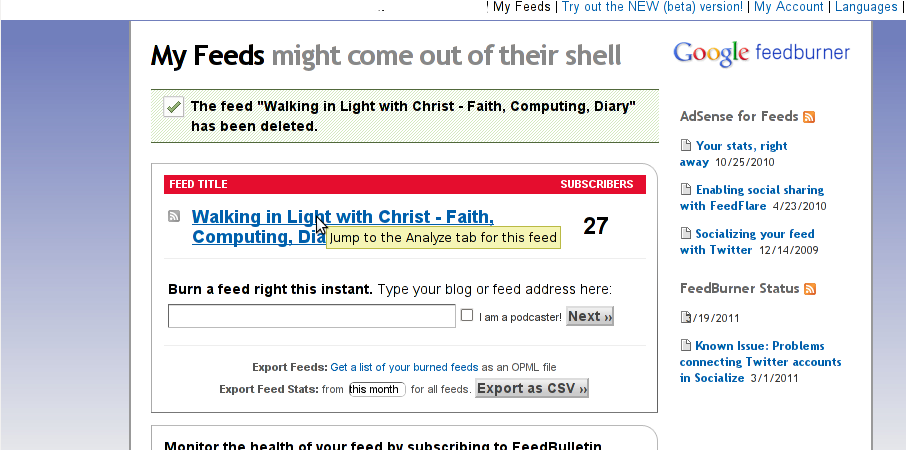
Right after clicking on your configured feed in my case Walking in Light With Christ – Faith, Computing, Diary you will see the screen:
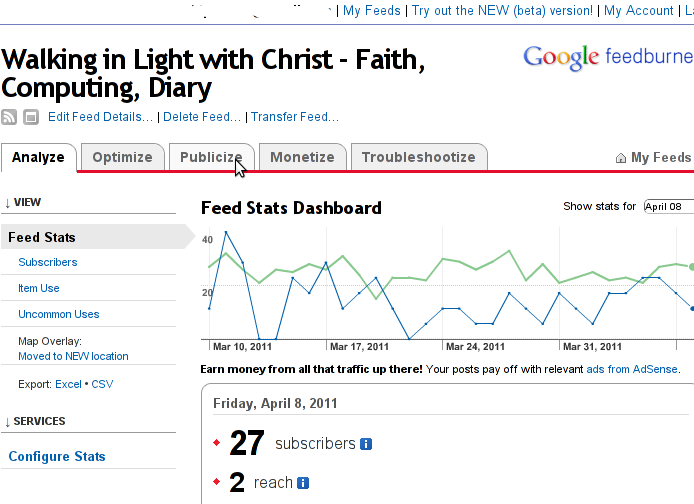
Step 4: Click on Publicize menu
You will see the following two screens while scrolling with your browser:
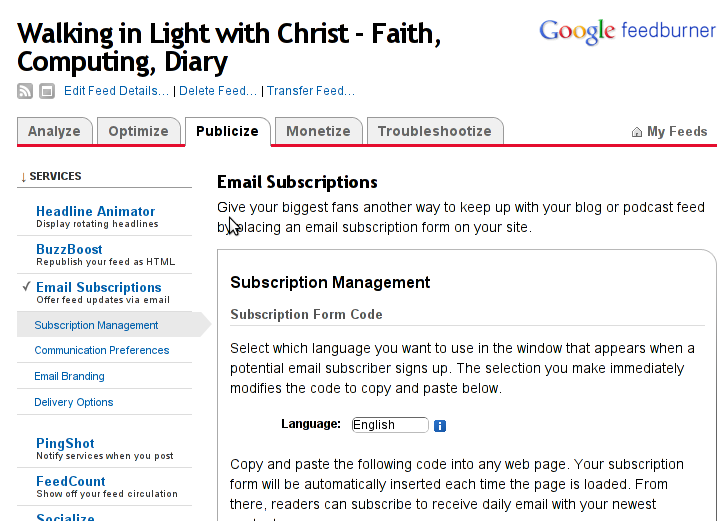
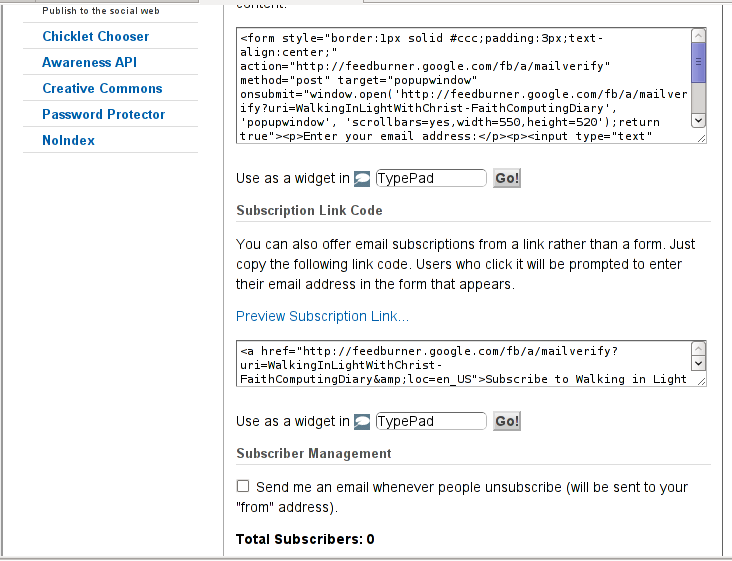
You see in the second screenshot above there is a textbox with a html form code, to set the feedburner subscription to appear on your blog you need to copy/paste this code and put it on your blog.
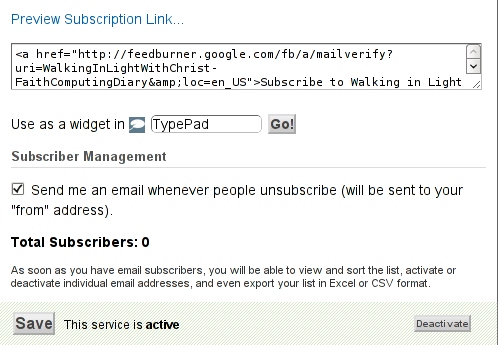
After copy/pasting the code, don’t forget to scroll down in your browser and save the email subscription generated form settings, (NB! if you don’t save it it want be working even if you install it on your blog).
Here is the Save button screenshot:
Step 5: Setting up feedburner email textbox to wordpress
In order to set up the just copied html and css form code you need to login to your wordpress blog admin and go to:
Appearance -> Widgets
Scroll over the Available Widgets list, find the Text Widget and press the Add button to include the Text Widget to your blog sidebar.
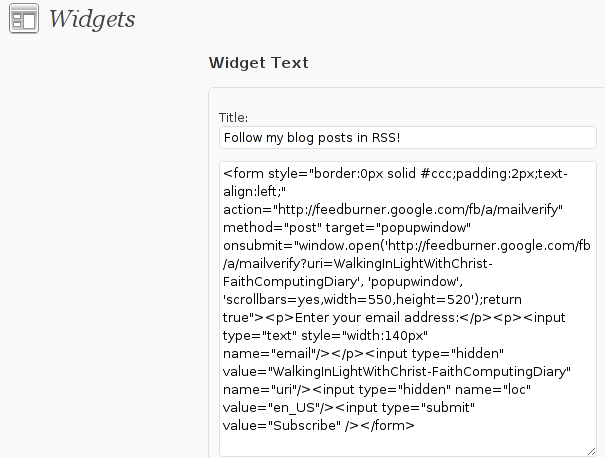
Further on the same Widgets page, go to the Sidebar menu find the just added Text Widget and click over the Edit link:

Here is my screenshot of the edit screen of the Text Widget:
Step 6. Add the feedburner email subscription box to single posts blog views
This step is not a requirement, but I found it for myself to be vital, as it might rise some more subscribers to my blog, if my blog readers finds individual indexed pages in Google.
This step is also highly dependant on the wordpress theme you use, I use the old wordpress default theme and it’s default behaviour is not to show up the wordpress sidebar, whether an individual wordpress post is clicked over, therefore to enable my feedburner subscription box for individual posts I also need to place the form code obtained from Feedburner.com’s to my templates single.php
If you’re using some kind of theme that doesn’t have the non-sidebar single post behaviour you might skip forward this step, otherwise just continue on reading.
To include the feedburner email form subscription to my single posts I edited blog/wp-content/themes/default/single.php
In the single.php file find the code:
<?php comments_template(); ?>
Immediately after the above code place your feedburner form code, like you see in below screenshot:

Step 7: Modify your form code css and javascript to make your feedburner more accustomed for your needs
Again this step is voluntary and is not necessery I’ve disliked the default way the form is formatted so I played a bit with few of it’s values to customize it to my likings, the things which I have changed a bit in the provided feedburner form code was:
- Remove the Delivered by Feedburner text from the form
-
>To do so in the issued feedburner form code below when you copy the code paste it to some text editor and remove from the code the text:<p>Delivered by <a href=”http://feedburner.google.com” target=”_blank”>FeedBurner</a></p>
- – Change the subsciption box width and height:
-
style=”width:140px”Changed that to:style=”width:120px”also I’ve changed:’scrollbars=yes,width=550,height=520’to:’scrollbars=yes,width=450,height=420’Another point of interest for adjustmnets in the feedburner for are in the form code:
- Remove feedburner subscription form default bordering
-
form style=”border:1px solid #ccc;padding:3px;text-align:center;”I’ve changed that to:form style=”border:0px solid #ccc;padding:2px;text-align:center;”By changing the css values border:1px to border:0px I have instructed the subscription box to show up without borders.
That’s all now refresh in your browser and check if the feedburner email subscription form is showing up properly to your wordpress.
To completely ensure yourself it works correctly try to subscribe yourself to the form and during your next blog post you should receive an email notifying you about the newly written article.
You can see, my blog feedburner subscription form on the blog right sidebar or on the below picture:
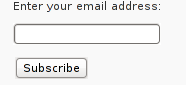
Hope that article will help somebody out there.
Tags: account settings, blogs, Button, Click, code, configure, conjunction, e mail, explanation, feature, Feed, Feedburner, form, google, mail subscription, menu, php, plugin, podcast, quite some time, screen, screenshot, scroll, sidebar, statistics, step 1, step 2, subsciption, subscription procedure, subscriptions, subscrpition, time, url, url address, variables, Wordpress
Posted in Various, Web and CMS, Wordpress | 7 Comments »
Tuesday, April 12th, 2011 Until recently, I have used a default wordpress theme which historically is a bit old and used to be a default theme to the older versions of wordpress.
Since however, I’ve went to many updates and on the other hand I do like and enjoy the template I have decided to continue use it for my blog until this very day.
However this nice theme’s default behaviour is a bit weird, since by default the Single opened posts are configured in a way that the usual index page sidebar is missing.
As in the sidebar there are plenty of navigation buttons and search in the blog button, at a certain moment I have realized it’s probably not a good idea that the single.php (single blog posts) open up with the right sidebar missing.
Thus I’ve decided to put back the missing sidebar in the single posts, with a hope that this will be helpful to my readers and hence have positive impact on the overall blog user experience.
Doing so prooved to be rather easy, here is how I added back the right sidebar to my wordpress single posts :
1. Edit blog/wp-content/themes/default/single.php
debian:~# vim /var/www/blog/wp-content/themes/default/single.php
2. In the single.php look up for the code:
<div id="content" class="widecolumn">
Substitute this html code with:
<div id="content" class="narrowcolumn">
3. Next find the code:
<?php get_footer(); ?>
Right before the get_footer(); php function add in the function;
<?php get_sidebar(); ?>
Tadam! Refresh a single post in Firefox and you should see your blog index.php sidebar to show up.
Tags: behaviour, blog, Button, code lt, content themes, default behaviour, default theme, div, div id, Firefox, footer, function, gt 3, hand, idea, impact, index page, moment, navigation buttons, older versions, page, php, Search, Single, substitute, Tadam, use, user experience, var, vim, way, wordpress blog, www
Posted in Web and CMS, Wordpress | 2 Comments »
Thursday, July 14th, 2011 
My WordPress blog had an odd problem, all on the blog, worked just fine except the Widgets add new widget drag and drop functionality.
As there was new version of wordpress available I tried updating but this fixed the missing drag and drop widget functionality neither, so finally after a bit of googling and experimentation to follow suggested fixes like using the enable Accessiblity Mode button on top Widgets.Thus the common suggested fix that worked for most of the people who stumbled upon this annoying wordpress bug was to simply nagivate to:
Appearance -> Widgets -> Screen Options -> Enable Accessibility Mode
As for me pressing over the Screen Options was impossible (nothing happened when I pressed over it), finally I’ve found a hack 😉
The hack is quite simple, all I had to do is just pass a variable ?widgets-access=on to the widget.php php script
Therefore the fix to the problem was as follows http://blog.mysite.com/wp-admin/widgets.php?widgets-access=on
And done, FIXED! 😉
Tags: Appearance, blog, Button, common, drag, drop functionality, fine, fix, FIXED, functionality, googling, hack, Mode, mode button, ModeAs, mysite com, nagivate, odd problem, php, problem, screen, screen options, script, scriptTherefore, version, widget, Widgets, Wordpress, wordpress blog
Posted in Web and CMS, Wordpress | 3 Comments »
Monday, October 3rd, 2011 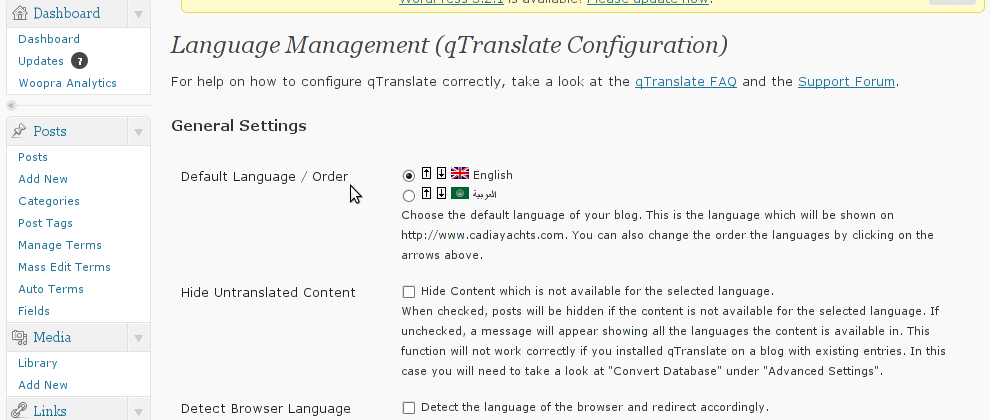
Lately, I have to deal with some wordpress based installs in big part of my working time. One of the wordpress sites needed to have added a multi language support.
My first research in Google pointed me to WPML Multilingual CMS The WordPress Multilingual Plugin
WPML Multilingual CMS looks nice and easy to use but unfortunately its paid, the company couldn’t afford to pay for the plugin so I looked forward online for a free alternative and stumbled upon QTranslate
QTranslate is free and very easy to install. Its installed the wordpress classic way and the installation went smoothly, e.g.:
1. Download and unzip QTranslate
# cd /var/www/blog/wp-content/plugins

/var/www/blog/wp-content/plugins# wget http://downloads.wordpress.org/plugin/qtranslate.2.5.24.zip

...

/var/www/blog/wp-content/plugins# unzip qtranslate.2.5.24.zip

...
Just for fun and in case the plugin disappears in future, a mirror of Qtranslate 2.5.24 is found here
2. Enable QTranslate from wordpress admin
Plugins -> Inactive -> qTranslate (Activate)
After activating the plugin, there is a Settings button from which qTranslate‘s various plugin parameteres can be tuned.
In my case my site had to support both English and Arabic, so from the settings I added support for Arabic translation to the wordpress install.
Adding Arabic is done in the following way:
a. From the Language Management (qTranslate Configuration) from the Languages menu and the Languages (Add Languages) I had to choose a language code (in my case a language code of ar – for Arabic). Next I had to choose the Arabic flag from the follow up flag list.
In next text box Name , again I had to fill Arabic, for Locale en_US.UTF-8
The following Date Format and Time Format text boxes are optional so I left them blank.
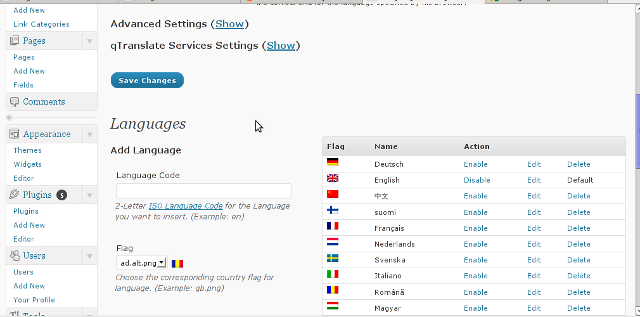
To complete the process of adding the Arabic as a new language wordpress should support I pressed the Add Language button and the Arabic got added as a second language.
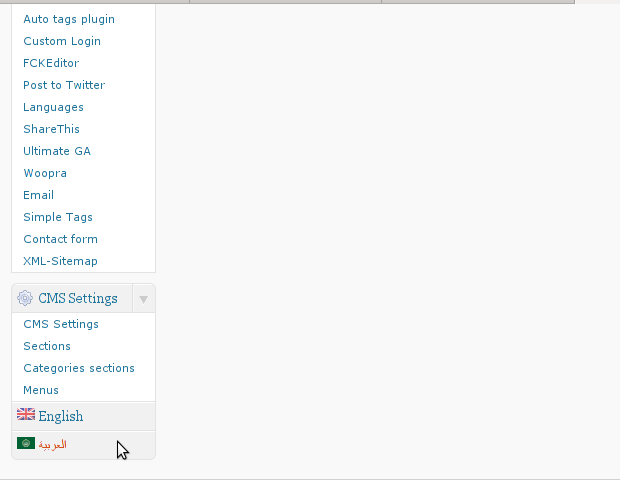
Afterwards the Arabic was added as second language, on the bottom of the left wordpress menu pane a button allowing a switch between English, Arabic appeared (see below screenshot):
Finally to make Arabic appear as a second language of choice on the website I added it as a Widget in the Widgets menu from the AWidgets menu:
Appearance -> Widgets
In widgets I added qTranslate Language Chooser to the Sidebar without putting any kind of Title for qtranslate widget .
I found it most helpful to choose the Text and Image as an option on how to display the Language switching in the wp.
Tags: Activate, alternative, arabi, Arabic, arabic translation, Button, cms, code, company, Date, downloads, flag, flag list, format, fun, google, Inactive, installation, language button, language code, language management, language support, languages, menu, mirror, multilingual, new language, plugin, Plugins, screenshot, second language, settings button, support, text, text boxes, time, time format, time one, unzip, UTF, utf 8, wget, Wordpress, working time
Posted in Various, Web and CMS, Wordpress | 2 Comments »


How to change default Comments and No Comments location in WordPress in wordpress default theme
Tuesday, April 5th, 2011For a number of time I’ve been planning to change my blog comments placement. Until this very day however I’ve kept the default wordpress theme’s Comments button placement.
I realize the default Comments button placement is a bit hard to see and not that much intuitive for the user that enters my blog for a first time.
My first guess was that there might be somewhere a wordpress plugin which will allow me to adjust my comments button placement.
After some research online and a realization that probably there is no such plugin existing yet. I’ve forced myself to tune it up myself.
It was clear to me that in order to change the it will be necessery to edit the WordPress templates files. I’m not a designer and when I hear about templates I usually get scared, however I took the time to take a look at the default wordpress template and find out actually that template modifications is actually rather easier than I thought.
My previous idea was that in order to edit templates you have to be some kind of CSS and HTML guru (which I’m not). Nevertheless it seems that in order to play and adjust in a good way the templates you don’t need ot be a pro.
Even an uneducated fool like myself can easily do almost everything he thinks of throughout few lines of code in the wp templates.
To get back to the major topic thanks God after a bit of review and reading of wordpress.org documentation and some user forums. I’ve figured out that in order to change my Comments placement you need to modify the file:
In index.php find the line starting with:
You will notice within this opened paragraph the php code:
<?php the_tags('Tags: ', ', ', ''); ?> Posted in <?php the_category(', ') ?>
| <?php edit_post_link('Edit', '', ' | '); ?>
<?php comments_popup_link('No Comments »', '1 Comment »', '% Comments »'); ?>
This is the actual default theme php code that makes the wordpress Comments or No Comments that maes the comments appear on the blog.
Now I’ve decided to let this be as it is but add one more Comment button to wordpress on a different location that is more appealing to my blog visitors
After quick evaluation I’ve determined that probably the best location that the Comments button should have is right after the end of the post text
If you think my idea for button placement is appropriate, to set this location for the Comments button, you will have to find the follwoing code in index.php:
<div class="entry"><?php the_content('Read the rest of this entry »'); ?>
</div>
Right after the end of this code place the following code:
<?php comments_popup_link('No Comments »', '1 Comment »', '% Comments »'); ?></div>
Tags: amp, Auto, blog, Button, button placement, code lt, Comment, content themes, CSS, default theme, Draft, everything, file, fool, god, guess, guru, HTML, idea, index, kind, line, link, location, lt, nbsp, necessery, online, order, org, paragraph, php, php code, place, placement, plugin, quot, reading, realization, right, template, text, textIf, time, topic, way, Wordpress, wordpress plugin, wordpress templates
Posted in Various, Web and CMS, Wordpress | 1 Comment »